【工业树莓派 CM0 NANO 单板计算机】MLX90640 热成像仪
本文介绍了工业树莓派 CM0 NANO 单板计算机结合 MLX90640 热成像传感器模块,实现环境热成像显示的热成像仪项目设计,包括模块设计、硬件连接、环境搭建、通信测试、图像显示和优化等流程。
项目介绍
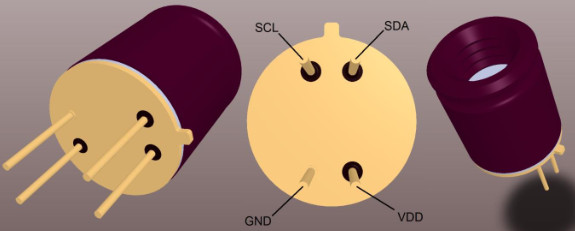
MLX90640 是一款高分辨率红外热成像阵列传感器,可与 Raspberry Pi 配合使用,实现实时温度可视化。
MLX90640 通过 Python 脚本读取数据并显示热图,调整刷新率和插值优化图像。
MLX90640 可广泛应用于人体检测、安防监控、工业设备温度监控、智能楼宇温控等场景。
- 硬件连接:使用杜邦线将 MLX90640 模块连接至树莓派 CM0 NANO 的 IIC 接口;
- 环境搭建:创建虚拟环境,安装所需软件包;
- 通信测试:测试硬件连接、设备 IIC 地址、热成像数据打印;
- 图像显示:使用 python 编程和 matplotlib 库函数显示实时图像;
- 平滑优化:结合 matplotlib 库函数实现数据平滑处理以提升显示效果。
模块设计
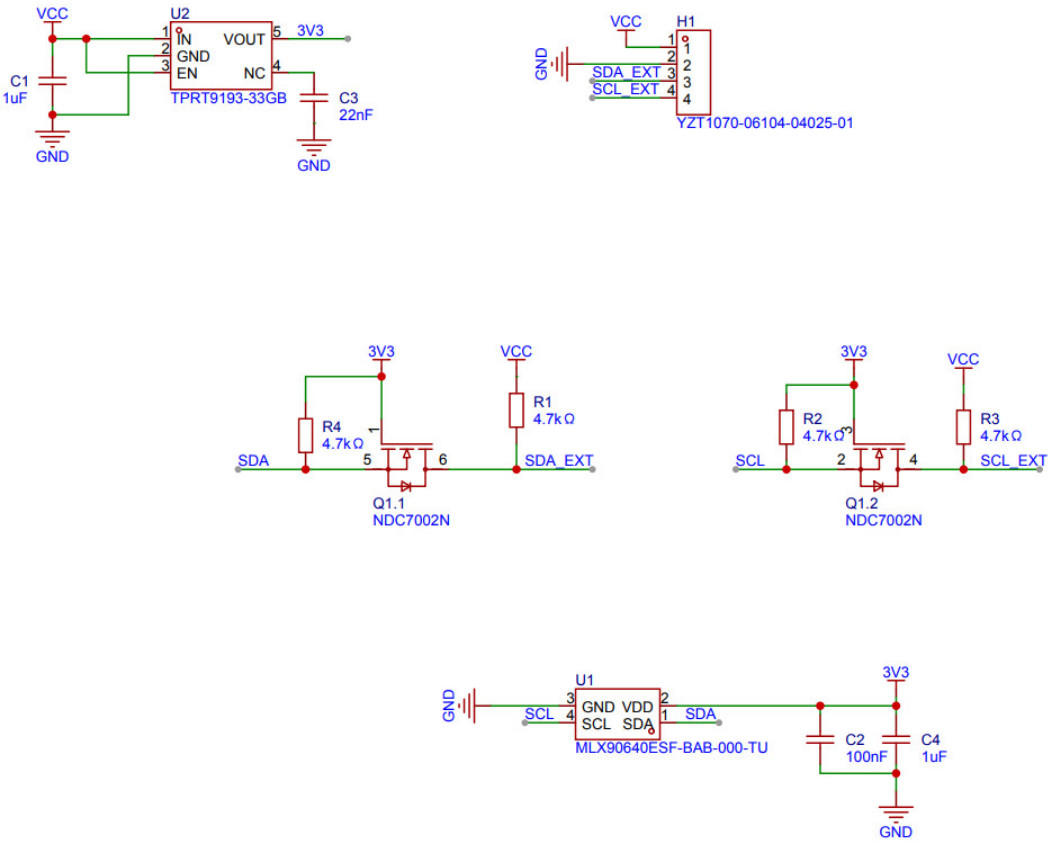
为了便于设备连接,设计基于 MLX90640 传感器和 IIC 通信协议的 PCB 模块。
3D 渲染图

原理图
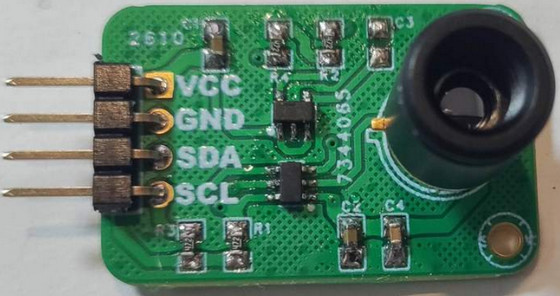
实物图
详见:MLX90640热成像传感器 - 立创开源硬件平台 .
硬件连接
-
使用 Type-C 数据线实现设备供电;
-
连接 WiFi 实现网络通信和数据交换;
-
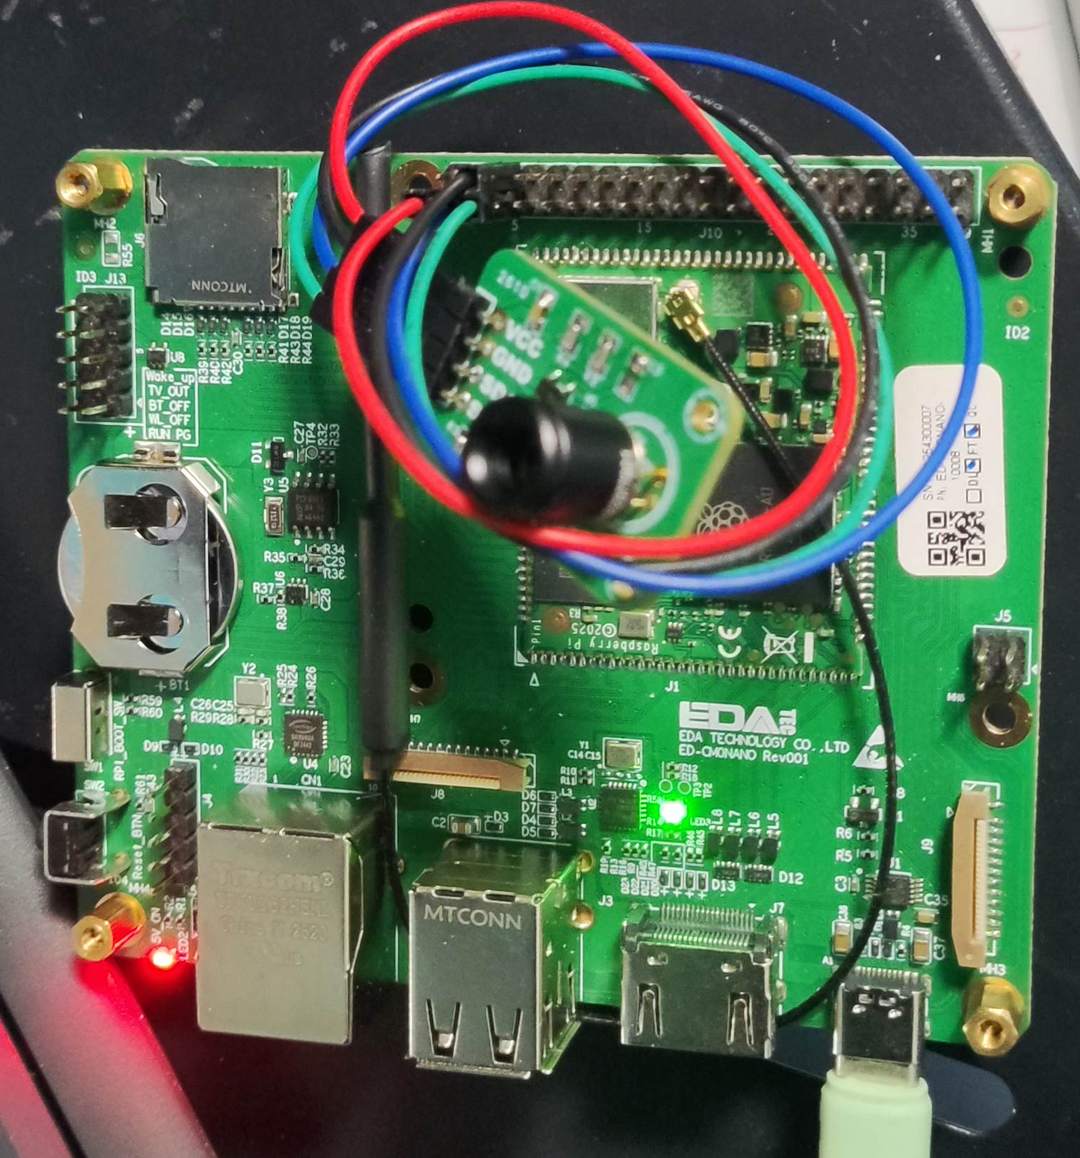
使用杜邦线连接 MLX90640 模块和 CM0 NANO 开发板,接线方式如下
| MLX90640 | RaspberryPi CM0 | Note |
|---|---|---|
| SDA | SDA (Pin3) | Serial Data |
| SCL | SCL (Pin5) | Serial Clock |
| GND | GND | Ground |
| VIN | 3V3 | Power |
实物图
环境搭建
创建并激活虚拟环境
bash
python -m venv .venv
source .venv/bin/activate
安装所需软件包
bash
pip install numpy
pip install matplotlib
pip install RPi.GPIO adafruit-blinka
pip install adafruit-circuitpython-mlx90640
连接测试
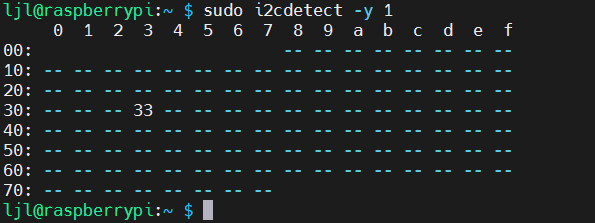
终端执行指令
bash
sudo i2cdetect -y 1显示 iic 设备地址为 0x33 对应设备为 MLX90640
通信测试
终端执行 mlx90640_print_temp.py 新建文件,并添加如下代码
python
import time
import board
import busio
import numpy as np
import adafruit_mlx90640

def main():
    # Setup I2C connection
    i2c = busio.I2C(board.SCL, board.SDA, frequency=400000)
    mlx = adafruit_mlx90640.MLX90640(i2c)
    mlx.refresh_rate = adafruit_mlx90640.RefreshRate.REFRESH_2_HZ

    frame = np.zeros((24 * 32,))  # Initialize the array for all 768 temperature readings

    while True:
        try:
            mlx.getFrame(frame)  # Capture frame from MLX90640
            average_temp_c = np.mean(frame)
            average_temp_f = (average_temp_c * 9.0 / 5.0) + 32.0
            print(f"Average MLX90640 Temperature: {average_temp_c:.1f}C ({average_temp_f:.1f}F)")
            time.sleep(0.5)  # Adjust this value based on how frequently you want updates

        except ValueError as e:
            print(f"Failed to read temperature, retrying. Error: {str(e)}")
            time.sleep(0.5)  # Wait a bit before retrying to avoid flooding with requests
        except KeyboardInterrupt:
            print("Exiting...")
            break
        except Exception as e:
            print(f"An unexpected error occurred: {str(e)}")

if __name__ == "__main__":
    main()
保存代码。
效果
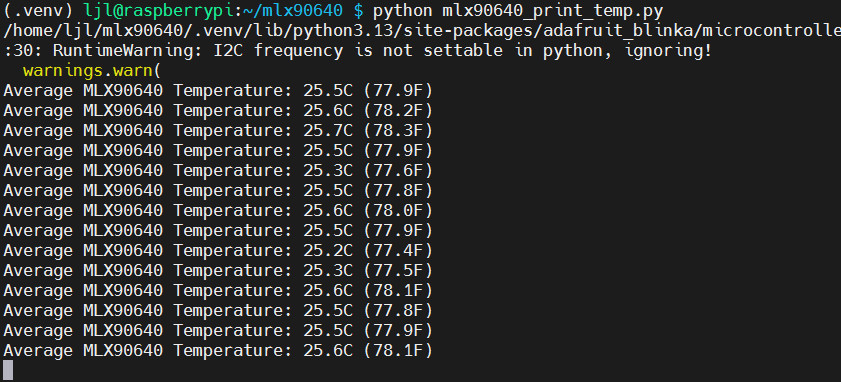
终端执行指令 python mlx90640_print.py 运行代码;
- 终端打印传感器采集画面的平均温度;手掌靠近传感器,温度上升至体温。
若报错则执行下列指令,以定义开发板型号
bash
export BLINKA_FORCEBOARD=RASPBERRY_PI_ZERO_2_W
export BLINKA_FORCECHIP=BCM2XXX
图像显示
终端执行 touch mlx90640_plt.py 新建文件,添加如下代码
python
import time
import board
import busio
import numpy as np
import adafruit_mlx90640
import matplotlib.pyplot as plt

i2c = busio.I2C(board.SCL, board.SDA)
mlx = adafruit_mlx90640.MLX90640(i2c)
mlx.refresh_rate = adafruit_mlx90640.RefreshRate.REFRESH_4_HZ  # Set to a feasible refresh rate

plt.ion()
fig, ax = plt.subplots(figsize=(12, 7))
therm1 = ax.imshow(np.zeros((24, 32)), vmin=0, vmax=60)
cbar = fig.colorbar(therm1)
cbar.set_label(r'Temperature [$^{\circ}$C]', fontsize=14)

frame = np.zeros((24*32,))
t_array = []
max_retries = 5

while True:
    t1 = time.monotonic()
    retry_count = 0
    while retry_count < max_retries:
        try:
            mlx.getFrame(frame)
            data_array = np.reshape(frame, (24, 32))
            therm1.set_data(np.fliplr(data_array))
            therm1.set_clim(vmin=np.min(data_array), vmax=np.max(data_array))
            fig.canvas.draw()  # Redraw the figure to update the plot and colorbar
            fig.canvas.flush_events()
            plt.pause(0.001)
            t_array.append(time.monotonic() - t1)
            print('Sample Rate: {0:2.1f}fps'.format(len(t_array)/np.sum(t_array)))
            break
        except ValueError:
            retry_count += 1
        except RuntimeError as e:
            retry_count += 1
            if retry_count >= max_retries:
                print(f"Failed after {max_retries} retries with error: {e}")
                break
保存代码。
效果
- 终端执行指令
python mlx90640_plt.py运行代码; - 弹窗显示 matplotlib 伪彩图,调整摄像头位置,采集热成像动态画面;
图像优化
为了优化画面显示效果,使用 Matplotlib 内置函数对数据进行平滑处理。
终端执行 touch mlx90640_plt_smooth.py 新建文件,添加如下代码
python
import time
import board
import busio
import numpy as np
import adafruit_mlx90640
import matplotlib.pyplot as plt

def initialize_sensor():
    i2c = busio.I2C(board.SCL, board.SDA)
    mlx = adafruit_mlx90640.MLX90640(i2c)
    mlx.refresh_rate = adafruit_mlx90640.RefreshRate.REFRESH_4_HZ
    return mlx

def setup_plot():
    plt.ion()
    fig, ax = plt.subplots(figsize=(12, 7))
    therm1 = ax.imshow(np.zeros((24, 32)), vmin=0, vmax=60, cmap='inferno', interpolation='bilinear')
    cbar = fig.colorbar(therm1)
    cbar.set_label(r'Temperature [°C]', fontsize=14)
    plt.title('Thermal Image')
    return fig, ax, therm1

def update_display(fig, ax, therm1, data_array):
    therm1.set_data(np.fliplr(data_array))
    therm1.set_clim(vmin=np.min(data_array), vmax=np.max(data_array))
    ax.draw_artist(ax.patch)
    ax.draw_artist(therm1)
    fig.canvas.draw()
    fig.canvas.flush_events()

def main():
    mlx = initialize_sensor()
    fig, ax, therm1 = setup_plot()

    frame = np.zeros((24*32,))
    t_array = []
    max_retries = 5

    while True:
        t1 = time.monotonic()
        retry_count = 0
        while retry_count < max_retries:
            try:
                mlx.getFrame(frame)
                data_array = np.reshape(frame, (24, 32))
                update_display(fig, ax, therm1, data_array)
                plt.pause(0.001)
                t_array.append(time.monotonic() - t1)
                print('Sample Rate: {0:2.1f}fps'.format(len(t_array) / np.sum(t_array)))
                break
            except ValueError:
                retry_count += 1
            except RuntimeError as e:
                retry_count += 1
                if retry_count >= max_retries:
                    print(f"Failed after {max_retries} retries with error: {e}")
                    break

if __name__ == '__main__':
    main()
保存代码。
效果
终端执行指令 python mlx90640_plt_smooth.py 运行代码
画面清晰度相较于平滑处理前有较大提升。
总结
本文介绍了工业树莓派 CM0 NANO 单板计算机结合 MLX90640 热成像模块,实现环境红外热成像显示的热成像仪项目设计,包括模块设计、硬件连接、环境搭建、通信测试、图像显示和优化等流程,为相关产品的快速开发和应用设计提供了参考。