摘要
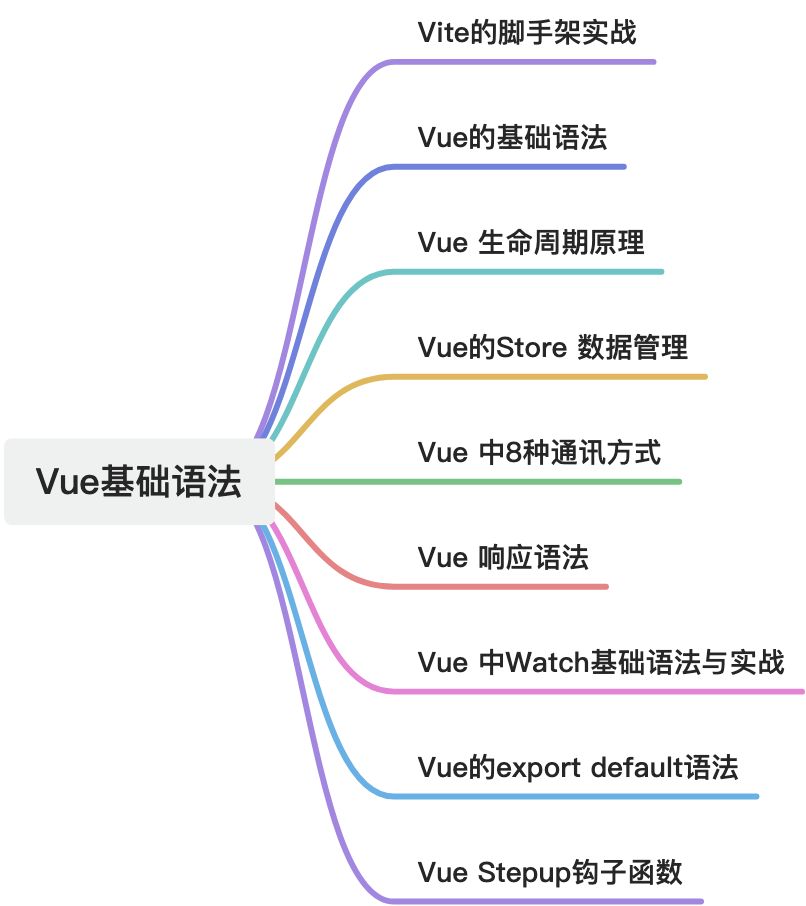
本文系统介绍了Vue.js基础语法,涵盖Vite脚手架、生命周期管理、Store状态管理、组件通信方式、响应式原理及核心API。重点对比Vue2与Vue3的差异,详细讲解ref/reactive/computed/watch等响应式API的使用场景,并推荐组合式API写法。
1. Vite脚手架
Vite (法语意为"快速",发音 /vit/)是新一代的前端构建工具和开发服务器,由 Vue.js 作者尤雨溪创建。它解决了传统构建工具(如 Webpack)在大型项目中的启动慢、热更新慢的问题。
1.1. 核心特点:
- ⚡ 极速启动 - 基于原生ES模块,无需打包
- 🔥 快速热更新 - 按需编译,只更新修改的部分
- 📦 开箱即用 - 支持 TypeScript、JSX、CSS 预处理器等
- 🔧 高度可配置 - 灵活的插件 API
- 🌐 生产优化 - 使用 Rollup 打包,输出高度优化的静态资源
1.2. Vite vs Webpack 对比
|-----------|-------------------|---------------|
| 特性 | Vite | Webpack |
| 启动速度 | ⚡ 极快(毫秒级) | 🐢 慢(项目越大越慢) |
| 热更新 | 🔥 快速(只更新修改的部分) | 🔄 较慢(重新打包) |
| 配置复杂度 | 🎯 简单(开箱即用) | 📚 复杂(需要大量配置) |
| 插件生态 | 🌱 正在快速增长 | 🌳 非常成熟丰富 |
| 构建原理 | 基于 ES 模块 + Rollup | 基于打包 + 插件系统 |
| 适用场景 | 现代浏览器项目 | 需要兼容旧浏览器的项目 |
1.3. Vite 核心原理
1.3.1. 传统构建工具(Webpack)的问题:
// Webpack 的工作方式:
1. 启动时:打包所有模块 → 生成 bundle → 启动服务器
📦 项目越大 → 打包时间越长 ⏱️(可能几十秒到几分钟)

2. 修改文件时:重新打包整个 bundle
✏️ 小修改 → 大打包 ⏱️(可能几秒到十几秒)
1.3.2. Vite 的创新方案:
// Vite 的工作方式:
1. 启动时:不打包!直接启动服务器
   ⚡ 毫秒级启动(无论项目大小)

2. 浏览器请求时:按需编译
   🌐 请求 `main.js` → 返回 ES 模块
   🌐 请求 `App.vue` → 实时编译后返回

3. 修改文件时:只编译修改的文件
   ✏️ 小修改 → 极速更新 ⚡(通常 < 100ms)
1.4. 如何使用 Vite?
1.4.1. 创建 Vite 项目
命令行创建(推荐):
# 使用 npm
npm create vite@latest my-vue-app -- --template vue

# 使用 yarn
yarn create vite my-vue-app --template vue

# 使用 pnpm
pnpm create vite my-vue-app --template vue

====================可能存在异常与解决方案========================

npm create vite@latest learn-vue-app
npm error code UNABLE_TO_GET_ISSUER_CERT_LOCALLY
npm error errno UNABLE_TO_GET_ISSUER_CERT_LOCALLY
npm error request to https://registry.npmjs.org/create-vite failed, reason: unable to get local issuer certificate
npm error A complete log of this run can be found in: /Users/hyxf/.npm/_logs/2026-03-05T07_42_10_393Z-debug-0.log
hyxf@hyxfdeMac-mini hyxf_vue % npm config set registry https://registry.npmmirror.com

执行的命令:

npm config set registry https://registry.npmmirror.com

npm config set strict-ssl false

npm create vite@latest learn-vue-app
1.4.1.1. 选择模板:
? Select a framework: ›
  Vanilla        # 原生 JavaScript
  Vue            # Vue
  React          # React
  Preact         # Preact
  Lit            # Lit
  Svelte         # Svelte
  Solid          # Solid
  Qwik           # Qwik
  Others ›       # 其他
1.4.1.2. 项目结构:
my-vue-app/
├── node_modules/
├── public/              # 静态资源
│   └── vite.svg
├── src/                 # 源代码
│   ├── assets/          # 图片等资源
│   ├── components/      # 组件
│   │   └── HelloWorld.vue
│   ├── App.vue          # 根组件
│   └── main.js          # 入口文件
├── index.html           # 入口 HTML
├── package.json
├── vite.config.js       # Vite 配置文件
└── README.md
1.4.2. 安装和运行
# 进入项目目录
cd my-vue-app

# 安装依赖
npm install
# 或
yarn install
# 或
pnpm install

# 启动开发服务器
npm run dev
# 或
yarn dev
# 或
pnpm dev

# 访问:http://localhost:5173
1.4.3. 基本配置
vite.config.js 基础配置:
// vite.config.js
import { defineConfig } from 'vite'
import vue from '@vitejs/plugin-vue'
import path from 'path'

export default defineConfig({
  // 插件配置
  plugins: [vue()],

  // 开发服务器配置
  server: {
    port: 3000,                    // 端口号
    open: true,                    // 自动打开浏览器
    host: true,                    // 允许局域网访问
    proxy: {                       // 代理配置
      '/api': {
        target: 'http://jsonplaceholder.typicode.com',
        changeOrigin: true,
        rewrite: (path) => path.replace(/^\/api/, '')
      }
    }
  },

  // 构建配置
  build: {
    outDir: 'dist',                // 输出目录
    sourcemap: false,              // 不生成 sourcemap
    rollupOptions: {
      output: {
        // 代码分割配置
        manualChunks: {
          'vendor': ['vue', 'vue-router', 'pinia']
        }
      }
    }
  },

  // 路径别名
  resolve: {
    alias: {
      '@': path.resolve(__dirname, './src'),
      '@components': path.resolve(__dirname, './src/components')
    }
  },

  // CSS 预处理器配置
  css: {
    preprocessorOptions: {
      scss: {
        additionalData: `@import "@/styles/variables.scss";`
      }
    }
  }
})
1.5. 常用功能示例
1.5.1. 环境变量配置
# .env
VITE_APP_TITLE=My Vue App
VITE_API_BASE_URL=http://localhost:3000/api

# .env.development
VITE_API_BASE_URL=http://localhost:3000/api

# .env.production
VITE_API_BASE_URL=https://api.example.com

// 在代码中使用环境变量
console.log(import.meta.env.VITE_APP_TITLE)
console.log(import.meta.env.VITE_API_BASE_URL)

// vite.config.js 中也可以访问
export default defineConfig(({ mode }) => {
  const env = loadEnv(mode, process.cwd())
  console.log(env.VITE_APP_TITLE)
})
1.5.2. 处理静态资源
<template>
  <div>
    <!-- 引入图片 -->
    <img :src="logo" alt="Logo">
      <img src="@/assets/logo.png" alt="Logo">
        <img src="/logo.png" alt="Logo"> <!-- 放在 public 目录 -->
        </div>
</template>

<script setup>
  import logo from '@/assets/logo.png'

  // 作为 URL 导入
  const imageUrl = new URL('./img.png', import.meta.url).href

  // 导入 JSON
  import pkg from '../package.json'
  console.log(pkg.version)
</script>
1.5.3. CSS 和预处理器
<template>
  <div class="container">
    <h1 class="title">Hello Vite</h1>
  </div>
</template>

<style scoped>
  /* 支持 CSS Modules */
  .container {
    color: var(--primary-color);
  }

  .title {
    font-size: 2rem;
  }
</style>

<!-- 使用 SCSS -->
<style lang="scss" scoped>
  $primary-color: #42b983;

  .container {
    color: $primary-color;

    .title {
      font-size: 2rem;
    }
  }
</style>
1.6. 集成常用插件
1.6.1. 安装常用插件:
# Vue 支持
npm install @vitejs/plugin-vue @vitejs/plugin-vue-jsx

# Router 和状态管理
npm install vue-router pinia

# CSS 预处理器
npm install sass less

# 自动导入(强烈推荐!)
npm install unplugin-auto-import unplugin-vue-components

# 图标支持
npm install unplugin-icons

# 开发工具
npm install @vitejs/plugin-legacy  # 浏览器兼容
npm install vite-plugin-inspect    # 调试插件
1.6.2. 配置插件示例:
// vite.config.js
import AutoImport from 'unplugin-auto-import/vite'
import Components from 'unplugin-vue-components/vite'
import { ElementPlusResolver } from 'unplugin-vue-components/resolvers'

export default defineConfig({
  plugins: [
    vue(),
    // 自动导入 Vue 相关函数
    AutoImport({
      imports: ['vue', 'vue-router', 'pinia'],
      dts: 'src/auto-imports.d.ts',  // 生成 TypeScript 声明文件
      resolvers: [ElementPlusResolver()]
    }),
    // 自动导入组件
    Components({
      dirs: ['src/components'],  // 自动导入 src/components 下的组件
      extensions: ['vue'],
      dts: 'src/components.d.ts',
      resolvers: [ElementPlusResolver()]
    })
  ]
})
1.7. 高级用法
1.7.1. 多页面应用配置
// vite.config.js
export default defineConfig({
  build: {
    rollupOptions: {
      input: {
        main: path.resolve(__dirname, 'index.html'),
        admin: path.resolve(__dirname, 'admin.html'),
        mobile: path.resolve(__dirname, 'mobile.html')
      }
    }
  }
})
1.7.2. SSR 配置
// vite.config.js
export default defineConfig({
  build: {
    ssr: true,  // 启用 SSR
    rollupOptions: {
      input: 'src/entry-server.js',
      output: {
        format: 'cjs',
        dir: 'dist/server'
      }
    }
  },
  ssr: {
    noExternal: ['vue', 'vue-router']  // 不外部化这些包
  }
})
1.7.3. 性能优化
export default defineConfig({
  build: {
    // 代码分割
    rollupOptions: {
      output: {
        manualChunks(id) {
          if (id.includes('node_modules')) {
            if (id.includes('vue')) return 'vue'
            if (id.includes('lodash')) return 'lodash'
            return 'vendor'
          }
        }
      }
    },

    // 压缩选项
    minify: 'terser',
    terserOptions: {
      compress: {
        drop_console: true,  // 生产环境移除 console
        drop_debugger: true
      }
    }
  }
})
2. Vue的基础语法
2.1. 根组件
在 Vue.js 中,根组件(Root Component) 是:**整个 Vue 应用最顶层的组件,是所有组件的父组件。**可以理解为:
Vue 应用
   │
   ▼
根组件 (Root Component)
   │
   ├── Header组件
   ├── Menu组件
└── Content组件也就是说:所有页面组件最终都会挂在根组件下面。
2.1.1. 为什么需要根组件
Vue 是 组件化框架。页面不是一个整体 HTML,而是:
页面 = 组件树例如:
App.vue  (根组件)
   │
   ├── Navbar.vue
   ├── Sidebar.vue
   └── Dashboard.vue
           │
           ├── Chart.vue
           └── Table.vue
这里:
App.vue就是根组件。
2.1.2. 根组件在代码中的位置
一个标准 Vue3 项目结构(使用 Vite 创建):
src
 ├── main.js
 ├── App.vue        ← 根组件
 └── components
2.1.3. 根组件如何启动
main.js
import { createApp } from 'vue'

import App from './App.vue'

createApp(App).mount('#app')
执行流程:
createApp(App)
  │
  ▼
  把 App 作为根组件
  │
  ▼
  mount('#app')
  │
  ▼
  Vue 接管页面
2.1.3.1. 根组件对应的 HTML
index.html
<div id="app"></div>Vue 启动后:
#app
  │
  ▼
App.vue (根组件)
2.2. 钩子函数
在 Vue 3 中,钩子函数(Lifecycle Hooks)是理解组件"生命周期"的关键。你可以把它们想象成组件在不同阶段发出的"广播",让你能在特定的时间点插入自己的逻辑。我们通常将其分为 组合式 API (Composition API) 和 选项式 API (Options API) 两个版本,现在主流推荐使用组合式 API。
2.2.1. 最常用的核心钩子 (Composition API)
在 <script setup> 中,这些是最频繁露脸的:
|-----------------------|------------------|---------------------------|
| 钩子名称 | 触发时机 | 常见用途 |
| onMounted() | 组件挂载完成(DOM 已生成) | 发送网络请求、操作 DOM、启动定时器。 |
| onUpdated() | 数据变化导致 DOM 重新渲染后 | 访问更新后的 DOM 状态(慎用,易导致死循环)。 |
| onUnmounted() | 组件销毁(卸载)后 | 清除定时器、取消事件监听、清理插件实例。 |
| onBeforeUnmount() | 组件卸载之前 | 此时还能访问 DOM,适合做最后的清理工作。 |
2.2.2. 特殊场景的钩子
除了核心钩子,Vue 还提供了一些应对特定功能的"特种部队":
A. 状态调试 (Debug)
- onRenderTracked: 响应式依赖被追踪时调用。
- onRenderTriggered: 响应式变量导致组件重新渲染时调用(找"谁让页面刷新了"的神器)。
B. 缓存组件 (Keep-alive)
如果你的组件被 <KeepAlive> 包裹,它不会被销毁,而是会被"冻结":
- onActivated: 组件从缓存中被重新插入 DOM 时调用。
- onDeactivated: 组件被移入缓存(隐藏)时调用。
C. 错误处理
- onErrorCaptured: 捕获子孙组件 抛出的错误。它和前面提到的
app.config.errorHandler的区别在于:这个是组件级的,可以拦截错误不让它继续往上传。
2.2.3. app.config.errorHandler钩子函数
这是 app.config 对象中最常用的属性之一。它是一个全局钩子函数 ,专门用来收集和处理应用中所有组件在运行期间抛出的未捕获错误。
在你的 main.js(或入口文件)中,你可以这样写:
import { createApp } from 'vue'
import App from './App.vue'

const app = createApp(App)

// 定义应用级错误处理器
app.config.errorHandler = (err, instance, info) => {
  // err: 具体的错误对象
  // instance: 发生错误的组件实例
  // info: Vue 特定的错误信息,比如 "setup function", "render function" 等

  console.error('捕获到全局错误:', err)
  console.log('错误所在的组件:', instance)
  console.log('错误详情:', info)

  // 实际场景中,你可能会在这里将错误发送到日志服务器(如 Sentry)
}

app.mount('#app')
如果没有这个全局处理器,组件内部的错误可能会导致:
- 静默失败:错误只在控制台打印,用户界面可能卡死或白屏。
- 难以追踪:在复杂的组件树中,很难定位错误到底是从哪个层级传上来的。
通过 app.config.errorHandler,你可以实现:
- 统一上报:自动监控生产环境的 Bug。
- 降级处理:当发生严重错误时,给用户展示一个友好的"抱歉,页面出错了"提示,而不是直接崩溃。
2.2.4. app.config 还能配置什么?
除了错误处理,这个对象还包含其他几个重要的全局配置:
|---------------------------|-------------------------------------------------------------------------------------|
| 配置项 | 用途 |
| globalProperties | 注册全局属性。例如 app.config.globalProperties.$http = axios,这样在所有组件里都能通过 this.$http 访问。 |
| performance | 设置为 true 后,可以在浏览器开发工具的性能面板中追踪组件初始化、编译和渲染的性能。 |
| optionMergeStrategies | 自定义选项的合并策略(属于进阶玩法,用于插件开发)。 |
| warnHandler | 捕获 Vue 的运行时警告(仅在开发环境下有效)。 |
3. Vue全生命周期原理
3.1. Vue生命周期总共可以分为8个阶段:
创建前后, 载入前后,更新前后,销毁前销毁后,以及一些特殊场景的生命周期
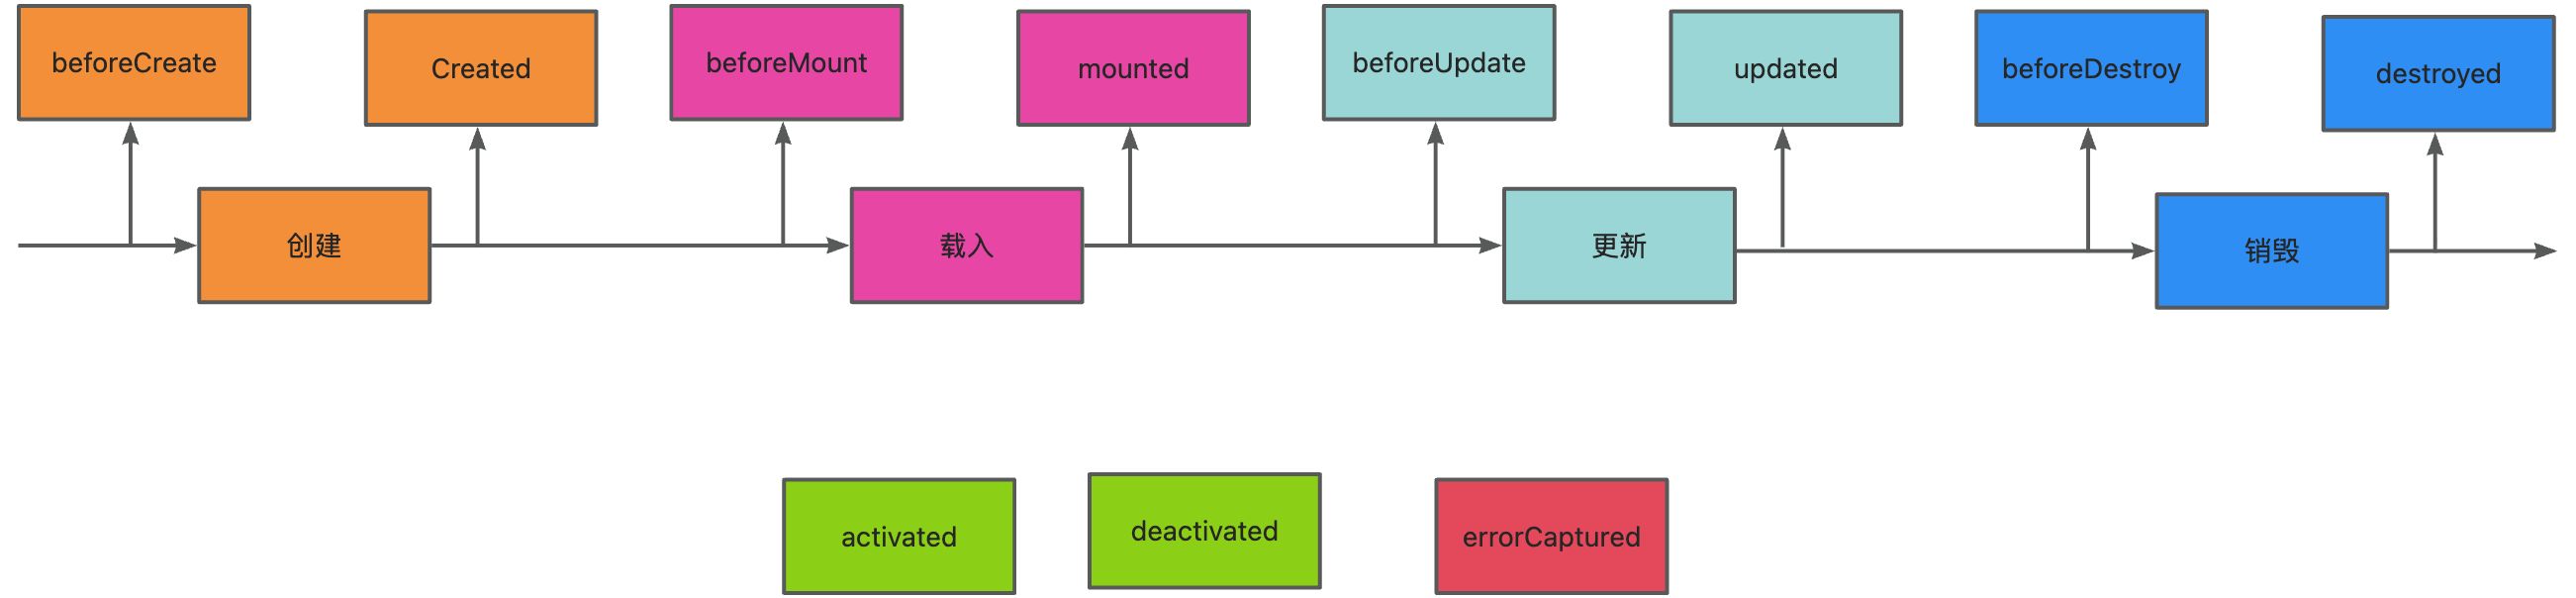
|---------------|-----------------------|
| 生命周期 | 描述 |
| setup | |
| beforeCreate | 组件实例被创建之初 |
| created | 组件实例已经完全创建 |
| beforeMount | 组件挂载之前 |
| mounted | 组件挂载到实例上去之后 |
| beforeUpdate | 组件数据发生变化,更新之前 |
| updated | 组件数据更新之后 |
| beforeDestroy | 组件实例销毁之前 |
| destroyed | 组件实例销毁之后 |
| activated | keep-alive 缓存的组件激活时 |
| deactivated | keep-alive 缓存的组件停用时调用 |
| errorCaptured | 捕获一个来自子孙组件的错误时被调用 |
使用场景分析
|---------------|--------------------------------|
| 生命周期 | 描述 |
| beforeCreate | 执行时组件实例还未创建,通常用于插件开发中执行一些初始化任务 |
| created | 组件初始化完毕,各种数据可以使用,常用于异步数据获取 |
| beforeMount | 未执行渲染、更新,dom未创建 |
| mounted | 初始化结束,dom已创建,可用于获取访问数据和dom元素 |
| beforeUpdate | 更新前,可用于获取更新前各种状态 |
| updated | 更新后,所有状态已是最新 |
| beforeDestroy | 销毁前,可用于一些定时器或订阅的取消 |
| destroyed | 组件已销毁,作用同上 |
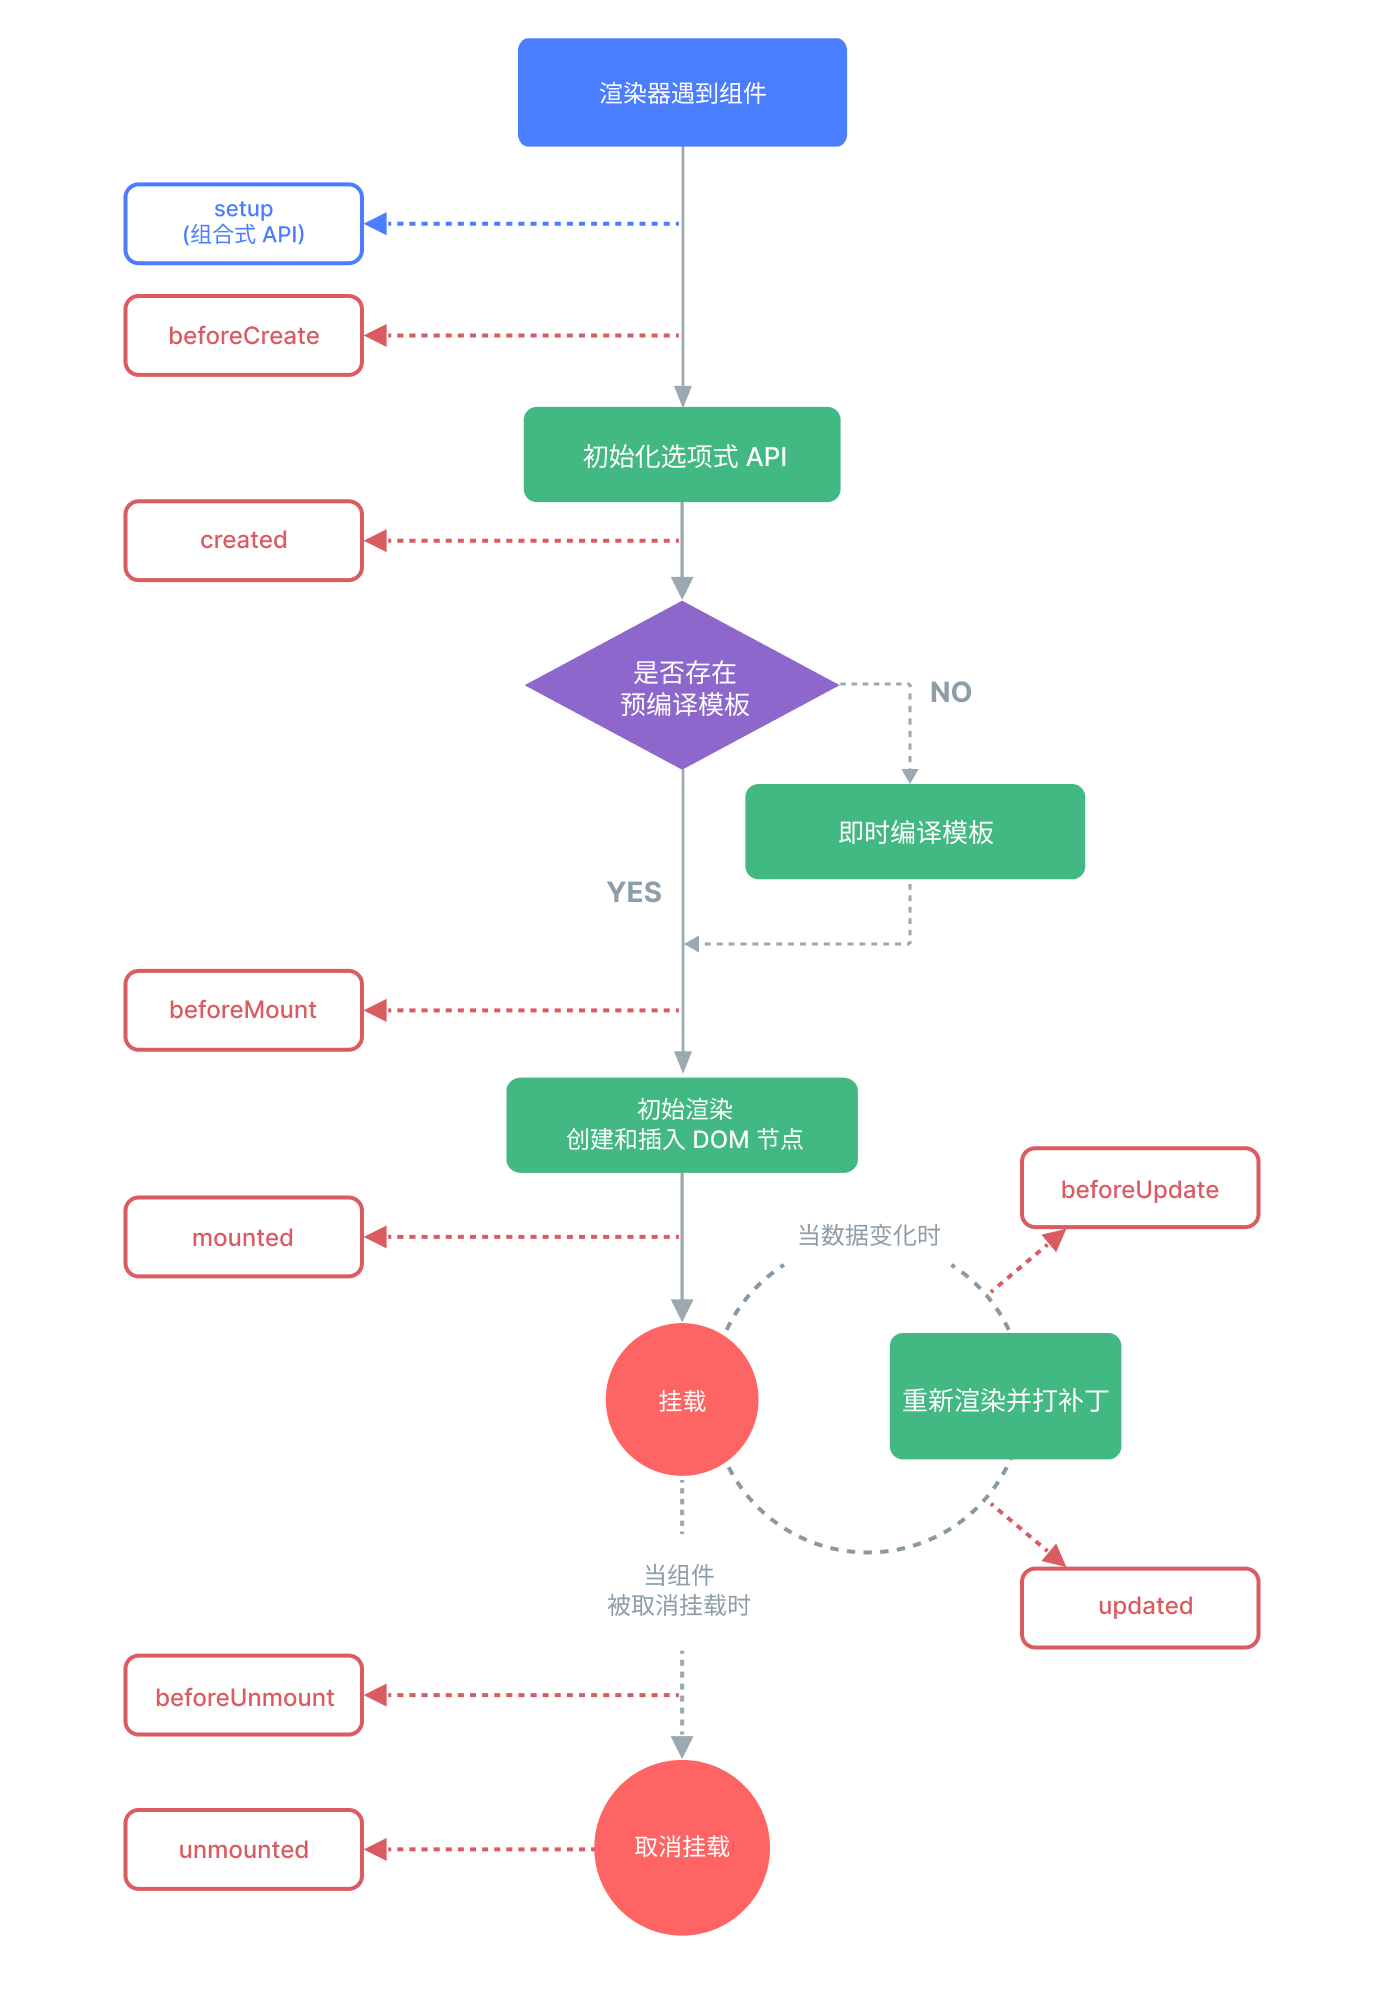
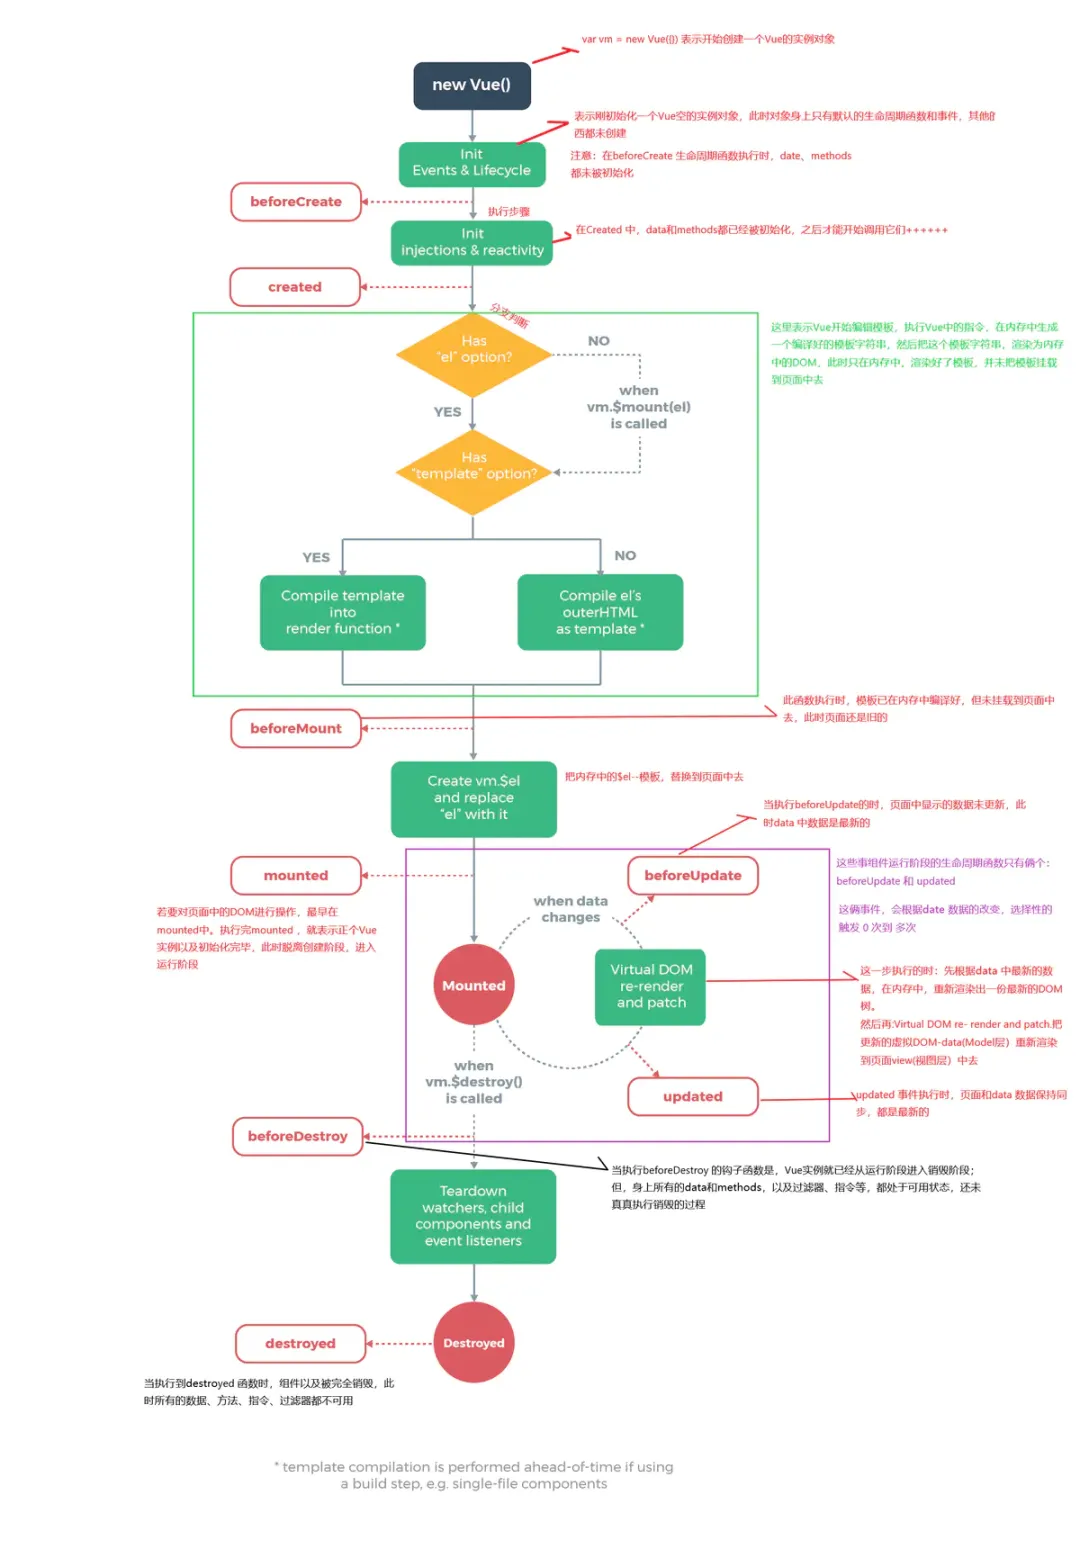
beforeCreate -> created
- 初始化
vue实例,进行数据观测
created
- 完成数据观测,属性与方法的运算,
watch、event事件回调的配置 - 可调用
methods中的方法,访问和修改data数据触发响应式渲染dom,可通过computed和watch完成数据计算 - 此时
vm.$el并没有被创建
created -> beforeMount
- 判断是否存在
el选项,若不存在则停止编译,直到调用vm.$mount(el)才会继续编译 - 优先级:
render>template>outerHTML vm.el获取到的是挂载DOM的
beforeMount
- 在此阶段可获取到
vm.el - 此阶段
vm.el虽已完成DOM初始化,但并未挂载在el选项上
beforeMount -> mounted
- 此阶段
vm.el完成挂载,vm.$el生成的DOM替换了el选项所对应的DOM
mounted
vm.el已完成DOM的挂载与渲染,此刻打印vm.$el,发现之前的挂载点及内容已被替换成新的DOM
beforeUpdate
- 更新的数据必须是被渲染在模板上的(
el、template、render之一) - 此时
view层还未更新 - 若在
beforeUpdate中再次修改数据,不会再次触发更新方法
updated
- 完成
view层的更新 - 若在
updated中再次修改数据,会再次触发更新方法(beforeUpdate、updated)
beforeDestroy
- 实例被销毁前调用,此时实例属性与方法仍可访问
destroyed
- 完全销毁一个实例。可清理它与其它实例的连接,解绑它的全部指令及事件监听器
- 并不能清除DOM,仅仅销毁实例
数据请求在created和mouted的区别
created是在组件实例一旦创建完成的时候立刻调用,这时候页面dom节点并未生成;mounted是在页面dom节点渲染完毕之后就立刻执行的。触发时机上created是比mounted要更早的,
两者的相同点:都能拿到实例对象的属性和方法。 讨论这个问题本质就是触发的时机,放在mounted中的请求有可能导致页面闪动(因为此时页面dom结构已经生成),但如果在页面加载前完成请求,则不会出现此情况。建议对页面内容的改动放在created生命周期当中。
4. Vue 中 Store理解
Store(仓库) 是Vue应用中的集中式状态管理容器 。它用于管理应用中多个组件需要共享的状态数据,解决组件间状态共享和通信的复杂性。想象一个**"全局的、响应式的数据仓库"**:
- 📦 容器:存储应用中多个组件需要访问的共享数据
- 🔄 响应式:数据变化时,依赖该数据的组件会自动更新
- 🌐 全局可访问:任何组件都可以安全地读取和修改其中的数据
- 🔒 受控的修改:提供明确的规则来修改数据,避免混乱
|--------------------------------|------------|-------------------------|
| 存储方式 | 适用场景 | 特点 |
| 组件内部状态 (ref, reactive) | 组件私有数据 | 简单直接,组件卸载时销毁 |
| Props/Events | 父子组件通信 | 层级浅时有效,深层传递麻烦 |
| Provide/Inject | 深层嵌套组件通信 | 避免层层传递,但仍是局部范围 |
| Event Bus | 任意组件通信 | 已过时,不推荐使用 |
| Store (Pinia/Vuex) | 全局状态共享 | 集中管理,响应式,可调试,支持时间旅行 |
4.1. 为什么需要 Store?
4.1.1. 没有 Store 时的问题(组件间状态传递)
<!-- 组件层级深时,需要层层传递 props -->
  <GrandParent>
    <!-- 需要把数据一层层传下去 -->
      <Parent :user="user" :settings="settings" :notifications="notifications">
      <!-- 中间可能还有更多层级 -->
        <Child :user="user" :settings="settings" :notifications="notifications">
        <GrandChild :user="user" :settings="settings" :notifications="notifications">
        <!-- 终于用到了数据 -->
          用户名:{{ user.name }}
        </GrandChild>
      </Child>
    </Parent>
  </GrandParent>
4.1.2. 有 Store 时的解决方案
<!-- 任何组件都可以直接访问 store -->
<GrandParent>
  <Parent>
  <Child>
  <GrandChild>
  <!-- 直接读取 store 中的数据 -->
  用户名:{{ userStore.user.name }}
</GrandChild>
</Child>
</Parent>
</GrandParent>

<!-- 另一个完全无关的组件 -->
<Sidebar>
当前用户:{{ userStore.user.name }} <!-- 同样可以访问 -->
</Sidebar>
4.2. Store 的设计原则
4.2.1. 单一职责
// ✅ 好的做法:按功能拆分
stores/
├── auth.js      # 认证相关
├── cart.js      # 购物车相关
├── products.js  # 商品数据
├── ui.js        # 界面状态
└── order.js     # 订单相关

// ❌ 不好的做法:所有状态放一个 store
# 包含用户、商品、订单、UI 所有状态
stores/monster-store.js
4.2.2. 何时该用 Store?
✅ 适合放在 Store 的状态:
// 1. 用户信息(多个页面需要)
// 2. 购物车数据
// 3. 全局设置(主题、语言)
// 4. 权限信息
// 5. 需要持久化的数据

❌ 适合放在组件内的状态:
// 1. 表单的临时输入值
// 2. 模态框的显示/隐藏
// 3. 组件内部的临时变量
// 4. 不与其他组件共享的数据
4.2.3. Store 通信模式
// Store 之间可以互相调用
export const useOrderStore = defineStore('order', {
  actions: {
    async checkout() {
      const cartStore = useCartStore()
      const authStore = useAuthStore()

      if (!authStore.isAuthenticated) {
        throw new Error('请先登录')
      }

      if (cartStore.items.length === 0) {
        throw new Error('购物车为空')
      }

      // 创建订单...
    }
  }
})
4.3. Store 的核心组成部分
以 Pinia (推荐)或 Vuex 为例,Store 通常包含:
4.3.1. State(状态) - 存储的数据
// 类似组件的 data()
state: () => ({
  user: null,          // 当前用户信息
  cartItems: [],       // 购物车商品
  isLoggedIn: false,   // 登录状态
  theme: 'light'       // 主题设置
})
4.3.2. Getters(获取器) - 计算属性
// 类似组件的 computed
getters: {
  // 基于 state 的计算值
  cartTotal: (state) => {
    return state.cartItems.reduce((total, item) => total + item.price, 0)
  },

    // 带参数的计算
    isProductInCart: (state) => (productId) => {
    return state.cartItems.some(item => item.id === productId)
  }
}
4.3.3. Actions(动作) - 修改状态的方法
// 类似组件的 methods(可异步)
actions: {
   // 同步操作
   addToCart(product) {
   this.cartItems.push(product)
  },

  // 异步操作(如 API 调用)
  async login(credentials) {
    const response = await api.login(credentials)
    this.user = response.data.user
    this.isLoggedIn = true
  }
}
4.4. Store实际应用场景示例
4.4.1. 场景 1:用户认证
// stores/auth.js
export const useAuthStore = defineStore('auth', {
  state: () => ({
    user: null,
    token: localStorage.getItem('token') || '',
    isAuthenticated: false
  }),

  actions: {
    async login(email, password) {
      const response = await api.login({ email, password })
      this.user = response.user
      this.token = response.token
      this.isAuthenticated = true
      localStorage.setItem('token', response.token)
    },

    logout() {
      this.user = null
      this.token = ''
      this.isAuthenticated = false
      localStorage.removeItem('token')
    }
  }
})
4.4.2. 场景 2:电商购物车
// stores/cart.js
export const useCartStore = defineStore('cart', {
  state: () => ({
    items: [],
    shippingAddress: null,
    paymentMethod: 'credit_card'
  }),

  getters: {
    totalItems: (state) => state.items.length,
    subtotal: (state) => state.items.reduce((sum, item) => sum + item.price * item.quantity, 0),
    total: (state) => {
      const subtotal = state.items.reduce((sum, item) => sum + item.price * item.quantity, 0)
      const shipping = state.shippingAddress?.shippingFee || 0
      return subtotal + shipping
    }
  },

  actions: {
    addItem(product, quantity = 1) {
      const existing = this.items.find(item => item.id === product.id)
      if (existing) {
        existing.quantity += quantity
      } else {
        this.items.push({ ...product, quantity })
      }
    },

    removeItem(productId) {
      this.items = this.items.filter(item => item.id !== productId)
    },

    clearCart() {
      this.items = []
    }
  }
})
4.4.3. 场景 3:UI 主题和设置
// stores/ui.js
export const useUIStore = defineStore('ui', {
  state: () => ({
    theme: 'light',
    sidebarCollapsed: false,
    notifications: [],
    language: 'zh-CN'
  }),

  actions: {
    toggleTheme() {
      this.theme = this.theme === 'light' ? 'dark' : 'light'
      document.documentElement.setAttribute('data-theme', this.theme)
    },

    toggleSidebar() {
      this.sidebarCollapsed = !this.sidebarCollapsed
    },

    addNotification(message, type = 'info') {
      this.notifications.push({
        id: Date.now(),
        message,
        type,
        timestamp: new Date()
      })
    }
  }
})
4.5. 在组件中使用 Store
4.5.1. 选项式 API 写法
<template>
  <div>
    <h1>欢迎, {{ userName }}</h1>
    <p>购物车: {{ cartTotal }} 元 ({{ cartItemCount }} 件)</p>
    <button @click="addSampleProduct">添加商品</button>
  </div>
</template>

<script>
  import { mapState, mapGetters, mapActions } from 'pinia'

  export default {
    computed: {
      // 将 store 的状态映射到组件计算属性
      ...mapState(useAuthStore, ['user']),
      ...mapState(useCartStore, ['items']),
      // 将 getters 映射到组件计算属性
      ...mapGetters(useCartStore, ['total', 'totalItems'])
    },
    methods: {
      // 将 actions 映射到组件方法
      ...mapActions(useCartStore, ['addItem', 'removeItem'])
    }
  }
</script>
4.5.2. 组合式 API 写法(推荐)
<template>
  <div>
    <h1>欢迎, {{ authStore.user?.name || '游客' }}</h1>
    <p>购物车: {{ cartStore.total }} 元 ({{ cartStore.totalItems }} 件)</p>
    <p>当前主题: {{ uiStore.theme }}</p>

    <button @click="addSampleProduct">添加商品</button>
    <button @click="uiStore.toggleTheme()">切换主题</button>
    <button @click="logout">退出登录</button>
  </div>
</template>

<script setup>
  import { useAuthStore, useCartStore, useUIStore } from '@/stores'

  // 直接使用 store
  const authStore = useAuthStore()
  const cartStore = useCartStore()
  const uiStore = useUIStore()

  // 访问状态
  console.log('当前用户:', authStore.user)

  // 调用 action
  const addSampleProduct = () => {
    cartStore.addItem({
      id: 1,
      name: '示例商品',
      price: 100
    })
  }

  const logout = () => {
    authStore.logout()
    // 可以同时操作多个 store
    cartStore.clearCart()
  }
</script>
5. Vue组件通信8种方式
在 Vue.js 中,组件之间需要进行 数据或事件传递 ,常见的组件通信方式大约有8种 。下面给你整理成方式+示例+使用场景表格,方便记忆和实际开发使用。
|---------------------|---------|--------------|-----------|
| 通信方式 | 通信方向 | 核心作用 | 典型使用场景 |
| props | 父 → 子 | 父组件传数据给子组件 | 组件参数配置 |
| emit / emit | 子 → 父 | 子组件通知父组件 | 表单提交、按钮事件 |
| slot | 父 → 子 | 父组件传结构给子组件 | UI组件、布局组件 |
| ref | 父 → 子 | 父组件直接调用子组件方法 | 表单校验、弹窗控制 |
| provide / inject | 祖先 → 后代 | 跨层级传递数据 | 深层组件共享数据 |
| event bus | 任意组件 | 事件发布订阅 | 兄弟组件通信 |
| vuex / pinia | 全局 | 全局状态管理 | 大型应用共享状态 |
| parent / $children | 父子 | 直接访问组件实例 | 简单组件关系 |
5.1. emit(子传父)
子组件通过事件通知父组件。
子组件
<button @click="send">提交</button>

<script>
  export default {
    methods:{
      send(){
        this.$emit("submit","数据")
      }
    }
  }
</script>
父组件
<Child @submit="getData"/>

methods:{
  getData(data){
     console.log(data)
  }
}
使用场景:
- 提交表单
- 点击按钮
- 通知父组件更新数据
5.2. props(父传子)
最基本通信方式。
子组件
<script>
  export default {
    props: ["title"]
  }
</script>

<template>
  <h1>{{ title }}</h1>
</template>
父组件
<Child title="Vue教程"/>使用场景:
- 列表组件
- UI组件参数
- 页面配置
5.3. slot(父传结构)
父组件向子组件插入内容。
子组件
<div class="card">
  <slot></slot>
</div>
父组件
<Card>
  <p>这里是内容</p>
</Card>
使用场景:
- UI组件
- 弹窗组件
- 表格组件
5.4. ref(父调用子组件)
父组件直接访问子组件实例。
父组件
<Child ref="child"/>

this.$refs.child.open()
子组件
methods:{
  open(){
     console.log("打开")
  }
}
使用场景:
- 打开弹窗
- 调用组件方法
- 表单校验
5.5. provide/inject(跨层级通信)
祖先组件提供数据。
父组件
provide(){
  return {
     theme:"dark"
  }
}
孙组件
inject:["theme"]使用场景:
- UI库
- 主题配置
- 深层组件数据共享
5.6. Event Bus(事件总线/Vue3 已不推荐)
通过事件中心通信。
eventBus.js
import Vue from "vue"
export default new Vue()
组件A
bus.$emit("msg","hello")组件B
bus.$on("msg",(data)=>{
   console.log(data)
})
使用场景:
- 兄弟组件通信
- 中小项目
⚠️ Vue3 已不推荐。
5.7. Vuex/Pinia(全局状态,推荐)
推荐使用 Pinia 或 Vuex。
store
export const useStore = defineStore('main',{
  state:()=>({
    count:0
  }),
  actions:{
    add(){
      this.count++
    }
  }
})
组件
const store = useStore()
store.add()
使用场景:
- 登录信息
- 用户信息
- 全局状态
5.8. parent / children (不推荐,大项目难维护。)
直接访问父子组件实例。
子组件
this.$parent.doSomething()父组件
this.$children[0].doSomething()使用场景:
- 简单父子关系
⚠️ 不推荐,大项目难维护。
6. Vue的响应式语法
在 Vue.js 中,响应式(Reactivity) 是 Vue 最核心的机制之一。简单理解:数据变化时,界面会自动更新,不需要手动操作 DOM。响应式完整流程
创建响应式数据
      ↓
模板使用数据
      ↓
Vue 收集依赖
      ↓
数据改变
      ↓
触发更新
      ↓
重新渲染 DOM
Vue 响应式优点
|--------|---------------|
| 优点 | 说明 |
| 自动更新UI | 不用手动操作DOM |
| 代码简洁 | 逻辑更清晰 |
| 性能优化 | Vue只更新需要更新的部分 |
| 开发效率高 | 减少DOM操作 |
6.1. 什么是Vue响应式
传统 JavaScript:
let count = 0
count = 1
页面不会自动更新。
而在 Vue 中:
<p>{{ count }}</p>
<button @click="count++">+1</button>
当 count****改变:
count 变化
↓
Vue 监听到
↓
自动更新 DOM
这就是响应式系统。
6.2. Vue响应式核心原理
响应式本质是:
数据变化 → 自动更新视图内部流程:
数据劫持
↓
依赖收集
↓
数据变化
↓
通知更新
↓
重新渲染 DOM
6.3. Vue2vsVue3 响应式实现
|------|-------------------------|
| 版本 | 实现方式 |
| Vue2 | Object.defineProperty |
| Vue3 | Proxy |
6.3.1. Vue2 原理
使用:
Object.defineProperty()监听对象属性变化。
示例:
Object.defineProperty(obj,'name',{
  get(){
    console.log("读取数据")
  },
  set(val){
    console.log("数据改变")
  }
})
问题:
无法监听数组变化
无法监听对象新增属性
6.3.2. Vue3 原理
Vue3 使用:
Proxy示例:
const obj = new Proxy(data,{
  get(target,key){
    return target[key]
  },
  set(target,key,value){
    target[key] = value
    return true
  }
})
优点:
可以监听整个对象
支持数组
性能更好
6.4. Vue3 响应式 API
在 Vue3 中主要使用:
|--------------|-----------|
| API | 作用 |
| ref() | 创建基本类型响应式 |
| reactive() | 创建对象响应式 |
| computed() | 计算属性 |
| watch() | 监听数据变化 |
6.4.1. ref 用于基本数据类型。
import { ref } from 'vue'

  const count = ref(0)

  count.value++
模板:
<p>{{ count }}</p>ref 需要 .value
count.value++reactive 不能直接解构
错误:
const {name} = user正确:
toRefs(user)6.4.2. reactive 用于对象。
import { reactive } from 'vue'

  const user = reactive({
    name:"Tom",
    age:18
  })
使用:
<p>{{ user.name }}</p>6.4.3. computed 计算属性。
const total = computed(()=>{
  return price * count
  })
特点:
有缓存
依赖变化才重新计算
6.4.4. watch 监听数据变化。
watch(count,(newVal,oldVal)=>{
  console.log(newVal)
})
常用于:
- 请求接口
- 监听表单变化
6.5. Vue中4种响应式场景
|--------------|-------------|---------------------------|-----------|
| API | 作用 | 什么时候使用 | 示例场景 |
| ref() | 创建基本类型响应式数据 | 变量是 number/string/boolean | 计数器、输入框 |
| reactive() | 创建对象响应式数据 | 管理对象或复杂状态 | 表单对象、用户信息 |
| computed() | 计算属性 | 需要根据数据计算新值 | 价格计算、过滤数据 |
| watch() | 监听数据变化 | 需要执行副作用 | 请求接口、监听表单 |
6.5.1. ref(最常用)
作用:
创建基本类型响应式数据适用于:
- number
- string
- boolean
示例
<script setup>
import { ref } from "vue"

const count = ref(0)

function add(){
  count.value++
}
</script>

<template>
  <p>{{ count }}</p>
  <button @click="add">+1</button>
</template>
使用场景:
|------|-------------|
| 场景 | 例子 |
| 计数器 | count |
| 输入框 | input value |
| 开关状态 | isLogin |
6.5.2. reactive
作用:
创建对象响应式适合:
- 对象
- 表单
- 复杂数据结构
示例
<script setup>
import { reactive } from "vue"

const user = reactive({
  name:"Tom",
  age:20
})
</script>

<template>
  <p>{{ user.name }}</p>
</template>
使用场景:
|------|----------|
| 场景 | 例子 |
| 表单数据 | form对象 |
| 用户信息 | user对象 |
| 复杂状态 | settings |
例如:
const form = reactive({
  username:"",
  password:""
})
6.5.3. computed(计算属性)
作用:
根据已有数据计算新数据特点:
- 有缓存
- 依赖不变不会重新计算
示例
<script setup>
  import { ref, computed } from "vue"

  const price = ref(100)
  const count = ref(2)

  const total = computed(()=>{
    return price.value * count.value
  })
</script>

<template>
  <p>总价:{{ total }}</p>
</template>
使用场景:
|-------|------------|
| 场景 | 例子 |
| 价格计算 | totalPrice |
| 数据过滤 | filterList |
| 格式化数据 | fullName |
例如:
const fullName = computed(()=>{
  return firstName.value + lastName.value
})
7. watch基础使用
作用:
监听数据变化特点:
数据变化 → 执行函数示例
<script setup>
import { ref, watch } from "vue"

const keyword = ref("")

watch(keyword,(newVal,oldVal)=>{
  console.log("搜索:",newVal)
})
</script>
使用场景:
|------|-------------|
| 场景 | 例子 |
| 搜索接口 | watch输入框 |
| 监听路由 | watch route |
| 表单变化 | watch form |
例如:
watch(keyword,(val)=>{
  fetchSearch(val)
})
8. export default语法(vue2 和Vue3 的区别)
export default {

}
这是 ES Module 导出语法。意思:导出一个 Vue 组件对象。Vue 组件本质就是:
一个 JS 对象8.1. Vue2 写法
export default {
  data() {
    return {
      count: 0
    }
  }
}
8.2. Vue3写法
setup() {
  const count = ref(0)
  return { count }
}
9. Vue中setup() 钩子函数
setup组件初始化时执行
setup()
   ↓
onBeforeMount
   ↓
onMounted
   ↓
onBeforeUpdate
   ↓
onUpdated
   ↓
onBeforeUnmount
   ↓
onUnmounted

setup() {
}
setup 是 Vue3 最重要的生命周期入口 。作用:**组件初始化时执行,**执行顺序:
setup()
↓
beforeCreate
↓
created
↓
mounted
在 Vue3 中:
setup ≈ Vue2 的 data + methods + computed