华为云项目实战
- 云平台架构图
-
- 公有云配置
- [虚拟私有云 (VPC)](#虚拟私有云 (VPC))
- 弹性公网IP(EIP)
- 弹性文件服务(SFS)
- [VPC终端节点(VPC Endpoint)](#VPC终端节点(VPC Endpoint))
- [弹性负载均衡(Elastic Load Balance)](#弹性负载均衡(Elastic Load Balance))
- 弹性云服务器(ECS)
- 跳板机配置
- 云服务管理
- [ELK 项目架构图](#ELK 项目架构图)
云平台架构图

公有云配置
区域: 同一个区域中的云主机是可以互相连通的,不通区域云主机是不能使用内部网络互相通信的 选择离自己比较近的区域,可以减少网络延时卡顿
虚拟私有云 (VPC)
- 什么是 虚拟私有云 :
就是在公共云上为你划出的一块逻辑隔离的私有网络区域,让你像管理本地数据中心一样自由定义网段、IP和路由规则。
配置私有云网络:
主网段 vpc-tedu :192.168.0.0/16子网掩码的前 16 位是网络位,剩下的 16 位用于主机子网 subnet-svc(192.168.0.0/24)子网 subnet-nsd(192.168.1.0/24)配置 默认安全组
- 添加出口策略 "开放全部端口"
- 添加入口策略 "开放全部端口"
弹性公网IP(EIP)
- 什么是 弹性公网IP :
就是一个可以独立购买、持有,并能随时绑定或解绑到云服务器、NAT网关等资源上的公网IP地址,能灵活地管理云资源的公网访问能力。
准备公网IP,待提供给云主机(跳板机,弹性负载均衡机等)使用,
让其能与公网进行连接,方便后面 对外提供服务 与 访问公网服务
弹性文件服务(SFS)
- 什么是 弹性文件服务:
是一种可按需扩展、支持多台云服务器(ECS)同时挂载访问的共享文件存储服务 ,协议(NFS/CIFS)- 像一个自动伸缩的共享硬盘,让多台服务器可以像访问本地文件夹一样,共同读写同一份数据
- 是一个通过 IP 提供服务、由分布式硬件集群支撑的共享存储池
VPC终端节点(VPC Endpoint)
- 是一项云服务,它能让你的虚拟私有云(VPC)通过内网安全地访问特定服务,而
无需使用公网IP,也无需通过网关或VPN。
简单来说,它就像在VPC和目标服务之间搭建了一条私有的"内网专线"- 作用 :
连接华为云yum仓库
VPC 终端节点本质上是一个反向代理。它会将你的内网请求转发到官方的镜像站源站
具有合规性/隔离性,极致性能,成本控制
弹性负载均衡(Elastic Load Balance)
通过 将访问流量自动分发到多台弹性云服务器,扩展应用系统对外的服务能力,实现更高水平的应用程序容错性能
- 削峰填谷:防止单台服务器压力过大,让所有服务器均衡分担压力,从而支撑更高的并发访问。
- 自动容错:实时监测后端服务器状态,一旦发现某台服务器故障,立即停止向其派发新请求,确保用户访问不中断
弹性云服务器(ECS)
就是一种可以随时按需获取、并且能根据业务压力灵活调整配置(如CPU、内存)的虚拟服务器。
- 云主机配置
| 名称 | IP地址 | 配置 |
|---|---|---|
| proxy | 192.168.1.252 | 2CPU,4G内存 |
| host | 192.168.1.125 | 2CPU,4G内存 |
| web-0001 | 192.168.1.11 | 2CPU,4G内存 |
| web-0002 | 192.168.1.12 | 2CPU,4G内存 |
| es-0001 | 192.168.1.21 | 2CPU,4G内存 |
| es-0002 | 192.168.1.22 | 2CPU,4G内存 |
| es-0003 | 192.168.1.23 | 2CPU,4G内存 |
跳板机配置
- 安装ansible 管理主机
测试:
- 使用proxy 与host 云主机,以proxy作为跳板机 对其优化系统配置,设置yum本地仓库。
- host 使用VPC终端节点配置华为云yum仓库 ,优化系统配置,再制作为 镜像模板,方便后续创建云主机
rust
#[ proxy ]
[root@ecs-proxy ~]# dnf install -y ansible-core glibc-langpack-zh	# 安装软件
#[创建密钥对,免密登入]
[root@ecs-proxy ~]# ssh-keygen
Generating public/private rsa key pair.
Enter file in which to save the key (/root/.ssh/id_rsa):
Enter passphrase (empty for no passphrase):
Enter same passphrase again:
... ...
[root@ecs-proxy ~]# chmod 0400 /root/.ssh/id_rsa							# 私钥设权,仅root读取
#[# 分发密钥]
[root@ecs-proxy ~]# ssh-copy-id -i /root/.ssh/id_rsa.pub 192.168.1.125
[root@ecs-proxy ~]# ansible all -i "192.168.1.125," -m ping
192.168.1.125 | SUCCESS => {
    "ansible_facts": {
        "discovered_interpreter_python": "/usr/libexec/platform-python"
    },
    "changed": false,
    "ping": "pong"
}

#[优化系统配置]
#[ #服务禁用与清理]
[root@ecs-proxy ~]# systemctl disable --now atd kdump nis-domainname uniagentd ces-uniagent hostguard
#[# 软件包移除]
[root@ecs-proxy ~]# dnf remove -y postfix at audit kexec-tools firewalld-* *-firmware unbound-libs
#[# 软件包安装]
[root@ecs-proxy ~]# dnf install -y rsync tree bash-completion tar gzip bzip2 xz zip unzip iptables ipset
#[# SSH 配置优化,强制 SSH 服务监听所有网络接口(IPv4 和 IPv6)]
[root@ecs-proxy ~]# echo 'ListenAddress 0.0.0.0' >>/etc/ssh/sshd_config
#[# 时间同步配置]
[root@ecs-proxy ~]# sed -ri 's,^(OPTIONS).*,\1="-4u chrony",' /etc/sysconfig/chronyd
#[# 防止云平台的元数据服务在每次重启时自动修改 /etc/hosts 文件]
[root@ecs-proxy ~]# sed 's,^manage_etc_hosts:.*,# &,' -i /etc/cloud/cloud.cfg
#[测试]
[root@ecs-proxy ~]# vim /etc/hosts
::1             localhost localhost.localdomain localhost6 localhost6.localdomain6
127.0.0.1       localhost localhost.localdomain localhost4 localhost4.localdomain4
[root@ecs-proxy ~]# reboot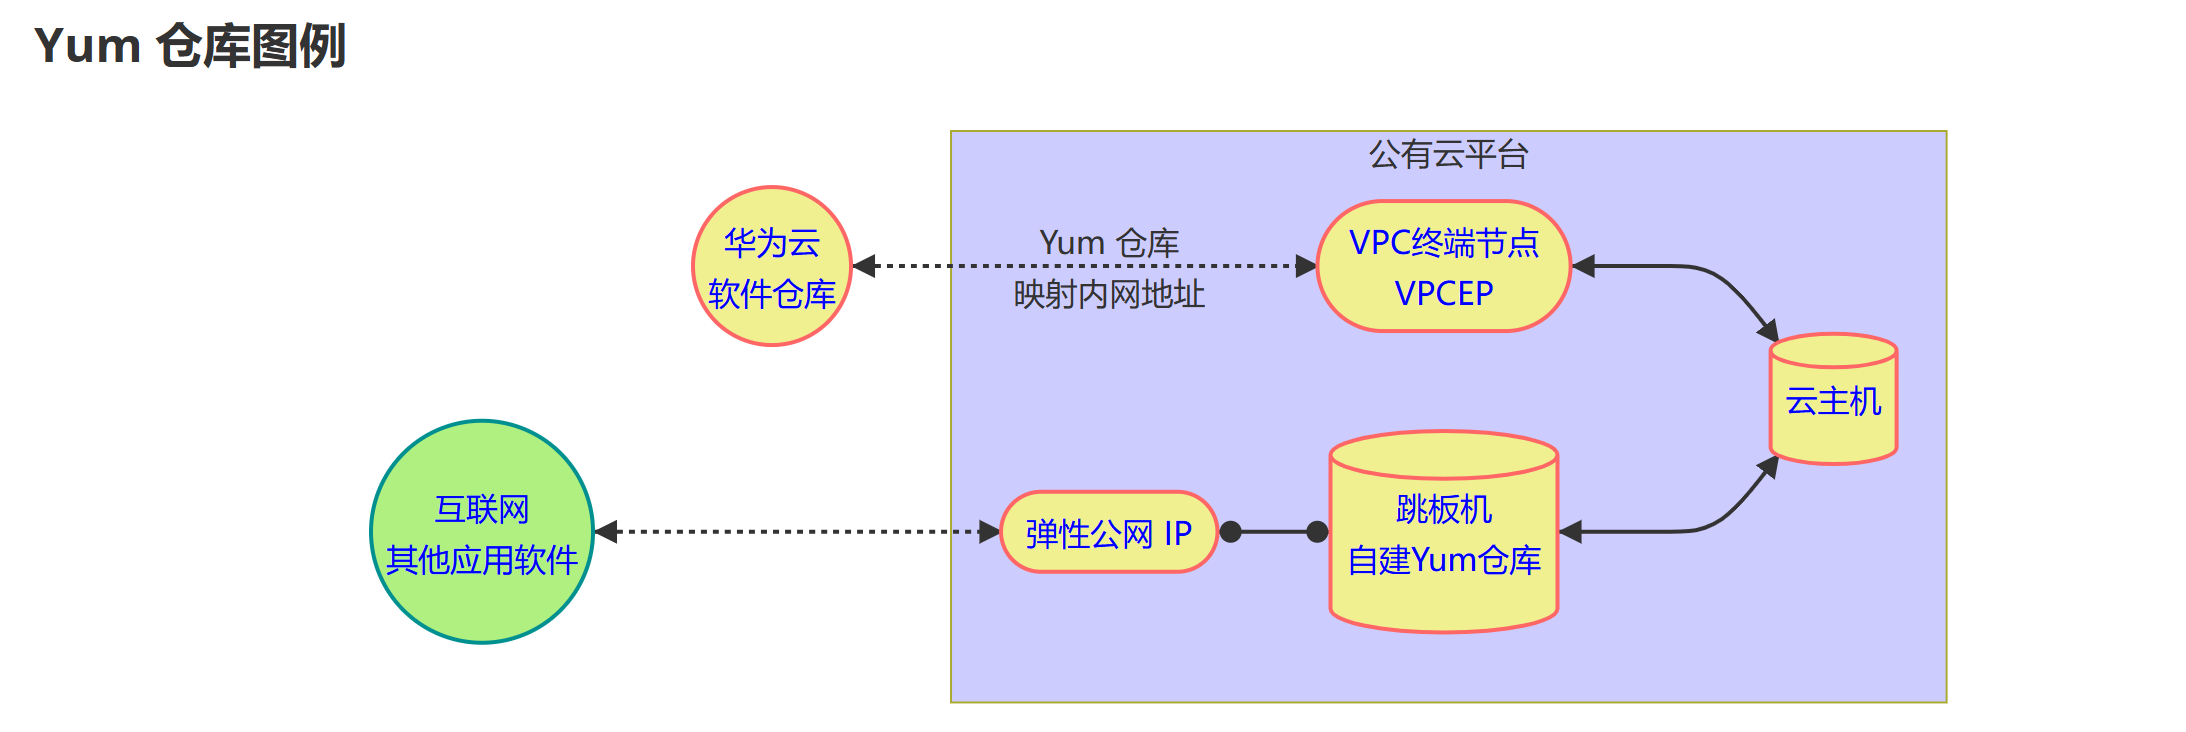
- Yum 仓库
内网云主机如何安装软件?
- 使用华为云提供的公共Yum仓库(配置终端节点服务)
- 自己搭建私有Yum仓库
rust
#[ 安装软件包 ]
[root@ecs-proxy ~]# dnf install -y nginx createrepo
[root@ecs-proxy ~]# systemctl enable --now nginx

#[ 创建私有仓库 ]
[root@ecs-proxy ~]# mkdir -p /var/localrepo
[root@ecs-proxy ~]# createrepo --update /var/localrepo
#[使用链接,并通过Web服务器(Nginx)对外发布]
[root@ecs-proxy ~]# ln -s /var/localrepo  /usr/share/nginx/html/
为什么做:
- 为了通过 HTTP 提供服务:YUM 仓库通常通过 HTTP 协议分发。Nginx 是一个 Web
服务器,它只能直接对外提供其根目录(html)下的文件。- 解耦与灵活性: RPM 包实际存放在 /var/localrepo(通常/var 分区空间较大),但想通过 Web 访问它。通过软链接,不需要把 RPM 包真的复制到 Web 目录下,既节省空间,又方便管理(增删 RPM 包只需在 /var/localrepo 操作,Web 访问自动同步)
- 镜像模板配置
测试:
- 使用华为云提供的公共Yum仓库(终端节点服务)
- 系统优化配置
关机后,在华为云上制作为 镜像模板
rust
#[使用反向代理访问互联网 Yum仓库]
[root@ecs-host ~]# rm -f /etc/yum.repos.d/{epel,Rocky-[!ABE]}*			# 匹配删除不需要的华为云yum配置文件
[root@ecs-host ~]# sed -ri 's,https://repo.huaweicloud.com,http://192.168.0.252,' /etc/yum.repos.d/*.repo
#[使用 自定义的yum仓库]
[root@ecs-host ~]# vim /etc/yum.repos.d/local.repo
[localrepo]
name=Rocky Linux $releasever - Localrepo
baseurl=http://192.168.1.252/localrepo
enabled=1
gpgcheck=0

[root@ecs-host ~]# dnf makecache
Rocky Linux 8 - AppStream                        187 kB/s | 4.8 kB     00:00
Rocky Linux 8 - BaseOS                           172 kB/s | 4.3 kB     00:00
Rocky Linux 8 - Extras                           105 kB/s | 3.5 kB     00:00
Rocky Linux 8 - Localrepo                        2.9 MB/s | 3.0 kB     00:00
Metadata cache created.

# [优化系统配置]
[root@ecs-host ~]# systemctl disable --now atd kdump nis-domainname uniagentd ces-uniagent hostguard
[root@ecs-host ~]# dnf remove -y postfix at audit kexec-tools firewalld-* *-firmware unbound-libs
[root@ecs-host ~]# dnf install -y rsync tree bash-completion tar gzip bzip2 xz zip unzip iptables ipset
[root@ecs-host ~]# echo 'ListenAddress 0.0.0.0' >>/etc/ssh/sshd_config
[root@ecs-host ~]# sed -ri 's,^(OPTIONS).*,\1="-4u chrony",' /etc/sysconfig/chronyd
[root@ecs-host ~]# sed 's,^manage_etc_hosts:.*,# &,' -i /etc/cloud/cloud.cfg
[root@ecs-host ~]# vim /etc/hosts
::1             localhost localhost.localdomain localhost6 localhost6.localdomain6
127.0.0.1       localhost localhost.localdomain localhost4 localhost4.localdomain4
#[清理缓存 并关机]
[root@ecs-host ~]# dnf clean all
[root@ecs-host ~]# poweroff- 上传软件包
- [root@localhost ~]# rsync -avXSH /linux-soft/s4 跳板机公网IP:/root/
云服务管理
云存储服务
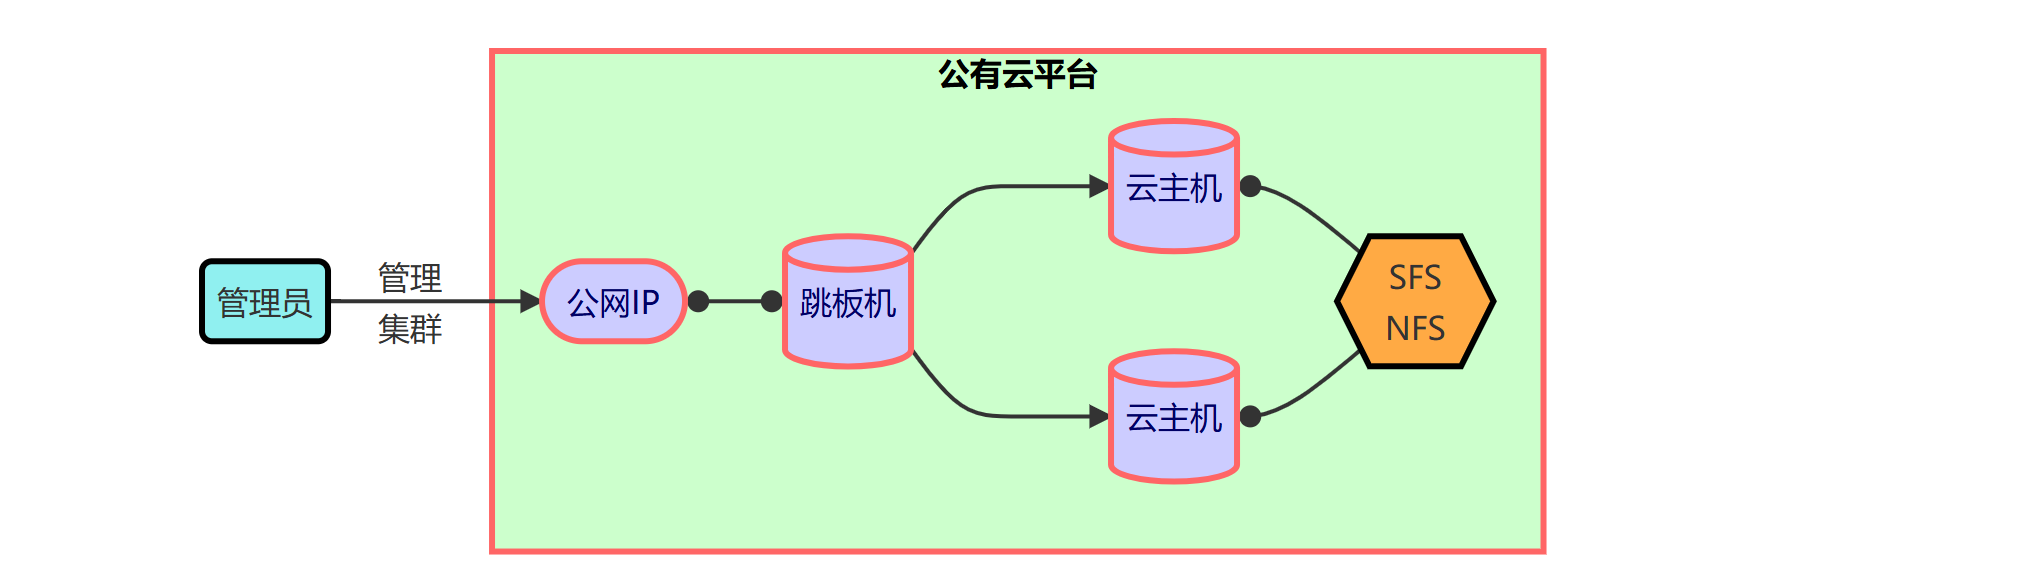
部署网站页面
测试
挂载华为云 SFS(弹性文件服务)至跳板机,让它像本地硬盘一样被访问
部署网站页面文件共享服务
rust
#[安装 nfs 协议客户端]
[root@ecs-proxy ~]# dnf install -y nfs-utils 						# 安装 NFS工具软件包
[root@ecs-proxy ~]# mount -t nfs -o nolock <SFS服务地址>  /mnt/    	# (挂载硬盘)将云端的共享存储(SFS)挂载到当前这台云服务器(ECS)的 /mnt 目录下,让它像本地硬盘一样被访问
[root@ecs-proxy ~]# df -h
Filesystem		Size		UsedAvail	 Use% 	Mountedon
...
192.168.0.135:/	500G		500G		  0%	  /mnt
[root@ecs-proxy ~]# mkdir /mnt/html									# 创建文件夹,提供网页存放地

#[ 部署网站页面到文件共享服务]
[root@ecs-proxy ~]# tar -zxf s4/public/website.tar.gz -C /mnt/html/		# 将准备好的网页文件解压存放至文件共享服务
部署 web 服务
配置开机自动挂载
将SFS文件共享服务挂载到 httpd的文档根目录
(/var/www/html),
_netdev 参数:声明网络设备,系统在具备网络参数后,再进行挂载本设备
rust
#[ 安装 Web 服务 ,web1-2都需要做]
[root@web ~]# dnf install -y httpd php nfs-utils	# web服务安装对应工具包
[root@web ~]# systemctl enable --now httpd			# 开启自启

#[ 配置开机自动挂载]
[root@web ~]# vim /etc/fstab
<SFS服务地址>:/html    /var/www/html      nfs    defaults,_netdev    1 1
[root@web ~]# systemctl daemon-reload				# 通知 systemd 重新加载其配置
[root@web ~]# mount -a								# 命令的作用是挂载 /etc/fstab 文件中定义的所有文件系统。

#[ 查看验证]
[root@web ~]# df -h
Filesystem     Size  Used   Avail   Use%   Mounted on
<SFS服务地址>   1.2T     0    1.2T     0%   /var/www/html
负载均衡服务
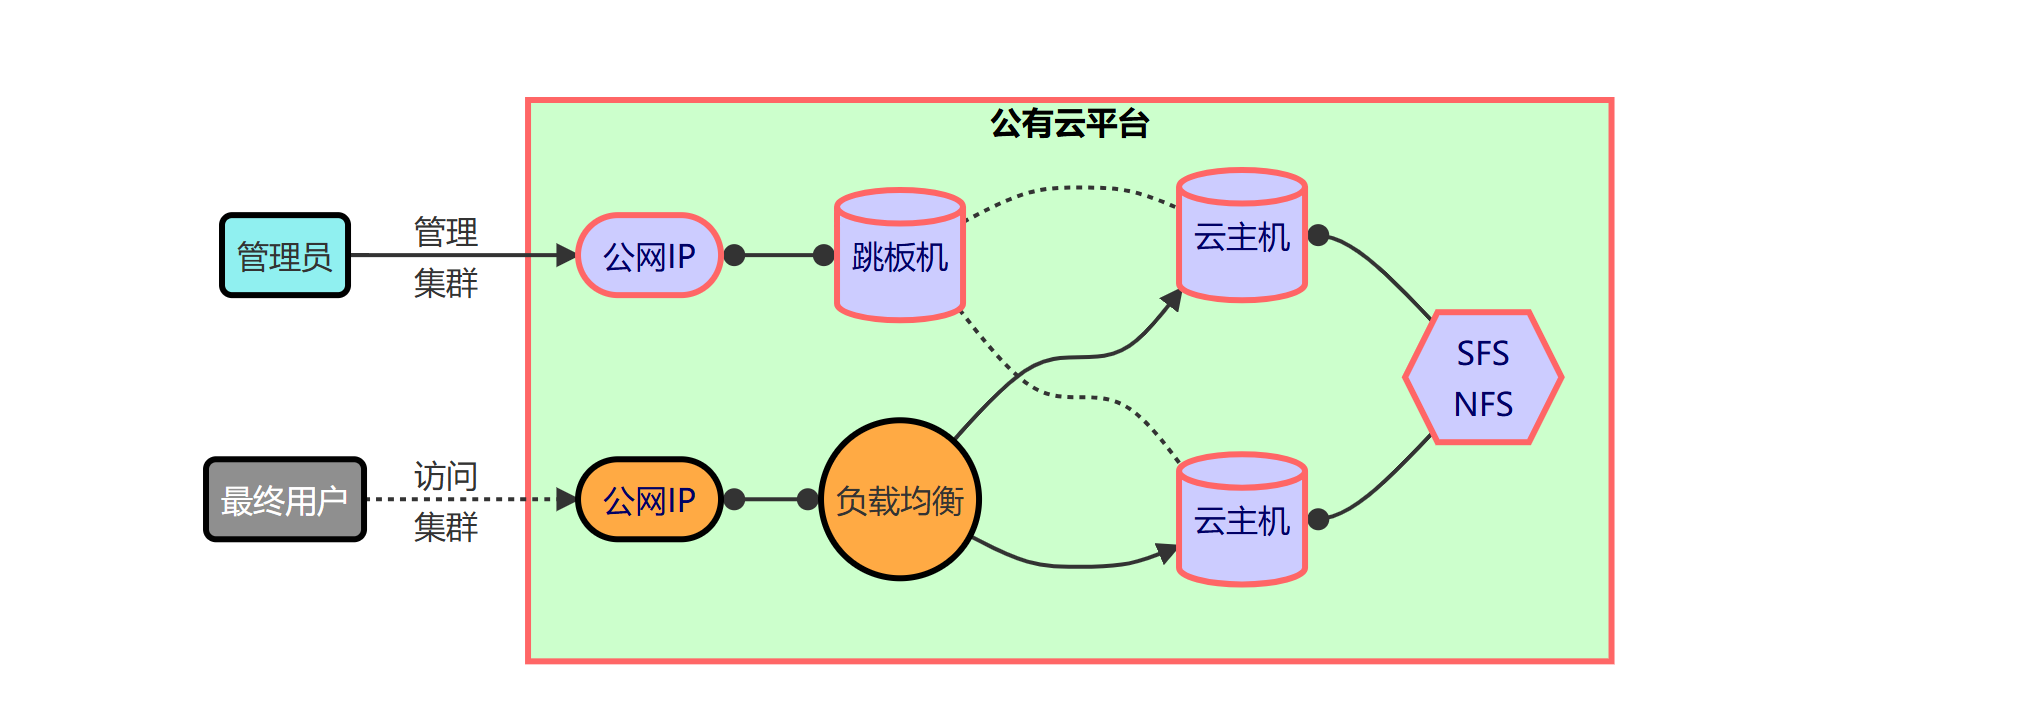
管理流程:
- 管理员通过公网IP连接跳板机,实现对云主机集群的运维管理
- 管理方式
- 配置监听器
- 后端服务器组
业务访问流程:
- 最终用户通过公网IP访问负载均衡,流量被分发至后端多台云主机,云主机通过SFS NFS共享存储实现数据一致性
整体架构实现了管理与业务流量的分离,保障了系统的高可用性与运维安全性
弹性负载均衡ELB 必须绑定弹性公网IP之后才能为Intelnet用户提供服务。
rust
#[访问验证]
[root@ecs-proxy s4]# curl -m3 http://192.168.0.250/info.php
<pre>
Array
(
    [REMOTE_ADDR] => 192.168.1.252
    [REQUEST_METHOD] => GET
    [HTTP_USER_AGENT] => curl/7.61.1
    [REQUEST_URI] => /info.php
)
php_host:   web
1229
ELK 项目架构图
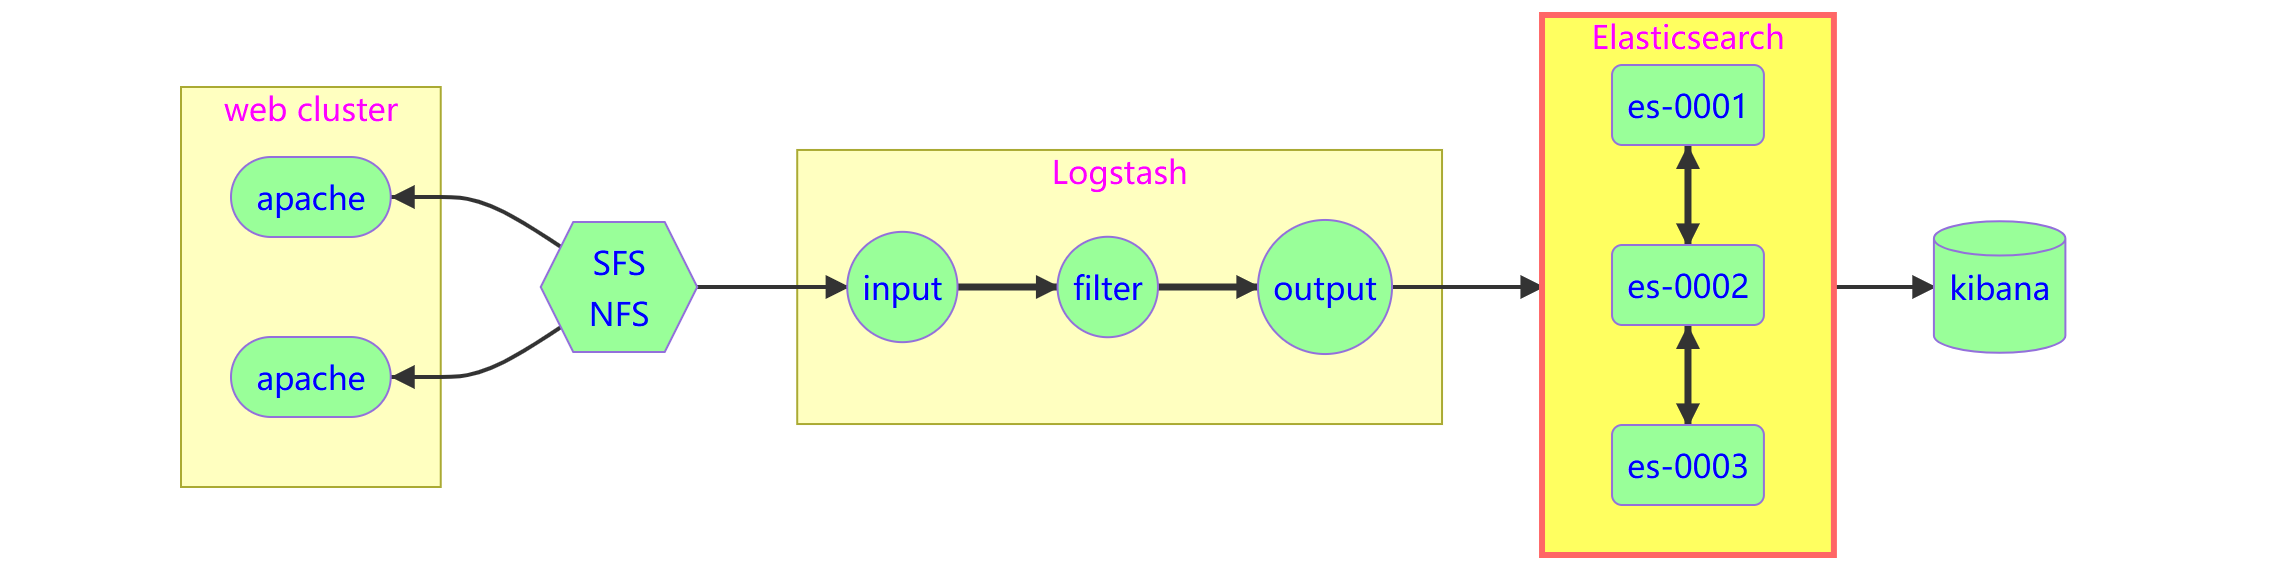
流程:
Web 服务器生成日志 → 写入共享存储 (SFS NFS) → Logstash 读取并清洗日志 → 存入Elasticsearch 集群 → Kibana 展示分析结果
- 数据源层(左侧)
Web Cluster(Apache):图中显示了两个 Apache 服务器实例,代表一个 Web 应用集群。这是日志的产生地(例如访问日志、错误日志)。- SFS NFS (共享存储):Apache 服务器将日志写入到一个共享文件系统(SFS NFS)中。这是一个关键设计,它确保了即使有多台 Web 服务器,Logstash也能从一个统一的位置读取所有日志,避免了在每台服务器上单独部署 Logstash Agent 的麻烦。
- 数据处理层(中间)
Logstash:这是==数据处理管道,负责日志的收集、处理和转发。它分为三个阶段:
- Input (输入):从 SFS NFS 中读取原始日志数据。
- Filter (过滤):对读取到的日志进行清洗、解析和结构化(例如,将非结构化的文本日志解析为 JSON格式的字段,如时间、IP、请求路径等)。
- Output (输出):将处理好的结构化数据发送到下游的 Elasticsearch 集群。
- 数据存储与检索层(右侧)
Elasticsearch(ES Cluster):这是一个分布式搜索和分析引擎集群,包含 es-0001、es-0002、es-0003 三个节点。
- 作用:接收 Logstash 发送过来的数据,并进行索引存储。
- 高可用:通过集群化部署,确保数据的冗余备份和高并发查询能力,防止单点故障。
- 数据可视化层(最右侧)
Kibana:这是 Elasticsearch 的可视化界面。
- 作用:连接到 Elasticsearch 集群,读取其中的数据。
- 功能:提供仪表盘、图表、搜索功能,让用户可以直观地查看日志分析结果、监控系统状态或排查问题
Elasticsearch 安装
概述
- elasticsearch是一个
基于Lucene的搜索服务器。它提供了一个分布式多用户能力的全文搜索引擎,基于 RESTfulAPI的Web接口
| 参数 | 解释 |
|---|---|
| Node | 装有一个ES服务器的节点 |
| Cluster | 有多个Node组成的集群 |
| Shards | 索引的分片,每一个分片就是一个Shard |
| Replicas | 索引的拷贝 |
| Index | 拥有相似特征的文档的集合 |
| Type | 一个索引中可以定义一种或多种类型 |
| Document | 一个可被搜索的基础信息单元 |
| Filed | 是ES的最小单位,相当于数据的某一列 |
| 关系型数据库 | Elasticsearch |
| Database | Index |
| Table | Type |
| ROW | Document |
| Column | Filed |
| Insert | PUT http: / |
| Delete | DELETE http: / |
| Update | POST http: / |
| Select | GET http: / |
rust
#[ 添加 ELK 软件包到自定义 Yum 仓库]
[root@ecs-proxy s4]# rsync -av elk/   /var/localrepo/elk/
[root@ecs-proxy s4]# createrepo --update /var/localrepo
集群安装
discovery.seed_hosts:"es-0001", "es-0002", "es-0003"
- 含义:定义发现集群中其他节点的"种子"列表。
- 作用:当一个节点(例如刚启动的 es-0001)想要加入集群时,它会去尝试连接这里列出的主机名(es-0001, es-0002, es-0003)。只要能连通其中任何一个,它就能获取到整个集群的完整节点列表。
- 重要性:这是节点之间建立联系的"电话簿"
cluster.initial_master_nodes: "es-0001", "es-0002", "es-0003"
- 含义:定义初始主节点的选举列表。
- 作用:仅在集群首次启动时生效。
- 场景:当你第一次启动这三个节点时,它们需要选出谁来当"Master"(主节点,负责管理集群状态)。这个参数告诉它们:"这三台机器都有资格竞选 Master"。
- 注意:对于一个高可用集群,通常建议奇数个节点(如 3 个)参与竞选,以避免"脑裂"问题。最低需配置3个
| 端口 | 用途 | 协议 | 备注 |
|---|---|---|---|
| 9200 | HTTP RESTful API | TCP | 用户/客户端访问入口 |
| 9300 | 节点间通信(集群内部) | TCP | 用于节点发现、数据同步,不要暴露给外部 |
- 部署 es-0001
rust
#[ 设置主机名和 IP 地址]
[root@es-0001 ~]# vim /etc/hosts
192.168.1.21    es-0001
192.168.1.22    es-0002
192.168.1.23    es-0003
#[安装 elasticsearch 软件包]
[root@es-0001 ~]# dnf install -y elasticsearch
#[修改配置文件]
[root@es-0001 ~]# vim /etc/elasticsearch/elasticsearch.yml
17:  cluster.name: my-es			# 集群名字
23:  node.name: es-0001				# 本机主机名
56:  network.host: 0.0.0.0			# 绑定网络接口,设置为 0.0.0.0 表示 Elasticsearch 服务将监听服务器上的所有网络接口(包括内网 IP 和外网 IP)
#[ 集群引导节点]
70:  discovery.seed_hosts: ["es-0001", "es-0002", "es-0003"]
#[ 集团创始人成员]
74:  cluster.initial_master_nodes: ["es-0001", "es-0002", "es-0003"]
[root@es-0001 ~]# systemctl enable --now elasticsearch
#[ 服务启动成功]
[root@es-0001 ~]# curl http://127.0.0.1:9200
{
  "name" : "es-0001",				// 节点名称(对应配置中的 node.name)
  "cluster_name" : "my-es",			// 集群名称(对应配置中的 cluster.name)
  "cluster_uuid" : "_na_",			// 集群唯一标识符
  "version" : {
    "number" : "7.17.8",			// ES 版本号
    "build_flavor" : "default",
    "build_type" : "rpm",
    "build_hash" : "120eabe1c8a0cb2ae87cffc109a5b65d213e9df1",
    "build_date" : "2022-12-02T17:33:09.727072865Z",
    "build_snapshot" : false,
    "lucene_version" : "8.11.1",
    "minimum_wire_compatibility_version" : "6.8.0",
    "minimum_index_compatibility_version" : "6.0.0-beta1"
  },
  "tagline" : "You Know, for Search"		 // 官方标语
}- 部署 es-0002
rust
#[ 验证集群状态失败]
[root@es-0002 ~]# curl http://192.168.1.21:9200/_cat/nodes?pretty
{
  "error" : {
    "root_cause" : [
      {
        "type" : "master_not_discovered_exception",
        "reason" : null
      }
    ],
    "type" : "master_not_discovered_exception",
    "reason" : null
  },
  "status" : 503
}
#[ 部署服务]
[root@es-0002 ~]# vim /etc/hosts
192.168.1.21    es-0001
192.168.1.22    es-0002
192.168.1.23    es-0003
[root@es-0002 ~]# dnf install -y elasticsearch
[root@es-0002 ~]# vim /etc/elasticsearch/elasticsearch.yml
17:  cluster.name: my-es
23:  node.name: es-0002
56:  network.host: 0.0.0.0
70:  discovery.seed_hosts: ["es-0001", "es-0002", "es-0003"]
74:  cluster.initial_master_nodes: ["es-0001", "es-0002", "es-0003"]
[root@es-0002 ~]# systemctl enable --now elasticsearch
#[ 验证集群状态]
[root@es-0002 ~]# curl http://127.0.0.1:9200/_cat/nodes
192.168.1.21 16 89  2 0.15 0.06 0.04 cdfhilmrstw * es-0001
192.168.1.22 6 88 61 1.00 0.23 0.08 cdfhilmrstw - es-0002- 部署 es-0003
rust
[root@es-0003 ~]# vim /etc/hosts
192.168.1.21    es-0001
192.168.1.22    es-0002
192.168.1.23    es-0003
[root@es-0003 ~]# dnf install -y elasticsearch
[root@es-0003 ~]# vim /etc/elasticsearch/elasticsearch.yml
17:  cluster.name: my-es
23:  node.name: es-0003
56:  network.host: 0.0.0.0
70:  discovery.seed_hosts: ["es-0001", "es-0002", "es-0003"]
74:  cluster.initial_master_nodes: ["es-0001", "es-0002", "es-0003"]
[root@es-0003 ~]# systemctl enable --now elasticsearch
[root@es-0003 ~]# curl http://127.0.0.1:9200/_cat/nodes
192.168.1.21 16 89  2 0.15 0.06 0.04 cdfhilmrstw * es-0001
192.168.1.22  6 88 61 1.00 0.23 0.08 cdfhilmrstw - es-0002
192.168.1.23  6 86  1 0.64 0.21 0.07 cdfhilmrstw - es-0003
Head插件

- 部署插件页面
通过 ELB 的 8080 端口,发布服务到互联网
rust
#[拷贝插件 public/head.tar.gz 到 es-0001 主机]
[root@ecs-proxy s4]# rsync -av public/head.tar.gz 192.168.1.21:./
#-------------------------------------------------
#[ 在 es-0001 上安装 web 服务,并部署插件]
[root@es-0001 ~]# dnf install -y nginx
[root@es-0001 ~]# systemctl enable --now nginx
[root@es-0001 ~]# tar zxf head.tar.gz -C /usr/share/nginx/html/- 认证和代理
将所有带有 /es/ 前缀的请求,通过 Nginx 反向代理到本地的 ES 服务端口(9200),并在代理过程中强制进行密码验证
参数解析 :
proxy_pass http://127.0.0.1:9200/$1;
- 访问 http://你的域名/es/ 或 http://你的域名/es/index/_search 都会被这个规则捕获。
auth_basic "Elasticsearch admin";
- 开启 HTTP 基本身份验证
auth_basic_user_file /etc/nginx/auth-user;
- 指定存放用户名和密码的文件路径,这个文件通常使用 htpasswd 工具生成,里面存储了经过加密的用户名和密码对。只有文件中存在的用户才能通过验证访问 ES
rust
#[方向代理	]
[root@es-0001 ~]# vim /etc/nginx/default.d/esproxy.conf
location ~* ^/es/(.*)$ {
    proxy_pass http://127.0.0.1:9200/$1;
    auth_basic "Elasticsearch admin";
    auth_basic_user_file /etc/nginx/auth-user;
}
#[安装 Apache HTTP 服务器的工具集]
[root@es-0001 ~]# dnf install -y httpd-tools
#[生成一个名为 auth-user 的密码文件,并添加一个名为 admin 的用户]
[root@es-0001 ~]# htpasswd -cm /etc/nginx/auth-user admin
New password:
Re-type new password:
Adding password for user admin
[root@es-0001 ~]# systemctl reload nginx


- 举例:浏览器访问的是 /es/my_index/_search,Nginx 会把请求转发给 http://127.0.0.1:9200/my_index/_search- 通过 head 插件管理 elasticsearch 集群
API原语管理
集群状态查询
rust
# 查询支持的关键字
[root@es-0001 ~]# curl -XGET http://127.0.0.1:9200/_cat/
# 查具体的信息
[root@es-0001 ~]# curl -XGET http://127.0.0.1:9200/_cat/master
# 显示详细信息 ?v
[root@es-0001 ~]# curl -XGET http://127.0.0.1:9200/_cat/master?v
# 显示帮助信息 ?help
[root@es-0001 ~]# curl -XGET http://127.0.0.1:9200/_cat/master?help
# 显示易读格式 ?pretty
[root@es-0001 ~]# curl -XGET http://127.0.0.1:9200/_cat/master?pretty
创建索引
- 指定索引的名称,指定分片数量,指定副本数量
rust
#[ 创建 tedu 索引]
[root@es-0001 ~]# curl 'http://127.0.0.1:9200/tedu?pretty' \
    -X PUT -H 'Content-Type: application/json' -d '{
      "settings": {
        "number_of_shards": 3,
        "number_of_replicas": 1
      }
    }'
增加数据
rust
[root@es-0001 ~]# curl -XPUT -H "Content-Type: application/json" \
    http://127.0.0.1:9200/tedu/teacher/1?pretty -d '{
        "职业": "诗人","名字": "李白","称号": "诗仙","年代": "唐"
    }'
查询数据
rust
[root@es-0001 ~]# curl -XGET http://127.0.0.1:9200/tedu/teacher/_search?pretty
[root@es-0001 ~]# curl -XGET http://127.0.0.1:9200/tedu/teacher/1?pretty
修改数据
rust
[root@es-0001 ~]# curl -XPOST -H "Content-Type: application/json" \
    http://127.0.0.1:9200/tedu/teacher/1/_update -d '{
      "doc": {"年代":"公元701"}
    }'
删除数据
rust
#[ 删除一条]
[root@es-0001 ~]# curl -XDELETE http://127.0.0.1:9200/tedu/teacher/1
#[ 删除索引]
[root@es-0001 ~]# curl -XDELETE http://127.0.0.1:9200/tedu