1. 为什么要死磕 web2py 的 SQLFORM.grid?
在开发订单类管理系统时,"主从关联表"(Header - Lines)的展示是最核心的需求,Header 表存订单头信息,Lines表存行项目明细信息,Header - Lines 通过Header 的主键关联。通常我们有两个选择:
-
方案 A:完全手写。 灵活性高,但这意味着你要手写分页逻辑、手写复杂的搜索解析、手写导出功能。这个在2026年了是不可能自己这样搞的。
-
方案 B:使用开源组件(如 DataTables 等)。尝试了一些组件,但是始终觉得差点意思,因为 Web2py的 Grid 天然优势: 它自带了一套极其丝滑的查询解析引擎 。用户可以直接在搜索框输入
name contains "xx" and brand == "xx"这种复杂逻辑。这种"零代码"实现的强大搜索功能,是任何开发者都不想放弃的,也是高阶用户喜欢的。
痛点所在:
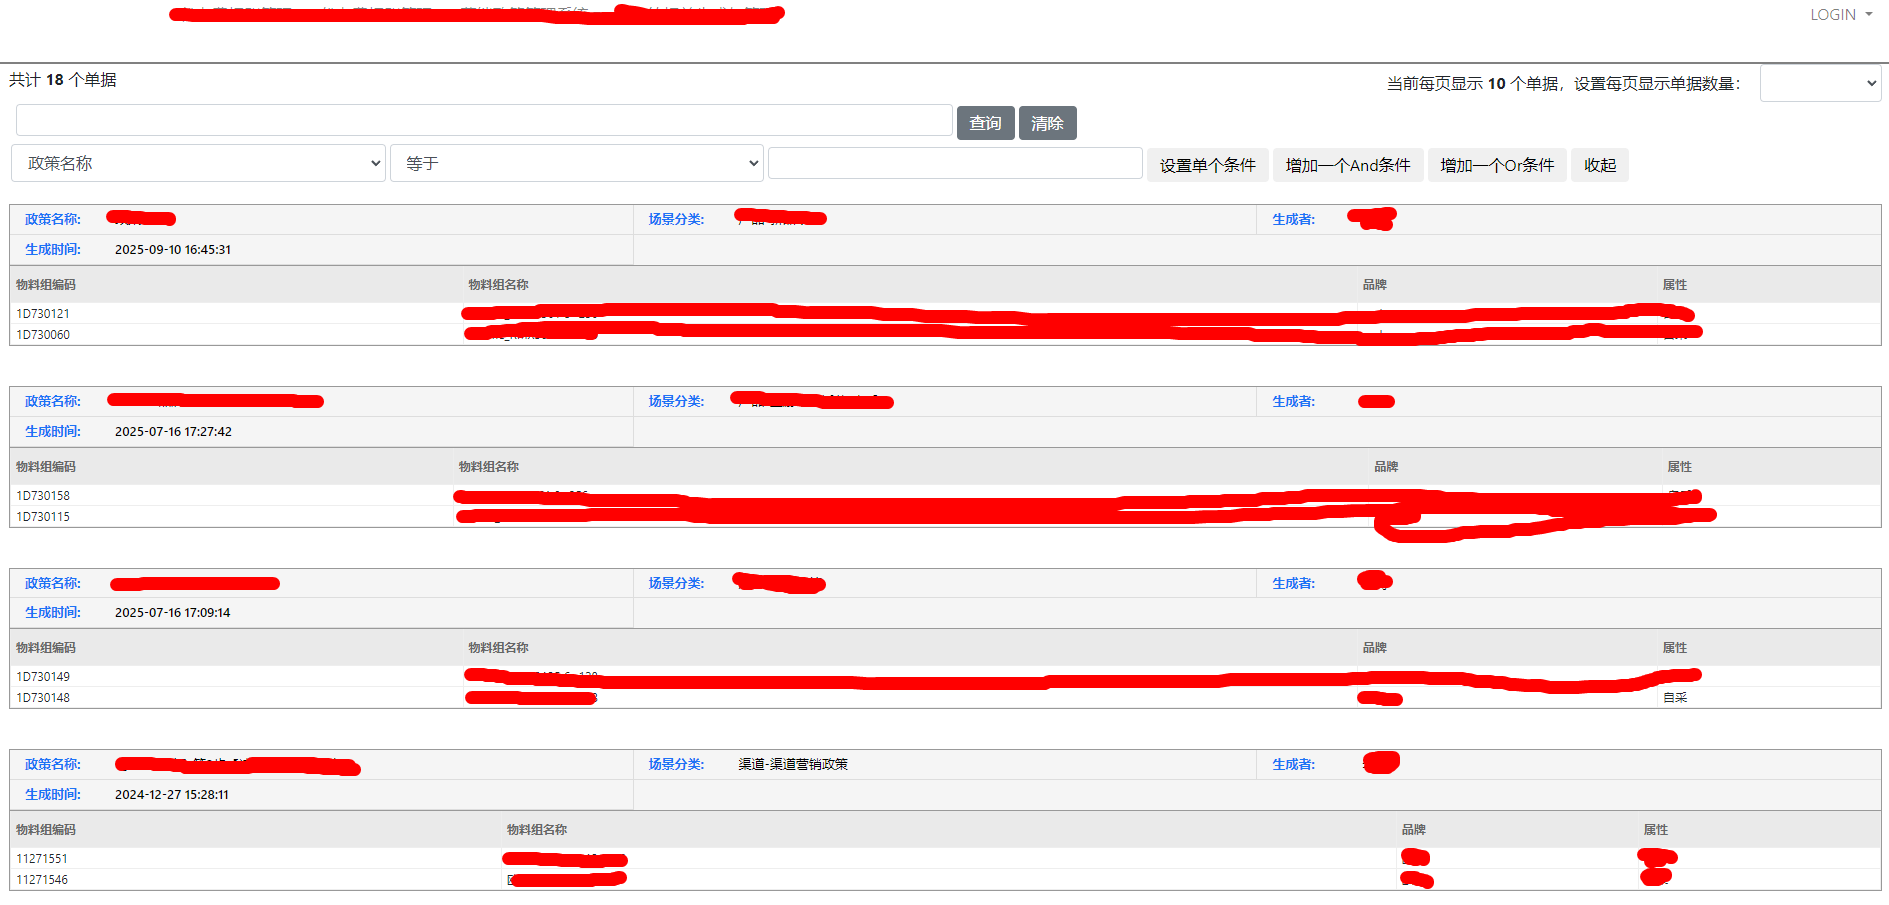
1、如果直接把 Header - Lines两个表连接后在Grid组件中展示,整个表是拉平的,似乎直接把底层数据给了用户看,订单类系统还是应该"卡片式"的订单UI展现才对;
2、Grid 的原生逻辑是**"行过滤"**。如果你搜一个订单行的商品编码,它就只展示那一行明细。但在订单管理中,我们搜索的是"特征",看到的必须是"单据(整体)"。为了保住 Grid 丝滑的搜索,同时实现 单据展示,我们开启了这次改造之旅。
2. 深度改造:思路、原理与三步走策略
(1) 视觉层:从"拉平表格"到"结构化卡片"
-
原理:利用 jQuery 在 DOM 加载后"拦截"原生Grid 的Table 数据。
-
实现:
-
通过
colgroup和thead解析字段元数据,识别哪些是主表字段(订单头),哪些是明细字段。 -
将原本拉平的行数据(Flat Rows)按主表 ID 进行归类。
-
隐藏原生 Table ,动态渲染出带有灰色底纹订单头和纯白明细行的卡片式布局。
-
(2) 逻辑层:重构分页(按"单"分页而非按"行")
这是最关键的后端逻辑转变。
-
痛点 :Grid 默认
N条/页指的是 N行数据。作为一个单据系统,我们应该是一页N个单据。 -
思路 :主从分离,ID 驱动。
-
步骤:
-
手动解析
request.vars.keywords,通过SQLFORM.build_query还原搜索意图。 -
执行一次
distinct查询,获取符合条件的订单 ID 列表(而不是所有行)。 -
根据当前页码截取 ID 列表(如
target_ids = all_ids[0:x])。 -
将这 x个 ID 喂给 Grid 的
query参数。
-
(3) 底层重构:实现"搜局部,前端展现和导出 仍然是整个订单全部"
-
最后的细节陷阱 :即便我们锁定了订单 ID,Grid 在实例化时仍会自动把
keywords拼接到 SQL 里。结果就是:虽然你定位到了那个订单,但订单里不符合关键词的行依然会被 Grid 过滤掉。 -
源码级解决方案 : 直接修改 Web2py 核心库
gluon/sqlhtml.py,为grid方法新增一个order_mode参数:-
在
order_mode=True模式下,强制 Grid 在处理subquery和export(导出)时忽略keywords的二次过滤。 -
原理:利用我们前置计算好的 ID 集合作为硬性约束,让 Grid 只负责"捞数据"和"画搜索框",而不参与"结果过滤"。
-
3. 结语:
我们既保留了 Web2py Grid 那套"打遍天下无敌手"的动态搜索 UI,又获得了单据系统才有的单据聚合展示能力。对于单据管理类需求,这套方案堪称完美。
图片和源码如下:
def vouchers_mod():

    paginate = session.Paginate_index or 10
    page = int(request.vars.page or 1)

    # 定义搜索字段(必须包含主表和关联表的所有可能被搜索的字段)
    fields = [
        db.order_header.id,
        db.order_header.name,
        db.order_header.scene,
        db.order_header.owneruser,
        db.order_header.cttime,
        db.order_lines.sku,
        db.order_lines.sku_name,
        db.order_lines.brand,
        db.order_lines.price,
        db.order_lines.nums,
    ]

    # 利用 Grid 内部机制解析用户输入的复杂关键词
    # 这样用户在搜索框写什么,base_query 就能还原出什么
    keywords = request.vars.keywords or ""

    if keywords:
        search_query = SQLFORM.build_query(fields, keywords)
    else:
        search_query = db.order_header.id > 0

    # --- 3. 获取真正的订单 ID 列表 ---
    # 我们需要 JOIN 关联表,因为搜索条件可能涉及明细表的字段(如品牌)
    left = db.order_lines.on(db.order_header.id == db.order_lines.jcid)

    all_vouchers_ids = db(search_query).select(
        db.order_header.id,
        left=left,
        orderby=~db.order_header.id,
    ).as_dict()

    # 扁平化处理
    all_vouchers_ids = list(all_vouchers_ids.keys())
    total_vouchers = len(all_vouchers_ids)

    # --- 4. 截取当前页 ID ---
    start = (page - 1) * paginate
    end = start + paginate
    target_ids = all_vouchers_ids[start:end]

    # --- 5. 构建渲染用的 Grid ---
    render_query = db.order_header.id.belongs(target_ids) if target_ids else (db.order_header.id == 0)

    # 1. 定义连接
    left = db.order_lines.on(db.order_header.id == db.order_lines.jcid)

    grid = SQLFORM.grid(
        render_query,
        # 本次改造用到新增的参数,order_mode
        order_mode=True,
        left=left,
        fields=fields,
        orderby=~db.order_header.id,
        maxtextlength=1000,
        searchable=True,
        paginate=2000,
    )

    total_pages = (total_vouchers + paginate - 1) // paginate if total_vouchers > 0 else 1

    return dict(grid=grid, page=page, paginate=paginate,
total_vouchers=total_vouchers, total_pages=total_pages)<title>单据管理</title>
{{extend 'layout.html'}}
<style>
/* 1. 基础隔离:隐藏原生表格 */
.web2py_htmltable {
display: none !important;
}
.web2py_counter {
display: none !important;
}
/* 2. 卡片容器:外边框强化 */
.order-card {
border: 1px solid #999; /* 稍微加深外框 */
margin-bottom: 40px;
background: #fff;
}
/* 3. 订单头:灰色底纹 + 紧凑布局 */
.order-header {
display: flex;
flex-wrap: wrap;
background-color: #f5f5f5; /* 订单头统一浅灰色底纹 */
border-bottom: 1px solid #999; /* 头与行的分界线加深 */
}
.header-item {
width: 33.33%; /* 控制订单头每行几个字段 */
box-sizing: border-box;
border-right: 1px solid #ddd;
border-bottom: 1px solid #ddd;
padding: 6px 15px; /* 适中的紧凑度 */
font-size: 13px;
display: flex;
align-items: flex-start;
line-height: 1.3;
}
/* 每一行最后一个格子去掉右边线 */
.header-item:nth-child(3n) { border-right: none; }
.header-label {
color: #1d74f5; /* 保留你喜欢的蓝色标签 */
font-weight: bold;
width: 90px;
flex-shrink: 0;
}
.header-value {
color: #000;
word-break: break-all;
font-weight: 500;
}
/* 4. 订单明细表格:纯净白底 + 细线 */
.order-lines-table {
width: 100%;
border-collapse: collapse;
font-size: 12px;
background-color: #fff; /* 确保明细区域纯白 */
}
.order-lines-table th, .order-lines-table td {
border: 1px solid #eee; /* 使用极细的浅色线 */
padding: 10px 15px;
text-align: left;
white-space: normal !important;
word-break: break-all !important;
}
.order-lines-table th {
background-color: transparent; /* 去掉明细表头底纹 */
color: #666; /* 表头文字颜色中性化 */
font-weight: bold;
border-top: none;
}
.order-lines-table tr:hover {
background-color: #f9f9f9; /* 仅在鼠标悬停时提供极淡的反馈 */
}
/* 5. 分页与导出 */
.web2py_console { margin-bottom: 20px; }
.web2py_paginator, .web2py_export_menu {
padding: 15px;
background: #fdfdfd;
border: 1px dashed #ccc;
margin-top: 10px;
}
/* 自定义分页器样式 */
.custom-pagination-container {
margin: 20px 0;
display: flex;
justify-content: center; /* 居中显示 */
gap: 5px;
}
.page-link {
padding: 6px 12px;
border: 1px solid #ddd;
background: #fff;
color: #333;
text-decoration: none;
border-radius: 4px;
transition: all 0.2s;
}
.page-link:hover {
background-color: #f5f5f5;
border-color: #ccc;
text-decoration: none;
}
.page-link.active {
background-color: #1d74f5;
color: #fff;
border-color: #1d74f5;
cursor: default;
}
.page-link.disabled {
color: #999;
cursor: not-allowed;
background: #fafafa;
}
</style>
<div class="row clearfix" style="border-top:2px solid grey;">
<div class="col-md-12">
<div style="float: left; line-height: 30px;">
<span class="label label-info">共计 <strong>{{=total_vouchers}}</strong> 个单据</span>
</div>
</div>
</div>
<div class="row">
<div class="col-md-12">
{{=grid}}
<div id="card-view-container"></div>
<div class="custom-pagination-container">
{{def make_url(p):
vars = dict(page=p, paginate=paginate)
if request.vars.keywords: vars['keywords'] = request.vars.keywords
return URL(args=request.args, vars=vars)
}}
{{if page > 1:}}
<a class="page-link" href="{{=make_url(page-1)}}">« 上一页</a>
{{else:}}
<span class="page-link disabled">« 上一页</span>
{{pass}}
{{
start_p = max(1, page - 3)
end_p = min(total_pages, page + 3)
}}
{{if start_p > 1:}}
<a class="page-link" href="{{=make_url(1)}}">1</a>
{{if start_p > 2:}}<span class="page-link disabled">...</span>{{pass}}
{{pass}}
{{for p in range(start_p, end_p + 1):}}
<a class="page-link {{='active' if p == page else ''}}" href="{{=make_url(p)}}">{{=p}}</a>
{{pass}}
{{if end_p < total_pages:}}
{{if end_p < total_pages - 1:}}<span class="page-link disabled">...</span>{{pass}}
<a class="page-link" href="{{=make_url(total_pages)}}">{{=total_pages}}</a>
{{pass}}
{{if page < total_pages:}}
<a class="page-link" href="{{=make_url(page+1)}}">下一页 »</a>
{{else:}}
<span class="page-link disabled">下一页 »</span>
{{pass}}
</div>
</div>
</div>
<script>
jQuery(function() {
const $table = jQuery('.web2py_table table');
if (!$table.length) return;
// 1. 解析字段元数据
const fieldMeta = [];
let mainTableName = "";
$table.find('colgroup col').each(function(i) {
const fullId = jQuery(this).attr('id') || "";
const parts = fullId.split('-');
if (i === 0) mainTableName = parts[0];
fieldMeta.push({
fieldName: parts[1],
isHeader: (parts[0] === mainTableName),
label: $table.find('thead th').eq(i).text().trim()
});
});
// 2. 提取数据
const allRows = [];
$table.find('tbody tr').each(function() {
const $tds = jQuery(this).find('td');
const rowId = jQuery(this).attr('id');
const row = { _rowId: rowId };
fieldMeta.forEach((meta, i) => {
row[meta.fieldName] = $tds.eq(i).text().trim();
});
allRows.push(row);
});
const uniqueIds = [...new Set(allRows.map(r => r._rowId))].filter(id => id);
// 3. 构建 UI
const $container = jQuery('#card-view-container');
$container.empty();
uniqueIds.forEach(targetId => {
const rows = allRows.filter(r => r._rowId === targetId);
const first = rows[0];
const hFields = fieldMeta.filter(m => m.isHeader);
const lFields = fieldMeta.filter(m => !m.isHeader);
let headerHtml = hFields.map(m => `
<div class="header-item">
<span class="header-label">${m.label}:</span>
<span class="header-value">${first[m.fieldName] || '-'}</span>
</div>
`).join('');
let tableHeaderHtml = lFields.map(m => `<th>${m.label}</th>`).join('');
let tableBodyHtml = rows.map(row => `
<tr>
${lFields.map(m => `<td>${row[m.fieldName]}</td>`).join('')}
</tr>
`).join('');
const cardHtml = `
<div class="order-card">
<div class="order-header">${headerHtml}</div>
<table class="order-lines-table">
<thead><tr>${tableHeaderHtml}</tr></thead>
<tbody>${tableBodyHtml}</tbody>
</table>
</div>
`;
$container.append(cardHtml);
});
// 4. 组件重排:卡片放中间,分页和导出菜单放最后
const $w2pTable = jQuery('.web2py_table');
$container.prependTo($w2pTable);
});
</script>最后改造sqlhtml.py源码文件,总共改3处,很简单:
1、构造grid这里增加一个
@staticmethod
def grid(query,
         order_mode=False,
.........
2、搜索 if searchable: 这段,这里是控制grid的关键字子查询逻辑,找到
if keywords:
    try:
        # todo: 实现搜索行,展现整个订单模式
        if callable(searchable):
            if order_mode:
                subquery = None
            else:
                subquery = searchable(sfields, keywords)
        else:
            if order_mode:
                subquery = None
            else:
                subquery = SQLFORM.build_query(sfields, keywords)
    except RuntimeError:
        subquery = None
error = T('Invalid query')2、搜索 if export_type in exportManager and exportManager[export_type]:if keywords:
......
if callable(searchable):
dbset = dbset(searchable)
else:
# todo: 实现搜索行,展现整个订单模式
if order_mode:
dbset = dbset(searchable)
else:
dbset = dbset(SQLFORM.build_query(sfields, keywords))