

🔥个人主页:北极的代码(欢迎来访)
🎬作者简介:java后端学习者
✨命运的结局尽可永在,不屈的挑战却不可须臾或缺!
前言
本章思维导图
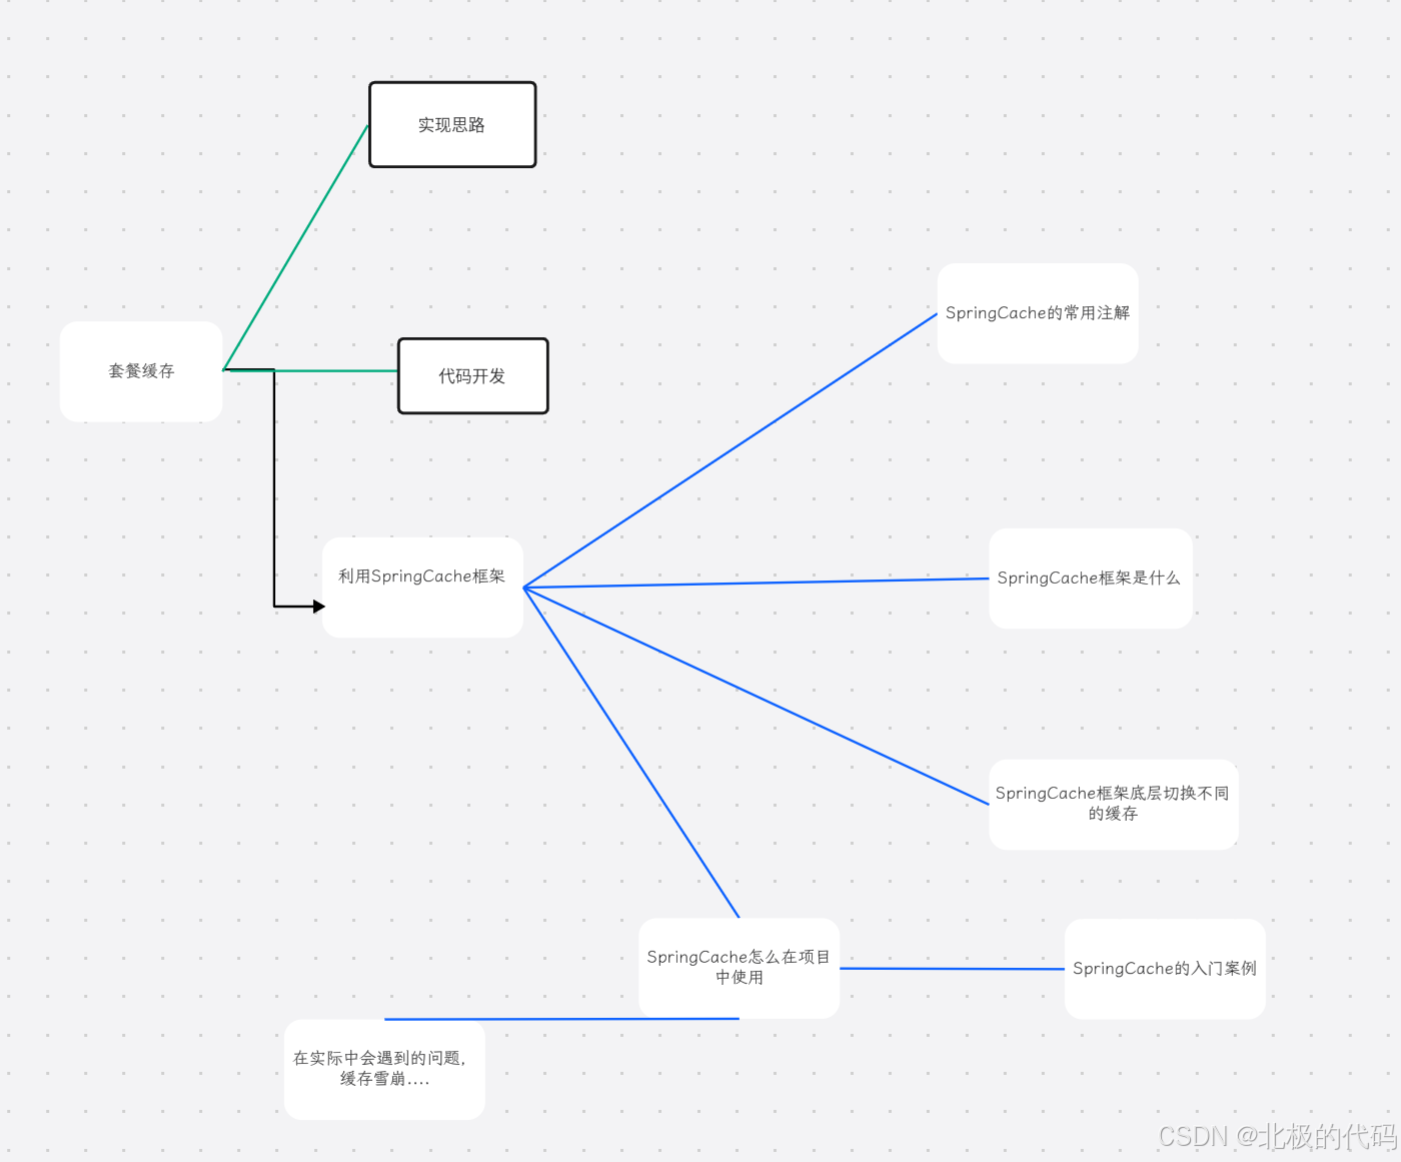
Spring Cache
SpringCache是一个框架,实现了基于注解的缓存功能,只需要简单地加一个注解,就能实现缓存功能。
SpringCache提供了一层抽象,底层可以切换不同的缓存实现,例如:
EHCache
Caffeine
Redis
<dependency>
<groupId>org.springframework.boot</groupId><artifactId>spring-boot-starter-cache</artifactId>
<version>2.7.3</version>
</dependency>
一、核心缓存注解
1. @Cacheable - 最常用
作用:触发缓存填充,方法执行前先检查缓存,如果缓存中存在则直接返回,否则执行方法并将结果缓存。(注解的底层其实就是创建了方法的代理对象,提前调用,所以如果有缓存数据,就不会执行我们自己的方法)
java
java

@Cacheable(value = "users", key = "#id")
public User getUserById(Long id) {
    // 如果缓存中没有,才会执行此方法
    return userRepository.findById(id);
}

// 带条件的缓存
@Cacheable(value = "users", condition = "#id > 10")
public User getUserById(Long id) {
    return userRepository.findById(id);
}

// 除非条件
@Cacheable(value = "users", unless = "#result.age < 18")
public User getUserById(Long id) {
    return userRepository.findById(id);
}
2. @CachePut - 更新缓存
作用:无论缓存是否存在,都会执行方法,并将结果更新到缓存中(常用于更新操作)。
java
java

@CachePut(value = "users", key = "#user.id")
public User updateUser(User user) {
    return userRepository.save(user);
}
3. @CacheEvict - 清除缓存
作用:清除指定缓存中的一条或多条数据。(底层是SpringCache框架创建一个代理对象)
java
java

// 清除单个缓存
@CacheEvict(value = "users", key = "#id")
public void deleteUser(Long id) {
    userRepository.deleteById(id);
}

// 清除所有缓存
@CacheEvict(value = "users", allEntries = true)
public void deleteAllUsers() {
    userRepository.deleteAll();
}

// 方法执行前清除缓存
@CacheEvict(value = "users", key = "#id", beforeInvocation = true)
public void deleteUserBefore(Long id) {
    // 清除缓存后再执行方法
    userRepository.deleteById(id);
}
4. @Caching - 组合多个缓存操作
作用:当一个方法需要同时应用多个缓存注解时使用。
java
java

@Caching(
    put = {
        @CachePut(value = "users", key = "#user.id"),
        @CachePut(value = "usersByName", key = "#user.name")
    },
    evict = {
        @CacheEvict(value = "userList", allEntries = true)
    }
)
public User saveUser(User user) {
    return userRepository.save(user);
}
二、类级别注解
5. @CacheConfig - 类级别的缓存配置
作用:在类级别共享缓存配置,避免在每个方法上重复定义。
java
java

@CacheConfig(cacheNames = "users", cacheManager = "cacheManager")
@Service
public class UserService {

    @Cacheable(key = "#id")  // 继承了类级别的 cacheNames = "users"
    public User getUserById(Long id) {
        return userRepository.findById(id);
    }

    @CacheEvict(key = "#id")
    public void deleteUser(Long id) {
        userRepository.deleteById(id);
    }
}
三、注解属性详解
常用属性
| 属性 | 说明 | 示例 |
|---|---|---|
| value/cacheNames | 缓存名称,可以指定多个 | @Cacheable("users") 或 @Cacheable({"users", "profiles"}) |
| key | SpEL表达式,用于动态计算key | #id、#user.id、#root.methodName |
| keyGenerator | 自定义key生成器 | keyGenerator = "customKeyGenerator" |
| condition | 满足条件才缓存 | condition = "#id % 2 == 0"(偶数ID才缓存) |
| unless | 满足条件则不缓存 | unless = "#result == null"(结果为null时不缓存) |
| cacheManager | 指定使用的缓存管理器 | cacheManager = "redisCacheManager" |
SpEL支持的上下文变量
| 变量 | 描述 | 示例 |
|---|---|---|
| #root.methodName | 方法名 | #root.methodName |
| #root.method | 方法对象 | #root.method.name |
| #root.target | 目标对象 | #root.target |
| #root.targetClass | 目标类 | #root.targetClass |
| #root.args | 方法参数数组 | #root.args[0] |
| #root.caches | 当前方法使用的缓存 | #root.caches[0].name |
| #参数名 | 按参数名引用 | #id、#user.name |
| #a0/#p0 | 按索引引用参数 | #a0(第一个参数)、#p1(第二个参数) |
| #result | 方法返回值(用于@CachePut和@CacheEvict的unless条件) | #result.id |
四、实际使用示例
java
java

@Service
@CacheConfig(cacheNames = "products")
public class ProductService {

    @Cacheable(key = "#id", unless = "#result == null")
    public Product getProduct(Long id) {
        return productRepository.findById(id).orElse(null);
    }

    @Cacheable(key = "#category", condition = "#category != null")
    public List<Product> getProductsByCategory(String category) {
        return productRepository.findByCategory(category);
    }

    @CachePut(key = "#product.id")
    public Product updateProduct(Product product) {
        return productRepository.save(product);
    }

    @CacheEvict(key = "#id")
    public void deleteProduct(Long id) {
        productRepository.deleteById(id);
    }

    @Caching(
        evict = {
            @CacheEvict(key = "#id"),
            @CacheEvict(value = "productLists", allEntries = true)
        }
    )
    public void deleteAndClearCache(Long id) {
        productRepository.deleteById(id);
    }
}
五、启用缓存注解
需要在配置类上添加 @EnableCaching 注解:
java
java

@Configuration
@EnableCaching
public class CacheConfig {

    @Bean
    public CacheManager cacheManager() {
        // 配置具体的缓存管理器,如 RedisCacheManager, ConcurrentMapCacheManager 等
        return new ConcurrentMapCacheManager("users", "products");
    }
}
Spring Cache 入门案例
让我通过一个完整的用户管理系统案例,带您逐步了解 Spring Cache 的使用流程。
一、项目结构
text
src/main/java/com/example/cache/
├── config/
│   └── CacheConfig.java          # 缓存配置类
├── controller/
│   └── UserController.java       # REST接口层
├── service/
│   ├── UserService.java          # 业务逻辑层(使用缓存)
│   └ impl/
│       └── UserServiceImpl.java  # 业务实现类
├── repository/
│   └── UserRepository.java       # 数据访问层
├── entity/
│   └── User.java                 # 用户实体
└── Application.java              # 启动类
二、环境准备
1. 添加依赖(Maven)
XML
xml

<dependencies>
    <!-- Spring Boot Web -->
    <dependency>
        <groupId>org.springframework.boot</groupId>
        <artifactId>spring-boot-starter-web</artifactId>
    </dependency>

    <!-- Spring Cache -->
    <dependency>
        <groupId>org.springframework.boot</groupId>
        <artifactId>spring-boot-starter-cache</artifactId>
    </dependency>

    <!-- 可选:使用Redis作为缓存 -->
    <dependency>
        <groupId>org.springframework.boot</groupId>
        <artifactId>spring-boot-starter-data-redis</artifactId>
    </dependency>
</dependencies>
2. 配置文件(application.yml)
XML
yaml

spring:
  # 缓存配置
  cache:
    type: simple  # simple=内存缓存, redis=Redis缓存
    cache-names: users,userLists

  # Redis配置(如果使用Redis)
  redis:
    host: localhost
    port: 6379
    database: 0

# 日志配置(方便查看缓存操作)
logging:
  level:
    com.example.cache: DEBUG
    org.springframework.cache: TRACE
三、核心代码实现
1. 实体类
java
java

package com.example.cache.entity;

import java.io.Serializable;
import java.time.LocalDateTime;

public class User implements Serializable {
    private static final long serialVersionUID = 1L;

    private Long id;
    private String username;
    private String email;
    private Integer age;
    private LocalDateTime createTime;

    // 构造函数
    public User() {}

    public User(Long id, String username, String email, Integer age) {
        this.id = id;
        this.username = username;
        this.email = email;
        this.age = age;
        this.createTime = LocalDateTime.now();
    }

    // getter/setter 省略,实际开发中请使用Lombok简化
    public Long getId() { return id; }
    public void setId(Long id) { this.id = id; }

    public String getUsername() { return username; }
    public void setUsername(String username) { this.username = username; }

    public String getEmail() { return email; }
    public void setEmail(String email) { this.email = email; }

    public Integer getAge() { return age; }
    public void setAge(Integer age) { this.age = age; }

    public LocalDateTime getCreateTime() { return createTime; }
    public void setCreateTime(LocalDateTime createTime) { this.createTime = createTime; }

    @Override
    public String toString() {
        return "User{id=" + id + ", username='" + username + "', email='" + email + "', age=" + age + "}";
    }
}
2. 配置类
java
java

package com.example.cache.config;

import org.springframework.cache.CacheManager;
import org.springframework.cache.annotation.EnableCaching;
import org.springframework.cache.concurrent.ConcurrentMapCacheManager;
import org.springframework.context.annotation.Bean;
import org.springframework.context.annotation.Configuration;

@Configuration
@EnableCaching  // 启用缓存注解
public class CacheConfig {

    /**
     * 配置缓存管理器(使用内存缓存)
     * 如果使用Redis,可以配置RedisCacheManager
     */
    @Bean
    public CacheManager cacheManager() {
        ConcurrentMapCacheManager cacheManager = new ConcurrentMapCacheManager();
        cacheManager.setAllowNullValues(false);  // 不允许缓存null值
        return cacheManager;
    }

    /**
     * 可以自定义Key生成器
     */
    @Bean
    public KeyGenerator customKeyGenerator() {
        return (target, method, params) -> {
            StringBuilder sb = new StringBuilder();
            sb.append(target.getClass().getSimpleName());
            sb.append("_").append(method.getName());
            for (Object param : params) {
                sb.append("_").append(param.toString());
            }
            return sb.toString();
        };
    }
}
3. 数据访问层(模拟)
java
java

package com.example.cache.repository;

import com.example.cache.entity.User;
import org.springframework.stereotype.Repository;
import java.util.ArrayList;
import java.util.List;
import java.util.Map;
import java.util.concurrent.ConcurrentHashMap;
import java.util.concurrent.atomic.AtomicLong;

/**
 * 模拟数据库操作
 */
@Repository
public class UserRepository {

    // 模拟数据库表
    private final Map<Long, User> database = new ConcurrentHashMap<>();
    private final AtomicLong idGenerator = new AtomicLong(1);

    /**
     * 模拟从数据库查询用户
     */
    public User findById(Long id) {
        // 模拟数据库查询延迟
        simulateDelay();

        System.out.println("[数据库] 执行查询: SELECT * FROM users WHERE id = " + id);
        return database.get(id);
    }

    /**
     * 模拟从数据库查询所有用户
     */
    public List<User> findAll() {
        simulateDelay();

        System.out.println("[数据库] 执行查询: SELECT * FROM users");
        return new ArrayList<>(database.values());
    }

    /**
     * 模拟保存用户到数据库
     */
    public User save(User user) {
        simulateDelay();

        if (user.getId() == null) {
            // 新增用户
            Long newId = idGenerator.getAndIncrement();
            user.setId(newId);
            System.out.println("[数据库] 执行插入: INSERT INTO users VALUES(" + user + ")");
        } else {
            // 更新用户
            System.out.println("[数据库] 执行更新: UPDATE users SET ... WHERE id = " + user.getId());
        }

        database.put(user.getId(), user);
        return user;
    }

    /**
     * 模拟从数据库删除用户
     */
    public void deleteById(Long id) {
        simulateDelay();

        System.out.println("[数据库] 执行删除: DELETE FROM users WHERE id = " + id);
        database.remove(id);
    }

    /**
     * 模拟根据用户名查询
     */
    public User findByUsername(String username) {
        simulateDelay();

        System.out.println("[数据库] 执行查询: SELECT * FROM users WHERE username = '" + username + "'");
        return database.values().stream()
                .filter(user -> user.getUsername().equals(username))
                .findFirst()
                .orElse(null);
    }

    /**
     * 模拟初始化数据
     */
    public void initData() {
        save(new User(null, "张三", "zhangsan@example.com", 25));
        save(new User(null, "李四", "lisi@example.com", 30));
        save(new User(null, "王五", "wangwu@example.com", 28));
    }

    private void simulateDelay() {
        try {
            Thread.sleep(1000); // 模拟1秒数据库查询延迟
        } catch (InterruptedException e) {
            Thread.currentThread().interrupt();
        }
    }
}
4. 服务层(使用缓存注解)
java
java

package com.example.cache.service.impl;

import com.example.cache.entity.User;
import com.example.cache.repository.UserRepository;
import com.example.cache.service.UserService;
import org.springframework.beans.factory.annotation.Autowired;
import org.springframework.cache.annotation.CacheConfig;
import org.springframework.cache.annotation.CacheEvict;
import org.springframework.cache.annotation.CachePut;
import org.springframework.cache.annotation.Cacheable;
import org.springframework.cache.annotation.Caching;
import org.springframework.stereotype.Service;
import java.util.List;

@Service
@CacheConfig(cacheNames = "users")  // 类级别统一缓存名称
public class UserServiceImpl implements UserService {

    @Autowired
    private UserRepository userRepository;

    /**
     * 初始化数据
     */
    public void init() {
        userRepository.initData();
    }

    /**
     * 根据ID查询用户
     * 缓存注解说明:
     * - 先从缓存查询,如果缓存存在直接返回
     * - 如果缓存不存在,执行方法查询数据库
     * - 将查询结果放入缓存
     */
    @Override
    @Cacheable(key = "#id", unless = "#result == null")
    public User getUserById(Long id) {
        System.out.println("=== 缓存未命中,查询数据库 ===");
        return userRepository.findById(id);
    }

    /**
     * 根据用户名查询用户
     * 使用SpEL表达式动态计算key
     */
    @Override
    @Cacheable(key = "'username_' + #username")
    public User getUserByUsername(String username) {
        System.out.println("=== 缓存未命中,根据用户名查询数据库 ===");
        return userRepository.findByUsername(username);
    }

    /**
     * 查询所有用户
     * 注意:所有用户列表的缓存,当数据变化时需要清除
     */
    @Override
    @Cacheable(value = "userLists", key = "'all_users'")
    public List<User> getAllUsers() {
        System.out.println("=== 缓存未命中,查询所有用户数据库 ===");
        return userRepository.findAll();
    }

    /**
     * 保存用户
     * @CachePut: 无论缓存是否存在,都会执行方法并更新缓存
     */
    @Override
    @CachePut(key = "#user.id")
    @CacheEvict(value = "userLists", allEntries = true)  // 清除用户列表缓存
    public User saveUser(User user) {
        System.out.println("=== 保存用户到数据库 ===");
        return userRepository.save(user);
    }

    /**
     * 更新用户
     * 组合缓存操作:更新单个用户缓存,清除列表缓存
     */
    @Override
    @Caching(
        put = {@CachePut(key = "#user.id")},
        evict = {@CacheEvict(value = "userLists", allEntries = true)}
    )
    public User updateUser(User user) {
        System.out.println("=== 更新用户到数据库 ===");
        return userRepository.save(user);
    }

    /**
     * 删除用户
     * @CacheEvict: 删除缓存
     * beforeInvocation: 在方法执行前删除缓存
     */
    @Override
    @Caching(
        evict = {
            @CacheEvict(key = "#id"),
            @CacheEvict(value = "userLists", allEntries = true)
        }
    )
    public void deleteUser(Long id) {
        System.out.println("=== 从数据库删除用户 ===");
        userRepository.deleteById(id);
    }

    /**
     * 带条件的缓存
     * condition: 年龄大于18才缓存
     */
    @Override
    @Cacheable(key = "#id", condition = "#result != null and #result.age > 18")
    public User getUserWithCondition(Long id) {
        return userRepository.findById(id);
    }
}
5. 控制器层
java
java

package com.example.cache.controller;

import com.example.cache.entity.User;
import com.example.cache.service.UserService;
import org.springframework.beans.factory.annotation.Autowired;
import org.springframework.web.bind.annotation.*;
import java.util.List;

@RestController
@RequestMapping("/api/users")
public class UserController {

    @Autowired
    private UserService userService;

    /**
     * 初始化数据
     */
    @PostMapping("/init")
    public String init() {
        userService.init();
        return "数据初始化完成";
    }

    /**
     * 根据ID查询用户
     * 第一次访问会查询数据库,后续从缓存读取
     */
    @GetMapping("/{id}")
    public User getUserById(@PathVariable Long id) {
        long start = System.currentTimeMillis();
        User user = userService.getUserById(id);
        long cost = System.currentTimeMillis() - start;
        System.out.println("查询耗时: " + cost + "ms");
        return user;
    }

    /**
     * 根据用户名查询用户
     */
    @GetMapping("/username/{username}")
    public User getUserByUsername(@PathVariable String username) {
        return userService.getUserByUsername(username);
    }

    /**
     * 查询所有用户
     */
    @GetMapping
    public List<User> getAllUsers() {
        return userService.getAllUsers();
    }

    /**
     * 新增用户
     */
    @PostMapping
    public User addUser(@RequestBody User user) {
        return userService.saveUser(user);
    }

    /**
     * 更新用户
     */
    @PutMapping
    public User updateUser(@RequestBody User user) {
        return userService.updateUser(user);
    }

    /**
     * 删除用户
     */
    @DeleteMapping("/{id}")
    public String deleteUser(@PathVariable Long id) {
        userService.deleteUser(id);
        return "用户删除成功";
    }

    /**
     * 演示缓存穿透
     * 查询不存在的用户
     */
    @GetMapping("/test/{id}")
    public String testCache(@PathVariable Long id) {
        User user = userService.getUserById(id);
        if (user == null) {
            return "用户不存在";
        }
        return user.toString();
    }
}
6. 启动类
java
java

package com.example.cache;

import org.springframework.boot.SpringApplication;
import org.springframework.boot.autoconfigure.SpringBootApplication;
import org.springframework.cache.annotation.EnableCaching;

@SpringBootApplication
@EnableCaching  // 启用缓存
public class Application {
    public static void main(String[] args) {
        SpringApplication.run(Application.class, args);
    }
}
四、测试验证
1. 测试流程
bash
# 1. 初始化数据
curl -X POST http://localhost:8080/api/users/init

# 2. 第一次查询用户1(查询数据库)
curl http://localhost:8080/api/users/1
# 输出:[数据库] 执行查询: SELECT * FROM users WHERE id = 1
# 耗时约1000ms

# 3. 第二次查询用户1(从缓存读取)
curl http://localhost:8080/api/users/1
# 输出:直接从缓存返回,无数据库查询
# 耗时约10ms

# 4. 查询所有用户(第一次)
curl http://localhost:8080/api/users
# 输出:查询数据库

# 5. 查询所有用户(第二次)
curl http://localhost:8080/api/users
# 输出:从缓存读取

# 6. 新增用户(会清除列表缓存)
curl -X POST http://localhost:8080/api/users \
  -H "Content-Type: application/json" \
  -d '{"username":"赵六","email":"zhaoliu@example.com","age":35}'

# 7. 再次查询所有用户(重新查询数据库,因为缓存被清除)
curl http://localhost:8080/api/users
# 输出:重新查询数据库,包含新用户
2. 观察日志
text
# 第一次查询
=== 缓存未命中,查询数据库 ===
[数据库] 执行查询: SELECT * FROM users WHERE id = 1
查询耗时: 1005ms

# 第二次查询(相同的ID)
查询耗时: 3ms  # 明显加快,说明从缓存读取

# 更新用户后
=== 更新用户到数据库 ===
[数据库] 执行更新: UPDATE users SET ... WHERE id = 1
# 缓存自动更新

# 删除用户后
=== 从数据库删除用户 ===
[数据库] 执行删除: DELETE FROM users WHERE id = 1
# 缓存自动清除
五、进阶用法
1. 自定义缓存配置
java
java

@Configuration
@EnableCaching
public class AdvancedCacheConfig {

    @Bean
    public CacheManager cacheManager() {
        // 配置不同缓存的TTL
        Map<String, Long> expires = new HashMap<>();
        expires.put("users", 3600L);      // 用户缓存1小时
        expires.put("userLists", 1800L);  // 列表缓存30分钟

        // 使用Redis缓存
        RedisCacheConfiguration config = RedisCacheConfiguration.defaultCacheConfig()
            .entryTtl(Duration.ofHours(1))
            .disableCachingNullValues();

        return RedisCacheManager.builder(redisConnectionFactory())
            .cacheDefaults(config)
            .withInitialCacheConfigurations(expires)
            .build();
    }
}
2. 缓存监控
java
java

@Component
public class CacheMonitor {

    private final Map<String, AtomicInteger> cacheHits = new ConcurrentHashMap<>();
    private final Map<String, AtomicInteger> cacheMisses = new ConcurrentHashMap<>();

    public void recordHit(String cacheName) {
        cacheHits.computeIfAbsent(cacheName, k -> new AtomicInteger()).incrementAndGet();
    }

    public void recordMiss(String cacheName) {
        cacheMisses.computeIfAbsent(cacheName, k -> new AtomicInteger()).incrementAndGet();
    }

    public void printStats() {
        System.out.println("=== 缓存统计 ===");
        cacheHits.forEach((name, hits) -> {
            int misses = cacheMisses.getOrDefault(name, new AtomicInteger()).get();
            double hitRate = (double) hits.get() / (hits.get() + misses) * 100;
            System.out.printf("%s: 命中=%d, 未命中=%d, 命中率=%.2f%%\n",
                name, hits.get(), misses, hitRate);
        });
    }
}
六、常见问题
1. 缓存穿透问题
java
java

// 解决:缓存空值
@Cacheable(value = "users", key = "#id", unless = "#result == null")
// 或者允许缓存null
@Bean
public CacheManager cacheManager() {
    ConcurrentMapCacheManager cacheManager = new ConcurrentMapCacheManager();
    cacheManager.setAllowNullValues(true);  // 允许缓存null
    return cacheManager;
}
2. 缓存雪崩问题
java
java

// 解决:设置不同的过期时间
@Bean
public CacheManager cacheManager() {
    RedisCacheConfiguration config = RedisCacheConfiguration.defaultCacheConfig()
        .entryTtl(Duration.ofSeconds(new Random().nextInt(300) + 300)); // 300-600秒随机
    return RedisCacheManager.builder(redisConnectionFactory())
        .cacheDefaults(config)
        .build();
}
3. 缓存击穿问题
java
java

// 解决:使用同步锁
@Cacheable(value = "users", key = "#id", sync = true)  // 开启同步,防止缓存击穿
public User getUserById(Long id) {
    return userRepository.findById(id);
}
七、最佳实践总结
-
明确缓存边界:只缓存频繁查询、不经常变化的数据
-
合理设置过期时间:根据业务需求设置TTL
-
统一缓存Key规范 :如
类名_方法名_参数 -
缓存粒度控制:用户维度数据用ID,列表数据用查询条件
-
异常处理:缓存失败不影响业务
-
监控告警:统计命中率,及时调整策略
