Kubernetes平台存储系统搭建_CRI、CNI、CSI
存储系统是个专业性的整个体系,我们只用常见方式搭建,具体优化需要参照公司自己的产品等各种进行调整
Rook+Ceph【可以使用到任意能力的存储】
- Rook帮我们创建好 StorageClass
- pvc只需要指定存储类,Rook自动调用 StorageClass 里面的 Provisioner供应商,接下来对ceph集群操作
- Ceph
- Block:块存储。RWO(ReadWriteOnce)单节点读写【一个Pod操作一个自己专属的读写区】,适用于有状态副本集【例如:mysql的多个实例,每个实例都有自己专属的文件系统,mysql之间如何同步数据是他们程序要做的事情】
- Share FS:共享存储(理解为共享目录)。RWX(ReadWriteMany)多节点读写【多个Pod操作同一个存储区,可读可写】,适用于无状态应用【例如:多个程序读取同一个配置】
- ...
- 总结:
- 无状态应用随意复制多少份,一定要用到RWX能力。
- 有状态应用复制任意份,每份都只是读写自己的存储,用到RWO(优先)或者RWX。
一、Ceph
1、基本概念
Ceph可以有
- Ceph对象存储:键值存储,其接口就是简单的GET,PUT,DEL等。如七牛,阿里云oss等
- Ceph块设备:AWS的EBS ,青云的云硬盘 和阿里云的盘古系统 ,还有Ceph的RBD(RBD是Ceph面向块存储的接口)
- Ceph文件系统:它比块存储具有更丰富的接口,需要考虑目录、文件属性等支持,实现一个支持并行化的文件存储应该是最困难的。
一个Ceph存储集群需要
-
至少一个Ceph监视器、Ceph管理器、Ceph OSD(对象存储守护程序)
-
需要运行Ceph文件系统客户端,则需要部署 Ceph Metadata Server。

-
Monitors : Ceph Monitor (
ceph-mon) 监视器:维护集群状态信息- 维护集群状态的映射,包括监视器映射,管理器映射,OSD映射,MDS映射和CRUSH映射。
- 这些映射是Ceph守护程序相互协调所必需的关键群集状态。
- 监视器还负责管理守护程序和客户端之间的身份验证。
- 通常至少需要三个监视器才能实现冗余和高可用性。
-
Managers : Ceph Manager 守护进程(
ceph-mgr) : 负责跟踪运行时指标和Ceph集群的当前状态- Ceph Manager守护进程(ceph-mgr)负责跟踪运行时指标和Ceph集群的当前状态
- 包括存储利用率,当前性能指标和系统负载。
- Ceph Manager守护程序还托管基于python的模块,以管理和公开Ceph集群信息,包括基于Web的Ceph Dashboard和REST API。
- 通常,至少需要两个管理器才能实现高可用性。
-
Ceph OSDs : Ceph OSD (对象存储守护进程,
ceph-osd) 【存储数据】- 通过检查其他Ceph OSD守护程序的心跳来存储数据,处理数据复制,恢复,重新平衡,并向Ceph监视器和管理器提供一些监视信息。
- 通常至少需要3个Ceph OSD才能实现冗余和高可用性。
-
MDSs : Ceph Metadata Server (MDS,
ceph-mdsceph元数据服务器)- 存储能代表 Ceph File System 的元数据(如:Ceph块设备和Ceph对象存储不使用MDS).
- Ceph元数据服务器允许POSIX文件系统用户执行基本命令(如ls,find等),而不会给Ceph存储集群带来巨大负担
二、Rook
1、基本概念
Rook是云原生平台的存储编排工具
Rook工作原理如下:
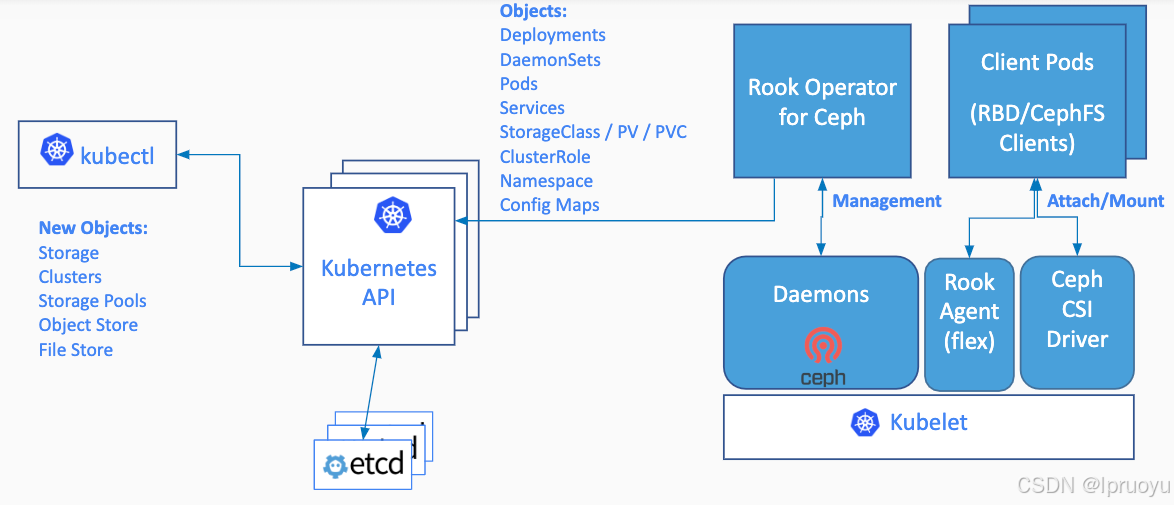
Rook架构如下
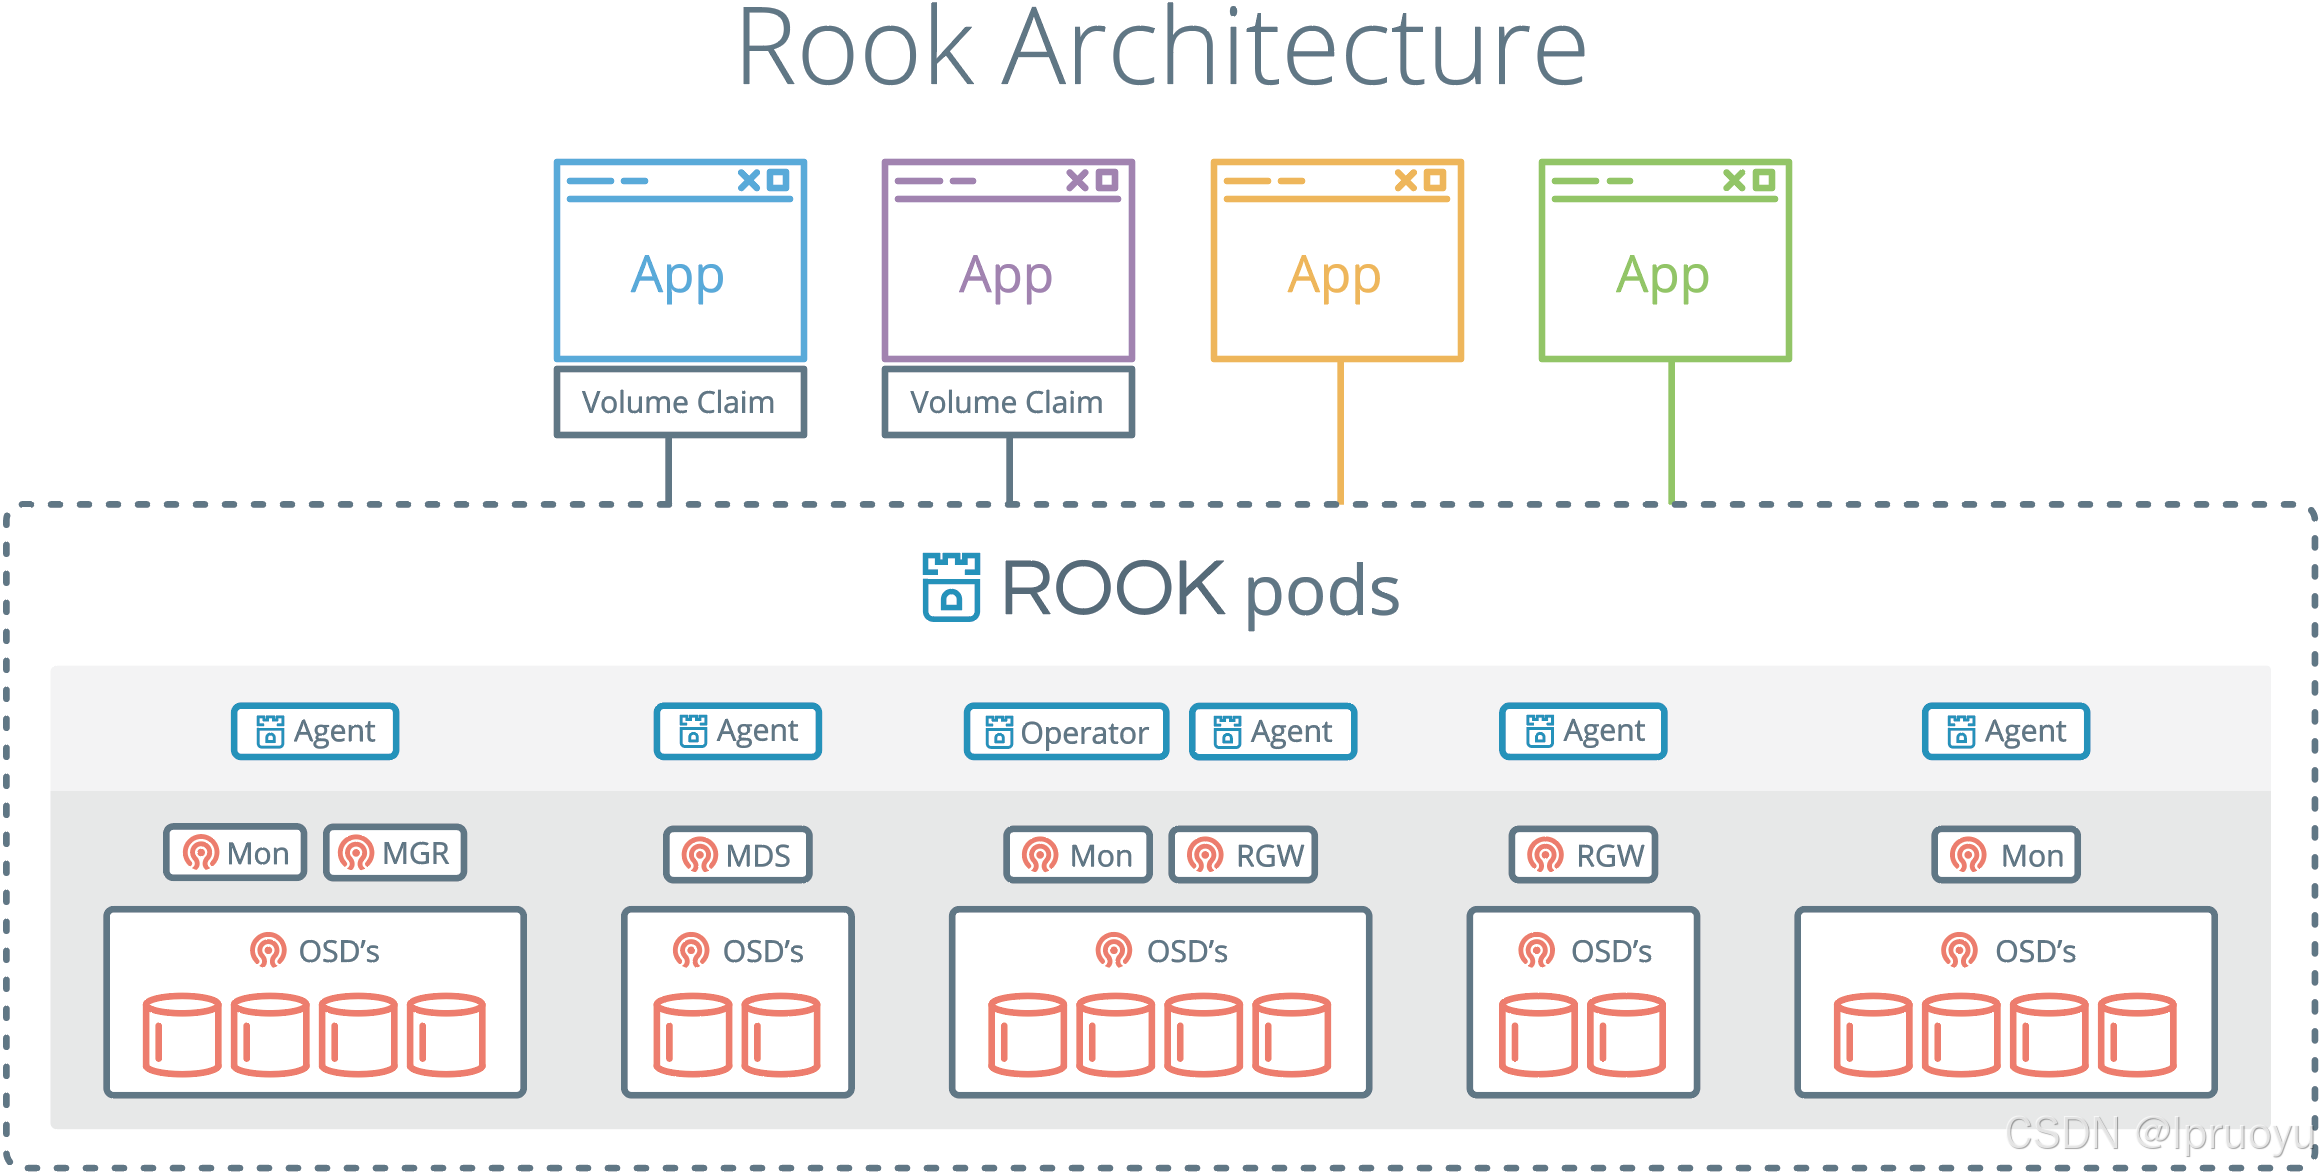
RGW:为Restapi Gateway
2、operator是什么
k8s中operator+CRD(CustomResourceDefinitions【k8s自定义资源类型】),可以快速帮我们部署一些有状态应用集群,如redis,mysql,Zookeeper等。
Rook的operator是我们k8s集群和存储集群之间进行交互的解析器
CRD:CustomResourceDefinitions (自定义资源);如:LPofDream
operator:这个能处理自定义资源类型
yaml
apiVersion: apps/v1
kind: LPofDream
...
部署好了后,kubectl api-resources -n rook-ceph 就可以看到他自定义了很多资源类型
三、部署
https://rook.io/docs/rook/v1.6/ceph-quickstart.html
0、为3个工作node的虚拟机挂磁盘
完成硬件添加后,请务必记住不要格式化,以保持其"原始"状态来满足 Ceph 的要求
-
关闭虚拟机:在添加新硬件前,最好将虚拟机关机或处于关闭状态
-
打开设置 :在 VMware 列表中,右键点击你的目标虚拟机,在弹出菜单中选择 "设置"
-
添加硬件 :在虚拟机设置窗口的底部(或硬件选项卡中),点击 "添加" (Add) 按钮
-
选择硬盘 :在添加硬件向导中,选择 "硬盘" (Hard Disk),然后点击"完成"或"下一步"
- 在 VMware Workstation 中,你通常需要先选择"硬盘",然后选择 "创建新虚拟磁盘"
-
配置磁盘参数:
-
磁盘类型 :保持默认的 SCSI 或根据你的系统选择即可,Ceph 对此没有特殊要求
-
磁盘容量 :根据你的存储规划,输入新磁盘的大小,比如
50GB -
磁盘格式(关键步骤) :在"磁盘空间分配"选项中,请务必选择 "立即分配所有磁盘空间"
-
存储为单个文件 :选择 "将虚拟磁盘存储为单个文件" (Store virtual disk as a single file),这通常能获得更好的性能
-
-
完成:确认设置无误后,点击"完成"并保存虚拟机配置。
启动与验证 :启动你的虚拟机。使用 SSH 登录后,运行 lsblk -f 命令。你应该能看到一个新的磁盘设备(例如 /dev/sdb),并且其 FSTYPE 字段为空 。切记不要对它运行 mkfs 等格式化命令,这正是 Ceph 所期望的"原始"状态

1、查看前提条件
- Raw devices (no partitions or formatted filesystems); 原始磁盘,无分区或者格式化
- Raw partitions (no formatted filesystem);原始分区,无格式化文件系统
sh
fdisk -l
找到自己挂载的磁盘
如: /dev/vdc

# 查看满足要求的
lsblk -f

#云厂商都这么磁盘清0
dd if=/dev/zero of=/dev/vdc bs=1M status=progress
NAME                  FSTYPE      LABEL UUID                                   MOUNTPOINT
vda
└─vda1                LVM2_member       >eSO50t-GkUV-YKTH-WsGq-hNJY-eKNf-3i07IB
 ├─ubuntu--vg-root   ext4              c2366f76-6e21-4f10-a8f3-6776212e2fe4   /
 └─ubuntu--vg-swap_1 swap              9492a3dc-ad75-47cd-9596-678e8cf17ff9   [SWAP]
vdb
vdb 是可用的【FSTYPE为空】
2、修改
在master1执行:
sh
git clone --single-branch --branch v1.6.3 https://github.com/rook/rook.git

cd rook/cluster/examples/kubernetes/ceph
修改operator.yaml
镜像: rook/ceph:v1.6.3 换成 registry.cn-hangzhou.aliyuncs.com/lfy_k8s_images/rook-ceph:v1.6.3
yaml
  ROOK_CSI_CEPH_IMAGE: "registry.cn-hangzhou.aliyuncs.com/lfy_k8s_images/cephcsi:v3.3.1"
  ROOK_CSI_REGISTRAR_IMAGE: "registry.cn-hangzhou.aliyuncs.com/lfy_k8s_images/csi-node-driver-registrar:v2.0.1"
  ROOK_CSI_RESIZER_IMAGE: "registry.cn-hangzhou.aliyuncs.com/lfy_k8s_images/csi-resizer:v1.0.1"
  ROOK_CSI_PROVISIONER_IMAGE: "registry.cn-hangzhou.aliyuncs.com/lfy_k8s_images/csi-provisioner:v2.0.4"
  ROOK_CSI_SNAPSHOTTER_IMAGE: "registry.cn-hangzhou.aliyuncs.com/lfy_k8s_images/csi-snapshotter:v4.0.0"
  ROOK_CSI_ATTACHER_IMAGE: "registry.cn-hangzhou.aliyuncs.com/lfy_k8s_images/csi-attacher:v3.0.2"
修改
cluster.yaml使用我们指定的磁盘当做存储节点即可
镜像: ceph/ceph:v15.2.11 换成 registry.cn-hangzhou.aliyuncs.com/lfy_k8s_images/ceph-ceph:v15.2.11
yaml
  storage: # cluster level storage configuration and selection
    useAllNodes: false
    useAllDevices: false
    config:
      osdsPerDevice: "3" #每个设备osd数量
    nodes:
    - name: "k8s-ha-node3"
      devices:
      - name: "sdb"
    - name: "k8s-ha-node1"
      devices:
      - name: "sdb"
    - name: "k8s-ha-node2"
      devices:
      - name: "sdb"
类似于osdsPerDevice,如果要部署高可用【多个实例,多个副本】的mgr,修改yaml文件即可。
3、部署
sh
kubectl create -f crds.yaml -f common.yaml -f operator.yaml

#running后再运行下一步
kubectl get all -n rook-ceph -owide

kubectl create -f cluster.yaml
watch -n 1 kubectl get pod -n rook-ceph -owide
4、部署dashboard
https://www.rook.io/docs/rook/v1.6/ceph-dashboard.html
前面的步骤,已经自动部署了。
sh
kubectl -n rook-ceph get service |grep dashboard


#获取访问密码
kubectl -n rook-ceph get secret rook-ceph-dashboard-password -o jsonpath="{['data']['password']}" | base64 --decode && echo

#默认账号 admin
{msI0.|,h).o]n:aJd'#
参考00、网络规划,使用ingress访问rook的dashboard
如果部署了高可用的mgr【多个mgr,但是他是主备模式的,所以一般部署一个即可】:
先部署nodePort,验证到底哪个mgr不能访问
他是主备模式的高可用。kubectl get svc -n rook-ceph|grep dashboard
curl 访问dashboard确定哪个mgr不能访问
自己做一个可访问到的service。如果哪天服务器故障mgr有问题。修改svc的selector即可
yamlapiVersion: v1 kind: Service metadata: labels: app: rook-ceph-mgr ceph_daemon_id: a rook_cluster: rook-ceph name: rook-ceph-mgr-dashboard-active namespace: rook-ceph spec: ports: - name: dashboard port: 8443 protocol: TCP targetPort: 8443 selector: #service选择哪些Pod app: rook-ceph-mgr ceph_daemon_id: a rook_cluster: rook-ceph sessionAffinity: None type: ClusterIP再部署如下的ingress
yamlapiVersion: networking.k8s.io/v1 kind: Ingress metadata: name: ceph-rook-dash namespace: rook-ceph annotations: nginx.ingress.kubernetes.io/backend-protocol: "HTTPS" nginx.ingress.kubernetes.io/server-snippet: | proxy_ssl_verify off; spec: # tls: 不用每个名称空间都配置证书信息 # - hosts: # - itdachang.com # - 未来的 # secretName: testsecret-tls rules: - host: rook.itdachang.com http: paths: - path: / pathType: Prefix backend: service: name: rook-ceph-mgr-dashboard-active port: number: 8443
5、部署完成的最终结果一定要有这些组件
yaml
NAME                                                 READY   STATUS      RESTARTS   AGE
csi-cephfsplugin-provisioner-d77bb49c6-n5tgs         5/5     Running     0          140s
csi-cephfsplugin-provisioner-d77bb49c6-v9rvn         5/5     Running     0          140s
csi-cephfsplugin-rthrp                               3/3     Running     0          140s
csi-rbdplugin-hbsm7                                  3/3     Running     0          140s
csi-rbdplugin-provisioner-5b5cd64fd-nvk6c            6/6     Running     0          140s
csi-rbdplugin-provisioner-5b5cd64fd-q7bxl            6/6     Running     0          140s
rook-ceph-crashcollector-minikube-5b57b7c5d4-hfldl   1/1     Running     0          105s
rook-ceph-mgr-a-64cd7cdf54-j8b5p                     1/1     Running     0          77s
rook-ceph-mon-a-694bb7987d-fp9w7                     1/1     Running     0          105s
rook-ceph-mon-b-856fdd5cb9-5h2qk                     1/1     Running     0          94s
rook-ceph-mon-c-57545897fc-j576h                     1/1     Running     0          85s
rook-ceph-operator-85f5b946bd-s8grz                  1/1     Running     0          92m
rook-ceph-osd-0-6bb747b6c5-lnvb6                     1/1     Running     0          23s
rook-ceph-osd-1-7f67f9646d-44p7v                     1/1     Running     0          24s
rook-ceph-osd-2-6cd4b776ff-v4d68                     1/1     Running     0          25s
rook-ceph-osd-prepare-node1-vx2rz                    0/2     Completed   0          60s
rook-ceph-osd-prepare-node2-ab3fd                    0/2     Completed   0          60s
rook-ceph-osd-prepare-node3-w4xyz                    0/2     Completed   0          60s
不行了就检查yaml,卸载重新部署。【还是不行,就查看磁盘是否可用,不可用就重新挂磁盘】
6、卸载
sh
# rook集群的清除,

cd /root/rook/cluster/examples/kubernetes/ceph

kubectl delete -f crds.yaml -f common.yaml -f  -f cluster.yaml operator.yaml

kubectl -n rook-ceph patch cephclusters.ceph.rook.io rook-ceph -p '{"metadata":{"finalizers": []}}' --type=merge

for CRD in $(kubectl get crd -n rook-ceph | awk '/ceph.rook.io/ {print $1}'); do
    kubectl get -n rook-ceph "$CRD" -o name | \
    xargs -I {} kubectl patch -n rook-ceph {} --type merge -p '{"metadata":{"finalizers": []}}'
done

##清除每个节点的 /var/lib/rook 目录
rm -rf /var/lib/rook
7、CRI、CNI、CSI
CRI:Container Runtime Interface:容器运行时接口(k8s集群整合容器运行时环境)
CNI:Container Network Interface:容器网络接口(k8s集群整合网络组件的接口)
CSI:Container Storage Interface:容器存储接口(k8s集群整合存储组件的接口)
kubelet启动一个Pod。CRI、CNI、CSI 起作用的顺序
- 启动Pod流程
- kubelet 触发 SyncPod;
- kubelet 的 Volume Manager 会检查 Pod 声明的所有卷(如 PVC)。如果需要,它会执行以下操作:Attach/Detach(如果是远程块存储)、Mount/Unmount(文件系统挂载)
- 这些操作完成后,创建 Sandbox (pause 容器);此时,卷的挂载已经就绪,pause 容器本身不直接使用这些卷,但它所在的挂载命名空间会继承这些挂载点,使得后续的应用容器可以访问。
- 每个Pod,都伴随一个Pause容器(沙箱容器)【kubectl get pod 1/1 不计算沙箱容器】。真正的容器(nginx)和沙箱容器是共用用一个网络、存储、名称空间...
- 启动沙箱容器。
- CRI。创建沙箱容器的运行时环境
- CNI。挂载沙箱容器网络
- 启动应用容器。
- 判断网络(前面准备好的)CNI
- 挂载 CSI
- 容器启动 CRI
- 从应用容器角度出发:
CSI先于CRI启动。- 代码:
四、实战
rbd:是ceph用来做块存储的
cephfs:是用来做共享文件系统的
1、块存储(RBD)
RBD: RADOS Block Devices
RADOS: Reliable, Autonomic Distributed Object Store
不能是RWX模式。
1、配置
https://www.rook.io/docs/rook/v1.6/ceph-block.html
常用 块存储 。RWO(ReadWriteOnce:单人读写)模式;STS删除,pvc不会删除,需要自己手动维护
cat /root/rook/cluster/examples/kubernetes/ceph/csi/rbd/storageclass.yaml
kubectl apply -f storageclass.yaml
kubectl get storageclass
yaml
apiVersion: ceph.rook.io/v1
kind: CephBlockPool
metadata:
  name: replicapool
  namespace: rook-ceph
spec:
  failureDomain: host  #容灾模式,host或者osd
  replicated:
    size: 2  #数据副本数量
---
apiVersion: storage.k8s.io/v1
kind: StorageClass  #存储驱动
metadata:
   name: rook-ceph-block
# Change "rook-ceph" provisioner prefix to match the operator namespace if needed
provisioner: rook-ceph.rbd.csi.ceph.com
parameters:
    # clusterID is the namespace where the rook cluster is running
    clusterID: rook-ceph
    # Ceph pool into which the RBD image shall be created
    pool: replicapool

    # (optional) mapOptions is a comma-separated list of map options.
    # For krbd options refer
    # https://docs.ceph.com/docs/master/man/8/rbd/#kernel-rbd-krbd-options
    # For nbd options refer
    # https://docs.ceph.com/docs/master/man/8/rbd-nbd/#options
    # mapOptions: lock_on_read,queue_depth=1024

    # (optional) unmapOptions is a comma-separated list of unmap options.
    # For krbd options refer
    # https://docs.ceph.com/docs/master/man/8/rbd/#kernel-rbd-krbd-options
    # For nbd options refer
    # https://docs.ceph.com/docs/master/man/8/rbd-nbd/#options
    # unmapOptions: force

    # RBD image format. Defaults to "2".
    imageFormat: "2"

    # RBD image features. Available for imageFormat: "2". CSI RBD currently supports only `layering` feature.
    imageFeatures: layering

    # The secrets contain Ceph admin credentials.
    csi.storage.k8s.io/provisioner-secret-name: rook-csi-rbd-provisioner
    csi.storage.k8s.io/provisioner-secret-namespace: rook-ceph
    csi.storage.k8s.io/controller-expand-secret-name: rook-csi-rbd-provisioner
    csi.storage.k8s.io/controller-expand-secret-namespace: rook-ceph
    csi.storage.k8s.io/node-stage-secret-name: rook-csi-rbd-node
    csi.storage.k8s.io/node-stage-secret-namespace: rook-ceph

    # Specify the filesystem type of the volume. If not specified, csi-provisioner
    # will set default as `ext4`. Note that `xfs` is not recommended due to potential deadlock
    # in hyperconverged settings where the volume is mounted on the same node as the osds.
    csi.storage.k8s.io/fstype: ext4

# Delete the rbd volume when a PVC is deleted
reclaimPolicy: Delete
allowVolumeExpansion: true
2、STS案例实战【StatefulSet:STS:有状态服务】
yaml
apiVersion: apps/v1
kind: StatefulSet
metadata:
  name: sts-nginx
  namespace: default
spec:
  selector:
    matchLabels:
      app: sts-nginx # has to match .spec.template.metadata.labels
  serviceName: "sts-nginx"
  replicas: 3 # by default is 1
  template:
    metadata:
      labels:
        app: sts-nginx # has to match .spec.selector.matchLabels
    spec:
      terminationGracePeriodSeconds: 10
      containers:
      - name: sts-nginx
        image: nginx
        ports:
        - containerPort: 80
          name: web
        volumeMounts:
        - name: www
          mountPath: /usr/share/nginx/html
  volumeClaimTemplates:
  - metadata:
      name: www
    spec:
      accessModes: [ "ReadWriteOnce" ]
      storageClassName: "rook-ceph-block"
      resources:
        requests:
          storage: 20Mi
---
apiVersion: v1
kind: Service
metadata:
  name: sts-nginx
  namespace: default
spec:
  selector:
    app: sts-nginx
  type: ClusterIP
  ports:
  - name: sts-nginx
    port: 80
    targetPort: 80
    protocol: TCP
测试: 创建sts、修改nginx数据、删除sts、重新创建sts。他们的数据丢不丢,共享不共享
sh
kubectl get pod
sts-nginx-0                 1/1     Running   0          5m44s
sts-nginx-1                 1/1     Running   0          5m6s
sts-nginx-2                 1/1     Running   0          4m53s


kubectl exec -it sts-nginx-0 -- /bin/bash
echo 000 > /usr/share/nginx/html/index.html
exit

kubectl exec -it sts-nginx-1 -- /bin/bash
echo 111 > /usr/share/nginx/html/index.html
exit

kubectl exec -it sts-nginx-2 -- /bin/bash
echo 222 > /usr/share/nginx/html/index.html
exit


kubectl get svc
sts-nginx    ClusterIP   10.96.50.112   <none>        80/TCP    6m15s

curl 10.96.50.112
2、文件存储(CephFS)
1、配置
常用 文件存储。 RWX模式;如:10个Pod共同操作一个地方
https://rook.io/docs/rook/v1.6/ceph-filesystem.html
cat /root/rook/cluster/examples/kubernetes/ceph/filesystem.yaml
vi mfilesystem.yaml:
yaml
apiVersion: ceph.rook.io/v1
kind: CephFilesystem
metadata:
  name: myfs
  namespace: rook-ceph # namespace:cluster
spec:
  # The metadata pool spec. Must use replication.
  metadataPool:
    replicated:
      size: 3
      requireSafeReplicaSize: true
    parameters:
      # Inline compression mode for the data pool
      # Further reference: https://docs.ceph.com/docs/nautilus/rados/configuration/bluestore-config-ref/#inline-compression
      compression_mode:
        none
        # gives a hint (%) to Ceph in terms of expected consumption of the total cluster capacity of a given pool
      # for more info: https://docs.ceph.com/docs/master/rados/operations/placement-groups/#specifying-expected-pool-size
      #target_size_ratio: ".5"
  # The list of data pool specs. Can use replication or erasure coding.
  dataPools:
    - failureDomain: host
      replicated:
        size: 3
        # Disallow setting pool with replica 1, this could lead to data loss without recovery.
        # Make sure you're *ABSOLUTELY CERTAIN* that is what you want
        requireSafeReplicaSize: true
      parameters:
        # Inline compression mode for the data pool
        # Further reference: https://docs.ceph.com/docs/nautilus/rados/configuration/bluestore-config-ref/#inline-compression
        compression_mode:
          none
          # gives a hint (%) to Ceph in terms of expected consumption of the total cluster capacity of a given pool
        # for more info: https://docs.ceph.com/docs/master/rados/operations/placement-groups/#specifying-expected-pool-size
        #target_size_ratio: ".5"
  # Whether to preserve filesystem after CephFilesystem CRD deletion
  preserveFilesystemOnDelete: true
  # The metadata service (mds) configuration
  metadataServer:
    # The number of active MDS instances
    activeCount: 1
    # Whether each active MDS instance will have an active standby with a warm metadata cache for faster failover.
    # If false, standbys will be available, but will not have a warm cache.
    activeStandby: true
    # The affinity rules to apply to the mds deployment
    placement:
      #  nodeAffinity:
      #    requiredDuringSchedulingIgnoredDuringExecution:
      #      nodeSelectorTerms:
      #      - matchExpressions:
      #        - key: role
      #          operator: In
      #          values:
      #          - mds-node
      #  topologySpreadConstraints:
      #  tolerations:
      #  - key: mds-node
      #    operator: Exists
      #  podAffinity:
      podAntiAffinity:
        requiredDuringSchedulingIgnoredDuringExecution:
          - labelSelector:
              matchExpressions:
                - key: app
                  operator: In
                  values:
                    - rook-ceph-mds
            # topologyKey: kubernetes.io/hostname will place MDS across different hosts
            topologyKey: kubernetes.io/hostname
        preferredDuringSchedulingIgnoredDuringExecution:
          - weight: 100
            podAffinityTerm:
              labelSelector:
                matchExpressions:
                  - key: app
                    operator: In
                    values:
                      - rook-ceph-mds
              # topologyKey: */zone can be used to spread MDS across different AZ
              # Use <topologyKey: failure-domain.beta.kubernetes.io/zone> in k8s cluster if your cluster is v1.16 or lower
              # Use <topologyKey: topology.kubernetes.io/zone>  in k8s cluster is v1.17 or upper
              topologyKey: topology.kubernetes.io/zone
    # A key/value list of annotations
    annotations:
    #  key: value
    # A key/value list of labels
    labels:
    #  key: value
    resources:
    # The requests and limits set here, allow the filesystem MDS Pod(s) to use half of one CPU core and 1 gigabyte of memory
    #  limits:
    #    cpu: "500m"
    #    memory: "1024Mi"
    #  requests:
    #    cpu: "500m"
    #    memory: "1024Mi"
    # priorityClassName: my-priority-class
  mirroring:
    enabled: false
kubectl apply -f mfilesystem.yaml
cat /root/rook/cluster/examples/kubernetes/ceph/csi/cephfs/storageclass.yaml
yaml
apiVersion: storage.k8s.io/v1
kind: StorageClass
metadata:
  name: rook-cephfs
# Change "rook-ceph" provisioner prefix to match the operator namespace if needed
provisioner: rook-ceph.cephfs.csi.ceph.com
parameters:
  # clusterID is the namespace where operator is deployed.
  clusterID: rook-ceph

  # CephFS filesystem name into which the volume shall be created
  fsName: myfs
  # Ceph pool into which the volume shall be created
  # Required for provisionVolume: "true"
  pool: myfs-data0
  # The secrets contain Ceph admin credentials. These are generated automatically by the operator
  # in the same namespace as the cluster.
  csi.storage.k8s.io/provisioner-secret-name: rook-csi-cephfs-provisioner
  csi.storage.k8s.io/provisioner-secret-namespace: rook-ceph
  csi.storage.k8s.io/controller-expand-secret-name: rook-csi-cephfs-provisioner
  csi.storage.k8s.io/controller-expand-secret-namespace: rook-ceph
  csi.storage.k8s.io/node-stage-secret-name: rook-csi-cephfs-node
  csi.storage.k8s.io/node-stage-secret-namespace: rook-ceph

reclaimPolicy: Delete
# reclaimPolicy: Retain   # 这样 PVC 被删除后,PV 会保留,但需要手动清理和重用,一般用于需要手动备份的场景。
allowVolumeExpansion: true
kubectl apply -f storageclass.yaml
在下面的测试中体会reclaimPolicy的不同配置
2、测试
vi mpvc.yaml
yaml
apiVersion: v1
kind: PersistentVolumeClaim
metadata:
  name: nginx-pv-claim
  labels:
    app:  nginx-deploy
spec:
  storageClassName: rook-cephfs
  accessModes:
    - ReadWriteMany
  resources:
    requests:
      storage: 10Mi
kubectl apply -f mpvc.yaml
vi thisdeploy.yaml
yaml
apiVersion: apps/v1
kind: Deployment
metadata:
  name:  nginx-deploy
  namespace: default
  labels:
    app:  nginx-deploy
spec:
  selector:
    matchLabels:
      app: nginx-deploy
  replicas: 3
  strategy:
    rollingUpdate:
      maxSurge: 25%
      maxUnavailable: 25%
    type: RollingUpdate
  template:
    metadata:
      labels:
        app:  nginx-deploy
    spec:
      containers:
      - name:  nginx-deploy
        image:  nginx
        volumeMounts:
        - name: localtime
          mountPath: /etc/localtime
        - name: nginx-html-storage
          mountPath: /usr/share/nginx/html
      volumes:
        - name: localtime
          hostPath:
            path: /usr/share/zoneinfo/Asia/Shanghai
        - name: nginx-html-storage
          persistentVolumeClaim:
            claimName: nginx-pv-claim
测试,创建deploy、修改页面、删除deploy,新建deploy是否绑定成功,数据是否在。
sh
kubectl apply -f thisdeploy.yaml

kubectl get all -owide
pod/nginx-deploy-85994bdd96-ncbxq   1/1     Running   0          52s   172.18.135.99   k8s-ha-node3     <none>           <none>
pod/nginx-deploy-85994bdd96-qwwpg   1/1     Running   0          52s   172.18.46.215   k8s-ha-node2     <none>           <none>
pod/nginx-deploy-85994bdd96-rmljt   1/1     Running   0          52s   172.18.46.221   k8s-ha-node2     <none>           <none>

curl 172.18.135.99
curl 172.18.46.215
curl 172.18.46.221

kubectl exec -it pod/nginx-deploy-85994bdd96-ncbxq -- /bin/bash
echo aaa > /usr/share/nginx/html/index.html
exit

kubectl exec -it pod/nginx-deploy-85994bdd96-qwwpg -- /bin/bash
echo bbb > /usr/share/nginx/html/index.html
exit

kubectl exec -it pod/nginx-deploy-85994bdd96-rmljt -- /bin/bash
echo ccc > /usr/share/nginx/html/index.html
exit

curl 172.18.135.99
curl 172.18.46.215
curl 172.18.46.221

kubectl delete -f thisdeploy.yaml #继续测试上面


kubectl exec -it pod/nginx-deploy-85994bdd96-6txn2 -- /bin/bash
echo lpbbb888 > /usr/share/nginx/html/index.html
exit

curl 172.18.135.113
3、总结
有状态应用(3个副本)使用块存储。自己操作自己的pvc挂载的pv;PVC不删不丢失【删了也不一定丢失,看你怎么配StorageClass的reclaimPolicy】
无状态应用(3个副本)使用共享存储。很多人操作一个pvc挂载的pv;PVC不删不丢失
- 其他Pod可以对数据进行修改【看你怎么配pvc的accessModes, 可以配为多人只读】
3、pvc扩容
参照CSI(容器存储接口)文档:
卷扩容:https://www.rook.io/docs/rook/v1.6/ceph-csi-drivers.html#dynamically-expand-volume
动态卷扩容:
yaml
# 之前创建storageclass的时候已经配置好了

# 测试:去容器挂载目录  curl -O 某个大文件  默认不能下载

# 修改原来的PVC的storage,可以扩充容器。

# 注意,只能扩容,不能缩容