目录
[二、SIFT 特征匹配 + 图像拼接](#二、SIFT 特征匹配 + 图像拼接)
本篇博客基于 OpenCV-Python 实现三大经典计算机视觉任务:
- 扇子图像分割(边缘检测 + 轮廓提取 + 掩模 + 按位与抠图)
- SIFT 特征匹配与图像拼接
- 答题卡自动阅卷
一、扇子图像分割
读取扇子图片 → 缩放旋转预处理 → Canny 边缘检测 → 提取最大外轮廓 → 生成掩模 → 按位与抠图 → 保存透明背景扇子图
python
import cv2
import numpy as np

# 图像显示工具函数:窗口名 + 图像,按任意键继续
def cv_show(name,img):
    cv2.imshow(name,img)
    cv2.waitKey(0)

# ===================== 1. 图像读取与预处理 =====================
# 读取原始图片
fan1=cv2.imread("fan.jpg")
# 统一缩放尺寸 640x480
fan2=cv2.resize(fan1,(640,480))
cv_show('fan2',fan2)

# 逆时针旋转90度,调整扇子方向
fan3=np.rot90(fan2,k=1)
cv_show('fan3',fan3)
cv2.waitKey(0)

# ===================== 2. 灰度化 + Canny边缘检测 =====================
# 彩色图转灰度图(边缘检测必须灰度图)
fan4=cv2.cvtColor(fan3,cv2.COLOR_BGR2GRAY)
# Canny边缘提取,100/200为高低阈值
fan5=cv2.Canny(fan4,100,200)
cv_show("canny边缘检测",fan5)

# ===================== 3. 二值化 + 轮廓检测 =====================
# 自适应二值化,强化边缘
ref = cv2.threshold(fan5,100,255,cv2.THRESH_BINARY | cv2.THRESH_OTSU)[1]
# 查找所有轮廓
cnts = cv2.findContours(ref.copy(), cv2.RETR_LIST, cv2.CHAIN_APPROX_SIMPLE)[-2]
cv2.waitKey(0)

# ===================== 4. 筛选最大轮廓(扇子外轮廓) =====================
# 按轮廓面积从大到小排序
cnts = sorted(cnts,key=cv2.contourArea,reverse=True)

max_circle_cnt = None
max_radius =0

# 遍历轮廓,找到外接圆最大的轮廓(扇子整体)
for c in cnts:
    (x,y),radius =cv2.minEnclosingCircle(c)
    if radius>max_radius:
        max_radius=radius
        max_circle_cnt=c

# 绘制最大外轮廓(红色线)
fan1_contour=cv2.drawContours(fan3.copy(),[max_circle_cnt],-1,(0,0,255),2)
cv2.imshow('fan1_contour',fan1_contour)
cv2.waitKey(0)

# ===================== 5. 生成掩模 + 按位与抠图 =====================
# 创建纯黑背景(与灰度图同大小)
mask = np.zeros_like(fan4)
# 轮廓内部填充白色(生成掩模)
cv2.drawContours(mask,[max_circle_cnt],-1,255,thickness=-1)
cv_show('mask',mask)
cv2.waitKey(0)

# 单通道掩模转3通道,匹配彩色图像
mask_3channel = cv2.cvtColor(mask,cv2.COLOR_GRAY2BGR)
# 按位与:只保留掩模白色区域(扇子)
result = cv2.bitwise_and(fan3,mask_3channel)
cv_show('result',result)

# 保存最终结果
cv2.imwrite("shanzi.png",result)
print("已经保存:shanzi.png")
cv2.waitKey(0)
依次显示:原图→旋转图→边缘图→轮廓图→掩模图→最终抠图结果
自动生成 shanzi.png(纯扇子 + 黑背景)
结果如下: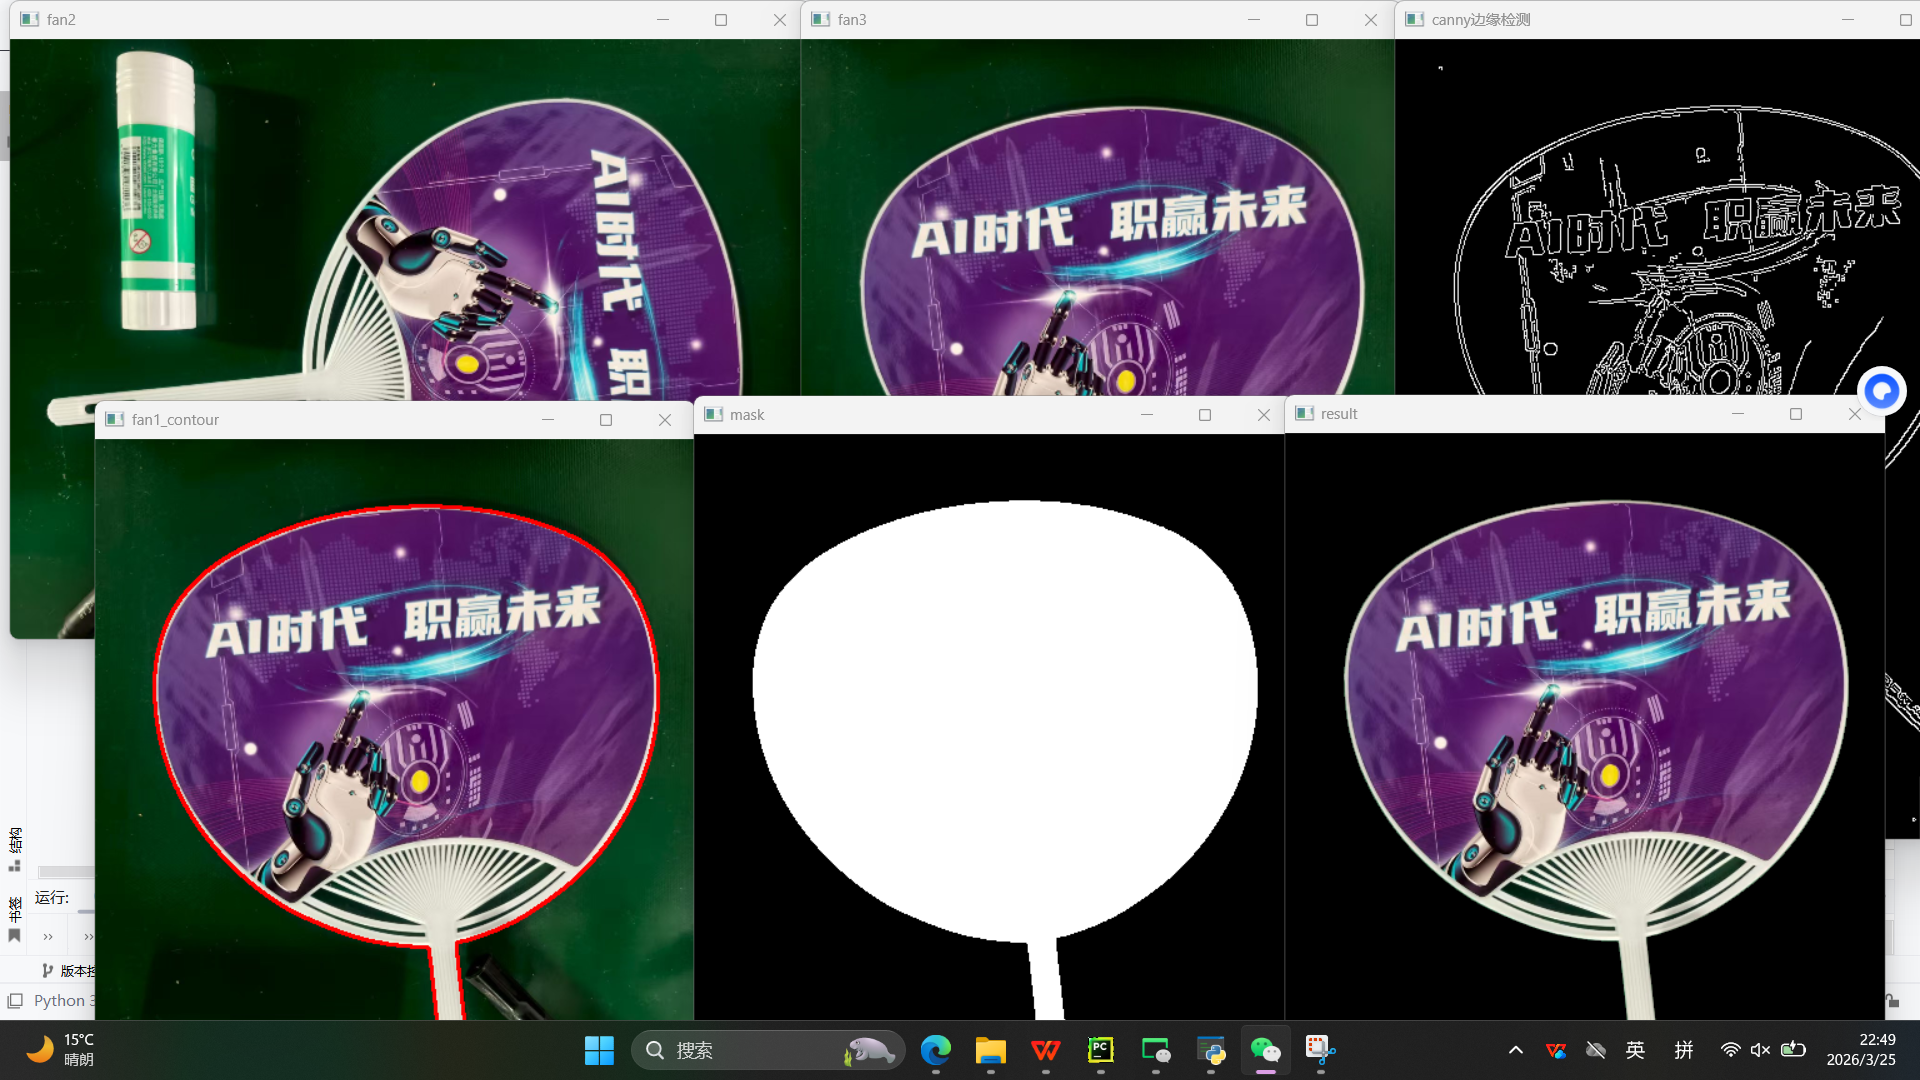
二、SIFT 特征匹配 + 图像拼接
提取两张图片 SIFT 特征 → 暴力匹配 → 单应性矩阵 → 透视变换 → 图像无缝拼接
python
import cv2
import numpy as np
import sys

# 图像显示函数
def cv_show(name,img):
    cv2.imshow(name,img)
    cv2.waitKey(0)

# 提取SIFT特征与描述子
def detectAndDescribe(image):
    gray = cv2.cvtColor(image,cv2.COLOR_BGR2GRAY)  # 转灰度
    sift = cv2.SIFT_create()                       # 创建SIFT
    (kps,des) = sift.detectAndCompute(gray,None)   # 检测特征点
    kps_float = np.float32([kp.pt for kp in kps]) # 坐标转浮点
    return(kps,kps_float,des)

# ===================== 读取待拼接图片 =====================
imageA=cv2.imread("A.jpg")
cv_show('imageA',imageA)
imageB=cv2.imread("B.jpg")
cv_show('imageB',imageB)

# ===================== 提取SIFT特征 =====================
(kpsA,kps_floatA,desA)=detectAndDescribe(imageA)
(kpsB,kps_floatB,desB)=detectAndDescribe(imageB)

# ===================== 暴力匹配特征点 =====================
matcher=cv2.BFMatcher()
rawMatches =matcher.knnMatch(desB,desA,2)

good=[]
matches=[]
for m in rawMatches:
    # 比例测试,筛选优质匹配
    if len(m) == 2 and m[0].distance < 0.65*m[1].distance:
        good.append(m)
        matches.append((m[0].queryIdx,m[0].trainIdx))

# 绘制匹配点
vis =cv2.drawMatchesKnn(imageB,kpsB,imageA,kpsA,good,None,flags=cv2.DRAW_MATCHES_FLAGS_DRAW_RICH_KEYPOINTS)
cv_show("keypoint Matches",vis)

# ===================== 计算单应性矩阵 + 拼接 =====================
if len(matches)>4:
    ptsB = np.float32([kps_floatB[i] for (i,_) in matches])
    ptsA = np.float32([kps_floatA[i] for (_,i) in matches])
    # RANSAC 鲁棒估计单应性矩阵
    (H,mask) = cv2.findHomography(ptsB,ptsA,cv2.RANSAC,10)
else:
    print('图片未找到4个以上的匹配点')
    sys.exit()

# 透视变换
result = cv2.warpPerspective(imageB,H,(imageB.shape[1]+imageA.shape[1],imageB.shape[0]))
# 左图覆盖
result[0:imageA.shape[0],0:imageA.shape[1]]=imageA
cv_show('result',result)
cv2.imwrite('pingjie.jpg',result)
显示特征匹配连线
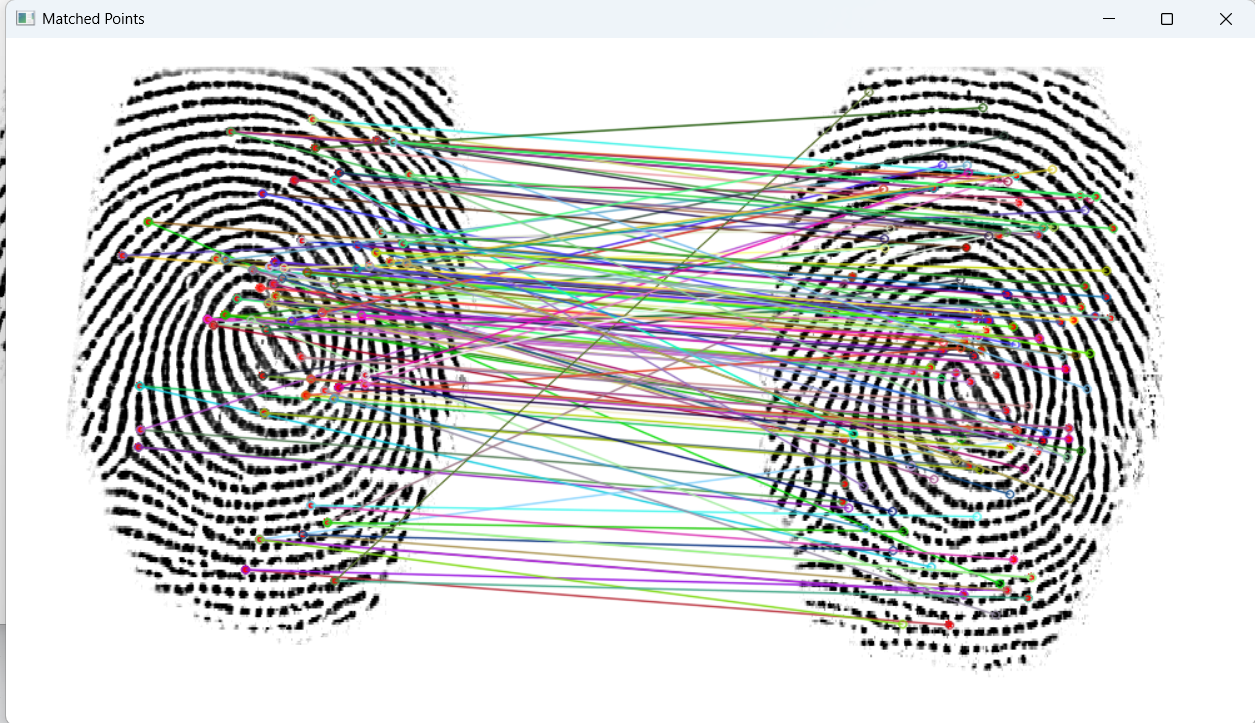
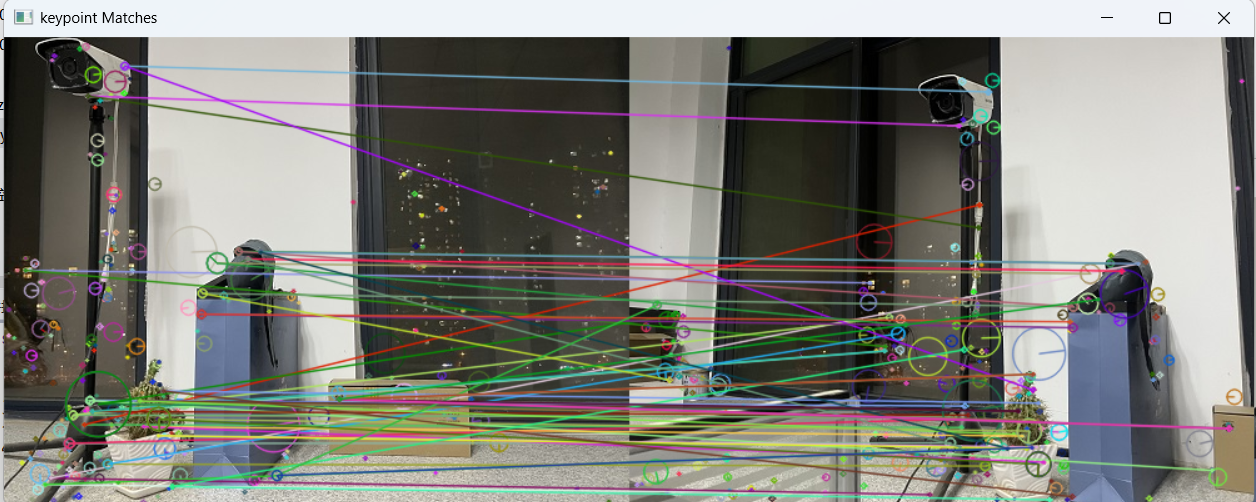
输出无缝拼接大图 pingjie.jpg

三、答题卡自动阅卷系统
图像预处理 → 轮廓检测 → 透视变换摆正 → 选项识别 → 自动判分 → 输出分数
python
import numpy as np
import cv2
# 正确答案
ANSWER_KEY ={0:1,1:4,2:0,3:3,4:1}
# 四点坐标排序
def order_points(pts):
rect = np.zeros((4, 2), dtype="float32")
s = pts.sum(axis=1)
rect[0] = pts[np.argmin(s)]
rect[2] = pts[np.argmax(s)]
diff = np.diff(pts, axis=1)
rect[1] = pts[np.argmin(diff)]
rect[3] = pts[np.argmax(diff)]
return rect
# 四点透视变换
def four_point_transform(image, pts):
rect = order_points(pts)
(tl, tr, br, bl) = rect
widthA = np.sqrt(((br[0] - bl[0]) ** 2) + ((br[1] - bl[1]) ** 2))
widthB = np.sqrt(((tr[0] - tl[0]) ** 2) + ((tr[1] - tl[1]) ** 2))
maxWidth = max(int(widthA), int(widthB))
heightA = np.sqrt(((tr[0] - br[0]) ** 2) + ((tr[1] - br[1]) ** 2))
heightB = np.sqrt(((tl[0] - bl[0]) ** 2) + ((tl[1] - bl[1]) ** 2))
maxHeight = max(int(heightA), int(heightB))
dst = np.array([[0, 0],[maxWidth - 1, 0],[maxWidth - 1, maxHeight - 1],[0, maxHeight - 1]], dtype="float32")
M = cv2.getPerspectiveTransform(rect, dst)
warped = cv2.warpPerspective(image, M, (maxWidth, maxHeight))
return warped
# 轮廓排序
def sort_contours(cnts, method="left-to-right"):
reverse = False
i = 0
if method == "right-to-left" or method == "bottom-to-top":
reverse = True
if method == "top-to-bottom" or method == "bottom-to-top":
i = 1
boundingBoxes = [cv2.boundingRect(c) for c in cnts]
(cnts, boundingBoxes) = zip(*sorted(zip(cnts, boundingBoxes),key=lambda b: b[1][i], reverse=reverse))
return (cnts, boundingBoxes)
# 显示图像
def cv_show(name, img):
cv2.imshow(name, img)
cv2.waitKey(0)
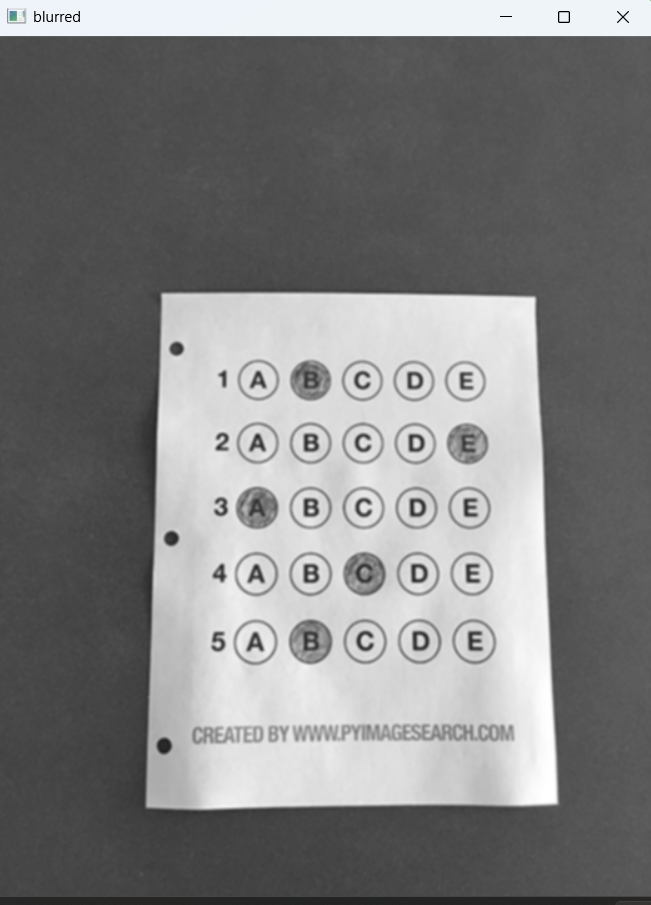
# ===================== 预处理 =====================
image =cv2.imread(r'./images/test_01.png')
contours_img =image.copy()
gray =cv2.cvtColor(image,cv2.COLOR_BGR2GRAY)
blurred = cv2.GaussianBlur(gray,(5,5),0)
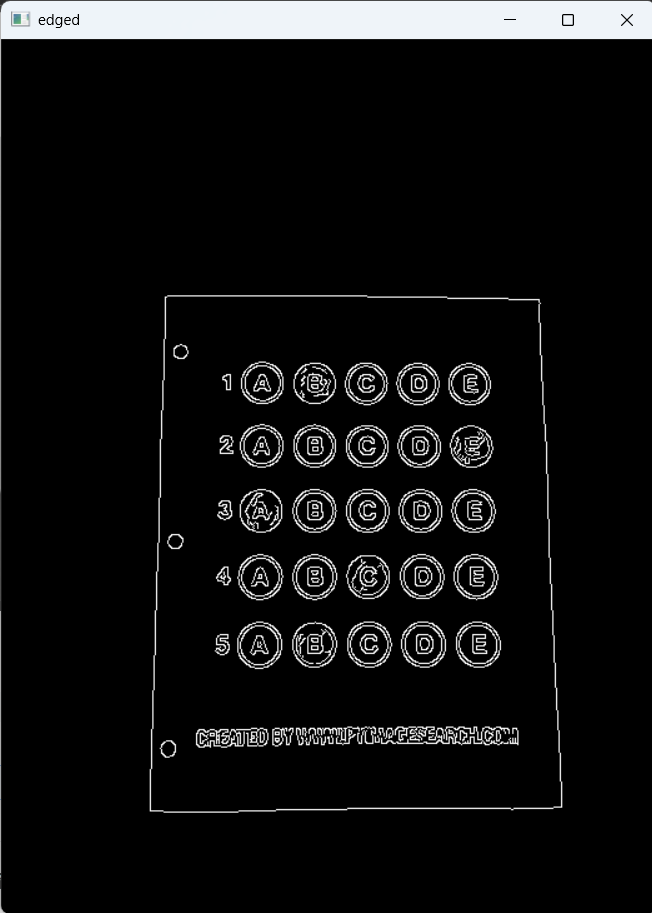
edged=cv2.Canny(blurred,75,200)
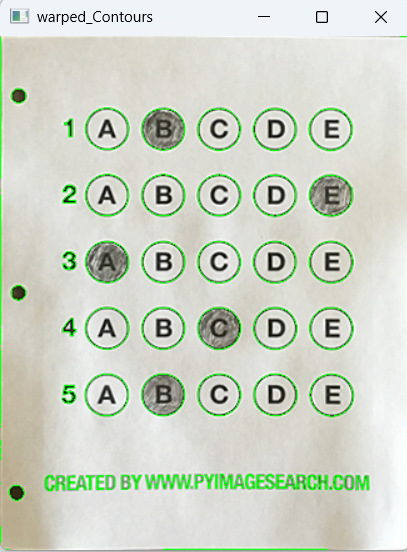
# ===================== 轮廓检测 + 透视变换 =====================
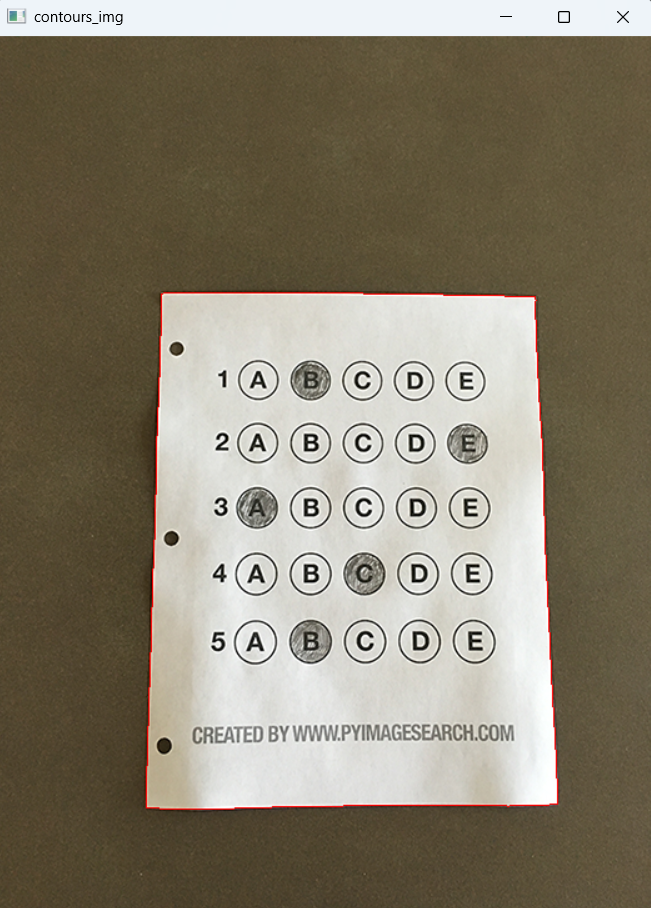
cnts = cv2.findContours(edged.copy(),cv2.RETR_EXTERNAL,cv2.CHAIN_APPROX_SIMPLE)[-2]
cv2.drawContours(contours_img,cnts,-1,(0,0,255))
cnts = sorted(cnts,key=cv2.contourArea,reverse=True)
docCnt =None
for c in cnts:
peri =cv2.arcLength(c,True)
approx = cv2.approxPolyDP(c,0.02*peri,True)
if len(approx)==4:
docCnt = approx
break
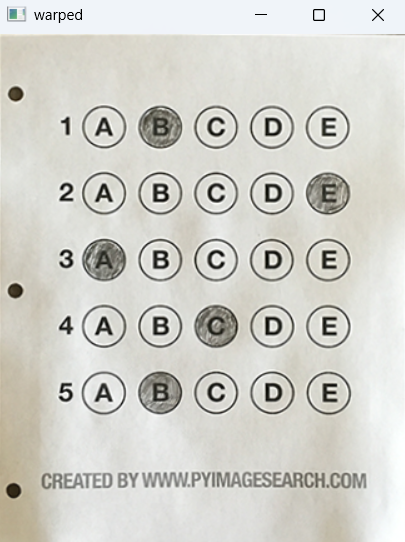
warped_t=four_point_transform(image,docCnt.reshape(4,2))
warped_new=warped_t.copy()
warped =cv2.cvtColor(warped_t,cv2.COLOR_BGR2GRAY)
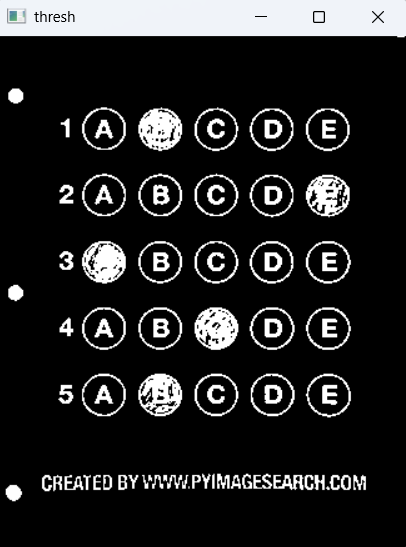
# ===================== 二值化 + 选项识别 =====================
thresh = cv2.threshold(warped,0,255,cv2.THRESH_BINARY_INV | cv2.THRESH_OTSU)[1]
cnts = cv2.findContours(thresh,cv2.RETR_EXTERNAL,cv2.CHAIN_APPROX_SIMPLE)[-2]
questionCnts=[]
for c in cnts:
(x,y,w,h)=cv2.boundingRect(c)
ar = w/float(h)
if w>=20 and h>=20 and 0.9<=ar <=1.1:
questionCnts.append(c)
# ===================== 自动判分 =====================
questionCnts = sort_contours(questionCnts,method="top-to-bottom")[0]
correct =0
for(q,i) in enumerate(np.arange(0,len(questionCnts),5)):
cnts=sort_contours(questionCnts[i:i+5])[0]
bubbled =None
for(j,c) in enumerate(cnts):
mask=np.zeros(thresh.shape,dtype="uint8")
cv2.drawContours(mask,[c],-1,255,-1)
thresh_mask_and = cv2.bitwise_and(thresh,thresh,mask=mask)
total = cv2.countNonZero(thresh_mask_and)
if bubbled is None or total>bubbled[0]:
bubbled=(total,j)
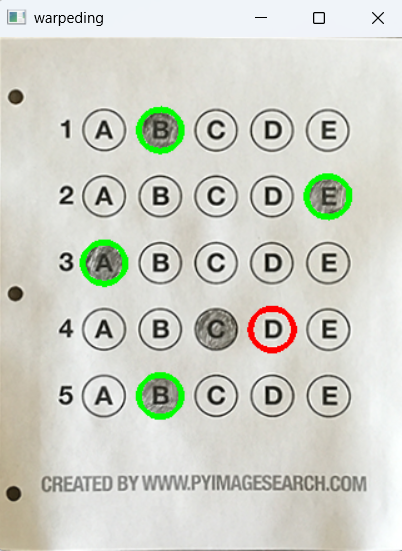
color =(0,0,255)
k=ANSWER_KEY[q]
if k == bubbled[1]:
color =(0,255,0)
correct +=1
cv2.drawContours(warped_new,[cnts[k]],-1,color,3)
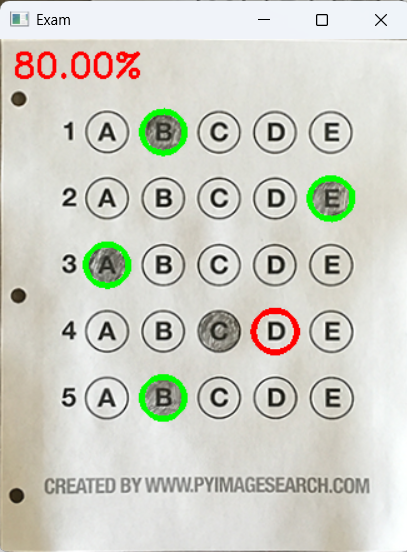
# 输出分数
score = (correct/5.0)*100
print("INFO score:{:.2f}%".format(score))
cv2.putText(warped_new,"{:.2f}%".format(score),(10,30),cv2.FONT_HERSHEY_SIMPLEX,0.9,(0,0,255),2)
cv2.imshow("Original",image)
cv2.imshow("Exam",warped_new)
cv2.waitKey(0)
cv2.destroyAllWindows()自动摆正答题卡
识别涂黑选项
对比答案输出正确率
绿色对、红色错标注
运行结果: