WPF MvvmLight 超详细使用教程
前言
在WPF桌面开发中,MVVM 是公认的最佳架构模式,能彻底实现UI界面与业务逻辑解耦,让代码更易维护、更易测试。而MvvmLight作为轻量级、零门槛的MVVM框架,凭借简洁易用、无侵入、上手快的特点,成为中小型WPF项目的首选。
很多初学者觉得MVVM难上手,大多是因为没吃透框架核心用法。本文全程干货,不讲晦涩理论,只讲实战操作,带你一步步掌握MvvmLight,写出规范的MVVM代码。
适用版本:.NET Framework 4.5+、.NET Core 3.1、.NET 5/6/7/8
开发工具:Visual Studio 2022
框架包:GalaSoft.MvvmLight / MvvmLightLibs(高版本适配)
一、MvvmLight 框架基础认知
1.1 什么是MVVM模式
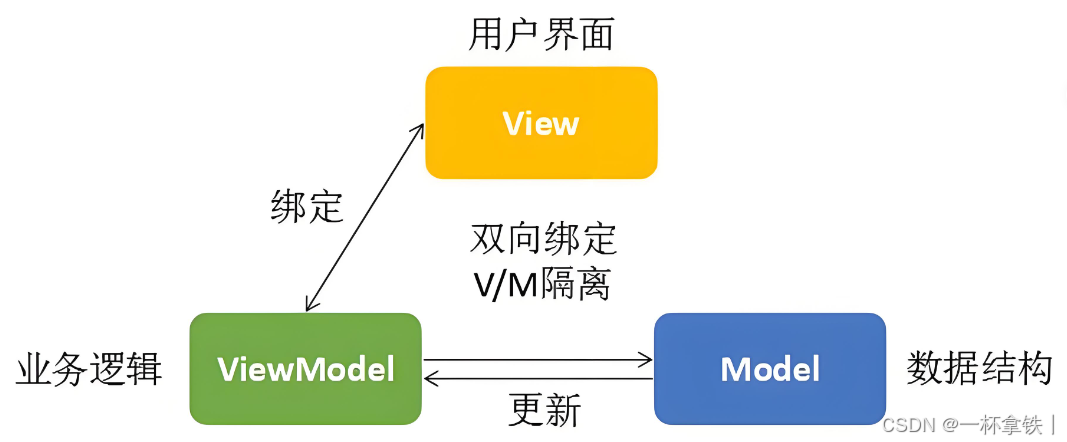
MVVM分为三层,各司其职,完全解耦:
-
View(视图):XAML界面,只负责展示和交互,不写任何业务逻辑
-
ViewModel(视图模型):中间桥梁,封装数据、命令、业务逻辑,不持有View引用
-
Model(模型):数据实体、数据访问、业务模型,负责数据存储和处理
数据流向:Model → ViewModel → View(数据展示);用户操作:View → ViewModel → Model(数据修改)。
1.2 MvvmLight 框架优势
-
✅ 轻量级:体积小,无复杂依赖,引入即用
-
✅ 内置通知:封装INotifyPropertyChanged,省去重复通知代码
-
✅ 便捷命令:提供RelayCommand,快速实现按钮等交互绑定
-
✅ 解耦通信:Messenger消息机制,跨ViewModel、跨页面无耦合传值
-
✅ 设计时支持:支持设计器预览,方便UI并行开发
-
✅ 自带IOC:SimpleIoc轻量级依赖注入,管理对象生命周期
1.3 MVVM与MvvmLight对应关系
-
View:WPF窗口、页面(.xaml)
-
ViewModel:继承ViewModelBase,实现属性、命令
-
Model:实体类、服务类
-
核心工具:ViewModelBase、RelayCommand、Messenger、SimpleIoc
二、环境搭建与项目初始化
2.1 创建WPF项目
-
打开Visual Studio 2022,选择创建新项目
-
搜索并选择WPF应用,点击下一步
-
设置项目名称(如MvvmLightDemo)、存储路径,选择目标框架(推荐.NET 6)
-
点击创建,完成空白WPF项目搭建
2.2 安装MvvmLight NuGet包
方式一:NuGet包管理器(推荐)
-
右键项目 → 管理NuGet程序包
-
切换到浏览页,搜索MvvmLight
-
.NET Framework项目安装:GalaSoft.MvvmLight
-
.NET 6+高版本项目安装:MvvmLightLibs(官方兼容移植版)
-
选择稳定版,点击安装,接受许可协议
方式二:程序包管理器控制台
powershell
// .NET Framework
Install-Package GalaSoft.MvvmLight

// .NET 6+
Install-Package MvvmLightLibs
方式三:.NET CLI命令
powershell
dotnet add package MvvmLightLibs2.3 项目结构规范
为了代码规范,建议按以下分层创建文件夹:
-
📁 Models:实体类、数据模型
-
📁 ViewModels:视图模型,存放所有ViewModel
-
📁 Views:窗口、页面,分离主窗口和子窗口
-
📁 Messages:消息类,用于Messenger通信
-
📁 Services:服务层,数据访问、业务接口
-
📁 Common:公共工具、常量、扩展方法
三、MvvmLight 核心组件详解
3.1 ViewModelBase(属性通知基类)
ViewModelBase是所有ViewModel的父类,内置实现了INotifyPropertyChanged接口,负责属性变更通知,让UI能同步刷新。
核心方法
-
Set(ref T field, T value):赋值并自动触发属性通知
-
RaisePropertyChanged(string name):手动触发通知(多用于计算属性)
-
IsInDesignMode:判断是否处于设计器模式,用于加载模拟数据
代码示例
csharp
using GalaSoft.MvvmLight;

namespace MvvmLightDemo.ViewModels
{
    public class MainViewModel : ViewModelBase
    {
        // 私有字段
        private string _userName;
        private int _age;

        // 公开绑定属性
        public string UserName
        {
            get => _userName;
            set => Set(ref _userName, value);
        }

        public int Age
        {
            get => _age;
            set => Set(ref _age, value);
        }

        // 计算属性
        public string Info => $"姓名:{UserName},年龄:{Age}";

        // 构造函数
        public MainViewModel()
        {
            // 设计时模拟数据
            if (IsInDesignMode)
            {
                UserName = "测试用户";
                Age = 22;
            }
            // 监听依赖属性,刷新计算属性
            PropertyChanged += (s, e) =>
            {
                if (e.PropertyName == nameof(UserName) || e.PropertyName == nameof(Age))
                {
                    RaisePropertyChanged(nameof(Info));
                }
            };
        }
    }
}
3.2 RelayCommand(命令绑定)
在MVVM中,按钮点击、菜单选择等交互,不能直接写后台事件,要用命令绑定。MvvmLight提供RelayCommand,简化ICommand实现。
两种常用命令
-
RelayCommand:无参数命令
-
RelayCommand<T>:带参数命令,T为参数类型
核心语法
csharp
// 无参数命令
RelayCommand(Action execute, Func<bool> canExecute = null)

// 带参数命令
RelayCommand<T>(Action<T> execute, Func<T, bool> canExecute = null)

// 刷新命令可用状态
RaiseCanExecuteChanged()
代码示例
csharp
using GalaSoft.MvvmLight;
using GalaSoft.MvvmLight.Command;
using System.Windows;

namespace MvvmLightDemo.ViewModels
{
    public class MainViewModel : ViewModelBase
    {
        private int _age;
        public int Age
        {
            get => _age;
            set
            {
                Set(ref _age, value);
                // 年龄变化,刷新命令状态
                (CheckAgeCommand as RelayCommand)?.RaiseCanExecuteChanged();
            }
        }

        // 1. 无参数命令
        public ICommand ClearCommand { get; private set; }

        // 2. 带条件命令
        public ICommand CheckAgeCommand { get; private set; }

        public MainViewModel()
        {
            // 初始化命令
            ClearCommand = new RelayCommand(() =>
            {
                Age = 0;
                UserName = string.Empty;
            });

            // 带条件:年龄大于18才可执行
            CheckAgeCommand = new RelayCommand(() =>
            {
                MessageBox.Show("已成年");
            }, () => Age > 18);
        }
    }
}
XAML绑定命令
xml
<Window x:Class="MvvmLightDemo.MainWindow"
        xmlns="http://schemas.microsoft.com/winfx/2006/xaml/presentation"
        xmlns:x="http://schemas.microsoft.com/winfx/2006/xaml"
        xmlns:vm="clr-namespace:MvvmLightDemo.ViewModels"
        Title="主页面" Height="300" Width="500">
    <!--绑定DataContext-->
    <Window.DataContext>
        <vm:MainViewModel/>
    </Window.DataContext>

    <Grid>
        <StackPanel VerticalAlignment="Center" HorizontalAlignment="Center">
            <TextBox Text="{Binding Age,Mode=TwoWay}" Width="200" Margin="10"/>
            <Button Content="验证成年" Command="{Binding CheckAgeCommand}"
                    Width="120" Height="30" Margin="5"/>
            <Button Content="清空" Command="{Binding ClearCommand}"
                    Width="120" Height="30" Margin="5"/>
        </StackPanel>
    </Grid>
</Window>
3.3 Messenger(消息通信)
Messenger采用发布-订阅模式,实现跨ViewModel、跨页面无耦合通信,不用互相引用,彻底解耦。
核心方法
-
Register(this, 回调):订阅消息
-
Send(消息内容):发布消息
-
Unregister<T>(this):取消订阅(防止内存泄漏)
使用步骤
-
创建消息实体类(用于传递数据)
-
订阅方注册消息
-
发布方发送消息
-
页面销毁时取消订阅
代码示例
1. 消息实体类(Messages/UserInfoMsg.cs)
csharp
namespace MvvmLightDemo.Messages
{
    public class UserInfoMsg
    {
        public string Name { get; set; }
        public int Age { get; set; }
    }
}
2. 订阅消息(MainViewModel)
csharp
using GalaSoft.MvvmLight;
using GalaSoft.MvvmLight.Messaging;
using MvvmLightDemo.Messages;

namespace MvvmLightDemo.ViewModels
{
    public class MainViewModel : ViewModelBase
    {
        public string MsgContent { get; set; }

        public MainViewModel()
        {
            // 注册监听消息
            Messenger.Default.Register<UserInfoMsg>(this, msg =>
            {
                MsgContent = $"收到消息:{msg.Name} {msg.Age}岁";
            });
        }

        // 页面销毁时释放
        public override void Cleanup()
        {
            Messenger.Default.Unregister<UserInfoMsg>(this);
            base.Cleanup();
        }
    }
}
3. 发送消息(子ViewModel)
csharp
using GalaSoft.MvvmLight;
using GalaSoft.MvvmLight.Command;
using GalaSoft.MvvmLight.Messaging;
using MvvmLightDemo.Messages;

namespace MvvmLightDemo.ViewModels
{
    public class ChildViewModel : ViewModelBase
    {
        public ICommand SendMsgCommand { get; private set; }

        public ChildViewModel()
        {
            SendMsgCommand = new RelayCommand(() =>
            {
                // 发送消息
                Messenger.Default.Send(new UserInfoMsg
                {
                    Name = "小张",
                    Age = 20
                });
            });
        }
    }
}
3.4 SimpleIoc(依赖注入)
MvvmLight自带轻量级IOC容器,用于统一管理ViewModel和服务实例,实现解耦和单例控制。
使用步骤
-
创建ViewModelLocator定位器
-
在IOC中注册类型
-
在XAML中通过Locator绑定
代码示例
ViewModelLocator.cs
csharp
using GalaSoft.MvvmLight.Ioc;
using Microsoft.Practices.ServiceLocation;
using MvvmLightDemo.ViewModels;

namespace MvvmLightDemo.Common
{
    public class ViewModelLocator
    {
        public ViewModelLocator()
        {
            ServiceLocator.SetLocatorProvider(() => SimpleIoc.Default);
            // 注册ViewModel
            SimpleIoc.Default.Register<MainViewModel>();
        }

        // 公开实例
        public MainViewModel Main => SimpleIoc.Default.GetInstance<MainViewModel>();
    }
}
App.xaml绑定
xml
<Application.Resources>
    <ResourceDictionary>
        <vm:ViewModelLocator x:Key="Locator"
                             xmlns:vm="clr-namespace:MvvmLightDemo.Common"/>
    </ResourceDictionary>
</Application.Resources>
窗口绑定
xml
DataContext="{Binding Main,Source={StaticResource Locator}}"四、完整实战:学生信息管理系统
4.1 功能说明
-
学生列表展示(DataGrid)
-
新增、编辑、删除学生
-
模糊搜索学生
-
跨页面消息通信刷新列表
4.2 Model层(Student.cs)
csharp
namespace MvvmLightDemo.Models
{
    public class Student
    {
        public int Id { get; set; }
        public string Name { get; set; }
        public int Age { get; set; }
        public string ClassName { get; set; }
    }
}
4.3 Service层(数据服务)
csharp
using MvvmLightDemo.Models;
using System.Collections.Generic;
using System.Linq;

namespace MvvmLightDemo.Services
{
    public class StudentService
    {
        // 模拟数据
        private List<Student> _studentList = new List<Student>
        {
            new Student{Id=1,Name="张三",Age=17,ClassName="高一(1)"},
            new Student{Id=2,Name="李四",Age=18,ClassName="高一(2)"},
            new Student{Id=3,Name="王五",Age=17,ClassName="高一(1)"}
        };

        // 查询全部
        public List<Student> GetAll() => _studentList;

        // 新增
        public bool Add(Student model)
        {
            model.Id = _studentList.Max(x => x.Id) + 1;
            _studentList.Add(model);
            return true;
        }

        // 修改
        public bool Update(Student model)
        {
            var item = _studentList.FirstOrDefault(x => x.Id == model.Id);
            if (item == null) return false;
            item.Name = model.Name;
            item.Age = model.Age;
            item.ClassName = model.ClassName;
            return true;
        }

        // 删除
        public bool Delete(int id)
        {
            var item = _studentList.FirstOrDefault(x => x.Id == id);
            if (item == null) return false;
            _studentList.Remove(item);
            return true;
        }

        // 搜索
        public List<Student> Search(string keyword)
        {
            if (string.IsNullOrWhiteSpace(keyword)) return GetAll();
            return _studentList.Where(x => x.Name.Contains(keyword)).ToList();
        }
    }
}
4.4 Message层(刷新消息)
csharp
namespace MvvmLightDemo.Messages
{
    public class RefreshMsg
    {
        // 标记是否需要刷新列表
        public bool IsRefresh { get; set; }
    }
}
4.5 ViewModel层
MainViewModel.cs(主页面)
csharp
using GalaSoft.MvvmLight;
using GalaSoft.MvvmLight.Command;
using GalaSoft.MvvmLight.Messaging;
using MvvmLightDemo.Messages;
using MvvmLightDemo.Models;
using MvvmLightDemo.Services;
using MvvmLightDemo.Views;
using System.Collections.ObjectModel;
using System.Windows;

namespace MvvmLightDemo.ViewModels
{
    public class MainViewModel : ViewModelBase
    {
        private readonly StudentService _studentService;

        // 学生集合
        private ObservableCollection<Student> _students;
        public ObservableCollection<Student> Students
        {
            get => _students;
            set => Set(ref _students, value);
        }

        // 选中学生
        private Student _selectedStudent;
        public Student SelectedStudent
        {
            get => _selectedStudent;
            set => Set(ref _selectedStudent, value);
        }

        // 搜索关键词
        private string _keyword;
        public string Keyword
        {
            get => _keyword;
            set
            {
                Set(ref _keyword, value);
                Search();
            }
        }

        // 命令
        public ICommand AddCommand { get; private set; }
        public ICommand EditCommand { get; private set; }
        public ICommand DeleteCommand { get; private set; }

        public MainViewModel()
        {
            _studentService = new StudentService();
            // 加载数据
            LoadData();
            // 初始化命令
            InitCommand();
            // 注册刷新消息
            Messenger.Default.Register<RefreshMsg>(this, msg =>
            {
                if (msg.IsRefresh) LoadData();
            });
        }

        // 加载数据
        private void LoadData()
        {
            Students = new ObservableCollection<Student>(_studentService.GetAll());
        }

        // 搜索
        private void Search()
        {
            Students = new ObservableCollection<Student>(_studentService.Search(Keyword));
        }

        // 初始化命令
        private void InitCommand()
        {
            // 新增
            AddCommand = new RelayCommand(() =>
            {
                new EditWindow().ShowDialog();
            });

            // 编辑
            EditCommand = new RelayCommand(() =>
            {
                if (SelectedStudent == null)
                {
                    MessageBox.Show("请选择一条数据");
                    return;
                }
                new EditWindow(SelectedStudent).ShowDialog();
            });

            // 删除
            DeleteCommand = new RelayCommand(() =>
            {
                if (SelectedStudent == null)
                {
                    MessageBox.Show("请选择一条数据");
                    return;
                }
                var result = MessageBox.Show("确认删除?", "提示", MessageBoxButton.YesNo);
                if (result == MessageBoxResult.Yes)
                {
                    _studentService.Delete(SelectedStudent.Id);
                    LoadData();
                }
            });
        }

        // 释放
        public override void Cleanup()
        {
            Messenger.Default.Unregister<RefreshMsg>(this);
            base.Cleanup();
        }
    }
}
EditViewModel.cs(编辑页面)
csharp
using GalaSoft.MvvmLight;
using GalaSoft.MvvmLight.Command;
using GalaSoft.MvvmLight.Messaging;
using MvvmLightDemo.Messages;
using MvvmLightDemo.Models;
using MvvmLightDemo.Services;
using System.Windows;

namespace MvvmLightDemo.ViewModels
{
    public class EditViewModel : ViewModelBase
    {
        private readonly StudentService _studentService;
        private Student _studentInfo;
        public Student StudentInfo
        {
            get => _studentInfo;
            set => Set(ref _studentInfo, value);
        }

        public ICommand SaveCommand { get; private set; }
        public ICommand CancelCommand { get; private set; }

        // 新增构造
        public EditViewModel()
        {
            _studentService = new StudentService();
            StudentInfo = new Student();
            InitCommand();
        }

        // 修改构造
        public EditViewModel(Student model)
        {
            _studentService = new StudentService();
            StudentInfo = model;
            InitCommand();
        }

        private void InitCommand()
        {
            // 保存
            SaveCommand = new RelayCommand(() =>
            {
                if (string.IsNullOrWhiteSpace(StudentInfo.Name))
                {
                    MessageBox.Show("姓名不能为空");
                    return;
                }
                bool flag;
                if (StudentInfo.Id == 0)
                {
                    flag = _studentService.Add(StudentInfo);
                }
                else
                {
                    flag = _studentService.Update(StudentInfo);
                }
                if (flag)
                {
                    // 发送刷新消息
                    Messenger.Default.Send(new RefreshMsg { IsRefresh = true });
                    // 关闭当前窗口
                    Application.Current.Windows.OfType<EditWindow>().FirstOrDefault()?.Close();
                }
            });

            // 取消
            CancelCommand = new RelayCommand(() =>
            {
                Application.Current.Windows.OfType<EditWindow>().FirstOrDefault()?.Close();
            });
        }
    }
}
4.6 View层
MainWindow.xaml(主页面)
xml
<Window x:Class="MvvmLightDemo.MainWindow"
        xmlns="http://schemas.microsoft.com/winfx/2006/xaml/presentation"
        xmlns:x="http://schemas.microsoft.com/winfx/2006/xaml"
        xmlns:vm="clr-namespace:MvvmLightDemo.ViewModels"
        Title="学生管理系统" Height="450" Width="700">
    <Window.DataContext>
        <vm:MainViewModel/>
    </Window.DataContext>
    <Grid Margin="15">
        <Grid.RowDefinitions>
            <RowDefinition Height="Auto"/>
            <RowDefinition Height="*"/>
            <RowDefinition Height="Auto"/>
        </Grid.RowDefinitions>

        <!--搜索栏-->
        <StackPanel Grid.Row="0" Orientation="Horizontal" Margin="0 0 0 10">
            <TextBox Text="{Binding Keyword,Mode=TwoWay}"
                     Width="200" Height="25" PlaceholderText="请输入姓名"/>
        </StackPanel>

        <!--数据列表-->
        <DataGrid Grid.Row="1" ItemsSource="{Binding Students}"
                  SelectedItem="{Binding SelectedStudent}"
                  AutoGenerateColumns="False" CanUserAddRows="False">
            <DataGrid.Columns>
                <DataGridTextColumn Header="学号" Binding="{Binding Id}" Width="80"/>
                <DataGridTextColumn Header="姓名" Binding="{Binding Name}" Width="120"/>
                <DataGridTextColumn Header="年龄" Binding="{Binding Age}" Width="80"/>
                <DataGridTextColumn Header="班级" Binding="{Binding ClassName}" Width="150"/>
            </DataGrid.Columns>
        </DataGrid>

        <!--操作按钮-->
        <StackPanel Grid.Row="2" Orientation="Horizontal" HorizontalAlignment="Right" Margin="0 10 0 0">
            <Button Content="新增" Command="{Binding AddCommand}" Width="80" Height="28" Margin="5"/>
            <Button Content="编辑" Command="{Binding EditCommand}" Width="80" Height="28" Margin="5"/>
            <Button Content="删除" Command="{Binding DeleteCommand}" Width="80" Height="28" Margin="5"/>
        </StackPanel>
    </Grid>
</Window>
EditWindow.xaml(编辑页面)
xml
<Window x:Class="MvvmLightDemo.Views.EditWindow"
        xmlns="http://schemas.microsoft.com/winfx/2006/xaml/presentation"
        xmlns:x="http://schemas.microsoft.com/winfx/2006/xaml"
        xmlns:vm="clr-namespace:MvvmLightDemo.ViewModels"
        Title="学生信息" Height="280" Width="400" ResizeMode="NoResize">
    <Window.DataContext>
        <vm:EditViewModel/>
    </Window.DataContext>
    <Grid Margin="20">
        <StackPanel>
            <StackPanel Margin="0 10">
                <TextBlock Text="姓名"/>
                <TextBox Text="{Binding StudentInfo.Name,Mode=TwoWay}" Height="25"/>
            </StackPanel>
            <StackPanel Margin="0 10">
                <TextBlock Text="年龄"/>
                <TextBox Text="{Binding StudentInfo.Age,Mode=TwoWay}" Height="25"/>
            </StackPanel>
            <StackPanel Margin="0 10">
                <TextBlock Text="班级"/>
                <TextBox Text="{Binding StudentInfo.ClassName,Mode=TwoWay}" Height="25"/>
            </StackPanel>
            <StackPanel Orientation="Horizontal" HorizontalAlignment="Right" Margin="0 15 0 0">
                <Button Content="保存" Command="{Binding SaveCommand}"
                        Width="70" Height="28" Margin="5"/>
                <Button Content="取消" Command="{Binding CancelCommand}"
                        Width="70" Height="28" Margin="5"/>
            </StackPanel>
        </StackPanel>
    </Grid>
</Window>
4.7 EditWindow后台构造函数
csharp
using MvvmLightDemo.Models;
using MvvmLightDemo.ViewModels;
using System.Windows;

namespace MvvmLightDemo.Views
{
    public partial class EditWindow : Window
    {
        // 新增
        public EditWindow()
        {
            InitializeComponent();
        }

        // 修改
        public EditWindow(Student model)
        {
            InitializeComponent();
            // 传递数据
            (DataContext as EditViewModel).StudentInfo = model;
        }
    }
}
五、开发避坑要点(必看)
-
属性必须用Set赋值,否则UI不刷新
-
命令必须是public只读属性,不能是字段
-
Messenger用完必须取消订阅,防止内存泄漏
-
列表绑定用ObservableCollection,List不会自动刷新
-
条件命令变更后,调用RaiseCanExecuteChanged
-
.NET高版本用MvvmLightLibs,兼容更好
-
ViewModel不要直接操作View,保持解耦
六、总结
MvvmLight是WPF开发中极具性价比的MVVM框架,核心就是掌握属性通知、命令绑定、消息通信三大件。本文从基础到实战,完整覆盖了日常开发的全部场景,代码规范、可直接运行。
掌握这套用法,不仅能写出整洁解耦的项目,更能理解MVVM的设计思想,后续学习Prism等重型框架也会更轻松。
💬 留言交流:如果你在使用中遇到问题,欢迎在评论区留言~
👍 原创不易,觉得有用可以点赞、收藏、关注,持续更新WPF实战干货!