文章目录
- 一、前言
- 二、基础环境准备
-
- [1. 引入 Spring Boot Mail Starter 依赖](#1. 引入 Spring Boot Mail Starter 依赖)
- [2. 获取 QQ 邮箱 SMTP 授权码](#2. 获取 QQ 邮箱 SMTP 授权码)
- 三、单体服务下邮件发送实现
-
- [1. 编写邮件配置文件](#1. 编写邮件配置文件)
- [2. 开发 EmailUtil 邮件工具类](#2. 开发 EmailUtil 邮件工具类)
- [3. 注入使用 EmailUtil](#3. 注入使用 EmailUtil)
- 四、微服务场景下公共邮件模块封装
-
- [1. 改造 EmailUtil 工具类](#1. 改造 EmailUtil 工具类)
- [2. 编写自动配置类](#2. 编写自动配置类)
- [3. 实现 Spring Boot 自动装配](#3. 实现 Spring Boot 自动装配)
- [4. 业务服务引入公共模块并配置](#4. 业务服务引入公共模块并配置)
- 五、邮件发送使用示例
- 六、常见问题与注意事项
一、前言
在实际项目开发中,邮件发送是非常常见的功能,例如用户注册验证码、登录验证、消息通知、异常告警等场景都需要用到邮件服务。
Spring Boot 提供了开箱即用的 spring-boot-starter-mail 依赖,可以非常方便地实现邮件发送功能。本文将详细讲解单体应用中快速集成邮件发送 ,以及微服务架构下将邮件能力封装为公共 starter 模块,供其他业务服务复用的完整实现方案。
二、基础环境准备
1. 引入 Spring Boot Mail Starter 依赖
在需要使用邮件功能的服务 pom.xml 中引入邮件启动器依赖:
xml
<dependency>
    <groupId>org.springframework.boot</groupId>
    <artifactId>spring-boot-starter-mail</artifactId>
</dependency>
2. 获取 QQ 邮箱 SMTP 授权码
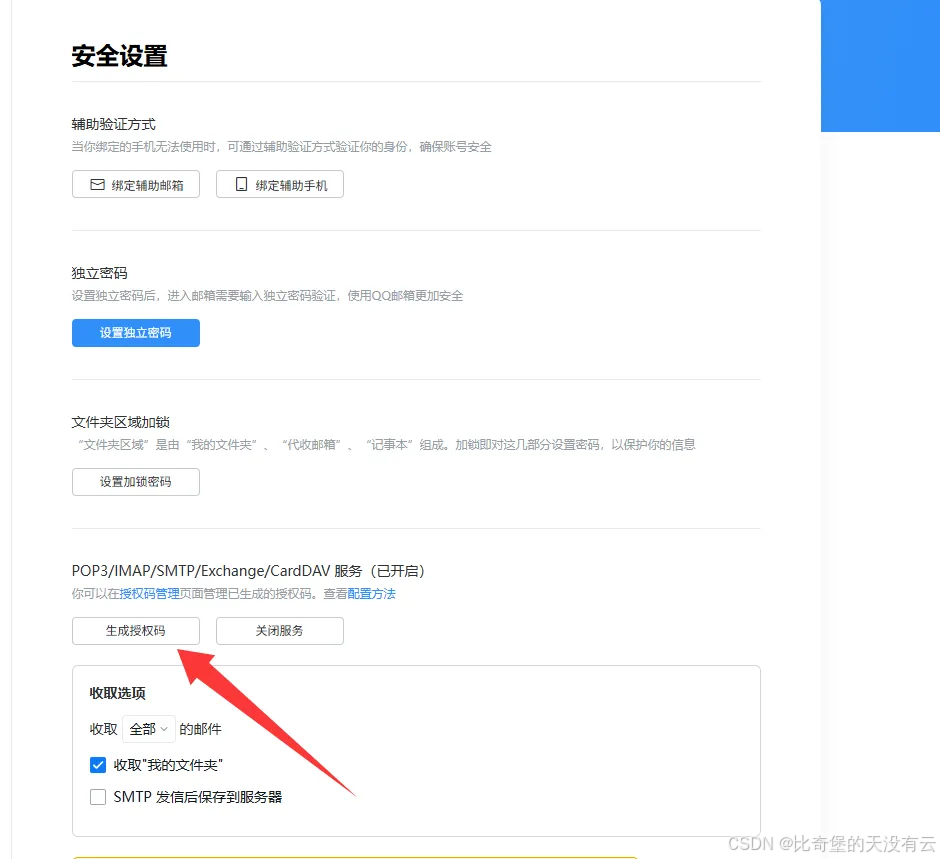
以 QQ 邮箱为例,获取 SMTP 授权码步骤:
- 登录网页版 QQ 邮箱
- 进入 设置 → 账号与安全 → 安全设置
- 开启 POP3/IMAP/SMTP 服务
- 点击 生成授权码,完成安全验证后即可获得一串授权码
- 该授权码即为配置文件中
password对应的值,不是邮箱登录密码
三、单体服务下邮件发送实现
1. 编写邮件配置文件
在 application.yml 中添加邮件相关配置:
yaml
spring:
  mail:
    # 邮箱 SMTP 地址
    host: smtp.qq.com  # QQ 邮箱
    #host: smtp.163.com # 163 邮箱
    #host: smtp.exmail.qq.com # 腾讯企业邮箱

    username: 你的发件邮箱地址
    password: 刚才生成的 SMTP 授权码

    properties:
      mail:
        smtp:
          auth: true
          starttls:
            enable: true
            required: true
    default-encoding: UTF-8
2. 开发 EmailUtil 邮件工具类
单体应用中直接使用 @Component 将工具类交给 Spring 管理:
java
import jakarta.annotation.Resource;
import jakarta.mail.MessagingException;
import jakarta.mail.internet.MimeMessage;
import lombok.extern.slf4j.Slf4j;
import org.springframework.boot.autoconfigure.mail.MailProperties;
import org.springframework.mail.javamail.JavaMailSender;
import org.springframework.mail.javamail.MimeMessageHelper;
import org.springframework.stereotype.Component;

@Slf4j
@Component
public class EmailUtil {

    @Resource
    private JavaMailSender javaMailSender;

    @Resource
    private MailProperties mailProperties;

    public EmailUtil(JavaMailSender javaMailSender, MailProperties mailProperties) {
        this.javaMailSender = javaMailSender;
        this.mailProperties = mailProperties;
    }

    /**
     * 发送邮箱验证码
     *
     * @param toEmail 收件人
     * @param code    验证码
     * @throws MessagingException
     */
    public void sendEmailCode(String toEmail, String code) throws MessagingException {
        MimeMessage message = javaMailSender.createMimeMessage();
        MimeMessageHelper helper = new MimeMessageHelper(message, true);

        helper.setFrom(mailProperties.getUsername());
        helper.setTo(toEmail);
        helper.setSubject("登录验证码");

        String content = "<h3>你的验证码是:" + code + "</h3>"
                + "<p>5分钟内有效,请勿泄露给他人</p>";

        helper.setText(content, true);
        javaMailSender.send(message);
        log.info("发送验证码到邮箱成功,邮箱:{},验证码:{}", toEmail, code);
    }

    /**
     * 通用邮件发送
     *
     * @param toEmail 收件人
     * @param subject 邮件主题
     * @param content 邮件内容
     * @throws MessagingException
     */
    public void sendEmailCode(String toEmail, String subject, String content) throws MessagingException {
        MimeMessage message = javaMailSender.createMimeMessage();
        MimeMessageHelper helper = new MimeMessageHelper(message, true);

        helper.setFrom(mailProperties.getUsername());
        helper.setTo(toEmail);
        helper.setSubject(subject);

        helper.setText(content, true);
        javaMailSender.send(message);
        log.info("发送邮件到邮箱成功,邮箱:{},主题:{}, 内容:{}", toEmail, subject, content);
    }
}
3. 注入使用 EmailUtil
在业务 Service/Controller 中直接注入使用:
java
@Resource
private EmailUtil emailUtil;

// 发送验证码
emailUtil.sendEmailCode("xxx@qq.com", "123456");
四、微服务场景下公共邮件模块封装
微服务项目中,通常会将邮件发送抽成公共模块 ,避免每个服务重复编写代码,此时不能使用 @Component 直接注入,需要通过 Spring Boot 自动装配实现。
1. 改造 EmailUtil 工具类
移除 @Component,@Resource 注解,仅保留构造器注入:
java
import jakarta.mail.MessagingException;
import jakarta.mail.internet.MimeMessage;
import lombok.extern.slf4j.Slf4j;
import org.springframework.boot.autoconfigure.mail.MailProperties;
import org.springframework.mail.javamail.JavaMailSender;
import org.springframework.mail.javamail.MimeMessageHelper;

@Slf4j
public class EmailUtil {

    private final JavaMailSender javaMailSender;
    private final MailProperties mailProperties;

    public EmailUtil(JavaMailSender javaMailSender, MailProperties mailProperties) {
        this.javaMailSender = javaMailSender;
        this.mailProperties = mailProperties;
    }

    /**
     * 发送邮箱验证码
     */
    public void sendEmailCode(String toEmail, String code) throws MessagingException {
        MimeMessage message = javaMailSender.createMimeMessage();
        MimeMessageHelper helper = new MimeMessageHelper(message, true);

        helper.setFrom(mailProperties.getUsername());
        helper.setTo(toEmail);
        helper.setSubject("登录验证码");

        String content = "<h3>你的验证码是:" + code + "</h3>"
                + "<p>5分钟内有效,请勿泄露给他人</p>";

        helper.setText(content, true);
        javaMailSender.send(message);
        log.info("发送验证码到邮箱成功,邮箱:{},验证码:{}", toEmail, code);
    }

    /**
     * 通用邮件发送
     */
    public void sendEmailCode(String toEmail, String subject, String content) throws MessagingException {
        MimeMessage message = javaMailSender.createMimeMessage();
        MimeMessageHelper helper = new MimeMessageHelper(message, true);

        helper.setFrom(mailProperties.getUsername());
        helper.setTo(toEmail);
        helper.setSubject(subject);

        helper.setText(content, true);
        javaMailSender.send(message);
        log.info("发送邮件到邮箱成功,邮箱:{},主题:{}, 内容:{}", toEmail, subject, content);
    }
}
2. 编写自动配置类
创建自动配置类,将 EmailUtil 注册为 Spring Bean:
java
import org.springframework.boot.autoconfigure.condition.ConditionalOnMissingBean;
import org.springframework.boot.autoconfigure.mail.MailProperties;
import org.springframework.context.annotation.Bean;
import org.springframework.context.annotation.Configuration;
import org.springframework.mail.javamail.JavaMailSender;

@Configuration
public class EmailAutoConfiguration {

    @Bean
    @ConditionalOnMissingBean // 先去 Spring 容器里找一找,没有再进行创建
    public EmailUtil emailUtil(JavaMailSender javaMailSender, MailProperties mailProperties) {
        return new EmailUtil(javaMailSender, mailProperties);
    }
}
作用:
- 将
EmailUtil注入 Spring 容器 - 自动注入
JavaMailSender和MailProperties完成初始化 @ConditionalOnMissingBean保证业务侧可自定义覆盖
3. 实现 Spring Boot 自动装配
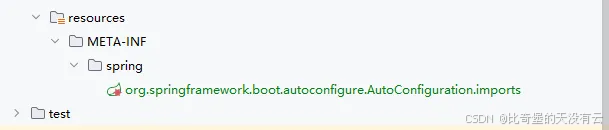
在公共模块的资源目录下创建文件:
resources/META-INF/spring/org.springframework.boot.autoconfigure.AutoConfiguration.imports文件中写入配置类全限定名:
com.xxx.common.mail.config.EmailAutoConfigurationSpring Boot 启动时会自动加载该配置类。

4. 业务服务引入公共模块并配置
- 业务服务
pom.xml引入公共邮件模块 - 业务服务配置文件中依旧配置
spring.mail相关信息(与单体应用一致) - 直接注入
EmailUtil即可使用
五、邮件发送使用示例
java
@RestController
@RequestMapping("/mail")
@RequiredArgsConstructor
public class MailController {

    private final EmailUtil emailUtil;

    @GetMapping("/send/code")
    public String sendCode(String email) throws MessagingException {
        // 生成6位数字验证码
        String code = String.valueOf((int)((Math.random() * 9 + 1) * 100000));
        emailUtil.sendEmailCode(email, code);
        return "发送成功";
    }

    @GetMapping("/send/custom")
    public String sendCustom(String email, String subject, String content) throws MessagingException {
        emailUtil.sendEmailCode(email, subject, content);
        return "发送成功";
    }
}
六、常见问题与注意事项
- password 不是邮箱密码,是 SMTP 授权码
- 发送失败检查:SMTP 地址、端口、授权码、网络策略、防火墙
- 微服务公共模块必须配置自动装配文件,否则无法注入
- 建议对邮件发送做异常捕获、重试机制、限流防刷
- 验证码建议存入 Redis 并设置过期时间(如 5 分钟)
- 避免频繁发送导致邮箱被判定为垃圾邮件