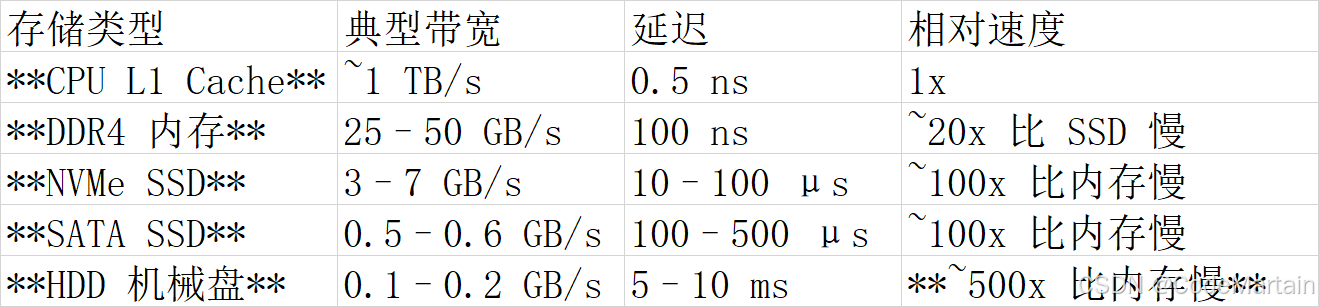
首先我们要了解, 从内存读取数据跟从磁盘读取数据的带宽差别很大
带宽
其次 ,redis是单线程,就没有多线程的上下文切换的开销;
I/O 多路复用
然后 redis采用io多路复用(非阻塞io)
I/O 多路复用 vs 传统模型

三大实现机制对比
- select(POSIX 标准)
原理:轮询 fd_set 中的所有文件描述符
缺陷:
最大连接数限制(FD_SETSIZE=1024)
每次调用需 全量拷贝 fd_set 到内核
O(n) 时间复杂度(遍历所有 fd) - poll(Linux 特有)
改进:使用 pollfd 数组替代 bitmap
仍存在:
O(n) 遍历开销
无内核级事件通知 - epoll(Linux 高性能方案)
核心创新:
事件驱动:内核维护就绪队列(O(1) 获取就绪 fd)
内存共享:mmap 避免用户态/内核态数据拷贝
边缘触发(ET)/水平触发(LT) 模式
性能:百万级连接仅需 毫秒级响应
为什么 Redis 单线程能扛高并发?
epoll 避免了线程切换开销 + 内存操作极快
Java netty 代码实例
EpollServer
服务类
java
package com.itranswarp.learnjava.redisio;

import io.netty.bootstrap.ServerBootstrap;
import io.netty.channel.*;
import io.netty.channel.epoll.Epoll;
import io.netty.channel.epoll.EpollEventLoopGroup;
import io.netty.channel.epoll.EpollServerSocketChannel;
import io.netty.channel.nio.NioEventLoopGroup;
import io.netty.channel.socket.SocketChannel;
import io.netty.channel.socket.nio.NioServerSocketChannel;
import io.netty.handler.codec.DelimiterBasedFrameDecoder;
import io.netty.handler.codec.Delimiters;
import io.netty.handler.codec.string.StringDecoder;
import io.netty.handler.codec.string.StringEncoder;
import io.netty.util.CharsetUtil;

public class EpollServer {

    public void start(int port) {
        // 主线程组:接收连接
        EventLoopGroup bossGroup = Epoll.isAvailable() ?
                new EpollEventLoopGroup(1) :
                new NioEventLoopGroup(1);

        // 工作线程组:处理读写(默认 CPU 核心数 * 2)
        EventLoopGroup workerGroup = Epoll.isAvailable() ?
                new EpollEventLoopGroup() :
                new NioEventLoopGroup();

        try {
            ServerBootstrap b = new ServerBootstrap();
            b.group(bossGroup, workerGroup)
                    // Linux 使用 Epoll,否则使用 NIO
                    .channel(Epoll.isAvailable() ? EpollServerSocketChannel.class : NioServerSocketChannel.class)
                    .childHandler(new ChannelInitializer<SocketChannel>() {
                        @Override
                        protected void initChannel(SocketChannel ch) {
                            ChannelPipeline pipeline = ch.pipeline();
                            // 1. 按换行符拆包(最大帧 1MB)
                            pipeline.addLast(new DelimiterBasedFrameDecoder(1024 * 1024, Delimiters.lineDelimiter()));
//                            pipeline.addLast(new FixedLengthFrameDecoder(100));
                            // 2. ByteBuf → String 解码
                            pipeline.addLast(new StringDecoder(CharsetUtil.UTF_8));
                            // 3. String → ByteBuf 编码
                            pipeline.addLast(new StringEncoder(CharsetUtil.UTF_8));
                            pipeline.addLast(new EchoHandler());
                        }
                    })
                    .option(ChannelOption.SO_BACKLOG, 128)
                    .childOption(ChannelOption.SO_KEEPALIVE, true);

            // 绑定端口启动
            ChannelFuture f = b.bind(port).sync();
            System.out.println("Netty Epoll 服务启动,端口:" + port
                    + ",是否启用 Epoll:" + Epoll.isAvailable());

            // 等待服务关闭
            f.channel().closeFuture().sync();
        } catch (InterruptedException e) {
            Thread.currentThread().interrupt();
        } finally {
            // 优雅关闭线程组
            bossGroup.shutdownGracefully();
            workerGroup.shutdownGracefully();
        }
    }


    public static void main(String[] args) {
        new EpollServer().start(8080);
    }
}
消息处理类
java
package com.itranswarp.learnjava.redisio;
import io.netty.channel.ChannelHandlerContext;
import io.netty.channel.SimpleChannelInboundHandler;
/**
* @className: EchoHandler 业务处理器
* @author: lcy
* @date: 2026/4/2 11:12
* @Version: 1.0
* @description:
*/
public class EchoHandler extends SimpleChannelInboundHandler<String> {
@Override
protected void channelRead0(ChannelHandlerContext channelHandlerContext, String msg) throws Exception {
// 1. 读取原始数据(不移动 readerIndex)
// 此时 msg 已是完整字符串(不含换行符)
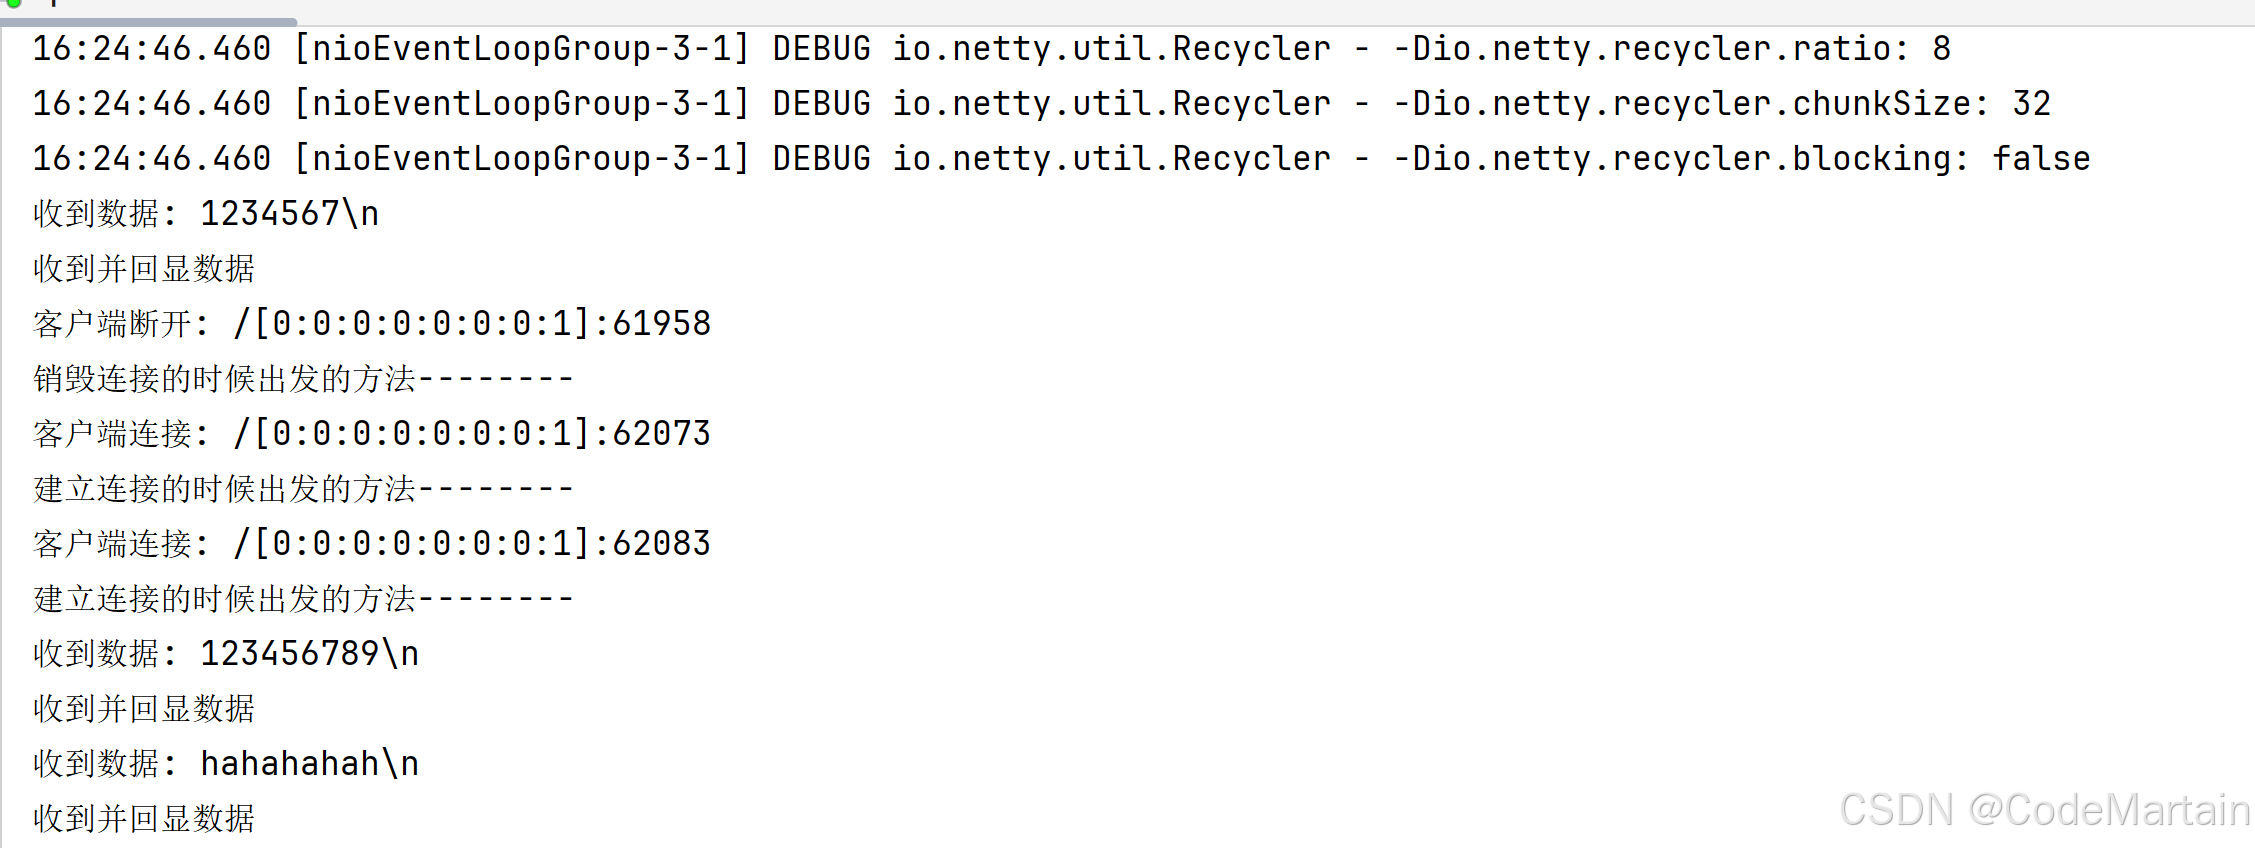
System.out.println("收到数据: " + msg);
System.out.println("收到并回显数据");
}
@Override
public void channelActive(ChannelHandlerContext ctx) {
System.out.println("客户端连接: " + ctx.channel().remoteAddress());
System.out.println("建立连接的时候出发的方法--------");
}
@Override
public void channelInactive(ChannelHandlerContext ctx) {
System.out.println("客户端断开: " + ctx.channel().remoteAddress());
System.out.println("销毁连接的时候出发的方法--------");
}
}运行EpollServer 这样我们就监听了8080 端口
我们可以向8080 端口发送消息了
打开cmd
bash
telnet localhost 8080
此时我们可以打开多个 cmd 同时连接8080 端口;
当然我们也可以写一个客户端往 8080 端口发送消息
java
package com.itranswarp.learnjava.redisio;
import io.netty.bootstrap.Bootstrap;
import io.netty.channel.*;
import io.netty.channel.nio.NioEventLoopGroup;
import io.netty.channel.socket.SocketChannel;
import io.netty.channel.socket.nio.NioSocketChannel;
import io.netty.handler.codec.DelimiterBasedFrameDecoder;
import io.netty.handler.codec.Delimiters;
import io.netty.handler.codec.string.StringDecoder;
import io.netty.handler.codec.string.StringEncoder;
import io.netty.util.CharsetUtil;
public class EchoClient {
public static void main(String[] args) throws InterruptedException {
EventLoopGroup group = new NioEventLoopGroup();
try {
Bootstrap b = new Bootstrap();
b.group(group)
.channel(NioSocketChannel.class)
.handler(new ChannelInitializer<SocketChannel>() {
@Override
protected void initChannel(SocketChannel ch) {
ChannelPipeline pipeline = ch.pipeline();
// 和服务端完全一致的编解码器(必须一样!)
pipeline.addLast(new DelimiterBasedFrameDecoder(1024 * 1024, Delimiters.lineDelimiter()));
pipeline.addLast(new StringDecoder(CharsetUtil.UTF_8));
pipeline.addLast(new StringEncoder(CharsetUtil.UTF_8));
// 客户端业务处理器
pipeline.addLast(new EchoClientHandler());
}
});
// 连接服务端 8080
ChannelFuture f = b.connect("127.0.0.1", 8080).sync();
System.out.println("✅ 已连接到 Netty 服务端 8080");
// 发送消息
f.channel().writeAndFlush("Hello Netty Server!\n"); // 必须带 \n 换行!
System.out.println("📤 已发送消息:Hello Netty Server!");
// 等待连接关闭
f.channel().closeFuture().sync();
} finally {
group.shutdownGracefully();
}
}
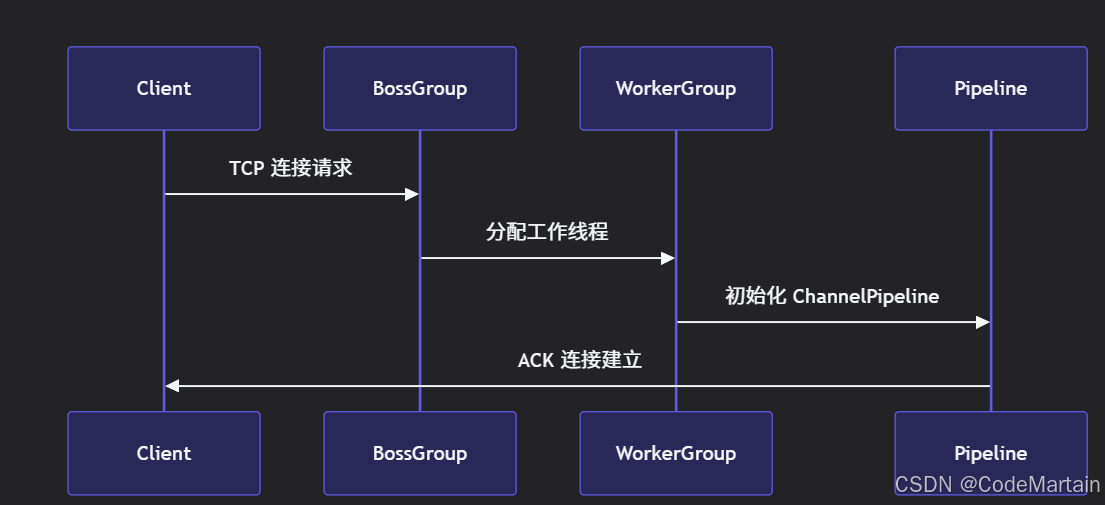
}示意图
高效的数据结构实现

String
先说字符串String ,采用SDS
1,存的字符串长度,
2,剩余长度
3,字节数组
底层源码:
c
struct sdshdr {
    int len;    // 已用长度
    int free;   // 剩余长度
    char buf[]; // 字节数组
};
hash
zipList(压缩链表) +HashTable(哈希表)
策略:小数据用zipList 大数据用hashTable
元素少,值少---zipList
超过阈值---转hashtable
阈值是多少?配置文件中可以设置
配置文件:redis.conf
hash-max-ziplist-entries 512 # 键值对数量上限
hash-max-ziplist-value 64 # 单个 value 字节数上限
同时,满足,用zipList,任一超过就会转hashtable
ZipList 高效
一块连续的内存,无指针,无碎片
内存小,遍历快
hashtable
数组+链表
查找O(1)
Redis 做了rehash 渐进式,不阻塞请求
List
QuickList= 双向链表+ZipList
高效的原因:
1,链表保证快速插入,删除
2,每个节点是ZipList ,节省内存
配置文件
list-max-ziplist-size -2 # 每个节点约 8KB
Set
intSet(有序整数数组) IntSet 内存极小。
hashTable 非整数
配置文件
set-max-intset-entries 512 # 全整数且≤512 → intset
非整数 或 数量 > 512 → 转 hashtable
Zset
SkipList跳表
底层是ZipList(小数据)
SkipList+HashTable (大数据)
范围查找快
插入删除不用旋转,比红黑树快
O(logN)查找,媲美平衡树
配置文件
zset-max-ziplist-entries 128
zset-max-ziplist-value 64
简单来说就是
数据存储的高效带来最小的内存 ,加上内存连续实现快速访问
redis调优:
1,调内存大小,防止内存溢出
ini
maxmemory 16gb # 根据机器设置,建议不超过物理内存的 50%~75%2,调淘汰策略,一般使用 allkeys
ini
maxmemory-policy allkeys-lfu # 推荐淘汰策略淘汰策略:
conf
hash-max-ziplist-entries 512
hash-max-ziplist-value 128

zset-max-ziplist-entries 128
zset-max-ziplist-value 128

set-max-intset-entries 512

list-max-ziplist-size -2    # 每个quicklist节点 8kb
持久化调优(RDB+AOF)
高并发下 推荐策略
纯缓存 关闭RDB+AOF
必须持久化: AOF+每秒刷盘
conf
appendonly yes
appendfsync everysec
auto-aof-rewrite-percentage 100
auto-aof-rewrite-min-size 64mb
aof-load-truncated yes
避免aof重写阻塞
conf
aof-rewrite-incremental-fsync yes
rdb-save-incremental-fsync yes
配置:
port 6379
daemonize yes
pidfile /var/run/redis.pid
logfile /var/log/redis.log

maxmemory 16gb
maxmemory-policy allkeys-lfu

appendonly yes
appendfsync everysec
aof-rewrite-incremental-fsync yes

auto-aof-rewrite-percentage 100
auto-aof-rewrite-min-size 64mb

save ""

timeout 0
tcp-keepalive 300
maxclients 100000
tcp-backlog 511

stop-writes-on-bgsave-error no
rdbcompression yes
rdbchecksum no

hash-max-ziplist-entries 512
hash-max-ziplist-value 128
zset-max-ziplist-entries 128
zset-max-ziplist-value 128
其他的就是尽量不要大key