在计算机视觉领域,人脸分析是极具应用价值的研究方向,其中人脸关键点检测是表情识别、人脸对齐、美颜特效等应用的核心基础。本文将从实战角度出发,讲解如何基于 Dlib 和 OpenCV 实现人脸 68 个关键点检测,并进一步通过关键点特征计算实现简单的表情识别。
一、技术栈与原理说明
1. 核心工具
-
Dlib:一款开源的 C++/Python 机器学习库,内置了预训练的人脸检测器和 68 个关键点预测模型,无需手动训练即可实现高精度的人脸关键点提取。
-
OpenCV:经典的计算机视觉库,负责图像 / 视频的读取、处理、绘制和显示。
-
NumPy:用于数值计算,方便关键点坐标的矩阵化处理。
2. 68 个人脸关键点分布
Dlib 的模型可检测 68 个关键点,这些点覆盖了人脸的核心区域:
-
0-16:脸部轮廓
-
17-21:左眉毛
-
22-26:右眉毛
-
27-35:鼻子
-
36-41:右眼
-
42-47:左眼
-
48-67:嘴巴(48-59 为嘴外部,60-67 为嘴内部)
3. 表情识别原理
通过计算嘴巴区域关键点的距离比值(如嘴宽 / 脸宽、嘴高 / 嘴宽),量化嘴巴的张开程度,从而判断表情(正常、微笑、大笑)。
二、实战步骤
步骤 1:环境准备
安装所需依赖库:
bash
pip install dlib opencv-python numpy scikit-learn pillow同时下载 Dlib 的 68 关键点预训练模型:shape_predictor_68_face_landmarks.dat(解压后放在项目根目录)。(地址:https://github.com/davisking/dlib-models)

步骤 2:人脸关键点检测(图片 + 视频)
1. 图片关键点检测
读取图片,检测人脸并绘制 68 个关键点,同时标注关键点索引:
python
import numpy as np
import cv2
import dlib

# 读取图片
img = cv2.imread('zp.png')
# 初始化人脸检测器和关键点预测器
detector = dlib.get_frontal_face_detector()
predictor = dlib.shape_predictor("shape_predictor_68_face_landmarks.dat")

# 检测人脸
faces = detector(img, 0)
for face in faces:
    # 获取68个关键点
    shape = predictor(img, face)
    landmarks = np.array([[p.x, p.y] for p in shape.parts()])
    # 绘制关键点和索引
    for idx, point in enumerate(landmarks):
        pos = (point[0], point[1])
        # 绘制绿色实心圆(关键点)
        cv2.circle(img, pos, 2, color=(0, 255, 0), thickness=-1)
        # 标注关键点索引
        cv2.putText(img, str(idx), pos, cv2.FONT_HERSHEY_SIMPLEX, 0.4, (255, 255, 255), 1, cv2.LINE_AA)

# 显示结果
cv2.imshow('Face Landmarks (Image)', img)
cv2.waitKey(0)
cv2.destroyAllWindows()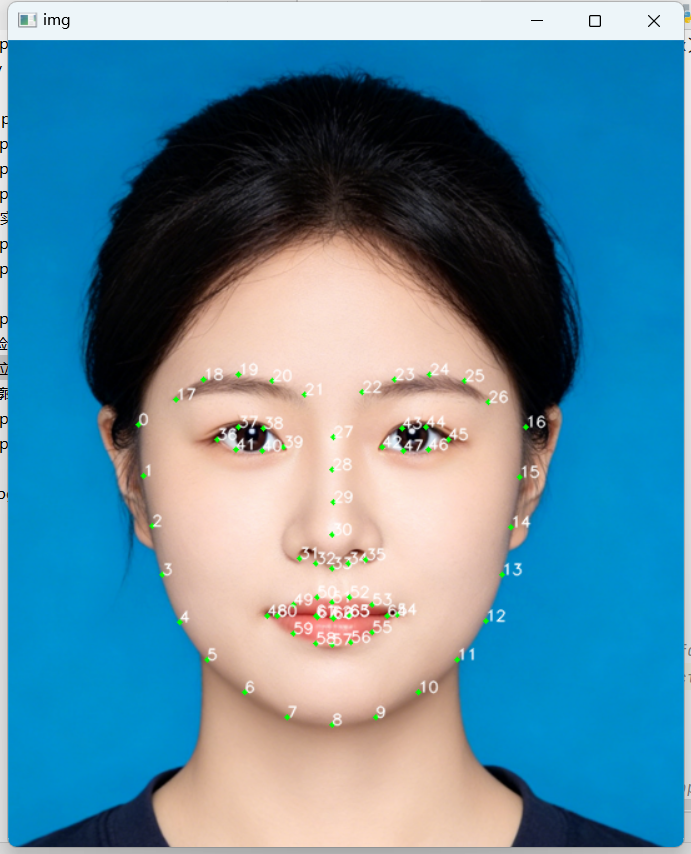
2. 实时视频关键点检测
调用摄像头,实时检测人脸并绘制关键点:
python
import numpy as np
import cv2
import dlib

detector = dlib.get_frontal_face_detector()
predictor = dlib.shape_predictor("shape_predictor_68_face_landmarks.dat")
# 启动摄像头
cap = cv2.VideoCapture(0)

if not cap.isOpened():
    print("Error: 无法打开摄像头")
else:
    while True:
        ret, frame = cap.read()
        # 水平翻转画面(镜像效果)
        frame = cv2.flip(frame, 1)
        if not ret:
            print("Error: 无法捕获画面")
            break

        # 检测人脸
        faces = detector(frame, 0)
        for face in faces:
            shape = predictor(frame, face)
            landmarks = np.matrix([[p.x, p.y] for p in shape.parts()])
            # 绘制关键点
            for idx, point in enumerate(landmarks):
                pos = (point[0, 0], point[0, 1])
                cv2.circle(frame, pos, 2, (0, 255, 0), -1)
                cv2.putText(frame, str(idx), pos, cv2.FONT_HERSHEY_SIMPLEX, 0.4, (255, 255, 255), 1, cv2.LINE_AA)

        cv2.imshow("Real-time Facial Landmarks", frame)
        # 按q退出
        if cv2.waitKey(1) & 0xFF == ord('q'):
            break

cap.release()
cv2.destroyAllWindows()
步骤 3:人脸关键点轮廓绘制
基于关键点绘制人脸区域轮廓(如眼睛、嘴巴、眉毛),更直观地展示关键点的区域划分:
python
import numpy as np
import dlib
import cv2

# 绘制点连线
def drawLine(start, end):
    pts = shape[start:end]
    for l in range(1, len(pts)):
        ptA = tuple(pts[l - 1])
        ptB = tuple(pts[l])
        cv2.line(image, ptA, ptB, (0, 255, 0), 2)

# 绘制凸包轮廓(适用于眼睛、嘴巴)
def drawConvexHull(start, end):
    Facial = shape[start:end+1]
    hull = cv2.convexHull(Facial)
    cv2.drawContours(image, [hull], -1, (0, 255, 0), 2)

# 读取图片
image = cv2.imread('zp.png')
detector = dlib.get_frontal_face_detector()
predictor = dlib.shape_predictor("shape_predictor_68_face_landmarks.dat")

# 检测人脸并绘制轮廓
faces = detector(image, 0)
for face in faces:
    shape = predictor(image, face)
    shape = np.array([[p.x, p.y] for p in shape.parts()])

    # 绘制眼睛、嘴巴凸包
    drawConvexHull(36, 41)  # 右眼
    drawConvexHull(42, 47)  # 左眼
    drawConvexHull(48, 59)  # 嘴外部
    drawConvexHull(60, 67)  # 嘴内部

    # 绘制脸部轮廓、眉毛、鼻子连线
    drawLine(0, 17)   # 脸颊
    drawLine(17, 22)  # 左眉毛
    drawLine(22, 27)  # 右眉毛
    drawLine(27, 36)  # 鼻子

cv2.imshow("Facial Contours", image)
cv2.waitKey()
cv2.destroyAllWindows()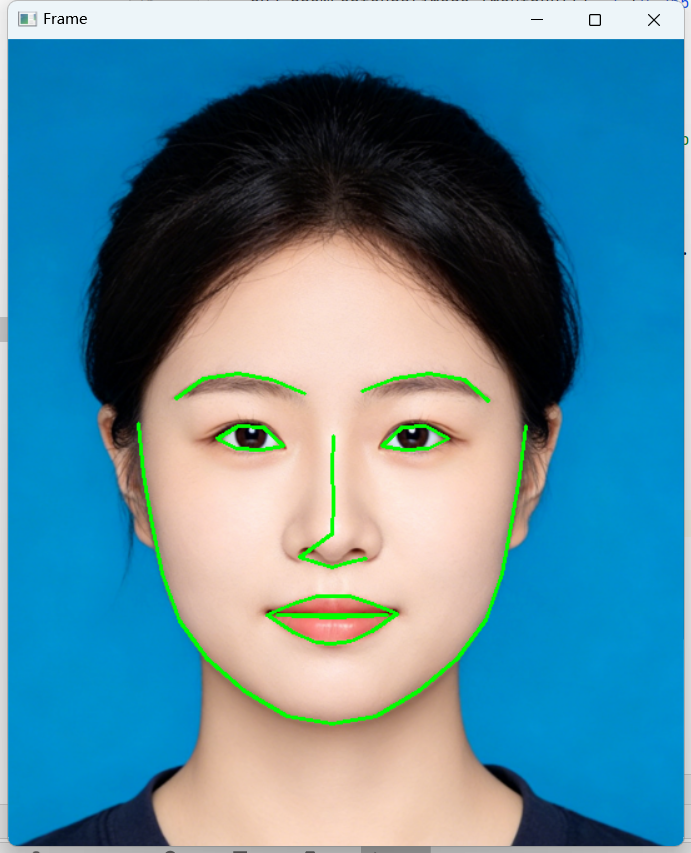
步骤 4:基于关键点的表情识别
通过计算嘴巴区域的距离比值(MAR:嘴高 / 嘴宽,MJR:嘴宽 / 脸宽),判断表情类型:
python
import numpy as np
import dlib
import cv2
from sklearn.metrics.pairwise import euclidean_distances
from PIL import Image, ImageDraw, ImageFont

# 计算嘴高比值(MAR)
def MAR(shape):
    A = euclidean_distances(np.array(shape[50]), np.array(shape[58]))
    B = euclidean_distances(np.array(shape[51]), np.array(shape[57]))
    C = euclidean_distances(np.array(shape[52]), np.array(shape[56]))
    D = euclidean_distances(np.array(shape[48]), np.array(shape[54]))
    return ((A+B+C)/3)/D

# 计算嘴宽比值(MJR)
def MJR(shape):
    M = euclidean_distances(np.array(shape[48]), np.array(shape[54]))
    J = euclidean_distances(np.array(shape[3]), np.array(shape[13]))
    return M/J

# OpenCV添加中文文字(解决默认不支持中文问题)
def cv2AddchineseText(img, text, position, textColor=(0,255,0), textSize=30):
    if isinstance(img, np.ndarray):
        img = Image.fromarray(cv2.cvtColor(img, cv2.COLOR_BGR2RGB))
    draw = ImageDraw.Draw(img)
    # 加载中文字体(需确保simsun.ttc存在)
    fontStyle = ImageFont.truetype("simsun.ttc", textSize, encoding="utf-8")
    draw.text(position, text, textColor, font=fontStyle)
    return cv2.cvtColor(np.asarray(img), cv2.COLOR_RGB2BGR)

# 初始化检测器
detector = dlib.get_frontal_face_detector()
predictor = dlib.shape_predictor("shape_predictor_68_face_landmarks.dat")
cap = cv2.VideoCapture(0)

while True:
    ret, frame = cap.read()
    frame = cv2.flip(frame, 1)
    if not ret:
        break

    rects = detector(frame, 0)
    for rect in rects:
        # 获取关键点
        shape = predictor(frame, rect)
        shape = np.matrix([[p.x, p.y] for p in shape.parts()])

        # 计算比值
        mar = MAR(shape)[0,0]
        mjr = MJR(shape)[0,0]

        # 判断表情
        result = "正常"
        if mar > 0.5:
            result = "大笑"
        elif mjr > 0.45:
            result = "微笑"

        # 绘制嘴巴轮廓和表情结果
        mouthHull = cv2.convexHull(shape[48:61])
        cv2.drawContours(frame, [mouthHull], -1, (0,255,0), 1)
        frame = cv2AddchineseText(frame, result, (50,100))

        # 打印比值(调试用)
        print(f"MAR: {mar:.2f}, MJR: {mjr:.2f}, 表情: {result}")

    cv2.imshow("Emotion Recognition", frame)
    # 按ESC退出
    if cv2.waitKey(1) == 27:
        break

cap.release()
cv2.destroyAllWindows()
三、常见问题与优化
1. 中文显示问题
OpenCV 默认不支持中文绘制,本文通过 PIL 库中转,加载系统中文字体(如simsum.ttc)解决,需确保字体文件路径正确。
2. 模型精度优化
-
若检测效果差,可调整detector的第二个参数(上采样次数),如detector(frame,1),但会增加计算量。
-
可添加人脸对齐、降噪预处理,提升关键点检测稳定性。
3. 表情识别阈值调整
MAR 和 MJR 的阈值需根据实际场景调整(不同人脸比例、拍摄角度会影响比值),建议通过大量样本标定最优阈值。
四、应用场景拓展
-
美颜特效:基于关键点实现瘦脸、大眼、口红涂抹等效果;
-
疲劳检测:结合眼睛关键点的 EAR(眼高比值)判断眨眼频率,实现驾驶疲劳检测;
-
人机交互:通过表情识别实现情绪反馈,应用于智能客服、游戏交互等场景;
-
医疗辅助:通过面部表情分析,辅助判断情绪障碍、疼痛程度等。
五、总结
本文基于 Dlib 和 OpenCV 实现了从人脸关键点检测到表情识别的完整流程,核心是利用预训练模型快速提取关键点,再通过数值计算量化面部特征,最终实现表情分类。该方案无需复杂的深度学习训练,轻量化且易于部署,适合入门级计算机视觉开发者学习和拓展。
后续可进一步结合深度学习(如 CNN、LSTM)提升表情识别的精度和鲁棒性,或拓展到多表情分类(如生气、悲伤、惊讶等),挖掘更多人脸分析的应用价值。