Spring MVC + OpenFeign 标准设计模式详解
这是微服务架构中最标准、最主流的开发模式:
接口定义契约(路由 + API 规范),Controller 实现业务,Feign 直接复用接口做远程调用,
一套接口同时满足「本地 HTTP 接口」和「微服务远程调用」,彻底避免重复代码和契约不一致问题。
核心概念
- 核心设计模式:面向接口编程 + 契约优先
接口层:
只定义请求路由、参数、返回值、API 规范,不写业务代码(既是 MVC 的 API 契约,也是 Feign 的远程调用契约)
Controller 层:
实现接口,重写方法,编写真实业务逻辑(Spring MVC 对外暴露 REST 接口)
Feign Client:
直接继承接口,无需重复定义 URL / 参数,自动生成远程调用客户端
- 关键技术角色
Spring MVC:
负责将 Controller 注册为 HTTP 接口,处理前端 / 网关请求
Spring Cloud OpenFeign:
微服务远程调用组件,复用同一套接口作为调用契约
统一契约:接口 = REST 路由定义 = Feign 调用规范,一份代码两端通用
- 标准优势(微服务必备)
✅ 无重复代码:服务提供者和消费者共用一套 API 接口
✅ 契约一致:避免接口 URL、参数、返回值定义不一致
✅ 结构清晰:接口定义规范,Controller 专注业务
✅ 易于维护:修改接口只需改动一处,两端同步生效
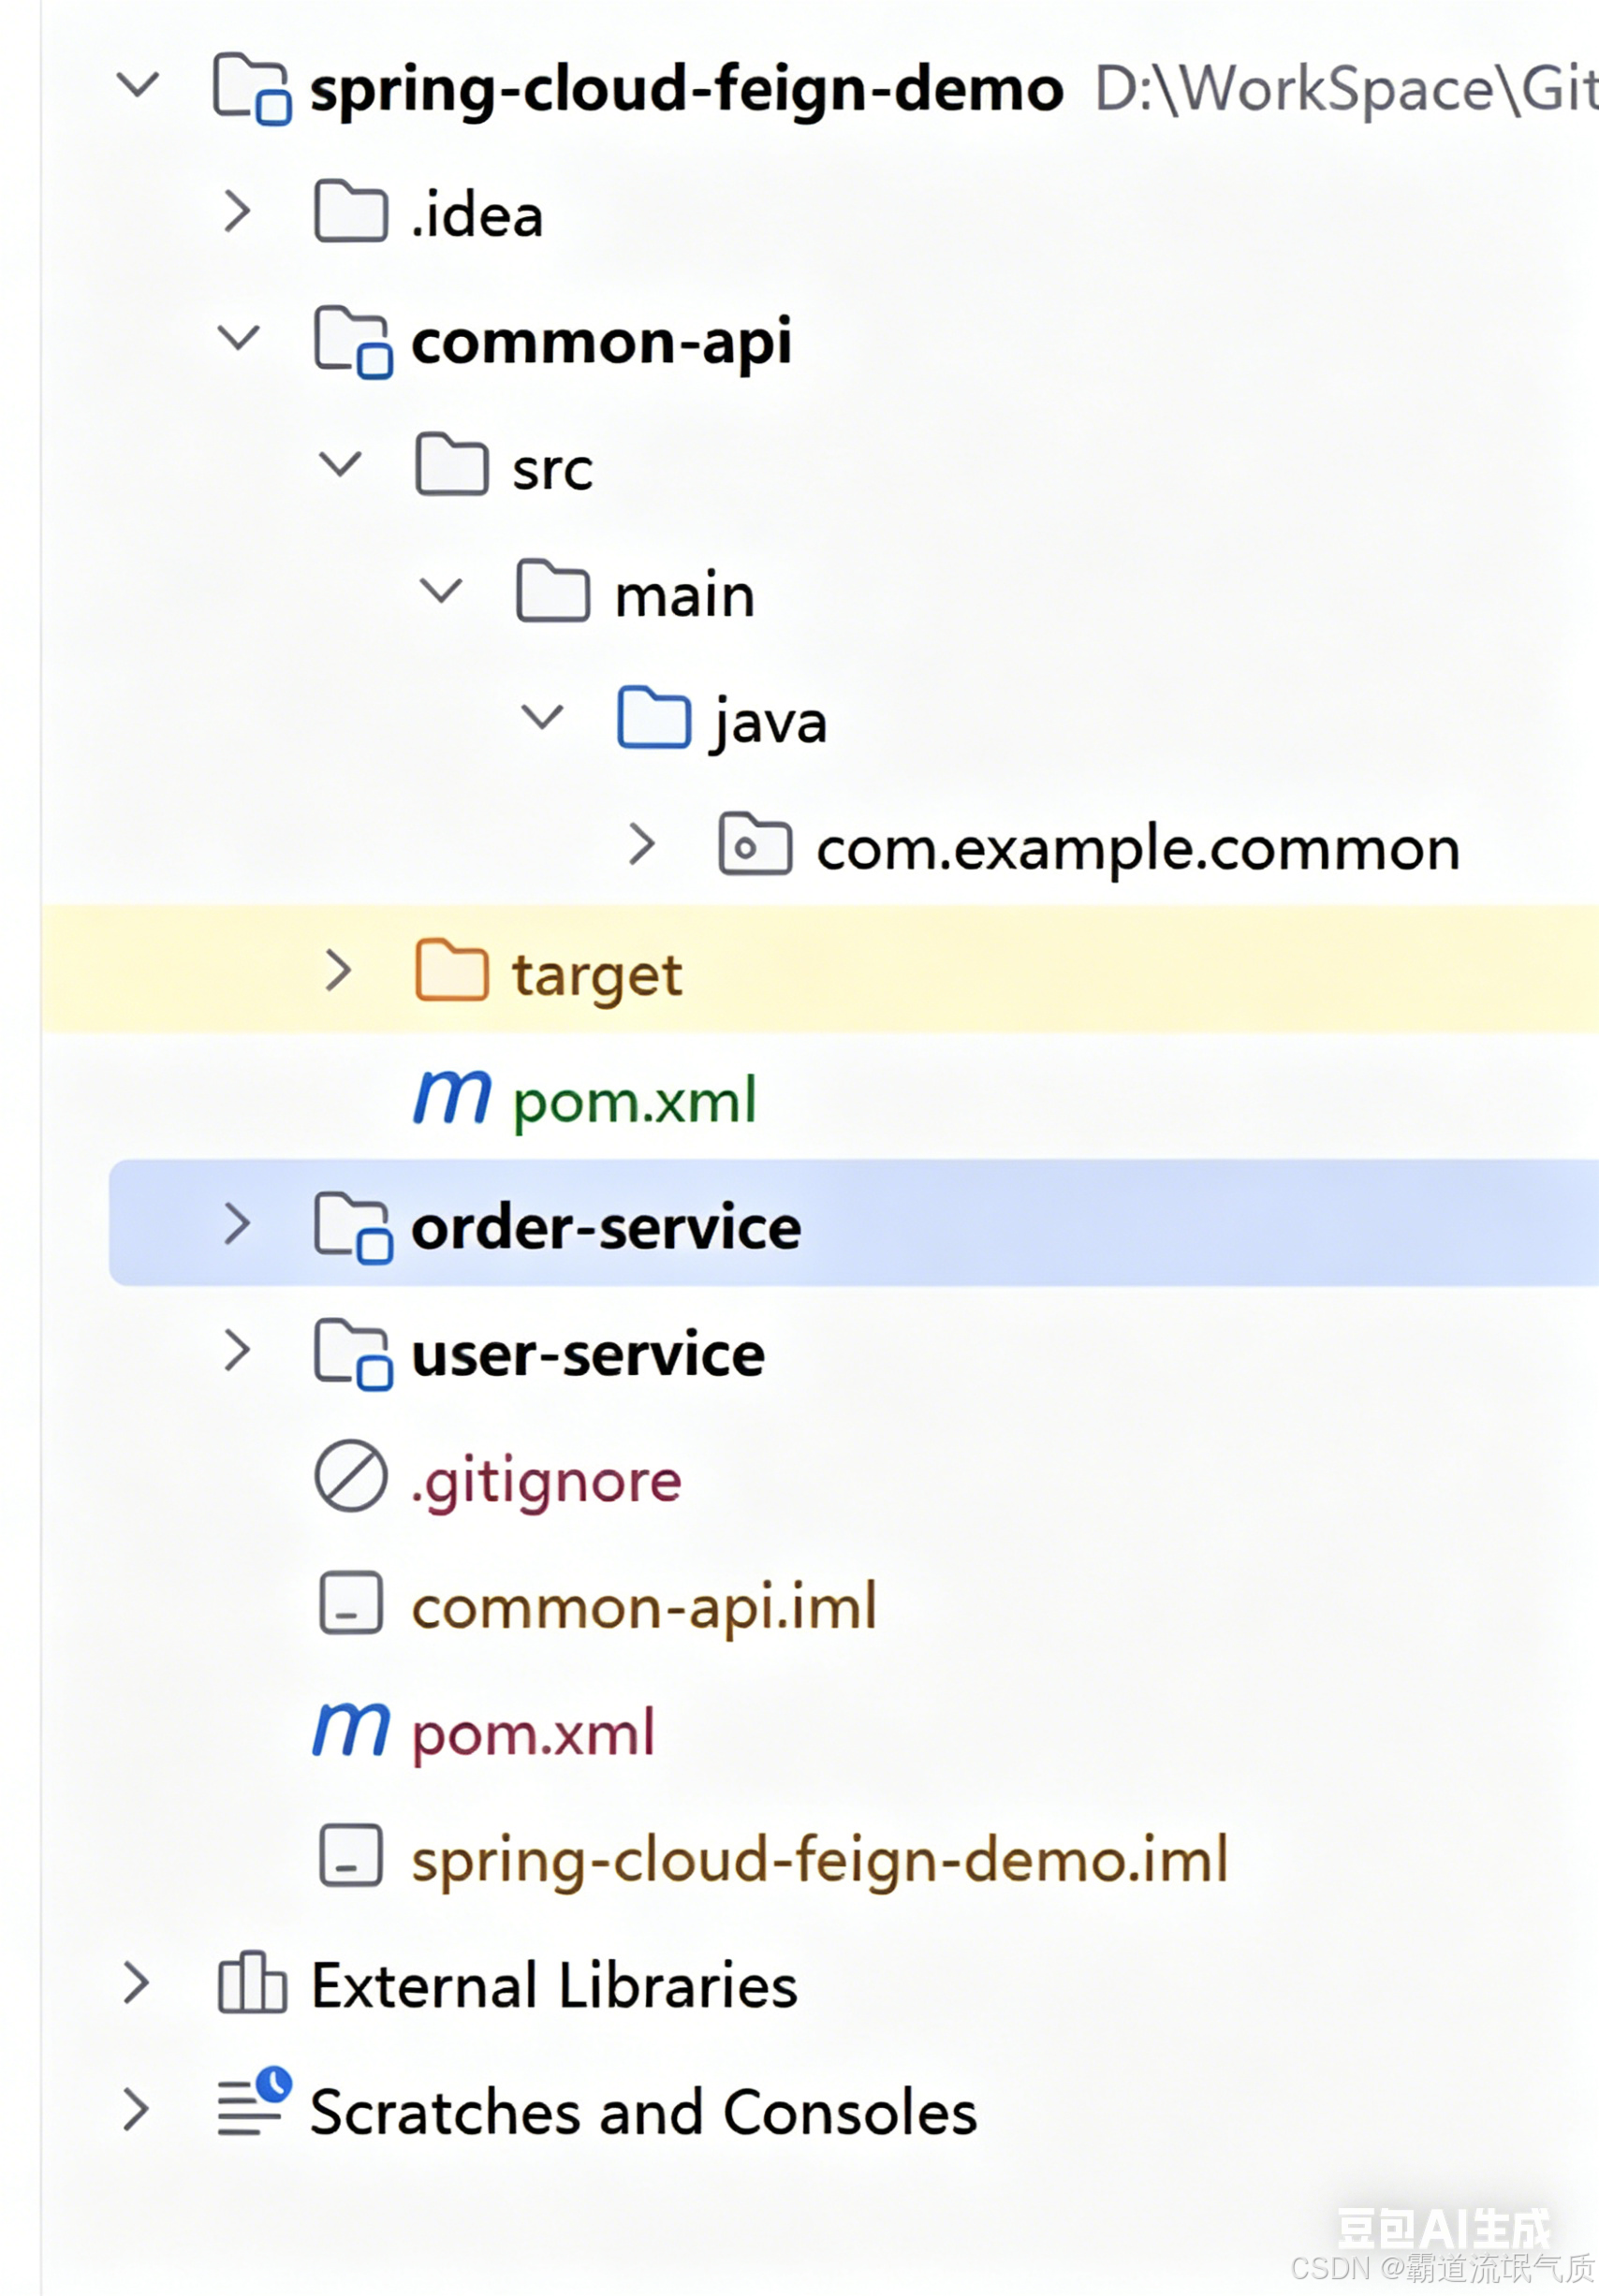
标准项目结构
公共模块(放通用接口,被所有服务依赖)
common-api/
└── feign/
└── UserFeignApi.java # 核心:统一API接口(契约)
服务提供者(提供真实接口)
user-service/
└── controller/
└── UserController.java # 实现接口,编写业务
服务消费者(调用远程接口)
order-service/
└── feign/
└── UserFeignClient.java # 继承接口,Feign客户端
工作流程总结
公共接口定义所有 API 的路由、参数、返回值(契约)
服务提供者实现接口,编写业务,对外暴露 REST 接口
服务消费者继承接口,生成 Feign 客户端,远程调用
全程一套接口,两端复用,无冗余代码,契约完全一致
这套模式的本质 = 契约优先(Contract First)
这是整个设计的灵魂。
什么是契约?
契约 = 接口的统一标准
URL 地址
请求方式(GET/POST)
参数格式
返回值格式
一句话:接口就是契约,契约就是接口。
为什么要契约优先?
微服务里有多个服务:
用户服务(user-service)
订单服务(order-service)
商品服务(product-service)
如果没有统一契约:
A 服务写一套接口
B 服务调用时再写一套一模一样的
结果:写错 URL、参数不匹配、返回值解析失败、维护爆炸
解决方案
只写一次接口,所有服务共用。
服务提供者:实现接口(提供真实功能)
服务消费者:继承接口(远程调用)
核心概念逐字拆解
1. 接口定义路由(API 契约层)
位置:
公共模块(common-api)作用:只定义规范,不写任何业务逻辑。
包含 4 个关键信息:
请求路径(/api/user/{id})
请求方法(GET/POST/PUT/DELETE)
请求参数(路径参数、请求体、参数)
返回值类型
代码特征:
只有 Spring MVC 注解
没有任何业务代码
不被实例化
这就是:接口定义路由
2. Controller 类实现业务逻辑(服务提供层)
位置:服务提供者(user-service)作用:实现接口,写真正的业务代码。
Spring MVC 会自动:
扫描 @RestController
把接口里的路由注册成 HTTP 接口
对外提供可访问的 REST 服务
Controller 只干两件事:
实现接口方法
编写业务逻辑(查库、调用 Service、计算、返回数据)
这就是:Controller 实现业务
3. OpenFeign 客户端继承接口(服务调用层)
位置:服务消费者(order-service)作用:不用再写 URL、参数、请求方式,直接继承接口。
Feign 会自动:
生成动态代理
根据注解拼接 HTTP 请求
向目标服务发送远程调用
解析返回结果
Feign 客户端 = 远程调用的替身
这就是:API 接口既是 REST 端点定义,也是 Feign Client 契约
注:
博客:
https://blog.csdn.net/badao_liumang_qizhi
实现
IDEA搭建项目
一、创建父工程(空 Maven 项目)
打开 IDEA
File → New → Project
选择 Maven,不要选骨架(archetype)
注:新版IDEA若没有Maven选项,则选择Java项目,再选择BuildSystem为Maven
直接 Next
填写:
Name:spring-cloud-feign-demo
Location:自选目录
GroupId:com.example
ArtifactId:spring-cloud-feign-demo
Finish
得到一个空 Maven 项目,删除 src 目录(父工程不用代码)。
二、创建三个子模块
父工程上右键 → New → Module依次创建 3 个模块:
- 公共模块 common-api
New Module → Maven → Next
Name:common-api
父工程选择:spring-cloud-feign-demo
Finish
- 服务提供者 user-service
New Module → Spring Initializr
Next
Artifact:user-service
依赖勾选:Spring Web
Finish
- 服务消费者 order-service
New Module → Spring Initializr
Artifact:order-service
依赖勾选:Spring Web
Finish
项目框架如下:
三、修改父项目pom文件
    <parent>
        <groupId>org.springframework.boot</groupId>
        <artifactId>spring-boot-starter-parent</artifactId>
        <version>2.7.18</version>
        <relativePath/>
    </parent>

    <groupId>com.example</groupId>
    <artifactId>spring-cloud-feign-demo</artifactId>
    <version>1.0-SNAPSHOT</version>
    <!-- 父工程必须设置为pom打包 -->
    <packaging>pom</packaging>

    <modules>
        <module>common-api</module>
        <module>user-service</module>
        <module>order-service</module>
        <module>common-api</module>
    </modules>

    <dependencyManagement>
        <dependencies>
            <dependency>
                <groupId>org.springframework.cloud</groupId>
                <artifactId>spring-cloud-dependencies</artifactId>
                <version>2021.0.8</version>
                <type>pom</type>
                <scope>import</scope>
            </dependency>
            <dependency>
                <groupId>com.alibaba.cloud</groupId>
                <artifactId>spring-cloud-alibaba-dependencies</artifactId>
                <version>2021.0.5.0</version>
                <type>pom</type>
                <scope>import</scope>
            </dependency>
        </dependencies>
    </dependencyManagement>

    <properties>
        <maven.compiler.source>8</maven.compiler.source>
        <maven.compiler.target>8</maven.compiler.target>
        <project.build.sourceEncoding>UTF-8</project.build.sourceEncoding>
    </properties>
四、配置common-api
修改common-api的pom文件
    <parent>
        <groupId>com.example</groupId>
        <artifactId>spring-cloud-feign-demo</artifactId>
        <version>1.0-SNAPSHOT</version>
    </parent>

    <artifactId>common-api</artifactId>

    <dependencies>
        <!-- scope provided 表示编译时需要,打包时不包含,节省体积 -->
        <dependency>
            <groupId>org.springframework.boot</groupId>
            <artifactId>spring-boot-starter-web</artifactId>
            <scope>provided</scope>
        </dependency>
    </dependencies>

    <properties>
        <maven.compiler.source>8</maven.compiler.source>
        <maven.compiler.target>8</maven.compiler.target>
        <project.build.sourceEncoding>UTF-8</project.build.sourceEncoding>
    </properties>

    <build>
        <plugins>
            <!-- 编译插件:指定JDK版本 -->
            <plugin>
                <groupId>org.apache.maven.plugins</groupId>
                <artifactId>maven-compiler-plugin</artifactId>
                <version>3.8.1</version>
                <configuration>
                    <source>1.8</source> <!-- 对应你的JDK版本 -->
                    <target>1.8</target>
                </configuration>
            </plugin>
        </plugins>
    </build>
创建接口契约
在 common-api 新建包:
com.example.common新建类 UserApi 接口:
package com.example.common;

import org.springframework.web.bind.annotation.GetMapping;
import org.springframework.web.bind.annotation.PathVariable;

public interface UserApi {

    // 定义路由、请求方式、参数、返回值 → 契约
    @GetMapping("/api/user/{id}")
    String getUserInfo(@PathVariable("id") Long id);
}
五、配置 user-service(服务提供者)
user-service/pom.xml 加入依赖
    <parent>
        <groupId>org.springframework.boot</groupId>
        <artifactId>spring-boot-starter-parent</artifactId>
        <version>2.7.18</version>
        <relativePath/>
    </parent>

    <groupId>com.example</groupId>
    <artifactId>user-service</artifactId>
    <version>0.0.1-SNAPSHOT</version>
    <name>user-service</name>
    <description>user-service</description>

    <properties>
        <java.version>1.8</java.version>
        <maven.compiler.source>1.8</maven.compiler.source>
        <maven.compiler.target>1.8</maven.compiler.target>
    </properties>
    <dependencies>
        <dependency>
            <groupId>org.springframework.boot</groupId>
            <artifactId>spring-boot-starter-web</artifactId>
        </dependency>

        <dependency>
            <groupId>org.springframework.boot</groupId>
            <artifactId>spring-boot-starter-test</artifactId>
            <scope>test</scope>
        </dependency>

        <dependency>
            <groupId>com.example</groupId>
            <artifactId>common-api</artifactId>
            <version>1.0-SNAPSHOT</version>
        </dependency>

    </dependencies>

    <build>
        <plugins>
            <plugin>
                <groupId>org.springframework.boot</groupId>
                <artifactId>spring-boot-maven-plugin</artifactId>
            </plugin>
        </plugins>
    </build>
Controller 实现接口
建包 com.example.user.controller
新建 UserController:
package com.example.userservice.controller;

import com.example.common.UserApi;
import org.springframework.web.bind.annotation.PathVariable;
import org.springframework.web.bind.annotation.RestController;

@RestController
public class UserController implements UserApi {

    @Override
    public String getUserInfo(@PathVariable Long id) {
        // 真实业务逻辑
        return "【用户服务】返回用户信息:id=" + id + ",姓名=张三";
    }
}
修改yml文件
server:
  port: 8081

spring:
  application:
    name: user-service
六、配置 order-service(服务消费者)
修改pom
    <parent>
        <groupId>org.springframework.boot</groupId>
        <artifactId>spring-boot-starter-parent</artifactId>
        <version>2.7.18</version>
        <relativePath/>
    </parent>

    <groupId>com.example</groupId>
    <artifactId>order-service</artifactId>
    <version>0.0.1-SNAPSHOT</version>
    <name>order-service</name>
    <description>order-service</description>

    <properties>
        <java.version>1.8</java.version>
        <maven.compiler.source>1.8</maven.compiler.source>
        <maven.compiler.target>1.8</maven.compiler.target>
    </properties>
    <dependencies>
        <dependency>
            <groupId>org.springframework.boot</groupId>
            <artifactId>spring-boot-starter-web</artifactId>
        </dependency>

        <dependency>
            <groupId>org.springframework.boot</groupId>
            <artifactId>spring-boot-starter-test</artifactId>
            <scope>test</scope>
        </dependency>

        <!-- OpenFeign -->
        <dependency>
            <groupId>org.springframework.cloud</groupId>
            <artifactId>spring-cloud-starter-openfeign</artifactId>
            <version>3.1.8</version>
        </dependency>

        <!-- 公共接口 -->
        <dependency>
            <groupId>com.example</groupId>
            <artifactId>common-api</artifactId>
            <version>1.0-SNAPSHOT</version>
        </dependency>
    </dependencies>

    <build>
        <plugins>
            <plugin>
                <groupId>org.springframework.boot</groupId>
                <artifactId>spring-boot-maven-plugin</artifactId>
            </plugin>
        </plugins>
    </build>
修改yml:
server:
  port: 8082

spring:
  application:
    name: order-service
新建FeignClient
package com.example.orderservice.feign;
import com.example.common.UserApi;
import org.springframework.cloud.openfeign.FeignClient;
@FeignClient(name = "user-service", url = "http://localhost:8081")
public interface UserFeignClient extends UserApi {
// 无需写任何代码 → 全部继承自 UserApi
}
新建测试controller
import com.example.orderservice.feign.UserFeignClient;
import org.springframework.web.bind.annotation.GetMapping;
import org.springframework.web.bind.annotation.PathVariable;
import org.springframework.web.bind.annotation.RestController;

import javax.annotation.Resource;

@RestController
public class OrderTestController {

    @Resource
    private UserFeignClient userFeignClient;

    @GetMapping("/test/feign/{id}")
    public String testFeign(@PathVariable Long id) {
        // 调用远程用户服务
        return "【订单服务调用用户服务】\n" + userFeignClient.getUserInfo(id);
    }
}
启动类加 @EnableFeignClients
@SpringBootApplication
@EnableFeignClients // 开启Feign
public class OrderServiceApplication {

    public static void main(String[] args) {
        SpringApplication.run(OrderServiceApplication.class, args);
    }

}
启动与测试
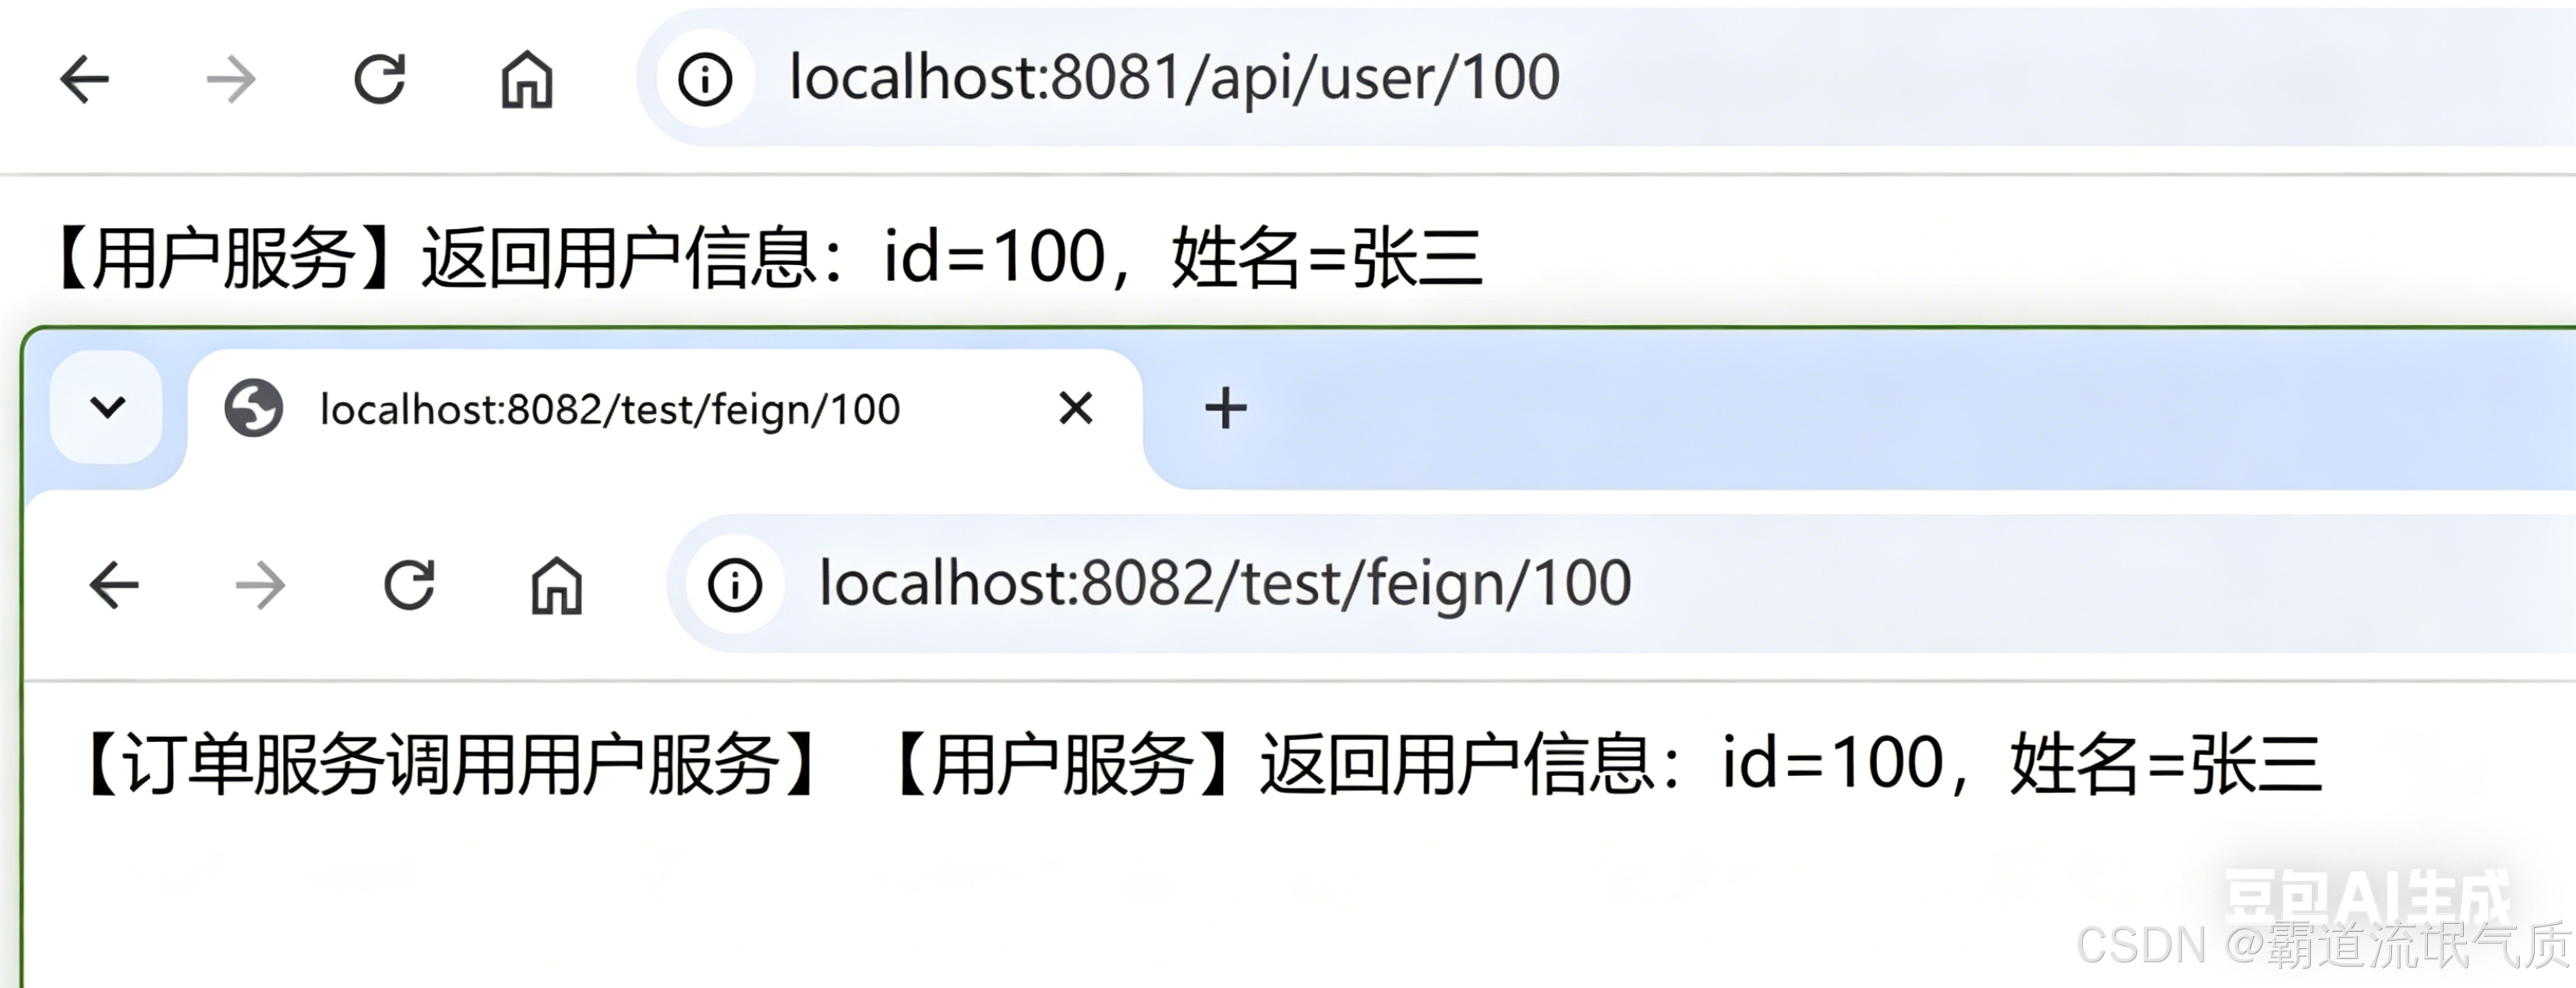
- 启动 user-service(8081)
访问:
http://localhost:8081/api/user/100
返回:
【用户服务】返回用户信息:id=100,姓名=张三
- 启动 order-service(8082)
访问:
http://localhost:8082/test/feign/100
返回:
【订单服务调用用户服务】
【用户服务】返回用户信息:id=100,姓名=张三
完整升级:Spring Cloud + OpenFeign + Nacos 注册中心(标准微服务)
直接把上一版完整示例无缝加入 Nacos,这是企业真正生产环境的标准架构:
去掉 Feign 写死的 URL
服务自动注册到 Nacos
服务名自动发现 + 负载均衡
纯微服务模式,可直接用于项目
第一步:安装启动 Nacos(最简版)
- 下载 Nacos
https://github.com/alibaba/nacos/releases
或者
https://www.nacos.io/download/nacos-server/
- 启动(单机模式)
windows上:
startup.cmd -m standalone
- 访问 Nacos 控制台验证
账号 / 密码:nacos / nacos
二、父工程 pom.xml 加入 Nacos 依赖
修改pom文件,添加如下
            <!-- Spring Cloud Alibaba + Nacos 核心依赖 -->
            <dependency>
                <groupId>com.alibaba.cloud</groupId>
                <artifactId>spring-cloud-alibaba-dependencies</artifactId>
                <version>2021.0.5.0</version>
                <type>pom</type>
                <scope>import</scope>
            </dependency>
三、服务提供者(user-service)修改
pom.xml 加入 Nacos 注册中心
        <!-- Nacos 服务注册 -->
        <dependency>
            <groupId>com.alibaba.cloud</groupId>
            <artifactId>spring-cloud-starter-alibaba-nacos-discovery</artifactId>
            <version>2021.0.5.0</version>
        </dependency>
application.yml 注册到 Nacos
server:
  port: 8081

spring:
  application:
    name: user-service
  cloud:
    nacos:
      discovery:
        server-addr: localhost:8848  # Nacos 地址
四、服务消费者(order-service)修改
pom.xml 加入 Nacos
        <!-- Nacos 服务注册 -->
        <dependency>
            <groupId>com.alibaba.cloud</groupId>
            <artifactId>spring-cloud-starter-alibaba-nacos-discovery</artifactId>
            <version>2021.0.5.0</version>
        </dependency>
另外还需要加入loadbalance
因为Spring Cloud 2020+ 以后 抛弃了 Ribbon,OpenFeign 必须依赖 Spring Cloud LoadBalancer 才能做负载均衡
        <dependency>
            <groupId>org.springframework.cloud</groupId>
            <artifactId>spring-cloud-starter-loadbalancer</artifactId>
            <version>3.1.8</version>
        </dependency>
application.yml 从 Nacos 发现服务
server:
  port: 8082

spring:
  application:
    name: order-service
  cloud:
    nacos:
      discovery:
        server-addr: localhost:8848  # 连接 Nacos
Feign Client 去掉 URL,只留服务名(核心!)
package com.example.orderservice.feign;


import com.example.common.UserApi;
import org.springframework.cloud.openfeign.FeignClient;

@FeignClient(name = "user-service")
public interface UserFeignClient extends UserApi {
    // 无需写任何代码 → 全部继承自 UserApi
}
五、启动测试(真正微服务)
-
启动 Nacos
-
启动 user-service(8081)
-
启动 order-service(8082)
-
查看 Nacos 服务列表
服务管理 → 服务列表能看到:
user-service
order-service
访问订单服务:
http://localhost:8082/test/feign/100
返回:
【订单服务调用用户服务】
【用户服务】返回用户信息:id=100,姓名=张三