本文是我学习人脸关键点检测过程中整理的笔记,包含原理、代码详解、常见问题及改进方案。适合 OpenCV 初学者参考。
一、什么是人脸关键点检测?
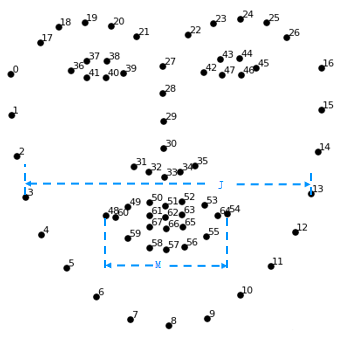
人脸关键点检测(Facial Landmark Detection)是在检测到的人脸区域内,定位出面部关键部位(眼睛、鼻子、嘴巴、眉毛、下巴轮廓等)的坐标。最常用的是 68 点模型,其索引分布如下:
| 索引范围 | 部位 | 点数 |
|---|---|---|
| 0 -- 16 | 下巴轮廓 | 17 |
| 17 -- 21 | 左眉毛 | 5 |
| 22 -- 26 | 右眉毛 | 5 |
| 27 -- 35 | 鼻梁 + 鼻尖 | 9 |
| 36 -- 41 | 右眼 | 6 |
| 42 -- 47 | 左眼 | 6 |
| 48 -- 59 | 嘴巴外轮廓 | 12 |
| 60 -- 67 | 嘴巴内轮廓 | 8 |
其效果图如下:
二、dlib 库的两个核心组件
1. 人脸检测器 dlib.get_frontal_face_detector()
-
基于 HOG(方向梯度直方图)+ 线性分类器
-
返回人脸矩形框列表(
dlib.rectangles) -
用法:
detector = dlib.get_frontal_face_detector() -
检测:
faces = detector(img, 1)其中1表示上采样次数(提高小脸检测率)
2. 关键点预测器 dlib.shape_predictor()
-
需要加载预训练模型文件
shape_predictor_68_face_landmarks.dat -
输入:图像 + 人脸矩形框
-
输出:
dlib.full_object_detection对象,包含 68 个关键点 -
用法:
predictor = dlib.shape_predictor("shape_predictor_68_face_landmarks.dat") -
预测:
shape = predictor(img, face)
三、完整代码示例及详解(一):绘制所有68个关键点并编号
3.1 先看完整代码
import numpy as np
import cv2
import dlib
import os
# 1. 读取图像
img = cv2.imread("cxk.jpg")
if img is None:
print("图像加载失败,请检查路径")
exit()
img = cv2.resize(img, None, fx=0.3, fy=0.3) # 缩小到原来的30%
# 2. 初始化人脸检测器
detector = dlib.get_frontal_face_detector()
# 3. 检查模型文件是否存在
model_path = "shape_predictor_68_face_landmarks.dat"
if not os.path.exists(model_path):
print("请下载模型文件 shape_predictor_68_face_landmarks.dat")
exit()
predictor = dlib.shape_predictor(model_path)
# 4. 检测人脸(上采样1次,提高小脸检测率)
faces = detector(img, 1)
if len(faces) == 0:
print("未检测到人脸")
exit()
# 5. 对每个人脸预测关键点并绘制
for face in faces:
shape = predictor(img, face) # 预测68个点
landmarks = np.array([[p.x, p.y] for p in shape.parts()]) # 转换为numpy数组
for idx, point in enumerate(landmarks):
pos = (int(point[0]), int(point[1]))
cv2.circle(img, pos, radius=2, color=(0, 255, 0), thickness=-1) # 画绿点
cv2.putText(img, str(idx), pos, cv2.FONT_HERSHEY_SIMPLEX,
0.4, (255, 255, 255), 1, cv2.LINE_AA) # 写编号
# 6. 显示结果
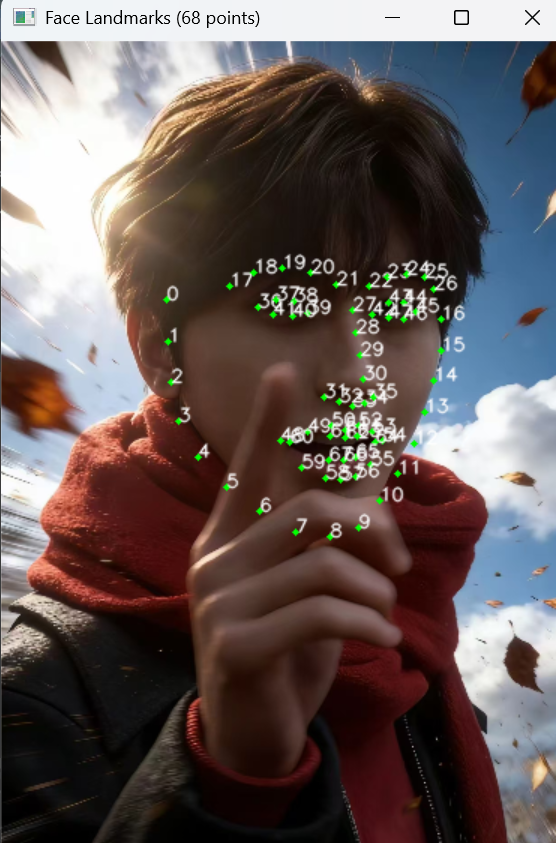
cv2.imshow("68 Landmarks", img)
cv2.waitKey(0)
cv2.destroyAllWindows()运行结果展示:
3.2 代码逐块讲解
(1)faces 的本质是什么?
faces = detector(img, 1)-
faces是一个dlib.rectangles对象,行为类似于 Python 列表 ,内部存储 0 个或多个dlib.rectangle对象。 -
每个
rectangle有left(),top(),right(),bottom()属性,代表人脸矩形框的边界。 -
我们可以像操作列表一样获取长度和遍历:
print(len(faces)) # 人脸数量 for face in faces: print(face.left(), face.top(), face.right(), face.bottom()) -
如果
len(faces) == 0,说明图像中没有检测到人脸,后续代码需要做相应处理(上面代码已做)。
(2)提取关键点坐标并转换为 NumPy 数组
landmarks = np.array([[p.x, p.y] for p in shape.parts()])-
shape.parts()返回一个可迭代对象,包含所有dlib.point对象。 -
列表推导式
[ [p.x, p.y] for p in shape.parts() ]提取每个点的x和y,生成一个 Python 列表。 -
np.array()将其转换为形状(68, 2)的 NumPy 数组。这样做的好处是:方便后续使用数组切片、数学运算等。
(3)绘制关键点:cv2.circle()
cv2.circle(img, pos, radius=2, color=(0, 255, 0), thickness=-1)-
参数含义:
-
img:要绘制的图像 -
pos:圆心坐标(x, y) -
radius=2:半径 2 像素 -
color=(0,255,0):绿色(BGR 顺序) -
thickness=-1:表示填充圆(实心点)
-
(4)绘制编号:cv2.putText()
cv2.putText(img, str(idx), pos, cv2.FONT_HERSHEY_SIMPLEX,
0.4, (255, 255, 255), 1, cv2.LINE_AA)-
org:文字左下角坐标(注意不是左上角)。 -
fontFace:字体类型。cv2.FONT_HERSHEY_SIMPLEX是 OpenCV 内置的一种简单无衬线字体(类似 Arial)。 -
fontScale=0.4:字体缩放因子,控制文字大小。 -
color=(255,255,255):白色。 -
thickness=1:文字线条粗细。 -
lineType=cv2.LINE_AA:抗锯齿,让文字边缘平滑。
小提示:OpenCV 的
putText不支持中文,如需绘制中文需要使用 PIL 等库。
四、完整代码示例及详解(二):分区绘制人脸轮廓(连线 + 凸包)
4.1 先看完整代码
import numpy as np
import dlib
import cv2
import os
def drawLine(start, end, shape, image):
"""将指定区间的关键点用线段连接(不闭合)"""
pts = shape[start:end] # 提取点集(左闭右开)
for l in range(1, len(pts)):
ptA = tuple(pts[l-1].astype(int))
ptB = tuple(pts[l].astype(int))
cv2.line(image, ptA, ptB, (0, 255, 0), 2)
def drawConvexHull(start, end, shape, image):
"""将指定区间的关键点生成凸包并绘制轮廓(闭合)"""
Facial = shape[start:end+1] # 注意:包含 end 索引
hull = cv2.convexHull(Facial) # 计算凸包
cv2.drawContours(image, [hull], -1, (0, 255, 0), 2)
# 主程序
image = cv2.imread("cxk.jpg")
if image is None:
print("图像加载失败")
exit()
image = cv2.resize(image, None, fx=0.3, fy=0.3)
detector = dlib.get_frontal_face_detector()
if not os.path.exists("shape_predictor_68_face_landmarks.dat"):
print("请下载模型文件")
exit()
predictor = dlib.shape_predictor("shape_predictor_68_face_landmarks.dat")
faces = detector(image, 1)
if len(faces) == 0:
print("未检测到人脸")
exit()
for face in faces:
shape = predictor(image, face)
shape = np.array([[p.x, p.y] for p in shape.parts()]) # 转换为numpy数组
# 绘制凸包(眼睛、嘴巴)
drawConvexHull(36, 41, shape, image) # 右眼
drawConvexHull(42, 47, shape, image) # 左眼
drawConvexHull(48, 59, shape, image) # 嘴外部
drawConvexHull(60, 67, shape, image) # 嘴内部
# 绘制连线(脸颊、眉毛、鼻子)
drawLine(0, 17, shape, image) # 下巴轮廓
drawLine(17, 22, shape, image) # 左眉毛
drawLine(22, 27, shape, image) # 右眉毛
drawLine(27, 36, shape, image) # 鼻子
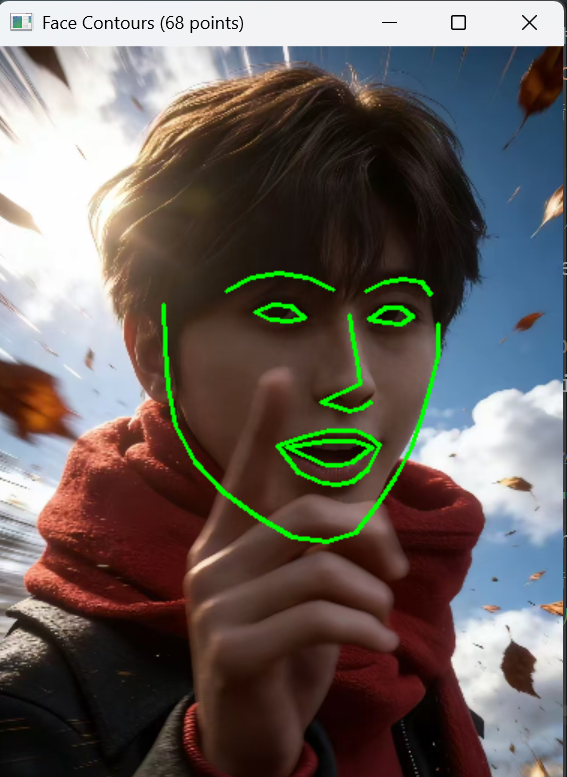
cv2.imshow("Face Contours", image)
cv2.waitKey(0)
cv2.destroyAllWindows()效果展示:
4.2 代码逐块讲解
(1)drawLine 函数:顺序连接相邻点(不闭合)
def drawLine(start, end, shape, image):
    pts = shape[start:end]          # 提取从 start 到 end-1 的点
    for l in range(1, len(pts)):
        ptA = tuple(pts[l-1].astype(int))
        ptB = tuple(pts[l].astype(int))
cv2.line(image, ptA, ptB, (0, 255, 0), 2)-
切片规则 :
shape[start:end]遵循 Python 左闭右开规则,即包含索引start,不包含end。 -
循环从第 2 个点开始,将当前点和前一个点连接,形成折线。
-
不闭合:最后一个点不会与第一个点连接(适合下巴轮廓、眉毛等开放曲线)。
-
适用场景 :脸颊轮廓(0~16)、眉毛(17~26)、鼻子(27~35)等凹形或开放区域。
(2)drawConvexHull 函数:计算凸包并绘制(闭合)
def drawConvexHull(start, end, shape, image):
    Facial = shape[start:end+1]          # 包含 end 索引
    hull = cv2.convexHull(Facial)
cv2.drawContours(image, [hull], -1, (0, 255, 0), 2)-
切片规则 :
shape[start:end+1]使得包含end索引的点(因为右边界要 +1)。例如右眼索引 36~41,调用drawConvexHull(36,41, ...)会取出索引 36,37,38,39,40,41。 -
凸包概念:
想象一组钉子在平面上,用一根橡皮筋从外部绷紧,橡皮筋形成的多边形就是凸包。
-
凸包是包含所有点的最小凸多边形。
-
它没有凹陷,顶点一定是原始点集中的点。
-
-
cv2.convexHull(Facial):输入点集(N×2 数组),返回凸包顶点(形状(M,1,2))。 -
cv2.drawContours(image, [hull], -1, color, thickness):绘制凸包轮廓,-1表示绘制所有轮廓。 -
适用场景 :眼睛(36~47)、嘴巴外轮廓(48~59)等凸形区域,自动闭合且保证凸性。
(3)为什么有些部位用凸包,有些用连线?
| 部位 | 使用方式 | 原因 |
|---|---|---|
| 眼睛、嘴巴外轮廓 | 凸包 | 这些区域的关键点排列近似凸多边形,凸包能快速得到平滑闭合轮廓 |
| 嘴巴内轮廓 | 凸包(或连线) | 内轮廓实际上是凹形(上下嘴唇之间有空隙),凸包会"封死"缝隙,有时效果不佳,可改为连线 |
| 脸颊、眉毛、鼻子 | 连线(不闭合) | 这些部位是开放曲线或凹形,使用凸包会丢失细节(如下巴尖会被填平) |
(4)凸包的直观理解与验证
可以运行以下代码观察凸包的效果:
import cv2
import numpy as np

img = np.zeros((300,300,3), dtype=np.uint8)
points = np.array([[150,30], [180,110], [270,110], [200,170],
                   [220,250], [150,200], [80,250], [100,170],
                   [30,110], [120,110]], dtype=np.int32)
hull = cv2.convexHull(points)
cv2.drawContours(img, [hull], -1, (0,255,0), 2)
for p in points:
    cv2.circle(img, tuple(p), 3, (0,0,255), -1)
cv2.imshow('Convex Hull', img)
cv2.waitKey(0)
你会看到凸包将五角星的"凹陷"填平,形成一个大的凸多边形。
五、常见问题与解决办法
Q1:ImportError: No module named 'dlib'
-
安装:
pip install dlibWindows 用户建议使用
conda install -c conda-forge dlib或下载预编译 whl。
Q2:RuntimeError: Unable to open shape_predictor_68_face_landmarks.dat
-
下载地址:http://dlib.net/files/shape_predictor_68_face_landmarks.dat.bz2
-
解压后放在与脚本相同的目录下。
Q3:检测不到人脸
-
调整
detector(img, 1)中的上采样次数(1 或 2) -
检查图像是否太暗或人脸太小
-
尝试先对图像做直方图均衡化
cv2.equalizeHist()
Q4:画出的点或线位置不对
-
确认缩放操作在检测之前进行
-
绘制时坐标直接使用
shape中的值,无需反向缩放
六、总结与扩展
通过本次学习,我掌握了:
✅ 使用 dlib 进行人脸检测和 68 点关键点定位
✅ 提取关键点坐标并转换为 NumPy 数组
✅ 用 OpenCV 绘制点、文字、线段和凸包
✅ 理解凸包的概念及其适用场景
✅ 编写健壮的代码(增加错误处理、模型检查)
🔭 下一步可以尝试:
-
实时摄像头关键点检测(
cv2.VideoCapture) -
人脸对齐(通过仿射变换将眼睛旋转到水平)
-
使用 MediaPipe 实现更快的 468 点模型
-
基于关键点的疲劳检测(眨眼、打哈欠)
笔记到此结束。希望对你也有帮助!如果有任何问题,欢迎评论区交流。
本文为原创学习笔记,转载时请注明出处。