0. 前言
在这个被AI颠覆的软件开发时代,身为一名普通程序员的我也感觉到了AI所带来的变革与焦虑。而今,对于编码这种事情不再需要亲力亲为,更多的是指挥与调试。
今天趁着闲暇,用一个支持DockKit 的自拍杆做一个自动跟随的拍摄神器,也记录一下关于Vibe Coding的常见操作。
最终实现的效果如下: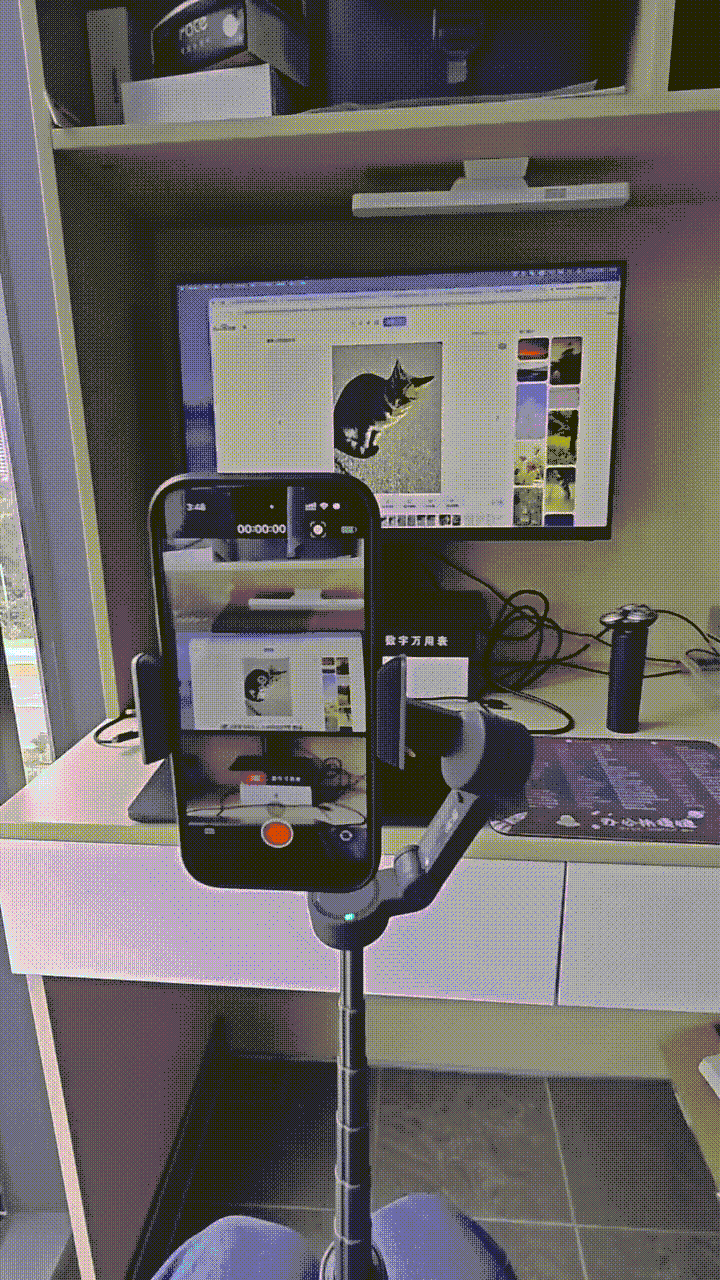
1. DockKit-API学习
尽管DockKit从发布到现在已经有些年头,但国内关于它的教程和资料却非常少。不过现在有了AI,这都不是事儿。
给Claude Code装上Chrome DevTools MCP之后,丢个DockKit的官方文档地址直接开干。
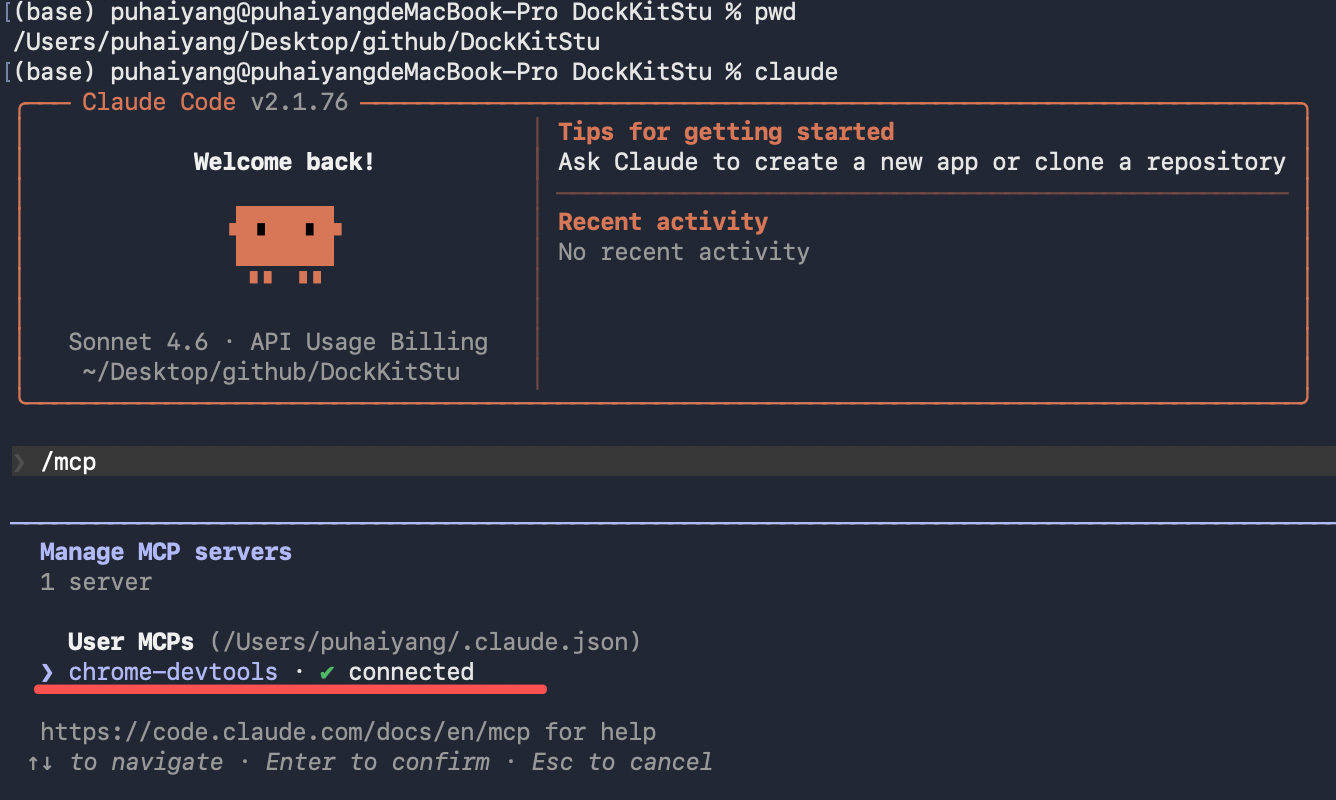
确保Claude Code 已经正确连接好chrome-devtools之后,输入以下提示词:
使用chrome-devtools这个MCP打开https://developer.apple.com/documentation/DockKit/,学习关于DockKit的API用法,并下载https://docs-assets.developer.apple.com/published/e69fb44a209f/AVCamBuildingACameraApp.zip 这个AVCam示例应用到本地,以方便我对它进行二次开发整合DockKit的功能。为了全自动,claude code 这里使用的是自动提交模式(有一定风险,谨慎使用 ):claude --dangerously-skip-permissions
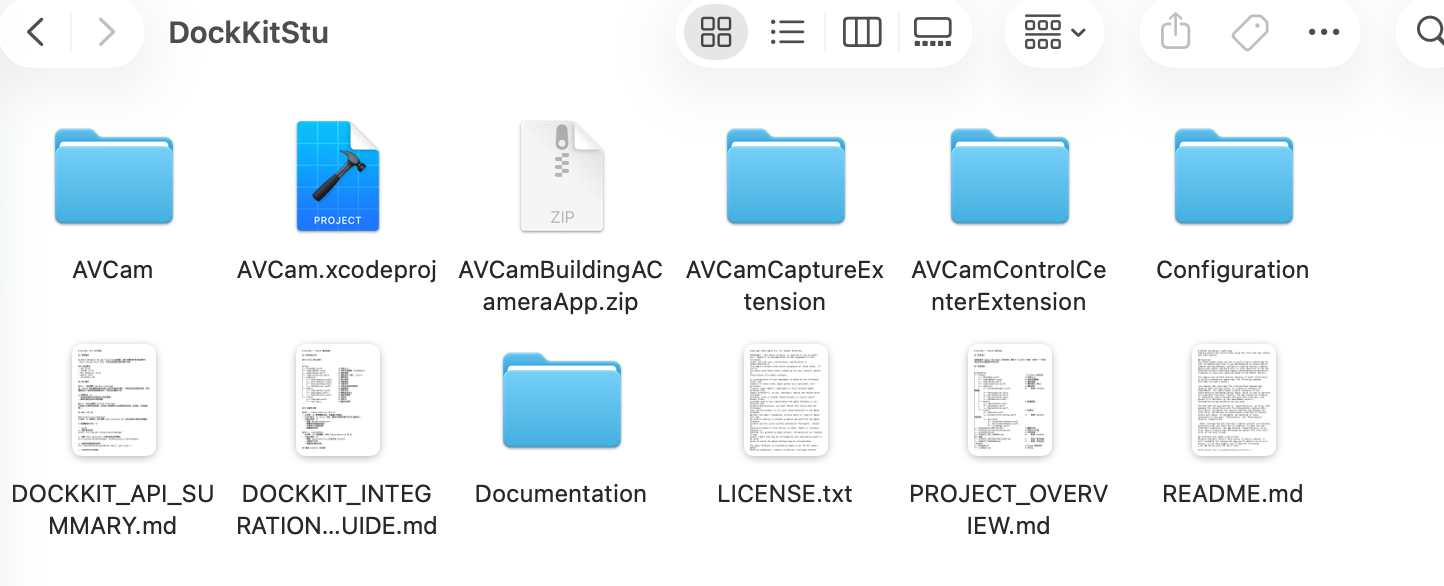
一顿操作之后,便生成了以下文件和相关文档,接下来使用Xcode打开进行二次开发即可。
2. 稳定器连接
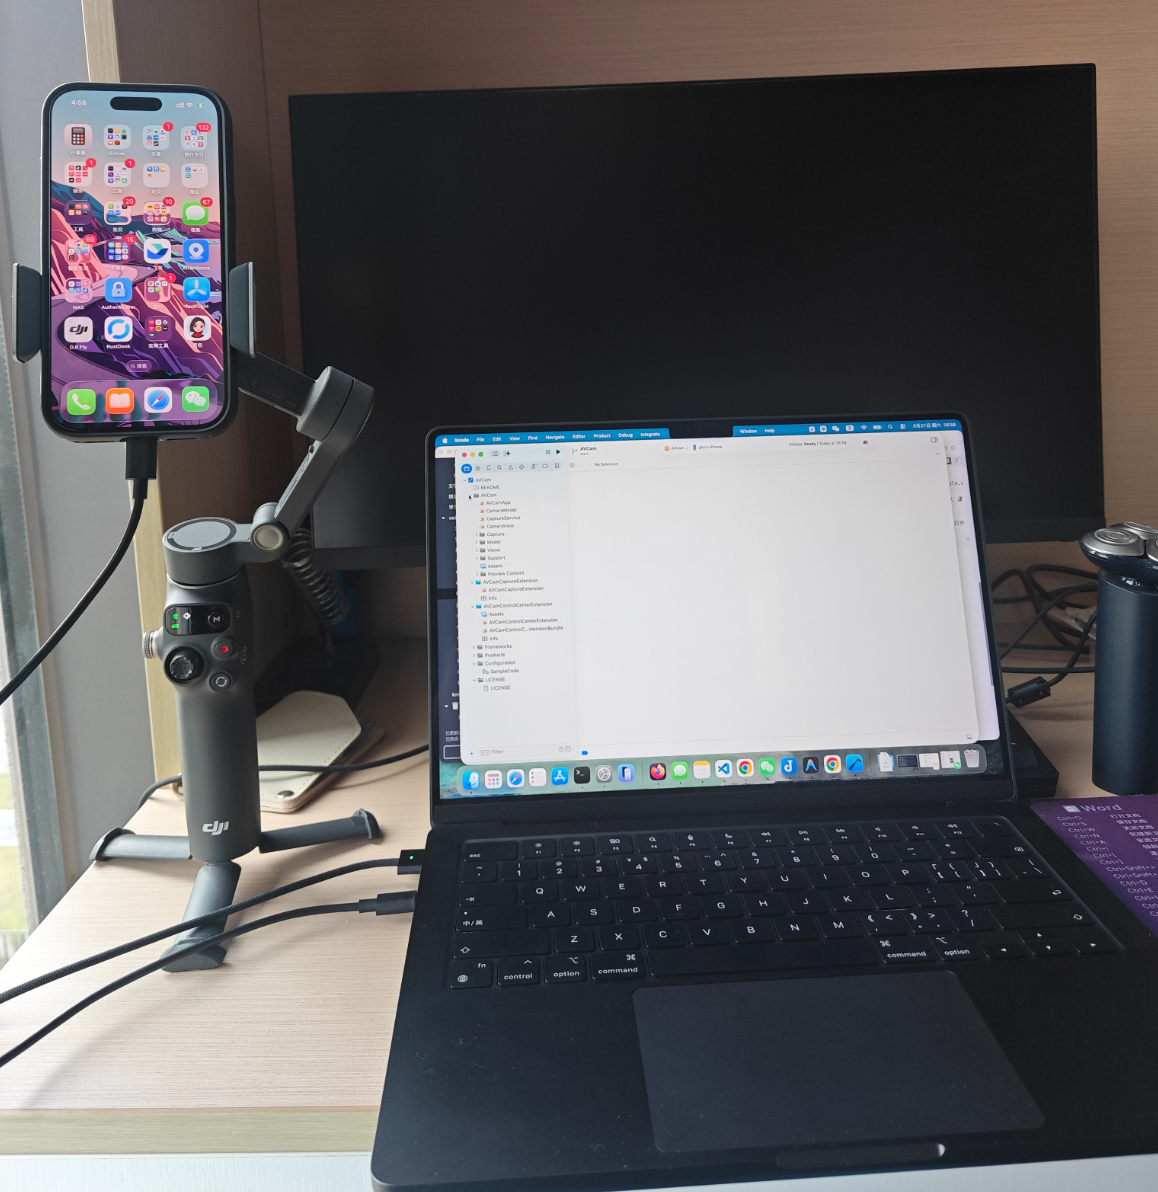
给电脑接上手机,给手机挂上稳定器,在Xcode 中打开AVCam.xcodeproj ,将APP推送到手机。
默认情况下它,这个APP就支持了人脸跟随。效果如下:
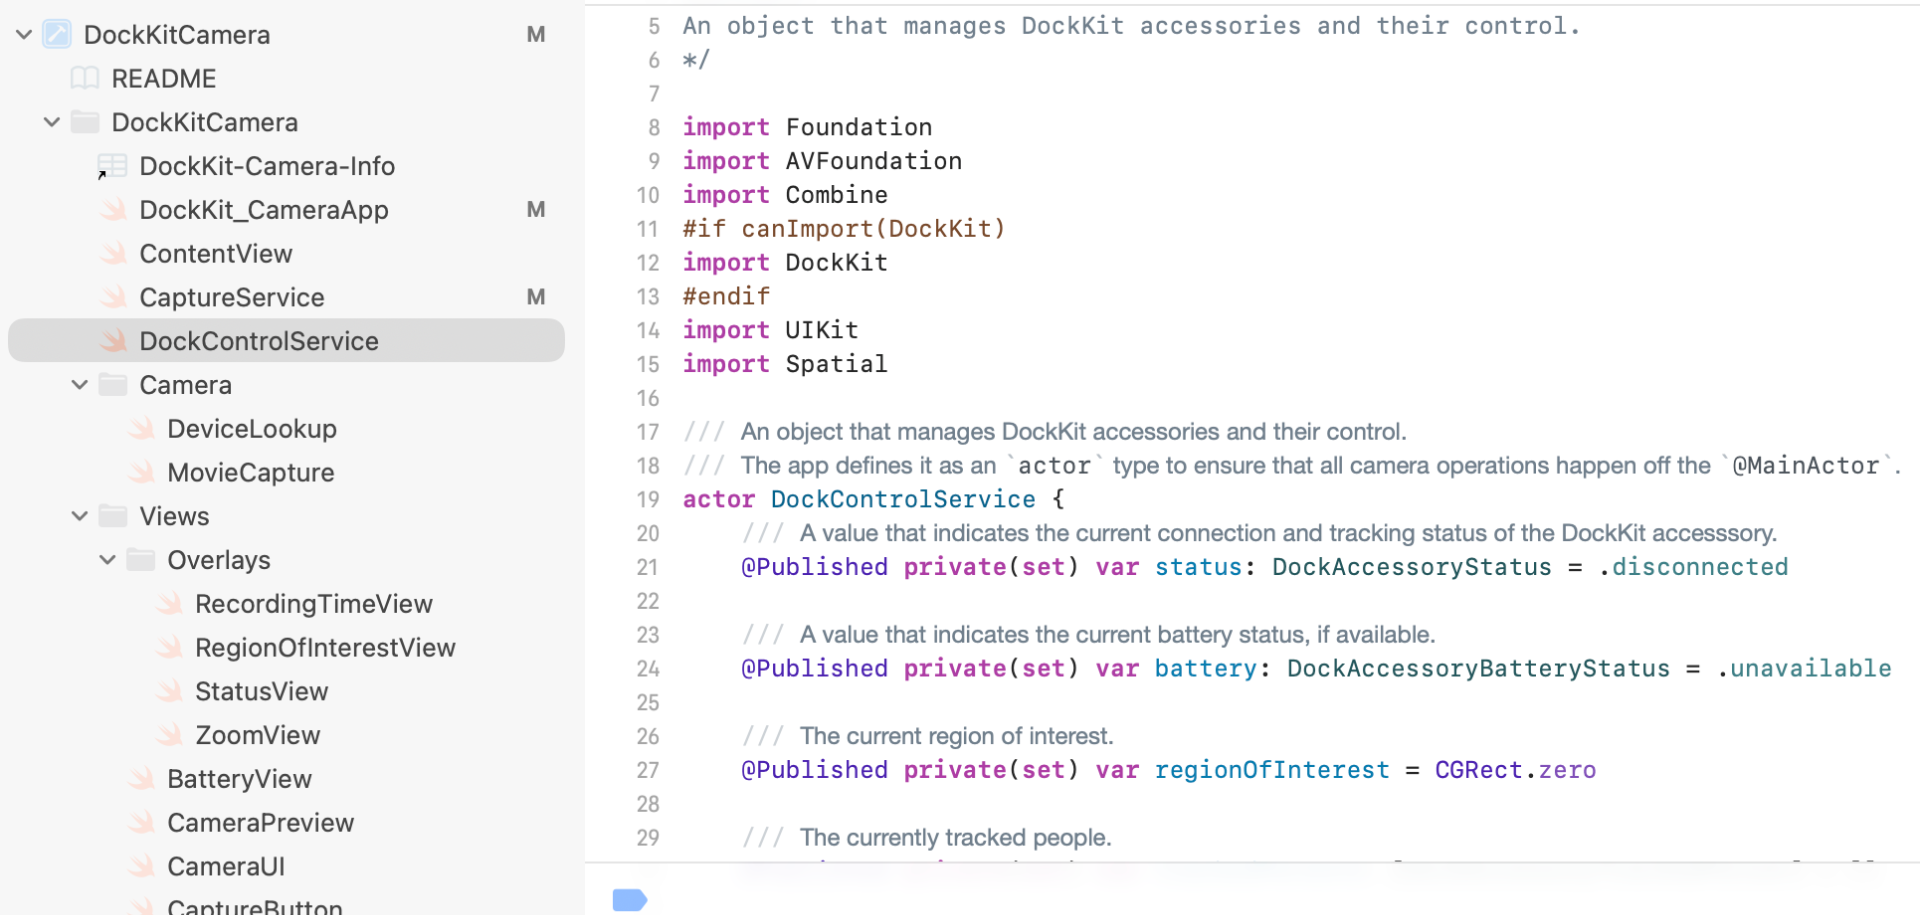
这是因为DockKit 的系统跟踪是系统级别的功能,任何使用 AVCaptureSession 的相机应用都会自动获得支持,无需编写任何额外代码。但我们这里为了实现一些定制化的功能,则需要再进行DockKit的接口整合。
首先先让AVCam 这个APP能获取到DockKit设备 (accessory)的连接状态 和固件信息,主要使用的API为:
- 连接监控,Obtaining-a-manager
- 设备信息读取,Getting accessory information
- 电池状态监控,DockAccessory.StateChange/BatteryState
- 运动状态监控,DockAccessory.MotionState
- 跟踪状态监控,TrackingStates
开发前,记得将DockKit的框架引入到AVCam中:
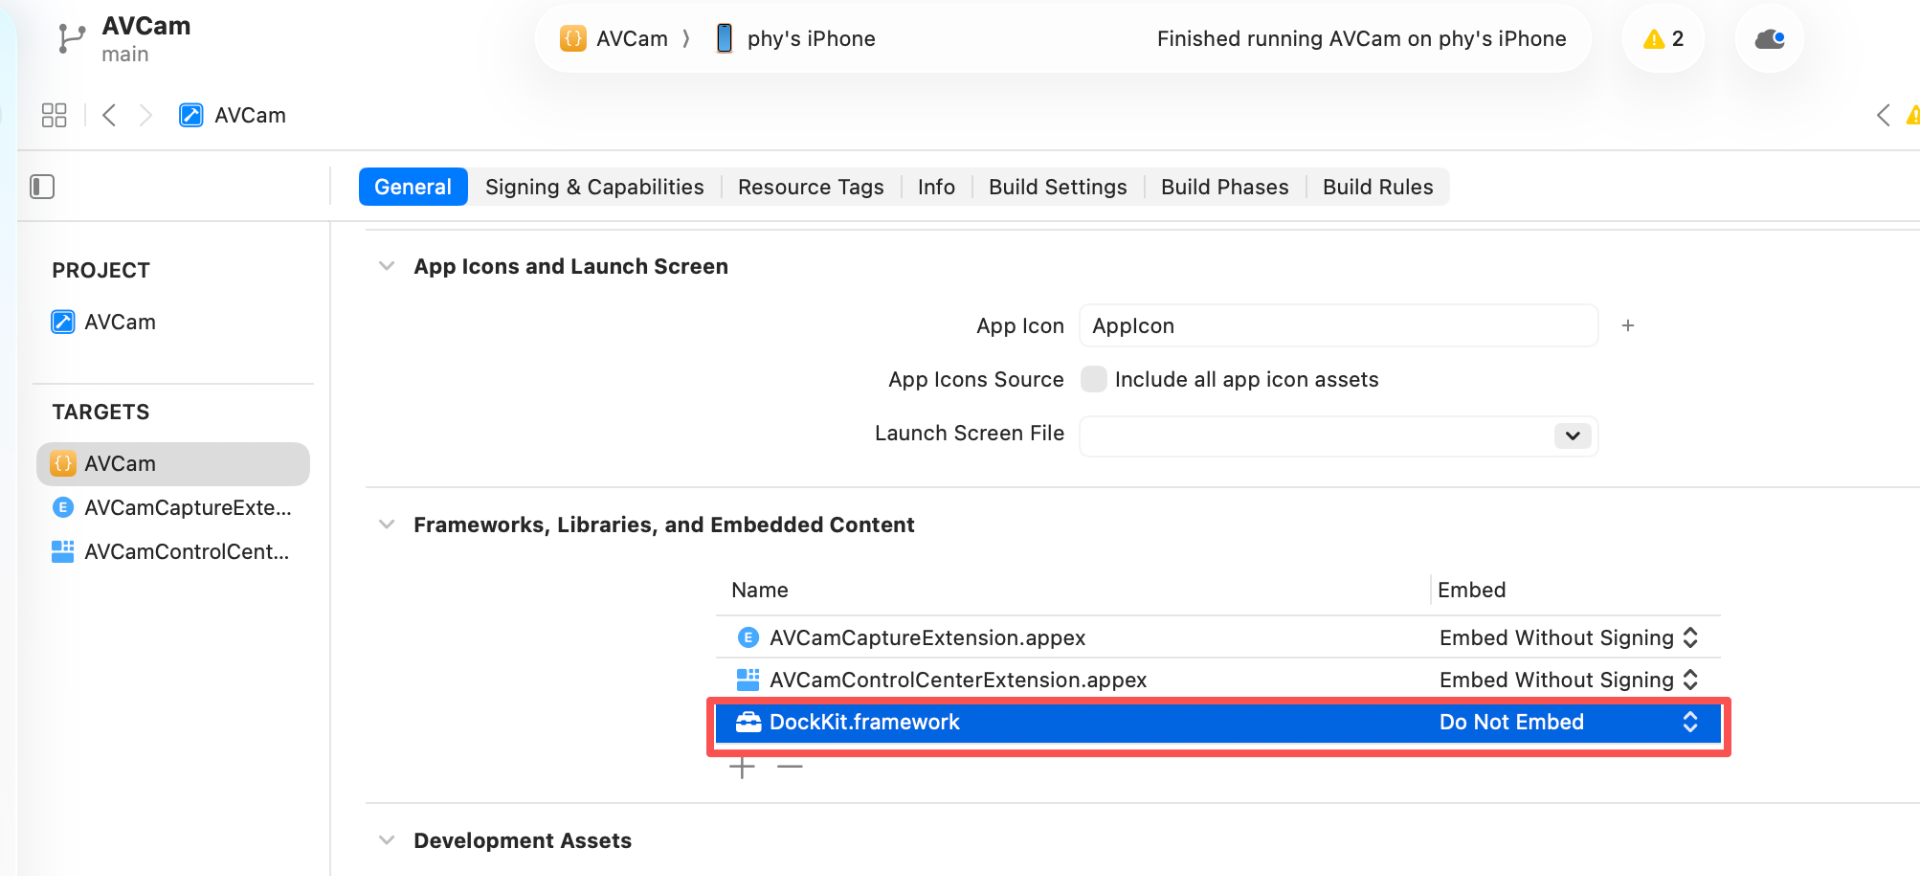
可选提示词为: 集成DockKit,并将设备的连接状态显示在界面中。将并它的设备信息以日志的方式输出。
3. 官方示例应用源码解读
在DockKit的官网中,描述了如何在相机应用中快速集成DockKit并实现目标追踪,示例源码下载链接为:https://docs-assets.developer.apple.com/published/8a91b3c4c6e5/ControllingADockKitAccessoryUsingYourCameraApp.zip
下载并解压后,在Xcode中打开:
在手机中运行后,截图如下:
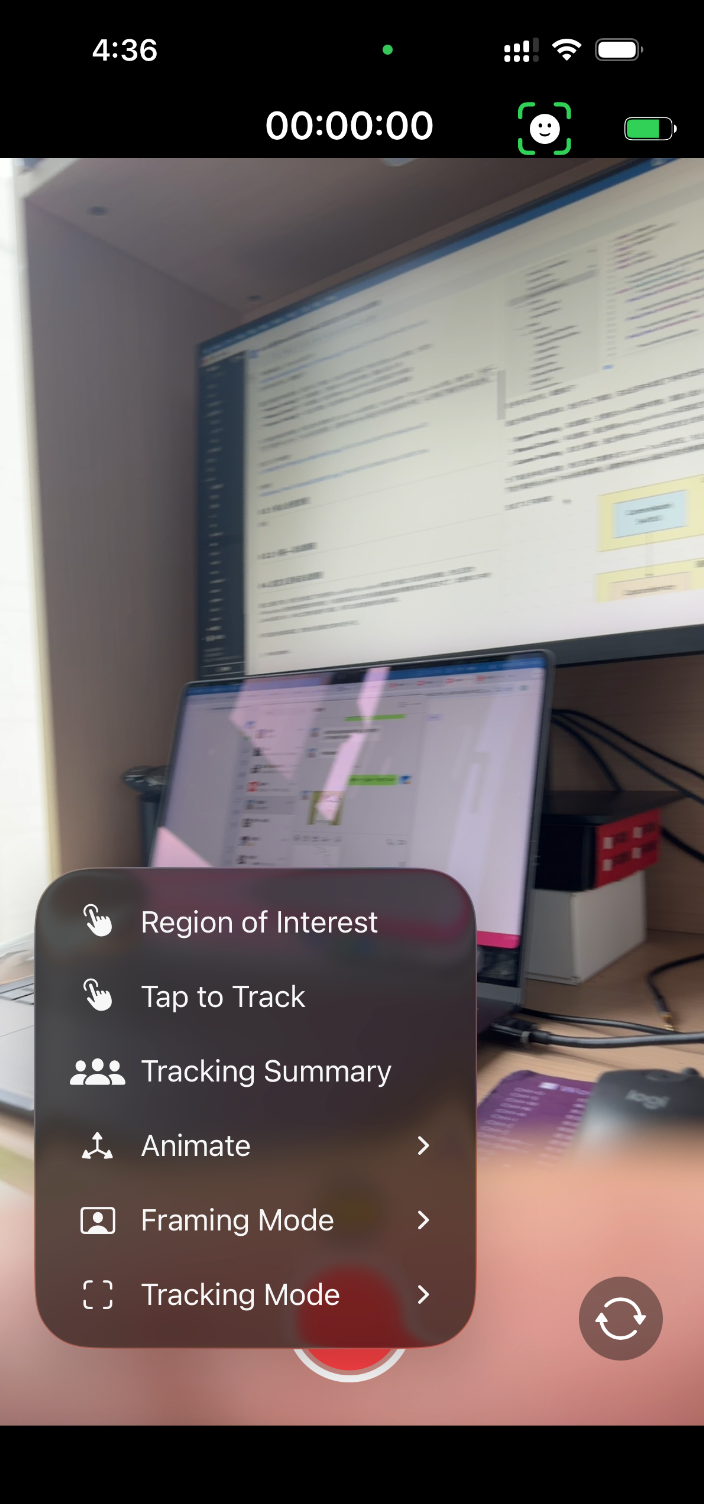
通过示例应用中的菜单,我们可以了解到,在此应用中实现了3种方式的DockKit控制,分别为:
- System Tracking ,系统跟踪,主要由DockKit硬件控制,跟踪人脸/人体
- Manual Control ,手动跟踪,通过调用setAngularVelocity实现指定方向移动
- Custom Tracking,自定义跟踪,通过调用track的API实现自定义的目标跟随
为了满足各种应用场景,我们这里只需要关注Custom Track 的实现。先让AI分析一下Custom Track 代码,提示词:分析一下这个项目中Custom Track的实现原理,必要时用mermaid画出对应的流程或时序图,以让我能了解到它的实现过程。
生成了以下架构图:
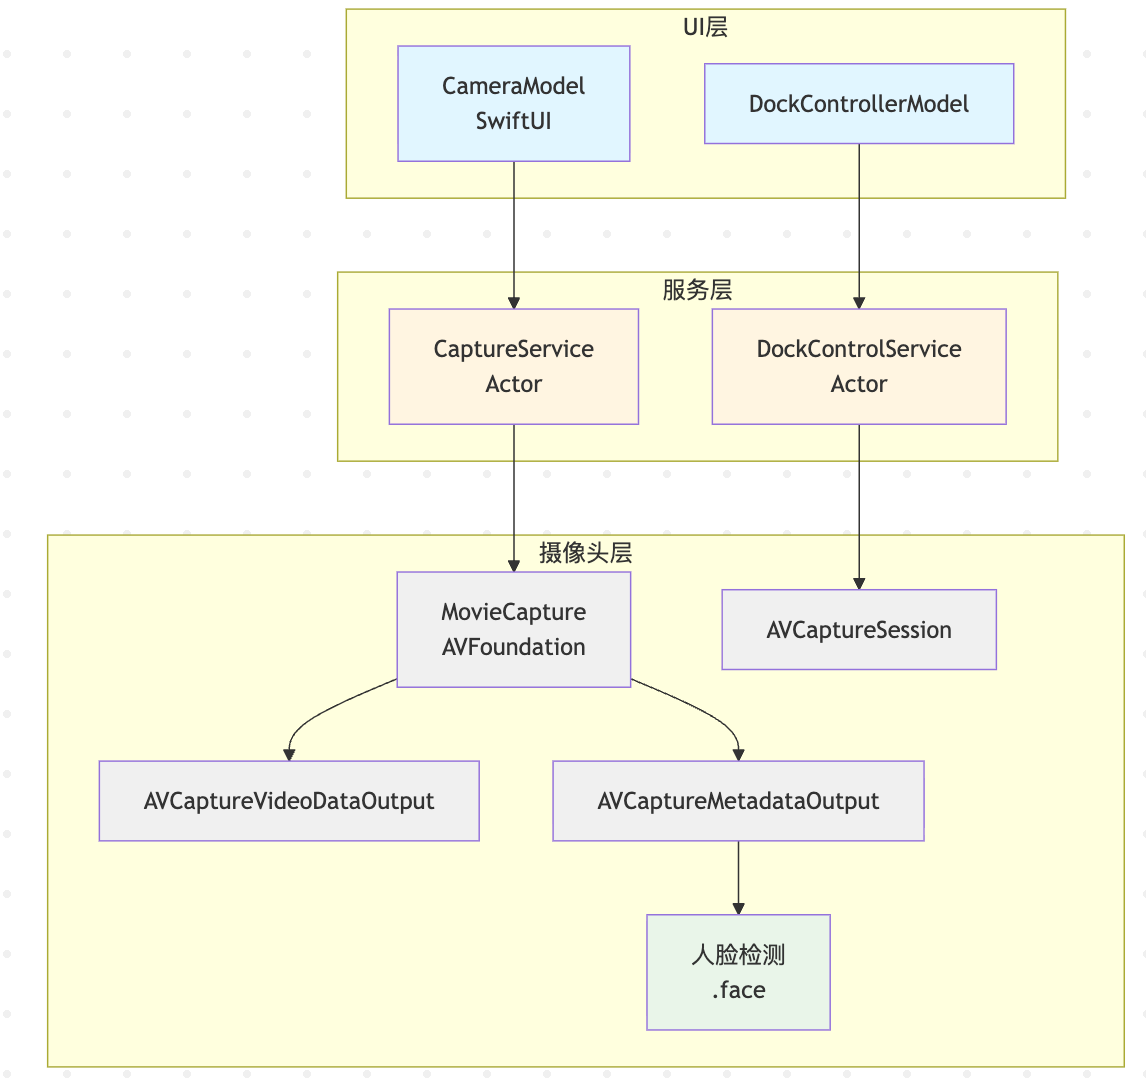
时序图:
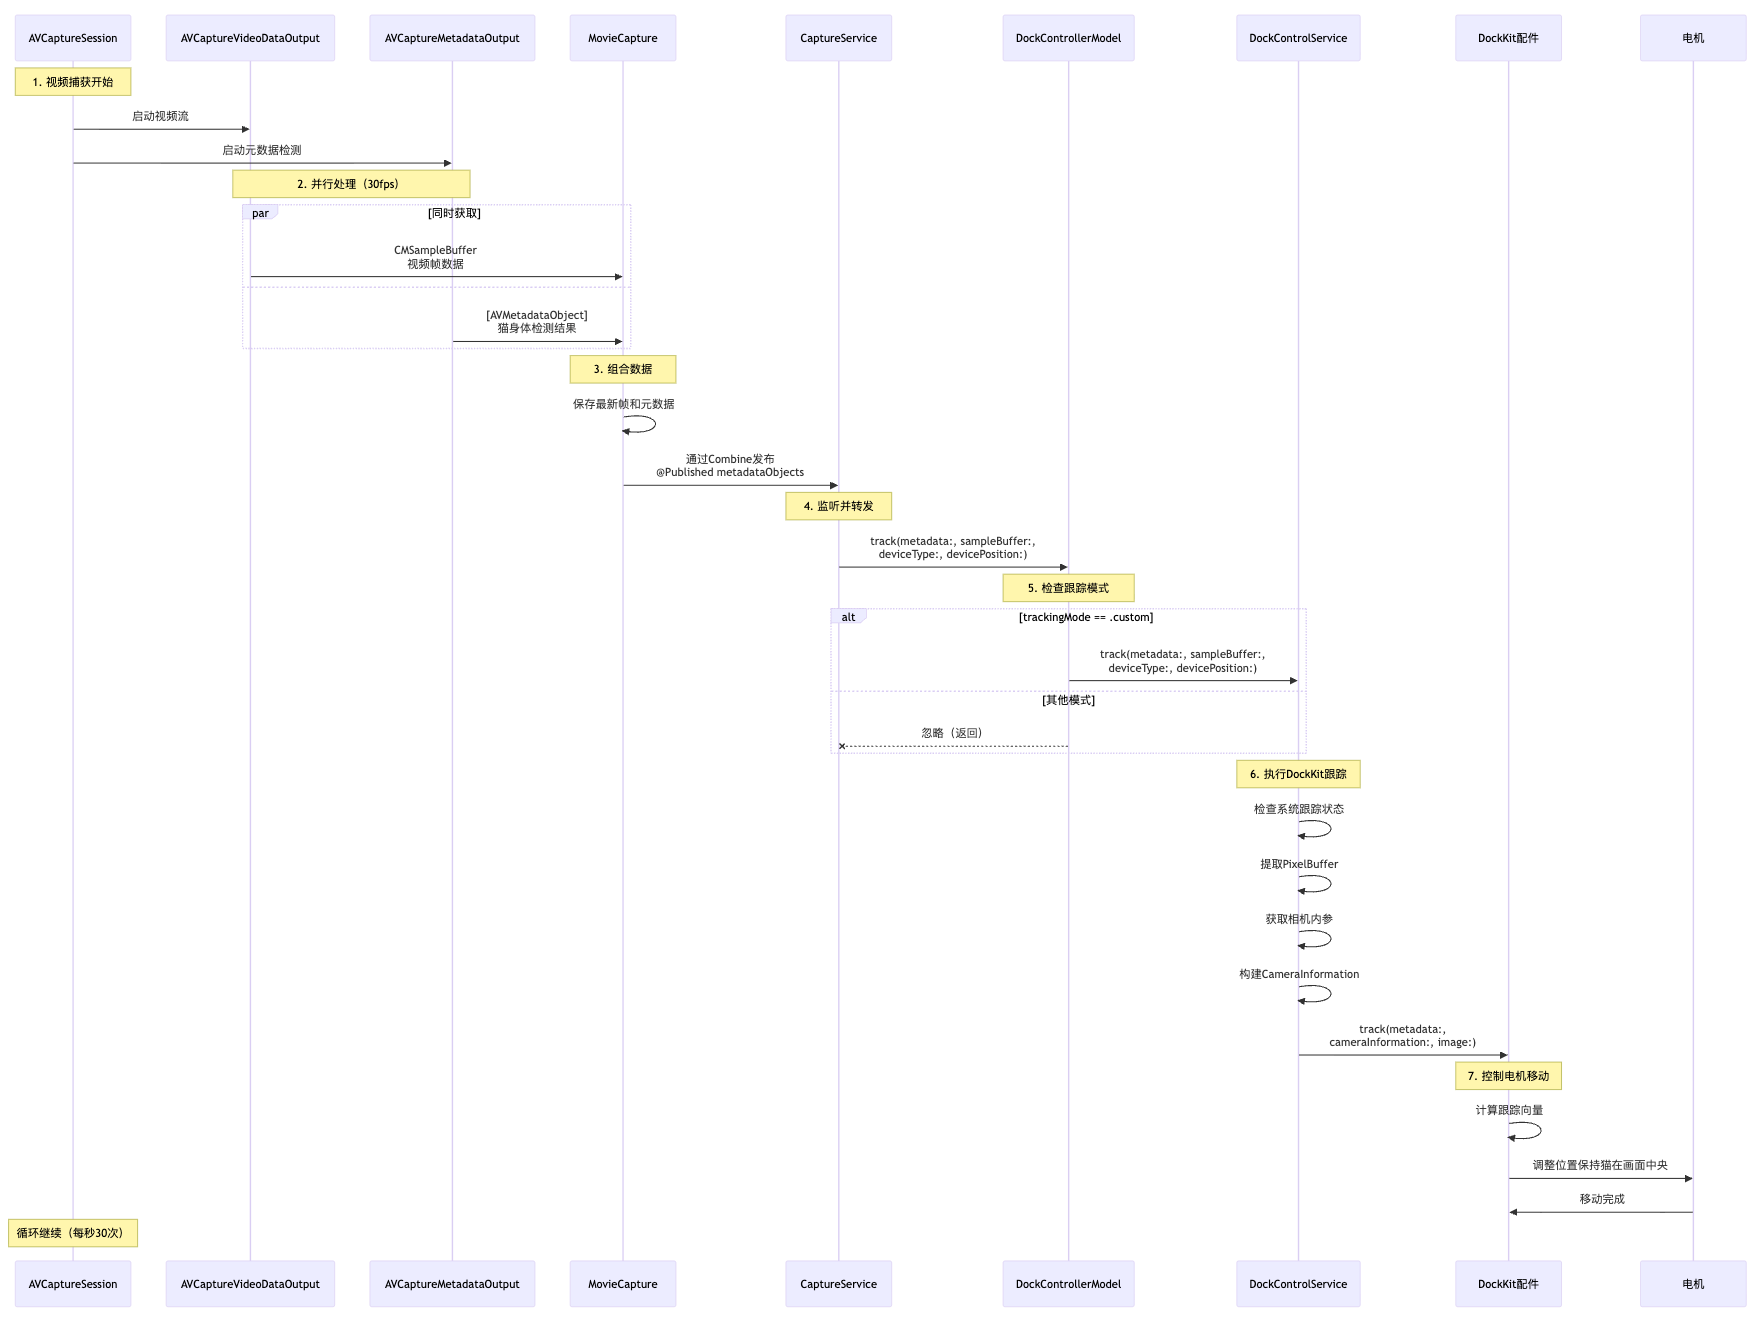
3.1 核心处理流程
结合项目中的代码与现有的流程图,对Custom Track的实现逻辑进行分析整理。
首先,我们先熟悉一下在示例应用中用到的关键DockKit API:
| API | 使用位置 | 用途 |
|---|---|---|
DockAccessoryManager.shared |
DockControlService.swift:76 | 管理DockKit配件连接 |
accessoryStateChanges |
DockControlService.swift:76 | 监听配件状态变化 |
setSystemTrackingEnabled(_:) |
DockControlService.swift:145,182,255,264 | 控制系统跟踪 |
accessoryEvents |
DockControlService.swift:114 | 监听配件按钮事件 |
batteryStates |
DockControlService.swift:413 | 监听电池状态 |
trackingStates |
DockControlService.swift:356 | 监听跟踪状态 |
setFramingMode(_:) |
DockControlService.swift:165 | 设置构图模式 |
selectSubject(at:) |
DockControlService.swift:204 | 选择跟踪主体 |
selectSubjects(_:) |
DockControlService.swift:207 | 清除选择的主体 |
setRegionOfInterest(_:) |
DockControlService.swift:229 | 设置感兴趣区域 |
animate(motion:) |
DockControlService.swift:258 | 执行预设动画 |
setAngularVelocity(_:) |
DockControlService.swift:458 | 手动控制速度 |
track(_:cameraInformation:image:) |
DockControlService.swift:327 | 核心自定义跟踪 |
其中,最关键的接口方法为track,在它的源码中可以看到以下定义:
swift
    /// Automatically generate and send tracking vectors to the device.
    ///
    /// The device receives tracking vectors based on manually constructed observations.
    ///
    /// Disable system tracking, then supply the observations at a fixed rate between 10 and 30 times per second. Any other rate is unsupported.
    /// Calling this method without first disabling system tracking is a fatal error.
    ///
    /// - Parameter data: An array of ``DockAccessory/Observation`` objects indicating the location of objects of interest in the frame.
    /// - Parameter cameraInformation: The camera currently being used, and the orientation of the device.
    /// - Throws: ``DockKitError/notSupported`` if called on macOS.
    @available(visionOS 2.1, *)
    final public func track(_ data: [DockAccessory.Observation], cameraInformation: DockAccessory.CameraInformation) async throws

    /// Automatically generate and send tracking vectors to the device.
    ///
    /// The device receives tracking vectors based on manually constructed observations.
    ///
    /// Disable system tracking, then supply the observations at a fixed rate between 10 and 30 times per second. Any other rate is unsupported.
    /// Calling this method without first disabling system tracking is a fatal error.
    ///
    /// - Parameter data: An array of ``DockAccessory/Observation`` objects indicating the location of objects of interest in the frame.
    /// - Parameter cameraInformation: The camera currently being used, and the orientation of the device.
    /// - Parameter image: The captured camera image buffer.
    /// - Throws: ``DockKitError/notSupported`` if called on macOS.
    @available(visionOS 2.1, *)
    final public func track(_ data: [DockAccessory.Observation], cameraInformation: DockAccessory.CameraInformation, image: CVPixelBuffer) async throws

    /// Automatically generate and send tracking vectors to the device.
    ///
    /// The vectors are based on metadata coming from the camera.
    ///
    /// Disable system tracking, then supply the observations at a fixed rate between 10 and 30 times per second. Any other rate is unsupported.
    /// - Parameter metadata: An array of <doc://com.apple.documentation/documentation/avfoundation/avmetadataobject> objects indicating the location of objects within the frame.
    /// - Parameter cameraInformation: The camera in current use and its orientation.
    /// - Throws: ``DockKitError/notSupported`` if called on macOS.
    @available(visionOS 2.1, *)
    final public func track(_ metadata: [AVMetadataObject], cameraInformation: DockAccessory.CameraInformation) async throws

    /// Automatically generate and send tracking vectors to the device.
    ///
    /// The vectors are based on metadata coming from the camera.
    ///
    /// Disable system tracking, then supply the observations at a fixed rate between 10 and 30 times per second. Any other rate is unsupported.
    /// - Parameter metadata: An array of <doc://com.apple.documentation/documentation/avfoundation/avmetadataobject> objects indicating the location of objects within the frame.
    /// - Parameter cameraInformation: The camera in current use and its orientation.
    /// - Parameter image: The captured camera image buffer.
    /// - Throws: ``DockKitError/notSupported`` if called on macOS.
    @available(visionOS 2.1, *)
    final public func track(_ metadata: [AVMetadataObject], cameraInformation: DockAccessory.CameraInformation, image: CVPixelBuffer) async throws
将这4个方法整理成表格对比一下:
| 方法 | 数据类型 | 是否含图像 | 使用场景 |
|---|---|---|---|
| 方法1 | [DockAccessory.Observation],CameraInformation |
❌ 无 | 自定义ML模型 |
| 方法2 | [DockAccessory.Observation],CameraInformation,CVPixelBuffer |
✅ 有 | 自定义ML模型+图像 |
| 方法3 | [AVMetadataObject],CameraInformation |
❌ 无 | 系统检测,简单跟踪 |
| 方法4 | [AVMetadataObject],CameraInformation,CVPixelBuffer |
✅ 有 | 系统检测+精确跟踪 |
在示例项目中,使用的是AVFoundation 实现的目标识别,所以使用的是方法4 ([AVMetadataObject],CameraInformation,CVPixelBuffer )实现的DockKit追踪,具体的代码如下:
swift
// DockControlService.swfit中,执行DockKit跟踪的核心方法
func track(metadata: [AVMetadataObject], sampleBuffer: CMSampleBuffer,
          deviceType: AVCaptureDevice.DeviceType, devicePosition: AVCaptureDevice.Position) async {

    // 1. 检查系统跟踪是否启用(自定义跟踪时需要关闭系统跟踪)
    if DockAccessoryManager.shared.isSystemTrackingEnabled {
        logger.notice("System tracking is enabled, ignoring command")
        return
    }

    // 2. 获取图像缓冲区
    guard let pixelBuffer = CMSampleBufferGetImageBuffer(sampleBuffer) else {
        logger.error("Error getting pixel buffer")
        return
    }

    // 3. 获取参考尺寸
    let referenceDimensions = CGSize(width: Double(CVPixelBufferGetWidth(pixelBuffer)),
                                     height: Double(CVPixelBufferGetHeight(pixelBuffer)))

    // 4. 获取相机内参(可选)
    var cameraIntrinsics: matrix_float3x3? = nil
    if let cameraIntrinsicsUnwrapped = CMGetAttachment(sampleBuffer,
                                                       key: kCMSampleBufferAttachmentKey_CameraIntrinsicMatrix,
                                                       attachmentModeOut: nil) as? Data {
        cameraIntrinsics = cameraIntrinsicsUnwrapped.withUnsafeBytes { $0.load(as: matrix_float3x3.self) }
    }

    // 5. 构建CameraInformation结构
    let cameraInfo = DockAccessory.CameraInformation(
        captureDevice: deviceType,
        cameraPosition: devicePosition,
        orientation: orientation,
        cameraIntrinsics: cameraIntrinsics,
        referenceDimensions: referenceDimensions
    )

    // 6. 调用DockKit的track方法
    if let imageBuffer = sampleBuffer.imageBuffer {
        Task {
            try await dockkitAccessory.track(metadata, cameraInformation: cameraInfo, image: imageBuffer)
        }
    } else {
        Task {
            try await dockkitAccessory.track(metadata, cameraInformation: cameraInfo)
        }
    }
}
在DockKit的官方说明中有这样的描述:
Call track(_:cameraInformation:) at an interval between 10 and 30 times per second. When calling this method , the tracking system analyzes the subjects and determines which one to focus on and how to frame it. The tracking vector derives from these two choices, and the accessory keeps the subjects framed appropriately.
它要求每秒调用track方法10-30次,这样以能让DockKit设备能实现对跟踪目标 的丝滑追踪。查看示例应用中的代码,我们可以找到track(metadata: [AVMetadataObject], sampleBuffer: CMSampleBuffer,deviceType: AVCaptureDevice.DeviceType, devicePosition: AVCaptureDevice.Position)的调用片段为:
swift
    private func setUpSession() throws {
        // Return early if already set up.
        guard !isSetUp else { return }

        // 获取Publisher($captureActivity)         绑定到属性(&$captureActivity)
        movieCapture.$captureActivity.assign(to: &$captureActivity)
		// ↑ 当movieCapture.captureActivity改变时
    	// 自动更新self.captureActivity

        Task {
            // 持续接收movieCapture.$metadataObjects的值
            for await metadataObjectsUpdate in movieCapture.$metadataObjects.values {
				// 持续将检测到的最新目标发送给DockKit设备
                trackingDelegate?.track(metadata: metadataObjectsUpdate,
                                        sampleBuffer: movieCapture.sampleBuffer,
                                        deviceType: currentDevice.deviceType,
                                        devicePosition: currentDevice.position)
            }
        }

        do {
            // 获取相机设备
            let defaultCamera = try deviceLookup.defaultCamera

            // 添加输入 (调用 addInput)
            activeVideoInput = try addInput(for: defaultCamera)

            // 1. 设置捕获会话,高质量
            captureSession.sessionPreset = .high
            // 2. 添加视频数据输出(用于获取视频帧,CMSampleBuffer)
            try addOutput(movieCapture.videoOutput)
			// 3. 添加元数据输出(用于获取检测结果,AVMetadataObject)
            try addOutput(movieCapture.metadataOutput)
			// 4. 配置元数据检测类型,这里设置的为检测:人脸
            let objectTypes: [AVMetadataObject.ObjectType] = [.face]
            movieCapture.metadataOutput.metadataObjectTypes = objectTypes
			// 5. 添加视频输出,用于录制视频文件
            try addOutput(movieCapture.movieOutput)

            // Configure a rotation coordinator for the default video device.
            createRotationCoordinator(for: defaultCamera)

			// 标记为已设置
            isSetUp = true
        } catch {
			// 任何步骤失败都会抛出错误
            throw CameraError.setupFailed
        }
}上面的addInput和addOutput可以理解为消息的生产者和消费者的关系。captureSession 类似于一个数据流的管道,将input 的数据端口输出到output,其实现代码片段为:
@discardableResult
private func addInput(for device: AVCaptureDevice) throws -> AVCaptureDeviceInput {
    // 第一步: 创建 AVCaptureDeviceInput
    let input = try AVCaptureDeviceInput(device: device)

    // 第二步: 检查会话是否可以添加此输入
    if captureSession.canAddInput(input) {
        // 可以添加: 执行添加操作
        captureSession.addInput(input)
    } else {
        // 不能添加: 抛出错误
        throw CameraError.addInputFailed
    }

    // 第三步: 返回创建的输入对象
    return input
}

private func addOutput(_ output: AVCaptureOutput) throws {
    // 第一步: 检查会话是否可以添加此输出
    if captureSession.canAddOutput(output) {
        // 可以添加: 执行添加操作
        captureSession.addOutput(output)
    } else {
        // 不能添加: 抛出错误
        throw CameraError.addOutputFailed
    }
}
转化为流程图,AVCaptureSession 的管道模型示例图如下:
┌─────────────────────────────────────────────────────────────┐
│                    AVCaptureSession                         │
│                                                             │
│    ┌──────────┐         ┌──────────────┐         ┌─────────┐│
│    │  Input   │  ---->  │   Pipeline   │  ---->  │ Output  ││
│    │  Source  │         │   Processing │         │  Dest   ││
│    └──────────┘         └──────────────┘         └─────────┘│
│                                                             │
│    [相机硬件]           [数据处理]              [输出目标]      │
└─────────────────────────────────────────────────────────────┘其中,addOutput(movieCapture.metadataOutput)中metadataOutput方法实现为:
swift
// 设置元数据输出代理
metadataOutput.setMetadataObjectsDelegate(self, queue: DispatchQueue(label: "MetaDataOutputQueue"))

// 第156-160行:实现元数据输出代理方法
extension MovieCapture: AVCaptureMetadataOutputObjectsDelegate {
    func metadataOutput(_ output: AVCaptureMetadataOutput,
                       didOutput metadataObjects: [AVMetadataObject],
                       from connection: AVCaptureConnection) {
        self.metadataObjects = metadataObjects  // 发布检测到的目标数据
    }
}captureOutput方法实现为:
swift
// 同时设置视频帧代理
videoOutput.setSampleBufferDelegate(self, queue: DispatchQueue(label: "VideoframesOutputQueue"))

// 获取视频帧
extension MovieCapture: AVCaptureVideoDataOutputSampleBufferDelegate {
    func captureOutput(_ output: AVCaptureOutput,
                      didOutput sampleBuffer: CMSampleBuffer,
                      from connection: AVCaptureConnection) {
        self.sampleBuffer = sampleBuffer  // 保存最新的视频帧
    }
}
movieCapture.metadataOutput.metadataObjectTypes = objectTypes(face)这一行的含义可见IOS系统源码描述:
swift
    /**
     @property metadataObjectTypes
     @abstract
        Specifies the types of metadata objects that the receiver should present to the client.

     @discussion
        AVCaptureMetadataOutput may detect and emit multiple metadata object types. For apps linked before iOS 7.0, the receiver defaults to capturing face metadata objects if supported (see -availableMetadataObjectTypes). For apps linked on or after iOS 7.0, the receiver captures no metadata objects by default. -setMetadataObjectTypes: throws an NSInvalidArgumentException if any elements in the array are not present in the -availableMetadataObjectTypes array.

        If you've set your AVCaptureMetadataOutput's connected input's `cinematicVideoCaptureEnabled` property to YES, you must set your `metadataObjectTypes` property to `requiredMetadataObjectTypesForCinematicVideoCapture` or an NSInvalidArgumentException is thrown.
     */
    open var metadataObjectTypes: [AVMetadataObject.ObjectType]!
3.2 小猫------自动跟随适配
从官方的示例代码中可以看出,它实现的是对人脸(face)的DockKit 跟随,如果要切换为对其他目标的跟随,我们仅需要修改 setUpSession() 中的源码即可。如我们要实现对小猫的跟随,就这样修改:
swift
            let objectTypes: [AVMetadataObject.ObjectType] = [.catBody]
movieCapture.metadataOutput.metadataObjectTypes = objectTypes上面的catBody的来源为extension AVMetadataObject.ObjectType 中定义的变量,它支持的有:
- humanBody
- humanFullBody
- catHead
- catBody
- dogHead
- dogBody
- salientObject
- face
- 条形码/二维码(qr、codabar、microQR、code93、......)
修改的的运行效果就是本文前面的GIF动画。
4. 自定义目标自动跟随
通过上面的了解,我们已经知道了如何使用DockKit 和AVFoundation 内置的识别能力完成目标的跟随。但也正因为AVFoundation 支持的检测类型非常有限,所以要完成自定义的目标跟随追踪 就得需要其他的实现方式了,如使用IOS 中的CoreML 或NCNN 、MNN 之类的机器学习框架,再调用DockKit/DockAccessory/track([DockAccessory.Observation],CameraInformation,CVPixelBuffer)则可以完成更通用 的目标跟随任务。
关于这部分的具体实践,会在后续的文章中进行补充。
五一快乐~