文章目录
- [1.理解 Service](#1.理解 Service)
-
- [1.1 ROS 通信体系概览](#1.1 ROS 通信体系概览)
- [1.2 什么是 Service](#1.2 什么是 Service)
- [1.3 Service vs Topic vs Action](#1.3 Service vs Topic vs Action)
- [1.4 Service 的适用场景](#1.4 Service 的适用场景)
- [2.Service 基础概念](#2.Service 基础概念)
-
- [2.1 Service 的数据结构:.srv 文件](#2.1 Service 的数据结构:.srv 文件)
- [2.2 Service 的通信流程](#2.2 Service 的通信流程)
- [2.3 Service 的底层协议](#2.3 Service 的底层协议)
- [3.创建自定义 Service](#3.创建自定义 Service)
-
- [3.1 创建功能包](#3.1 创建功能包)
- [3.2 定义 .srv 文件](#3.2 定义 .srv 文件)
- [3.3 配置CMakeLists.txt 和 package.xml](#3.3 配置CMakeLists.txt 和 package.xml)
-
- [3.3.1 修改 `package.xml`](#3.3.1 修改
package.xml) - [3.3.2 修改 `CMakeLists.txt`](#3.3.2 修改
CMakeLists.txt)
- [3.3.1 修改 `package.xml`](#3.3.1 修改
- [3.4 编译生成消息代码](#3.4 编译生成消息代码)
- [3.5 验证Service 定义](#3.5 验证Service 定义)
- [4.实现 Service Server(C++)](#4.实现 Service Server(C++))
-
- [4.1 编写Server代码](#4.1 编写Server代码)
- [4.2 代码逐行解析](#4.2 代码逐行解析)
-
- 4.2.1头文件
- 4.2.2回调函数签名
- [4.2.3注册 Service](#4.2.3注册 Service)
- 4.2.4事件循环
- [4.3 编译配置](#4.3 编译配置)
- [5.实现 Service Client(C++)](#5.实现 Service Client(C++))
-
- [5.1 编写 Client 代码](#5.1 编写 Client 代码)
- [5.2 代码逐行解析](#5.2 代码逐行解析)
-
- [5.2.1 创建Client](#5.2.1 创建Client)
- [5.2.2 发起调用](#5.2.2 发起调用)
- [5.3 同步与异步调用](#5.3 同步与异步调用)
- [6.Python 实现](#6.Python 实现)
-
- [6.1 Python Server](#6.1 Python Server)
- [6.2 Python Client](#6.2 Python Client)
- [7.常用内置 Service 类型](#7.常用内置 Service 类型)
-
- [7.1 std_srvs 系列](#7.1 std_srvs 系列)
-
- [7.1.1 std_srvs/Trigger - 触发器](#7.1.1 std_srvs/Trigger - 触发器)
- [7.1.2 std_srvs/SetBool - 布尔开关](#7.1.2 std_srvs/SetBool - 布尔开关)
- [7.1.3 std_srvs/Empty - 空操作](#7.1.3 std_srvs/Empty - 空操作)
- [7.1.4 std_srvs/String - 字符串操作](#7.1.4 std_srvs/String - 字符串操作)
- [7.1.5 传感器相关Service](#7.1.5 传感器相关Service)
- [7.2 自定义复杂 Service](#7.2 自定义复杂 Service)
- 8.命令行工具与调试
-
- [8.1 rosservice 命令大全](#8.1 rosservice 命令大全)
-
- [8.1.1 列出所有 Service](#8.1.1 列出所有 Service)
- [8.1.2 查看 Service 类型](#8.1.2 查看 Service 类型)
- [8.1.3 查看 Service 定义](#8.1.3 查看 Service 定义)
- [8.1.4 调用Service](#8.1.4 调用Service)
- [8.1.5 查找特定类型的Service](#8.1.5 查找特定类型的Service)
- [8.1.6 Service响应延迟测试](#8.1.6 Service响应延迟测试)
- [8.2 rossrv 命令](#8.2 rossrv 命令)
- [8.3 rosnode 调试](#8.3 rosnode 调试)
- [8.4 rqt 图形化调试](#8.4 rqt 图形化调试)
- [9.ROS 2中的Service](#9.ROS 2中的Service)
-
- [9.1 ROS 2 vs ROS 1 差异](#9.1 ROS 2 vs ROS 1 差异)
- [9.2 ROS 2 Service实现(Python)](#9.2 ROS 2 Service实现(Python))
-
- [9.2.1 创建功能包](#9.2.1 创建功能包)
- [9.2.2 定义.srv 文件](#9.2.2 定义.srv 文件)
- [9.2.3 编写Server](#9.2.3 编写Server)
- [9.2.4 编写Client](#9.2.4 编写Client)
- [9.2.5 配置`setup.py`](#9.2.5 配置
setup.py) - [9.2.6 编译与运行](#9.2.6 编译与运行)
- [9.3 ROS 2 Service实现(C++)](#9.3 ROS 2 Service实现(C++))
- [9.4 ROS 2命令行工具](#9.4 ROS 2命令行工具)
- 10.实战案例
-
- [10.1 案例一:机器人底盘控制服务](#10.1 案例一:机器人底盘控制服务)
-
- [10.1.1 **Service 定义**:](#10.1.1 Service 定义:)
- [10.1.2 **Server 实现(Python)**:](#10.1.2 Server 实现(Python):)
- [10.1.3 **使用示例**:](#10.1.3 使用示例:)
- [10.2 案例二:图像处理服务](#10.2 案例二:图像处理服务)
-
- [10.2.1 **Service 定义**:](#10.2.1 Service 定义:)
- [10.2.2 **Server 实现(Python + OpenCV)**:](#10.2.2 Server 实现(Python + OpenCV):)
- [10.3 案例三:多Service 协同工作](#10.3 案例三:多Service 协同工作)
-
- [10.3.1 **使用示例**:](#10.3.1 使用示例:)
- 11.最佳实践与常见问题
-
- [11.1 设计原则](#11.1 设计原则)
-
- [11.1.1 **保持 Service 接口简洁**](#11.1.1 保持 Service 接口简洁)
- [11.1.2 **使用有意义的返回值**](#11.1.2 使用有意义的返回值)
- [11.1.3 **设置合理的超时**](#11.1.3 设置合理的超时)
- [11.1.4 **处理 Service 不可用的情况**](#11.1.4 处理 Service 不可用的情况)
- [11.2 性能优化](#11.2 性能优化)
-
- [11.2.1 **使用持久连接**](#11.2.1 使用持久连接)
- [11.2.2 **避免在回调中执行耗时操作**](#11.2.2 避免在回调中执行耗时操作)
- [11.2.3 **合理使用Service vs Topic**](#11.2.3 合理使用Service vs Topic)
- [11.3 常见错误排查](#11.3 常见错误排查)
-
- [11.3.1 错误1:Service调用超时](#11.3.1 错误1:Service调用超时)
- [11.3.2 错误2:类型不匹配](#11.3.2 错误2:类型不匹配)
- [11.3.3 错误3:找不到头文件](#11.3.3 错误3:找不到头文件)
- [11.3.4 错误4:Python 导入失败](#11.3.4 错误4:Python 导入失败)
- [11.3.5 错误5:回调函数不被调用](#11.3.5 错误5:回调函数不被调用)
- 12.附录
-
- 12.1完整的catkin_ws创建命令
- [12.2 常用Service类型速查表](#12.2 常用Service类型速查表)
- [12.3 ROS 1 vs ROS 2 Service命令对比](#12.3 ROS 1 vs ROS 2 Service命令对比)
- [12.4 参考资源](#12.4 参考资源)
1.理解 Service
1.1 ROS 通信体系概览
ROS(Robot Operating System)的核心是一套分布式通信框架 。在一个典型的 ROS 系统中,数十个甚至上百个节点(Node)需要相互交换数据。
ROS 提供了三种主要的通信机制来满足不同的需求:
| 通信方式 | 中文名 | 通信模式 | 特点 | 适用场景 |
|---|---|---|---|---|
| Topic(话题) | 发布/订阅 | 异步单向 | 连续数据流 | 传感器数据、状态广播等持续性数据传输 |
| Service(服务) | 请求/响应 | 同步双向 | 一次性调用 | 查询配置、触发特定操作等即时请求 |
| Action(动作) | 目标/反馈 | 异步可取消 | 长时间任务 | 导航、机械臂运动等需要进度反馈的耗时任务 |
Topic 是ROS中最常用的通信方式,适用于连续的数据流(如传感器数据)。它采用发布/订阅模型,Publisher 和 Subscriber之间是松耦合的------Publisher 不关心谁在订阅,Subscriber 也不关心谁在发布。
Service 则完全不同。它采用客户端/服务器模型(C/S),就像你去餐厅点餐:你(Client)告诉服务员你要什么(Request),厨师(Server)做好后把菜端给你(Response)。整个过程中你一直在等待,直到拿到结果。
Action 是Service的增强版,适用于需要较长时间执行的任务。它在Service 基础上增加了反馈机制 (可以实时了解进度)和取消功能(可以中途取消任务)。
1.2 什么是 Service
Service是ROS中的同步请求/响应通信机制 。它由两个部分组成:
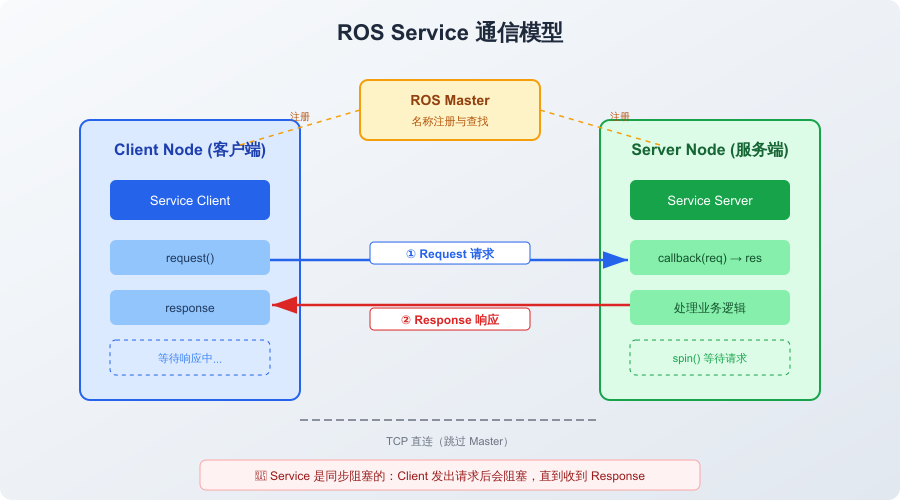
- Service Server:提供服务的一方,等待请求并返回结果
- Service Client:使用服务的一方,发送请求并等待响应
每个Service 都有一个唯一的名称 (如 /add_two_ints),Client 通过这个名称找到Server并发起调用。
Service 的数据结构由 .srv 文件定义,分为两部分:
- Request(请求):Client发送给Server的数据
- Response(响应):Server返回给Client的数据
baash
┌──────────────────────────────────────────┐
│            Service 数据流                 │
│                                          │
│   Client ──Request──→ Server            │
│          {a: 3, b: 5}                    │
│                                          │
│   Client ←─Response── Server            │
│          {sum: 8}                        │
└──────────────────────────────────────────┘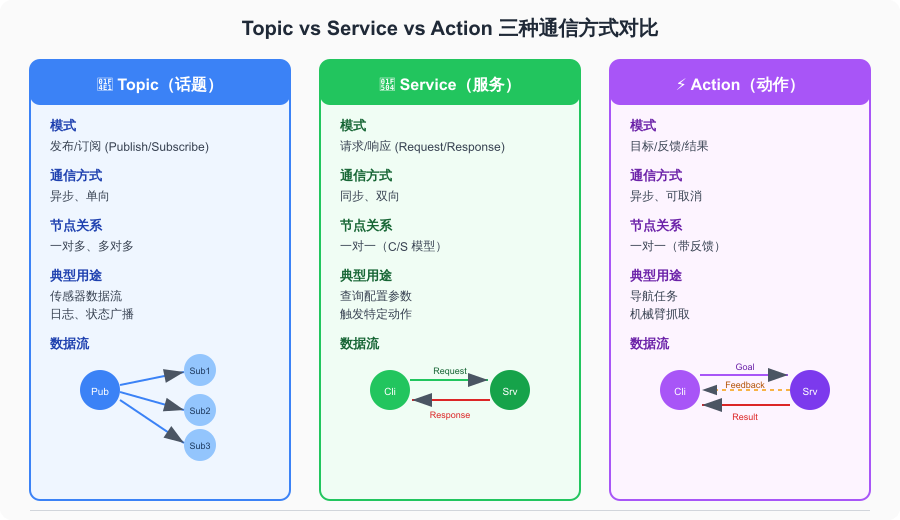
1.3 Service vs Topic vs Action
选择正确的通信方式是ROS开发的第一步。以下是详细的对比:
| 特性 | Topic | Service | Action |
|---|---|---|---|
| 通信模型 | 发布/订阅 | 请求/响应 | 目标/反馈/结果 |
| 同步性 | 异步 | 同步阻塞 | 异步非阻塞 |
| 方向 | 单向(一对多) | 双向(一对一) | 双向(一对一) |
| 阻塞行为 | 不阻塞 | Client 阻塞等待 | 不阻塞(回调) |
| 持续时间 | 持续数据流 | 短时间(毫秒~秒) | 长时间(秒~分钟) |
| 反馈机制 | 无 | 无 | 有(实时进度) |
| 取消功能 | 无 | 无 | 有 |
| 典型用途 | 传感器数据、状态发布 | 参数查询、触发动作 | 导航、抓取任务 |
| 类比 | 广播电台 | 打电话 | 下单快递 |
选择建议:
- 数据需要持续产生/消费 ?→ 用Topic(如激光雷达数据、图像流)
- 需要一次性请求并立即获得结果 ?→ 用Service(如查询机器人状态、重置参数)
- 任务执行时间长且需要反馈 ?→ 用 Action(导航到目标点、机械臂运动)
1.4 Service 的适用场景
Service在以下场景中特别有用:
配置与参数管理
bash
# 动态修改参数
rosservice call /rosout/set_logger_level "logger: 'rosout' level: 'DEBUG'"
触发特定动作
bash
# 重置机器人位置
rosservice call /gazebo/reset_simulation "{}"

# 清除地图
rosservice call /move_base/clear_costmaps "{}"
查询状态信息
bash
# 获取机器人当前位姿
rosservice call /get_robot_pose "{}"
设备控制
bash
# 开关 LED
rosservice call /led_control "{led_id: 1, state: true}"
2.Service 基础概念
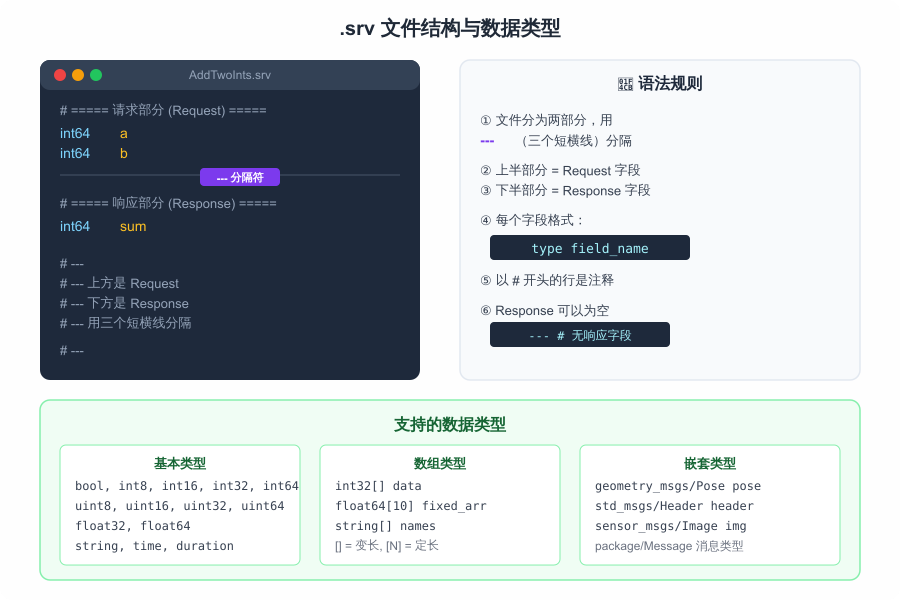
2.1 Service 的数据结构:.srv 文件
.srv 文件是 Service 的接口定义,类似于 Protocol Buffers 的 .proto 文件。它使用一种简单的文本格式来定义请求和响应的数据结构。
基本语法:
bash
# 注释行以 # 开头

# ========== Request(请求部分)==========
field_type1 field_name1
field_type2 field_name2
---
# ========== Response(响应部分)=========
field_type3 field_name3关键规则:
- 用
---(三个短横线)分隔 Request 和 Response - 每个字段由
类型+空格+字段名组成 - 以
#开头的行是注释 - Response 部分可以为空(表示无需返回值)
示例文件 AddTwoInts.srv:
bash
# 请求:两个整数
int64 a
int64 b
---
# 响应:它们的和
int64 sum支持的数据类型:
| 类型 | 说明 | 示例 |
|---|---|---|
bool |
布尔值 | true / false |
int8 / int16 / int32 / int64 |
有符号整数 | 42 |
uint8 / uint16 / uint32 / uint64 |
无符号整数 | 100 |
float32 / float64 |
浮点数 | 3.14 |
string |
字符串 | "hello" |
time |
时间戳 | {secs: 1000, nsecs: 0} |
duration |
时间段 | {secs: 5, nsecs: 0} |
T[] |
变长数组 | [1, 2, 3] |
T[N] |
定长数组 | [1, 2, 3](长度 N) |
package/Type |
嵌套消息 | geometry_msgs/Pose |
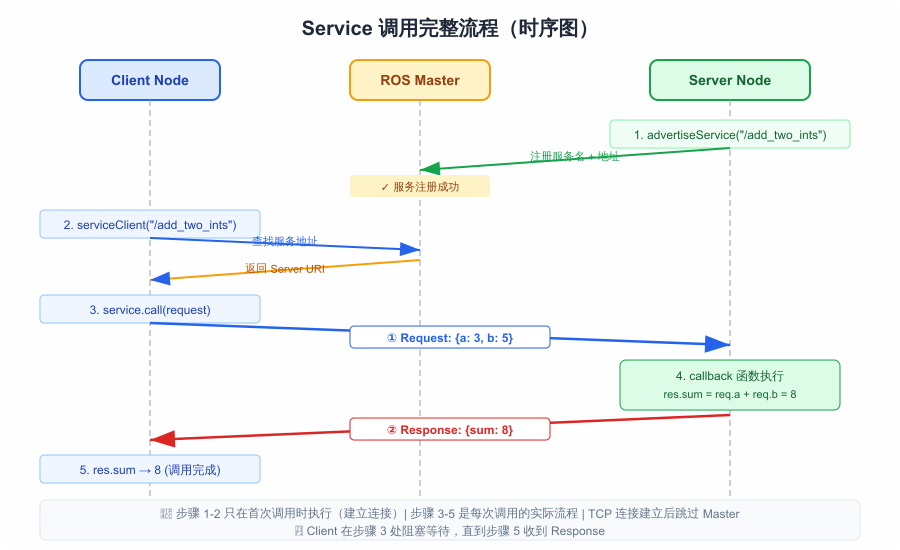
2.2 Service 的通信流程
Service的完整调用流程如下图所示:
bash
┌──────────┐                    ┌──────────┐
│  Client  │                    │  Server  │
│  Node    │                    │  Node    │
└────┬─────┘                    └────┬─────┘
     │                               │
     │          ① 注册服务            │
     │         ┌──────────┐         │
     │         │ROS Master│         │
     │         └──────────┘         │
     │  ←────── ② 查找地址 ─────────│
     │                               │
     │  ③ TCP 直连建立               │
     │ ←────────────────────────────→│
     │                               │
     │  ④ 发送 Request               │
     │ ─────────────────────────────→│
     │                               │
     │          (Server 处理中...)    │
     │          阻塞等待中            │
     │                               │
     │  ⑤ 返回 Response              │
     │ ←─────────────────────────────│
     │                               │
     │  调用完成                      │
↓ ↓详细步骤说明:
- 服务注册:Server启动时,向ROS Master注册自己提供的Service名称和通信地址
- 地址查找:Client发起调用前,先向ROS Master查询该Service的Server 地址
- 建立 TCP 连接:Client直接与Server建立TCP连接(后续通信不再经过Master)
- 发送请求:Client 将Request 数据序列化后通过TCP发送给Server
- 返回响应:Server处理完成后,将Response数据返回给Client
重要 :ROS Master只负责"牵线搭桥"(注册和查找),实际数据传输是Client 和 Server 之间的 TCP 直连。这意味着 Master 可以在建立连接后关闭,Service 调用仍然可以正常工作。
2.3 Service 的底层协议
在ROS1 中,Service 使用 TCPROS 协议进行通信,这是基于TCP的自定义协议。协议头部包含:
bash
┌─────────────────────────────────────────┐
│           TCPROS 协议头                  │
├─────────────────────────────────────────┤
│ callerid: /client_node                  │
│ md5sum: a]b3c4d5...                     │
│ type: my_service_pkg/AddTwoInts         │
│ service: /add_two_ints                  │
├─────────────────────────────────────────┤
│           Request 数据                   │
├─────────────────────────────────────────┤
│ byte: 表示 Server 已处理完毕            │
├─────────────────────────────────────────┤
│           Response 数据                  │
└─────────────────────────────────────────┘
ROS 2则使用 DDS(Data Distribution Service) 作为底层中间件,Service的实现基于 DDS 的 Request-Reply 模式。
3.创建自定义 Service
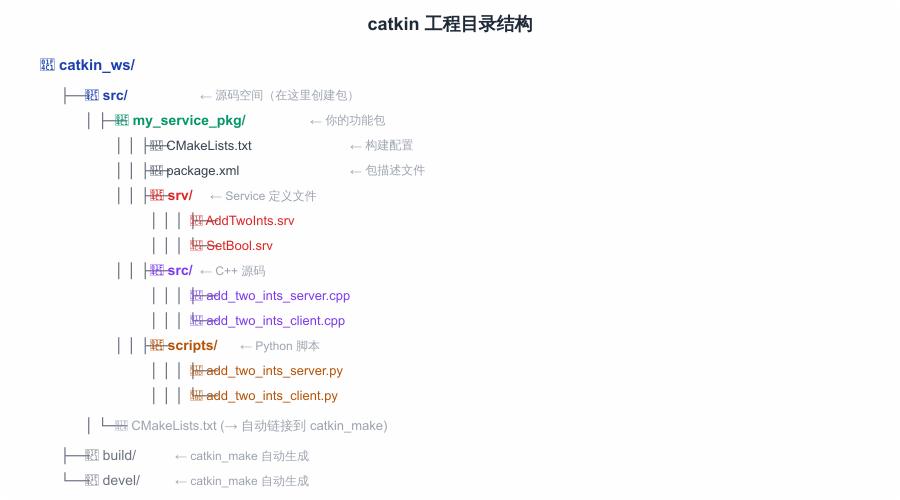
3.1 创建功能包
首先需要创建一个catkin功能包来承载Service 定义和相关代码。
bash
# 切换到工作空间的 src 目录
cd ~/catkin_ws/src

# 创建功能包,依赖 rospy roscpp std_msgs message_generation
catkin_create_pkg my_service_pkg rospy roscpp std_msgs message_generation

# 查看生成的目录结构
tree my_service_pkg/
bash
my_service_pkg/
├── CMakeLists.txt
├── include
│   └── my_service_pkg
├── package.xml
└── src
注意 :
message_generation和message_runtime是必须的依赖,前者用于编译.srv文件生成代码,后者用于运行时支持。
3.2 定义 .srv 文件
在功能包中创建 srv 目录并定义Service接口。
bash
# 创建 srv 目录
mkdir -p ~/catkin_ws/src/my_service_pkg/srv

# 创建第一个 Service 定义
cat > ~/catkin_ws/src/my_service_pkg/srv/AddTwoInts.srv << 'EOF'
# AddTwoInts.srv
# 计算两个整数的和

# ===== Request =====
int64 a
int64 b
---
# ===== Response =====
int64 sum
EOF

# 创建一个更复杂的 Service 定义
cat > ~/catkin_ws/src/my_service_pkg/srv/RobotStatus.srv << 'EOF'
# RobotStatus.srv
# 查询机器人状态

# ===== Request =====
bool detailed    # 是否返回详细信息
---
# ===== Response =====
bool success     # 是否成功
string message   # 状态消息
float64 battery  # 电池电量 (%)
float64 x        # 位置 x
float64 y        # 位置 y
float64 theta    # 朝向角 (rad)
string[] errors  # 错误列表
EOF

# 创建一个无响应的 Service(触发器)
cat > ~/catkin_ws/src/my_service_pkg/srv/Trigger.srv << 'EOF'
# Trigger.srv
# 简单触发器,无需参数也无需返回

---
# 空的 Response 部分
EOF
3.3 配置CMakeLists.txt 和 package.xml
3.3.1 修改 package.xml
xml
<?xml version="1.0"?>
<package format="2">
  <name>my_service_pkg</name>
  <version>0.1.0</version>
  <description>ROS Service 教程功能包</description>

  <maintainer email="your@email.com">your_name</maintainer>
  <license>MIT</license>

  <!-- 编译依赖 -->
  <build_depend>roscpp</build_depend>
  <build_depend>rospy</build_depend>
  <build_depend>std_msgs</build_depend>
  <build_depend>message_generation</build_depend>

  <!-- 运行依赖 -->
  <exec_depend>roscpp</exec_depend>
  <exec_depend>rospy</exec_depend>
  <exec_depend>std_msgs</exec_depend>
  <exec_depend>message_runtime</exec_depend>

  <!-- 导出依赖(可选) -->
  <export>
    <architecture_independent/>
  </export>
</package>
3.3.2 修改 CMakeLists.txt
cmake
cmake_minimum_required(VERSION 3.0.2)
project(my_service_pkg)

# 查找依赖包
find_package(catkin REQUIRED COMPONENTS
  roscpp
  rospy
  std_msgs
  message_generation    # 必须!用于编译 .srv 文件
)

# ==================================================
# 关键步骤:声明 Service 文件
# ==================================================

add_service_files(
  FILES
  AddTwoInts.srv
  RobotStatus.srv
  Trigger.srv
)

# 生成消息/服务代码
generate_messages(
  DEPENDENCIES
  std_msgs
)

# catkin 宏定义
catkin_package(
  CATKIN_DEPENDS roscpp rospy std_msgs message_runtime
)

# ==================================================
# 编译 C++ Server 和 Client
# ==================================================
include_directories(
  ${catkin_INCLUDE_DIRS}
)

# Server 可执行文件
add_executable(add_two_ints_server src/add_two_ints_server.cpp)
target_link_libraries(add_two_ints_server ${catkin_LIBRARIES})
add_dependencies(add_two_ints_server
  ${${PROJECT_NAME}_EXPORTED_TARGETS}
  ${catkin_EXPORTED_TARGETS}
)

# Client 可执行文件
add_executable(add_two_ints_client src/add_two_ints_client.cpp)
target_link_libraries(add_two_ints_client ${catkin_LIBRARIES})
add_dependencies(add_two_ints_client
  ${${PROJECT_NAME}_EXPORTED_TARGETS}
  ${catkin_EXPORTED_TARGETS}
)
重要 :
add_dependencies这一行不能省略!它确保.srv文件生成的头文件在编译 C++ 代码之前就已经就绪。
3.4 编译生成消息代码
bash
# 切换到工作空间根目录
cd ~/catkin_ws

# 编译
catkin_make

# 检查生成的头文件
ls devel/include/my_service_pkg/
# 应该看到: AddTwoInts.h  RobotStatus.h  Trigger.h

# 检查生成的 Python 模块
ls devel/lib/python3/dist-packages/my_service_pkg/srv/
# 应该看到: _AddTwoInts.py  _RobotStatus.py  _Trigger.py
编译成功后,会自动生成以下文件:
bash
devel/
├── include/my_service_pkg/
│   ├── AddTwoInts.h          ← C++ 头文件
│   ├── AddTwoIntsRequest.h   ← Request 结构
│   ├── AddTwoIntsResponse.h  ← Response 结构
│   ├── RobotStatus.h
│   └── Trigger.h
├── lib/python3/dist-packages/my_service_pkg/
│   └── srv/
│       ├── _AddTwoInts.py    ← Python 模块
│       ├── _RobotStatus.py
│       └── _Trigger.py
└── share/my_service_pkg/cmake/
    └── my_service_pkgConfig.cmake
3.5 验证Service 定义
编译完成后,使用命令行工具验证Service是否正确注册。
bash
# 加载工作空间环境
source ~/catkin_ws/devel/setup.bash

# 查看 Service 定义
rossrv show my_service_pkg/AddTwoInts
输出:
bash
int64 a
int64 b
---
int64 sum
bash
# 查看所有已注册的 Service 类型
rossrv list | grep my_service_pkg
4.实现 Service Server(C++)
4.1 编写Server代码
创建文件 src/add_two_ints_server.cpp:
cpp
/**
 * add_two_ints_server.cpp
 * ROS Service Server 示例 - 提供加法计算服务
 */

#include "ros/ros.h"
#include "my_service_pkg/AddTwoInts.h"

/**
 * Service 回调函数
 *
 * 每当 Client 发来请求时,此函数被调用。
 *
 * @param req   请求数据(包含 a 和 b)
 * @param res   响应数据(需要填充 sum)
 * @return      true 表示处理成功,false 表示失败
 */
bool add(my_service_pkg::AddTwoInts::Request  &req,
         my_service_pkg::AddTwoInts::Response &res)
{
    // 获取请求数据
    int64_t a = req.a;
    int64_t b = req.b;

    // 处理业务逻辑
    res.sum = a + b;

    // 日志输出
    ROS_INFO("Service called: %ld + %ld = %ld", a, b, res.sum);

    // 返回 true 表示处理成功
    return true;
}

int main(int argc, char **argv)
{
    // 初始化 ROS 节点
    ros::init(argc, argv, "add_two_ints_server");

    // 创建节点句柄
    ros::NodeHandle nh;

    // 注册 Service Server
    // 参数: Service名称, 回调函数
    ros::ServiceServer service = nh.advertiseService(
        "add_two_ints",  // Service 名称
        add              // 回调函数
    );

    ROS_INFO("AddTwoInts Server is ready. Waiting for requests...");

    // 进入循环,等待请求
    ros::spin();

    return 0;
}
4.2 代码逐行解析
4.2.1头文件
cpp
#include "ros/ros.h"                          // ROS 核心头文件
#include "my_service_pkg/AddTwoInts.h"        // 自动生成的 Service 头文件
my_service_pkg/AddTwoInts.h 是编译 .srv 文件时自动生成的头文件,它包含了:
AddTwoInts::Request结构体(包含字段a和b)AddTwoInts::Response结构体(包含字段sum)
4.2.2回调函数签名
cpp
bool add(my_service_pkg::AddTwoInts::Request  &req,
         my_service_pkg::AddTwoInts::Response &res)
回调函数的签名是固定的:
- 返回类型 :
bool(true=成功,false=失败) - 第一个参数 :
Request&(请求数据,const 引用) - 第二个参数 :
Response&(响应数据,需要填充)
4.2.3注册 Service
cpp
ros::ServiceServer service = nh.advertiseService("add_two_ints", add); advertiseService 方法做了两件事:
- 在 ROS Master 注册Service名称
/add_two_ints - 将回调函数
add绑定到该 Service
4.2.4事件循环
cpp
ros::spin(); ros::spin() 进入一个阻塞循环,持续检查是否有新的 Service 请求到达。当请求到达时,调用注册的回调函数处理。
4.3 编译配置
确保 CMakeLists.txt 中已添加(前面已完成配置):
cmake
add_executable(add_two_ints_server src/add_two_ints_server.cpp)
target_link_libraries(add_two_ints_server ${catkin_LIBRARIES})
add_dependencies(add_two_ints_server
  ${${PROJECT_NAME}_EXPORTED_TARGETS}
  ${catkin_EXPORTED_TARGETS}
)
编译并运行:
bash
# 编译
cd ~/catkin_ws
catkin_make

# 加载环境
source devel/setup.bash

# 启动 Server
rosrun my_service_pkg add_two_ints_server
输出:
bash
[INFO] [1234567890.123]: AddTwoInts Server is ready. Waiting for requests...5.实现 Service Client(C++)
5.1 编写 Client 代码
创建文件 src/add_two_ints_client.cpp:
cpp
/**
 * add_two_ints_client.cpp
 * ROS Service Client 示例 - 调用加法计算服务
 */

#include "ros/ros.h"
#include "my_service_pkg/AddTwoInts.h"
#include <cstdlib>  // for atoi

int main(int argc, char **argv)
{
    // 初始化 ROS 节点
    ros::init(argc, argv, "add_two_ints_client");

    // 创建节点句柄
    ros::NodeHandle nh;

    // 创建 Service Client
    // 参数: Service 名称
    ros::ServiceClient client = nh.serviceClient<my_service_pkg::AddTwoInts>(
        "add_two_ints"
    );

    // 创建请求对象
    my_service_pkg::AddTwoInts srv;

    // 从命令行参数获取数值
    if (argc == 3) {
        srv.request.a = atoll(argv[1]);
        srv.request.b = atoll(argv[2]);
    } else {
        // 默认值
        srv.request.a = 10;
        srv.request.b = 20;
        ROS_INFO("Usage: add_two_ints_client X Y");
        ROS_INFO("Using default values: a=10, b=20");
    }

    // 调用 Service
    // 这是一个同步阻塞调用,会一直等待直到收到响应
    if (client.call(srv)) {
        // 调用成功
        ROS_INFO("Result: %ld + %ld = %ld",
                 srv.request.a, srv.request.b, srv.response.sum);
    } else {
        // 调用失败
        ROS_ERROR("Failed to call service add_two_ints");
        return 1;
    }

    return 0;
}
5.2 代码逐行解析
5.2.1 创建Client
cpp
ros::ServiceClient client = nh.serviceClient<my_service_pkg::AddTwoInts>("add_two_ints");模板参数指定了Service的类型,字符串参数指定了 Service 的名称。这里 Client 并没有立即连接到 Server------它只是在本地"准备好了"。
5.2.2 发起调用
cpp
if (client.call(srv)) {
    // 成功
} else {
    // 失败
}
client.call(srv) 是同步阻塞调用:
- Client 向 ROS Master 查询 Server 地址
- 与 Server 建立 TCP 连接(如果尚未连接)
- 发送
srv.request - 阻塞等待 Server 返回
srv.response - 收到响应后返回
true;超时或连接失败返回false
5.3 同步与异步调用
除了上面的同步调用,ROS还提供了异步调用方式:
cpp
// ==================================================
// 方式 1:同步调用(阻塞)
// ==================================================
if (client.call(srv)) {
    ROS_INFO("Sum: %ld", srv.response.sum);
}

// ==================================================
// 方式 2:异步调用(非阻塞)
// ==================================================
ros::ServiceClient async_client = nh.serviceClient<my_service_pkg::AddTwoInts>(
    "add_two_ints", true  // persistent=true,保持连接
);

// 发起异步调用
boost::shared_ptr<my_service_pkg::AddTwoInts::Request> req(
    new my_service_pkg::AddTwoInts::Request
);
req->a = 3;
req->b = 5;

ros::ServiceClient::CallResult result = async_client.call(req);

// 可以做其他事情...
ROS_INFO("Waiting for result...");

// 等待结果
if (result->wait(ros::Duration(5.0))) {  // 5 秒超时
    ROS_INFO("Sum: %ld", result->response->sum);
} else {
    ROS_ERROR("Service call timed out");
}

// ==================================================
// 方式 3:检查 Service 是否可用
// ==================================================
if (client.waitForExistence(ros::Duration(5.0))) {
    ROS_INFO("Service is available");
    client.call(srv);
} else {
    ROS_ERROR("Service not available within 5 seconds");
}
6.Python 实现
6.1 Python Server
创建文件 scripts/add_two_ints_server.py:
python
#!/usr/bin/env python3
"""
add_two_ints_server.py
ROS Service Server 示例(Python 版本)
"""

import rospy
from my_service_pkg.srv import AddTwoInts, AddTwoIntsResponse


def handle_add_two_ints(req):
    """
    Service 回调函数

    Args:
        req: AddTwoIntsRequest 对象,包含 a 和 b 属性

    Returns:
        AddTwoIntsResponse 对象,包含 sum 属性
    """
    # 处理业务逻辑
    result = req.a + req.b

    # 日志输出
    rospy.loginfo(f"Service called: {req.a} + {req.b} = {result}")

    # 返回响应
    return AddTwoIntsResponse(sum=result)


def add_two_ints_server():
    """启动 Service Server"""

    # 初始化节点
    rospy.init_node('add_two_ints_server')

    # 创建 Service Server
    # 参数: Service名称, Service类型, 回调函数
    service = rospy.Service(
        'add_two_ints',      # Service 名称
        AddTwoInts,           # Service 类型
        handle_add_two_ints  # 回调函数
    )

    rospy.loginfo("AddTwoInts Server is ready. Waiting for requests...")

    # 保持节点运行
    # rospy.Service 内部已经调用了 spin,这里不需要再调用
    rospy.spin()


if __name__ == '__main__':
add_two_ints_server()设置执行权限:
bash
chmod +x ~/catkin_ws/src/my_service_pkg/scripts/add_two_ints_server.py6.2 Python Client
创建文件 scripts/add_two_ints_client.py:
python
#!/usr/bin/env python3
"""
add_two_ints_client.py
ROS Service Client 示例(Python 版本)
"""

import rospy
import sys
from my_service_pkg.srv import AddTwoInts


def add_two_ints_client(a, b):
    """
    调用 Service

    Args:
        a: 第一个加数
        b: 第二个加数

    Returns:
        计算结果,失败返回 None
    """
    # 等待 Service 可用
    # 参数: Service名称, 超时时间
    rospy.wait_for_service('add_two_ints', timeout=5.0)

    try:
        # 创建 Service Proxy(代理对象)
        # 参数: Service名称, Service类型
        add_two_ints = rospy.ServiceProxy(
            'add_two_ints',
            AddTwoInts
        )

        # 调用 Service
        # 直接传入 Request 字段值
        response = add_two_ints(a, b)

        rospy.loginfo(f"Result: {a} + {b} = {response.sum}")
        return response.sum

    except rospy.ServiceException as e:
        rospy.logerr(f"Service call failed: {e}")
        return None

    except rospy.ROSException as e:
        rospy.logerr(f"Service not available: {e}")
        return None


if __name__ == '__main__':
    # 从命令行参数获取数值
    if len(sys.argv) == 3:
        a = int(sys.argv[1])
        b = int(sys.argv[2])
    else:
        a = 10
        b = 20
        rospy.loginfo("Usage: add_two_ints_client.py X Y")
        rospy.loginfo(f"Using default values: a={a}, b={b}")

    # 初始化节点
    rospy.init_node('add_two_ints_client')

    # 调用 Service
    result = add_two_ints_client(a, b)

    if result is not None:
        rospy.loginfo(f"Successfully got result: {result}")
    else:
        rospy.logerr("Failed to get result")
sys.exit(1)设置执行权限:
bash
chmod +x ~/catkin_ws/src/my_service_pkg/scripts/add_two_ints_client.py7.常用内置 Service 类型
7.1 std_srvs 系列
ROS内置了一些通用的Service类型,可以直接使用,无需自定义。
7.1.1 std_srvs/Trigger - 触发器
最简单的Service,没有请求参数,返回成功/失败标志。
bash
# std_srvs/Trigger.srv
---
bool success
string message
使用示例:
bash
rosservice call /my_service/trigger "{}"
# 输出:
# success: True
# message: "Service triggered successfully"
7.1.2 std_srvs/SetBool - 布尔开关
bash
# std_srvs/SetBool.srv
bool data
---
bool success
string message
使用示例:
bash
# 开启
rosservice call /led_control true
# 关闭
rosservice call /led_control false
7.1.3 std_srvs/Empty - 空操作
bash
# std_srvs/Empty.srv
---
使用示例:
bash
rosservice call /reset "{}"7.1.4 std_srvs/String - 字符串操作
bash
# std_srvs/String.srv
string data
---
string data
7.1.5 传感器相关Service
bash
# sensor_msgs/SetCameraInfo.srv
# 设置相机内参
sensor_msgs/CameraInfo camera_info
---
bool success
string status_message

# nav_msgs/GetMap.srv
# 获取地图
---
nav_msgs/OccupancyGrid map

# nav_msgs/GetPlan.srv
# 获取路径规划
geometry_msgs/PoseStamped start
geometry_msgs/PoseStamped goal
float32 tolerance
---
nav_msgs/Path plan
7.2 自定义复杂 Service
以下是一个实际项目中可能用到的复杂Service定义示例:
bash
# NavigateToPose.srv
# 导航服务定义

# ===== Request =====
geometry_msgs/PoseStamped  target_pose   # 目标位姿
float64                    max_speed     # 最大速度 (m/s)
bool                       use_obstacle_avoidance  # 是否避障
string                     planner_type  # 规划器类型
---
# ===== Response =====
bool                       success       # 是否成功到达
string                     message       # 结果消息
float64                    distance      # 实际行驶距离
float64                    duration      # 行驶耗时
geometry_msgs/PoseStamped  final_pose    # 最终位姿
nav_msgs/Path              actual_path   # 实际路径
8.命令行工具与调试
8.1 rosservice 命令大全
rosservice 是调试 Service 最常用的命令行工具。
8.1.1 列出所有 Service
bash
rosservice list输出示例:
bash
/add_two_ints
/rosout/get_loggers
/rosout/set_logger_level
/rosout_agg
8.1.2 查看 Service 类型
bash
rosservice type /add_two_ints输出:
my_service_pkg/AddTwoInts8.1.3 查看 Service 定义
bash
rosservice info /add_two_ints输出:
bash
Node: /add_two_ints_server
URI: rosrpc://hostname:12345
Type: my_service_pkg/AddTwoInts
Args: a b
8.1.4 调用Service
bash
# 基本调用
rosservice call /add_two_ints "a: 3
b: 5"

# 或者写在一行
rosservice call /add_two_ints 3 5

# 使用 Tab 补全(推荐!)
# 输入 rosservice call /add_two_ints 然后按 Tab 键
# ROS 会自动生成请求模板
8.1.5 查找特定类型的Service
bash
rosservice find my_service_pkg/AddTwoInts8.1.6 Service响应延迟测试
bash
# 测量 Service 响应时间
rosservice call /add_two_ints "a: 1 b: 2" --wall-time
8.2 rossrv 命令
rossrv 用于查看 .srv 文件定义。
bash
# 查看 Service 定义
rossrv show my_service_pkg/AddTwoInts
输出:
bash
int64 a
int64 b
---
int64 sum
bash
# 列出所有 Service 类型
rossrv list

# 查找包含特定字段的 Service
rossrv list | grep int

# 查看 Service 所在的包
rossrv package my_service_pkg
8.3 rosnode 调试
bash
# 查看节点信息(包括提供的 Service)
rosnode info /add_two_ints_server
输出:
bash
Node [/add_two_ints_server]
Publications: None
Subscriptions: None
Services:
 * /add_two_ints [my_service_pkg/AddTwoInts]
bash
# 查看节点的 Service 列表
rosnode info /add_two_ints_server | grep "Services"
8.4 rqt 图形化调试
bash
# 启动 rqt 控制台
rqt

# 或者直接打开特定工具
rqt_graph          # 节点关系图
rqt_console        # 日志查看器
rqt_service_caller # Service 调用工具
rqt_service_caller 是调试 Service 的利器:
- 左侧选择要调用的 Service
- 右侧编辑 Request 数据
- 点击 "Call" 按钮发起调用
- 查看 Response 结果
9.ROS 2中的Service
9.1 ROS 2 vs ROS 1 差异
| 特性 | ROS 1 | ROS 2 |
|---|---|---|
| 中间件 | 自定义 TCPROS | DDS |
| Master | 需要 roscore | 不需要(DDS 自动发现) |
| QoS | 无 | 支持(可靠性、持久性等) |
| 生命周期 | 无 | 支持 Lifecycle Node |
| 类型系统 | msg/srv/action | 同上 + IDL |
| 构建系统 | catkin | colcon (ament) |
| Python | rospy | rclpy |
| C++ | roscpp | rclcpp |
ROS 2 的 Service 主要变化:
- 不再需要 Master,节点通过 DDS 自动发现
- 支持 QoS 策略配置
- 使用
rclpy(Python)和rclcpp(C++)客户端库 .srv文件格式不变,但编译工具不同
9.2 ROS 2 Service实现(Python)
9.2.1 创建功能包
bash
cd ~/ros2_ws/src
ros2 pkg create --build-type ament_python my_service_py \
    --dependencies rclpy std_msgs
9.2.2 定义.srv 文件
bash
mkdir -p ~/ros2_ws/src/my_service_py/srv
cat > ~/ros2_ws/src/my_service_py/srv/AddTwoInts.srv << 'EOF'
int64 a
int64 b
---
int64 sum
EOF
9.2.3 编写Server
python
#!/usr/bin/env python3
"""
ROS 2 Service Server 示例
"""

import rclpy
from rclpy.node import Node
from my_service_pkg.srv import AddTwoInts


class AddTwoIntsServer(Node):
    def __init__(self):
        super().__init__('add_two_ints_server')

        # 创建 Service Server
        # 参数: Service类型, Service名称, 回调函数
        self.srv = self.create_service(
            AddTwoInts,              # Service 类型
            'add_two_ints',          # Service 名称
            self.add_two_ints_callback  # 回调函数
        )

        self.get_logger().info('AddTwoInts Server is ready.')

    def add_two_ints_callback(self, request, response):
        """
        Service 回调函数

        Args:
            request:  请求对象(包含 a, b)
            response: 响应对象(需要填充 sum)

        Returns:
            response 对象
        """
        response.sum = request.a + request.b

        self.get_logger().info(
            f'Request: {request.a} + {request.b} = {response.sum}'
        )

        return response


def main(args=None):
    rclpy.init(args=args)

    server = AddTwoIntsServer()

    try:
        rclpy.spin(server)
    except KeyboardInterrupt:
        pass
    finally:
        server.destroy_node()
        rclpy.shutdown()


if __name__ == '__main__':
    main()
9.2.4 编写Client
python
#!/usr/bin/env python3
"""
ROS 2 Service Client 示例
"""

import rclpy
from rclpy.node import Node
from my_service_pkg.srv import AddTwoInts
import sys


class AddTwoIntsClient(Node):
    def __init__(self):
        super().__init__('add_two_ints_client')

        # 创建 Service Client
        # 参数: Service类型, Service名称
        self.client = self.create_client(
            AddTwoInts,
            'add_two_ints'
        )

        # 等待 Service 可用
        while not self.client.wait_for_service(timeout_sec=1.0):
            self.get_logger().info('Service not available, waiting...')

        self.get_logger().info('Service is available.')

    def send_request(self, a, b):
        """发送请求"""

        # 创建请求对象
        request = AddTwoInts.Request()
        request.a = a
        request.b = b

        # 异步发送请求
        future = self.client.call_async(request)

        # 等待结果
        rclpy.spin_until_future_complete(self, future)

        if future.result() is not None:
            response = future.result()
            self.get_logger().info(
                f'Result: {a} + {b} = {response.sum}'
            )
            return response.sum
        else:
            self.get_logger().error('Service call failed')
            return None


def main(args=None):
    rclpy.init(args=args)

    client = AddTwoIntsClient()

    a = int(sys.argv[1]) if len(sys.argv) > 2 else 10
    b = int(sys.argv[2]) if len(sys.argv) > 2 else 20

    client.send_request(a, b)

    client.destroy_node()
    rclpy.shutdown()


if __name__ == '__main__':
    main()
9.2.5 配置setup.py
python
from setuptools import setup

package_name = 'my_service_py'

setup(
    name=package_name,
    version='0.1.0',
    packages=[package_name],
    data_files=[
        ('share/ament_index/resource_index/packages',
            ['resource/' + package_name]),
        ('share/' + package_name, ['package.xml']),
        # 注册 .srv 文件
        ('share/' + package_name + '/srv', [
            'srv/AddTwoInts.srv',
        ]),
    ],
    install_requires=['setuptools'],
    zip_safe=True,
    maintainer='your_name',
    maintainer_email='your@email.com',
    description='ROS 2 Service tutorial package',
    license='MIT',
    entry_points={
        'console_scripts': [
            'server = my_service_py.add_two_ints_server:main',
            'client = my_service_py.add_two_ints_client:main',
        ],
    },
)
9.2.6 编译与运行
bash
# 编译
cd ~/ros2_ws
colcon build --packages-select my_service_py

# 加载环境
source install/setup.bash

# 终端 1:启动 Server
ros2 run my_service_py server

# 终端 2:调用 Client
ros2 run my_service_py client 3 5
9.3 ROS 2 Service实现(C++)
cpp
// add_two_ints_server.cpp (ROS 2)
#include "rclcpp/rclcpp.hpp"
#include "my_service_pkg/srv/add_two_ints.hpp"

class AddTwoIntsServer : public rclcpp::Node {
public:
    AddTwoIntsServer() : Node("add_two_ints_server") {
        // 创建 Service Server
        service_ = create_service<my_service_pkg::srv::AddTwoInts>(
            "add_two_ints",
            [this](
                const std::shared_ptr<my_service_pkg::srv::AddTwoInts::Request> request,
                std::shared_ptr<my_service_pkg::srv::AddTwoInts::Response> response
            ) {
                response->sum = request->a + request->b;
                RCLCPP_INFO(get_logger(),
                    "Request: %ld + %ld = %ld",
                    request->a, request->b, response->sum);
            }
        );

        RCLCPP_INFO(get_logger(), "Server is ready.");
    }

private:
    rclcpp::Service<my_service_pkg::srv::AddTwoInts>::SharedPtr service_;
};

int main(int argc, char** argv) {
    rclcpp::init(argc, argv);
    rclcpp::spin(std::make_shared<AddTwoIntsServer>());
    rclcpp::shutdown();
    return 0;
}
9.4 ROS 2命令行工具
bash
# 列出所有 Service
ros2 service list

# 查看 Service 类型
ros2 service type /add_two_ints
# 输出: my_service_pkg/srv/AddTwoInts

# 查看 Service 定义
ros2 service find my_service_pkg/srv/AddTwoInts

# 调用 Service
ros2 service call /add_two_ints my_service_pkg/srv/AddTwoInts "{a: 3, b: 5}"

# 使用 Tab 补全
ros2 service call /add_two_ints my_service_pkg/srv/AddTwoInts <Tab>
10.实战案例
10.1 案例一:机器人底盘控制服务
这是一个实际项目中常见的底盘控制Service设计。
10.1.1 Service 定义:
bash
# srv/SetVelocity.srv
# 设置底盘速度

# ===== Request =====
float64 linear_x     # 线速度 x (m/s)
float64 linear_y     # 线速度 y (m/s)
float64 angular_z    # 角速度 z (rad/s)
float64 duration     # 持续时间 (秒),0 = 持续运动
---
# ===== Response =====
bool success
string message
10.1.2 Server 实现(Python):
python
#!/usr/bin/env python3
import rospy
from geometry_msgs.msg import Twist
from my_service_pkg.srv import SetVelocity, SetVelocityResponse
import threading
import time


class ChassisControlServer:
    def __init__(self):
        rospy.init_node('chassis_control_server')

        # 速度发布者
        self.cmd_pub = rospy.Publisher(
            '/cmd_vel',
            Twist,
            queue_size=10
        )

        # 当前运动状态
        self.is_moving = False
        self.stop_timer = None
        self.lock = threading.Lock()

        # 创建 Service Server
        self.service = rospy.Service(
            '/chassis/set_velocity',
            SetVelocity,
            self.handle_set_velocity
        )

        rospy.loginfo("Chassis Control Server is ready.")

    def handle_set_velocity(self, req):
        """处理速度设置请求"""
        with self.lock:
            # 检查参数有效性
            if abs(req.linear_x) > 2.0 or abs(req.linear_y) > 2.0:
                return SetVelocityResponse(
                    success=False,
                    message="Velocity exceeds max limit (2.0 m/s)"
                )

            if abs(req.angular_z) > 3.14:
                return SetVelocityResponse(
                    success=False,
                    message="Angular velocity exceeds max limit (3.14 rad/s)"
                )

            # 创建速度消息
            twist = Twist()
            twist.linear.x = req.linear_x
            twist.linear.y = req.linear_y
            twist.angular.z = req.angular_z

            # 取消之前的定时器
            if self.stop_timer:
                self.stop_timer.cancel()

            # 发布速度
            self.cmd_pub.publish(twist)
            self.is_moving = True

            # 如果指定了持续时间,设置定时停止
            if req.duration > 0:
                self.stop_timer = threading.Timer(
                    req.duration,
                    self.stop_chassis
                )
                self.stop_timer.start()

                msg = f"Moving for {req.duration}s: vx={req.linear_x}, vy={req.linear_y}, wz={req.angular_z}"
            else:
                msg = f"Continuous motion: vx={req.linear_x}, vy={req.linear_y}, wz={req.angular_z}"

            rospy.loginfo(msg)
            return SetVelocityResponse(success=True, message=msg)

    def stop_chassis(self):
        """停止底盘"""
        with self.lock:
            twist = Twist()  # 全零速度
            self.cmd_pub.publish(twist)
            self.is_moving = False
            rospy.loginfo("Chassis stopped.")

    def run(self):
        rospy.spin()


if __name__ == '__main__':
    server = ChassisControlServer()
    server.run()
10.1.3 使用示例:
bash
# 前进 1m/s,持续 3 秒
rosservice call /chassis/set_velocity "linear_x: 1.0
linear_y: 0.0
angular_z: 0.0
duration: 3.0"

# 原地旋转,持续运动
rosservice call /chassis/set_velocity "linear_x: 0.0
linear_y: 0.0
angular_z: 0.5
duration: 0.0"

# 停止
rosservice call /chassis/set_velocity "linear_x: 0.0
linear_y: 0.0
angular_z: 0.0
duration: 0.0"
10.2 案例二:图像处理服务
10.2.1 Service 定义:
bash
# srv/ImageProcess.srv
# 图像处理服务

# ===== Request =====
sensor_msgs/Image input_image    # 输入图像
string filter_type               # 滤波类型: "blur", "edge", "threshold"
int32 kernel_size                # 滤波核大小
---
# ===== Response =====
bool success
string message
sensor_msgs/Image output_image   # 处理后的图像
float64 processing_time          # 处理耗时 (ms)
10.2.2 Server 实现(Python + OpenCV):
python
#!/usr/bin/env python3
import rospy
from my_service_pkg.srv import ImageProcess, ImageProcessResponse
from sensor_msgs.msg import Image
from cv_bridge import CvBridge
import cv2
import time


class ImageProcessServer:
    def __init__(self):
        rospy.init_node('image_process_server')

        self.bridge = CvBridge()

        # 创建 Service Server
        self.service = rospy.Service(
            '/image/process',
            ImageProcess,
            self.handle_process
        )

        # 注册处理方法
        self.filters = {
            'blur': self.apply_blur,
            'edge': self.apply_edge,
            'threshold': self.apply_threshold,
        }

        rospy.loginfo("Image Process Server is ready.")

    def handle_process(self, req):
        """处理图像请求"""
        start_time = time.time()

        try:
            # 将 ROS Image 转换为 OpenCV 格式
            cv_image = self.bridge.imgmsg_to_cv2(
                req.input_image,
                desired_encoding='bgr8'
            )

            # 选择滤波方法
            if req.filter_type not in self.filters:
                return ImageProcessResponse(
                    success=False,
                    message=f"Unknown filter: {req.filter_type}",
                    output_image=Image(),
                    processing_time=0
                )

            # 应用滤波
            result = self.filters[req.filter_type](
                cv_image,
                req.kernel_size
            )

            # 将结果转换回 ROS Image
            output_msg = self.bridge.cv2_to_imgmsg(
                result,
                encoding='bgr8'
            )

            elapsed = (time.time() - start_time) * 1000  # ms

            rospy.loginfo(
                f"Processed {req.filter_type} in {elapsed:.1f}ms"
            )

            return ImageProcessResponse(
                success=True,
                message=f"Filter '{req.filter_type}' applied",
                output_image=output_msg,
                processing_time=elapsed
            )

        except Exception as e:
            return ImageProcessResponse(
                success=False,
                message=str(e),
                output_image=Image(),
                processing_time=0
            )

    def apply_blur(self, image, kernel_size):
        k = max(3, kernel_size | 1)  # 确保是奇数
        return cv2.GaussianBlur(image, (k, k), 0)

    def apply_edge(self, image, kernel_size):
        gray = cv2.cvtColor(image, cv2.COLOR_BGR2GRAY)
        edges = cv2.Canny(gray, 50, 150)
        return cv2.cvtColor(edges, cv2.COLOR_GRAY2BGR)

    def apply_threshold(self, image, kernel_size):
        gray = cv2.cvtColor(image, cv2.COLOR_BGR2GRAY)
        _, thresh = cv2.threshold(gray, 127, 255, cv2.THRESH_BINARY)
        return cv2.cvtColor(thresh, cv2.COLOR_GRAY2BGR)


if __name__ == '__main__':
    server = ImageProcessServer()
    rospy.spin()
10.3 案例三:多Service 协同工作
这个案例展示如何在一个节点中同时提供多个 Service,并让它们协同工作。
python
#!/usr/bin/env python3
"""
多 Service 协同示例:机器人状态管理系统
"""

import rospy
from std_srvs.srv import Trigger, TriggerResponse
from my_service_pkg.srv import (
    SetBool, SetBoolResponse,
    RobotStatus, RobotStatusResponse
)


class RobotManager:
    def __init__(self):
        rospy.init_node('robot_manager')

        # 机器人状态
        self.state = {
            'is_active': False,
            'battery': 100.0,
            'x': 0.0,
            'y': 0.0,
            'theta': 0.0,
            'errors': [],
        }

        # 注册多个 Service
        self.services = {
            'activate': rospy.Service(
                '/robot/activate', Trigger, self.handle_activate
            ),
            'deactivate': rospy.Service(
                '/robot/deactivate', Trigger, self.handle_deactivate
            ),
            'status': rospy.Service(
                '/robot/status', RobotStatus, self.handle_status
            ),
            'reset': rospy.Service(
                '/robot/reset', Trigger, self.handle_reset
            ),
            'clear_errors': rospy.Service(
                '/robot/clear_errors', Trigger, self.handle_clear_errors
            ),
        }

        rospy.loginfo("Robot Manager is ready.")
        rospy.loginfo("Available services:")
        for name in self.services:
            rospy.loginfo(f"  - /robot/{name}")

    def handle_activate(self, req):
        """激活机器人"""
        if self.state['battery'] < 10.0:
            return TriggerResponse(
                success=False,
                message=f"Battery too low: {self.state['battery']}%"
            )

        self.state['is_active'] = True
        rospy.loginfo("Robot activated")
        return TriggerResponse(success=True, message="Robot activated")

    def handle_deactivate(self, req):
        """停用机器人"""
        self.state['is_active'] = False
        rospy.loginfo("Robot deactivated")
        return TriggerResponse(success=True, message="Robot deactivated")

    def handle_status(self, req):
        """查询状态"""
        return RobotStatusResponse(
            success=True,
            message="Active" if self.state['is_active'] else "Inactive",
            battery=self.state['battery'],
            x=self.state['x'],
            y=self.state['y'],
            theta=self.state['theta'],
            errors=self.state['errors']
        )

    def handle_reset(self, req):
        """重置状态"""
        self.state['x'] = 0.0
        self.state['y'] = 0.0
        self.state['theta'] = 0.0
        self.state['errors'] = []
        rospy.loginfo("Robot state reset")
        return TriggerResponse(success=True, message="State reset")

    def handle_clear_errors(self, req):
        """清除错误"""
        self.state['errors'] = []
        rospy.loginfo("Errors cleared")
        return TriggerResponse(success=True, message="Errors cleared")


if __name__ == '__main__':
    manager = RobotManager()
    rospy.spin()
10.3.1 使用示例:
bash
# 激活机器人
rosservice call /robot/activate "{}"

# 查询状态
rosservice call /robot/status "detailed: true"

# 重置位置
rosservice call /robot/reset "{}"
11.最佳实践与常见问题
11.1 设计原则
11.1.1 保持 Service 接口简洁
bash
# ❌ 不推荐:一个 Service 做太多事情
# ManageRobot.srv
string action    # "start", "stop", "reset", "configure", "query"...
string param1
string param2
---
bool success
string result

# ✅ 推荐:拆分为多个专用 Service
# StartRobot.srv
---
bool success

# StopRobot.srv
---
bool success

# QueryRobotStatus.srv
---
RobotStatus status
11.1.2 使用有意义的返回值
python
# ❌ 不推荐
def callback(req):
    result = do_something()
    return MyResponse()  # 没有任何信息

# ✅ 推荐
def callback(req):
    try:
        result = do_something()
        return MyResponse(success=True, message="Done", data=result)
    except Exception as e:
        return MyResponse(success=False, message=str(e))
11.1.3 设置合理的超时
python
# Client 端设置超时
rospy.wait_for_service('/my_service', timeout=5.0)

try:
    response = service_proxy(request)
except rospy.ServiceException as e:
    rospy.logerr(f"Service call failed: {e}")
11.1.4 处理 Service 不可用的情况
python
# 等待 Service 可用
if not client.wait_for_service(timeout_sec=1.0):
    rospy.logwarn("Service not available, retrying...")
    # 可以选择重试或使用备用方案
11.2 性能优化
11.2.1 使用持久连接
python
# 创建持久连接的 Client
# 第二个参数 True 表示持久连接
client = rospy.ServiceProxy('/my_service', MyService, persistent=True)

# 后续调用不需要重新查找和建立连接
for i in range(100):
response = client(request)注意:持久连接在 Server 重启后会断开,需要重新创建。
11.2.2 避免在回调中执行耗时操作
python
# ❌ 不推荐:在回调中执行耗时操作
def callback(req):
    result = expensive_computation(req.data)  # 耗时 5 秒
    return MyResponse(result=result)

# ✅ 推荐:使用线程或异步处理
import threading

def callback(req):
    thread = threading.Thread(
        target=process_request,
        args=(req,)
    )
    thread.start()
    return MyResponse(success=True, message="Processing started")
11.2.3 合理使用Service vs Topic
python
# ❌ 不推荐:用 Service 发布连续数据
def sensor_callback(req):
    return SensorResponse(data=read_sensor())  # 每次调用都读传感器

# ✅ 推荐:用 Topic 发布连续数据
pub = rospy.Publisher('/sensor_data', SensorMsg, queue_size=10)
timer = rospy.Timer(rospy.Duration(0.1), lambda e: pub.publish(read_sensor()))
11.3 常见错误排查
11.3.1 错误1:Service调用超时
bash
ERROR: Service [/my_service] failed: unable to connect to service原因及解决:
- Server 未启动 → 检查
rosnode list - Service 名称拼写错误 → 检查
rosservice list - 网络问题 → 检查
ROS_MASTER_URI设置 - Server 回调函数阻塞 → 检查回调中是否有死循环
11.3.2 错误2:类型不匹配
bash
ERROR: Service [/add_two_ints] returned error:
[/add_two_ints_client] expects type [my_service_pkg/AddTwoInts],
but server provides [my_service_pkg/AddTwoInts]原因:Client 和 Server 使用了不同版本的 Service 定义。
解决:
bash
# 重新编译
cd ~/catkin_ws
catkin_make
source devel/setup.bash

# 确认两边都加载了新环境
rossrv show my_service_pkg/AddTwoInts
11.3.3 错误3:找不到头文件
bash
fatal error: my_service_pkg/AddTwoInts.h: No such file or directory 原因 :CMakeLists.txt 中缺少 add_dependencies。
解决:
cmake
add_dependencies(your_target
  ${${PROJECT_NAME}_EXPORTED_TARGETS}
  ${catkin_EXPORTED_TARGETS}
)
11.3.4 错误4:Python 导入失败
bash
ImportError: No module named my_service_pkg.srv原因:未加载工作空间环境。
解决:
bash
source ~/catkin_ws/devel/setup.bash11.3.5 错误5:回调函数不被调用
原因 :忘记调用 ros::spin() 或 rospy.spin()。
解决:
cpp
// C++
ros::spin();  // 阻塞循环

// 或者使用 spinOnce() 在循环中处理
while (ros::ok()) {
    ros::spinOnce();
    // 其他逻辑
}
12.附录
12.1完整的catkin_ws创建命令
bash
# 一键创建完整工程
mkdir -p ~/catkin_ws/src && cd ~/catkin_ws/src
catkin_create_pkg my_service_pkg rospy roscpp std_msgs message_generation
cd my_service_pkg
mkdir srv scripts

# 创建 srv 文件
cat > srv/AddTwoInts.srv << 'EOF'
int64 a
int64 b
---
int64 sum
EOF

# 设置 Python 脚本权限
chmod +x scripts/*.py

# 编译
cd ~/catkin_ws
catkin_make
source devel/setup.bash
12.2 常用Service类型速查表
| 包 | Service | 用途 |
|---|---|---|
std_srvs |
Trigger | 无参数触发 |
std_srvs |
SetBool | 布尔开关 |
std_srvs |
Empty | 空操作 |
std_srvs |
String | 字符串传递 |
nav_msgs |
GetMap | 获取地图 |
nav_msgs |
GetPlan | 获取路径 |
sensor_msgs |
SetCameraInfo | 设置相机参数 |
gazebo_msgs |
SetModelState | 设置模型状态 |
gazebo_msgs |
GetPhysicsProperties | 获取物理属性 |
12.3 ROS 1 vs ROS 2 Service命令对比
| 操作 | ROS 1 | ROS 2 |
|---|---|---|
| 列出 Service | rosservice list |
ros2 service list |
| 查看类型 | rosservice type /name |
ros2 service type /name |
| 调用 Service | rosservice call /name args |
ros2 service call /name Type args |
| 查看定义 | rossrv show Type |
ros2 interface show Type |
12.4 参考资源
- ROS Wiki - Writing a Simple Service and Client (C++)
- ROS Wiki - Writing a Simple Service and Client (Python)
- ROS 2 Documentation - Writing a Service
- ROS Answers - Service Questions
总结 :Service 是 ROS 中不可或缺的通信机制,特别适合一次性请求/响应场景。掌握 Service 的定义、实现和调试,是每个 ROS 开发者的必备技能。从简单的
AddTwoInts开始,逐步构建更复杂的 Service 系统,你就能驾驭 ROS 的分布式通信架构。