友情提示
- 请先看这里👉前言
- 本系列文章提到的fabric均为v7版本,pixijs均为v8版本
- 相关代码👉地址,本文相关的代码在
fake-CanvasRenderingContext2D分支上,请切到这个分支查看代码
1. 前言
fabric的自定义元素,是基于ctx对象完成的(CanvasRenderingContext2D),我们要使用ctx.fill(),ctx.stroke()等api,来完成图形的绘制,而pixi是webGL渲染,没有canvas2D的这套东西,所以,如果要复刻一个fabric出来,那么我们首先需要用pixi来实现一个ctx,让用户使用起来,像在使用canvas2D一样。既然这个ctx是假的,那就叫它FakeCanvasRenderingContext2D吧!
2. 基础概念
2.1 ctx的状态
ctx是有状态的,这个状态包含很多东西,ctx.fillStyle、ctx.strokeStyle、ctx.textBaseline等等,都是ctx的状态。每次ctx.fill、ctx.stroke,都会使用当前的状态来进行绘制。我们会调用ctx.save(),ctx.restore()来不断保存,恢复这个状态,来实现对画笔的状态的控制,避免状态的污染。
2.2 子图形
在canvas2D中,我们绘制图形的方式,都是使用构造路径(path)+绘制的方式完成的,用ctx.arc(),ctx.rect()等函数构造路径,然后用ctx.fill(),ctx.stroke()来绘制出这个路径,这样就得到了一个子图形,我们可以用pixi提供的Graphics类来模拟这个过程,从pixi从v8开始,Graphics类的api就和ctx非常相似了,这简化了我们的开发过程。
3. 代码实现
3.1 FakeCanvasRenderingContext2D类
为了让用户使用起来像真的在使用ctx一样,这个类会实现CanvasRenderingContext2D接口,这样的话,对外暴露的api就和ctx一模一样了。
ts
class FakeCanvasRenderingContext2D implements CanvasRenderingContext2D{
  globalAlpha: number;
  fillStyle: string;
  strokeStyle: string;
  lineCap: CanvasLineCap;
  lineJoin: CanvasLineJoin;
  lineWidth: number;
  miterLimit: number;
  matrix: Matrix = new Matrix();
  font: string = '10px sans-serif';
  textAlign: CanvasTextAlign = 'start';
  textBaseline: CanvasTextBaseline = 'alphabetic';
  // ...
}
3.2 canvas的state
3.2.1 CanvasState类
用CanvasState类来记录canvas的state,这个state里面包含了:fillStyle、strokeStyle等等状态,并且挂载了和save和restore相关的逻辑,用来保存和恢复状态,fakeCtx中的save和restore都是基于此的。fakeCtx对象中,会记录很多个state,这些state将会被保存在一个栈中,save就是把当前state入栈,restore就是从栈顶取一个state,拿来作为当前state
ts
CanvasState implements CanvasStateBase {
  fillStyle: string;
  strokeStyle: string;
  globalAlpha: number;
  lineWidth: number;
  lineCap: CanvasLineCap;
  lineJoin: CanvasLineJoin;
  miterLimit: number;
  font: string;
  textAlign: CanvasTextAlign;
  textBaseline: CanvasTextBaseline;
  matrix: Matrix;
  constructor() {
    this.fillStyle = '#000000';
    this.strokeStyle = '#000000';
    this.globalAlpha = 1;
    this.lineWidth = 1;
    this.lineCap = 'butt';
    this.lineJoin = 'miter';
    this.miterLimit = 10;
    this.matrix = new Matrix();
    this.font = '10px sans-serif';
    this.textAlign = 'start';
    this.textBaseline = 'alphabetic';
  }
  copyStateFrom(ctx: FakeCanvasRenderingContext2D) {
    this.fillStyle = ctx.fillStyle;
    this.strokeStyle = ctx.strokeStyle;
    this.globalAlpha = ctx.globalAlpha;
    this.lineWidth = ctx.lineWidth;
    this.lineCap = ctx.lineCap;
    this.lineJoin = ctx.lineJoin;
    this.miterLimit = ctx.miterLimit;
    this.font = ctx.font;
    this.textAlign = ctx.textAlign;
    this.textBaseline = ctx.textBaseline;
    this.matrix.copyFrom(ctx.matrix);
  }
  setStateTo(ctx: FakeCanvasRenderingContext2D) {
    ctx.fillStyle = this.fillStyle;
    ctx.strokeStyle = this.strokeStyle;
    ctx.globalAlpha = this.globalAlpha;
    ctx.lineWidth = this.lineWidth;
    ctx.lineCap = this.lineCap;
    ctx.lineJoin = this.lineJoin;
    ctx.miterLimit = this.miterLimit;
    ctx.font = this.font;
    ctx.textAlign = this.textAlign;
    ctx.textBaseline = this.textBaseline;
    ctx.matrix.copyFrom(this.matrix);
  }
}
3.2.2 保存和恢复状态
用stateStack记录所有保存下来的状态,curStateIdx记录当前状态的下标位置,save和restore函数就是不断地在stateStack上穿梭,实现保存、恢复状态
ts
class FakeCanvasRenderingContext2D implements CanvasRenderingContext2D {
  private stateStack: CanvasState[] = [];
  private curStateIdx: number = -1;
  save(): void {
    this.curStateIdx++;
    if (!this.stateStack[this.curStateIdx]) {
      this.stateStack[this.curStateIdx] = new CanvasState();
    }

    this.stateStack[this.curStateIdx].copyStateFrom(this);
  }
  restore(): void {
    if (this.curStateIdx < 0) return;

    this.stateStack[this.curStateIdx].setStateTo(this);
    this.curStateIdx--;
  }
  // ...
}
3.3 ctx.beginPath()
虽然这个api名字叫begin path,但是它的作用其实是清理当前的path,所以从这个角度理解,它也可以叫clear path,在调用这个函数之前,我们要最好要调用fill或者stroke来把当前的path画出来,不然这些path就被clear掉了。
3.3.1 path
用pixi的Graphics类来表示当前path,这里注意一个问题,canvas2D中的path,是可以多次进行fill和stroke的,在这里我打算简化一下,改造成:一个path只能进行一次fill或者stroke,我们用fillIdx和strokeIdx来记录当前fill过的和stroke过的path,用drawIdx来记录当前最新的path在哪个位置。
3.3.2 beginPath实现
先判断当前有path内容,如果有内容,则记录当前的ctx状态以及当前path,然后开启下一个path(新建一个Graphics)
ts
class FakeCanvasRenderingContext2D implements CanvasRenderingContext2D {
  // ...
  private curGraphics!: Graphics;
  public getCurGraphics(): Graphics {
    const children = this.app.stage.children;
    if (!children[this.drawIdx]) {
      this.app.stage.addChild(new Graphics());
    }

    return children[this.drawIdx] as Graphics;
  }
  private finishPath(): void {
    this.curGraphics.setFromMatrix(this.matrix);
    this.drawIdx++;
    this.curGraphics = this.getCurGraphics();
  }
  beginPath(): void {
    if (this.curGraphics.pathDirty) {
      this.finishPath();
    }

    this.fillIdx = this.drawIdx;
    this.strokeIdx = this.drawIdx;
  }
}
3.4 ctx.fill()和ctx.stroke()
path是一个抽象的几何形状,fill和stroke才会真正地把内容绘制出来。在进行fill和stroke之后,立即进行finishPath,新建一个Graphics,避免后续的fill和stroke对已经fill或者stroke过的图形产生污染
ts
class FakeCanvasRenderingContext2D implements CanvasRenderingContext2D {
  // ...
  fill(): void {
    const fillIdx = this.fillIdx;
    const drawIdx = this.drawIdx;
    for (let i = fillIdx; i <= drawIdx; i++) {
      const g = this.app.stage.children[i] as Graphics;
      if (!g.skipFillOrStroke) {
        g.fill({ color: this.fillStyle || '#000000' });
      }
    }

    if (this.curGraphics.pathDirty) {
      this.finishPath();
    }

    this.fillIdx = this.drawIdx;
  }
  stroke(): void {
    const strokeIdx = this.strokeIdx;
    const drawIdx = this.drawIdx;
    for (let i = strokeIdx; i <= drawIdx; i++) {
      const g = this.app.stage.children[i] as Graphics;
      if (!g.skipFillOrStroke) {
        g.stroke({
          color: this.strokeStyle,
          width: this.lineWidth,
          miterLimit: this.miterLimit,
          join: this.lineJoin,
          cap: this.lineCap,
        });
      }
    }

    if (this.curGraphics.pathDirty) {
      this.finishPath();
    }

    this.strokeIdx = this.drawIdx;
  }
}
3.5 ctx.arc()、ctx.arcTo()、ctx.bezierCurveTo()、ctx.moveTo()、ctx.lineTo()、ctx.quadraticCurveTo()、ctx.rect()、ctx.roundRect()、ctx.closePath()
这一系列的api主要是绘制一些特定的路径出来,pixi v8版本的api与这些api完美兼容,所以可以直接拿来用。有一个点需要注意:每次调用了这些api,都会将当前的Graphics标记为dirty,代表这个Graphics是包含了路径的,可以进行fill和stroke
ts
class FakeCanvasRenderingContext2D implements CanvasRenderingContext2D {
  // ...
    arc(
    x: number,
    y: number,
    radius: number,
    startAngle: number,
    endAngle: number,
    counterclockwise?: boolean,
  ): void {
    this.curGraphics.arc(x, y, radius, startAngle, endAngle, counterclockwise);
    this.curGraphics.pathDirty = true;
  }
  arcTo(x1: number, y1: number, x2: number, y2: number, radius: number): void {
    this.curGraphics.arcTo(x1, y1, x2, y2, radius);
    this.curGraphics.pathDirty = true;
  }
  bezierCurveTo(
    cp1x: number,
    cp1y: number,
    cp2x: number,
    cp2y: number,
    x: number,
    y: number,
  ): void {
    this.curGraphics.bezierCurveTo(cp1x, cp1y, cp2x, cp2y, x, y);
    this.curGraphics.pathDirty = true;
  }
  moveTo(x: number, y: number): void {
    this.curGraphics.moveTo(x, y);
  }
  lineTo(x: number, y: number): void {
    this.curGraphics.lineTo(x, y);
    this.curGraphics.pathDirty = true;
  }
  quadraticCurveTo(cpx: number, cpy: number, x: number, y: number): void {
    this.curGraphics.quadraticCurveTo(cpx, cpy, x, y);
    this.curGraphics.pathDirty = true;
  }
  rect(x: number, y: number, w: number, h: number): void {
    this.curGraphics.rect(x, y, w, h);
    this.curGraphics.pathDirty = true;
  }
  roundRect(x: number, y: number, w: number, h: number, radii?: number): void {
    this.curGraphics.roundRect(x, y, w, h, radii);
    this.curGraphics.pathDirty = true;
  }
  closePath(): void {
    this.curGraphics.closePath();
  }
}
3.6 ctx.fillText()和ctx.strokeText()
pixijs并不具备文字能力,其底层是基于canvas2D的能力进行文字生成的,所以,在这里,也将使用canvas2D的能力进行文字生成。
3.6.1 TextFactory
在实际的使用场景中,可能对某个text进行多次绘制,如果每次都去生成一个text,那么性能将会大打折扣,所以,我们可以将那些一模一样的text缓存起来,把它当作一张图片,用的时候,再去取这张图片,而不用实时生成text。TextFactory类就是干这件事情的
TextFactory的具体代码可以看这里👉:地址
这个类的getOne方法会根据font、textAlign、textBaseline、fillStyle、strokeStyle、maxWidth等参数,来从缓存里获取一个text,如果缓存里没有,就生成一个
3.6.2 texture函数
用pixi的Graphics类中的textrue函数来将textFactory中获取的text绘制出来
ts
const textTexture = textFactory.getOne(
  text,
  this.font,
  this.textAlign,
  this.textBaseline,
  fillOrStroke,
  this.fillStyle,
  this.strokeStyle,
  maxWidth,
);
const {
  _pixiFabricOffsetX, // 偏移量x
  _pixiFabricOffsetY, // 偏移量y
  _pixiFabricWidth, // 宽
  _pixiFabricHeight, // 高
} = textTexture;
this.curGraphics.texture(
  textTexture,
  0xffffff,
  x + _pixiFabricOffsetX,
  y + _pixiFabricOffsetY,
  _pixiFabricWidth,
  _pixiFabricHeight,
);
3.7 ctx.drawImage()
canvas2D用这个api来进行图片的绘制,我们依然是用Graphics类的texture方法来实现drawImage函数
ts
class FakeCanvasRenderingContext2D implements CanvasRenderingContext2D {
  // ...
  // 这个函数有4种传参方式
  drawImage(
    image: HTMLImageElement | HTMLCanvasElement,
    dx: number,
    dy: number,
  ): void;
  drawImage(
    image: HTMLImageElement | HTMLCanvasElement,
    dx: number,
    dy: number,
    dw: number,
    dh: number,
  ): void;
  drawImage(
    image: HTMLImageElement | HTMLCanvasElement,
    sx: number,
    sy: number,
    sw: number,
    sh: number,
    dx: number,
    dy: number,
    dw: number,
    dh: number,
  ): void;
  drawImage(
    image: HTMLImageElement | HTMLCanvasElement,
    a: number,
    b: number,
    c?: number,
    d?: number,
    e?: number,
    f?: number,
    g?: number,
    h?: number,
  ): void {
    if (this.curGraphics.pathDirty) {
      this.finishPath();
    }

    // 判断参数的个数并使用不同的方式传给texture函数
    const hasEightArgs =
      typeof e === 'number' &&
      typeof f === 'number' &&
      typeof g === 'number' &&
      typeof h === 'number';
    const hasFourArgs = typeof c === 'number' && typeof d === 'number';

    let texture: Texture;
    if (hasEightArgs) {
      const baseTexture = TextureSource.from(image);
      texture = new Texture({
        source: baseTexture,
        frame: new Rectangle(a, b, c, d),
      });
      this.curGraphics.texture(texture, 0xffffff, e, f, g, h);
    } else if (hasFourArgs) {
      texture = Texture.from(image);
      this.curGraphics.texture(texture, 0xffffff, a, b, c, d);
    } else {
      texture = Texture.from(image);
      this.curGraphics.texture(texture, 0xffffff, a, b);
    }

    this.curGraphics.skipFillOrStroke = true;

    this.finishPath();
  }
}
3.8 ctx.rotate()、ctx.scale()、ctx.translate()、ctx.transform()
这几个api的作用是将当前2D空间进行某些变换,这样就能实现一些特殊效果了,其底层是:将当前的变换矩阵右乘一个新的变换矩阵。
ts
class FakeCanvasRenderingContext2D implements CanvasRenderingContext2D {
  // ...
  rotate(radian: number): void {
    this.matrix.append(Matrix.IDENTITY.clone().rotate(radian));
  }
  scale(x: number, y: number): void {
    this.matrix.append(Matrix.IDENTITY.clone().scale(x, y));
  }
  translate(x: number, y: number): void {
    this.matrix.append(Matrix.IDENTITY.clone().translate(x, y));
  }
  transform(
    a: number,
    b: number,
    c: number,
    d: number,
    e: number,
    f: number,
  ): void {
    this.matrix.append(new Matrix(a, b, c, d, e, f));
  }
}
3.9 ctx.getTransform()、ctx.setTransform()、ctx.resetTransform()
这3个api分别用来获取、设置、重置当前空间的变换矩阵
ts
class FakeCanvasRenderingContext2D implements CanvasRenderingContext2D {
  // ...
  getTransform() {
    const domMatrix = new DOMMatrix();
    domMatrix.a = this.matrix.a;
    domMatrix.b = this.matrix.b;
    domMatrix.c = this.matrix.c;
    domMatrix.d = this.matrix.d;
    domMatrix.e = this.matrix.tx;
    domMatrix.f = this.matrix.ty;
    return domMatrix;
  }
  setTransform(
    a: number,
    b: number,
    c: number,
    d: number,
    e: number,
    f: number,
  ): void;
  setTransform(transform?: DOMMatrix2DInit): void;
  setTransform(
    a?: number | DOMMatrix2DInit,
    b?: number,
    c?: number,
    d?: number,
    e?: number,
    f?: number,
  ): void {
    if (!a) {
      this.matrix.reset();
    } else if (typeof a === 'object') {
      const matrix = a as DOMMatrix2DInit;
      this.matrix.set(
        matrix.a ?? 1,
        matrix.b ?? 0,
        matrix.c ?? 0,
        matrix.d ?? 1,
        matrix.e ?? 0,
        matrix.f ?? 0,
      );
    } else {
      this.matrix.set(a ?? 1, b ?? 0, c ?? 0, d ?? 1, e ?? 0, f ?? 0);
    }
  }
  resetTransform(): void {
    this.matrix.reset();
  }
}
3.10 ctx.measureText()
这个api用来测量字体的尺寸,我们直接利用canvas2D的api来实现这个api
ts
const canvas = document.createElement('canvas');
const ctx = canvas.getContext('2d')!;
class FakeCanvasRenderingContext2D implements CanvasRenderingContext2D {
  // ...
  measureText(text: string): TextMetrics {
    ctx.font = this.font;
    ctx.textAlign = this.textAlign;
    ctx.textBaseline = this.textBaseline;
    const metrics = ctx.measureText(text);
    return metrics;
  }
}
3.11 其他api
由于时间问题,作者并没有把100%的CanvasRenderingContext2D api实现,而是只实现了一些常用的api,如果有需求,大家可以自己去实现一下。
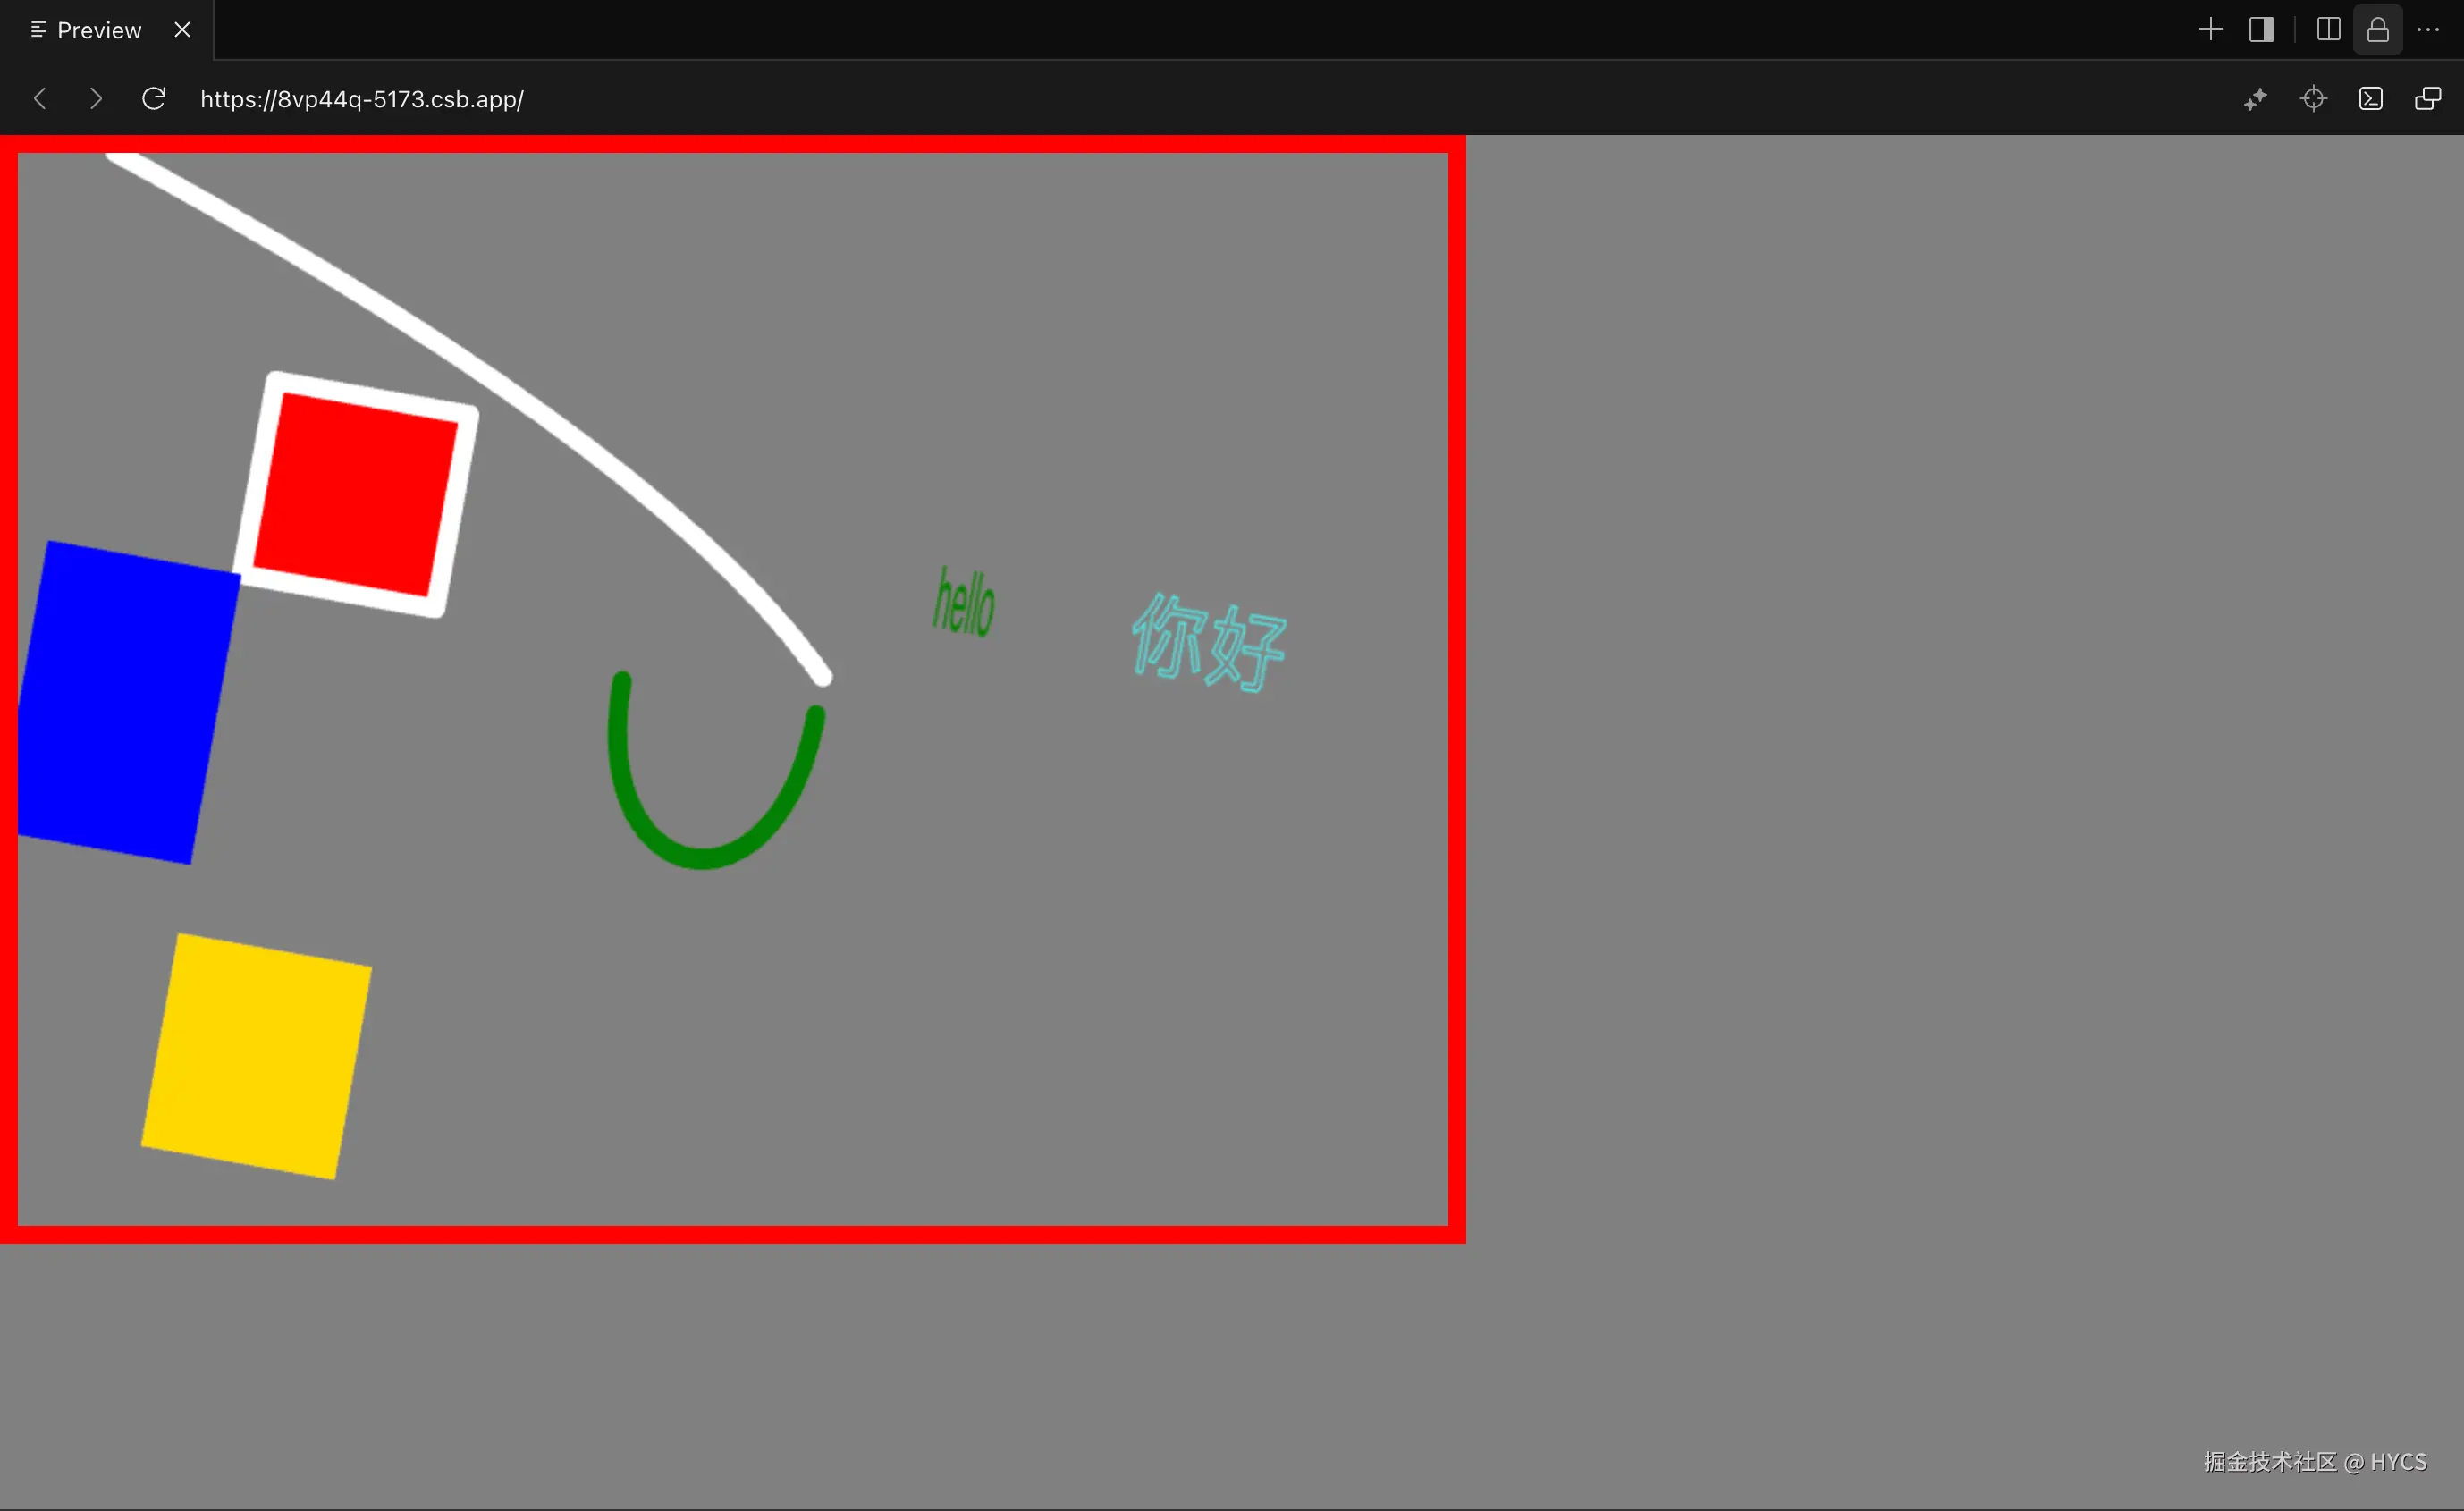
4. 测试一下
用使用ctx的方式,来测试一下fakeCtx的效果
测试代码:
ts
ctx.scale(1.1, 1.1);
ctx.translate(50, 0);
ctx.beginPath();
ctx.rotate((Math.PI / 180) * 10);

ctx.fillStyle = "red";
ctx.strokeStyle = "white";
ctx.lineWidth = 10;
ctx.lineJoin = "round";
ctx.lineCap = "round";

ctx.moveTo(100, 100);
ctx.lineTo(200, 100);
ctx.lineTo(200, 200);
ctx.lineTo(100, 200);
ctx.closePath();

ctx.fill();
ctx.stroke();

ctx.beginPath();
// ctx.translate(300, 0);
ctx.moveTo(0, 0);
ctx.quadraticCurveTo(300, 100, 400, 200);
ctx.stroke();

ctx.beginPath();
ctx.fillStyle = "blue";
ctx.rect(0, 200, 100, 150);
ctx.fill();

ctx.scale(1, 1.1);
ctx.beginPath();
ctx.fillStyle = "gold";
ctx.rect(100, 350, 100, 100);
ctx.fill();

ctx.beginPath();
ctx.moveTo(300, 200);
ctx.strokeStyle = "green";
ctx.bezierCurveTo(300, 300, 400, 300, 400, 200);
ctx.stroke();

ctx.translate(300, 0);
ctx.beginPath();
ctx.lineWidth = 1;
ctx.strokeStyle = "cyan";
ctx.fillStyle = "green";
ctx.font = "40px sans-serif";
ctx.fillText("hello", 150, 150, 30);
ctx.strokeText("你好", 250, 150);效果: