相比C++98/03,C++11则带来了数量可观的变化,其中包含了约140个新特性,以及对C++03标准中约600个缺陷的修正,C++11能更好地用于系统开发和库开发、语法更加泛华和简单化、更加稳定和安全,不仅功能更强大,而且能提升程序员的开发效率。
目录
[0x01 C++98传统的初始化](#0x01 C++98传统的初始化)
[0x02 Initializer_list](#0x02 Initializer_list)
[0x01 左值和右值](#0x01 左值和右值)
[0x02 左值引用和右值引用](#0x02 左值引用和右值引用)
[0x03 引用延长生命周期](#0x03 引用延长生命周期)
[0x04 左值和右值的参数匹配](#0x04 左值和右值的参数匹配)
[0x05 右值引用和移动语义的使用场景](#0x05 右值引用和移动语义的使用场景)
[0x06 类型分类](#0x06 类型分类)
[0x07 引用折叠](#0x07 引用折叠)
[0x08 完美转发](#0x08 完美转发)
[完美转发与 std::forward](#完美转发与 std::forward)
[3.1 工厂函数](#3.1 工厂函数)
[3.2 STL 容器和算法](#3.2 STL 容器和算法)
[0x02 包扩展](#0x02 包扩展)
[0x03 emplace_back](#0x03 emplace_back)
[1. push / insert 和 emplace 的核心区别](#1. push / insert 和 emplace 的核心区别)
[push_back 的思路](#push_back 的思路)
[emplace_back 的思路](#emplace_back 的思路)
[2. emplace 的底层本质:allocator + placement new](#2. emplace 的底层本质:allocator + placement new)
[3. emplace_back 的典型实现模型](#3. emplace_back 的典型实现模型)
[四. Lambda表达式](#四. Lambda表达式)
[0x01 function](#0x01 function)
[0x02 bind](#0x02 bind)
一.列表初始化
0x01 C++98传统的初始化
在C++98中,数组和结构体的初始化一般使用**花括号{}**进行:
cpp
struct Point {
    int _x;
    int _y;
};

int main() {
    int array1[] = {1, 2, 3, 4, 5};  // 初始化数组
    int array2[5] = {0};              // 数组初始化,只给第一个元素赋值,其他默认为 0
    Point p = {1, 2};                 // 结构体初始化
    return 0;
}
但对于自定义的类,或者像std::vector 这样的标准库容器,初始化的方式往往大相径庭,让人觉得 C++的初始化规则非常碎片化
为了解决这个问题,C++11引入了一个宏大的目标:试图实现一切对象皆可用{}初始化
📦 C++11 列表初始化的几个核心特点:
1.适用范围广:不仅是内置类型(int)支持,自定义类型也支持(如Date类)
2.可以省略等号:在使用{}初始化时,可以将=省略
cpp
int x{2};
Date d{2026,03,02};
3.底层优化:对于自定义类型,使用{}本质上是类型转换,中间会产生临时变量,但是现代编译器会优化为直接构造,提升效率
cpp
class Date{
public:
      Date(int year = 1,int month = 1,int day = 1)
          :_year(year),_month(month),_day(day)
           {}
      Date(const Date& d)
          :_year(d._year),_month(d._month),_day(d._day)
           {}
private:
    size_type _year;
    size_type _month;
    size_type _day;

    int main()
{
    int x = {2};
    Point p1{1,2};
    Date d1{2026,1,1};
    const Date& d2{2024,6,2};

    vector<Date>V;
    V.push_back({2023,1,1});

    return 0;
}
0x02 Initializer_list
C++11 引入了 std::initializer_list,使得容器能够直接支持使用花括号初始化多个值的功能。
cpp
int main()
{
   initializer_list<int> mylist = {10,20,30};
   cout<<sizeof(mylist)<<endl;
   cout<<mylist.begin()<<endl;
   cout<<mylist.end()<<endl;

   vector<int> v = {1,2,3,4,5};
   map<string,string> dict = {{"sort","排序"}};

   return 0;
}
std::initializer_list 本质上是一个简单的容器,底层实现是一个指向数组的两个指针(开始和结束)
二.左值引用和移动语义
0x01 左值和右值
首先,我们需要明确左值和右值的概念:
左值(Lvalue):
左值是一个可以取地址的表达式。它表示对象的持久性存储位置,可以出现在赋值符号的左边,也可以在右边
例如:变量,解引用的指针,数组元素等
Such as: int a = 10; a就是一个左值
右值(Rvalue):
右值是一个不能取地址的临时对象,通常是临时结果,或者是字面量常量(如数组,字符串常量)
例如:10,x+y,这些都是右值,它们的生命周期通常只存在于表达式求值的过程中
右值不能出现在赋值符号的左边
cpp
#include<iostream>
using namespace std;

int main() {
    // 左值:可以取地址
    int a = 5;             // a 是左值
    int* p = &a;           // p 存储的是 a 的地址

    // 右值:不能取地址
    10;  // 右值字面量
    x + y;  // 假设 x + y 为右值
    string("Hello");  // 临时字符串,右值

    return 0;
}
0x02 左值引用和右值引用
- 值引用(Lvalue Reference) :表示一个左值的引用。例如:
int& x = a;,这里x是a的引用。 - 右值引用(Rvalue Reference) :在 C++11 中引入,表示一个右值的引用。右值引用使用
&&来标识,例如:int&& x = 10;。 - 右值引用能够捕获临时对象的值,并允许我们修改它,最重要的是,它可以与"移动语义"一起使用,避免不必要的拷贝。
cpp
#include<iostream>
using namespace std;

int main() {
    int a = 5;
    int& lref = a;   // 左值引用
    int&& rref = 10; // 右值引用

    cout << "左值引用:" << lref << endl;
    cout << "右值引用:" << rref << endl;

    return 0;
}
0x03 引用延长生命周期
右值引用可以用于延长临时对象的生命周期,即使临时对象通常会在表达式结束后销毁 我们仍然可以通过右值引用延长其生命周期,知道引用不再使用
cpp
#include <iostream>
#include <string>
using namespace std;

int main() {
    // 延长临时对象的生命周期
    const string& str = "Hello, World!"; // 临时字符串延长生命周期
    cout << str << endl;  // 使用临时字符串
    return 0;
}
在上面的例子中,临时字符串 "Hello, World!" 的生命周期被延长,直到 str 不再使用为止。
0x04 左值和右值的参数匹配
cpp
#include<iostream>
using namespace std;

void f(int& x) { cout << "左值引用重载 f(" << x << ")" << endl; }
void f(const int& x) { cout << "const 左值引用重载 f(" << x << ")" << endl; }
void f(int&& x) { cout << "右值引用重载 f(" << x << ")" << endl; }

int main() {
    int a = 10;
    const int b = 20;
    f(a);  // 调用 f(int&)
    f(b);  // 调用 f(const int&)
    f(30); // 调用 f(int&&)
    return 0;
}
这里,函数 f 根据传入参数是左值还是右值,调用不同的重载版本:
- 传入左值时,调用
f(int&)。 - 传入常量左值时,调用
f(const int&)。 - 传入右值时,调用
f(int&&)。
0x05 右值引用和移动语义的使用场景
右值引用和移动语义为了避免在程序中进行不必要的深拷贝。比如在容器,字符串操作等场景中,临时对象的资源可以直接**"窃取"**而不是深拷贝,极大提高了程序的效率
移动构造和移动赋值:使用右值引用和移动语义,避免不必要的拷贝,而是直接移动资源。
移动构造:
移动构造函数类似拷贝构造函数,要求第一个参数时该类类型的引用 ,但不同的是要求这个参数是右值引用,如果还有其他参数,额外的参数必须有缺省值
移动赋值是一个赋值运算符的重载,他跟拷贝赋值构成函数重载,移动赋值要求第一个参数时该类类型的引用 ,但不同的是要求这个参数是右值引用
对于像string/vector这样的深拷⻉ 的类或者包含深拷⻉的 成员变量的类,移动构造和移动赋值才有 意义,因为移动构造 和移动赋值 的第⼀个参数都是右值引⽤的类型,他的本质是要**"窃取"**引⽤的 右值对象的资源,⽽不是像拷⻉构造和拷⻉赋值那样去拷⻉资源,从提⾼效率。
cpp
#include<iostream>
#include<string>
#include<utility>
#include<algorithm>
using namespace std;
class Mystring
{
private:
char* _str;
public:
Mystring(const char* str=""){
if (str)
{
_str = new char[strlen(str) + 1];
memcpy(_str, str,strlen(str));
}
else
{
_str = new char[1];
*_str = '\0';
}
std::cout << "构造函数: 分配内存并初始化 -> " << _str << std::endl;
}
Mystring(const Mystring& other)
{
_str = new char[strlen(other._str) + 1];
memcpy(_str, other._str,strlen(other._str));
std::cout << "拷贝构造: 深拷贝数据 -> " << _str << std::endl;
}
Mystring& operator=(const Mystring&other)
{
if(this!=&other)
{
//释放原内存
delete[] _str;
_str = new char[strlen(other._str)+1];
memcpy(_str, other._str,strlen(other._str));
std::cout << "拷贝赋值: 释放旧内存,深拷贝新数据 -> " << _str << std::endl;
}
return *this;
}
Mystring(Mystring&& other) noexcept
{
//【关键差异】:直接把对方的指针抢过来!没有任何 new,也没有数据复制!
_str = other._str;
other._str = nullptr;
std::cout << "移动构造: 窃取指针,不拷贝数据" << std::endl;
}
Mystring& operator=(Mystring&&other) noexcept
{
if(this!=&other)
{
std::swap(_str, other._str);
std::cout << "移动赋值: 交换指针" << std::endl;
}
return *this;
}
~Mystring() {
if (_str != nullptr) {
std::cout << "析构函数: 释放内存 -> " << _str << std::endl;
delete[] _str;
_str = nullptr;
}
else {
std::cout << "析构函数: 发现空壳对象,安全退出" << std::endl;
}
}
};
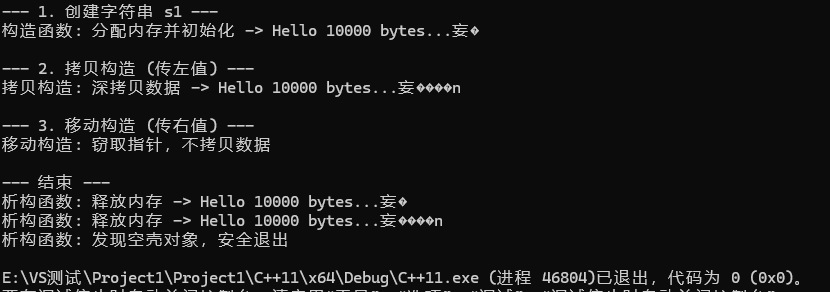
int main() {
std::cout << "--- 1. 创建字符串 s1 ---" << std::endl;
Mystring s1("Hello 10000 bytes...");
std::cout << "\n--- 2. 拷贝构造 (传左值) ---" << std::endl;
Mystring s2(s1); // s1 是左值,触发深拷贝
std::cout << "\n--- 3. 移动构造 (传右值) ---" << std::endl;
// 使用 std::move 把 s1 强转为右值,表示 "s1我不要了,资源你抢走吧"
Mystring s3(std::move(s1));
std::cout << "\n--- 结束 ---" << std::endl;
return 0;
}
-
工作量差异:
-
拷贝构造/赋值 :包含了
new(申请内存)和strcpy(遍历复制)。如果是 1GB 的数据,它就要复制 1GB 的数据,时间复杂度是 O(N)。 -
移动构造/赋值 :仅仅做了指针变量的赋值或交换(
_str = other._str)。无论数据是 1 字节还是 1GB,它都只挪动了那 8 个字节的指针地址,时间复杂度是永远的 O(1)。
-
-
对源对象(Other)的影响:
-
拷贝构造/赋值 :源对象的数据完好无损,你只是复印了一份。
-
移动构造/赋值 :源对象被彻底掏空 (
other._str = nullptr),变成了一个"空壳对象"。这就是为什么我们只能对右值 (即将消亡的临时对象,或者被std::move明确声明不再使用的对象)使用移动语义的原因。如果对还在使用中的左值强行窃取,后续代码再访问它就会发生灾难。
-
0x06 类型分类
C++11 在类型分类方面进行了进一步的细化,将原先的右值划分为两类:纯右值 (prvalue)和将亡值 (xvalue)。此外,还引入了 泛左值(glvalue) 的概念。
纯右值(prvalue)
纯右值是指那些不具名的临时对象或字面值常量,通常用于表达式求值过程中产生的临时对象或常量。例如:
- 字面量常量,如
42、true、nullptr等。 - 临时对象,如
str.substr(1, 2)或者通过加法运算符生成的临时结果a + b。
cpp
int main() {
    int a = 10;
    int b = 20;
    int c = a + b;  // a + b 是一个纯右值

    int x = 42;     // 42 是纯右值
    return 0;
}
将亡值(xvalue)
将亡值是指可以转化为右值引用的表达式,通常涉及到 move 函数或 static_cast 强制类型转换。换句话说,将亡值通常是指可以被"窃取"资源的对象 ,例如:通过 move 或 static_cast 转换后,可以获取其内部资源。
cpp
#include <iostream>
#include <utility>

void foo(int&& x) {
    // x 是将亡值,可以通过移动语义传递资源
}

int main() {
    int a = 10;
    foo(std::move(a));  // std::move(a) 是将亡值

    return 0;
}
泛左值(glvalue)
C++11 引入了泛左值(generalized lvalue,简称 glvalue),它是一个广泛的概念,包含了两类值:左值和将亡值。也就是说,泛左值包含了所有可以用左值引用来绑定的对象,无论是常规的左值还是右值引用。
简单来说,glvalue = 左值 + 将亡值。
cpp
int main() {
    int a = 10;
    int& lref = a;      // lref 是左值引用,a 是左值
    int&& rref = 20;    // rref 是右值引用,20 是右值

    return 0;
}
0x07 引用折叠
C++11 引入了引用折叠 (reference collapsing)规则,这一规则解决了引用类型在模板编程中的复杂性。当引用被作为模板参数时,C++11 自动折叠多重引用,使得我们不必手动处理左值引用和右值引用的组合。
规则:当有两个引用类型组合时,左值引用和右值引用会根据特定规则折叠成一个有效的引用类型。
T& &会折叠为T&。T& &&会折叠为T&。T&& &会折叠为T&&。T&& &&会折叠为T&&。
简单来说:右值引⽤的右值引⽤折叠成右值引⽤,所有其他组合均折叠成左值引⽤。
cpp
#include <iostream>

template <typename T>
void foo(T&& arg) {
    std::cout << "Forwarded argument: " << arg << std::endl;
}

int main() {
    int x = 5;
    foo(x);       // 左值传递
    foo(10);      // 右值传递
    return 0;
}foo(x):这里,x是左值,T会推导为int&,因此T&&会折叠为int&。最终foo传入的是一个int&左值引用。foo(10):这里,10是右值,T会推导为int&&,因此T&&保持不变,最终传入的是一个int&&右值引用。
通过引用折叠,模板在接受不同类型的参数时能够自动选择合适的引用类型。
0x08 完美转发
为什么要有完美转发???
我们知道变量表达式都是左值,也就意味着如果一个右值被右值引用后,右值引用变量表达式的属性是左值,也就是如果接着对表达式进行操作的话,调用的属性只会是左值,所以为了保持参数的属性,完美转发应运而生
完美转发是指在模板函数中,将传入的参数完美地传递给其他函数,而不丢失其左值 或右值 属性。完美转发依赖于引用折叠 和 std::forward 来保持传入参数的类型不变。
完美转发的核心思路是:如果我们从一个函数转发一个参数到另一个函数时,我们需要确保传递给目标函数的是正确的类型(即:左值或右值),而不是将参数意外地转化为另一个类型。
完美转发与 std::forward
std::forward 是一个函数模板,它能根据传入参数的值类别(左值或右值)来正确地转发参数。如果参数是左值,std::forward 会以左值引用的方式转发;如果参数是右值,std::forward 会以右值引用的方式转发。
cpp
#include <iostream>
#include <utility>

template <typename T>
void forward_example(T&& arg) {
    // 使用 std::forward 保留原始类型
    std::cout << "Forwarded argument: ";
    foo(std::forward<T>(arg));  // 完美转发
}

template <typename T>
void foo(T&& arg) {
    std::cout << "Received argument: " << arg << std::endl;
}

int main() {
    int x = 42;
    forward_example(x);   // 左值传递
    forward_example(10);  // 右值传递
    return 0;
}
完美转发的应用场景
完美转发常常用于实现通用的包装器或代理函数,使得你能够传递参数而不丢失其值类别。常见的应用场景包括:
3.1 工厂函数
在实现工厂函数时,完美转发非常有用。我们可以使用完美转发来传递构造函数的参数,而不丢失其原始类型。
cpp
template <typename T, typename... Args>
std::unique_ptr<T> create(Args&&... args) {
    return std::make_unique<T>(std::forward<Args>(args)...);
}
create 函数模板通过 std::forward<Args>(args)... 完美转发参数,确保它们被正确传递给 T 的构造函数,无论它们是左值还是右值。
3.2 STL 容器和算法
STL 容器和算法通常使用完美转发来传递参数。例如,std::vector 的 push_back 和 insert 方法,以及 std::sort 算法,都可以利用完美转发来避免不必要的拷贝。
cpp
std::vector<int> vec;
int val = 10;
vec.push_back(val); // 左值传递
vec.push_back(20);  // 右值传递
三.可变参数模板
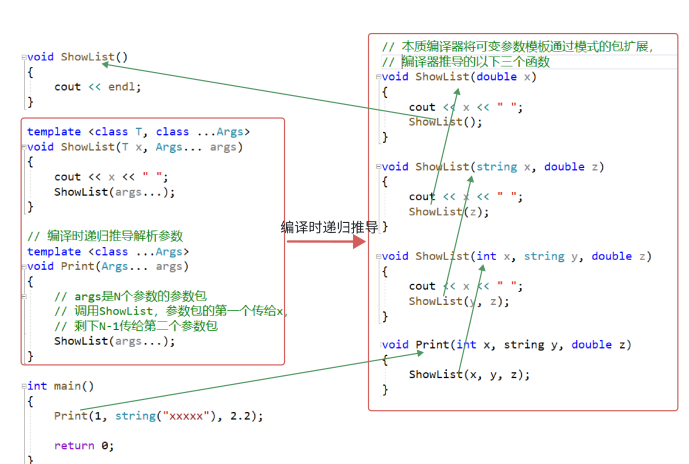
0x01:基本语法及原理
C++支持可变参数模板,也就是柯柏年数量参数的函数模板和类模板,可变数目的的参数被称为参数包,分为两种:模板参数包:表示零或多个模板;函数参数包:表示零或多个函数参数
我们⽤省略号来指出⼀个模板参数或函数参数的表⽰⼀个包,在模板参数列表class...typename...指出接下来的参数表⽰零或多个类型列表;在函数参数列表中,类型名后⾯跟...指出接下来表⽰零或多个形参对象列表;函数参数包可以⽤左值引⽤或右值引⽤表⽰,跟前⾯普通模板⼀样,每个参数实例化时遵循引⽤折叠规则。
cpp
template <class ...Args> // Args 是模板参数包(一堆类型的集合)
void Print(Args&&... args) // args 是函数参数包(一堆具体对象的集合)
0x02 包扩展
我们通过递归方式展开参数包
cpp
#include <iostream>
using namespace std;

template<typename... Args>
void print(Args&&... args) {
    (cout << ... << args) << endl;  // 使用折叠表达式
}

int main() {
    print(1, 2, 3, 4, 5);  // 打印多个整数
    print("Hello", " ", "World", "!");  // 打印多个字符串
    return 0;
}
cpp
#include <iostream>
using namespace std;

template<typename T>
T sum(T&& arg) {
    return arg;  // 基础情况,只有一个参数时直接返回
}

template<typename T, typename... Args>
T sum(T&& first, Args&&... args) {
    return first + sum(forward<Args>(args)...);  // 递归调用,计算和
}

int main() {
    cout << sum(1, 2, 3, 4, 5) << endl;  // 计算和
    return 0;
}
0x03 emplace_back
emplace 系列接口并不是"更高级的push_back "这般浅显,它的本质是:把构造对象所需的参数一路完美转发底层存储位置,在底层直接构造函数
C++11 以后 STL 容器新增 emplace 系列接口,它们使用可变参数模板 ,可以把构造 T 对象所需的参数直接传入容器内部,最终在容器空间上直接构造对象;传递参数包时必须使用 std::forward<Args>(args)...,否则右值引用变量表达式会退化成左值
1. push / insert 和 emplace 的核心区别
假设容器是:
cpp
std::vector<std::string> v;push_back 的思路
cpp
v.push_back(std::string("hello"));底层逻辑大致是:
cpp
std::string tmp("hello");   // 先在外面构造临时对象
v.push_back(std::move(tmp)); // 再移动构造到 vector 内部空间
cpp
外部临时对象 tmp
        |
        | move
        v
vector 内部存储位置
有一次临时对象构造,有一次移动构造。
emplace_back 的思路
底层逻辑大致是:
cpp
::new((void*)pos) std::string("hello");
cpp
"hello" 参数
    |
    | 直接传入 string 构造函数
    v
vector 内部存储位置直接构造 string 对象
没有外部临时 std::string。
这就是 emplace 的核心价值:减少中间临时对象。
2. emplace 的底层本质:allocator + placement new
底层模型
cpp
// 第一步:申请原始内存,只要字节,不构造对象
T* p = allocator.allocate(1);

// 第二步:在这块原始内存上原地构造对象
allocator_traits<Allocator>::construct(alloc, p, args...);
3. emplace_back 的典型实现模型
vector
cpp
template<class T, class Alloc = std::allocator<T>>
class MyVector {
public:
    template<class... Args>
    void emplace_back(Args&&... args) {
        if (_finish == _end_of_storage) {
            reserve(new_capacity());
        }

        std::allocator_traits<Alloc>::construct(
            _alloc,
            _finish,
            std::forward<Args>(args)...
        );

        ++_finish;
    }

private:
    T* _start = nullptr;
    T* _finish = nullptr;
    T* _end_of_storage = nullptr;
    Alloc _alloc;
};
list
cpp
template<class T>
class List {
public:
    template<class... Args>
    iterator emplace(iterator pos, Args&&... args) {
        Node* cur = pos._node;
        Node* prev = cur->_prev;

        Node* newnode = new Node(std::forward<Args>(args)...);

        prev->_next = newnode;
        newnode->_prev = prev;

        newnode->_next = cur;
        cur->_prev = newnode;

        return iterator(newnode);
    }

    template<class... Args>
    void emplace_back(Args&&... args) {
        emplace(end(), std::forward<Args>(args)...);
    }

private:
    using Node = ListNode<T>;
    Node* _head;
};
四. Lambda表达式
简单来说,Lambda 表达式就像是一个"一次性 "的、没有名字 的小函数(匿名函数)。它允许你在需要传递函数逻辑的地方,直接原地写出代码,而不需要在类的外部或全局作用域去专门定义一个传统的命名函数。
Lambda 表达式的"四大组件":捕获列表(参数列表) -> 返回类型 { 函数体 }
-
🧩
[]捕获列表 (Capture Clause) :这是 Lambda 最特殊的机制。它可以让你把外部环境里的变量"打包"带进工坊里使用。如果不需要外部变量,保持[]为空即可。 -
📥
()参数列表 (Parameters) :和普通函数完全一样,代表每次调用这个工坊时,你临时传递给它的输入数据。如果不需要参数,()甚至可以省略。 -
📤
->返回类型 (Return Type) :指明工坊最后产出的结果类型。在现代 C++ 中,只要函数体不太复杂,编译器都能自动推导出来,所以这一部分通常会被直接省略。 -
⚙️
{}函数体 (Body):里面存放的就是你实际的业务逻辑代码。
最简单的例子:我们定义一个不带外部变量,只接收参数的Lambda
cpp
auto say_hello = [](string name){
   cout<<"hello"<<name<<endl;
};

say_hello("Bob");
也可以写一个add
cpp
auto add = [](int a ,int b){
   return a+b;
};
接下来我们来了解一下 捕获机制 :按值捕获 和 按引用捕获
cpp
//按值捕获 语法:在 [] 中写上变量名,例如 [x]。
int multiplier = 3;
// 把 multiplier 复印一份带进 lambda
auto multiply = [multiplier](int n) {
    return n * multiplier;
};

cout << multiply(5); // 输出 15
//按引用捕获 在变量名前加一个 & 符号,例如 [&x]。
int count = 0;
// 拿走 count 的遥控器
auto click = [&count]() {
    count = count + 1; // 直接修改外面的本体!
};

click();
click();
// 此时外面的 count 已经变成了 2
如果你外面有十几个变量都要用,一个一个写太麻烦了,C++ 提供了两个快捷键:
-
[=]:外部所有局部变量,统统按值(复印)捕获。 -
[&]:外部所有局部变量,统统按引用(拿钥匙)捕获。
Lambda应用:
如果仅仅用来处理内置类型的话,那也太大材小用了 ,在项目中,一般都是自定义类型的较量
cpp
struct Goods
{
	string _name; // 名字
	double _price; // 价格
	int _evaluate; // 评价
	// ...
	Goods(const char* str, double price, int evaluate)
		:_name(str)
		, _price(price)
		, _evaluate(evaluate)
	{}
};struct ComparePriceLess
	{
		bool operator()(const Goods& gl, const Goods& gr)
		{
			return gl._price < gr._price;
		}
	};
	struct ComparePriceGreater
	{
		bool operator()(const Goods& gl, const Goods& gr)
		{
			return gl._price > gr._price;
		}
	};
int main()
{
	vector<Goods> v = { { "苹果", 2.1, 5 }, { "⾹蕉", 3, 4 }, { "橙⼦", 2.2, 3}, { "菠萝", 1.5, 4 } };
	sort(v.begin(), v.end(), ComparePriceGreater());


	sort(v.begin(), v.end(), [](const Goods& g1, const Goods& g2)
		{
		return g1._price < g2._price;
		});
	sort(v.begin(), v.end(), [](const Goods& g1, const Goods& g2) {
		return g1._price > g2._price;
		});
	sort(v.begin(), v.end(), [](const Goods& g1, const Goods& g2) {
		return g1._evaluate < g2._evaluate;
		});
	sort(v.begin(), v.end(), [](const Goods& g1, const Goods& g2) {
		return g1._evaluate > g2._evaluate;
		});
}
可以看到,其实Lambda表达式其实跟仿函数非常类似,原因是:Lambda底层就是仿函数对象,所以我们写Lambda以后,编译器会自动生成一个对应的仿函数类
五.包装器
0x01 function
定义头⽂件<functional>中
cpp
template <class T>
 class function;  // undefined
 template <class Ret, class... Args>
 class function<Ret(Args...)>;
在 C++ 中,"可调用对象"有很多种形式:普通函数、函数指针、Lambda 表达式、仿函数 (重载了 operator() 的类),以及类的成员函数。
在过去,如果你想写一个接收回调函数的接口,你可能需要写很多个重载版本,或者使用复杂的模板。std::function 的出现解决了这个问题,它提供了一种统一的类型来保存和调用任何签名匹配的可调用对象。
cpp
int f(int a, int b)
{
	return a + b;
}
struct Functor
{
public:
	int operator() (int a, int b)
	{
		return a + b;
	}
};
class Plus
{
public:
	Plus(int n = 10)
		:_n(n)
	{
	}
	static int plusi(int a, int b)
	{
		return a + b;
	}
	double plusd(double a, double b)
	{
		return (a + b) * _n;
	}
private:
	int _n;
};
int main()
{
	// 包装各种可调⽤对象
	function<int(int, int)> f1 = f;
	function<int(int, int)> f2 = Functor();
	function<int(int, int)> f3 = [](int a, int b) {return a + b; };
	cout << f1(1, 1) << endl;
	cout << f2(1, 1) << endl;
	cout << f3(1, 1) << endl;
	// 包装静态成员函数
	// 成员函数要指定类域并且前⾯加&才能获取地址 静态成员变量可以不加& 非静态需要添加
	function<int(int, int)> f4 = &Plus::plusi;
	cout << f4(1, 1) << endl;
	//// 包装普通成员函数
	//// 普通成员函数还有⼀个隐含的this指针参数,所以绑定时传对象或者对象的指针过去都可以
	function<double(plus*, double, double)> f5 = &plus::plusd;
	plus pd;
	cout << f5(&pd, 1.1, 1.1) << endl;
	function<double(Plus, double, double)> f6 = &Plus::plusd;
	cout << f6(pd, 1.1, 1.1) << endl;
	cout << f6(pd, 1.1, 1.1) << endl;
	function<double(Plus&&, double, double)> f7 = &Plus::plusd;
	cout << f7(move(pd), 1.1, 1.1) << endl;
	cout << f7(Plus(), 1.1, 1.1) << endl;
	return 0;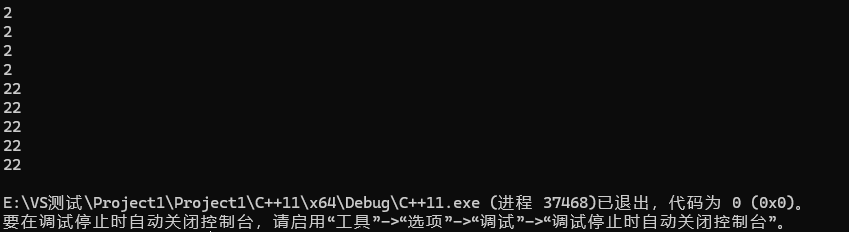
0x02 bind
cpp
simple(1)
template <class Fn, class... Args>
/* unspecified */ bind (Fn&& fn, Args&&... args);

with return type (2)
template <class Ret, class Fn, class... Args>7  /* unspecified */ bind (Fn&& fn, Args&&... args);
bind是⼀个函数模板,它也是⼀个可调⽤对象的包装器,可以把他看做⼀个函数适配器,对接收的fn可调⽤对象进⾏处理后返回⼀个可调⽤对象。bind可以⽤来调整参数个数和参数顺序。bind也在<functional>这个头⽂件中。
有时候,你手头有一个函数,但它的参数列表和目标接口不匹配(比如目标接口只需要 1 个参数,但你的函数需要 2 个参数)。此时就需要用到 std::bind。
std::bind 接受一个可调用对象,并生成一个新的可调用对象来"适应"原对象的参数列表。它可以用来延迟执行 、改变参数顺序 或固定部分参数。
基本使用与占位符(Placeholders)
cpp
#include <iostream>
#include <functional>

void print_info(const std::string& name, int age) {
    std::cout << "Name: " << name << ", Age: " << age << std::endl;
}

int main() {
    using namespace std::placeholders; // 引入 _1, _2 等占位符

    // 1. 固定某个参数 (将 age 固定为 25)
    // _1 表示新生成的包装器所接收的第一个参数
    auto bind_age = std::bind(print_info, _1, 25);
    bind_age("Alice"); // 实际调用 print_info("Alice", 25)

    // 2. 调换参数顺序
    auto bind_reverse = std::bind(print_info, _2, _1);
    bind_reverse(30, "Bob"); // 实际调用 print_info("Bob", 30)

    return 0;
}
std::bind 与类的成员函数
这是 std::bind 最常见的应用场景之一。类的非静态成员函数在调用时隐含了一个 this 指针。如果想用 std::function 包装类的成员函数,必须配合 std::bind 把对象实例(即 this 指针)绑定进去。
cpp
class MyClass {
public:
    void do_something(int x) {
        std::cout << "Class does something with: " << x << std::endl;
    }
};

int main() {
    MyClass obj;
    // 绑定成员函数:需要传递函数的地址,以及对象的地址(&obj)
    std::function<void(int)> func = std::bind(&MyClass::do_something, &obj, std::placeholders::_1);

    func(100); // 正常调用
    return 0;
}
func(100)中的右值100,就在std::function<void(int)>func = std::bind(&MyClass::do_something,&obj,std::placeholders::_1=100);
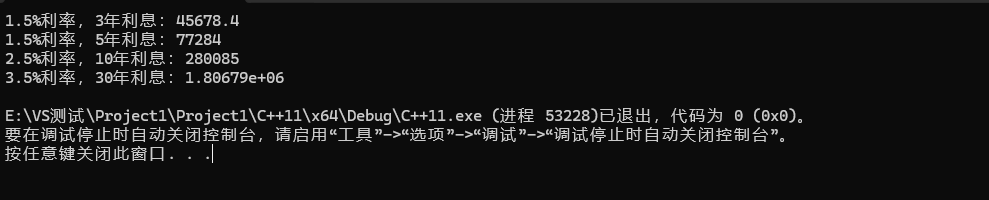
cpp
	// 计算复利的lambda
	auto func1 = [](double rate, double money, int year)->double {
		double ret = money;
		for (int i = 0; i < year; i++)
		{
			ret += ret * rate;
		}
		return ret - money;
		};
	// 绑死⼀些参数,实现出⽀持不同年华利率,不同⾦额和不同年份计算出复利的结算利息
	function<double(double)> func3_1_5 = bind(func1, 0.015, _1, 3);
	function<double(double)> func5_1_5 = bind(func1, 0.015, _1, 5);
	function<double(double)> func10_2_5 = bind(func1, 0.025, _1, 10);
	function<double(double)> func20_3_5 = bind(func1, 0.035, _1, 30);
	cout << func3_1_5(1000000) << endl;
	cout << func5_1_5(1000000) << endl;
	cout << func10_2_5(1000000) << endl;
	cout << func20_3_5(1000000) << endl;
	return 0;
}