文章目录
-
-
- 三种卡片类型对比
- 普通卡片:最常用的基础款
- 动效卡片:让卡片动起来
- [Canvas 卡片:想画啥画啥](#Canvas 卡片:想画啥画啥)
- 三种卡片的选用建议
-
搞懂 FormKit 基础之后,很多人会问一个问题:卡片 UI 能做到多花哨?
说实话,比我想象的要多。ArkTSCardDocsSample 里展示了三种玩法:普通交互卡片 、动效卡片 和 Canvas 自定义绘制卡片。本文把这三种实现方式的代码全部拆开讲清楚,顺便说说各自的使用场景和注意事项。
三种卡片类型对比
先来一张总览表,心里有个底:
| 类型 | 典型场景 | 关键技术 | 性能开销 |
|---|---|---|---|
| 普通卡片 | 文本展示 + 点击跳转 | postCardAction |
最低 |
| 动效卡片 | 按钮旋转、图标跳动 | @State + .animation() |
低 |
| Canvas 卡片 | 自定义图形、数据可视化 | CanvasRenderingContext2D |
中等 |
三种卡片都能在同一个应用里共存,通过 form_config.json 分别注册即可。
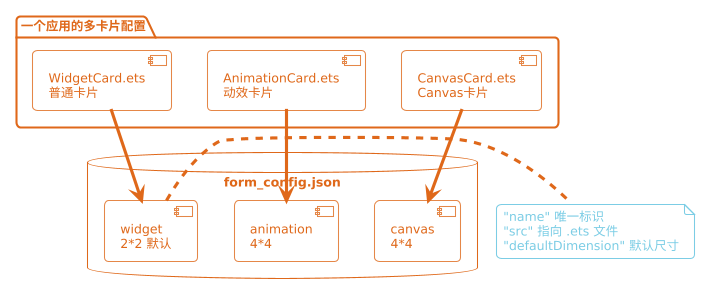
普通卡片:最常用的基础款
普通卡片的核心就两件事:展示数据 、点击跳转。
实现上特别简单,看 WidgetCard.ets 的代码:
typescript
@Entry
@Component
struct WidgetCard {
  // 这三个是固定动作参数,实际项目里建议提取到配置文件
  readonly ACTION_TYPE: string = 'router';
  readonly ABILITY_NAME: string = 'EntryAbility';
  readonly MESSAGE: string = 'add detail';

  // 卡片标题,由 FormExtensionAbility 通过 FormBindingData 传入
  @LocalStorageProp('title') title: ResourceStr = $r('app.string.widget_title');

  build() {
    Row() {
      Column() {
        Text(this.title)
          .fontSize($r('app.float.font_size'))
          .fontColor('#FFFFFF')
          .fontWeight(FontWeight.Bold)
          .padding({ left: 12, top: 12 })
      }
      .width('100%')
    }
    .height('100%')
    .backgroundColor('#1E90FF')
    .borderRadius(12)
    .onClick(() => {
      // postCardAction 是卡片与外部通信的唯一途径
      postCardAction(this, {
        'action': this.ACTION_TYPE,        // 'router' 表示路由跳转
        'abilityName': this.ABILITY_NAME,  // 目标 Ability 名称
        'params': {
          'message': this.MESSAGE          // 传给目标 Ability 的参数
        }
      });
    })
  }
}
postCardAction 的 action 字段支持三个值:
'router':跳转到指定 Ability(最常用)'message':发消息给FormExtensionAbility,触发onFormEvent回调'call':调用应用后台的 Ability(不拉起前台 UI)
普通卡片非常适合天气、待办、步数这类"看一眼就够了"的信息展示场景。
动效卡片:让卡片动起来
动效卡片跟普通卡片写法几乎一样,只不过多了动画逻辑。关键在于:卡片内支持属性动画(.animation()),但不支持显式动画(animateTo())。
看 AnimationCard.ets:
typescript
@Entry
@Component
struct AnimationCard {
  // 用 @State 管理旋转角度
  @State rotateAngle: number = 0;

  build() {
    Row() {
      Button('点我旋转')
        .width(120)
        .height(40)
        .fontSize(14)
        .fontColor(Color.White)
        .backgroundColor('#FF6B35')
        // 绑定旋转属性------当 rotateAngle 变化时自动触发动画
        .rotate({ angle: this.rotateAngle })
        // 配置动画效果
        .animation({
          curve: Curve.EaseOut,      // 缓出曲线,减速停止
          playMode: PlayMode.Normal, // 正向播放
          duration: 300,             // 300ms
        })
        .onClick(() => {
          // 切换角度,触发动画
          this.rotateAngle = (this.rotateAngle === 0 ? 90 : 0);
        })
    }
    .width('100%')
    .height('100%')
    .justifyContent(FlexAlign.Center)
    .alignItems(VerticalAlign.Center)
    .backgroundColor('#2C2C2C')
  }
}
工作原理其实很简单:
用户点击按钮
    ↓
rotateAngle 值改变(0 → 90 或 90 → 0)
    ↓
ArkUI 检测到绑定了 .animation() 的属性变化
    ↓
自动播放从旧值到新值的过渡动画可以做动效的属性(在卡片里支持):
.rotate()--- 旋转.scale()--- 缩放.opacity()--- 透明度.translate()--- 位移.backgroundColor()--- 背景色过渡
不能在卡片里用的动画方式:
animateTo()--- 显式动画,卡片里不支持@AnimationGroup--- 不支持
动效卡片适合做钟表、倒计时、状态切换这类有视觉反馈需求的场景。
Canvas 卡片:想画啥画啥
Canvas 卡片用到了 CanvasRenderingContext2D,如果你写过 HTML5 的 Canvas,会感觉非常亲切------API 几乎一模一样。
CanvasCard.ets 里画了一个笑脸,完整代码如下:
typescript
@Entry
@Component
struct CanvasCard {
  private settings: RenderingContextSettings = new RenderingContextSettings(true);
  private context: CanvasRenderingContext2D = new CanvasRenderingContext2D(this.settings);

  // 记录画布尺寸(在 onReady 里获取)
  private canvasWidth: number = 0;
  private canvasHeight: number = 0;

  build() {
    Column() {
      Canvas(this.context)
        .width('100%')
        .height('100%')
        // onReady 回调是绘制的入口,在这里才能拿到真实的画布尺寸
        .onReady(() => {
          this.canvasWidth = this.context.width;
          this.canvasHeight = this.context.height;
          this.drawSmiley();
        })
    }
    .width('100%')
    .height('100%')
  }

  // 绘制笑脸
  private drawSmiley(): void {
    const cx = this.canvasWidth / 2;
    const cy = this.canvasHeight / 2;
    const r = Math.min(this.canvasWidth, this.canvasHeight) * 0.35;

    // 1. 绘制背景
    this.context.fillStyle = '#EEF0FF';
    this.context.fillRect(0, 0, this.canvasWidth, this.canvasHeight);

    // 2. 绘制脸部圆形
    this.context.beginPath();
    this.context.arc(cx, cy, r, 0, 2 * Math.PI);
    this.context.fillStyle = '#FFD700';
    this.context.fill();
    this.context.strokeStyle = '#FF8C00';
    this.context.lineWidth = 3;
    this.context.stroke();

    // 3. 绘制左眼
    this.context.beginPath();
    this.context.arc(cx - r * 0.3, cy - r * 0.25, r * 0.1, 0, 2 * Math.PI);
    this.context.fillStyle = '#333333';
    this.context.fill();

    // 4. 绘制右眼
    this.context.beginPath();
    this.context.arc(cx + r * 0.3, cy - r * 0.25, r * 0.1, 0, 2 * Math.PI);
    this.context.fillStyle = '#333333';
    this.context.fill();

    // 5. 绘制笑嘴(弧线)
    this.context.beginPath();
    this.context.arc(cx, cy + r * 0.05, r * 0.45, 0.1 * Math.PI, 0.9 * Math.PI);
    this.context.strokeStyle = '#333333';
    this.context.lineWidth = 4;
    this.context.stroke();
  }
}
Canvas 绘制流程:
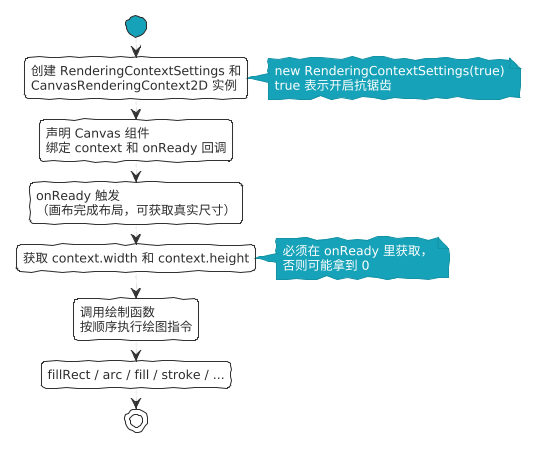
一个很重要的坑 :onReady 只会在组件初次布局完成时触发一次。如果你需要响应数据变化重新绘制,需要在数据更新后手动调用绘制函数。Canvas 卡片没法像普通组件那样靠 @State 自动刷新,必须手动控制绘制逻辑。
Canvas 卡片适合数据可视化(折线图、环形进度、雷达图)、自定义图标、复杂图形展示这类场景。
三种卡片的选用建议
简单总结一下:
- 大多数场景用普通卡片就够了,开发成本最低,性能最好
- 需要视觉反馈(按钮点击、状态切换)时用动效卡片,代码量增加不多,效果明显
- 需要自定义图形或者数据可视化时才用 Canvas 卡片,开发成本最高,但自由度最大
别为了"高端"而强行用 Canvas,普通卡片配上合适的图标和颜色,照样能做出好看的效果。