K8S-Helm
文章目录
- K8S-Helm
-
- 一、Helm概述
-
- [1.1、Helm 组件及相关术语](#1.1、Helm 组件及相关术语)
- 1.2、Helm工作原理
- 二、Helm部署
- 2.3、Helm命令
- [三、Helm Chart 详解](#三、Helm Chart 详解)
- 三、helm部署案例
- 四、升级与回滚
- #五、nginx的values.yaml模版
- [- name: foo # 示例卷](# 示例卷)
- secret:
- [secretName: mysecret](#secretName: mysecret)
- [optional: false](#optional: false)
- [Additional volumeMounts on the output Deployment definition.](#Additional volumeMounts on the output Deployment definition.)
- [- name: foo](#- name: foo)
- mountPath: "/etc/foo"
- [readOnly: true](#readOnly: true)
一、Helm概述
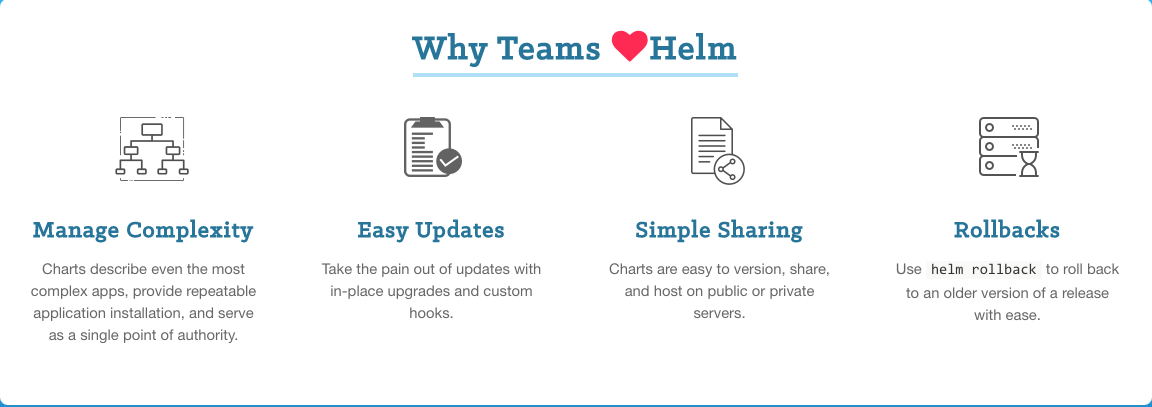
helm通过打包的方式,支持发布的版本管理和控制,很大程度上简化了Kubernetes应用的部署和管理。
Helm本质就是让k8s的应用管理(Deployment、Service等)可配置,能动态生成。通过动态生成K8S资源清单文(deployment.yaml、service.yaml)。然后kubectl自动调用K8S资源部署。
对于K8s来说,应用资源配置可以定义为K8s API对象,包括Deployment,Namespace,Service, PV(Persistent Volumes)和PVC(PersistentVolumeClaims)等等。通常一个应用的部署会涉及很多资源的共同协作,用户会定义这些API对象到一系列Yaml文件中,然后通过kubectl来逐一进行部署。
那么问题来了,假如我没接触过K8s, 只想部署个应用了解下,不会写Yaml一个个配这些资源对象怎么破?需要去结合K8s文档学习Yaml语法。过了几天我终于学会了,一个个配好了这些资源对象的Yaml文件,并逐一部署在这台机器上。后面想在这台机器上再重复部署几套,另外还有十台环境要配成和这台一样,怎么办?拷贝过去再一一部署出来?这配置管理也太麻烦了,不好用,直接劝退!
先别急!幸好已经有Helm,避免了我们去完成这些繁琐配置和维护过程。它能够把这些零零散散的应用资源文件放在一起进行统一配置,极大方便了开发人员对K8s集群应用的管理。
1.1、Helm 组件及相关术语
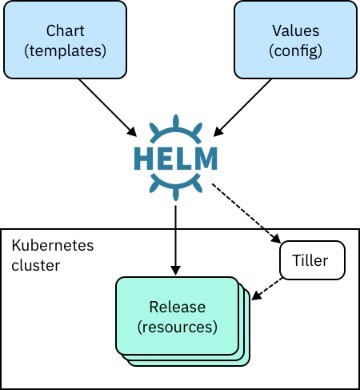
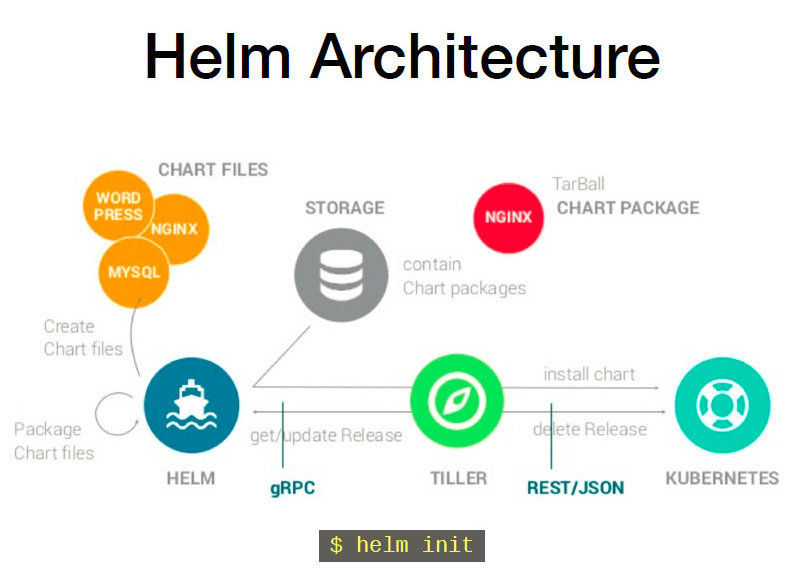
Helm是官方提供类似于YUM的包管理,是部署环境的流程封装,Helm有三个重要的概念:chart、release和Repository
- Helm:Helm 是一个命令行下的客户端工具。主要用于 Kubernetes 应用程序 Chart 的创建、打包、发布以及创建和管理本地和远程的 Chart 仓库。
- Tiller:Tiller 是 Helm 的服务端,部署在 Kubernetes 集群中。Tiller 用于接收 Helm 的请求,并根据 Chart 生成 Kubernetes 的部署文件( Helm 称为 Release ),然后提交给 Kubernetes 创建应用。Tiller 还提供了 Release 的升级、删除、回滚等一系列功能。
- Chart:Helm 的软件包,采用 TAR 格式。类似于 APT 的 DEB 包或者 YUM 的 RPM 包,其包含了一组定义 Kubernetes 资源相关的 YAML 文件。Chart有特定的文件目录结构,如果开发者想自定义一个新的 Chart,只需要使用Helm create命令生成一个目录结构即可进行开发。
- Repoistory:Helm 的软件仓库,Repository 本质上是一个 Web 服务器,该服务器保存了一系列的 Chart 软件包以供用户下载,并且提供了一个该 Repository 的 Chart 包的清单文件以供查询。Helm 可以同时管理多个不同的 Repository, 官方仓库的地址是https://hub.helm.sh。
- Release:使用 helm install 命令在 Kubernetes 集群中部署的 Chart 称为 Release。
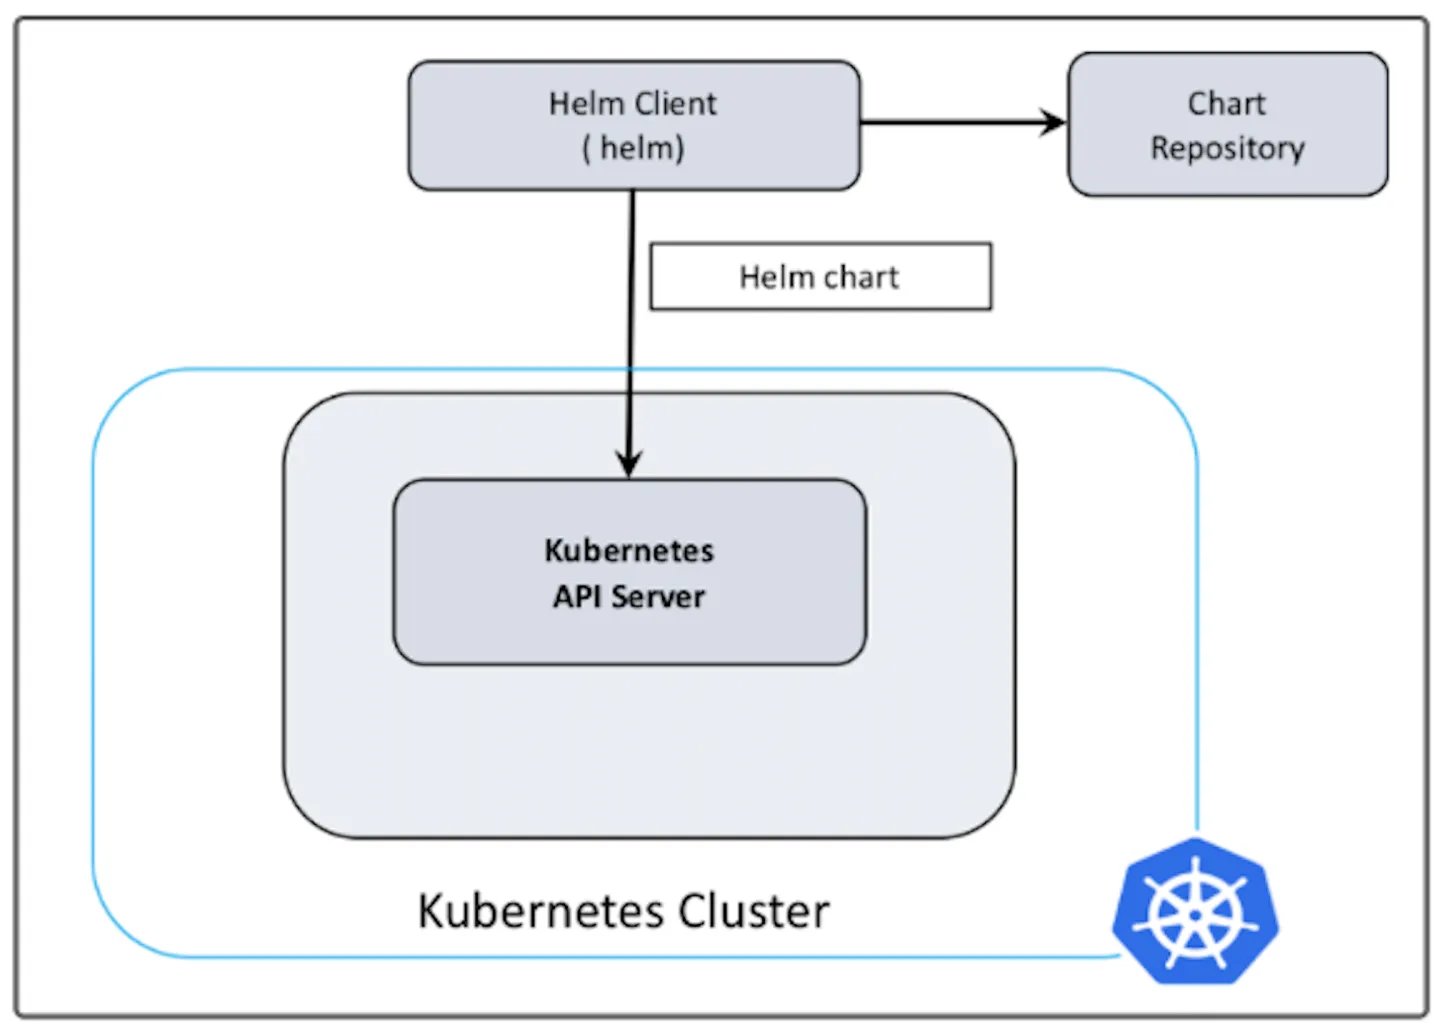
1.2、Helm工作原理
1、Chart Install 过程:
-
Helm从指定的目录或者tgz文件中解析出Chart结构信息
-
Helm将指定的Chart结构和Values信息通过gRPC传递给Tiller
-
Tiller根据Chart和Values生成一个Release
-
Tiller将Release发送给Kubernetes用于生成Release
2、Chart Update过程:
-
Helm从指定的目录或者tgz文件中解析出Chart结构信息
-
Helm将要更新的Release的名称和Chart结构,Values信息传递给Tiller
-
Tiller生成Release并更新指定名称的Release的History
-
Tiller将Release发送给Kubernetes用于更新Release
3、Chart Rollback过程:
- Helm将要回滚的Release的名称传递给Tiller
- Tiller根据Release的名称查找History
- Tiller从History中获取上一个Release
- Tiller将上一个Release发送给Kubernetes用于替换当前Release
二、Helm部署
现在越来越多的公司和团队开始使用Helm这个Kubernetes的包管理器,我们也会使用Helm安装Kubernetes的常用组件。Helm由客户端命令helm工具和服务端tiller组成。
helm的GitHub地址:https://github.com/helm/helm
2.1、安装方式
shell
[root@k8s-master01 ~]# mkdir helm
[root@k8s-master01 helm]# wget https://get.helm.sh/helm-v3.14.0-linux-amd64.tar.gz
[root@k8s-master01 helm]# tar -zxvf helm-v3.14.0-linux-amd64.tar.gz
[root@k8s-master01 helm]# cd linux-amd64/
[root@k8s-master01 linux-amd64]# cp helm /usr/local/bin/
[root@k8s-master01 linux-amd64]# echo "source <(helm completion bash)" >> ~/.bashrc
[root@k8s-master01 linux-amd64]# source ~/.bashrc
2.2、chart库配置
做完上述设置后即可使用helm search搜索官方helm hub chart库
shell
helm search hub nginx添加第三方Chart库
shell
helm repo add aliyun  https://kubernetes.oss-cn-hangzhou.aliyuncs.com/charts
helm repo add bitnami https://charts.bitnami.com/bitnami
查看Chart库
shell
helm repo list从仓库中查找指定chart的名字
shell
helm search repo nginx2.3、Helm命令
| 命令字 | 中文释义 | 作用 |
|---|---|---|
| completion | 完成 | 生成特定Shell的自动补全脚本 |
| create | 创建 | 使用给定的名称创建新图表 |
| dependency | 依赖 | 管理图表的依赖关系 |
| env | 环境 | Helm客户端环境信息 |
| get | 获取 | 下载已命名发布的扩展信息 |
| help | 帮助 | 关于任何命令的帮助 |
| history | 历史 | 获取发布历史记录 |
| install | 安装 | 安装图表 |
| lint | 检查 | 检查图表可能存在的问题 |
| list | 列表 | 列出发布 |
| package | 打包 | 将图表目录打包成图表存档 |
| plugin | 插件 | 安装、列出或卸载Helm插件 |
| pull | 拉取 | 从存储库下载图表,并可选在本地目录中解包 |
| push | 推送 | 将图表推送到远程存储库 |
| registry | 注册表 | 登录或注销注册表 |
| repo | 仓库 | 添加、列出、删除、更新和索引图表存储库 |
| rollback | 回滚 | 将发布回滚到先前版本 |
| search | 搜索 | 在图表中搜索关键字 |
| show | 显示 | 显示图表的信息 |
| status | 状态 | 显示指定发布的状态 |
| template | 模板 | 本地渲染模板 |
| test | 测试 | 运行发布的测试 |
| uninstall | 卸载 | 卸载发布 |
| upgrade | 升级 | 升级发布 |
| verify | 验证 | 验证给定路径的图表已签名并且有效 |
| version | 版本 | 打印客户端版本信息 |
三、Helm Chart 详解
3.1、chart目录结构
shell
# 通过helm create命令创建一个新的chart包
[root@k8s-master01 helm]# helm create nginx
Creating nginx
[root@k8s-master01 nginx]# tree
.
├── charts
├── Chart.yaml
├── templates
│   ├── deployment.yaml
│   ├── _helpers.tpl
│   ├── hpa.yaml
│   ├── ingress.yaml
│   ├── NOTES.txt
│   ├── serviceaccount.yaml
│   ├── service.yaml
│   └── tests
│       └── test-connection.yaml
└── values.yaml

3 directories, 10 files
####目录结构解析####
nginx/
├── charts  #依赖其他包的charts文件
├── Chart.yaml # 该chart的描述文件,包括ico地址,版本信息等
├── templates  # #存放k8s模板文件目录
│   ├── deployment.yaml # 创建k8s资源的yaml 模板
│   ├── _helpers.tpl # 下划线开头的文件,可以被其他模板引用
│   ├── hpa.yaml # 弹性扩缩容,配置服务资源CPU 内存
│   ├── ingress.yaml # ingress 配合service域名访问的配置
│   ├── NOTES.txt # 说明文件,helm install之后展示给用户看的内容
│   ├── serviceaccount.yaml # 服务账号配置
│   ├── service.yaml # kubernetes Serivce yaml 模板
│   └── tests # 测试模块
│       └── test-connection.yaml
└── values.yaml # 给模板文件使用的变量
3.2、Chart.yaml
yaml
apiVersion: 			# chart API 版本信息, 通常是 "v1" (必须)
name: 					# chart 的名称 (必须)
version: 				# chart 包的版本 (必须)
kubeVersion: 			# 指定 Kubernetes 版本 (可选)
type: 					# chart类型 (可选)
description: 			# 对项目的描述 (可选)
keywords:
  - 					# 有关于项目的一些关键字 (可选)
home: 					# 项目 HOME 页面的 URL 地址 (可选)
sources:
  - 					# 项目源码的 URL 地址 (可选)
dependencies: 			# chart 必要条件列表 (可选)
  - name: 				# chart名称 (nginx)
    version: 			# chart版本 ("1.2.3")
    repository: 		# (可选)仓库URL ("https://example.com/charts") 或别名 ("@repo-name")
    condition: 			# (可选) 解析为布尔值的yaml路径,用于启用/禁用chart (e.g. subchart1.enabled )
    tags: 				# (可选)
      - 				# 用于一次启用/禁用 一组chart的tag
    import-values: 		# (可选)
      - 				# ImportValue 保存源值到导入父键的映射。每项可以是字符串或者一对子/父列表项
    alias: 				# (可选) chart中使用的别名。当你要多次添加相同的chart时会很有用
maintainers: 			# (可选)维护者信息
  - name: 				# 维护者的名称
    email: 				# 维护者的邮件地址
    url: 				# 维护者的个人主页
engine: gotpl 			# 模板引擎的名称(可选,默认为 gotpl)
icon: 					# (可选)指定 chart 图标的 SVG 或 PNG 图像的 URL
appVersion: 			# 应用程序包含的版本
deprecated: 			# (可选,使用布尔值)该 chart 是否被废弃
annotations:
example: # 按名称输入的批注列表 (可选).- 从 v3.3.2,不再允许额外的字段。推荐的方法是在
annotations中添加自定义元数据。 - 每个 chart 都必须有个版本号(
version)。版本必须遵循 语义化版本 2 标准。不像经典 Helm, Helm v2 以及后续版本会使用版本号作为发布标记。仓库中的包通过名称加版本号标识。
比如 nginx chart 的版本字段 version: 1.2.3 按照名称被设置为:
shell
nginx-1.2.3.tgz三、helm部署案例
部署Nginx应用
shell
[root@k8s-master01 nginx-helm]# helm pull bitnami/nginx --version 15.3.5
[root@k8s-master01 nginx-helm]# ls
nginx-15.3.5.tgz
[root@k8s-master01 nginx-helm]# tar xf nginx-15.3.5.tgz
[root@k8s-master01 nginx-helm]# ls
nginx  nginx-15.3.5.tgz
[root@k8s-master01 nginx-helm]# cd nginx
[root@k8s-master01 nginx]# vim values.yaml
532 service:
533   ## @param service.type Service type
534   ##
535   type: ClusterIP
536   ## @param service.ports.http Service HTTP port
537   ## @param service.ports.https Service HTTPS port
538   ##
539   ports:
540     http: 80
541     https: 443
###安装chart###
[root@k8s-master01 nginx]# helm install nginx-server .
NAME: nginx-server
LAST DEPLOYED: Sat Feb  3 15:57:33 2024
NAMESPACE: default
STATUS: deployed
REVISION: 1
TEST SUITE: None
NOTES:
CHART NAME: nginx
CHART VERSION: 15.3.5
APP VERSION: 1.25.3

** Please be patient while the chart is being deployed **
NGINX can be accessed through the following DNS name from within your cluster:

    nginx-server.default.svc.cluster.local (port 80)

To access NGINX from outside the cluster, follow the steps below:

1. Get the NGINX URL by running these commands:

    export SERVICE_PORT=$(kubectl get --namespace default -o jsonpath="{.spec.ports[0].port}" services nginx-server)
    kubectl port-forward --namespace default svc/nginx-server ${SERVICE_PORT}:${SERVICE_PORT} &
    echo "http://127.0.0.1:${SERVICE_PORT}"
####查看pod和service###
[root@k8s-master01 nginx]# kubectl get deployments.apps
NAME              READY   UP-TO-DATE   AVAILABLE   AGE
nginx-deploy      3/3     3            3           23h
nginx-deploy1     3/3     3            3           22h
nginx-deploy2     3/3     3            3           22h
nginx-server      1/1     1            1           56s

[root@k8s-master01 nginx]# kubectl get pod
NAME                              READY   STATUS    RESTARTS       AGE
nginx-deploy-5f87d95c-7ph78       1/1     Running   1 (151m ago)   23h
nginx-deploy-5f87d95c-dswvq       1/1     Running   1 (151m ago)   23h
nginx-deploy-5f87d95c-vk9vg       1/1     Running   1 (151m ago)   23h
nginx-deploy1-c8d58b5c7-7dfrd     1/1     Running   1 (151m ago)   22h
nginx-deploy1-c8d58b5c7-d2hd7     1/1     Running   1 (151m ago)   22h
nginx-deploy1-c8d58b5c7-pfvhn     1/1     Running   1 (151m ago)   22h
nginx-deploy2-db98bd9d9-2jl74     1/1     Running   1 (151m ago)   22h
nginx-deploy2-db98bd9d9-h67n6     1/1     Running   1 (151m ago)   22h
nginx-deploy2-db98bd9d9-wfcmw     1/1     Running   1 (151m ago)   22h
nginx-server-ff5765f8-4wbms       1/1     Running   0              2m5s
pod-controller-qk5jl              1/1     Running   1 (151m ago)   19h
pod-controller-scsxt              1/1     Running   1 (151m ago)   19h

[root@k8s-master01 nginx]# kubectl get svc
NAME              TYPE           CLUSTER-IP      EXTERNAL-IP       PORT(S)        AGE
kubernetes        ClusterIP      10.10.0.1       <none>            443/TCP        14d
nginx-server      ClusterIP      10.10.127.16    <none>            80/TCP         2m32s
nginx-svc         ClusterIP      10.10.83.76     <none>            80/TCP         23h
nginx-svc1        LoadBalancer   10.10.168.131   192.168.115.167   80:31261/TCP   22h
nginx-svc2        NodePort       10.10.14.245    <none>            80:31110/TCP   22h

####测试访问###
[root@k8s-master01 nginx]# curl 10.10.127.16
<!DOCTYPE html>
<html>
<head>
<title>Welcome to nginx!</title>
<style>
html { color-scheme: light dark; }
body { width: 35em; margin: 0 auto;
font-family: Tahoma, Verdana, Arial, sans-serif; }
</style>
</head>
<body>
<h1>Welcome to nginx!</h1>
<p>If you see this page, the nginx web server is successfully installed and
working. Further configuration is required.</p>

<p>For online documentation and support please refer to
<a href="http://nginx.org/">nginx.org</a>.<br/>
Commercial support is available at
<a href="http://nginx.com/">nginx.com</a>.</p>

<p><em>Thank you for using nginx.</em></p>
</body>
</html>
四、升级与回滚
修改配置文件
shell
[root@k8s-master01 nginx]# vim values.yaml
123 replicaCount: 3
124 ## @param revisionHistoryLimit The number of old history to retain to allow rollback
125 ##
升级
shell
[root@k8s-master01 nginx]# helm upgrade nginx-server .查看升级结果
shell
[root@k8s-master01 nginx]# kubectl get pod
[root@k8s-master01 nginx]# kubectl get pod
NAME                              READY   STATUS    RESTARTS       AGE
nginx-deploy-5f87d95c-7ph78       1/1     Running   1 (166m ago)   23h
nginx-deploy-5f87d95c-dswvq       1/1     Running   1 (166m ago)   23h
nginx-deploy-5f87d95c-vk9vg       1/1     Running   1 (166m ago)   23h
nginx-deploy1-c8d58b5c7-7dfrd     1/1     Running   1 (166m ago)   23h
nginx-deploy1-c8d58b5c7-d2hd7     1/1     Running   1 (166m ago)   23h
nginx-deploy1-c8d58b5c7-pfvhn     1/1     Running   1 (166m ago)   23h
nginx-deploy2-db98bd9d9-2jl74     1/1     Running   1 (166m ago)   22h
nginx-deploy2-db98bd9d9-h67n6     1/1     Running   1 (166m ago)   22h
nginx-deploy2-db98bd9d9-wfcmw     1/1     Running   1 (166m ago)   22h
nginx-server-ff5765f8-4p6sh       1/1     Running   0              31s
nginx-server-ff5765f8-4wbms       1/1     Running   0              16m
nginx-server-ff5765f8-lnkkg       1/1     Running   0              31s
查看记录
shell
[root@k8s-master01 nginx]# helm history nginx-server
REVISION	UPDATED                 	STATUS    	CHART       	APP VERSION	DESCRIPTION
1       	Sat Feb  3 15:57:33 2024	superseded	nginx-15.3.5	1.25.3     	Install complete
2       	Sat Feb  3 16:13:44 2024	deployed  	nginx-15.3.5	1.25.3     	Upgrade complete
回滚
shell
[root@k8s-master01 nginx]# helm rollback nginx-server 1验证回滚
shell
[root@k8s-master01 nginx]# kubectl get pod
NAME                              READY   STATUS    RESTARTS       AGE
nginx-deploy-5f87d95c-7ph78       1/1     Running   1 (170m ago)   23h
nginx-deploy-5f87d95c-dswvq       1/1     Running   1 (170m ago)   23h
nginx-deploy-5f87d95c-vk9vg       1/1     Running   1 (170m ago)   23h
nginx-deploy1-c8d58b5c7-7dfrd     1/1     Running   1 (170m ago)   23h
nginx-deploy1-c8d58b5c7-d2hd7     1/1     Running   1 (170m ago)   23h
nginx-deploy1-c8d58b5c7-pfvhn     1/1     Running   1 (170m ago)   23h
nginx-deploy2-db98bd9d9-2jl74     1/1     Running   1 (170m ago)   22h
nginx-deploy2-db98bd9d9-h67n6     1/1     Running   1 (170m ago)   22h
nginx-deploy2-db98bd9d9-wfcmw     1/1     Running   1 (170m ago)   22h
nginx-server-ff5765f8-lnkkg       1/1     Running   0              4m44s
御载
shell
[root@k8s-master01 nginx]# helm uninstall nginx-server#五、nginx的values.yaml模版
# Default values for nginx.                                 # 原始注释:说明这是 nginx 的默认 values 文件;新注释:文件用途说明
# This is a YAML-formatted file.                            # 原始注释:说明这是 YAML 格式;新注释:文件格式声明
# Declare variables to be passed into your templates.       # 原始注释:声明变量传递给模板;新注释:Helm 模板变量定义

# This will set the replicaset count more information can be found here: https://kubernetes.io/docs/concepts/workloads/controllers/replicaset/
replicaCount: 1                                             # 原始注释:设置副本数;新注释:Deployment 的 Pod 副本数量,默认 1

# This sets the container image more information can be found here: https://kubernetes.io/docs/concepts/containers/images/
image:                                                      # 原始注释:设置容器镜像;新注释:镜像配置块开始
  repository: nginx                                         # 镜像仓库名称
  # This sets the pull policy for images.                   # 原始注释:设置镜像拉取策略;新注释:注释说明 pullPolicy 的作用
  pullPolicy: IfNotPresent                                  # 拉取策略:本地有则不拉取
  # Overrides the image tag whose default is the chart appVersion.
  tag: ""                                                   # 原始注释:覆盖镜像 tag,默认为 chart 的 appVersion;新注释:留空则使用 appVersion

# This is for the secrets for pulling an image from a private repository more information can be found here: https://kubernetes.io/docs/tasks/configure-pod-container/pull-image-private-registry/
imagePullSecrets: []                                        # 原始注释:私有仓库拉取镜像的 secrets;新注释:列表,默认为空

# This is to override the chart name.                       # 原始注释:覆盖 chart 名称;新注释:下面两个字段用于覆盖资源名称
nameOverride: ""                                            # 覆盖 chart 名称部分
fullnameOverride: ""                                        # 覆盖完整资源名称

# This section builds out the service account more information can be found here: https://kubernetes.io/docs/concepts/security/service-accounts/
serviceAccount:                                             # 原始注释:构建 ServiceAccount;新注释:SA 配置块
  # Specifies whether a service account should be created.  # 原始注释:指定是否创建 ServiceAccount;新注释:布尔值
  create: true                                              # 创建 SA,默认 true
  # Automatically mount a ServiceAccount's API credentials? # 原始注释:是否自动挂载 API 凭证;新注释:自动挂载
  automount: true                                           # 自动挂载,默认 true
  # Annotations to add to the service account.              # 原始注释:添加到 SA 的注解;新注释:键值对
  annotations: {}                                           # 注解,默认为空
  # The name of the service account to use.                 # 原始注释:使用的 SA 名称;新注释:如不设置且 create=true,则自动生成
  # If not set and create is true, a name is generated using the fullname template.
  name: ""                                                  # SA 名称,留空自动生成

# This is for setting Kubernetes Annotations to a Pod.      # 原始注释:设置 Pod 的 Kubernetes 注解;新注释:下面字段用于注解
# For more information checkout: https://kubernetes.io/docs/concepts/overview/working-with-objects/annotations/
podAnnotations: {}                                          # Pod 注解,默认为空

# This is for setting Kubernetes Labels to a Pod.           # 原始注释:设置 Pod 的 Kubernetes 标签;新注释:下面字段用于标签
# For more information checkout: https://kubernetes.io/docs/concepts/overview/working-with-objects/labels/
podLabels: {}                                               # Pod 标签,默认为空

podSecurityContext: {}                                      # Pod 安全上下文,默认为空
  # fsGroup: 2000                                           # 示例:文件系统组 ID

securityContext: {}                                         # 容器安全上下文,默认为空
  # capabilities:                                           # 示例:Linux capabilities
  #   drop:
  #   - ALL
  # readOnlyRootFilesystem: true
  # runAsNonRoot: true
  # runAsUser: 1000

# This is for setting up a service more information can be found here: https://kubernetes.io/docs/concepts/services-networking/service/
service:                                                    # 原始注释:设置 Service;新注释:Service 配置块
  # This sets the service type more information can be found here: https://kubernetes.io/docs/concepts/services-networking/service/#publishing-services-service-types
  type: ClusterIP                                           # 原始注释:设置 Service 类型;新注释:ClusterIP(集群内部访问)
  # This sets the ports more information can be found here: https://kubernetes.io/docs/concepts/services-networking/service/#field-spec-ports
  port: 80                                                  # 原始注释:设置端口;新注释:Service 暴露的端口号

# This block is for setting up the ingress for more information can be found here: https://kubernetes.io/docs/concepts/services-networking/ingress/
ingress:                                                    # 原始注释:设置 Ingress;新注释:Ingress 配置块
  enabled: false                                            # 是否启用 Ingress
  className: ""                                             # Ingress 类名称
  annotations: {}                                           # Ingress 注解
    # kubernetes.io/ingress.class: nginx                    # 示例:指定 Ingress Controller
    # kubernetes.io/tls-acme: "true"
  hosts:                                                    # 主机列表
    - host: chart-example.local                             # 主机名
      paths:                                                # 路径列表
        - path: /                                           # 路径
          pathType: ImplementationSpecific                  # 路径类型(ImplementationSpecific)
  tls: []                                                   # TLS 配置列表

# -- Expose the service via gateway-api HTTPRoute            # 原始注释:通过 Gateway API HTTPRoute 暴露服务
# Requires Gateway API resources and suitable controller installed within the cluster
# (see: https://gateway-api.sigs.k8s.io/guides/)
httpRoute:                                                  # 原始注释:HTTPRoute 配置;新注释:需要 Gateway API 资源
  # HTTPRoute enabled.                                      # 原始注释:是否启用 HTTPRoute
  enabled: false                                            # 默认关闭
  # HTTPRoute annotations.                                  # 原始注释:HTTPRoute 注解
  annotations: {}                                           # 注解
  # Which Gateways this Route is attached to.               # 原始注释:该路由附加到的 Gateway
  parentRefs:                                               # 父引用列表
  - name: gateway                                           # Gateway 名称
    sectionName: http                                       # 端口名称
    # namespace: default                                    # 可选命名空间
  # Hostnames matching HTTP header.                         # 原始注释:匹配 HTTP header 的主机名
  hostnames:                                                # 主机名列表
  - chart-example.local                                     # 示例主机名
  # List of rules and filters applied.                      # 原始注释:应用的规则和过滤器列表
  rules:                                                    # 规则列表
  - matches:                                                # 匹配条件
    - path:                                                 # 路径匹配
        type: PathPrefix                                    # 路径前缀类型
        value: /headers                                     # 路径值
  #   filters:                                              # 过滤器示例(已注释)
  #   - type: RequestHeaderModifier
  #     requestHeaderModifier:
  #       set:
  #       - name: My-Overwrite-Header
  #         value: this-is-the-only-value
  #       remove:
  #       - User-Agent
  # - matches:                                              # 另一个匹配示例(已注释)
  #   - path:
  #       type: PathPrefix
  #       value: /echo
  #     headers:
  #     - name: version
  #       value: v2

resources: {}                                               # 资源配额配置,默认不设置
  # We usually recommend not to specify default resources and to leave this as a conscious
  # choice for the user. This also increases chances charts run on environments with little
  # resources, such as Minikube. If you do want to specify resources, uncomment the following
  # lines, adjust them as necessary, and remove the curly braces after 'resources:'.
  # limits:                                                 # 资源上限示例
  #   cpu: 100m
  #   memory: 128Mi
  # requests:                                               # 资源请求示例
  #   cpu: 100m
  #   memory: 128Mi

# This is to setup the liveness and readiness probes more information can be found here: https://kubernetes.io/docs/tasks/configure-pod-container/configure-liveness-readiness-startup-probes/
livenessProbe:                                              # 原始注释:设置存活探针和就绪探针;新注释:存活探针配置
  httpGet:                                                  # HTTP GET 方式
    path: /                                                 # 探测路径
    port: http                                              # 端口名称(http 对应 service.port 的端口)
readinessProbe:                                             # 就绪探针配置
  httpGet:                                                  # HTTP GET 方式
    path: /                                                 # 探测路径
    port: http                                              # 端口名称

# This section is for setting up autoscaling more information can be found here: https://kubernetes.io/docs/concepts/workloads/autoscaling/
autoscaling:                                                # 原始注释:设置自动扩缩(HPA);新注释:HPA 配置块
  enabled: false                                            # 是否启用 HPA,默认 false
  minReplicas: 1                                            # 最小副本数
  maxReplicas: 100                                          # 最大副本数
  targetCPUUtilizationPercentage: 80                        # 目标 CPU 使用率百分比
  # targetMemoryUtilizationPercentage: 80                   # 可选:目标内存使用率

# Additional volumes on the output Deployment definition.   # 原始注释:在 Deployment 中增加卷;新注释:额外卷列表
volumes: []                                                 # 卷列表,默认为空
  # - name: foo                                             # 示例卷
  #   secret:
  #     secretName: mysecret
  #     optional: false

# Additional volumeMounts on the output Deployment definition.
volumeMounts: []                                            # 额外卷挂载列表,默认为空
  # - name: foo
  #   mountPath: "/etc/foo"
  #   readOnly: true

nodeSelector: {}                                            # 节点选择器,默认为空

tolerations: []                                             # 容忍度,默认为空

affinity: {}                                                # 亲和性配置,默认为空
默认为空
- name: foo # 示例卷
secret:
secretName: mysecret
optional: false
Additional volumeMounts on the output Deployment definition.
volumeMounts: \[\] # 额外卷挂载列表,默认为空
- name: foo
mountPath: "/etc/foo"
readOnly: true
nodeSelector: {} # 节点选择器,默认为空
tolerations: \[\] # 容忍度,默认为空
affinity: {} # 亲和性配置,默认为空