原始工程 https://github.com/chelsea23311/Cat-Face-Landmark-Detection
猫脸关键点检测 (Cat Face Landmark Detection)
PyTorch License
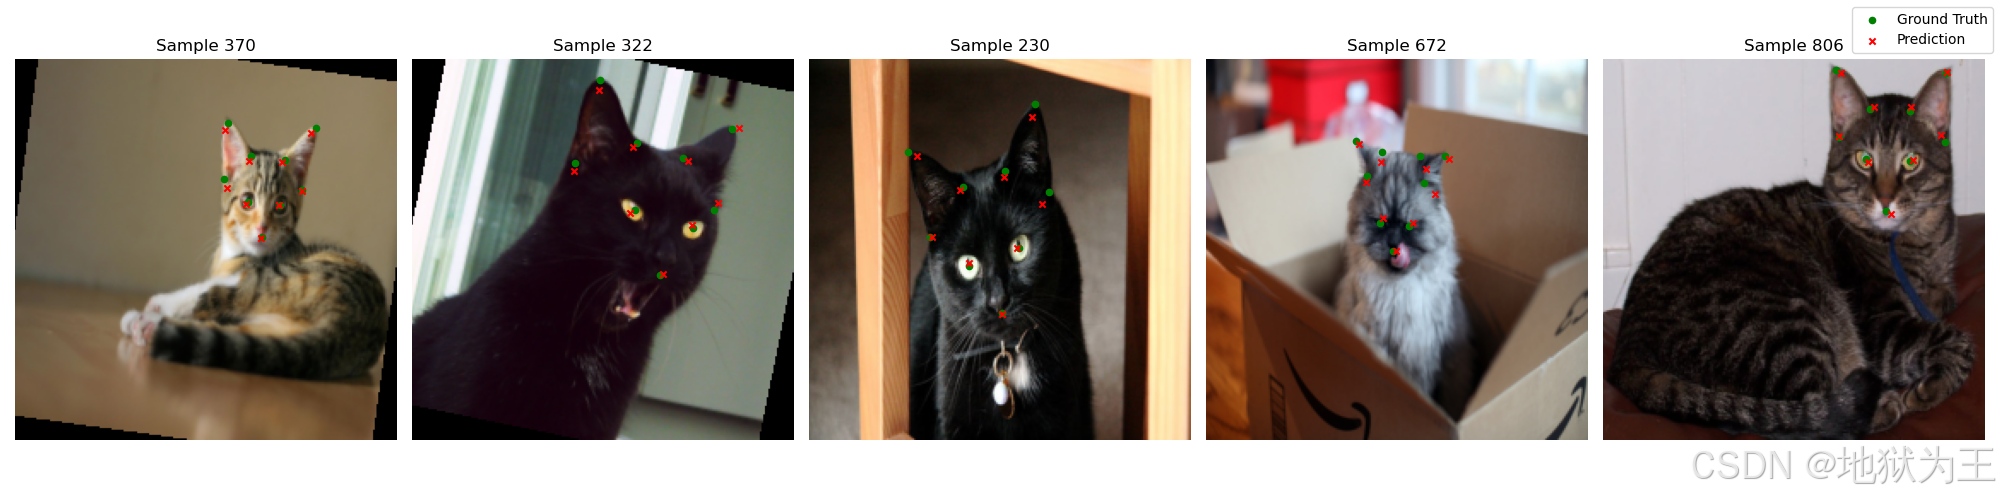
一个基于 ResNet-50 的深度学习项目,用于检测猫脸上的 9 个关键点(眼睛、鼻子、耳朵、嘴巴)。该项目包含完整的数据预处理、增强、训练、PCK/NME 评估以及错误案例分析流程。
模型转onnx
python
"""
将 best_cat_model.pth 导出为 ONNX 格式
=====================================================
模型来源: https://github.com/chelsea23311/Cat-Face-Landmark-Detection
网络结构: ResNet-50 backbone + Dropout(0.5) + Linear(2048, 18) + Sigmoid
输入: (1, 3, 224, 224) float32 RGB 已做 ImageNet 归一化
输出: (1, 18) float32 9个关键点坐标,已经 sigmoid 到 [0,1]
reshape → (9, 2) 后乘以 224 得到像素坐标
用法:
pip install torch torchvision onnx onnxsim onnxruntime
python export_cat_landmark_onnx.py --weights best_cat_model.pth --output cat_landmark.onnx --simplify
"""
import argparse
import os
from collections import OrderedDict
import torch
import torch.nn as nn
import torchvision.models as models
# ─────────────────────────────────────────────────────────────────────────────
# 模型定义 ------ 与 model.py 完全一致,无需依赖原始仓库
# ─────────────────────────────────────────────────────────────────────────────
class ResNet50(nn.Module):
"""
ResNet-50 猫脸关键点回归网络
输出 9 个关键点坐标,经 Sigmoid 归一化到 [0, 1]
顺序: 左眼, 右眼, 嘴, 左耳1, 左耳2, 左耳3, 右耳1, 右耳2, 右耳3
"""
def __init__(self, num_landmarks: int = 9):
super().__init__()
self.backbone = models.resnet50(weights=None) # 导出时不需要 pretrained 权重
num_ftrs = self.backbone.fc.in_features # 2048
self.backbone.fc = nn.Identity()
self.dropout = nn.Dropout(p=0.5)
self.fc = nn.Linear(num_ftrs, num_landmarks * 2)
def forward(self, x: torch.Tensor) -> torch.Tensor:
x = self.backbone(x) # (B, 2048)
x = self.dropout(x)
x = self.fc(x) # (B, 18)
return torch.sigmoid(x)
# ─────────────────────────────────────────────────────────────────────────────
# 工具函数
# ─────────────────────────────────────────────────────────────────────────────
def load_weights(model: nn.Module, weights_path: str, device: torch.device) -> nn.Module:
"""加载 .pth 权重,自动处理 DataParallel 的 'module.' 前缀"""
print(f" 加载权重: {weights_path}")
state_dict = torch.load(weights_path, map_location=device)
# 兼容 DataParallel 保存的 state_dict
if list(state_dict.keys())[0].startswith('module.'):
new_sd = OrderedDict()
for k, v in state_dict.items():
new_sd[k[7:]] = v # 去掉 'module.' 前缀
state_dict = new_sd
model.load_state_dict(state_dict, strict=True)
model.eval()
return model
# ─────────────────────────────────────────────────────────────────────────────
# 导出主函数
# ─────────────────────────────────────────────────────────────────────────────
def export(weights_path: str, output_path: str, simplify: bool = True, opset: int = 12):
device = torch.device('cpu')
# 1. 建模 & 加载权重
print("[1/4] 构建模型并加载权重 ...")
model = ResNet50(num_landmarks=9).to(device)
model = load_weights(model, weights_path, device)
# 2. 构造 dummy 输入
# 预处理与 predict.py 完全一致:
# - resize to 224×224
# - ToTensor (值域 0~1)
# - Normalize(mean=[0.485,0.456,0.406], std=[0.229,0.224,0.225])
dummy = torch.zeros(1, 3, 224, 224, dtype=torch.float32)
print("[2/4] 验证前向推理 ...")
with torch.no_grad():
out = model(dummy)
print(f" 输出 shape: {out.shape} (期望: [1, 18])")
assert out.shape == (1, 18), f"输出形状异常: {out.shape}"
# 3. 导出 ONNX
print(f"[3/4] 导出 ONNX (opset={opset}) → {output_path}")
torch.onnx.export(
model,
dummy,
output_path,
export_params=True,
opset_version=opset,
do_constant_folding=True,
input_names=['input'], # (1, 3, 224, 224)
output_names=['landmarks'], # (1, 18) [x0,y0, x1,y1, ..., x8,y8]
dynamic_axes=None, # 静态 shape,方便 Unity 使用
verbose=False,
)
print(" ONNX 文件已写入。")
# 4. 可选简化
if simplify:
try:
import onnx, onnxsim
print("[4/4] 使用 onnx-simplifier 简化计算图 ...")
model_onnx = onnx.load(output_path)
model_sim, ok = onnxsim.simplify(model_onnx)
if ok:
onnx.save(model_sim, output_path)
print(" 简化成功。")
else:
print(" 简化失败,保留原始 ONNX。")
except ImportError:
print("[4/4] 未安装 onnx/onnxsim,跳过简化。")
print(" 安装: pip install onnx onnx-simplifier")
else:
print("[4/4] 已跳过简化 (去掉 --simplify 参数)。")
# 5. ONNXRuntime 正确性验证
try:
import onnxruntime as ort
import numpy as np
sess = ort.InferenceSession(output_path, providers=['CPUExecutionProvider'])
inp = dummy.numpy()
outs = sess.run(None, {'input': inp})
print(f"\n[OK] ONNXRuntime 验证通过。输出 shape: {outs[0].shape}")
# 输出坐标范围应在 [0, 1]
print(f" 坐标值范围: [{outs[0].min():.4f}, {outs[0].max():.4f}] (期望 0~1)")
except ImportError:
print("\n[INFO] 未安装 onnxruntime,跳过验证。")
file_size = os.path.getsize(output_path) / 1024 / 1024
print(f"\n完成!模型已保存: {output_path} ({file_size:.1f} MB)")
print("\n预处理合同 (Unity 端必须保持一致)")
print(" 1. 将输入图像 resize 到 224×224 (RGB)")
print(" 2. 各通道除以 255 归一化到 [0,1]")
print(" 3. 减均值: R-=0.485, G-=0.456, B-=0.406")
print(" 4. 除标准差: R/=0.229, G/=0.224, B/=0.225")
print(" 5. 排列为 NCHW float32: shape (1, 3, 224, 224)")
print(" 输出: (1, 18) → reshape 为 (9, 2) → 每个值乘以 224 得像素坐标")
print(" 关键点顺序: 左眼 右眼 嘴 左耳1 左耳2 左耳3 右耳1 右耳2 右耳3")
if __name__ == '__main__':
parser = argparse.ArgumentParser(description='导出猫脸关键点模型为 ONNX')
parser.add_argument('--weights', default='best_cat_model.pth', help='.pth 权重路径')
parser.add_argument('--output', default='cat_landmark.onnx', help='输出 .onnx 路径')
parser.add_argument('--opset', default=12, type=int, help='ONNX opset 版本 (默认 12)')
parser.add_argument('--simplify', action='store_true', help='使用 onnx-simplifier 简化')
args = parser.parse_args()
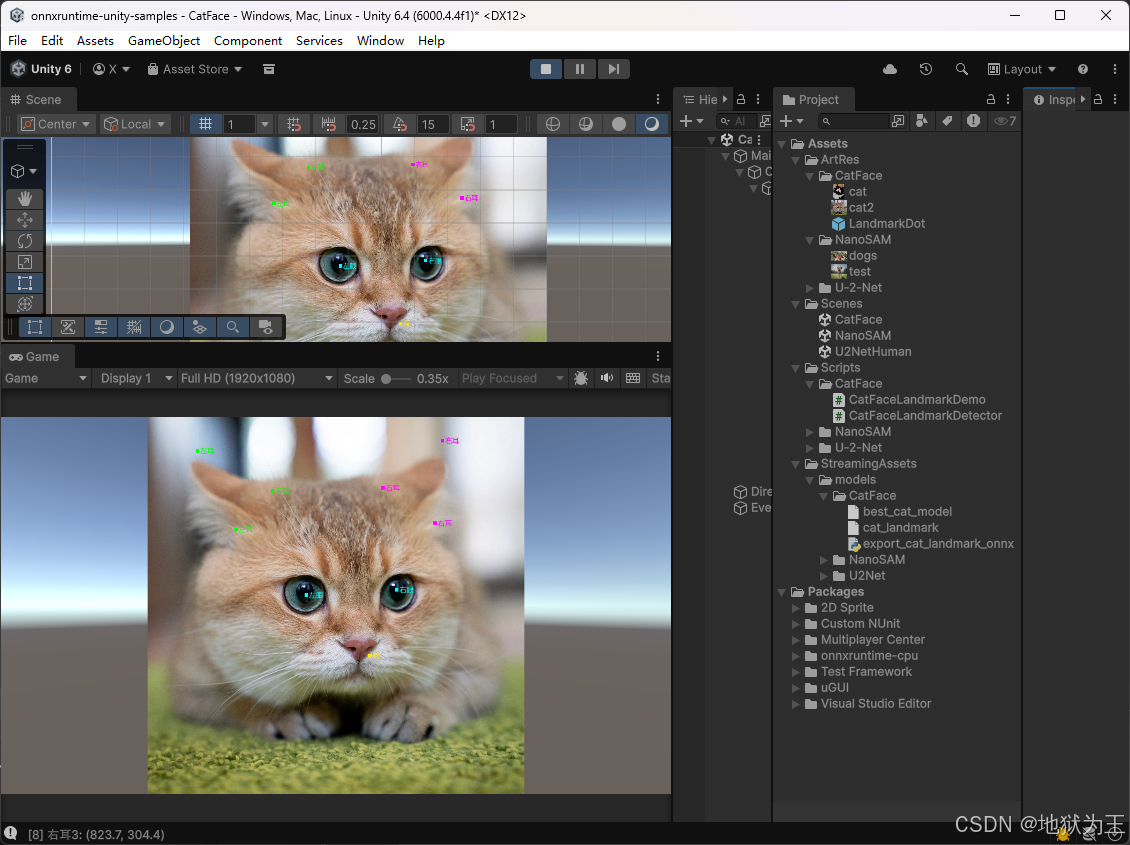
export(args.weights, args.output, args.simplify, args.opset)Unity 集成
工程添加以下包
https://github.com/xue-fei/onnxruntime-unity.git
https://github.com/xue-fei/onnxruntime-unity-cpu.git
https://github.com/xue-fei/onnxruntime-unity-cuda.git
https://github.com/xue-fei/onnxruntime-unity-directml.git
csharp
// =====================================================================
// Unity 猫脸关键点检测推理脚本
// 模型: cat_landmark.onnx (ResNet-50, 9 关键点)
// 依赖: Microsoft.ML.OnnxRuntime >= 1.17
// 输出关键点顺序:
//   0=左眼  1=右眼  2=嘴
//   3=左耳1 4=左耳2 5=左耳3
//   6=右耳1 7=右耳2 8=右耳3
// =====================================================================

using System;
using System.Collections.Generic;
using System.IO;
using System.Linq;
using Microsoft.ML.OnnxRuntime;
using Microsoft.ML.OnnxRuntime.Tensors;
using UnityEngine;

public class CatFaceLandmarkDetector : MonoBehaviour
{
    // ── Inspector 配置 ────────────────────────────────────────────────
    [Header("模型文件")]
    [Tooltip("放在 StreamingAssets/ 下的 onnx 文件名")]
    public string modelFileName = "models/cat_landmark.onnx";

    [Header("可视化 (可选)")]
    [Tooltip("挂载后会在 OnGUI 中绘制关键点,调试用")]
    public bool showDebugGUI = true;

    // ── 常量:与 Python 预处理完全一致 ───────────────────────────────
    private const int INPUT_SIZE = 224;

    // ImageNet 均值 / 标准差,RGB 顺序
    private static readonly float[] MEAN = { 0.485f, 0.456f, 0.406f };
    private static readonly float[] STD = { 0.229f, 0.224f, 0.225f };

    private static readonly string[] LANDMARK_NAMES =
    {
        "左眼", "右眼", "嘴",
        "左耳1", "左耳2", "左耳3",
        "右耳1", "右耳2", "右耳3"
    };

    // ── 私有成员 ──────────────────────────────────────────────────────
    private InferenceSession _session;
    private Vector2[] _lastLandmarks;
    private int _lastOrigW, _lastOrigH;

    // ─────────────────────────────────────────────────────────────────
    // 生命周期
    // ─────────────────────────────────────────────────────────────────
    private void Awake()
    {
        LoadModel();
    }

    private void OnDestroy()
    {
        _session?.Dispose();
    }

    // ─────────────────────────────────────────────────────────────────
    // 公开 API
    // ─────────────────────────────────────────────────────────────────

    /// <summary>
    /// 对输入 Texture2D 做关键点检测。
    /// 返回 9 个关键点在原图像素坐标系中的位置(左上角原点,Y 向下)。
    /// </summary>
    public Vector2[] Detect(Texture2D srcTexture)
    {
        if (_session == null)
        {
            Debug.LogError("[CatLandmark] 模型尚未加载!");
            return null;
        }

        _lastOrigW = srcTexture.width;
        _lastOrigH = srcTexture.height;

        float[] inputData = Preprocess(srcTexture);
        float[] rawOutput = RunInference(inputData);   // 长度 18
        _lastLandmarks = RestoreCoordinates(rawOutput, _lastOrigW, _lastOrigH);
        return _lastLandmarks;
    }

    // ─────────────────────────────────────────────────────────────────
    // 模型加载
    // ─────────────────────────────────────────────────────────────────
    private void LoadModel()
    {
        string modelPath = Path.Combine(Application.streamingAssetsPath, modelFileName);
        if (!File.Exists(modelPath))
            throw new FileNotFoundException($"[CatLandmark] 找不到模型: {modelPath}");

        var opts = new SessionOptions();
        opts.GraphOptimizationLevel = GraphOptimizationLevel.ORT_ENABLE_ALL;
        opts.AppendExecutionProvider_CUDA(0);
        _session = new InferenceSession(modelPath, opts);
        Debug.Log($"[CatLandmark] 模型加载成功: {modelPath}");
    }

    // ─────────────────────────────────────────────────────────────────
    // 预处理
    //   输入: 任意尺寸 Texture2D (RGB)
    //   输出: float[3 * 224 * 224]  NCHW,已做 ImageNet 归一化
    //
    //   与 predict.py transforms.Compose 完全一致:
    //     Resize(224) → ToTensor(÷255) → Normalize(mean, std)
    // ─────────────────────────────────────────────────────────────────
    private float[] Preprocess(Texture2D src)
    {
        // Step 1: GPU Blit resize 到 224×224
        RenderTexture rt = RenderTexture.GetTemporary(
            INPUT_SIZE, INPUT_SIZE, 0, RenderTextureFormat.ARGB32);
        Graphics.Blit(src, rt);
        RenderTexture.active = rt;

        Texture2D resized = new Texture2D(INPUT_SIZE, INPUT_SIZE, TextureFormat.RGB24, false);
        resized.ReadPixels(new Rect(0, 0, INPUT_SIZE, INPUT_SIZE), 0, 0);
        resized.Apply();

        RenderTexture.active = null;
        RenderTexture.ReleaseTemporary(rt);

        Color32[] pixels = resized.GetPixels32();
        Destroy(resized);

        // Step 2: NCHW float + ImageNet 归一化
        // Unity GetPixels32 (0,0) 在左下角,需垂直翻转
        float[] data = new float[3 * INPUT_SIZE * INPUT_SIZE];
        int area = INPUT_SIZE * INPUT_SIZE;

        for (int row = 0; row < INPUT_SIZE; row++)
        {
            int srcRow = INPUT_SIZE - 1 - row;  // 翻转 Y 轴
            for (int col = 0; col < INPUT_SIZE; col++)
            {
                Color32 c = pixels[srcRow * INPUT_SIZE + col];

                float r = (c.r / 255f - MEAN[0]) / STD[0];
                float g = (c.g / 255f - MEAN[1]) / STD[1];
                float b = (c.b / 255f - MEAN[2]) / STD[2];

                int idx = row * INPUT_SIZE + col;
                data[0 * area + idx] = r;   // channel R
                data[1 * area + idx] = g;   // channel G
                data[2 * area + idx] = b;   // channel B
            }
        }

        return data;
    }

    // ─────────────────────────────────────────────────────────────────
    // ONNX 推理
    //
    // 修复说明(对应三处编译错误):
    //   错误1/2: DenseTensor<T>(float[], long[]) 构造函数不存在
    //     → 改用 DenseTensor<T>(Memory<T>, ReadOnlySpan<int>)
    //       其中 dims 用 int[] 而非 long[]
    //   错误3: Tensor<T>.Buffer 属性不存在
    //     → 改用 .ToArray(),所有 OnnxRuntime 版本均支持
    // ─────────────────────────────────────────────────────────────────
    private float[] RunInference(float[] inputData)
    {
        // ✅ 修复1/2:Memory<float> + int[] 维度,不再使用 long[]
        var memory = new System.Memory<float>(inputData);
        int[] dims = { 1, 3, INPUT_SIZE, INPUT_SIZE };
        var tensor = new DenseTensor<float>(memory, dims);

        var inputs = new List<NamedOnnxValue>
        {
            NamedOnnxValue.CreateFromTensor("input", tensor)
        };

        using var results = _session.Run(inputs);

        // ✅ 修复3:用 .ToArray() 替代 .Buffer.Span
        var outputTensor = results.First(r => r.Name == "landmarks").AsTensor<float>();
        return outputTensor.ToArray();   // float[18]
    }

    // ─────────────────────────────────────────────────────────────────
    // 坐标还原
    //   输出 18 个 [0,1] 归一化坐标 → 原图像素坐标
    //   对应 predict.py: pred.reshape(9,2) * IMG_SIZE → 再按原图缩放
    // ─────────────────────────────────────────────────────────────────
    private static Vector2[] RestoreCoordinates(float[] raw, int origW, int origH)
    {
        var pts = new Vector2[9];
        for (int i = 0; i < 9; i++)
        {
            pts[i] = new Vector2(
                raw[i * 2 + 0] * origW,
                raw[i * 2 + 1] * origH);
        }
        return pts;
    }

    // ─────────────────────────────────────────────────────────────────
    // 调试:在 Game 视图叠加显示关键点
    // ─────────────────────────────────────────────────────────────────
    private void OnGUI()
    {
        if (!showDebugGUI || _lastLandmarks == null) return;

        float scaleX = Screen.width / (float)_lastOrigW;
        float scaleY = Screen.height / (float)_lastOrigH;

        GUIStyle style = new GUIStyle(GUI.skin.label) { fontSize = 10 };

        for (int i = 0; i < _lastLandmarks.Length; i++)
        {
            float sx = _lastLandmarks[i].x * scaleX;
            float sy = _lastLandmarks[i].y * scaleY;

            GUI.color = GetLandmarkColor(i);
            GUI.DrawTexture(new Rect(sx - 4, sy - 4, 8, 8), Texture2D.whiteTexture);

            GUI.color = Color.white;
            GUI.Label(new Rect(sx + 5, sy - 6, 60, 16), LANDMARK_NAMES[i], style);
        }

        GUI.color = Color.white;
    }

    private static Color GetLandmarkColor(int idx) => idx switch
    {
        0 or 1 => Color.cyan,
        2 => Color.yellow,
        3 or 4 or 5 => Color.green,
        _ => Color.magenta
    };
}

// ─────────────────────────────────────────────────────────────────────────────
// 结果结构体(供外部调用者使用)
// ─────────────────────────────────────────────────────────────────────────────
[Serializable]
public struct CatLandmarkResult
{
    /// <summary>9 个关键点,原图像素坐标(左上角原点,Y 向下)</summary>
    public Vector2[] Points;

    public static readonly string[] Names =
    {
        "左眼", "右眼", "嘴",
        "左耳1", "左耳2", "左耳3",
        "右耳1", "右耳2", "右耳3"
    };

    public override string ToString()
    {
        if (Points == null) return "CatLandmarkResult(empty)";
        var sb = new System.Text.StringBuilder();
        for (int i = 0; i < Points.Length; i++)
            sb.AppendLine($"  [{i}] {Names[i]}: ({Points[i].x:F1}, {Points[i].y:F1})");
        return sb.ToString();
    }
}
csharp
using System.Collections;
using UnityEngine;
using UnityEngine.UI;

[RequireComponent(typeof(CatFaceLandmarkDetector))]
public class CatFaceLandmarkDemo : MonoBehaviour
{
    // ── Inspector 配置 ────────────────────────────────────────────────
    [Header("输入图片")]
    [Tooltip("Texture2D")]
    public Texture2D _currentTexture;

    [Header("UI 显示")]
    [Tooltip("场景中用于显示猫脸图片的 RawImage(Canvas 下)")]
    public RawImage displayImage;

    [Tooltip("关键点标记 Prefab,建议用一个小圆 UI Image(Pivot 设为 0.5,0.5)")]
    public GameObject landmarkDotPrefab;

    [Tooltip("关键点标签字体大小")]
    public int labelFontSize = 12;

    // ── 运行时状态 ────────────────────────────────────────────────────
    private CatFaceLandmarkDetector _detector;
    private GameObject[] _dotObjects;   // 9 个关键点点对象
    private Text[] _labelTexts;   // 9 个标签文字

    // 关键点颜色
    private static readonly Color[] DOT_COLORS =
    {
        Color.cyan,    // 0 左眼
        Color.cyan,    // 1 右眼
        Color.yellow,  // 2 嘴
        Color.green,   // 3 左耳1
        Color.green,   // 4 左耳2
        Color.green,   // 5 左耳3
        Color.magenta, // 6 右耳1
        Color.magenta, // 7 右耳2
        Color.magenta, // 8 右耳3
    };

    private static readonly string[] LANDMARK_NAMES =
    {
        "左眼", "右眼", "嘴",
        "左耳1", "左耳2", "左耳3",
        "右耳1", "右耳2", "右耳3"
    };

    // ─────────────────────────────────────────────────────────────────
    // 生命周期
    // ─────────────────────────────────────────────────────────────────
    private void Awake()
    {
        displayImage.texture = _currentTexture;
        displayImage.SetNativeSize();
        _detector = GetComponent<CatFaceLandmarkDetector>();
        // 关闭 Detector 自带的 OnGUI 调试显示,由本脚本统一管理 UI
        _detector.showDebugGUI = false;
    }

    private void Start()
    {
        StartCoroutine(LoadAndInfer());
    }

    private void Update()
    {
        // 按空格重新推理
        if (Input.GetKeyDown(KeyCode.Space))
            StartCoroutine(LoadAndInfer());
    }

    // ─────────────────────────────────────────────────────────────────
    // 主流程:加载图片 → 推理 → 显示结果
    // ─────────────────────────────────────────────────────────────────
    private IEnumerator LoadAndInfer()
    {
        // ── 3. 显示原图到 UI RawImage ─────────────────────────────────
        if (displayImage != null)
        {
            displayImage.texture = _currentTexture;
            // 保持图片原始宽高比
            FitRawImageToTexture(displayImage, _currentTexture);
        }

        // 等一帧,确保 UI Layout 更新完毕后再计算坐标映射
        yield return null;

        // ── 4. 推理 ───────────────────────────────────────────────────
        Debug.Log($"[Demo] 开始推理,图片尺寸: {_currentTexture.width}×{_currentTexture.height}");
        Vector2[] landmarks = _detector.Detect(_currentTexture);

        if (landmarks == null || landmarks.Length != 9)
        {
            Debug.LogError("[Demo] 推理失败或输出异常");
            yield break;
        }

        // ── 5. 打印结果到 Console ─────────────────────────────────────
        Debug.Log("[Demo] 推理完成!关键点坐标(原图像素):");
        for (int i = 0; i < 9; i++)
            Debug.Log($"  [{i}] {LANDMARK_NAMES[i]}: ({landmarks[i].x:F1}, {landmarks[i].y:F1})");

        // ── 6. 在 UI 上绘制关键点 ─────────────────────────────────────
        if (displayImage != null && landmarkDotPrefab != null)
            DrawLandmarksOnUI(landmarks, _currentTexture.width, _currentTexture.height);
    }

    // ─────────────────────────────────────────────────────────────────
    // 在 UI RawImage 上绘制 9 个关键点
    //
    //   坐标映射:
    //     原图坐标 (px, py) 范围 [0, origW] × [0, origH]
    //     → RawImage 的 AnchoredPosition
    //
    //   注意:
    //     RawImage 的坐标原点在中心(UI 默认),Y 轴向上
    //     原图坐标原点在左上角,Y 轴向下
    //     需要做两步转换:
    //       uiX =  (px / origW - 0.5) * rectW
    //       uiY = -(py / origH - 0.5) * rectH
    // ─────────────────────────────────────────────────────────────────
    private void DrawLandmarksOnUI(Vector2[] landmarks, int origW, int origH)
    {
        // 清除旧的点
        ClearDots();

        _dotObjects = new GameObject[9];
        _labelTexts = new Text[9];

        Rect imgRect = displayImage.rectTransform.rect;
        float rectW = imgRect.width;
        float rectH = imgRect.height;

        for (int i = 0; i < 9; i++)
        {
            // ── 坐标转换 ──────────────────────────────────────────────
            float normX = landmarks[i].x / origW;       // [0, 1]
            float normY = landmarks[i].y / origH;       // [0, 1]
            float uiX = (normX - 0.5f) * rectW;      // UI X(中心为0)
            float uiY = -(normY - 0.5f) * rectH;      // UI Y(中心为0,翻转Y)

            // ── 实例化关键点 Prefab ───────────────────────────────────
            GameObject dot = Instantiate(landmarkDotPrefab, displayImage.transform);
            RectTransform dotRT = dot.GetComponent<RectTransform>();
            if (dotRT != null)
            {
                dotRT.anchorMin = new Vector2(0.5f, 0.5f);
                dotRT.anchorMax = new Vector2(0.5f, 0.5f);
                dotRT.pivot = new Vector2(0.5f, 0.5f);
                dotRT.anchoredPosition = new Vector2(uiX, uiY);
                dotRT.sizeDelta = new Vector2(10f, 10f);
            }

            // 设置颜色
            Image dotImg = dot.GetComponent<Image>();
            if (dotImg != null)
                dotImg.color = DOT_COLORS[i];

            // ── 添加标签文字 ──────────────────────────────────────────
            GameObject labelObj = new GameObject($"Label_{LANDMARK_NAMES[i]}");
            labelObj.transform.SetParent(displayImage.transform, false);
            RectTransform labelRT = labelObj.AddComponent<RectTransform>();
            labelRT.anchorMin = new Vector2(0.5f, 0.5f);
            labelRT.anchorMax = new Vector2(0.5f, 0.5f);
            labelRT.pivot = new Vector2(0f, 0.5f);
            labelRT.anchoredPosition = new Vector2(uiX + 8f, uiY);
            labelRT.sizeDelta = new Vector2(50f, 24f);

            Text label = labelObj.AddComponent<Text>();
            label.text = LANDMARK_NAMES[i];
            label.fontSize = labelFontSize;
            label.color = DOT_COLORS[i];
            label.font = Resources.GetBuiltinResource<Font>("LegacyRuntime.ttf");
            label.alignment = TextAnchor.MiddleLeft;

            _dotObjects[i] = dot;
            _labelTexts[i] = label;
        }
    }

    // ─────────────────────────────────────────────────────────────────
    // 清除上一次的关键点 UI 对象
    // ─────────────────────────────────────────────────────────────────
    private void ClearDots()
    {
        if (_dotObjects != null)
        {
            foreach (var d in _dotObjects)
                if (d != null) Destroy(d);
            _dotObjects = null;
        }
        if (_labelTexts != null)
        {
            foreach (var t in _labelTexts)
                if (t != null) Destroy(t.gameObject);
            _labelTexts = null;
        }
    }

    // ─────────────────────────────────────────────────────────────────
    // 让 RawImage 保持图片宽高比填充
    // ─────────────────────────────────────────────────────────────────
    private void FitRawImageToTexture(RawImage img, Texture2D tex)
    {
        float texAspect = (float)tex.width / tex.height;
        RectTransform rt = img.rectTransform;
        float containerW = rt.rect.width > 0 ? rt.rect.width : Screen.width;
        float containerH = rt.rect.height > 0 ? rt.rect.height : Screen.height;
        float containerAsp = containerW / containerH;

        if (texAspect > containerAsp)
        {
            // 宽度撑满,高度等比收缩
            img.uvRect = new Rect(0, (1f - containerAsp / texAspect) / 2f,
                                  1f, containerAsp / texAspect);
        }
        else
        {
            // 高度撑满,宽度等比收缩
            img.uvRect = new Rect((1f - texAspect / containerAsp) / 2f, 0,
                                  texAspect / containerAsp, 1f);
        }
    }

    private void OnDestroy()
    {
        ClearDots();
    }
}
Unity运行效果图