1.基础知识
工具链用户手册中提供了 profiler debug 工具的使用教程,对于常规流程,大家可参考官方用户手册。本文主要基于一些典型场景进行使用上的介绍。
在出现精度问题时,且排除前后处理问题后,可以使用 profiler debug 工具进行分析,排查过程中,涉及到几种模型,这里先做说明: 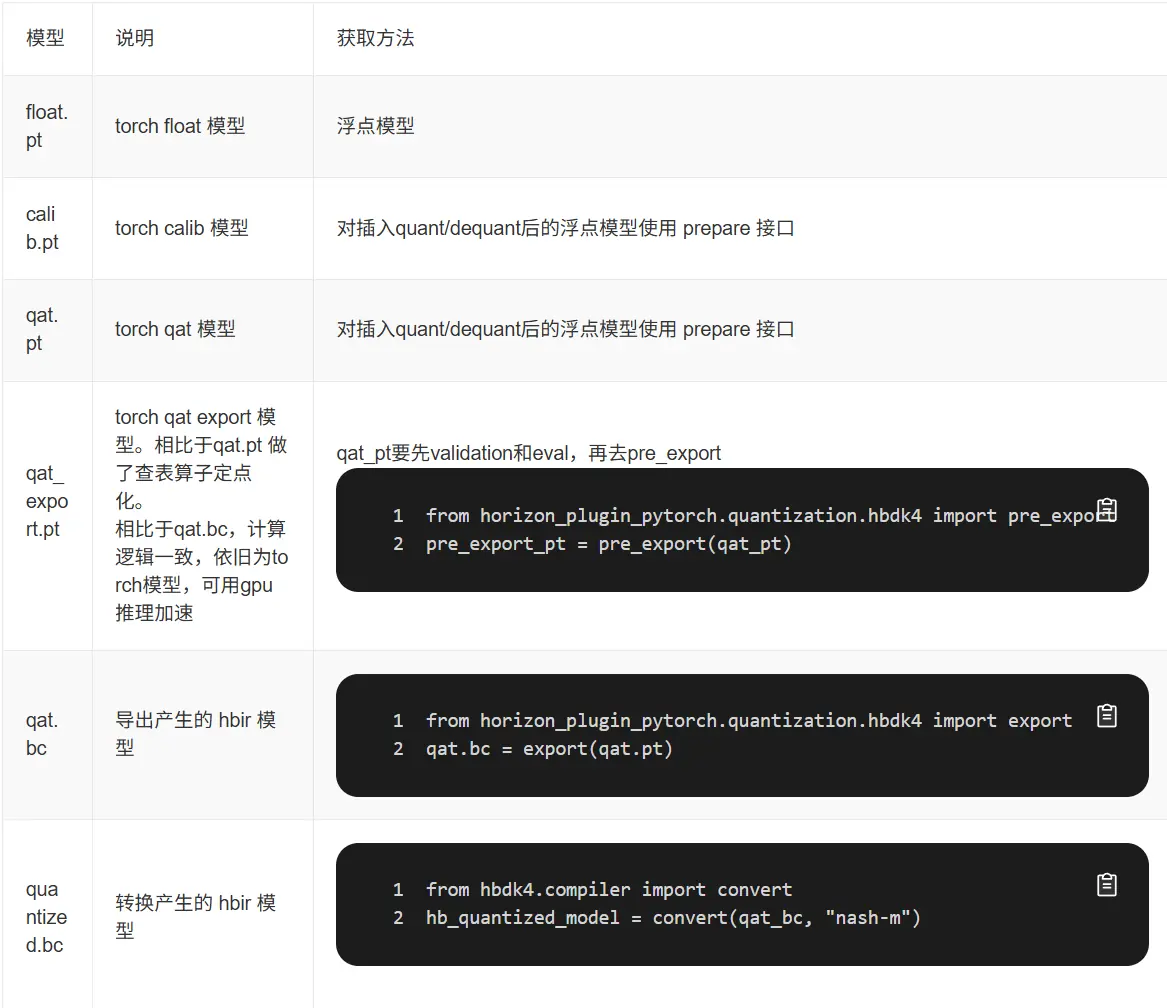
2.profiler debug 工具使用场景
当 calib 精度不符合预期时,可以使用 profiler debug 工具进行 float_model vs calib_model 的 debug。
当定位精度损失发生在 export / convert 阶段时,优先尝试高一致性策略。若依旧不行,可以使用 profiler debug 工具对比:
- qat_pt vs pre_export_pt
- pre_export_pt vs quantized_bc
下面先介绍高一致性 QAT 策略,再通过一个 case 介绍 profiler debug 工具的使用方法。
2.1 高一致性 QAT 策略【beta 功能】
注意:
- 高一致性策略对查表转定点无影响,主要影响 convert 前后的一致性
- level0 全局开启会对 latency 有负面影响,大约 10~20%,甚至出现过 40% 的情况
- level2 对 latency 有正面收益,推荐优先使用 level2
- 高一致性策略仅适用于 J6EM
- 实现方式未来会进行优化,请大家使用时关注用户手册《QAT-训练部署一致性-高一致性 QAT 策略》章节
高一致性策略封装在 horizon_plugin_pytorch.qat_mode.ConsistencyStrategy 下,可以使用 set_consistency_level 接口设置策略。
当前支持五个等级( 0 - 4 )的策略,等级越高,一致性越好,但 QAT 精度可能受到轻微影响。推荐直接使用 level 2,在绝大多数情况下对 QAT 精度无影响,甚至可以改善因截断误差引起的精度问题,对性能和一致性有正收益。
对于未使用高一致性策略得到的 QAT 模型,如果希望不重训 获得一致性更高的定点模型,可以在 prepare export 模型前 设置一致性策略等级为 0(不重训的情况下只有 level 0 有效,level 1 - 4 需要设置等级后重训模型)。
Plain
from horizon_plugin_pytorch.qat_mode import ConsistencyStrategy

# 必须在 prepare 之前设置一致性策略
ConsistencyStrategy.set_consistency_level(2)
...
qat_pt = prepare(float_model)
...
qat_bc = export(qat_pt, example_inputs)
# 如果在prepare前设置 ConsistencyStrategy.set_consistency_level(0), 可以做如下检查
# print(qat_bc._high_precision_qpp)    # 需要是 true,不要用assert检查
level2 在 convert 阶段,linear 与 conv 会有一个 scale 的误差,其它 op 是对齐的
level4 在 convert 阶段,linear 与 conv 也会有一个 scale 的误差,但概率会降低到万分之几
linear 与 conv 将 bias 去掉,level4 在 convert 阶段将没有误差
2.2 profiler debug 工具用法
2.2.1 calib 产生的误差
float 精度与可视化正常,calib 精度差很多,运行该阶段 debug
Plain
from horizon_plugin_profiler import QuantAnalysis

# float.pt和calib.pt跑一致性敏感度和逐层对比
qa = QuantAnalysis(float_pt, calib_pt, "fake_quant", out_dir="./float_vs_calib")
qa.set_bad_case(bad_example_input)
qa.run()
qa.compare_per_layer()
qa.sensitivity()
2.2.2 pre_export 转查表 产生的误差
qat_pt 精度与可视化正常,pre_export_pt 精度 与 可视化不正常,运行该阶段的 debug
Plain
from horizon_plugin_profiler import QuantAnalysis
from horizon_plugin_pytorch.quantization.hbdk4 import pre_export

# qat.pt和qat.export.pt跑一致性敏感度和逐层对比
qa = QuantAnalysis(qat_pt, pre_export_pt, "pre_export", out_dir="./qatpt_vs_qatexportpt")
qa.set_bad_case(bad_example_input)
qa.run()
qa.compare_per_layer()
qa.sensitivity()
2.2.3 export 非转查表 产生的误差
pre_export_pt 精度与可视化正常,qat_bc 可视化不正常,运行该阶段的 debug
Plain
from horizon_plugin_profiler import QuantAnalysis

qa = QuantAnalysis(pre_export_pt, qat_bc, "export", out_dir="./pre_export_pt_vs_qatbc")
# torch 与 bc 可接受同一格式输入时,一起跑统计量
qa.set_bad_case(badcase)
qa.run()

# torch 与 bc 不可接受同一格式输入时,分开跑统计量,pt_badcase 与 bc_badcase 除格式外全部相同。
qa.set_bad_case(pt_badcase)
qa.run(run_baseline_model=True, run_analysis_model=False)
2.2.4 convert 产生的误差
pre_export_pt 精度与可视化正常,qat_bc 可视化正常,quantized.bc 精度与可视化不正常,运行该阶段的 debug
Plain
from horizon_plugin_profiler import QuantAnalysis
from horizon_plugin_pytorch.quantization.hbdk4 import pre_export

# qat.bc 和 quantized.bc 跑逐层对比
qa = QuantAnalysis(qat_bc, quantized_bc, "convert", out_dir="./qatbc_vs_quantizedbc")
qa.set_bad_case(bad_example_input)
qa.run()
qa.compare_per_layer()

# qat.export.pt 跑一致性敏感度,quantzed_bc起到占位作用
2.3 profiler debug 工具实例
2.3.1 标准实例
全流程示例代码如下,注意区分不同阶段的输入是什么、不同 debug 时的配置参数是什么。
Plain
import torch
import torch.nn as nn
from typing import Dict, List
from hbdk4.compiler import load, Hbm
from horizon_plugin_pytorch import set_march, March
set_march(March.NASH_E)
from horizon_plugin_pytorch.quantization import prepare, set_fake_quantize, FakeQuantState
from horizon_plugin_pytorch.quantization import QuantStub
from horizon_plugin_pytorch.quantization.hbdk4 import export
from horizon_plugin_pytorch.quantization.qconfig_template import calibration_8bit_weight_16bit_act_qconfig_setter
2.3.2 input 中存在"task"字符串
模型输入形式 inputs:dictstr, tensor + task:liststr,task 只用于决定模型 forward 走什么任务,实际并不会作为最终部署的输入 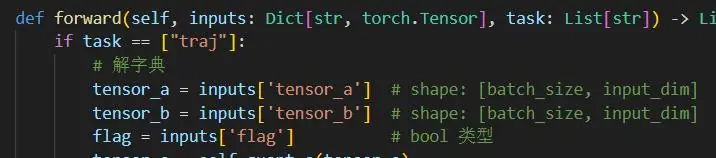
在 float 推理时,给的 example_input 示例如下: 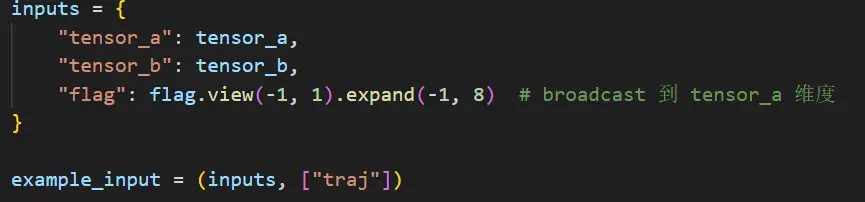
思考:
- float+calib+export 阶段需要有 task 输入,这是为了知道运行哪些任务
- 进行 float vs calib 的 debug 时,浮点模型结构,需要知道运行哪儿,输入需要加 task
- 进行 qat.bc vs quantized.bc 的 debug 时,bc 模型结构已确定,bc 的输入中不包含 task 参数,所以输入不能加 task
全流程示例代码如下,注意区分不同阶段的输入是什么、不同 debug 时的配置参数是什么。
Plain
import torch
import torch.nn as nn
from typing import Dict, List
from hbdk4.compiler import load, Hbm
from horizon_plugin_pytorch import set_march, March
set_march(March.NASH_E)
from horizon_plugin_pytorch.quantization import prepare, set_fake_quantize, FakeQuantState
from horizon_plugin_pytorch.quantization import QuantStub
from horizon_plugin_pytorch.quantization.hbdk4 import export
from horizon_plugin_pytorch.quantization.qconfig_template import calibration_8bit_weight_16bit_act_qconfig_setter
2.3.3 后处理添加与去除
debug 时如何添加后处理
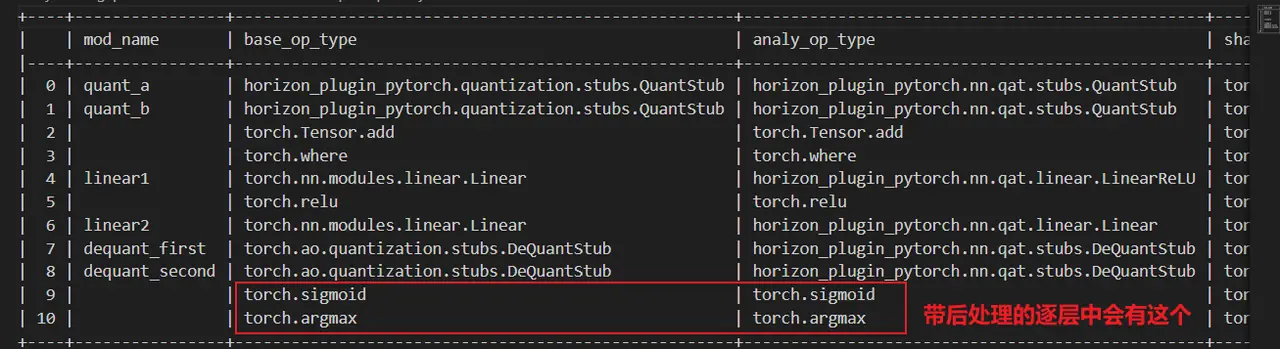
debug 分析时,经常会遇到模型后处理应该怎么办的问题,相关的介绍如下: 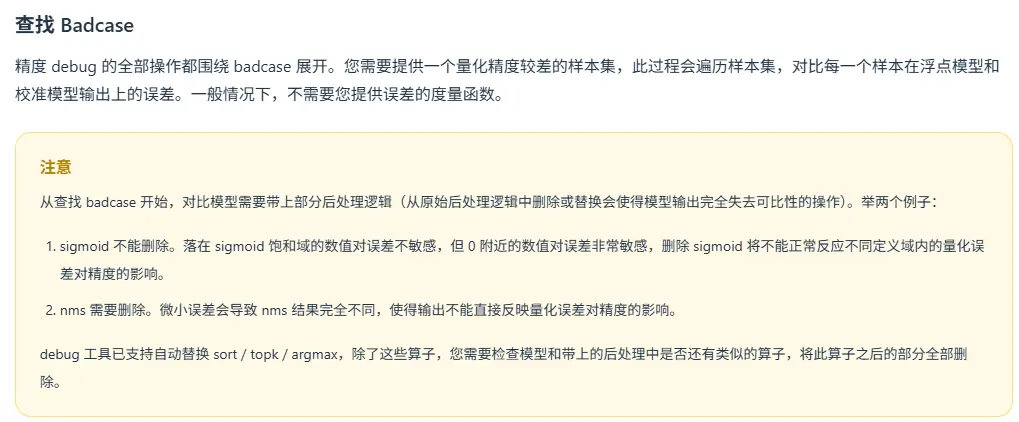
如果希望将后处理带在 debug 工具中,可参考如下写法: 
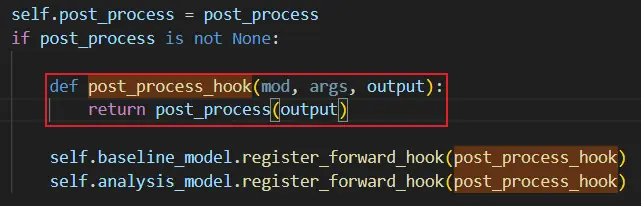
后处理封装为一个 class 时,对应的示例代码如下:
Plain
import torch
import torch.nn as nn
from typing import Dict, List
from hbdk4.compiler import load, Hbm
from horizon_plugin_pytorch import set_march, March
from horizon_plugin_pytorch.quantization import prepare, set_fake_quantize, FakeQuantState
from horizon_plugin_pytorch.quantization import QuantStub
from horizon_plugin_pytorch.quantization.hbdk4 import export
from horizon_plugin_pytorch.quantization.qconfig_template import calibration_8bit_weight_16bit_act_qconfig_setter
from torch.quantization import DeQuantStub
上述示例对应的产出物中,会有对应后处理的相关信息: