ENV
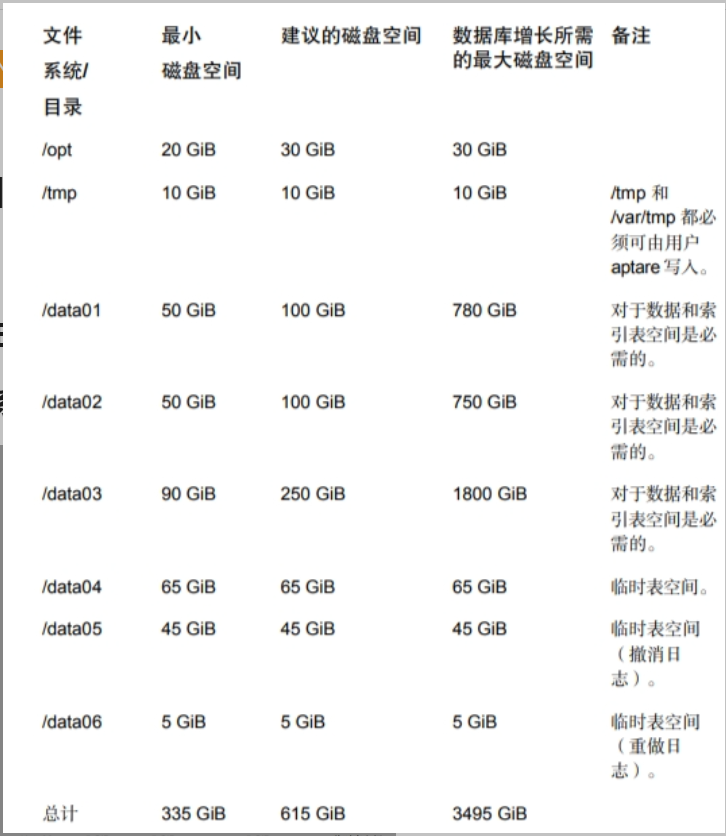
系统资源
Total physical memory (currently 7821 MB) must be greater than 12288 MB.戏
Total swap memory (currently 8063 MB) must be greater than 16384 MB. Otherwise Oracle database will fail to install. Add more swap memory to the Portal server. The minimum swap memory required for the Oracle database is 16384 MB.
Total temporary file system (tmpfs) memory (currently 8245 MB) must be more than 12288 MB. Oracle will fail to start. Increase the size of tmpfs, typically in /etc/fstab
Linux需要安装GUI
fontconfig
root@nbuitasrv \~# rpm -qa |grep fontconfig
fontconfig-2.13.0-4.3.el7.x86_64
rpm -ivh fontconfig-2.13.0-4.3.el7.x86_64.rpm dejavu-sans-fonts-2.33-6.el7.noarch.rpm fontpackages-filesystem-1.44-8.el7.noarch.rpm dejavu-fonts-common-2.33-6.el7.noarch.rpm
rpm requirement
rpm -q perl-TermReadKey perl-Data-Dumper binutils glibc libaio elfutils-libelf perl-Getopt-Long compat-libcap1 compat-libstdc++-33 gcc gcc-c++ glibc-devel ksh libaio-devel libgcc libstdc++ libXtst libXrender libstdc++-devel sysstat psmisc bc make --qf '%{name}.%{arch}\n'|sort

yum install compat-libcap1 -y
yum install compat-libstdc++-33 -y
yum install gcc-c++-4.8.5 -y
yum install ksh-20120801 -y
yum install libaio-devel -y
yum install perl-TermReadKey -y
yum install libXrender -y
yum install libXtst -y
yum install perl-Data-Dumper -y
yum install psmisc -y
yum install -y sysstat
yum install -y unzip
user group
groupadd aptare
groupadd dba
groupadd tomcat
useradd -g aptare -G dba aptare
useradd -g tomcat -G aptare tomcat
disable_FW disable_selinux
install oracle
mount itanalytics_dbinstaller_shared-service_linux_11200.iso /mnt
/mnt/install_oracle.sh

Checking the pre-requisite conditions for installer..
A complete log of this session is in this file /opt/aptare/logs/install/install\_oracle\_20230913164206394.log
**************************************************************************
* NetBackup IT Analytics ORACLE Installer Version 19.3.0.0.0 (20230302155805)
**************************************************************************
To use this software you must agree to the following terms and
conditions. Press ENTER to continue:
Enter "accept" to accept these Terms and Conditions: accept
Creating group aptare ...groupadd: group 'aptare' already exists
Done.
Creating group dba ...groupadd: group 'dba' already exists
Done.
User aptare is already a member of group: dba
User aptare is already a member of group: dba
Creating ORACLE_HOME directory in /opt/aptare/oracle ... Done.
Creating ORACLE_HOME/logs directory ...
Setting up IT Analytics database directories /data01 /data02 /data03 /data04 /data05 /data06 ...Done.


This Oracle database installer requires Oracle Database 19c zip "LINUX.X64_193000_db_home.zip" to be available on this system. Enter the absolute directory path containing the Oracle Universal Installer zip file:/u01

ERROR: Could not find Oracle Database 19c zip file LINUX.X64_193000_db_home.zip in /u01

This Oracle database installer requires Oracle Database 19c zip "LINUX.X64_193000_db_home.zip" to be available on this system. Enter the absolute directory path containing the Oracle Universal Installer zip file:/u01
Extracting files...this process may take 1-2 minutes to execute...

Executing Oracle Universal Installer script...
Done.
Done.

A complete log of this session can be found at /opt/aptare/logs/install/install_oracle_20230913164206394.log

Oracle Database 19.3.0 is installed. Refer to the Oracle documentation and apply the latest Critical Patch Updates from Oracle.
As a next step, execute the following command after mounting the IT Analytics Portal Software ISO say at /mnt/diska/
/mnt/diska/Itanalyticsinstaller.sh
Install ITA
mount -o loop itanalytics_installer_11200_linux.iso /mnt
/mnt/Itanalyticsinstaller.sh

A complete log of this session is in this file /opt/aptare/logs/install/Itanalyticsinstaller_20240718173045549.log
**************************************************************************
*  NetBackup IT Analytics Installer Version 11200
**************************************************************************
Revision 11.2.00.20230311013300 build 03112023-1034

IT Analytics requires a Web Server and a Database server.
They can be on separate machines or on same machine.

This script will only install the Web Server components.

Will this machine be the Web Server  (y/n)? y

To begin this installation, you must have the following
 IT Analytics ISO:
			  IT Analytics Portal Software
Do you have this ISO (y/n)? y

Enter "accept" to accept these Terms and Conditions: accept
Found unzip at /usr/bin/unzip

Enter your domain name: (itasrv)
Enter IP Address for itanalyticsportal.itasrv: (192.168.111.134)
Enter IP Address for your database server: (192.168.111.134)
You have entered:
   Hostname  			IP Address
   itanalyticsportal.itasrv  	192.168.111.134
   itanalyticsagent.itasrv  	192.168.111.134
   database server  	192.168.111.134
  Is this correct(y/n)? y

These names will be set up in /etc/hosts.  You can remove the entries
and add them to your local DNS later.

Would you like add them to /etc/hosts (y/n)?  y
You can create the Database schema as a part of this installation or create it later using create_itanalytics_database.sh script.
Do you want to create the Database schema as a part of this installation (y/n)? y

Creating /opt/aptare...Already exists. Continuing.
Creating /opt/aptare/logs...Already exists. Continuing.
Creating /opt/aptare/bin...Done.


Ensure that the ISO labeled
	"IT Analytics Portal Software"
is mounted. Press ENTER to continue
Using ISO mounted at /mnt.

Checking for Java...No Java executable found at /usr/java/bin/java


Creation of IT Analytics Database completed at Thu Jul 18 19:04:46 CST 2024
A complete log of this session can be found in the file: /opt/aptare/logs/install/create_itanalytics_database_20240718175258409.log


Ensure that any custom OS user or group names used while deployment are also updated in /opt/aptare/bin/aptare_env.sh

As root user, start the Portal services with the following command

systemctl start aptare.service

Log into the Portal http://itanalyticsportal.itasrv from a browser with your username as admin@itasrv. The Portal has an initial default password P@ssw0rd. Ensure that itanalyticsportal.itasrv resolves to an IP address on the system from where the browser is opened.
To avoid a security vulnerability by leaving the default password, you can change the default password for the Database "portal" and "aptare_ro" users. Execute the following script
/opt/aptare/utils/changeDBPassword.sh -user portal <New password>
/opt/aptare/utils/changeDBPassword.sh -user aptare_ro <New password>

Installing Evaluation License

Verifying license...
License installed
======= VERIFYING LICENSE AGAINST CONFIGURATION ========
======= No license overage detected. ========
======= REPORT COMPLETE ========

 Evaluation license installed successfully.
Install DC
mount -o loop itanalytics\_datacollector\_linux\_11200.iso /mnt
/mnt/dc\_installer.sh

Enter "accept" to accept these Terms and Conditions: accept

Enter Install Location: (Default location: /usr/openv/analyticscollector)
(Refer the Certified Configuration Guide for Data Collector disk space requirement.)


Enter Data Collector Name:
(This Data Collector name will be used to authenticate the Data Collector with the Data Receiver)
(Required Field)
nbu

Enter Data Collector Passcode:
(This Data Collector passcode will be used to authenticate the Data Collector with the Data Receiver)
(Required Field)

Enter Data Receiver URL:
(Enter the URL to the Data Receiver. Ex: http(s)://itanalyticsagent.mycompany.com)
(Required Field)
http://itanalyticsagent.itasrv


Enter the Data Collector's Key File path:
(The file path must include name of the file that was downloaded from the Portal.)
(Required Field)
/root/nbu.key


Use Proxy? (y/n) (Default: n):


Copying files...
The step can take between 2 and 10 minutes to complete depending on system performance

Setting up Kafka


Setting permission...


Updating conf files...


Updating conf files...


Congratulations! The NetBackup IT Analytics Data Collector has been successfully installed to:
/usr/openv/analyticscollector

You are recommended to run the /usr/openv/analyticscollector/mbs/bin/checkinstall.sh script to validate the Data Collector installation.
As root user, start the Data Collector processes with the following command
/usr/openv/analyticscollector/mbs/bin/aptare_agent start

A complete log of this session can be found in the file: /usr/openv/analyticscollector/installlogs/dc_installer_20240718191055623.log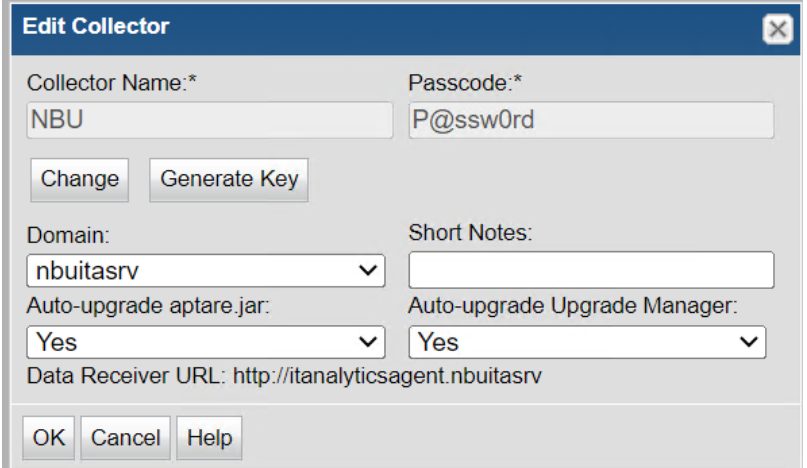
After start dc services, the state of dc on portal should be online
install other DC
root@fawnbu2 bin# ./checkinstall.sh
Version information for Data Collector installed at /usr/openv/analyticscollector on this server fawnbu2
Version: 11.2.00 03112023-1301
Version information for datarcvr, aptare.jar and Upgrade Manager at http://itanalyticsagent.NBUITASRV
datarcvr Version
Version: 11.2.1.03
aptare.jar Version
Current Version: 11.2.1.03
Build Number: 06232023-1635
Upgrade Manager Version
Current Version: 11.2.1.03
Build Number: 06232023-1703
Version information for aptare.jar and Upgrade Manager at /usr/openv/analyticscollector/upgrade on this server fawnbu2
aptare.jar Version
Current Version: 11.2.0.01
Build Number: 03112023-1301
Upgrade Manager Version
Current Version: 11.2.0.01
Build Number: 03112023-0952
Version information for other jars:
aptare-dc-appliance-col.jar version is: 11.2.0.01.20230311013300|03112023-0926
aptare-dc-avamar-col.jar version is: 11.2.0.01.20230311013300|03112023-0926
aptare-dc-avamar-com.jar version is: 11.2.0.01.20230311013300|03112023-0926
aptare-dc-brocade-col.jar version is: 11.2.0.01.20230311013300|03112023-0926
...
Validating aptare.jar Version Compatibility - FAILED
Reason: The first three tokens of the "Current Version" of the aptare.jar on this
server does not match the first three tokens of the "datarcvr Version".
Initiating auto download of the correct version of aptare.jar
from http://itanalyticsagent.NBUITASRV/servlet/smartupdater
The Data Collector upgrade has started.
This process may take a few minutes to complete.
The Data Collector will start/restart after the upgrade has completed.
The Data Collector upgrade has successfully completed.
Completed Data collector upgrade.