目录
[ls -l](#ls -l)
[ll , ls , ls -l区别](#ll , ls , ls -l区别)
[ls -l](#ls -l)
[ls -a](#ls -a)
[cd ~:进入用户家目录(单独输入cd 等价于 cd ~)](#cd ~:进入用户家目录(单独输入cd 等价于 cd ~))
[cd -:返回最近访问目录](#cd -:返回最近访问目录)
rmdir指令(这个了解即可,未来我们用的最多是rm指令进行删除)
[man num](#man num)
[man -a](#man -a)
引言:
从本篇开始,我们正式讲解 Linux 常用指令 (由于内容体量较大,我将整体内容分为上下两篇讲解,避免单篇内容臃肿)。
市面上绝大多数 Linux 教程只单纯罗列命令用法,大多停留在 "背指令、敲命令" 的层面。但在实际开发、服务器运维和面试场景中,真正重要的不是命令本身,而是命令背后的 Linux 底层原理。
所以本系列教程主打 实操演示 + 底层原理深挖:带你不仅会敲指令,更能吃透指令延伸的系统机制,真正做到学以致用、理解记忆,告别死记硬背。
前置知识(环境部署)
操作系统大体可以分为两类。
Linux 在工程项目中应用十分广泛。Windows 日常主要依靠图形界面交互,图形界面面向普通使用者,提升操作便捷性。但图形界面会占用较多系统资源,对于 Linux 服务器场景来说,图形界面并非必备。
后续学习 Linux,我们统一采用终端 + 命令的操作方式(Linux 也支持图形界面)。Windows、Linux 系统都自带终端:Windows 下的 cmd 控制台就是终端,同样能够执行指令。
在Xshell中复制粘贴是一套新的体系
复制:Ctrl+Insert
粘贴:Shift+Insert
最后补充一个通用排错技巧 :如果在命令行中出现了异常情况,统一尝试Ctrl+C来终止异常(如果异常比较严重就按着别松手)
那么话不多说,接下来进入正文------------>

前置准备
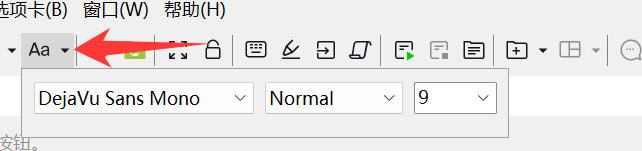
连接好自己的云服务器,如果想要调字体的话可以在这里调字体样式,然后我这里先用root账号进行讲解,等讲到后面需要转换成普通用户时我会再提
快速了解几个指令
clear指令
清屏,这可以说是最简单的指令了,就不演示了
whoami指令
打印用户名
我这里演示一下(前面\[\]中的暂时不用管,这个时候我在一个目录里,后面会讲)

cpp
[root@VM-0-2-centos Linux_learn]# whoami
root
pwd指令
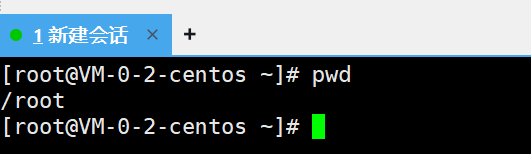
打印用户当前所在的目录
因为我们用的是root账号,所以显示的是root
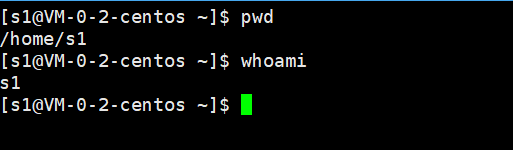
在CentOS下,普通用户是在home目录下的,我这里用普通用户登录的情况给你们演示一下
mkdir指令
快速创建一个目录(目录可以把它等价于Windows系统中的文件夹,在Linux中,后面我不做特殊声明的情况下,我一般把文件夹称为目录)
使用如下,这个Linux_learn就是我们新建的目录

接下来,我们通过ls或ll 指令观察,ls或ll就是用来显示当前目录下的文件(具体会在对应指令部分讲,这里主要是观察Linux_learn这个目录有没有添加成功),如下,我们可以发现,这个文件名是蓝色的,蓝色的文件我们就可以把它当成文件夹
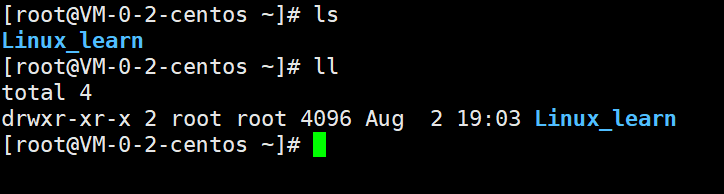
cpp
[root@VM-0-2-centos ~]# mkdir Linux_learn
[root@VM-0-2-centos ~]# ls
Linux_learn
[root@VM-0-2-centos ~]# ll
total 4
drwxr-xr-x 2 root root 4096 Aug  2 19:03 Linux_learn
cd指令
跳转到目录里
我用我创建的Linux_learn目录演示一下,如下,通过前面的变化我们就可以知道我们已经进入Linux_learn目录中了

cpp
[root@VM-0-2-centos ~]# cd Linux_learn
[root@VM-0-2-centos Linux_learn]#
我们用pwd观察一下

touch指令
新建一个普通文件
我这直接举个例子

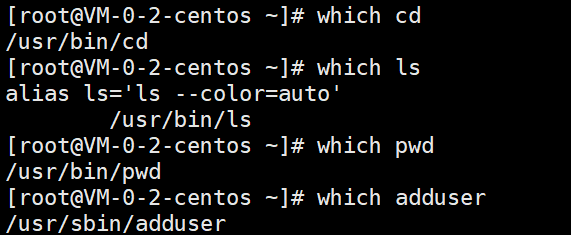
which指令
查找可执行程序的绝对路径(定位命令所在位置,只搜索 PATH 环境变量里的可执行文件)
我这直接举个例子
cat指令
显示普通文本文件内容
我举个例子

ls指令
语法: ls 选项 目录或文件(大多数情况下选项和目录的顺序可以前后颠倒,一般还是不要颠倒好)
功能:对于目录,该命令列出该目录下的所有子目录与文件。对于文件,将列出文件名以及其他信息
ls
显示当前目录下的文件
这个当前目录指的是当前这个用户所处的目录
我们的籍贯其实就可以想成是一个目录
我们通过pwd指令就可以知道我们当前用户所处的目录在哪里

然后ls是显示当前目录下的文件,也就是Linux_learn目录下的文件
我们用ls显示一下目录下的文件,可以发现没有(因为我们没有给这个目录里面添加文件或目录,即空目录,也就是我们window系统下所说的空文件夹 ),如下
那我们为了能看到文件,我这里再创建一个目录,此时我们就能看到新建的目录

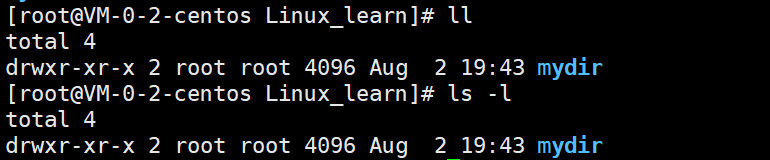
不止ls能看,ll 和 ls -l 也能看,如下
ls -l
接下来,我来说说 ll ,ls 和 ls -l 这三个指令的区别
ll , ls , ls -l区别
ls
显示的时候默认只会显示文件名
Linux理论知识:目录和文件
我们在windows系统下的文件为了保存的持久性,文件是会存在磁盘里的,那么,如果我们创建一个空的文件,是否也会占用磁盘的内存呢,如下

该文件其实也会占用磁盘内存 ,虽然打开文件没有内容,但是文件还有文件名,日期,文件类型,文件位置等等等等。这些我们称之为文件的属性,文件的属性也是数据,不要以为磁盘里只存文件里写的数据。磁盘为了维护文件的属性数据也会占用磁盘空间。我们可以通过C++的类来类比下,当类没有成员变量的时候,这个类理论而言所占内存大小是0,但是实际上是1,这相当于就是存了一个占位标识符一样(这是 C++ 编译器实现层面的规则,和 Linux 文件机制只是类比,不要划等号)。
所以文件 = 内容 + 属性,Linux 下一切皆文件,目录本身也是特殊文件
之后我们学习文件的时候:要么对内容操作,要么对属性操作
其实我们之前学C/C++的时候就已经涉及过这方面的操作了,对内容操作比如向文件写入数据,对属性操作其实也有,比如获取文件大小,修改文件的读写位置,比如rewind呀,fssek呀等等(忘了可以看这篇博文C语言文件操作详解_c语言文件操作csdn-CSDN博客)这其实就是变相的在修改文件的属性
所以ls是用来查看我们文件名的,那也就是查看的是文件属性中的其一属性------文件名
我们未来显示的时候更多的就是显示文件的属性
ls虽说是显示当前文件下的文件,但更准确的说法是ls用来显示当前文件的属性,只有ls,就只显示文件的文件名属性
ls -l
ls -l显示当前目录下文件的详细信息

上图中的ls, 我们称之为命令 ,随后空格不要忘,空格后面接的**-** 开头的我们称之为命令行选项(我会在后面讲命令行参数和环境变量时再重点讲,现在只需要知道就可以了(未来这个选项可以是零个或多个,多个选项都是用空格隔开的))
ls -l相比ls会显示文件更多的属性
Linux理论知识:文件类型的认识
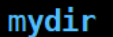 这个就是文件名
 这个就是文件最近修改或者创建的时间
 这个是文件当前的大小
 这个也是文件的属性,这里我只讲第一个字母的用处
首先,在Linux当中我们查看类型一般不是以颜色区分 ,因为颜色本身就是一种配色方案,Linux中区分文件类型也不是跟windows一样直接看后缀,Linux区分文件类型看的是ls -l 显示的所有属性中的第一列的第一个字母区分,也就是这个

d开头表示这个文件是目录

-开头 表示这个文件是普通文件(有点特殊,后面再说)
我们在这个目录中通过touch添加一个文件,随后用 ls 访问,就会多出一个文件,如下

cpp
[root@VM-0-2-centos Linux_learn]# touch test.c
[root@VM-0-2-centos Linux_learn]# ls
mydir  test.c
ls -l 就能看见更详细的文件内容

cpp
[root@VM-0-2-centos Linux_learn]# ls -l
total 4
drwxr-xr-x 2 root root 4096 Aug  2 19:43 mydir
-rw-r--r-- 1 root root    0 Aug  2 22:35 test.c
ll
CentOS 中 ll 是系统预定义别名,等价于 ls -l,但是**Ubuntu 等系统默认没有 ll 别名。**在 CentOS 环境下 ll 等价 ls -l,不是通用标准命令。
Linux理论知识:指令的本质
我们先看下述代码,我们先用which指令获取这些指令所在的位置,然后用ls -l查看这些指令的具体信息
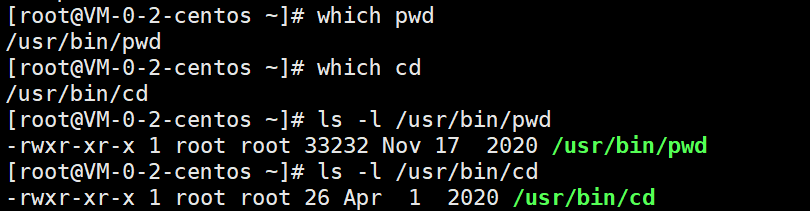
cpp
[root@VM-0-2-centos ~]# which pwd
/usr/bin/pwd
[root@VM-0-2-centos ~]# which cd
/usr/bin/cd
[root@VM-0-2-centos ~]# ls -l /usr/bin/pwd
-rwxr-xr-x 1 root root 33232 Nov 17  2020 /usr/bin/pwd
[root@VM-0-2-centos ~]# ls -l /usr/bin/cd
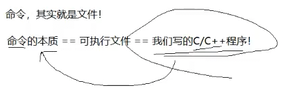
-rwxr-xr-x 1 root root 26 Apr 1 2020 /usr/bin/cd我们可以发现,这些指令是-开头的,也就是说,这些指令本质其实就是可执行程序(对于可执行程序,给完整路径就会自动执行内部程序)
所以我们用路径来执行命令,照样也能跑起来,如下

cpp
[root@VM-0-2-centos ~]# /usr/bin/pwd
/root我们自己其实也可以实现到这种效果,如下(有些接口还没讲,看懂就行)不要跟着写,跟着写的话你们进vim后可能出不来了,如果想跟着写可以吧vim改成nano,nano指令一进去就是记事本,可以直接编辑,(如果没有nano,装一下就好了,用下面这个命令)
cpp
yum install -y nano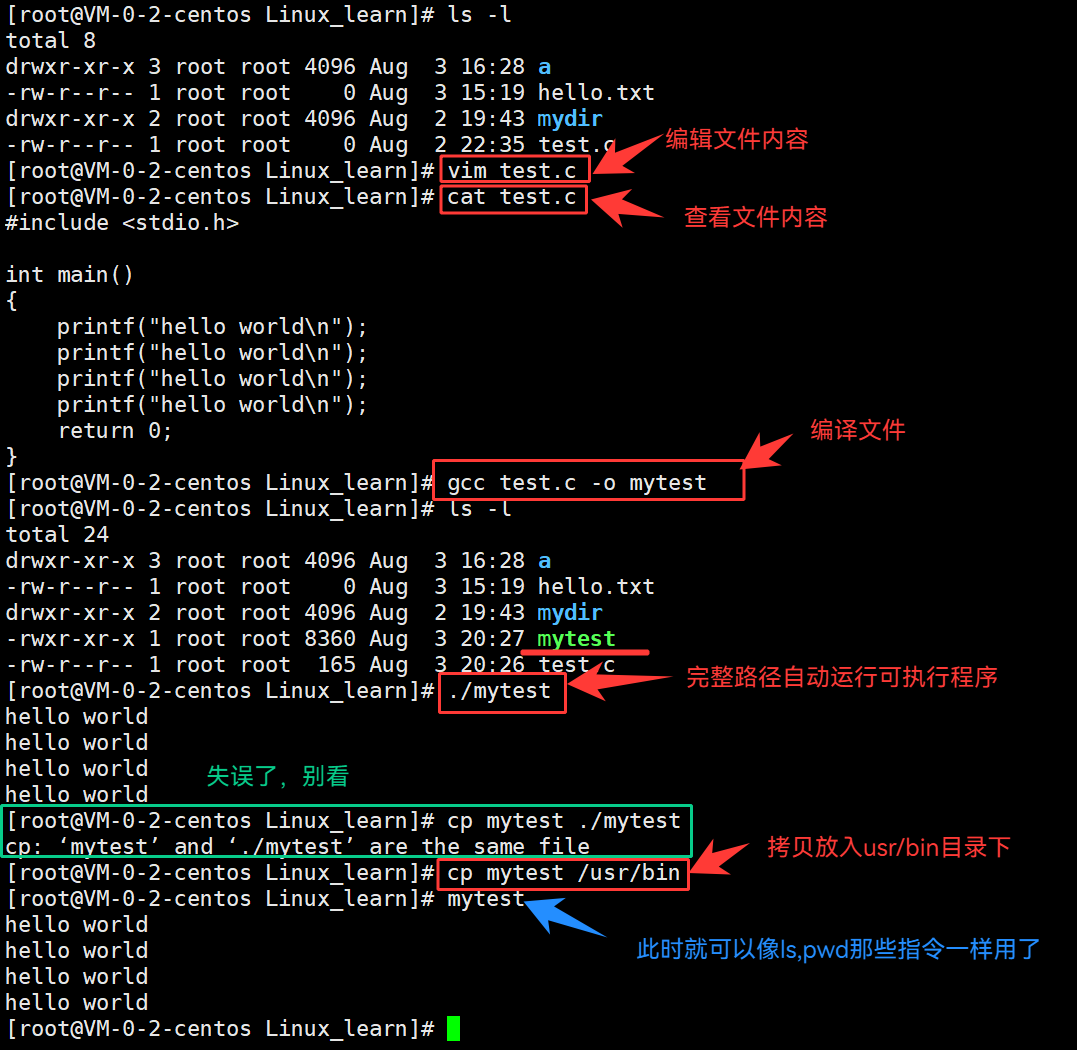
cpp
[root@VM-0-2-centos Linux_learn]# ls -l
total 8
drwxr-xr-x 3 root root 4096 Aug  3 16:28 a
-rw-r--r-- 1 root root    0 Aug  3 15:19 hello.txt
drwxr-xr-x 2 root root 4096 Aug  2 19:43 mydir
-rw-r--r-- 1 root root    0 Aug  2 22:35 test.c
[root@VM-0-2-centos Linux_learn]# vim test.c
[root@VM-0-2-centos Linux_learn]# cat test.c
#include <stdio.h>

int main()
{
    printf("hello world\n");
    printf("hello world\n");
    printf("hello world\n");
    printf("hello world\n");
    return 0;
}
[root@VM-0-2-centos Linux_learn]# gcc test.c -o mytest
[root@VM-0-2-centos Linux_learn]# ls -l
total 24
drwxr-xr-x 3 root root 4096 Aug  3 16:28 a
-rw-r--r-- 1 root root    0 Aug  3 15:19 hello.txt
drwxr-xr-x 2 root root 4096 Aug  2 19:43 mydir
-rwxr-xr-x 1 root root 8360 Aug  3 20:27 mytest
-rw-r--r-- 1 root root  165 Aug  3 20:26 test.c
[root@VM-0-2-centos Linux_learn]# ./mytest
hello world
hello world
hello world
hello world
[root@VM-0-2-centos Linux_learn]# cp mytest ./mytest
cp: 'mytest' and './mytest' are the same file
[root@VM-0-2-centos Linux_learn]# cp mytest /usr/bin
[root@VM-0-2-centos Linux_learn]# mytest
hello world
hello world
hello world
hello world这里展示这个主要是为了让你们意识到,其实指令的本质就是可执行程序,然后可执行程序内部就是由C/C++之类的语言实现的,我上面的mytest拷贝到/usr/bin目录下,这个其实就是在Linux下的软件安装
Windows下软件安装还会搞的很高级,什么进度条呀,正在安装呀,其实大部分的安装都只是拷贝罢了(拷贝到指定目录下就能跑)
alias指令
知道了指令的本质后,我们先来看下ls

alias是一个命令,它的作用是给其他命令起别名
这里举点例子
如果我想给单指令取别名就这样即可

cpp
[root@VM-0-2-centos Linux_learn]# alias lingran=pwd
[root@VM-0-2-centos Linux_learn]# pwd
/root/Linux_learn
[root@VM-0-2-centos Linux_learn]# lingran
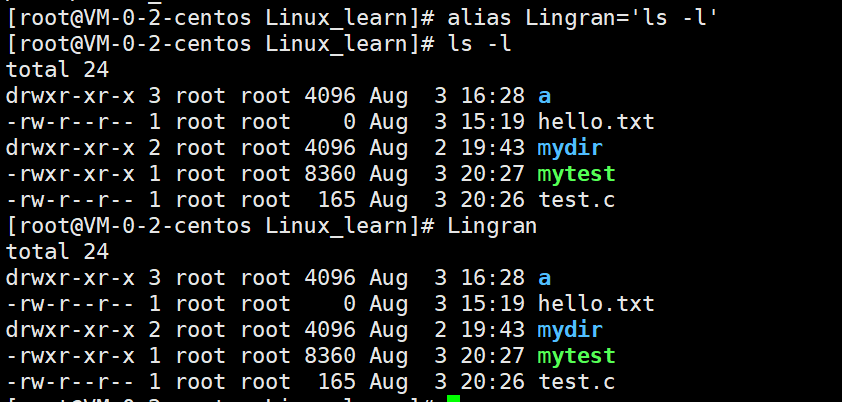
/root/Linux_learn如果我想给有选项的,目录等等的取别名,我们就需要加上单引号(' ')
cpp
[root@VM-0-2-centos Linux_learn]# alias Lingran='ls -l'
[root@VM-0-2-centos Linux_learn]# ls -l
total 24
drwxr-xr-x 3 root root 4096 Aug  3 16:28 a
-rw-r--r-- 1 root root    0 Aug  3 15:19 hello.txt
drwxr-xr-x 2 root root 4096 Aug  2 19:43 mydir
-rwxr-xr-x 1 root root 8360 Aug  3 20:27 mytest
-rw-r--r-- 1 root root  165 Aug  3 20:26 test.c
[root@VM-0-2-centos Linux_learn]# Lingran
total 24
drwxr-xr-x 3 root root 4096 Aug  3 16:28 a
-rw-r--r-- 1 root root    0 Aug  3 15:19 hello.txt
drwxr-xr-x 2 root root 4096 Aug  2 19:43 mydir
-rwxr-xr-x 1 root root 8360 Aug  3 20:27 mytest
-rw-r--r-- 1 root root  165 Aug  3 20:26 test.c
其实从这里大致就可以猜到了,ll其实就是ls -l 的别名,我们验证一下
我们把ls和ll横向对比下
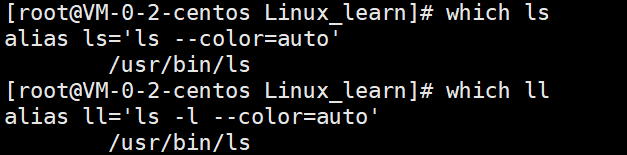
很明显,ll就是 ls -l 的别名
然后这个 --color=auto 是让显示的时候有颜色区分,我们也可以对比下

cpp
[root@VM-0-2-centos Linux_learn]# /usr/bin/ls
a  hello.txt  mydir  mytest  test.c

[root@VM-0-2-centos Linux_learn]# /usr/bin/ls --color=auto
a  hello.txt  mydir  mytest  test.c
接下来如果我们不想要这些别名了很简单,直接断开云服务连接就可以了,因为我们起的别名都是临时的,重新连接就没了(起永久的要改系统配置文件,暂且不说)
ls -a
列出目录下的所有文件,包括以 . 开头的隐藏文件(就相当于windows的显示隐藏文件)
我们来对比下ls和ls -a的效果

cpp
[root@VM-0-2-centos Linux_learn]# ls
mydir  test.c
[root@VM-0-2-centos Linux_learn]# ls -a
.  ..  mydir  test.c
我们可以发现,ls -a和ls相比,多了几个点
这几个点我们先不管,我先讲一个东西再讲这个
ls现在有了俩个选项了,一个 -l,一个 -a,多选项是可以一起用的,而且有很多种方式,如下
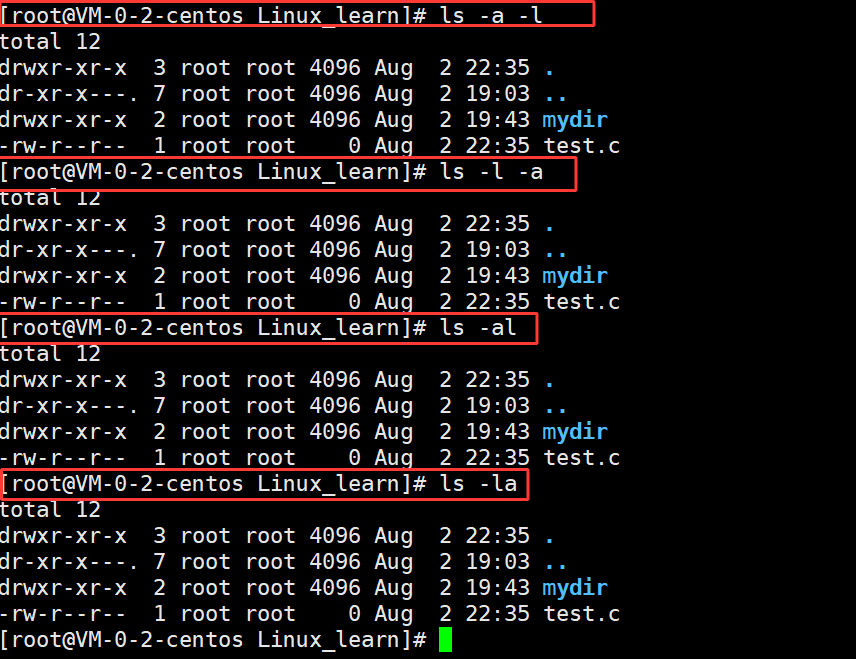
在我们Linux的指令当中,绝大部分的选项,实现的效果,和是否连着写,是否分开写,是否按顺序写完全没有关系,如果有多个选项,你可以用空格隔开,连起来也完全没问题
那么,我们通过-l 和-a选项的组合使用,我们就可以去观察一下 . 和 ..这俩个文件了
在Linux中,以 .开头的文件是隐藏文件,在Windows中也有隐藏文件,如下
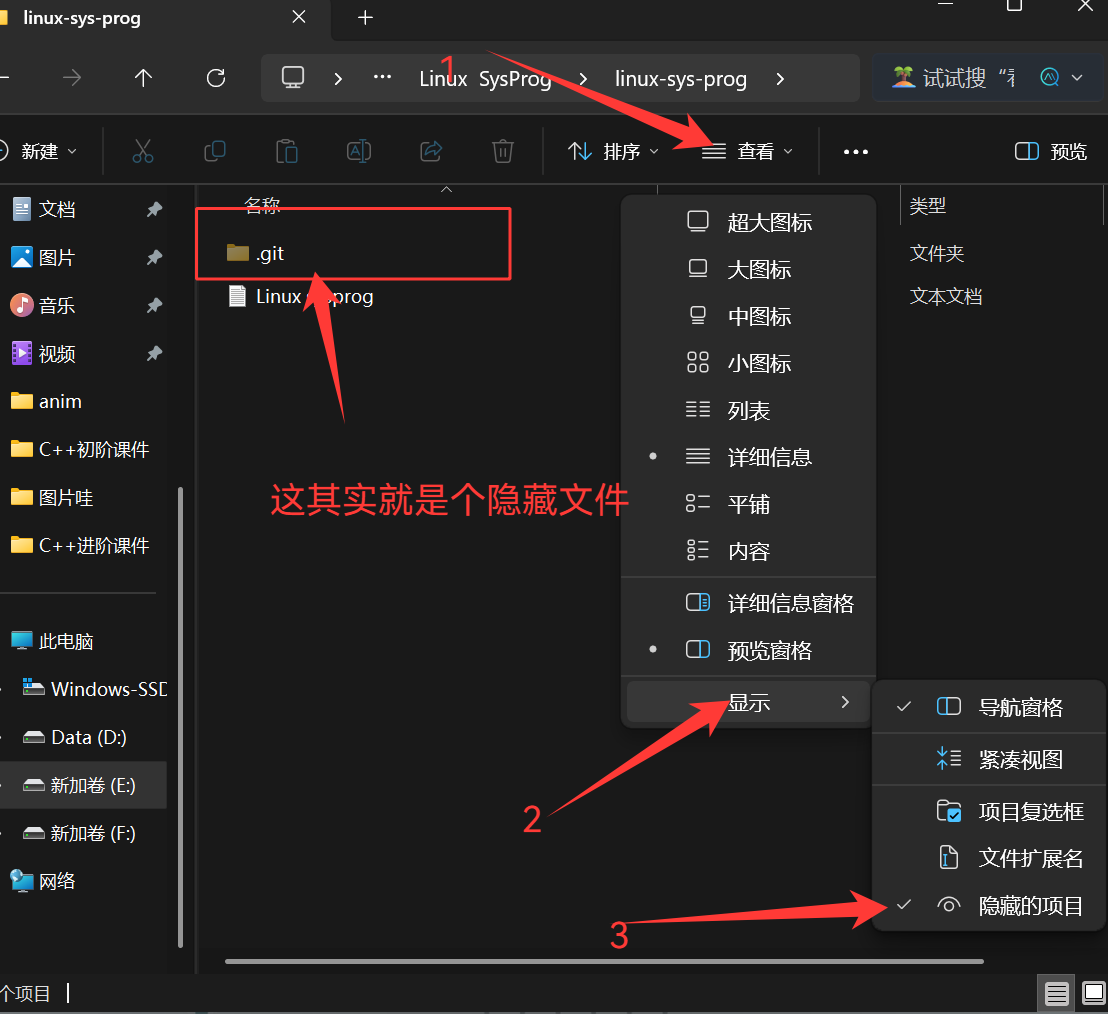
隐藏文件我们用普通的ls或ls -l是找不到的(因为隐藏文件没有被显示出来),这个时候,就需要用到 -a选项(将隐藏文件显示出来,就和windows的显示隐藏项目这个功能很像)
我们也可以自己新建个隐藏文件加进去,如下

cpp
[root@VM-0-2-centos Linux_learn]# touch .youcannotseeme.txt
[root@VM-0-2-centos Linux_learn]# ls
mydir  test.c
[root@VM-0-2-centos Linux_learn]# ls -a
.  ..  mydir  test.c  .youcannotseeme.txt
我们用 ls 就不会显示我们所添加的普通隐藏文件
但是用 ls -a就找到了
当然,我们也可以隐藏目录(未来在Linux机器上想有一些自己的小秘密就可以用这个)

cpp
[root@VM-0-2-centos Linux_learn]# mkdir .dir
[root@VM-0-2-centos Linux_learn]# ls
mydir  test.c
[root@VM-0-2-centos Linux_learn]# ls -a
.  ..  .dir  mydir  test.c  .youcannotseeme.txt
那么,现在上面的那俩个 .和..的目录不能直接用ls看到的原因也自然就知道了,那便是那俩个以 . 开头是隐藏目录,自然看不到(.和..是系统自动生成的特殊目录,所有目录默认自带 ,不需要手动创建),需要用 -a选项显示隐藏文件
这俩目录干什么的我会在cd指令的位置讲
ls常用选项
ls的选项我讲了俩个,一个是 -l,一个是 -a,剩下的选项就不讲了,因为目前你们所掌握的内容还不够,我这里就直接罗列一下ls常用的一些选项及其作用
- -a列出目录下的所有文件,包括以 . 开头的隐含文件。
- -d 将目录像文件一样显示,而不是显示其下的文件(只看目录本身相关的属性)。如:ls --d 指定目录
- -i 输出文件的 i 节点的索引信息。如 ls --ai 指定文件
- -k 以 k 字节的形式表示文件的大小。ls --alk 指定文件
- -l 列出文件的详细信息
- -n 用数字的 UID,GID 代替名称。(介绍 UID,GID)
- -F 在每个文件名后附上一个字符以说明该文件的类型,"*" 表示可执行的普通文件;"/" 表示目录;"@" 表示符号链接;"|" 表示 FIFOs;"=" 表示套接字 (sockets)。(目录类型识别)
- -r 对目录反向排序
- -t 以时间排序
- -s 在文件名后输出该文件的大小。(大小排序,如何找到目录下最大的文件)
- -R 列出所有子目录下的文件。(递归)
- -1 一行只输出一个文件。
举例

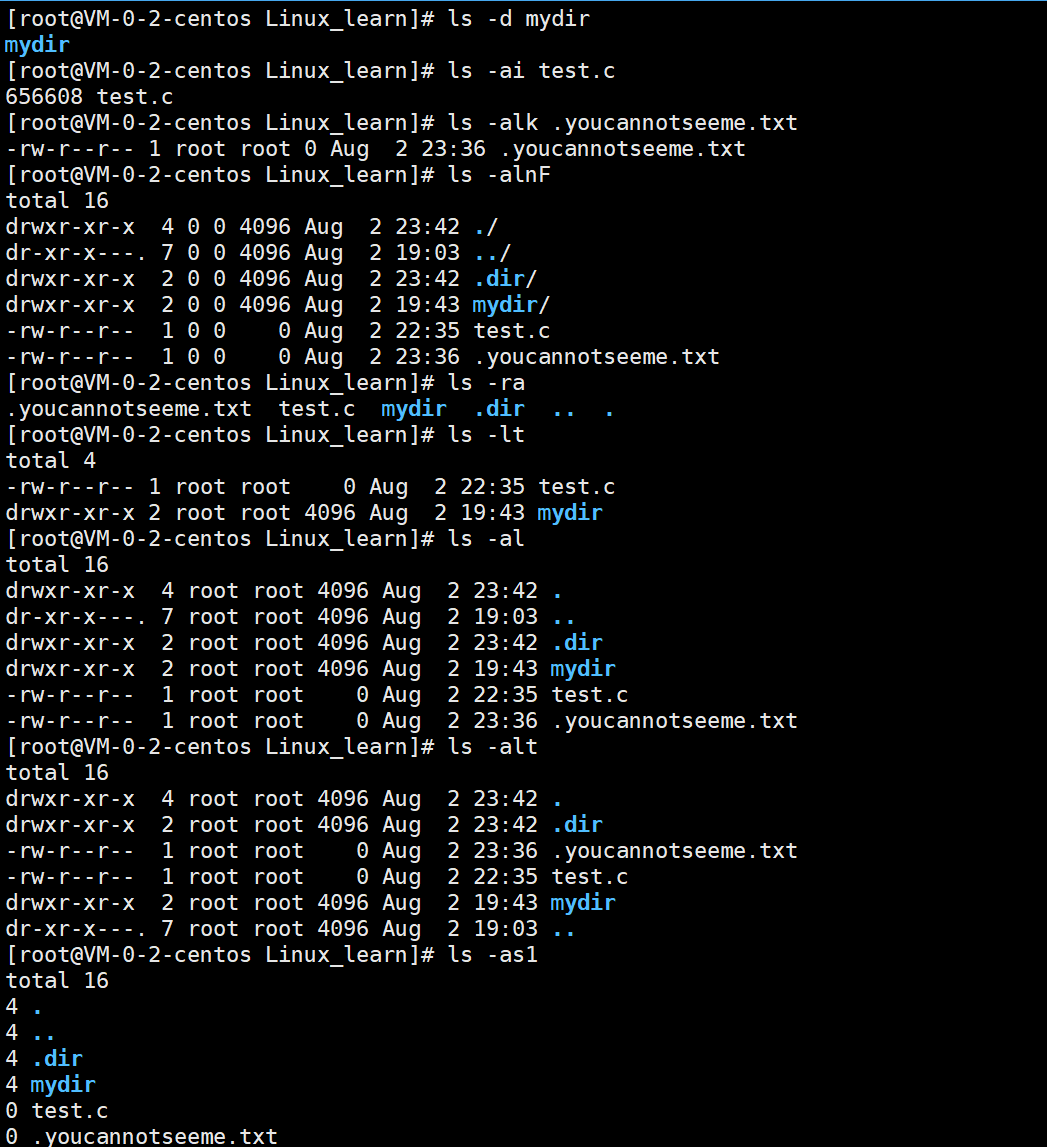
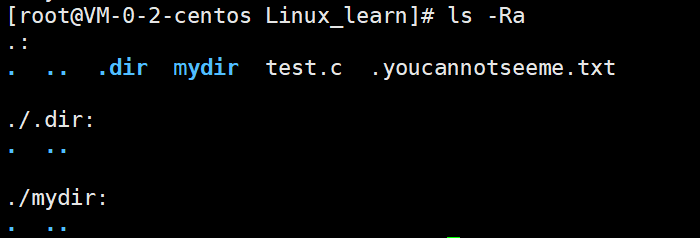
cpp
[root@VM-0-2-centos Linux_learn]# ls
mydir  test.c
[root@VM-0-2-centos Linux_learn]# ls -a
.  ..  .dir  mydir  test.c  .youcannotseeme.txt
[root@VM-0-2-centos Linux_learn]# ls -d mydir
mydir
[root@VM-0-2-centos Linux_learn]# ls -ai test.c
656608 test.c
[root@VM-0-2-centos Linux_learn]# ls -alk .youcannotseeme.txt
-rw-r--r-- 1 root root 0 Aug  2 23:36 .youcannotseeme.txt
[root@VM-0-2-centos Linux_learn]# ls -alnF
total 16
drwxr-xr-x  4 0 0 4096 Aug  2 23:42 ./
dr-xr-x---. 7 0 0 4096 Aug  2 19:03 ../
drwxr-xr-x  2 0 0 4096 Aug  2 23:42 .dir/
drwxr-xr-x  2 0 0 4096 Aug  2 19:43 mydir/
-rw-r--r--  1 0 0    0 Aug  2 22:35 test.c
-rw-r--r--  1 0 0    0 Aug  2 23:36 .youcannotseeme.txt
[root@VM-0-2-centos Linux_learn]# ls -ra
.youcannotseeme.txt  test.c  mydir  .dir  ..  .
[root@VM-0-2-centos Linux_learn]# ls -lt
total 4
-rw-r--r-- 1 root root    0 Aug  2 22:35 test.c
drwxr-xr-x 2 root root 4096 Aug  2 19:43 mydir
[root@VM-0-2-centos Linux_learn]# ls -al
total 16
drwxr-xr-x  4 root root 4096 Aug  2 23:42 .
dr-xr-x---. 7 root root 4096 Aug  2 19:03 ..
drwxr-xr-x  2 root root 4096 Aug  2 23:42 .dir
drwxr-xr-x  2 root root 4096 Aug  2 19:43 mydir
-rw-r--r--  1 root root    0 Aug  2 22:35 test.c
-rw-r--r--  1 root root    0 Aug  2 23:36 .youcannotseeme.txt
[root@VM-0-2-centos Linux_learn]# ls -alt
total 16
drwxr-xr-x  4 root root 4096 Aug  2 23:42 .
drwxr-xr-x  2 root root 4096 Aug  2 23:42 .dir
-rw-r--r--  1 root root    0 Aug  2 23:36 .youcannotseeme.txt
-rw-r--r--  1 root root    0 Aug  2 22:35 test.c
drwxr-xr-x  2 root root 4096 Aug  2 19:43 mydir
dr-xr-x---. 7 root root 4096 Aug  2 19:03 ..
[root@VM-0-2-centos Linux_learn]# ls -as1
total 16
4 .
4 ..
4 .dir
4 mydir
0 test.c
0 .youcannotseeme.txt
[root@VM-0-2-centos Linux_learn]# ls -Ra
.:
.  ..  .dir  mydir  test.c  .youcannotseeme.txt

./.dir:
.  ..

./mydir:
.  ..
pwd指令
显示一个用户当前所处的目录
使用在上面讲过了,这里我讲讲目录这个东西
在Windows中我们也能看当前所处目录,如下
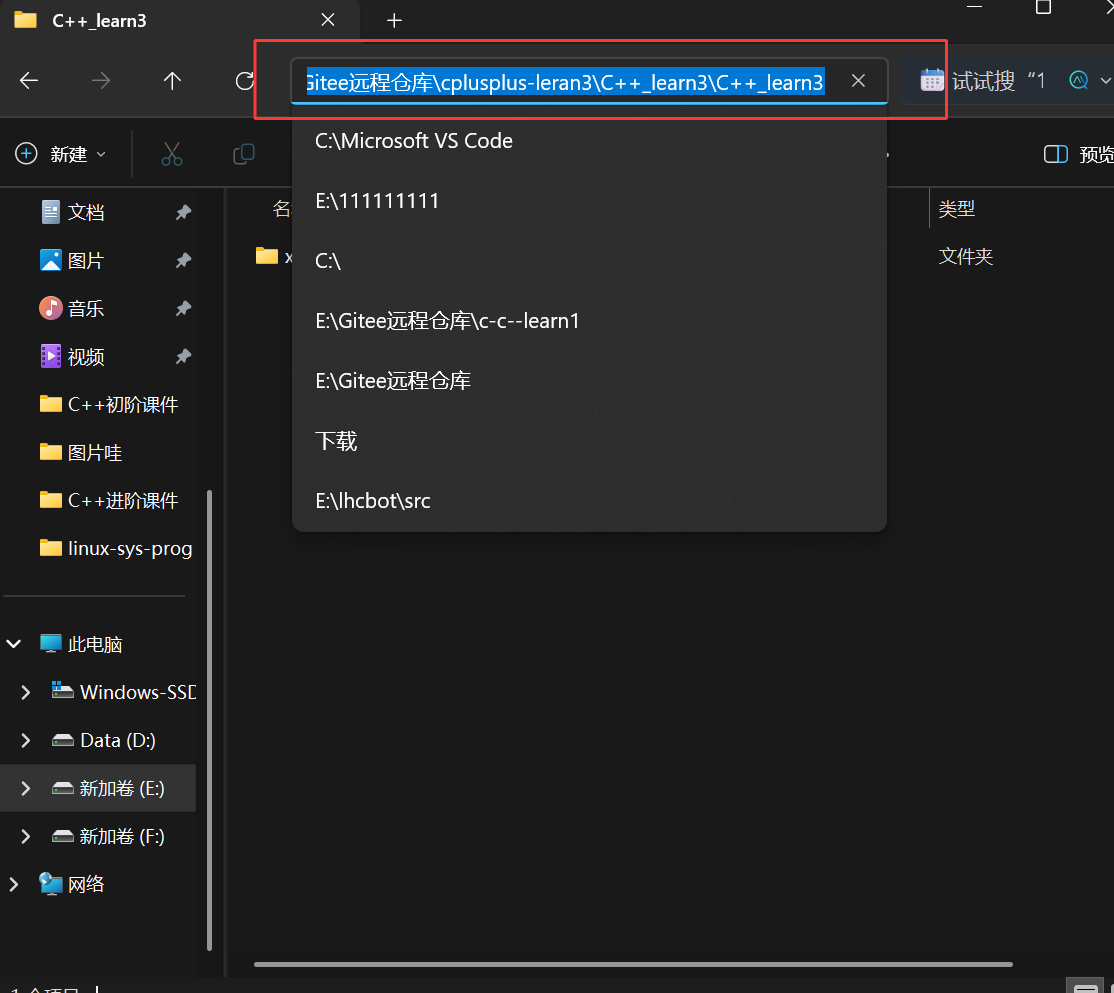
这是Windows下的路径
E:\Gitee远程仓库\cplusplus-leran3\C++_learn3\C++_learn3
这是Linux下的路径

Windows和Linux的路径分割符是不一样的,Windows下是 \ ,Linux下是 / 作为路径分隔符,俩个路径分隔符之间的一定是目录。最后一个有可能是目录,也有可能是文件**(指的就是上面的Linux_learn,C++_learn3这种)**
所谓的路径本质上就是一个个的目录构成的
cd指令
进行路径切换
Linux理论知识:路径的认识
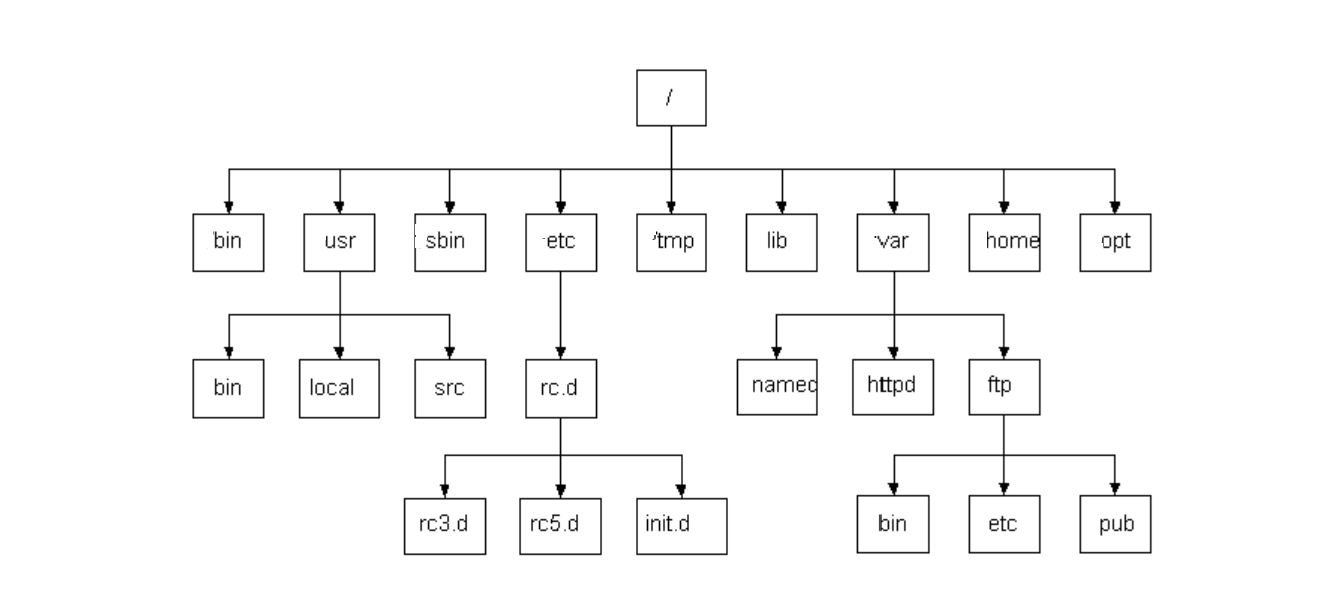
- Linux 系统中,磁盘上的文件和目录被组成一棵目录树,每个节点都是目录或文件
- 其中普通文件一定是目录树的叶子节点
- 目录可能是叶子 (空目录),也可能是路上节点
- 理解路径存在的意义 : 树状组织方式,都是为了保证快速定位查找到指定的文件,而定位文件就需要具有唯一性的方案来进行定位文件。其中任何一个节点,都只有一个父节点,所以,从根目录开始,定位指定文件,路径具有唯一性
- 绝对路径:一般从
/开始,不依赖其他目录的定位文件的方式- 相对路径:相对于当前用户所处目录,定位文件的路径方式
- 绝对路径一般不会随着用户的路径变化而丧失唯一性,一般在特定服务的配置文件中经常被使用
- 相对路径因为它的便捷性,一般在命令行中使用较多
我们可以输入完整的路径进行跳转(绝对路径),也可以直接输入当前用户所在路径下的目录(相对路径)
绝对路径
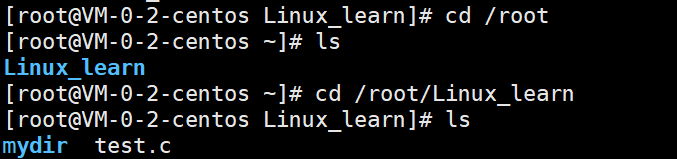
cpp
[root@VM-0-2-centos Linux_learn]# cd /root
[root@VM-0-2-centos ~]# ls
Linux_learn
[root@VM-0-2-centos ~]# cd /root/Linux_learn
[root@VM-0-2-centos Linux_learn]# ls
mydir  test.c
相对路径我们就需要用到我们前面所讲的隐藏文件 . 和 ..
. 代表的是当前目录
我们可以通过cd跳转到 . 目录去,我们可以发现,路径并没有变化,说明我们用户一直在这个当前路径下(从当前到当前)
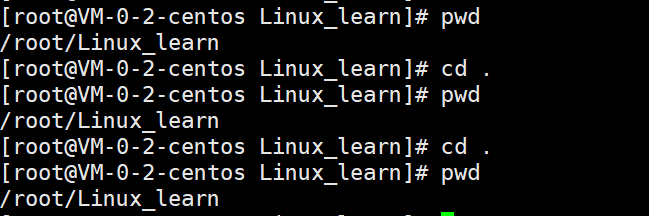
cpp
[root@VM-0-2-centos Linux_learn]# pwd
/root/Linux_learn
[root@VM-0-2-centos Linux_learn]# cd .
[root@VM-0-2-centos Linux_learn]# pwd
/root/Linux_learn
[root@VM-0-2-centos Linux_learn]# cd .
[root@VM-0-2-centos Linux_learn]# pwd
/root/Linux_learn
所以我们用-d的时候显示的是这个也就有了原因

cpp
[root@VM-0-2-centos Linux_learn]# ls -ald
drwxr-xr-x 4 root root 4096 Aug  2 23:42 .
-d是把当前路径想文件一样显示,. 其实就是当前路径所以,我们用 -d 的时候没有显示/root/Linux_learn 而是 .
我们可以通过对比比对一下(我们先回到根目录,然后在根目录直接进行对应目录的ls -d),. 和 /root/Linux_leran路径的属性其实是一样的

cpp
[root@VM-0-2-centos Linux_learn]# cd /
[root@VM-0-2-centos /]# pwd
/
[root@VM-0-2-centos /]# ls -ald /root/Linux_learn
drwxr-xr-x 4 root root 4096 Aug  2 23:42 /root/Linux_learn
.. 代表的是上级目录(用cd ..就是回退到上级路径)
我们通过cd 跳转到 .. 目录去,我们可以发现,回到了上级目录
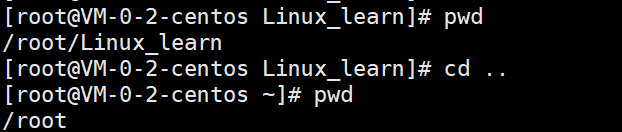
cpp
[root@VM-0-2-centos Linux_learn]# pwd
/root/Linux_learn
[root@VM-0-2-centos Linux_learn]# cd ..
[root@VM-0-2-centos ~]# pwd
/root
我们再cd ..
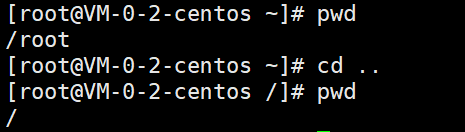
cpp
[root@VM-0-2-centos ~]# pwd
/root
[root@VM-0-2-centos ~]# cd ..
[root@VM-0-2-centos /]# pwd
/
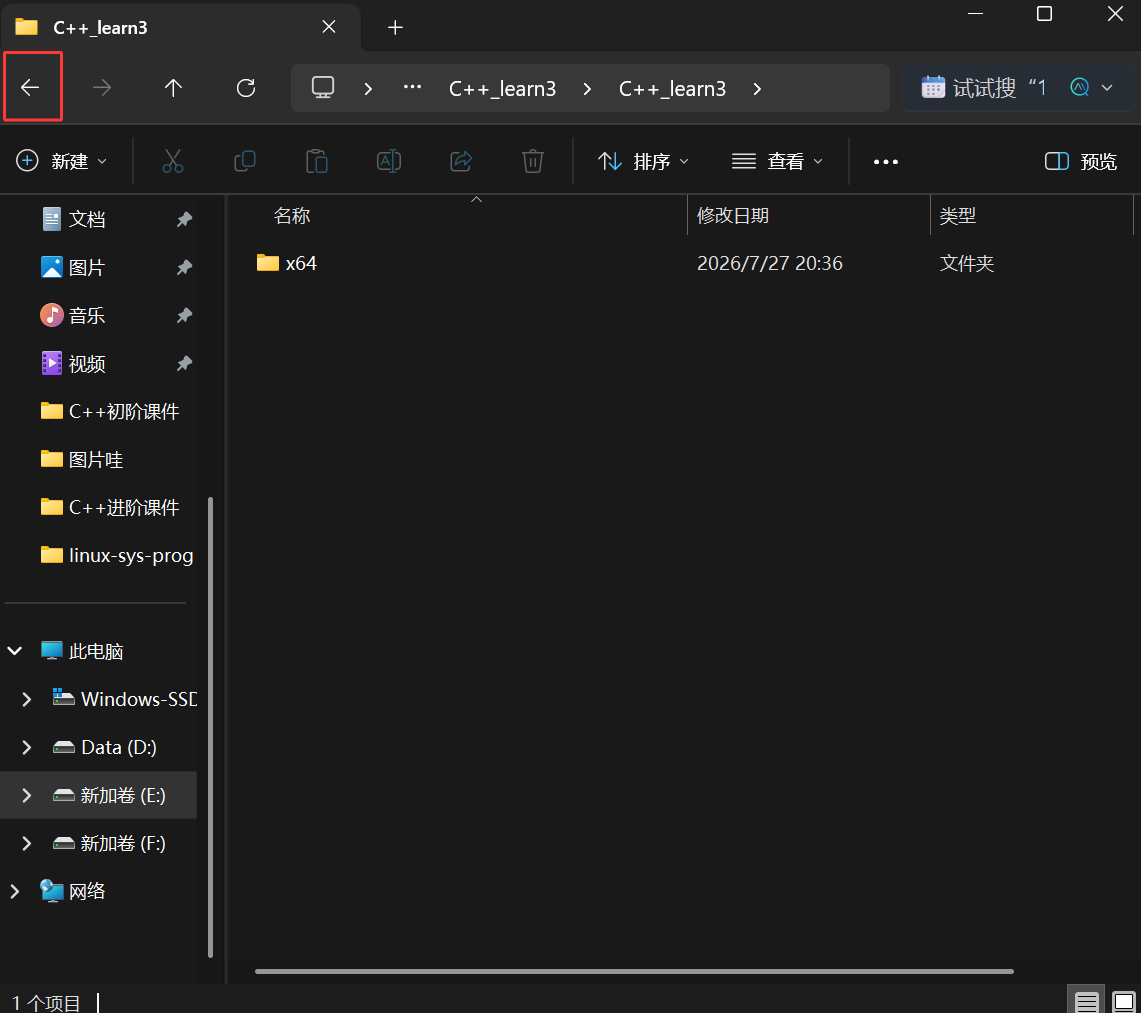
这个cd ..在Windows中其实就相当于是那个回退,如下图
在Linux中,回退的终点就是路径只剩一个 / (这个 / 我们称之为Linux根目录 )了,此时,我们再回退就回退不了了(此时 . 和 ..指的都是根目录)
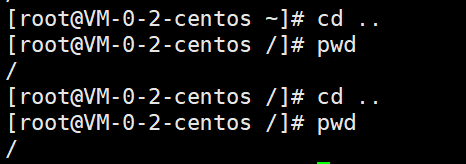
cpp
[root@VM-0-2-centos ~]# cd ..
[root@VM-0-2-centos /]# pwd
/
[root@VM-0-2-centos /]# cd ..
[root@VM-0-2-centos /]# pwd
/
根目录也有属性,如下
cpp
[root@VM-0-2-centos /]# ls -ald /
dr-xr-xr-x. 19 root root 4096 Aug  3 10:23 /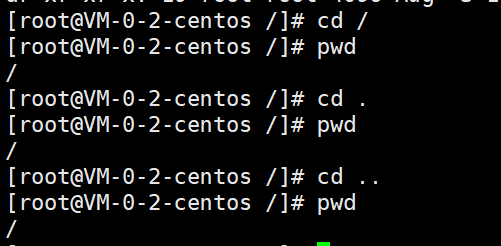
cpp
[root@VM-0-2-centos /]# cd /
[root@VM-0-2-centos /]# pwd
/
[root@VM-0-2-centos /]# cd .
[root@VM-0-2-centos /]# pwd
/
[root@VM-0-2-centos /]# cd ..
[root@VM-0-2-centos /]# pwd
/
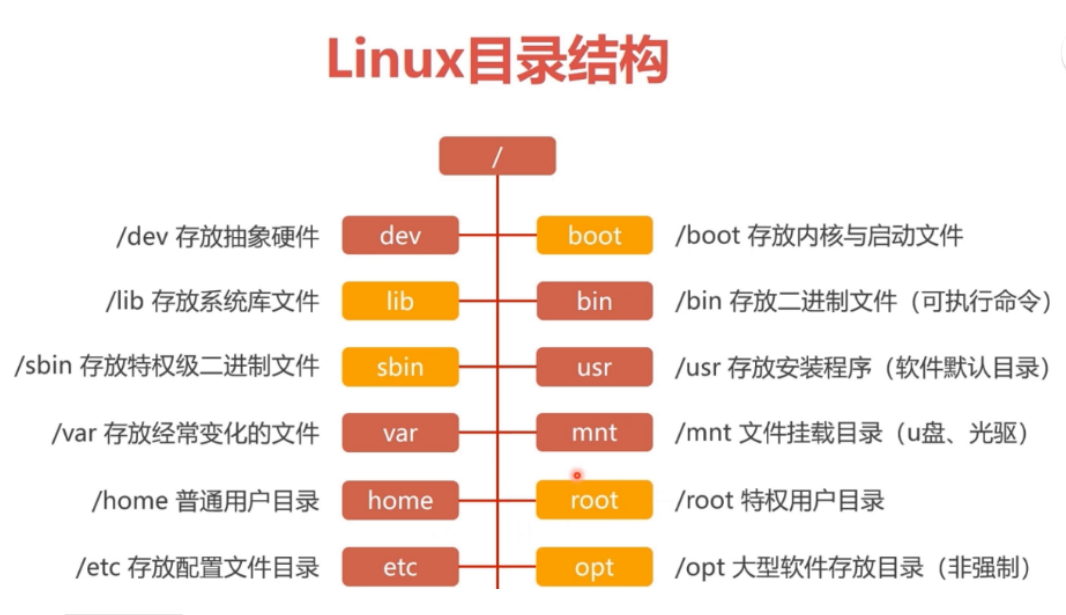
Linux下所有目录的起点就是根目录,而Windows下的起点叫盘符(C盘,D盘,我把Linux目录讲完后就讲讲这个)
根目录既然是个目录,自然我们也可以在根目录下添加新的文件或目录
Linux的文件结构,是一颗从根目录( / )开始的一个多叉树,这颗树的叶子结点一定是普通文件或空目录,非叶子结点一定是一个非空目录,即如下图
. 和 ..懂了后,我们就可以采用相对路径来访问想要访问的目录,这也是 . 和 .. 存在的意义(所以任何一个目录,即便是空的,系统也要默认给该目录自动生成 . 和 .. )
其实我们之前用的如下这个就是用的相对路径(我们不写.和..的时候,默认是 . )
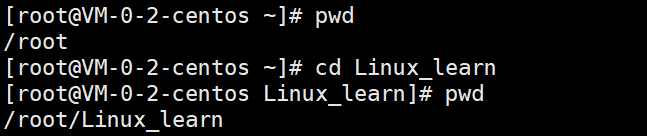
cpp
[root@VM-0-2-centos ~]# pwd
/root
[root@VM-0-2-centos ~]# cd Linux_learn
[root@VM-0-2-centos Linux_learn]# pwd
/root/Linux_learn
上面其实就等价于这个
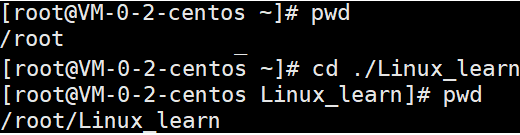
cpp
[root@VM-0-2-centos ~]# pwd
/root
[root@VM-0-2-centos ~]# cd ./Linux_learn
[root@VM-0-2-centos Linux_learn]# pwd
/root/Linux_learn
当然因为是相对路径,我们自然可以回退回去看

cpp
[root@VM-0-2-centos Linux_learn]# pwd
/root/Linux_learn
[root@VM-0-2-centos Linux_learn]# cd ../../home
[root@VM-0-2-centos home]# pwd
/home
Windows的文件结构也是多叉树的结构
虽然有很多磁盘,C盘,D盘,E盘,F盘,我们在Windows中称之为盘符,但其实本质就是个一个个根目录(此电脑不是根目录,只是把这些根目录汇总起来放在一起让我们看而已)
所以简单的说就是Linux是以 / 为根目录的一个巨型多叉树结构
Windows是由多个以盘符为根目录的多叉树结构组成的,这些树相互独立,互不影响
我们用手机点开一个应用也可以把那个图标当成对应目录的入口
现在所有的操作系统没有例外,文件结构全都是采用多叉树的样子
cd指令
语法:cd 目录名
功能:改变工作目录,将当前工作目录改到指定目录下
在上面,我们已经介绍了俩种方式,绝对路径以及相对路径
回顾下
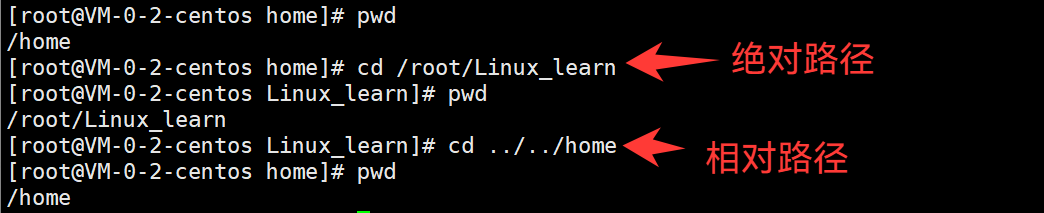
cpp
[root@VM-0-2-centos home]# pwd
/home
[root@VM-0-2-centos home]# cd /root/Linux_learn
[root@VM-0-2-centos Linux_learn]# pwd
/root/Linux_learn
[root@VM-0-2-centos Linux_learn]# cd ../../home
[root@VM-0-2-centos home]# pwd
/home
我再介绍俩种用法
cd ~:进入用户家目录(单独输入cd 等价于 cd ~)
所谓的家目录就是------任何一个linux用户,用特定的用户名登录系统时,默认初始所在的目录就称为家目录(我们现在用的CentOS和之后要用的Ubuntu都是 root家目录是/root,普通用户的家目录是/home/用户名)
我们用户登录进去后在不改变用户所处目录的情况下,用pwd就可以知道这个用户的家目录在哪,我这里演示一下
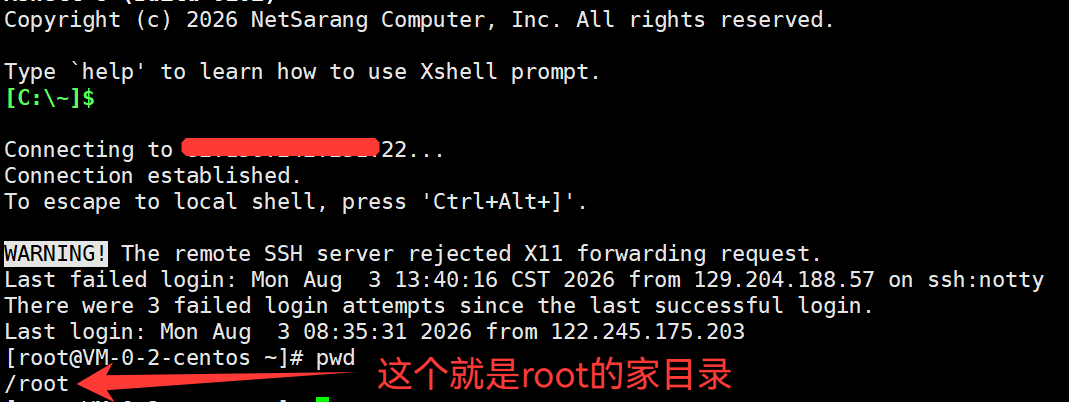
我们现在用的是root,所以我们cd ~会跳到root的家目录中,如下
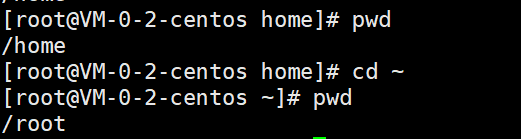
cpp
[root@VM-0-2-centos home]# pwd
/home
[root@VM-0-2-centos home]# cd ~
[root@VM-0-2-centos ~]# pwd
/root
当我们之后用普通用户的时候 ,cd ~也是同理,跳回到家目录,这里就演示一下,如下
我这边添加了一个s用户来演示

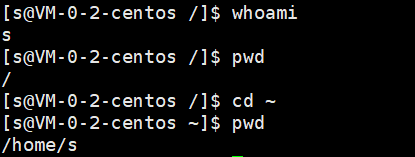
cpp
[s@VM-0-2-centos /]$ whoami
s
[s@VM-0-2-centos /]$ pwd
/
[s@VM-0-2-centos /]$ cd ~
[s@VM-0-2-centos ~]$ pwd
/home/s
Windows下的家目录
Windows系统下,也有家目录的概念(Windows下也是个多用户操作系统系统,我们也可以在Windows下新建用户),当我们首次登录用户的时候,我们新建的用户其实在用户目录下,如下图
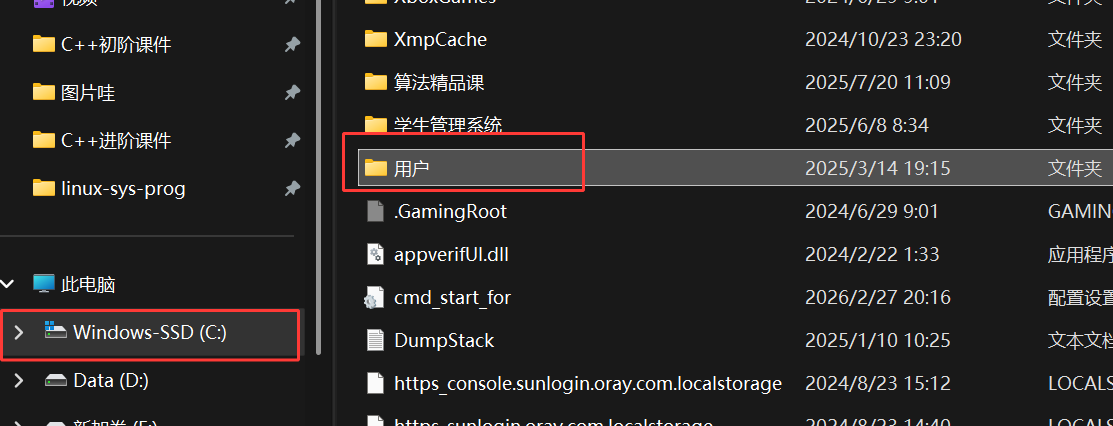
在我们不自己创建用户的情况下,默认用户就是lenovo
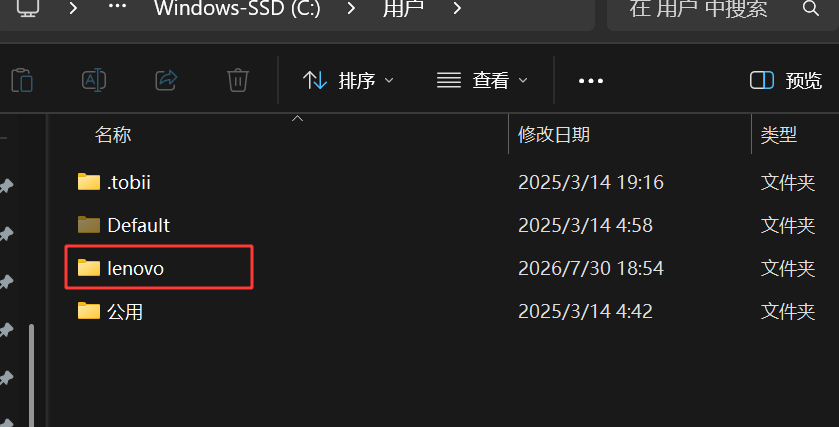
进来后就是这个用户的目录了
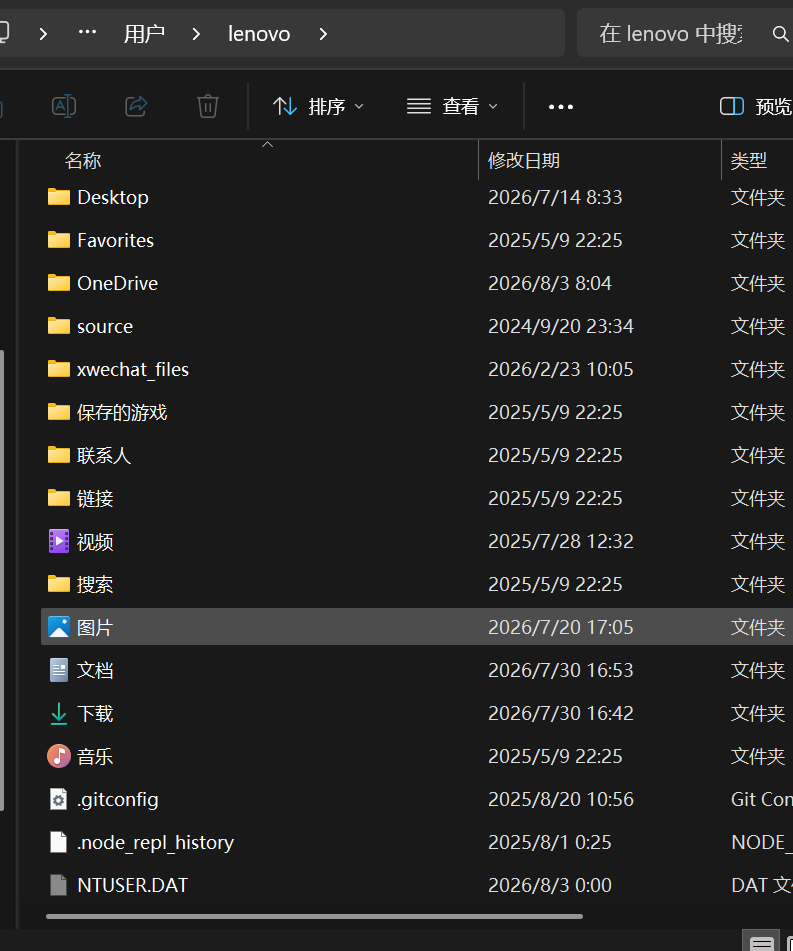
正常这个用户目录里面是会有桌面的,我是迁移到了别的地方

这里我们就能发现,其实,桌面就是个文件夹,点进去后,就是你放在电脑桌面上的那些文件了
所以其实Windows的流程就是先登录用户,用户登录成功后就去用户的目录里面找到对应的桌面文件夹,加载桌面的本质其实就是把桌面 这个文件夹里面的内容给你拿图标的形式展现出来了而已,展现的就是你这个用户所对应的桌面 ,你换个用户登录,桌面就会不一样了
所以,如果我是以lenovo用户登录的,我当前的家目录就是C:\Users\lenovo
这也是为什么我们要学命令行,因为图形化界面包裹的太严重了,学起来会让我们进入很抽象的概念,难以理解,命令行能让我们更清晰的了解,而且图形化界面本质说到底也还是命令行
通过这边的讲解,通过偏底层的视角去看待 ,我们就能知晓我们用了这么久的电脑这些究竟是怎么实现的了
因为我们现在用的CentOS系统是线上的,它没有桌面的概念,用虚拟机的的话就有桌面的概念了

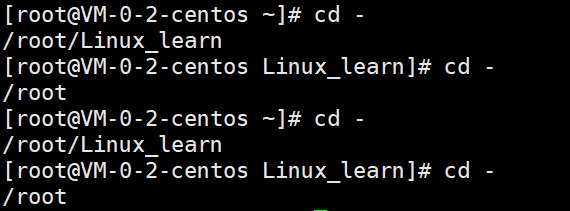
cd -:返回最近访问目录
这个实现的效果就很明显,我就直接演示一下
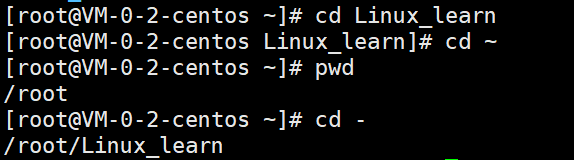
cpp
[root@VM-0-2-centos ~]# cd Linux_learn
[root@VM-0-2-centos Linux_learn]# cd ~
[root@VM-0-2-centos ~]# pwd
/root
[root@VM-0-2-centos ~]# cd -
/root/Linux_learn
如果我们连续使用cd -,那就是在俩个目录之间来回跳转(如果我们未来有时候需要在俩个目录间频繁来回操作,就可以通过这个实现快捷跳转,这也算是个快捷操作),如下
cpp
[root@VM-0-2-centos ~]# cd -
/root/Linux_learn
[root@VM-0-2-centos Linux_learn]# cd -
/root
[root@VM-0-2-centos ~]# cd -
/root/Linux_learn
[root@VM-0-2-centos Linux_learn]# cd -
/root
touch指令
touch指令
语法:touch 选项 文件
功能:touch命令参数可更改文件或目录的日期时间,包括存取时间和更改时间,或者新建一个不存在的普通文件
touch指令最重要的用途有俩个(如上),首先是创建一个普通文件(创建普通文件只能用touch指令),如下
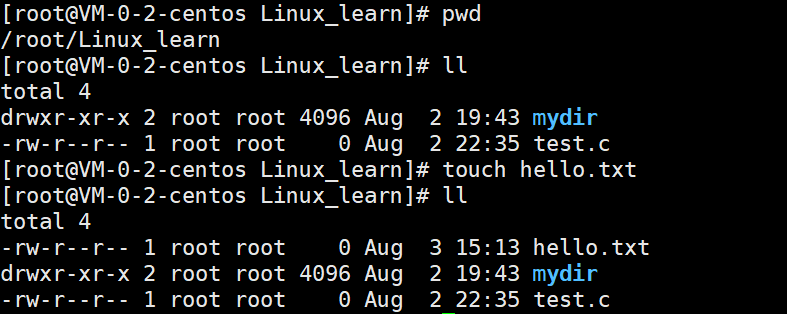
cpp
[root@VM-0-2-centos Linux_learn]# pwd
/root/Linux_learn
[root@VM-0-2-centos Linux_learn]# ll
total 4
drwxr-xr-x 2 root root 4096 Aug  2 19:43 mydir
-rw-r--r-- 1 root root    0 Aug  2 22:35 test.c
[root@VM-0-2-centos Linux_learn]# touch hello.txt
[root@VM-0-2-centos Linux_learn]# ll
total 4
-rw-r--r-- 1 root root    0 Aug  3 15:13 hello.txt
drwxr-xr-x 2 root root 4096 Aug  2 19:43 mydir
-rw-r--r-- 1 root root 0 Aug 2 22:35 test.ctouch也可以更新文件或目录的时间,如下(但现在的知识储备没有场景让我们用,没有需求,现在讲用处不大,现在只需要知道touch是用来创建文件的就够了)
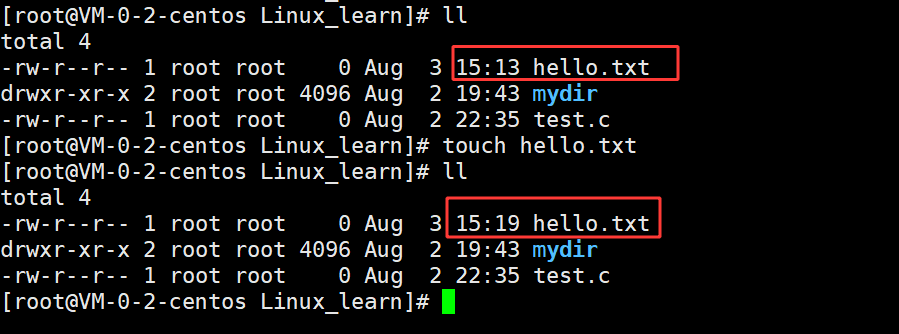
cpp
[root@VM-0-2-centos Linux_learn]# ll
total 4
-rw-r--r-- 1 root root    0 Aug  3 15:13 hello.txt
drwxr-xr-x 2 root root 4096 Aug  2 19:43 mydir
-rw-r--r-- 1 root root    0 Aug  2 22:35 test.c
[root@VM-0-2-centos Linux_learn]# touch hello.txt
[root@VM-0-2-centos Linux_learn]# ll
total 4
-rw-r--r-- 1 root root    0 Aug  3 15:19 hello.txt
drwxr-xr-x 2 root root 4096 Aug  2 19:43 mydir
-rw-r--r-- 1 root root    0 Aug  2 22:35 test.c
拓展(stat指令):
在Linux中,文件=文件内容+文件属性,其实我们ls,ll查看到的这些信息全都是文件的属性
而文件中有一种属性叫做文件对应的时间,一般文件的时间有三种,我们可以通过stat指令查看,此时我们就能看到文件的详细属性介绍
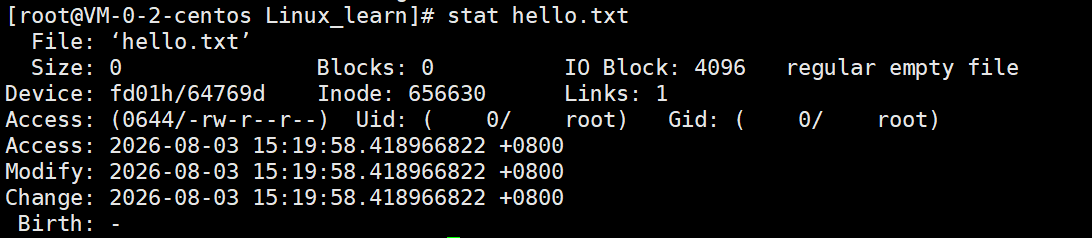
这里就有文件的三个时间------Access time(文件最近被访问的时间),Modify time(文件内容最近被修改的时间),Change(文件属性或内容最近被修改的时间) time,这三个时间我们想快速有印象打过算法的可以这么记(ACM),如果文件没有被修改,那么Modify time 和 Change time就是文件创建的时间,touch更改时间主要更改的就是Modify time和Change time
touch选项
-a或--time=atime或--time=access或--time=use只更改存取时间。-c或--no-create不建立任何文档。-d使用指定的日期时间,而非现在的时间。-f此参数将忽略不予处理,仅负责解决 BSD 版本 touch 指令的兼容性问题。-m或--time=mtime或--time=modify只更改变动时间。-r把指定文档或目录的日期时间,统一设成和参考文档或目录的日期时间相同。-t使用指定的日期时间,而非现在的时间。
mkdir指令
mkdir指令
语法:mkdir 选项 dirname
功能:在当前目录下创建一个名为"dirname"的目录
常用选项:
-p/--parents : 可以是⼀个路径名称。此时若路径中的某些⽬录尚不存在,加上此选项后,系统将自动建立好那些尚不存在的目录,即**⼀次可以建立多个⽬录**
mkdir创建单个目录的操作我们已经在之前演示过好多次了,就不演示了
这里我演示一下一次创建多个目录的样例
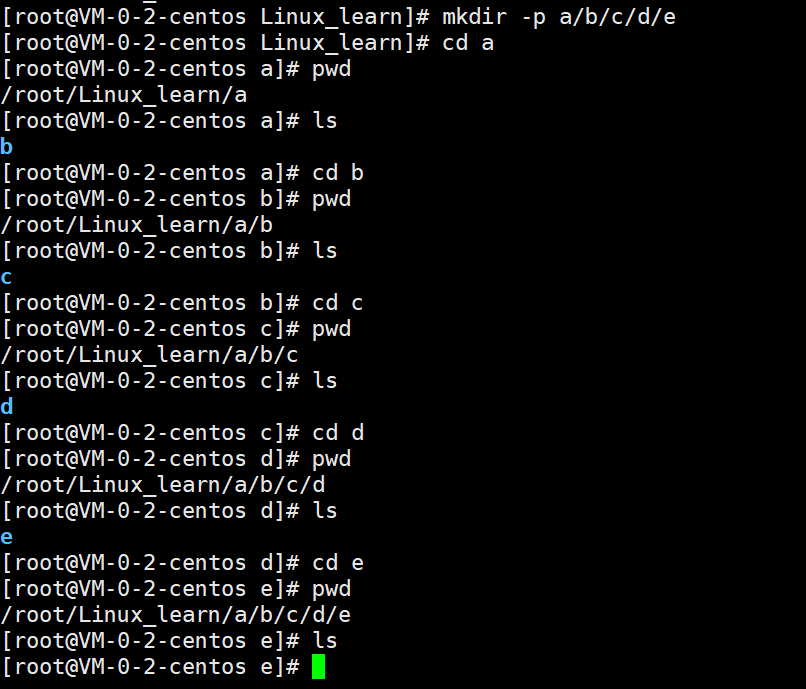
cpp
[root@VM-0-2-centos Linux_learn]# mkdir -p a/b/c/d/e
[root@VM-0-2-centos Linux_learn]# cd a
[root@VM-0-2-centos a]# pwd
/root/Linux_learn/a
[root@VM-0-2-centos a]# ls
b
[root@VM-0-2-centos a]# cd b
[root@VM-0-2-centos b]# pwd
/root/Linux_learn/a/b
[root@VM-0-2-centos b]# ls
c
[root@VM-0-2-centos b]# cd c
[root@VM-0-2-centos c]# pwd
/root/Linux_learn/a/b/c
[root@VM-0-2-centos c]# ls
d
[root@VM-0-2-centos c]# cd d
[root@VM-0-2-centos d]# pwd
/root/Linux_learn/a/b/c/d
[root@VM-0-2-centos d]# ls
e
[root@VM-0-2-centos d]# cd e
[root@VM-0-2-centos e]# pwd
/root/Linux_learn/a/b/c/d/e
[root@VM-0-2-centos e]# ls
[root@VM-0-2-centos e]#
但是,我们会发现,这么查的话效率太低了,而且好麻烦,这个时候我们就可以用一个新的指令------tree
拓展:tree指令
tree 命令是一个递归以树状结构显示指定目录的命令,现在一般都是没有安装的,我们要安装下(如果你们运行没报错,说明你们那个系统预装了,这就跟你的系统和云服务器有关系了)
CentOS系统下
如果当前用户是 root:yum install -y tree(因为现在开始用的都是 root,所以推荐这个用法,如果是Ubuntu,把yum改成apt即可)
如果当前用户是普通用户:sudo yum install -y tree(后面讲完 vim,大家才能将自己添加到系统信任列表中,暂时普通用户无法使用 sudo)
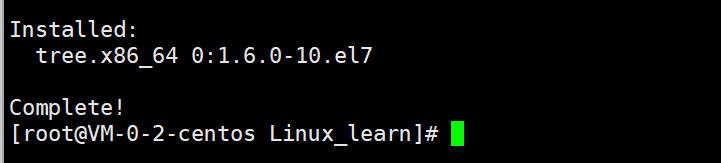
这样就安装完了,这也是安到了usr/bin目录下,我们安装的本质就是把对应命令从网络上下载下来,然后拷贝到usr/bin目录下

接下来我们先跳到一开始的Linux_learn目录,随后使用tree
tree目录可以指定目录显示成树形结构,也可以用 . 把当前目录下的所有目录和文件显示成树形结构
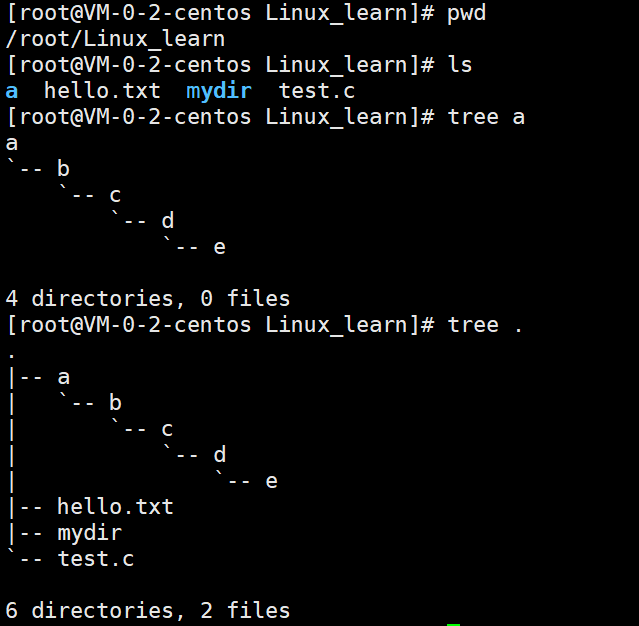
cpp
[root@VM-0-2-centos Linux_learn]# pwd
/root/Linux_learn
[root@VM-0-2-centos Linux_learn]# ls
a  hello.txt  mydir  test.c
[root@VM-0-2-centos Linux_learn]# tree a
a
`-- b
    `-- c
        `-- d
            `-- e

4 directories, 0 files
[root@VM-0-2-centos Linux_learn]# tree .
.
|-- a
|   `-- b
|       `-- c
|           `-- d
|               `-- e
|-- hello.txt
|-- mydir
`-- test.c

6 directories, 2 files
当然,我们也可以将tree 和 ~搭配起来,这样就会返回整个家目录的结构,如下
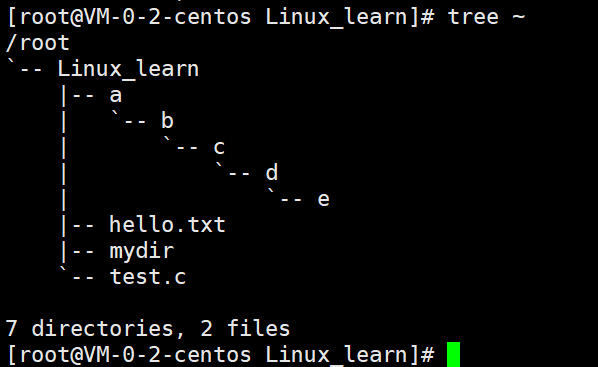
cpp
[root@VM-0-2-centos Linux_learn]# tree ~
/root
`-- Linux_learn
    |-- a
    |   `-- b
    |       `-- c
    |           `-- d
    |               `-- e
    |-- hello.txt
    |-- mydir
    `-- test.c

7 directories, 2 files
rmdir指令(这个了解即可,未来我们用的最多是rm指令进行删除)
这个指令和mkdir指令相对应,mkdir是创建目录,rmdir就是删除目录
语法:rmdir -p 目录名
适用对象:具有当前目录操作权限的所有使用者
功能:删除空目录
特别注意:rmdir只能删除空目录
常用选项
-p 当子目录被删除后如果父目录也变成空目录的话,就连带父目录一起删除(直到父目录不为空)
这里我就简单的演示一下
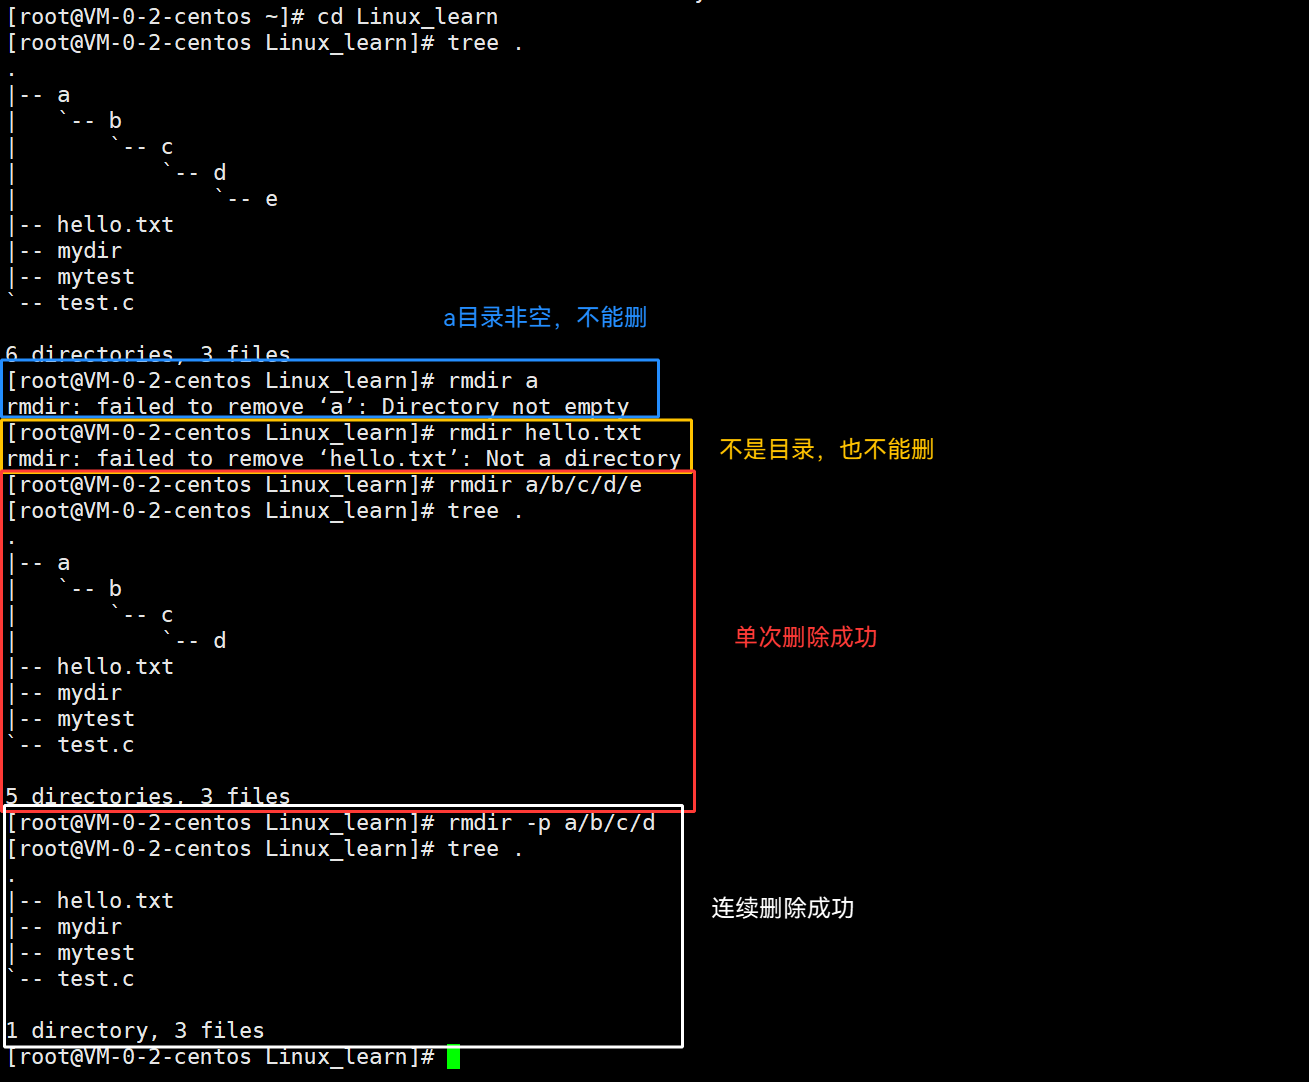
cpp
[root@VM-0-2-centos ~]# cd Linux_learn
[root@VM-0-2-centos Linux_learn]# tree .
.
|-- a
|   `-- b
|       `-- c
|           `-- d
|               `-- e
|-- hello.txt
|-- mydir
|-- mytest
`-- test.c

6 directories, 3 files
[root@VM-0-2-centos Linux_learn]# rmdir a
rmdir: failed to remove 'a': Directory not empty
[root@VM-0-2-centos Linux_learn]# rmdir hello.txt
rmdir: failed to remove 'hello.txt': Not a directory
[root@VM-0-2-centos Linux_learn]# rmdir a/b/c/d/e
[root@VM-0-2-centos Linux_learn]# tree .
.
|-- a
|   `-- b
|       `-- c
|           `-- d
|-- hello.txt
|-- mydir
|-- mytest
`-- test.c

5 directories, 3 files
[root@VM-0-2-centos Linux_learn]# rmdir -p a/b/c/d
[root@VM-0-2-centos Linux_learn]# tree .
.
|-- hello.txt
|-- mydir
|-- mytest
`-- test.c

1 directory, 3 files
rm指令(重点)
rm指令
rm就是remove,移除
语法:rm 选项 文件名/目录名
功能:删除文件或目录(可以同时删除)(不加选项默认只能删普通文件)
适用对象:所有使用者
常用选项
-f 即使文件属性为只读(即写保护),亦直接删除(不会询问是否确定删除)
-i 删除前注意询问确认
-r 删除目录及其以下所有文件
我这里演示一下种种情况,因为我们这里用的是 root 账号,我们每次删除系统都会询问我们是否确定删除,普通用户下如果文件前有你用户名字(也就是你创建的),系统不会问你
删除普通文件
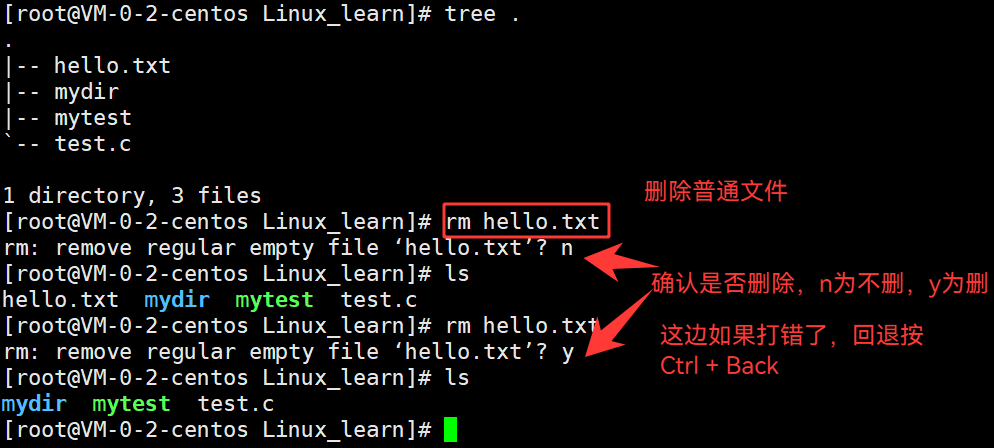
cpp
[root@VM-0-2-centos Linux_learn]# tree .
.
|-- hello.txt
|-- mydir
|-- mytest
`-- test.c

1 directory, 3 files
[root@VM-0-2-centos Linux_learn]# rm hello.txt
rm: remove regular empty file 'hello.txt'? n
[root@VM-0-2-centos Linux_learn]# ls
hello.txt  mydir  mytest  test.c
[root@VM-0-2-centos Linux_learn]# rm hello.txt
rm: remove regular empty file 'hello.txt'? y
[root@VM-0-2-centos Linux_learn]# ls
mydir  mytest  test.c
那么,对于我们先前拷贝到/usr/bin下的mytest可执行程序自然也就可以删除了,我这里直接-f强制删除了,如下
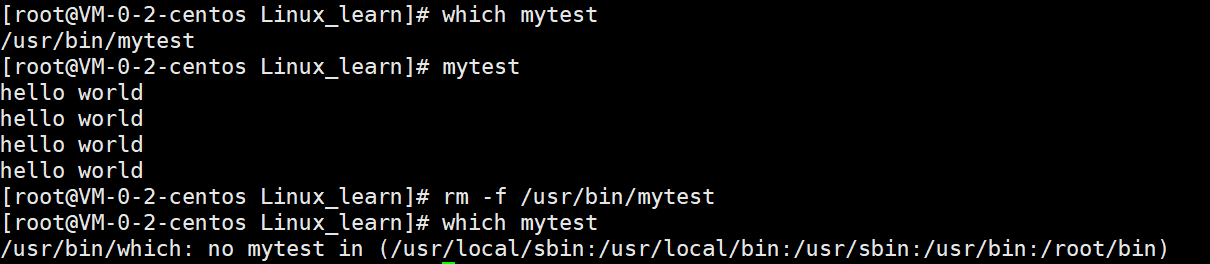
cpp
[root@VM-0-2-centos Linux_learn]# which mytest
/usr/bin/mytest
[root@VM-0-2-centos Linux_learn]# mytest
hello world
hello world
hello world
hello world
[root@VM-0-2-centos Linux_learn]# rm -f /usr/bin/mytest
[root@VM-0-2-centos Linux_learn]# which mytest
/usr/bin/which: no mytest in (/usr/local/sbin:/usr/local/bin:/usr/sbin:/usr/bin:/root/bin)
删除目录
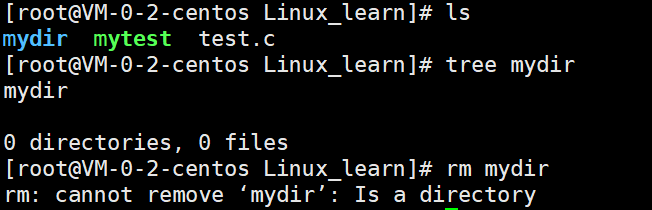
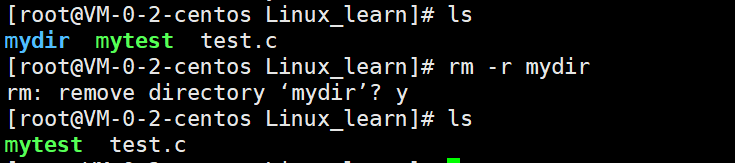
我们可以发现rm删目录删不掉,这是因为rm默认情况下只能删除普通文件(就跟rmdir一样,默认删空目录)
我们要删目录需要加上 -r 的选项
如下
cpp
[root@VM-0-2-centos Linux_learn]# ls
mydir  mytest  test.c
[root@VM-0-2-centos Linux_learn]# rm -r mydir
rm: remove directory 'mydir'? y
[root@VM-0-2-centos Linux_learn]# ls
mytest  test.c
这里其实就能反映出超级管理员的问题了
我们可以直接删除整个Linux系统,就比如下面这样操作(因为我们现在登录的是root账号,所以我们想删的话,是可以从根目录开始直接把整个Linux系统给删除的)

cpp
[root@VM-0-2-centos Linux_learn]# rm -rf /这里我就不演示了,你们可以尝试一下,一按回车系统就挂掉了,这个时候问题也不大,因为我们用的是云服务器,去云服务器后台那边重装一下系统就好了(实例------更多------重装系统),现实工作时候绝对不要这么搞,这是重大的工程事故!!!!!!!!!
当然,虽然我们rm是从系统的根目录开始删,我们还是root管理员权限,但不一定能删除系统的所有文件,这就跟权限没关系了(但他会把能删的全删了),在Windows下你们肯定也遇到过删除删不掉的情况,比如会弹出有些文件正在使用无法删除
Linux理论知识:通配符(*)
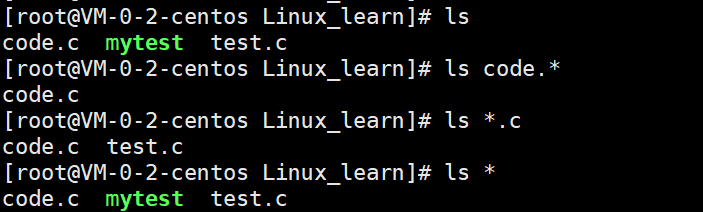
通配符就是可以去匹配任意内容,我来演示一下
cpp
[root@VM-0-2-centos Linux_learn]# ls
code.c  mytest  test.c
[root@VM-0-2-centos Linux_learn]# ls code.*
code.c
[root@VM-0-2-centos Linux_learn]# ls *.c
code.c  test.c
[root@VM-0-2-centos Linux_learn]# ls *
code.c  mytest  test.c
code.*就是只要是code.开头,后面都不管,*.c就是只要是.c结尾,前面都不管,*就是没要求都匹配,然后我们也可以通过通配符来删除多个文件,如下

cpp
[root@VM-0-2-centos Linux_learn]# ls *
code.c  mytest  test.c
[root@VM-0-2-centos Linux_learn]# rm -rf *.c
[root@VM-0-2-centos Linux_learn]# ls
mytest
此时我们就把.c后缀的所有文件都删掉了
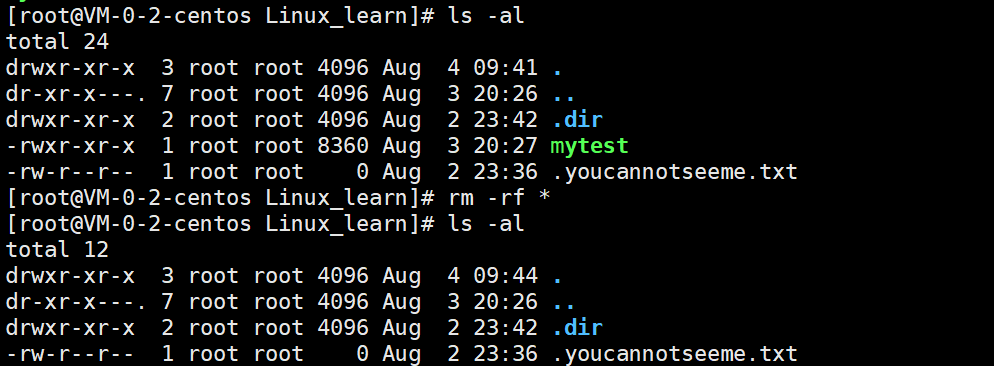
有的人也喜欢这么删除目录下的文件,但这种删除方法,隐藏目录是不会被删的,如下
cpp
[root@VM-0-2-centos Linux_learn]# ls -al
total 24
drwxr-xr-x  3 root root 4096 Aug  4 09:41 .
dr-xr-x---. 7 root root 4096 Aug  3 20:26 ..
drwxr-xr-x  2 root root 4096 Aug  2 23:42 .dir
-rwxr-xr-x  1 root root 8360 Aug  3 20:27 mytest
-rw-r--r--  1 root root    0 Aug  2 23:36 .youcannotseeme.txt
[root@VM-0-2-centos Linux_learn]# rm -rf *
[root@VM-0-2-centos Linux_learn]# ls -al
total 12
drwxr-xr-x  3 root root 4096 Aug  4 09:44 .
dr-xr-x---. 7 root root 4096 Aug  3 20:26 ..
drwxr-xr-x  2 root root 4096 Aug  2 23:42 .dir
-rw-r--r--  1 root root    0 Aug  2 23:36 .youcannotseeme.txt
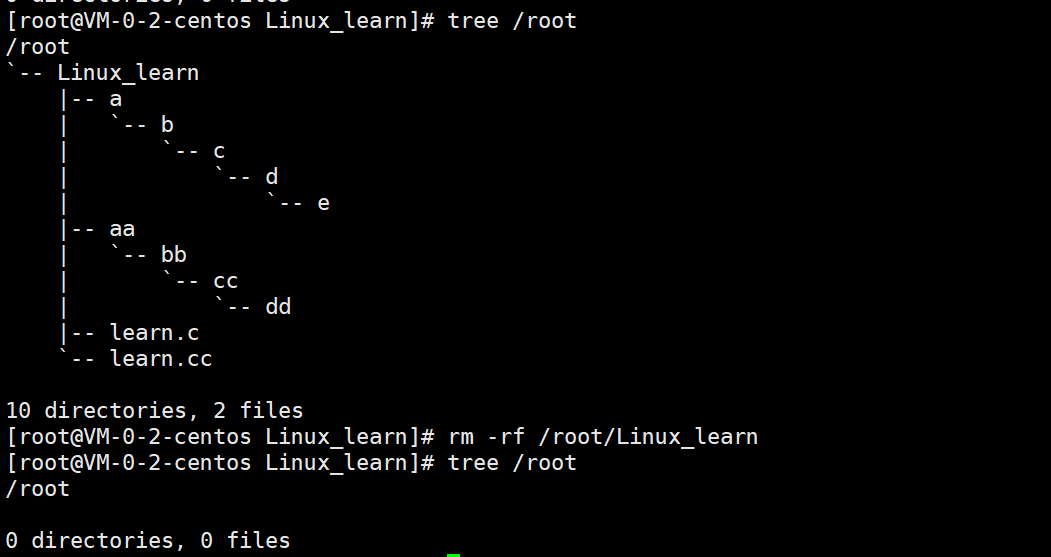
但如果我们用路径方式删除,那隐藏文件就会被删除了(因为他是全删了,连目录都删了,而上面是删的目录下的文件和目录),如下
cpp
[root@VM-0-2-centos Linux_learn]# tree /root
/root
`-- Linux_learn
    |-- a
    |   `-- b
    |       `-- c
    |           `-- d
    |               `-- e
    |-- aa
    |   `-- bb
    |       `-- cc
    |           `-- dd
    |-- learn.c
    `-- learn.cc

10 directories, 2 files
[root@VM-0-2-centos Linux_learn]# rm -rf /root/Linux_learn
[root@VM-0-2-centos Linux_learn]# tree /root
/root

0 directories, 0 files
这个通配符可能的问题其实跟上面我们rm -rf /问题一样,你如果在根目录,你直接 rm -rf *,虽然根目录没被删除,但根目录里面的大部分东西全被删除了
我们删除的时候一定要谨慎,因为如果发生上面这种事,就是很大的工程事故了,也就是你们常听说的(删库跑路)------Linux没有所谓的回收站,删了就是删了,找不到了(虽然可以恢复,但是恢复方式特别麻烦,需要专业的恢复工程师来进行恢复)
man指令(重要)
Linux的命令有很多参数,我们不可能全记住,我们可以通过man来查阅,这指令就相当于我们C/C++的平台手册一样,不会的搜就行
语法:man 选项 指令
常用选项
- -k 根据关键字搜索联机帮助
- num 只在第num章节查找
- -a 将所有章节的都显示出来,比如 man printf 它缺省从第一章开始探索,找到就停止 ,用-a选项,当按下q退出,他会继续往后搜索,直到所有章节都搜索完毕
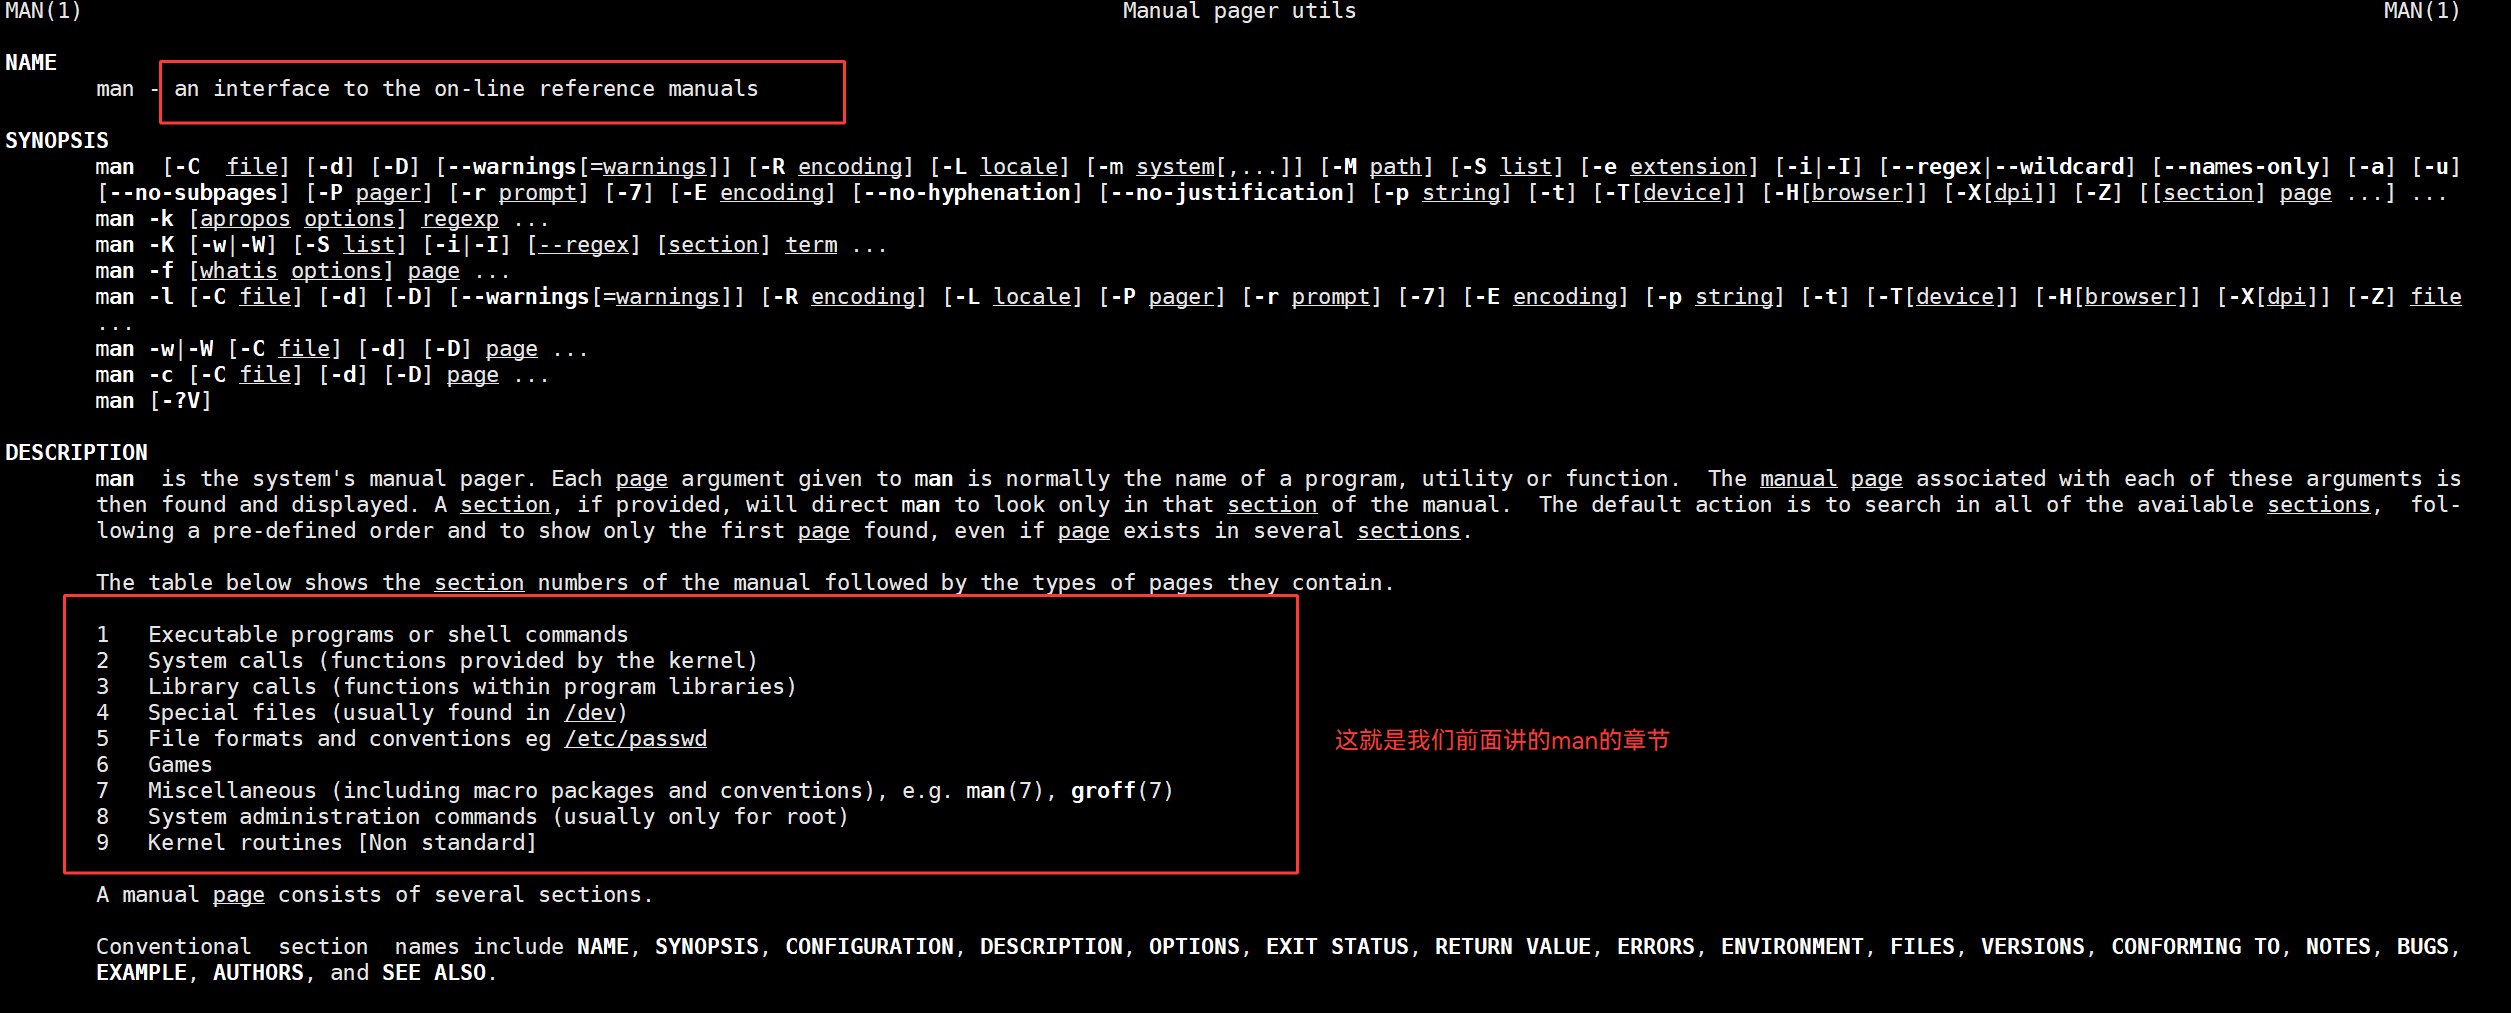
注:man手册分为9章(不同系统可能有差别)------前三章最常用
- 是普通的命令(shell 普通指令:ls、rm、cd)
- 是系统调用,如 open,write 之类的 (通过这个,至少可以很方便的查到调用这个函数,需要加什么头文件)
- 是库函数,如 printf,fread。(一般都是C接口)
- 是特殊文件,也就是 /dev 下的各种设备文件
- 是指文件的格式,比如 passwd,就会说明这个文件中各个字段的含义
- 是给游戏留的,由各个游戏自己定义
- 是附件还有一些变量,比如像 environ 这种全局变量在这里就有说明
- 是系统管理用的命令,这些命令只能由 root 使用,如 ifconfig
- 内核程序 / 内核模块(拓展)
man
比如我们pwd指令不会用,我们就能用man查查,如下,作用就是打印当前的工作路径

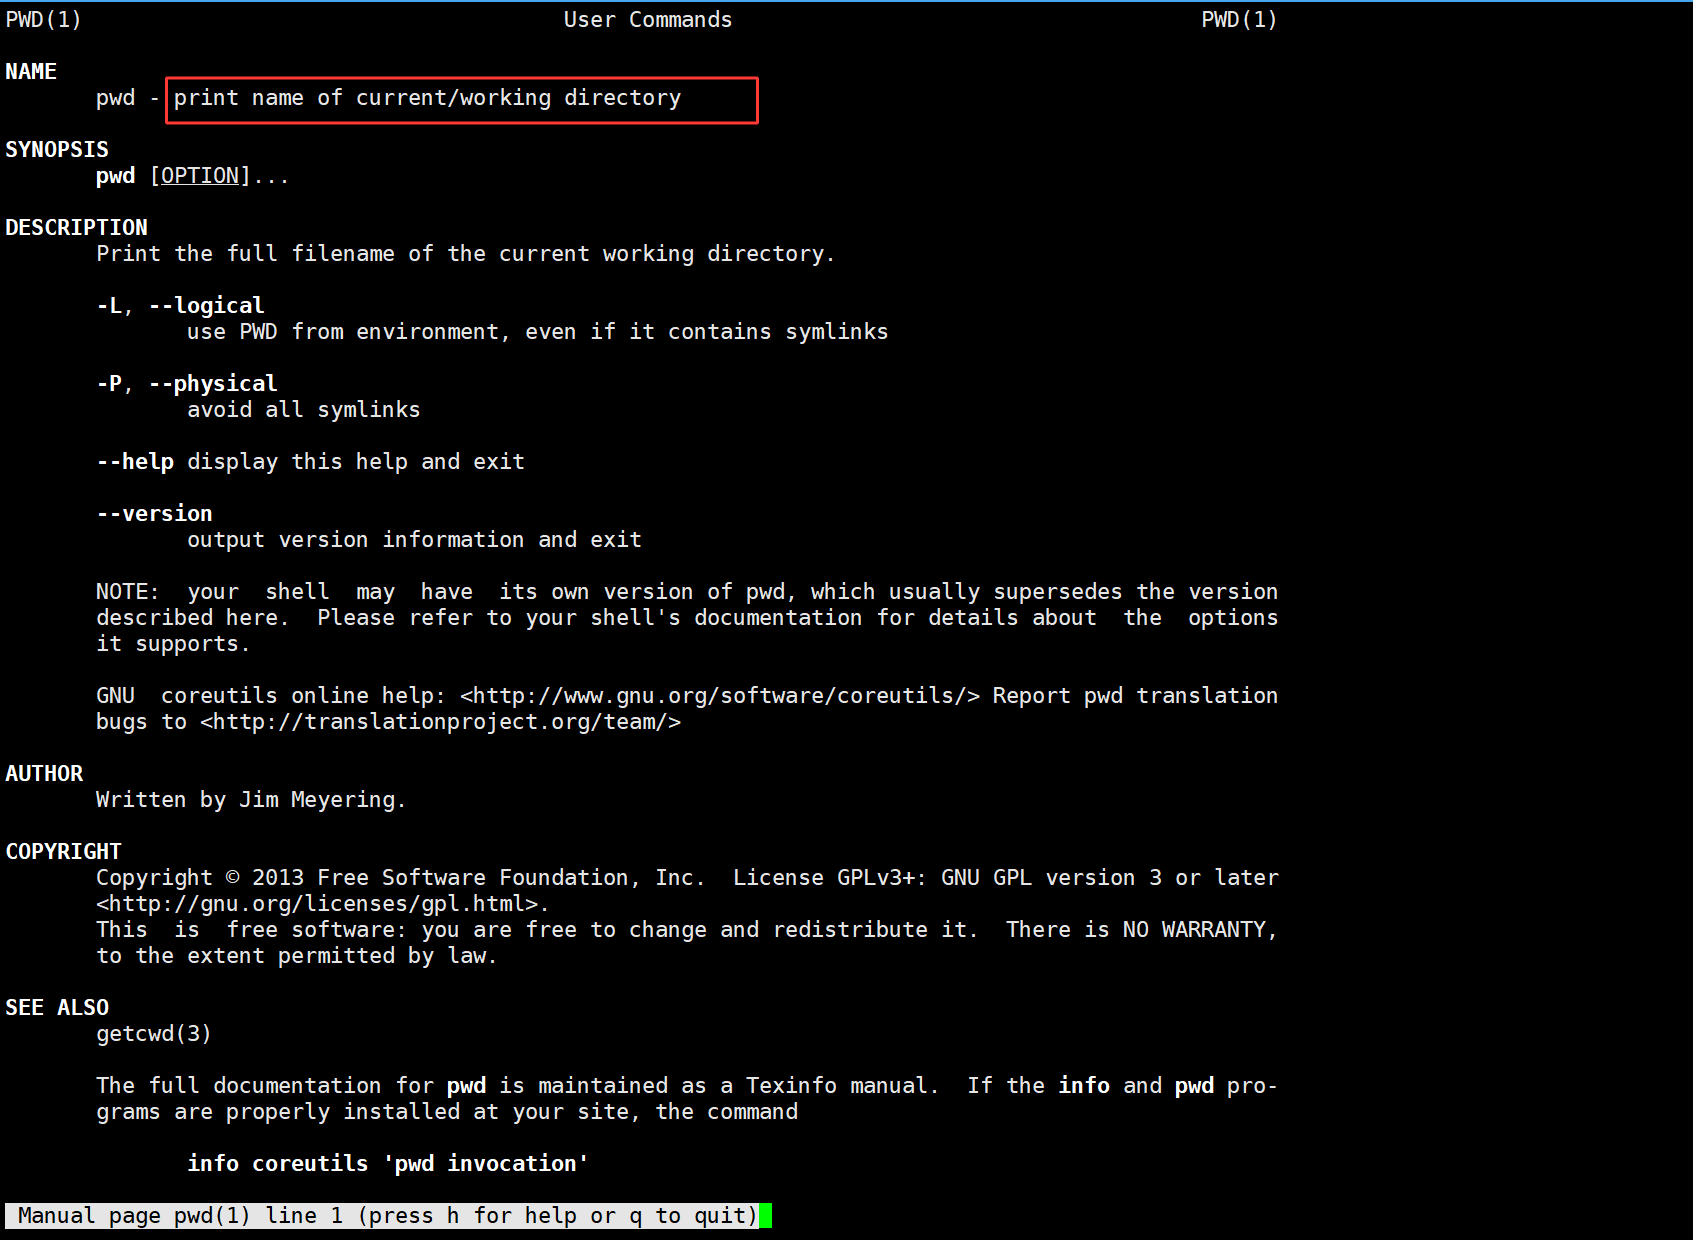
想要退出按q或Ctrl+Z(挂起进程)就行
我们也能看看man是个什么指令

我们可以看到,他就是个在线手册
man num
我们用man查的时候,默认查的都是1号手册(即命令)------如果查不到会往后面的手册查(查到就终止)
注意:我们云服务器默认man是只装了1号手册的,其余手册我们要自己装,如果不装的话,我们查其他手册我们是查不到的**,用下面这个指令安装全套man手册**
cpp
#if 0
CentOS下
#endif
yum install -y man-pages man-pages-overrides

#if 0
Ubuntu下
#endif
apt update
apt install -y manpages manpages-dev命令行快速操作:我们用历史命令的话,其实可以不用手动输,上下方向键就能找到历史命令
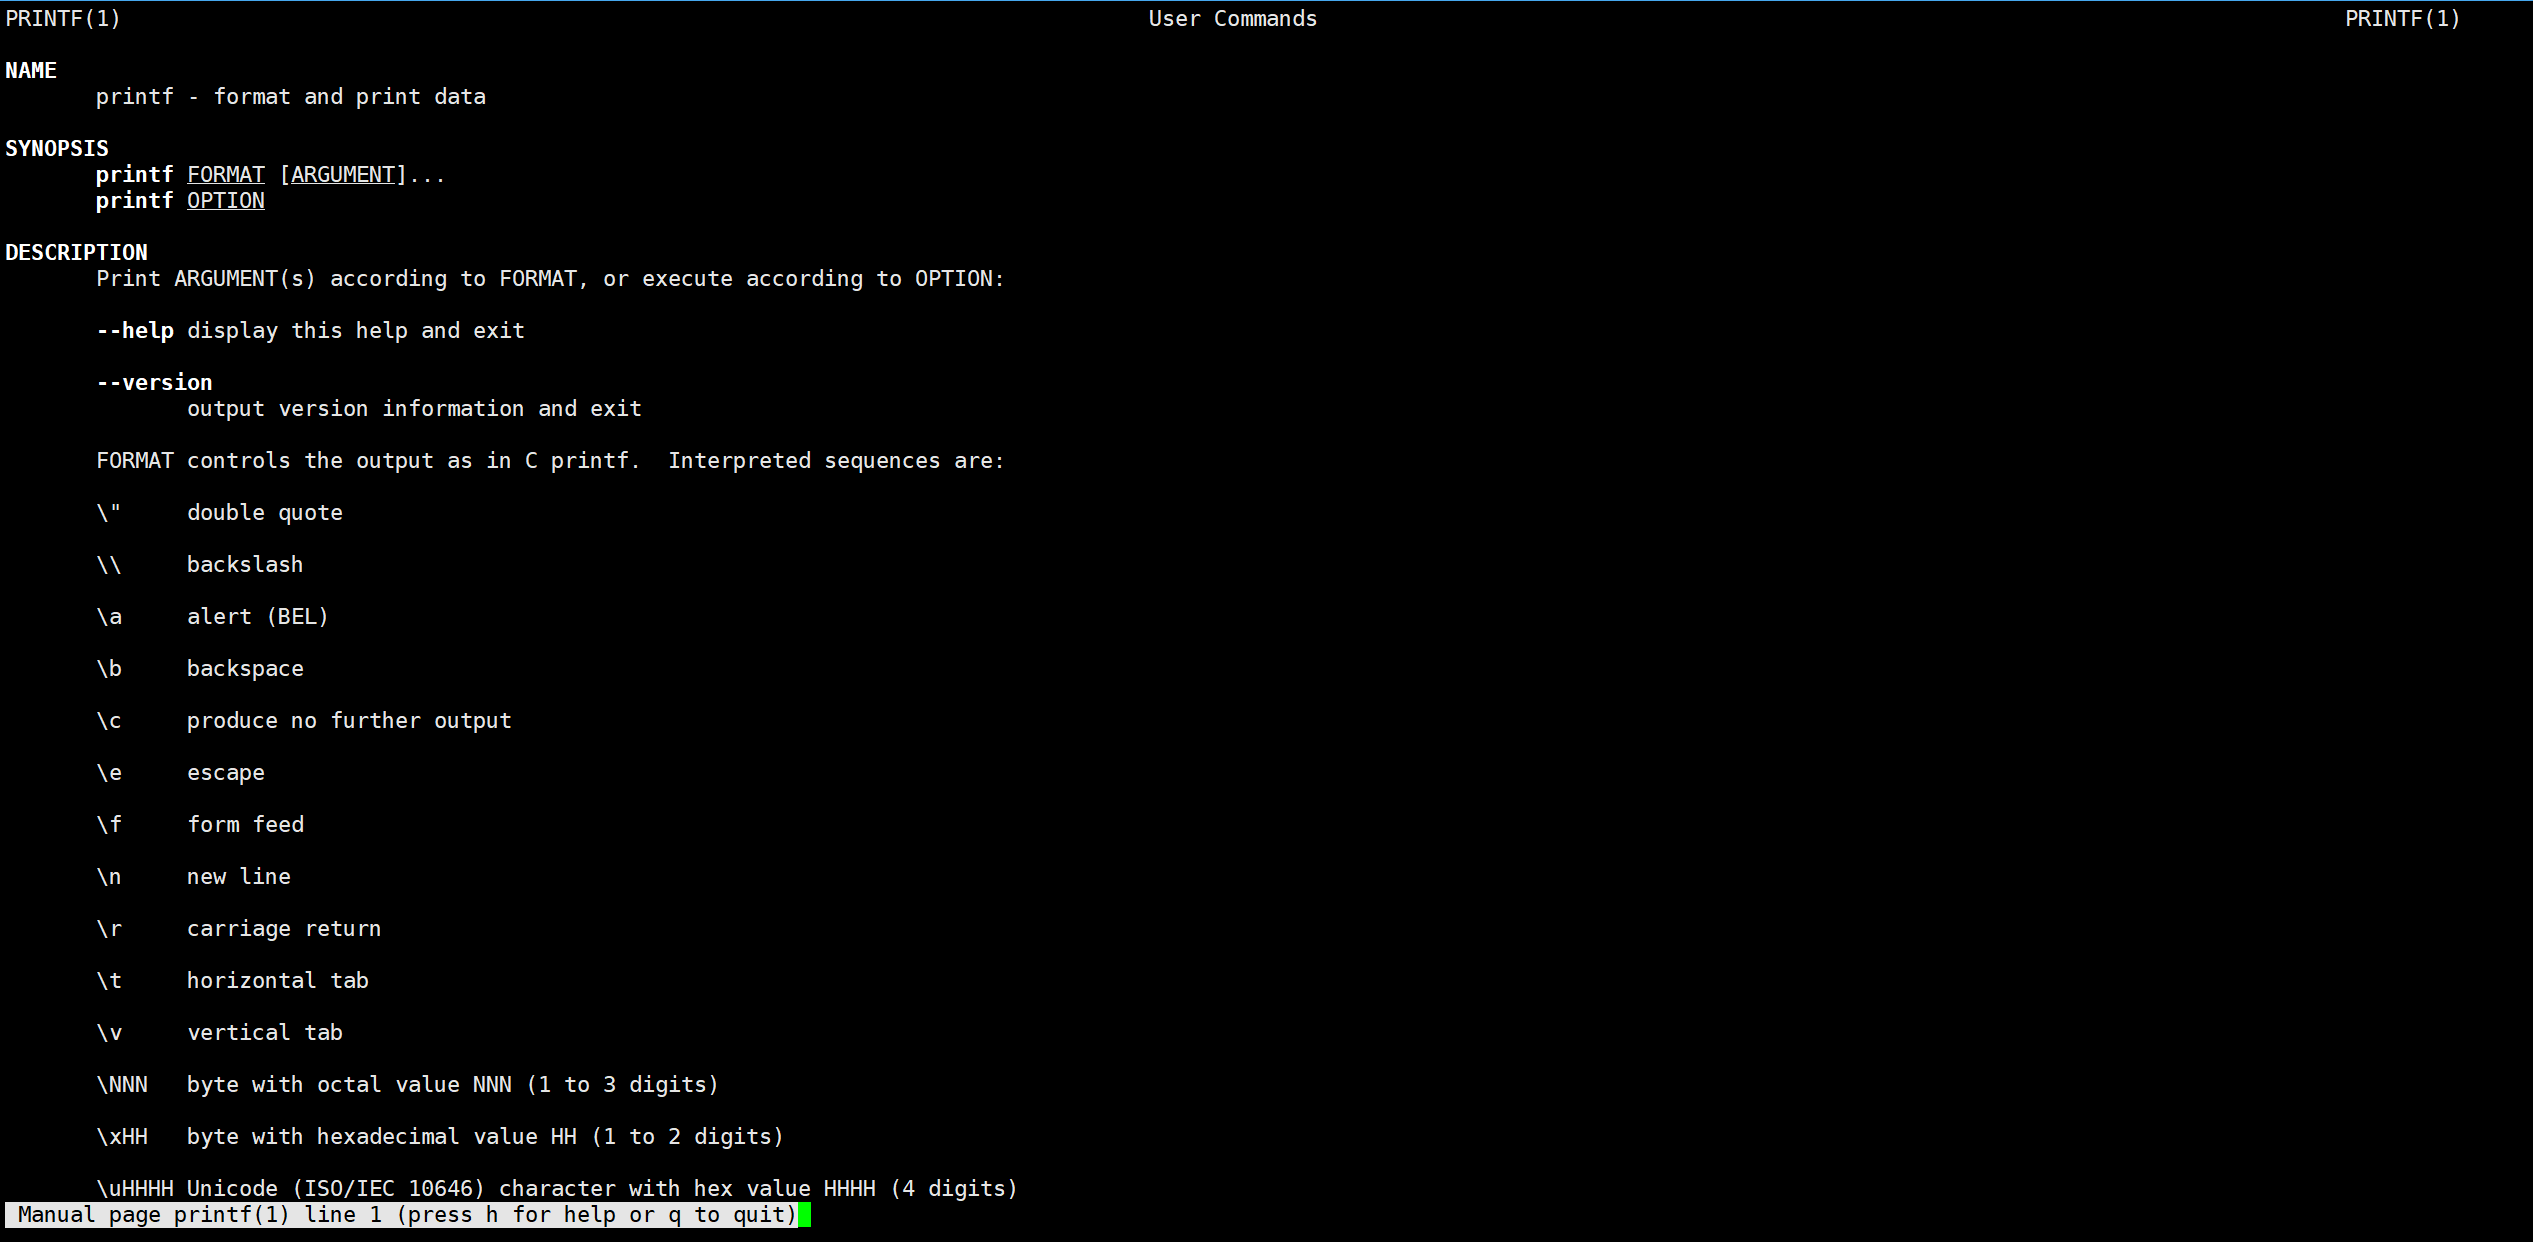
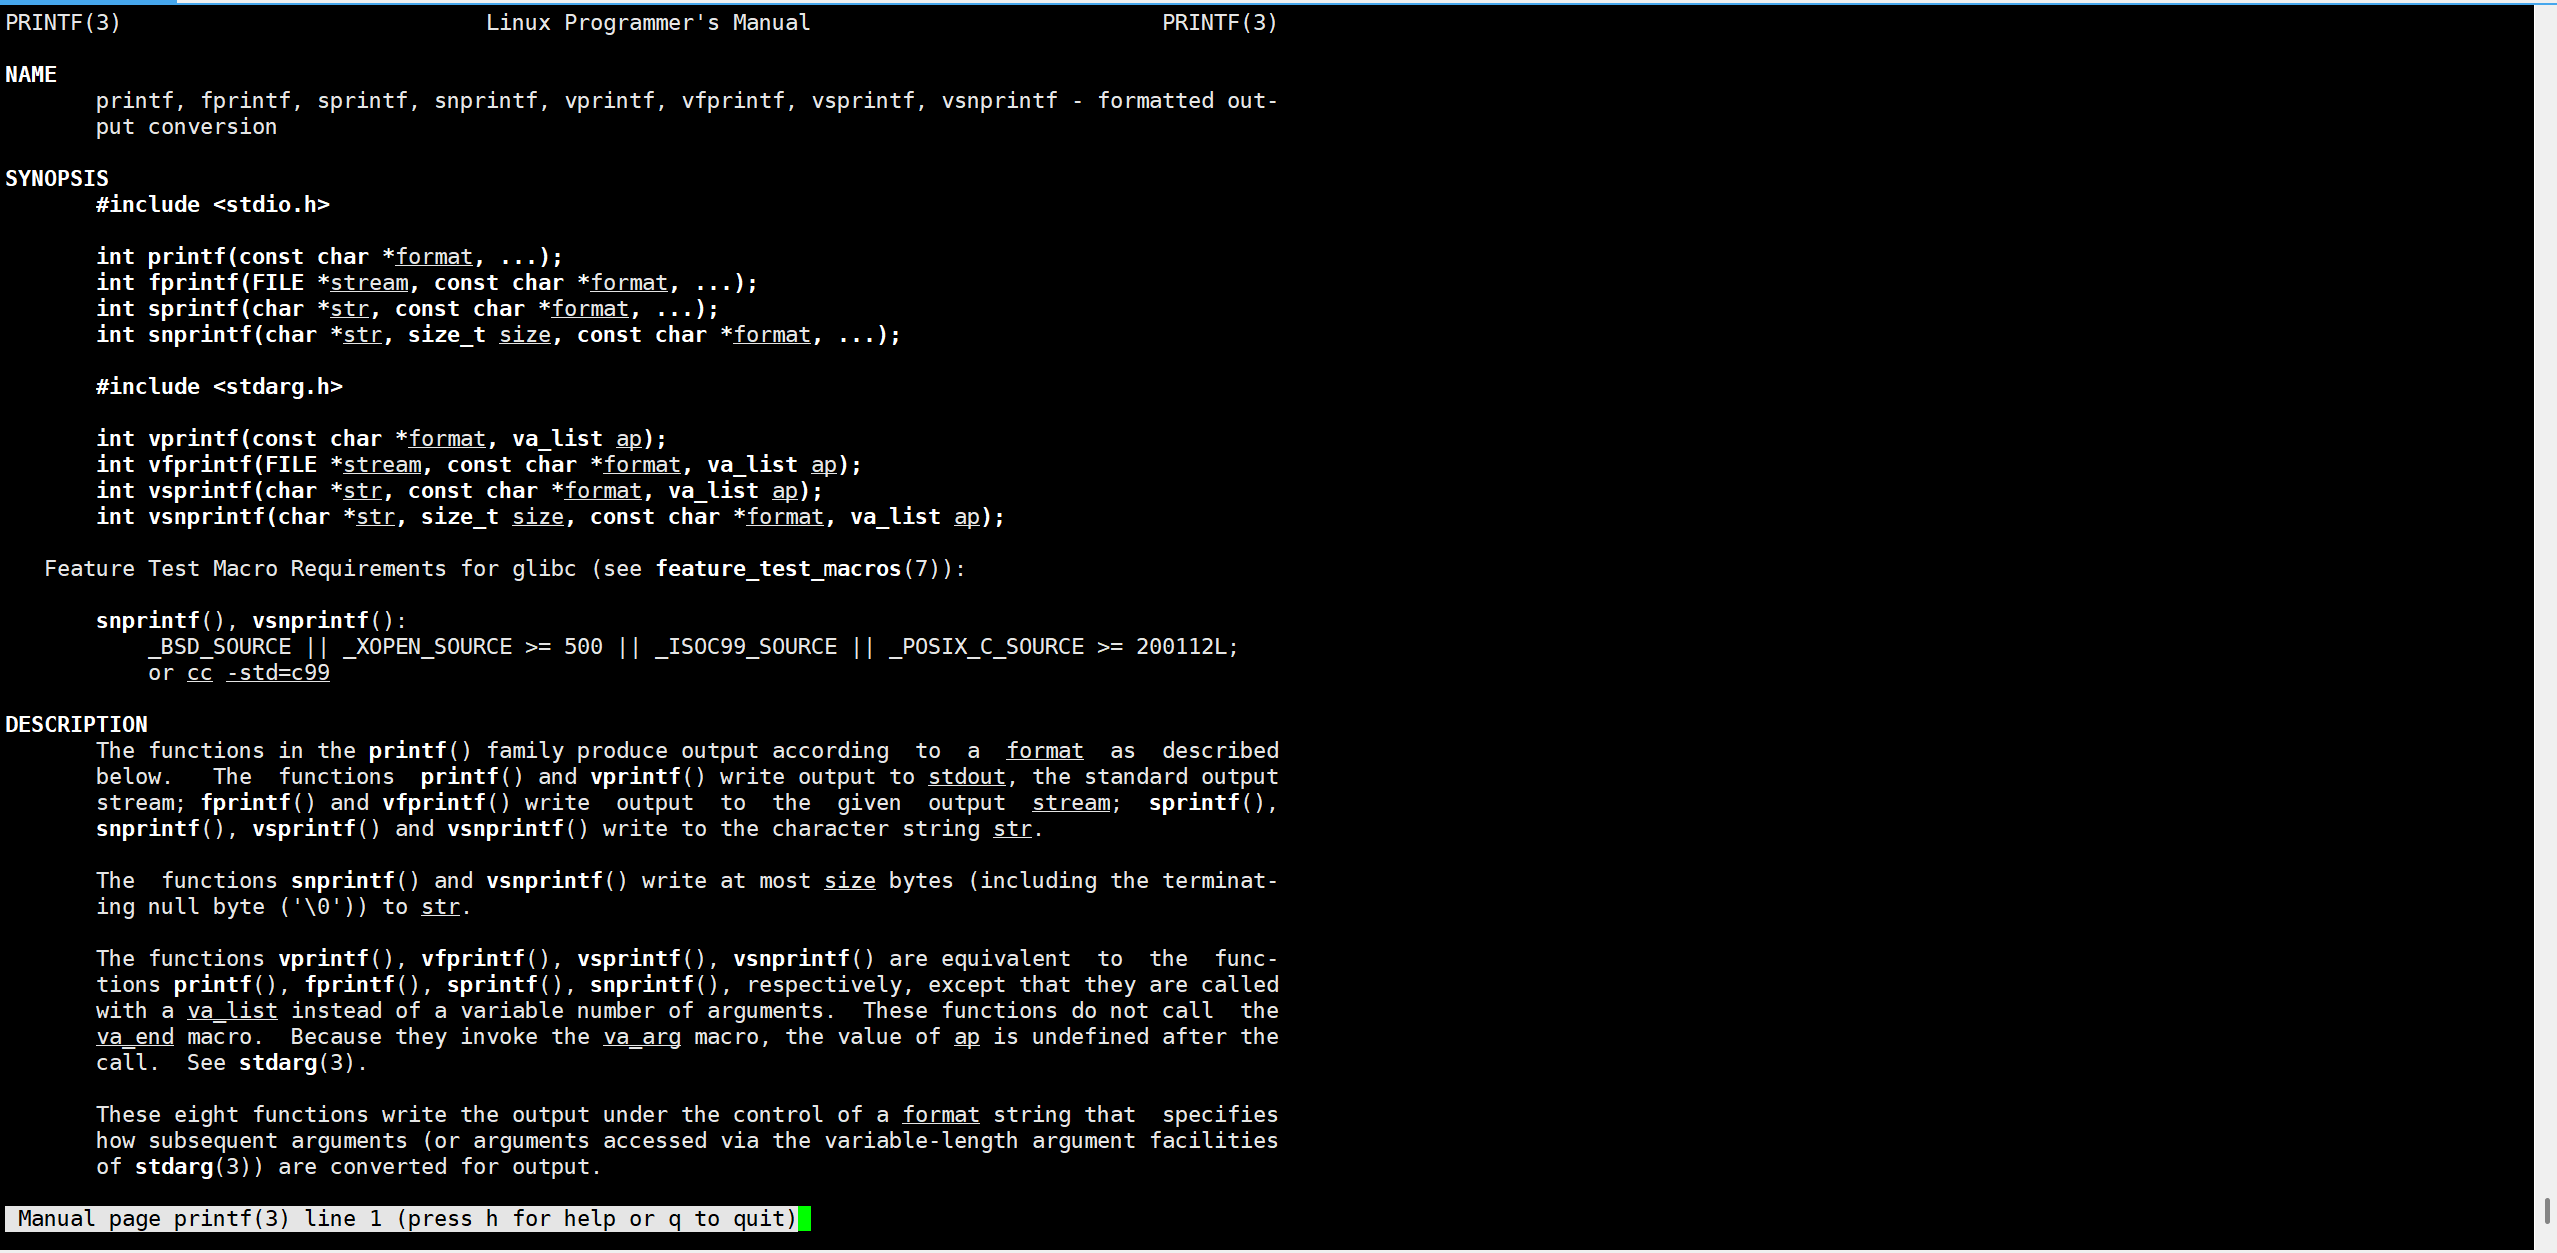
Liinux下是有printf指令的,我们想查Linux下的printf指令就要去1号目录查,如果相查C语言的printf函数,就要去3号目录查,如下(这俩printf没关系)

cpp
[root@VM-0-2-centos Linux_learn]# man 1 printf
[root@VM-0-2-centos Linux_learn]# man 3 printf
这是Linux指令的printf
这是C语言的printf库函数
man -a
man手册里面有多个printf相关的东西,我们不想要就查一个,这个时候我们就可以用 -a选项从头到尾查一遍,如下

cpp
[root@VM-0-2-centos Linux_learn]# man -a printf先进入1号目录
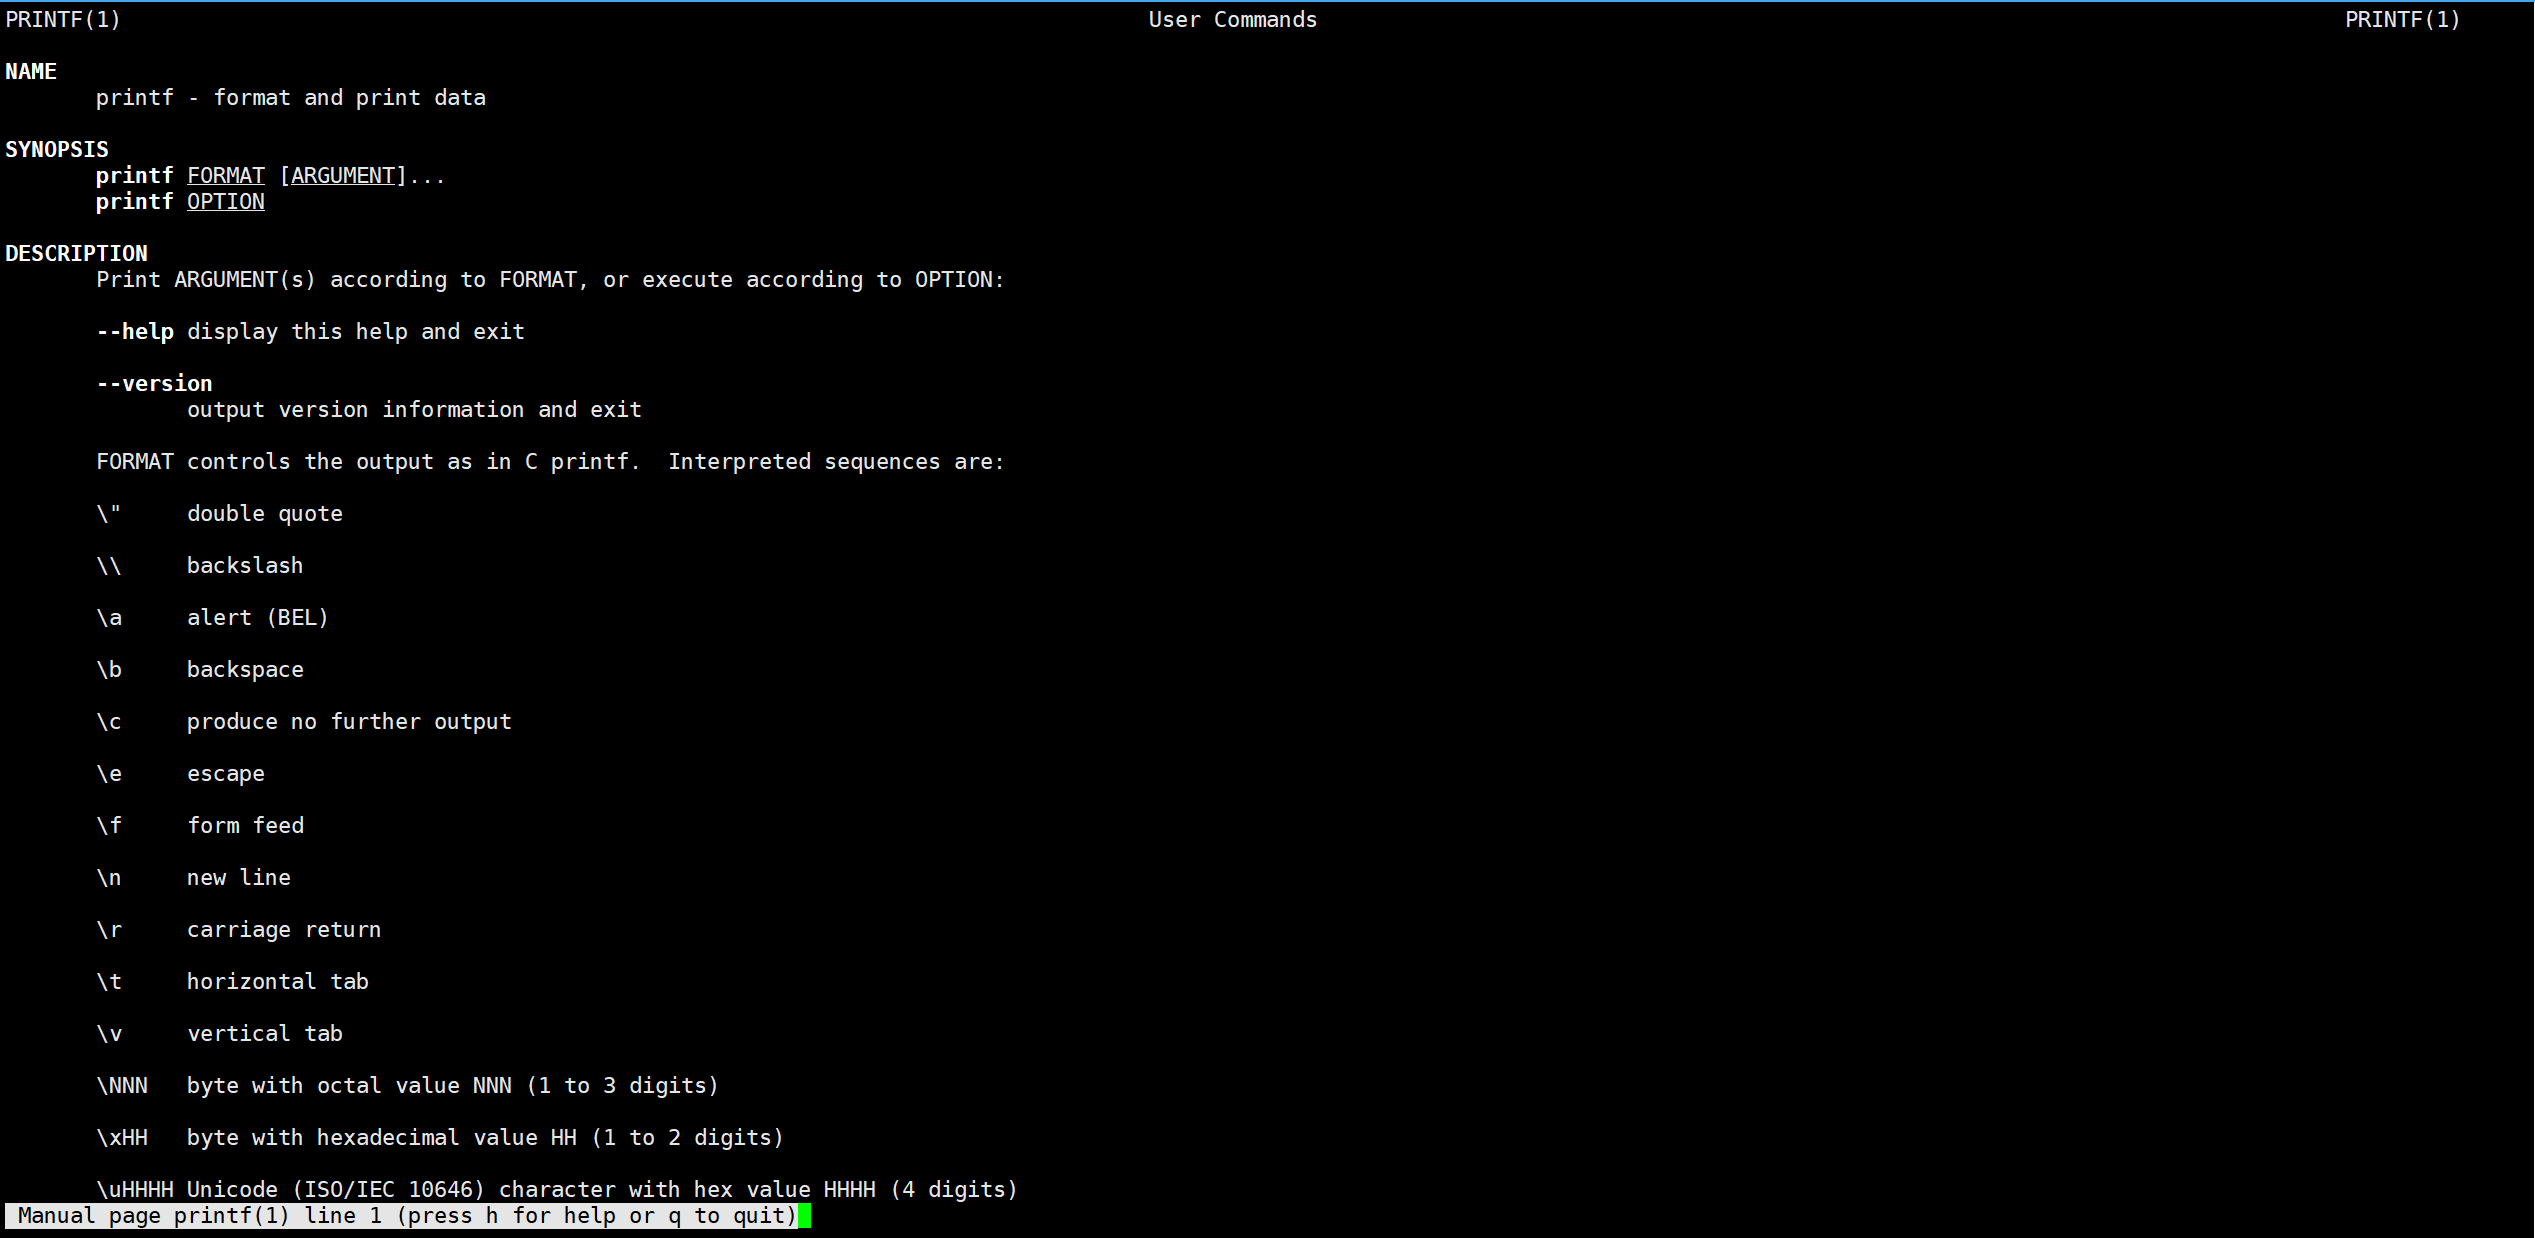
随后我们按q,进入下一个匹配的文档

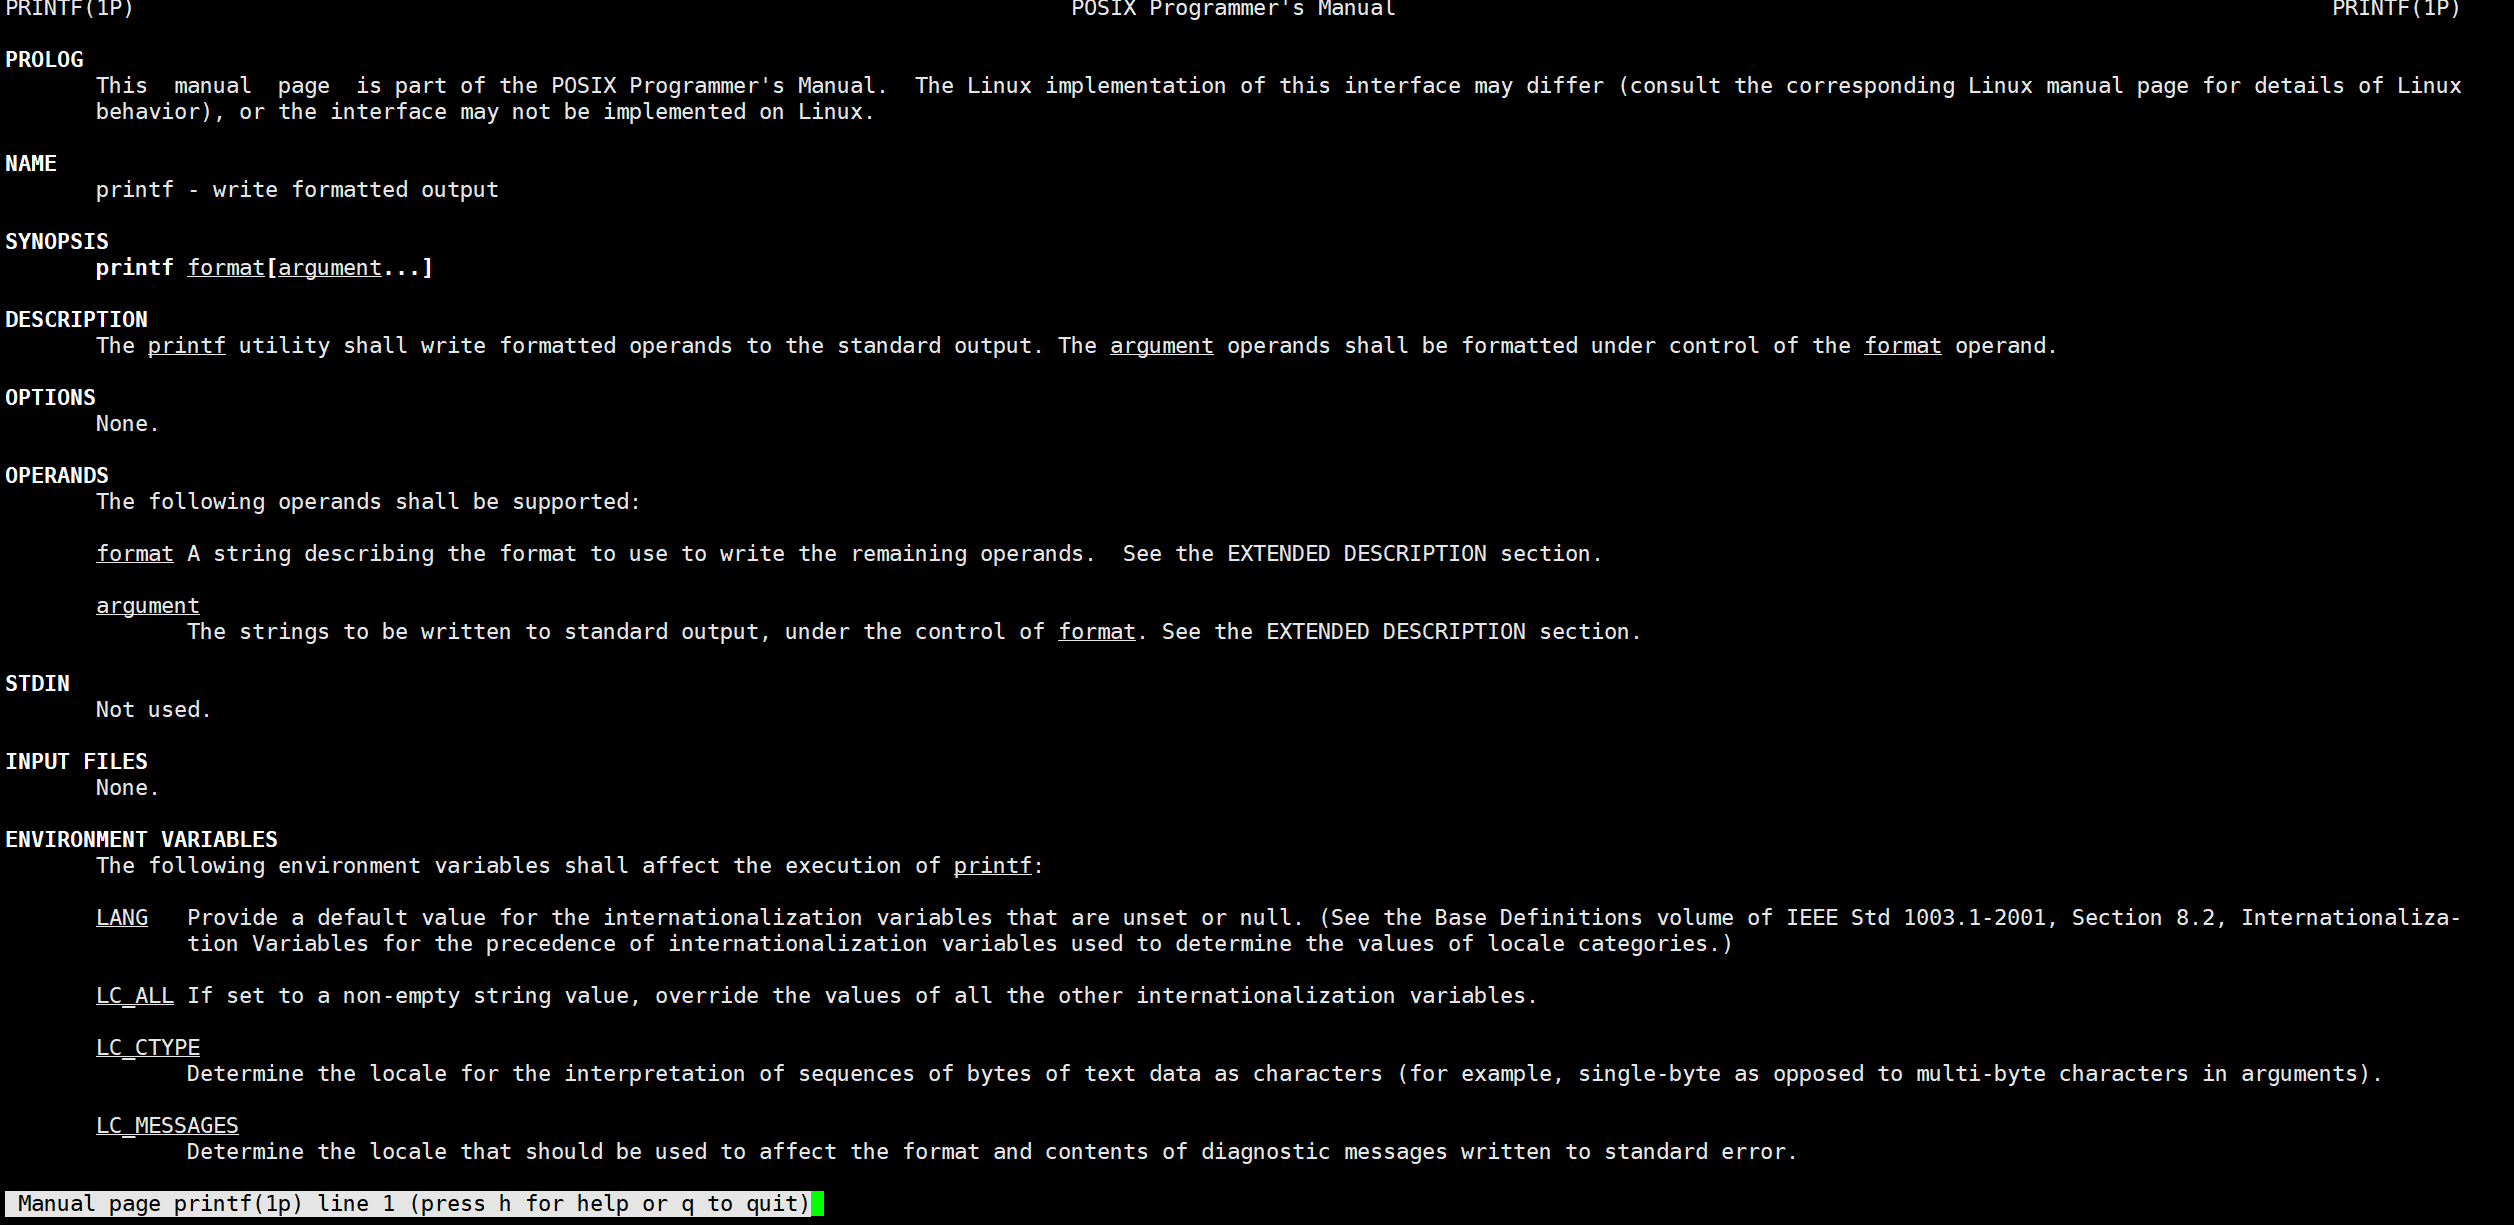
然后我们再按q,就能看加下来匹配的文档,如果没有匹配文档了,就结束了,如下
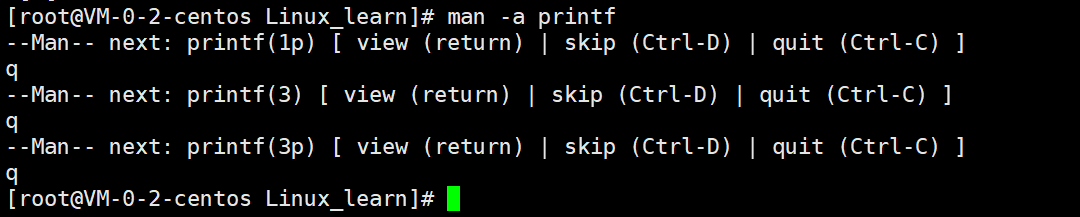
cpp
[root@VM-0-2-centos Linux_learn]# man -a printf
--Man-- next: printf(1p) [ view (return) | skip (Ctrl-D) | quit (Ctrl-C) ]
q
--Man-- next: printf(3) [ view (return) | skip (Ctrl-D) | quit (Ctrl-C) ]
q
--Man-- next: printf(3p) [ view (return) | skip (Ctrl-D) | quit (Ctrl-C) ]
q
如果中途想结束Ctrl+C即可
cp指令
语法:cp 选项 源文件或目录 目标文件或目录
功能:复制源文件或目录到目标文件或目录下
注:
- cp指令用于复制文件和目录
- 如果同时制定多个文件或目录,且最后的目的地是一个已经存在的目录,则它会把前面指定的所有文件或目录都复制到此目录中
常用选项
- -f 或 --force 强行复制文件或目录,不论目的文件或目录是否存在
- -i 或 --interactive 覆盖文件之前先询问用户
- -r 递归处理,讲指定目录下的文件与子目录一并处理。若源文件或目录的形态不属于目录或符号链接,则一律视为普通文件处理
为了演示cp指令,我先把我的文件结构调为如下样子
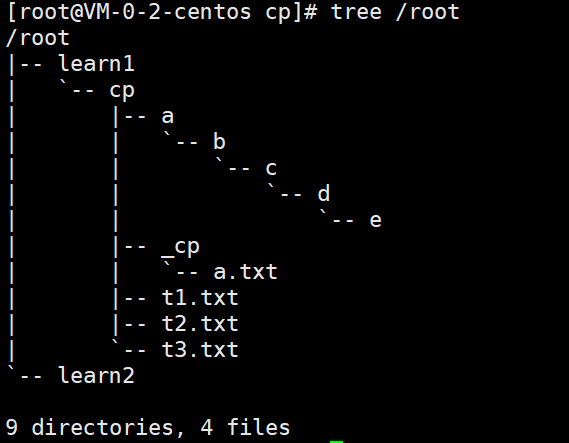
随后我们对这些普通文件里面写点内容,t1里就写1,t2里就写2,t3里就写3,a里就写a,这样之后拷贝到别的地方的时候好观察,这里推荐nano指令进去写(vim比nano复杂点,nano怎么操作下面都给你提示了,而且可以直接写,写完Ctrl+X然后Y然后回车就行了),写完后我的文件里内容是这些
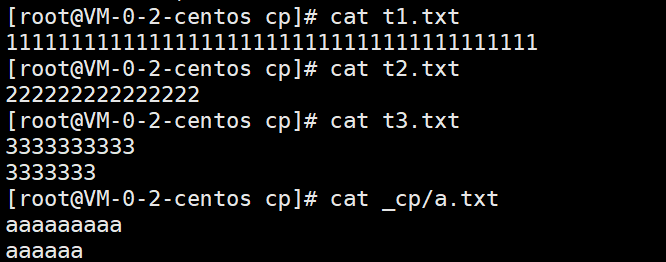
那这里我就不演示了,我们主要讲cp这个指令
拷贝普通文件
拷贝普通文件有俩种情况,我们拷贝到已经存在的文件中,或者是拷贝到不存在的文件中
拷贝到存在的文件中------直接覆盖
比如我在learn2目录里创建一个文件,随后我把t1拷贝过去
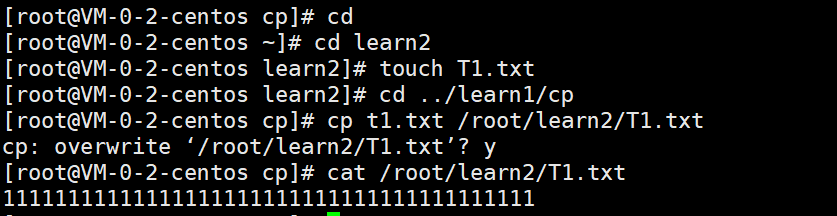
cpp
[root@VM-0-2-centos cp]# cd
[root@VM-0-2-centos ~]# cd learn2
[root@VM-0-2-centos learn2]# touch T1.txt
[root@VM-0-2-centos learn2]# cd ../learn1/cp
[root@VM-0-2-centos cp]# cp t1.txt /root/learn2/T1.txt
cp: overwrite '/root/learn2/T1.txt'? y
[root@VM-0-2-centos cp]# cat /root/learn2/T1.txt
11111111111111111111111111111111111111111
这边是询问是否覆盖文件,y就是覆盖
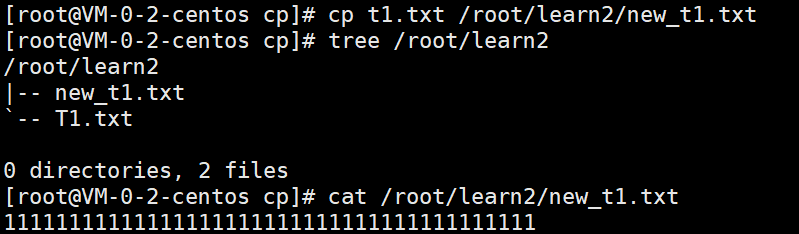
拷贝到不存在的文件中------会新建出一个文件
learn2目录下现在是没有new_t1的,那我将t1拷贝到learn2下的new_t1,他就会新建个new_t1
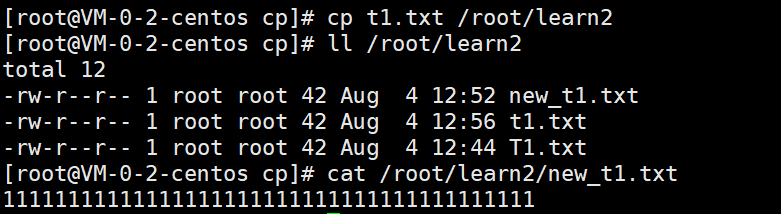
如果我们不给文件名,他就会在那边创一个同名文件
cpp
[root@VM-0-2-centos cp]# cp t1.txt /root/learn2/new_t1.txt
[root@VM-0-2-centos cp]# tree /root/learn2
/root/learn2
|-- new_t1.txt
`-- T1.txt

0 directories, 2 files
[root@VM-0-2-centos cp]# cat /root/learn2/new_t1.txt
11111111111111111111111111111111111111111
[root@VM-0-2-centos cp]# cp t1.txt /root/learn2
[root@VM-0-2-centos cp]# ll /root/learn2
total 12
-rw-r--r-- 1 root root 42 Aug  4 12:52 new_t1.txt
-rw-r--r-- 1 root root 42 Aug  4 12:56 t1.txt
-rw-r--r-- 1 root root 42 Aug  4 12:44 T1.txt
[root@VM-0-2-centos cp]# cat /root/learn2/new_t1.txt
11111111111111111111111111111111111111111
拷贝目录(目录是递归式的,要带-r选项,不能直接拷贝)
拷贝目录和拷贝文件一样,也分俩种情况
拷贝到不存在的目录中
直接生成目录拷贝过去,和普通文件的拷贝一样
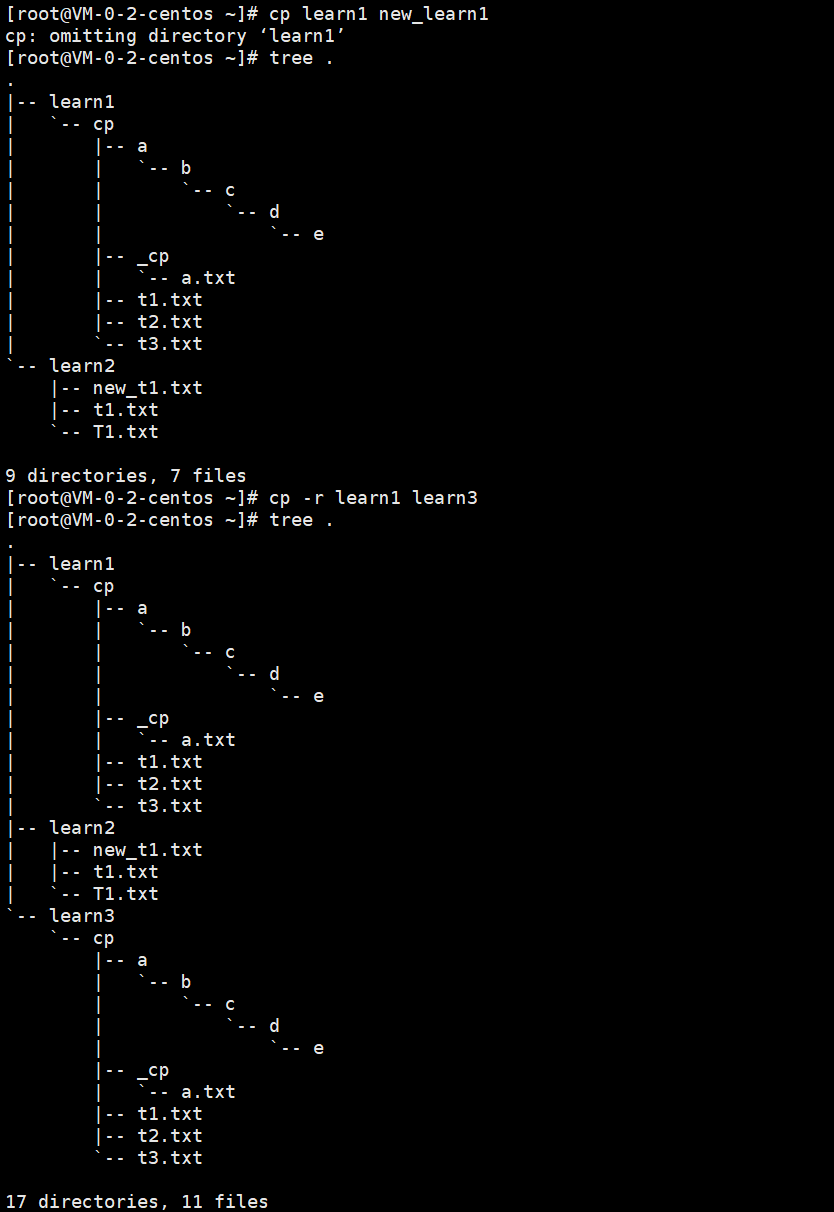
cpp
[root@VM-0-2-centos ~]# cp learn1 new_learn1
cp: omitting directory 'learn1'
[root@VM-0-2-centos ~]# tree .
.
|-- learn1
|   `-- cp
|       |-- a
|       |   `-- b
|       |       `-- c
|       |           `-- d
|       |               `-- e
|       |-- _cp
|       |   `-- a.txt
|       |-- t1.txt
|       |-- t2.txt
|       `-- t3.txt
`-- learn2
    |-- new_t1.txt
    |-- t1.txt
    `-- T1.txt

9 directories, 7 files
[root@VM-0-2-centos ~]# cp -r learn1 learn3
[root@VM-0-2-centos ~]# tree .
.
|-- learn1
|   `-- cp
|       |-- a
|       |   `-- b
|       |       `-- c
|       |           `-- d
|       |               `-- e
|       |-- _cp
|       |   `-- a.txt
|       |-- t1.txt
|       |-- t2.txt
|       `-- t3.txt
|-- learn2
|   |-- new_t1.txt
|   |-- t1.txt
|   `-- T1.txt
`-- learn3
    `-- cp
        |-- a
        |   `-- b
        |       `-- c
        |           `-- d
        |               `-- e
        |-- _cp
        |   `-- a.txt
        |-- t1.txt
        |-- t2.txt
        `-- t3.txt

17 directories, 11 files
文件内的内容也是完全拷贝过去的
拷贝到存在的目录中
不管我们是源文件还是源目录,只要目标是个目录(如果存在),会把源文件或目录拷贝到目标目录内部
就拿learn2来举例,我们把learn2拷贝了俩次,第一次拷贝是上面那种情况,第二次拷贝是这次情况,它并没有像文件那样可以覆盖,而是拷贝到了目标目录的内部
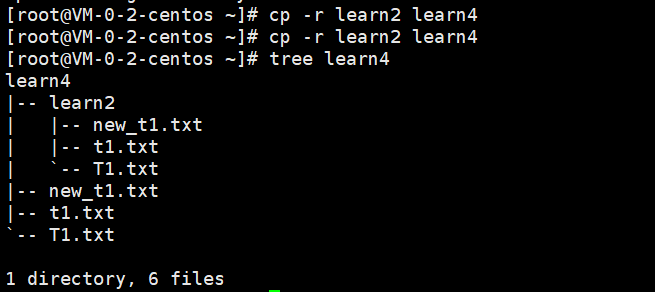
cpp
[root@VM-0-2-centos ~]# cp -r learn2 learn4
[root@VM-0-2-centos ~]# cp -r learn2 learn4
[root@VM-0-2-centos ~]# tree learn4
learn4
|-- learn2
|   |-- new_t1.txt
|   |-- t1.txt
|   `-- T1.txt
|-- new_t1.txt
|-- t1.txt
`-- T1.txt

1 directory, 6 files
因为一个目录下不能有同名目录和文件,我们这个时候再拷贝learn2的时候他就会询问是否覆盖这个目录,如下

cpp
[root@VM-0-2-centos ~]# cp -r learn2 learn4
cp: overwrite 'learn4/learn2/T1.txt'? y
cp: overwrite 'learn4/learn2/t1.txt'? y
cp: overwrite 'learn4/learn2/new_t1.txt'? y
如果不想要他提示你的话,加上-f选项就好了(加上-f后普通用户操作不会提醒,root用户还是会提醒,因为root权限太高了)
拷贝多文件目录
我们也可以一口气拷贝多个文件和目录到一个目录去,如果目录存在,会把这些全都一口气拷贝过去
我举个例子,这里就是把learn1,learn2,learn3,learn4全拷贝到了learn5去

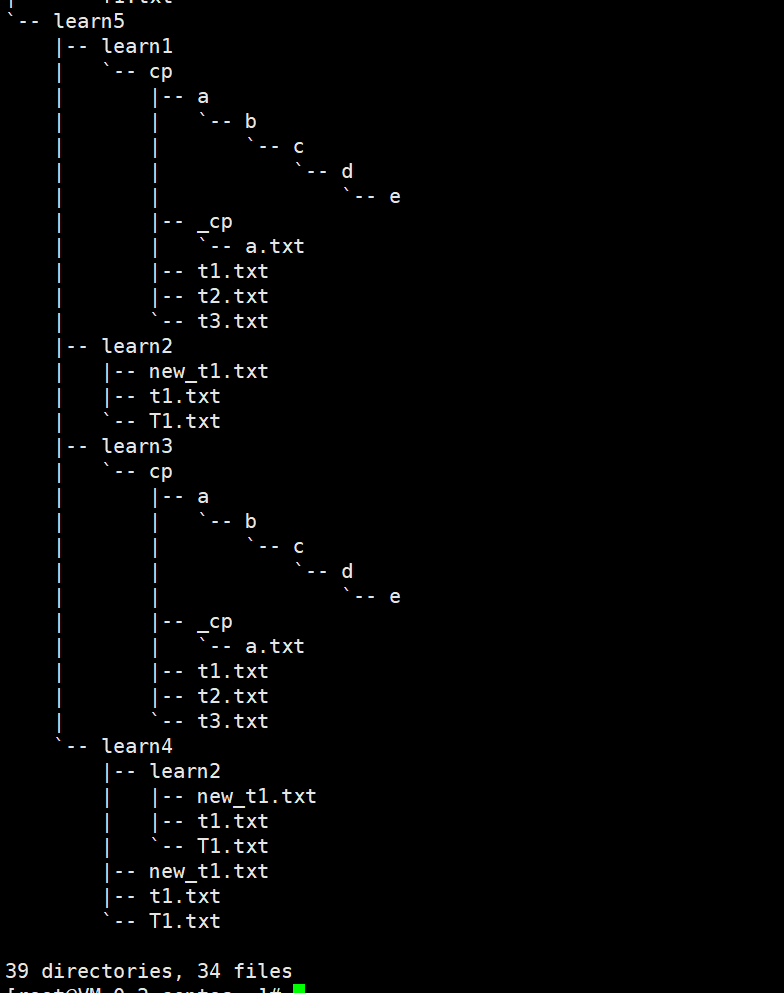
cpp
[root@VM-0-2-centos ~]# mkdir learn5
[root@VM-0-2-centos ~]# cp -r learn1 learn2 learn3 learn4 learn5
[root@VM-0-2-centos ~]# tree .
.
|-- learn1
|   `-- cp
|       |-- a
|       |   `-- b
|       |       `-- c
|       |           `-- d
|       |               `-- e
|       |-- _cp
|       |   `-- a.txt
|       |-- t1.txt
|       |-- t2.txt
|       `-- t3.txt
|-- learn2
|   |-- new_t1.txt
|   |-- t1.txt
|   `-- T1.txt
|-- learn3
|   `-- cp
|       |-- a
|       |   `-- b
|       |       `-- c
|       |           `-- d
|       |               `-- e
|       |-- _cp
|       |   `-- a.txt
|       |-- t1.txt
|       |-- t2.txt
|       `-- t3.txt
|-- learn4
|   |-- learn2
|   |   |-- new_t1.txt
|   |   |-- t1.txt
|   |   `-- T1.txt
|   |-- new_t1.txt
|   |-- t1.txt
|   `-- T1.txt
`-- learn5
    |-- learn1
    |   `-- cp
    |       |-- a
    |       |   `-- b
    |       |       `-- c
    |       |           `-- d
    |       |               `-- e
    |       |-- _cp
    |       |   `-- a.txt
    |       |-- t1.txt
    |       |-- t2.txt
    |       `-- t3.txt
    |-- learn2
    |   |-- new_t1.txt
    |   |-- t1.txt
    |   `-- T1.txt
    |-- learn3
    |   `-- cp
    |       |-- a
    |       |   `-- b
    |       |       `-- c
    |       |           `-- d
    |       |               `-- e
    |       |-- _cp
    |       |   `-- a.txt
    |       |-- t1.txt
    |       |-- t2.txt
    |       `-- t3.txt
    `-- learn4
        |-- learn2
        |   |-- new_t1.txt
        |   |-- t1.txt
        |   `-- T1.txt
        |-- new_t1.txt
        |-- t1.txt
        `-- T1.txt

39 directories, 34 files
如果目标目录不存在的话是不能这么搞的

结语:
那么,Linux基础指令(上)的内容就全部讲解完毕啦,希望以上内容对你有所帮助,感谢观看,若觉得写的还可以,可以分享给朋友一起来看哦,毕竟一起进步更有动力嘛,当然能关注一下就更好啦。