tsconfig.ts
{
  "compilerOptions": {
    // ...
    "baseUrl": "./",  // 这里需要配置
    "paths": {
      "@/*": ["./src/*"]  // 这里需要配置
    }
    // 如果baseUrl设置为'src',那paths就应该配置为{"@/*": "./*"},如下:
    // "baseUrl": "src",
    // "paths": {
    //  "@/*": ["./*"]
    // }
    // 相关baseUrl,paths说明请查看官方文档
  },
  // include也需要配置以下:
  "include": ["src/**/*.ts", "src/**/*.d.ts", "src/**/*.tsx", "src/**/*.vue"],
  "exclude": ["node_modules"]
}
vite.config.ts
import { defineConfig } from 'vite'
import vue from '@vitejs/plugin-vue'
import path from 'path'

// https://vite.dev/config/
export default defineConfig({
  plugins: [vue()],
  resolve: {
      alias: {  // 这里就是需要配置resolve里的别名
        "@": path.join(__dirname, "./src"), // path记得引入
        // 'vue': 'vue/dist/vue.esm-bundler.js' // 定义vue的别名,如果使用其他的插件,可能会用到别名
      },
    },
})
v-text ,v-html
v-bind
html
<script setup>
const link = 'https://www.baidu.com';
const   iszhtbs=true;
</script>
<template>
  <a v-bind:href="link"
            :class="{zhtbs:iszhtbs}">baidu连接</a>
</template>
<style scoped>
.zhtbs {
  color: red;
  font-weight: 900;
}
</style>
v-bind 指令中的多类设置
在实际开发中元素的css样式会有多个,这些css样式会根据业务数据的变化而发生改变。可以通过v-bind绑定指令中来实现多个css样式变化的业务逻辑。在绑定的指令中用**,号** 将不同业务的css样式类分组,在通过每组绑定的变量来判断这个css样式是否在页面中执行与展示。
html
<script setup>
const iszhtbs = true;
const isBlack = true;
</script>
<p :class="{zhtbs:iszhtbs,back:isback}"></p>
html
v-bind:class="{变量名称 && 'class名称'}"   //短路求值,iszhtbs为true返回'class名称',为false就为null了

v-bind:class="{变量名称 || 'class名称'}"
<p :class="iszhtbs ? 'zhtbs':'back'"></p>
// 以在数组中使多种逻辑组合。
<script setup>
import {ref} from 'vue'

const link = 'https://www.baidu.com';
let iszhtbs=ref(true);
const isback = true;
const changeZhtbs = () => {
    iszhtbs.value = !iszhtbs.value;
}
</script>
<template>
    <p :class="{zhtbs:iszhtbs}">{zhtbs:iszhtbs}</p>
    <p :class="iszhtbs && 'zhtbs'">iszhtbs && 'zhtbs'</p>
    <p :class="iszhtbs ? 'zhtbs':'Black'">3元表达式</p>
    <p :class="['zhtbs','Black']">数组</p>
    <p :class="[{ zhtbs: iszhtbs },Black]">[{ zhtbs: iszhtbs },Black]</p>
    <p :class="[{ zhtbs: iszhtbs },'Black']">[{ zhtbs: iszhtbs },'Black']</p>
    <p :class="[{ 'zhtbs': iszhtbs }]">[{ 'zhtbs': iszhtbs }]</p>
    <p :class="[iszhtbs && 'zhtbs','Black']">[iszhtbs && 'zhtbs','Black']"</p>
    <div :class="[iszhtbs ? 'zhtbs' : 'Black', 'blueviolet']">[iszhtbs ? 'zhtbs' : 'Black', 'blueviolet']</div>
    <div :class="[iszhtbs ? 'zhtbs' : 'Black', blueviolet]">[iszhtbs ? 'zhtbs' : 'Black', blueviolet]</div>
    <button @click="changeZhtbs">改变Zhtbs</button>
</template>
<style scoped>
.zhtbs {
    color: red;
    font-weight: 900;
}

.Black {
    color: rgb(82, 79, 79);
    background-color: darkcyan;
}

.blueviolet {
    width: 600px;
    height: 30px;
    border: 2px solid blueviolet;
}
</style>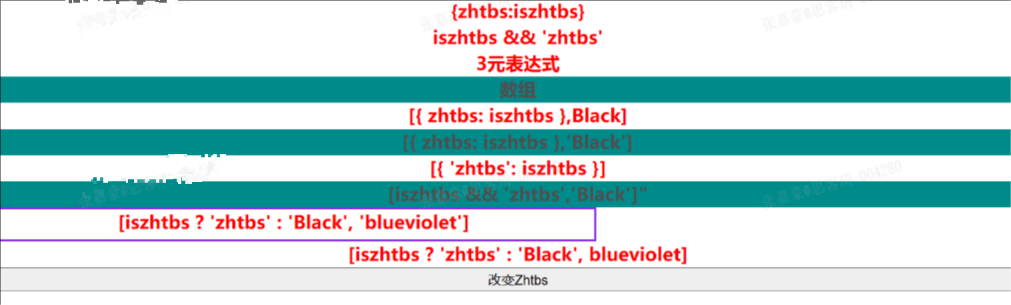
结论,对象里类名可加也可不加'单引号',数组里类名一定要加单引号,控制变量不加单引号
html
<script setup>
const activeColor = 'red';
const fontStress = '900';
</script>

<template>
  <h1>Vue 3 入门</h1>
  <p :style="{ color: activeColor, fontWeight: fontStress }">
    v-bind设置style样式属性
  </p>
</template>
上面fontWeight的描述是驼峰式的,但是在使用普通样式属性的时候,要用单引号
html
<p :style="{ color: activeColor, 'font-weight': fontStress }">
  v-bind设置style样式属性
</p>
html
<script setup>
const styleObjcet = {
  color: 'red',
  fontWeight: 900,
};
</script>

<template>
  <h1>Vue 3 入门</h1>
  <p :style="styleObjcet"> v-bind设置style样式属性</p>
</template>
html
<script setup>
const styleObjcet = 'color:red;font-weight:900;width:300px;';
</script>
<template>
  <h1>Vue 3 入门</h1>
  <p :style="styleObjcet">v-bind设置style样式属性</p>
</template>
v-show,v-if
在元素使用v-if指令的情况下,元素不存在。而元素使用v-show的情况下,元素本身存在浏览其中,但是这个元素的style属性中,display被设置为none。
v-for
html
<script setup>
const users = [
  { id: 1, name: 'zht', email: 'zht114001@163.com', admin: true },
  { id: 2, name: 'kaimi', email: 'jane@163.com', admin: false },
  { id: 3, name: 'fun', email: 'fun@163.com', admin: false },
];
</script>


<template>
  <h1>Vue3 用户列表</h1>
  <p v-for="user in users" :key="user.id">{{ user }}</p>
</template>
html
<template>
  <h1>Vue3 数组操作</h1>
  <ul>
  <li v-for="(zht, index) in users" :key="zht.id">
    {{ index }}索引 {{ zht.id }}:{{ zht.name }}({{ zht.email }})
   </li>
  </ul>
</template>
html
<template>
  <h1>Vue 3 对象</h1>
  <div v-for="(value, name) in user" :key="value">{{ name }}:{{ value }}</div>
</template>
v-for 遍历数组
html
<script setup>
const user = { id: 1, name: 'zht', email: 'zht114001@163.com', admin: true };
</script>
<template>
  <h1>Vue3 对象</h1>
  <div v-for="zht in user" :key="zht.id">{{ zht }}</div>
</template>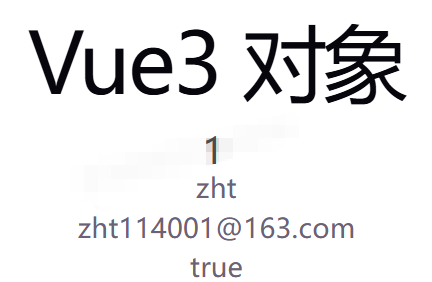
不要使用index作为key,对于有增删改的情况

v-on指令缩写
v-on指令有一个缩写,v-on:click可以写成@click,开发中可以使用省略的@click来绑定事件
html
<script setup>
const clickButton = (msg) => {
   alert(msg);
};
const zht=1;
</script>
<template>
  <h1>Vue 3 事件</h1>
  <button @click="clickButton(zht)">点击按钮</button>
</template>
执行多函数
html
<script setup>
const clickButton = (msg) => {
 alert(msg);
};
const another = (msg) => {
alert(msg);
};
const zht=1;
</script>
<template>
  <h1>Vue 3 事件</h1>
  <button @click="clickButton('我要点击'), another(zht)">点击按钮</button>
</template>
事件对象
在 Vue 中,每个事件被触发执行后都会在脚本的对应函数中产生一个与事件对象$event。我们可以通过检查接收到的事件对象中的 target 属性来获取有关被单击元素的信息。
html
<script setup>
const clickButton = (event) => {
  console.log(event.target);
};
</script>
<template>
  <h1>Vue 3 事件</h1>
  <button @click="clickButton($event)">点击按钮</button>
</template>
当执行表单from的提交时,页面总是重新加载。要防止页面重新加载,我们需要使用事件对象并调用 event.preventDefault方法来解决。
.stop 表示停止冒泡
.prevent 表示阻止默认事件
.capture 表示使用事件捕获模式
.self 表示当在event.target 是当前元素自身时触发处理函数
.once 表示事件只会触发一次
.passive 表示处理事件函数中不会调用preventDefault函数
按键修饰符
html
<script setup>
const send = (event) => {
  alert('保存');
};
</script>
<template>
  <h1>Vue 3 事件</h1>
  <form @submit.prevent="send">
    <button @keyup.enter="submit">保存</button>
  </form>
</template>
其他事件
.enter:只有在按下 Enter 键时才触发事件处理函数。
.tab:只有在按下 Tab 键时才触发事件处理函数。
.delete:只有在按下 Delete 或 Backspace 键时才触发事件处理函数。
.esc:只有在按下 Esc 键时才触发事件处理函数。
.space:只有在按下空格键时才触发事件处理函数。
.up:只有在按下上箭头键时才触发事件处理函数。
.down:只有在按下下箭头键时才触发事件处理函数。
.left:只有在按下左箭头键时才触发事件处理函数。
.right:只有在按下右箭头键时才触发事件处理函数。
ref
html
<script setup>
import { ref } from 'vue';
const count = ref(0);
const addCount = () => {
  //函数中使用累加功能
  count.value++;
};
</script>
<template>
  <h1>Vue 3 count累加</h1>
  <button type="button" @click="addCount">count 是: {{ count }}</button>
</template>
很多人不喜欢在代码中使用import { ref } from 'vue';来进入r e f 函数。我们可以在 v i t e . c o n f i g . j s ∗ ∗ 文件中添加 r e a c t i v i t y T r a n s f o r m : t r u e 插件的参数,就可以直接使用 ref函数。我们可以在**vite.config.js** 文件中添加 reactivityTransform: true 插件的参数,就可以直接使用ref函数。我们可以在∗∗vite.config.js∗∗文件中添加reactivityTransform:true插件的参数,就可以直接使用ref函数。
html
import { defineConfig } from 'vite'
import vue from '@vitejs/plugin-vue'
// https://vitejs.dev/config/
export default defineConfig({
  plugins: [vue({
    reactivityTransform: true
  })]
})
reactive函数
注意在 ref 函数中将boolean、string、object 作为参数,但是reactive函数中只能将 object 作为参数。ref 和 reactive 的不同之处在于如何设置初始值以及如何更新值。
html
<script setup>
import { reactive } from 'vue';
//在事件中与显示的时候需要使用state对象来操作。
const state = reactive({-------------
  count: 0,                         |
});                                 |
</script>                           |
<template>                          |
  <h1>Vue 3 count累加</h1>           |
  <button type="button"             |
          @click="state.count++"> <-|
      count 是: {{ state.count }} <-|
    </button>
</template>
输入表格v-model指令
v-mode用的是bind和事件实现的
我们在开发表单页面的时候,都会使用到input 元素来接受用户数据输入与输出。在Vue中表单开发中,为我们提供了一个v-model指令来与反应函数变量进行绑定,这样可以达到mvvm模式的效果。在组成输入表单input元素和textarea元素中输入的值,以及在select元素中选择的内容,它们都会立即反映在反应变量中。我们就可以将这些数据模型中的数据进行操作。v-model指令需要和发应变量ref 与reactivity函数联合在一起使用。
v-model使用的标签与组件
input
select
textarea
vue组件中
计算属性
两次使用计算属性,在数据没有发生改变的情况下,也只调用一次,所以得出计算属性可以缓存
Vue2
html
<template>
  <div>
    <p>姓氏:<input v-model="firstName"></p>
    <p>名字:<input v-model="lastName"></p>
    <p>全名:{{ fullName }}</p>
    <p>{{fullNameSimple}}</p>
    <button @click="changeName">修改全名</button>
  </div>
</template>

<script>
export default {
  data() {
    return {
      firstName: '张',
      lastName: '三'
    }
  },
  computed: {
    // 1. 简写写法:只有getter时才能简写
    fullNameSimple() {
      return this.firstName + this.lastName
    },

    // 2. 完整写法:get + set,可读可修改
    fullName: {
      // 获取值触发
      get() {
        return this.firstName + this.lastName
      },
      // 赋值修改触发
      set(newVal) {
        this.firstName = newVal.slice(0, 1)
        this.lastName = newVal.slice(1)
      }
    }
  },
  methods: {
    changeName() {
      // 给计算属性赋值,触发set
      this.fullName = '李四'
    }
  }
}
</script>
Vue3
html
<script setup>
import { reactive} from 'vue';
const user = reactive({
name: 'zhtbs',
class: '一年一班',
age: '27',
});
// const zht = computed({
// get() {
// return `名称:${user.name} 班级:${user.class} 年龄:${user.age}`;
// },
// set(newValue) {
// const names = newValue.split(' ');
// user.name = names[0];
// user.class = names[names.length - 1];
// },
// });
//只有getter简写
const zht = computed(() => {return user.name+" -- " +user.class});
const changeName = () => {
zht.value = 'zht 二年二';
};
</script>
<template>
<h1>Vue 3 computed</h1>
<div>{{zht}}</div>
<button @click="changeName">名字变化</button>
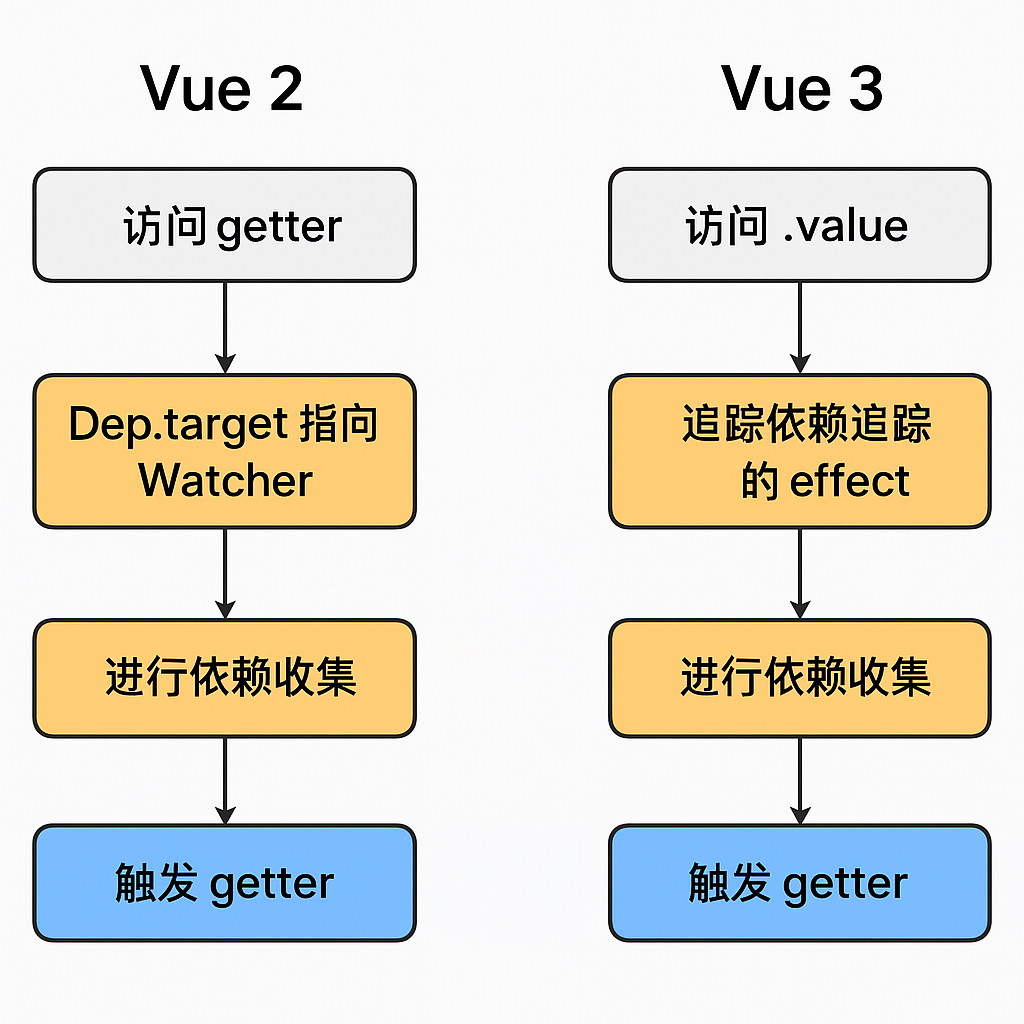
</template>Watch
html
<script setup lang="ts">
import { ref, watch ,reactive} from 'vue';
const count = ref(0);
//------------------监听基本数据类型-----------

watch(count, (count, previousCount) => {
  console.log('基本数据类型count:'+count+"  previousCount:"+previousCount);
  console.log("------------------------------------------");
});
//------------------监听ref对象------------
const state = ref({
  count: 0,
});

watch(state, (newValue, previousCount) => {
  console.log('ref对象监听 count:'+newValue.count+"  previousCount:"+previousCount.count);
},{deep:true});
//必须加{deep:true}开启深度监视,否则会监听失败
// 或者你可以监听他的属性,例如⬇
watch(() => state.value.count, (newValue, previousCount) => {//ref一定要加.value
  console.log('监听属性 () => count:'+newValue+"  previousCount:"+previousCount);

});


let numdata = reactive<number[]>([1, 2]);
const shownum = () => {
    console.log("------------------------------------------");
    numdata[0] += 1;
    console.log("下标0 被修改");
};

const shownum2 = () => {
    numdata[1] = 22
    console.log("下标 1 被修改");
};


watch(numdata, (newValue, OldValue): void => {
    console.log("数据变化了", newValue, OldValue);
    console.log(newValue[0],newValue[1]);
    console.log(OldValue[0],OldValue[1]);
    // 注意:当只修改嵌套的属性触发监听时 `newValue` 此处和 `oldValue` 是相等的
    // 因为它们是同一个对象!
});

watch(() => numdata[0], (newValue, OldValue): void => {
    console.log("numdata[0]数据变化了","新值:" ,newValue, "旧值",OldValue);
});


</script>
<template>
    <h1>Vue 3 Watcher监听</h1>
    <button @click="count++">Count:{{ count }}</button>
    <button @click="state.count++">Count:{{ state.count }}</button>
    <button @click="shownum">改变数组</button>
</template>
截图用AI去除了敏感信息
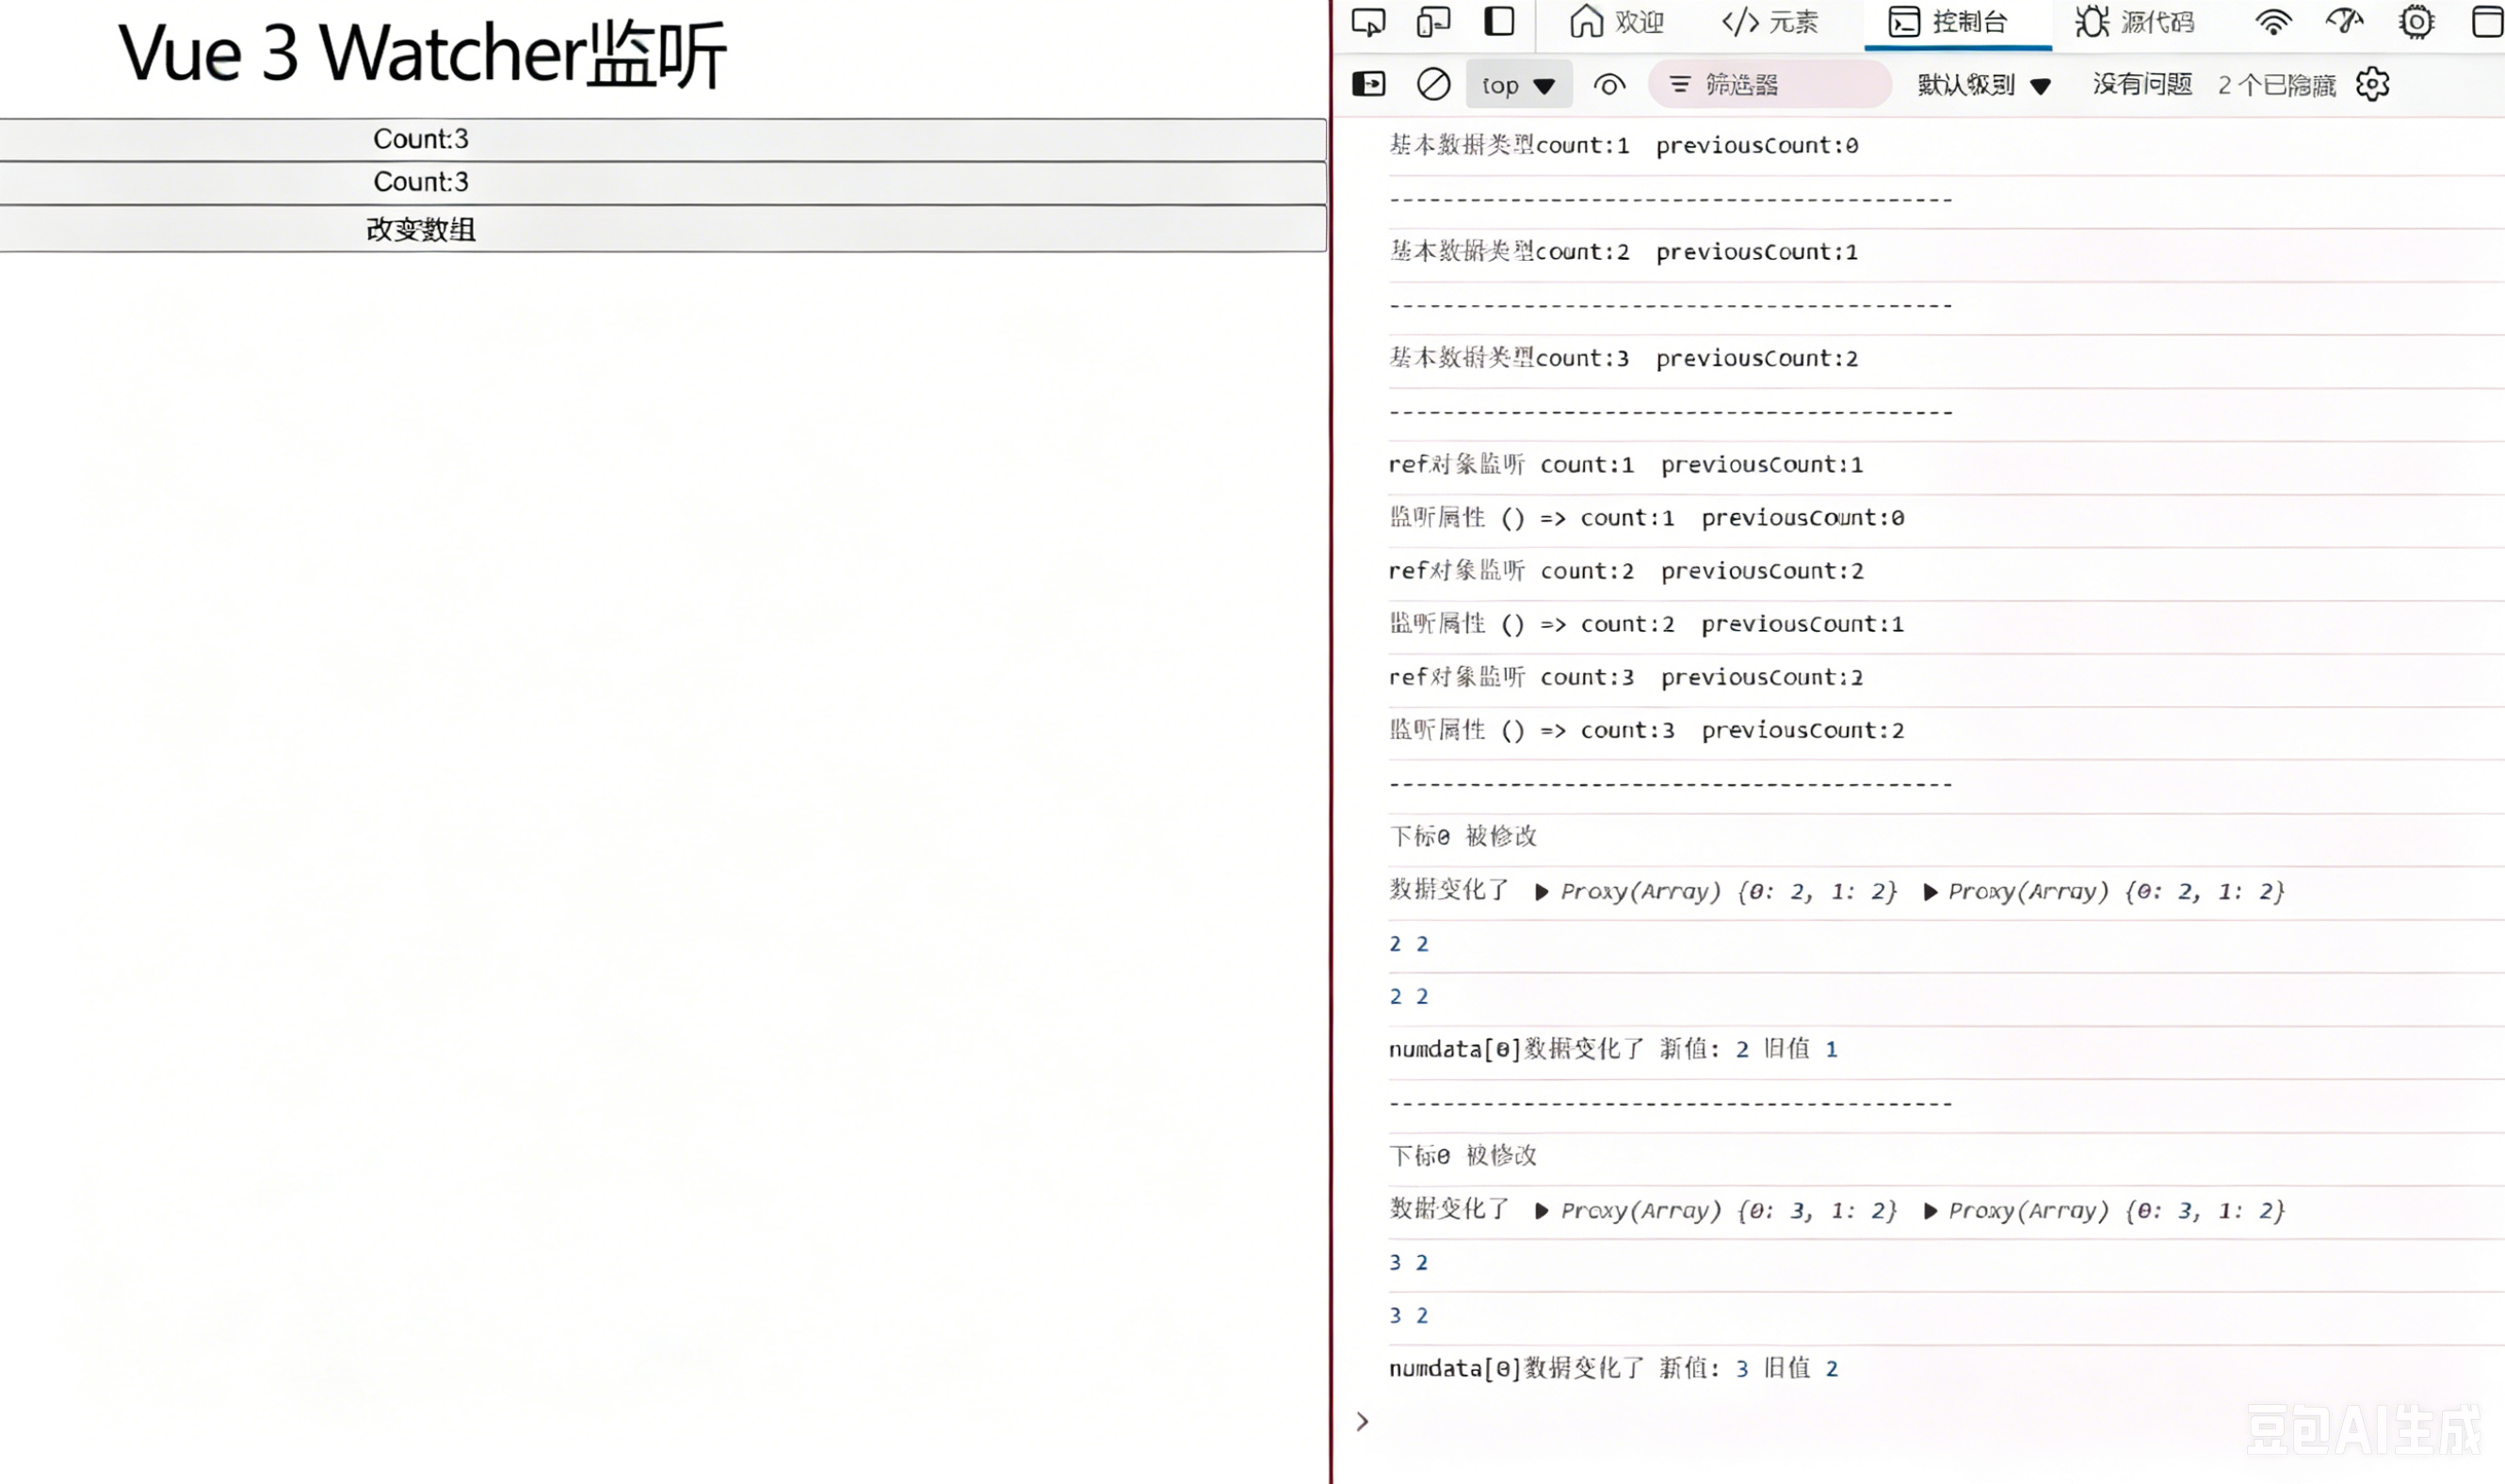
ref对象监听的值为啥一样,因为state的地址没有变,指向的同一个
reactive 返回的是一个Proxy 代理对象 ,watch 监听这个对象时,newVal 和 oldVal 指向的是同一个 Proxy 引用,只是内部数据变了。
reactive 默认开启深度监视,且无法通过配置项{ deep: false }关闭。
watch第3个参数
immediate:在侦听器创建时立即触发回调。第一次调用时旧值是 undefined
deep:如果源是对象,强制深度遍历,以便在深层级变更时触发回调。参考深层监听器
flush:调整回调函数的刷新时机。参考回调刷新的时机以及watchEffect()
onTrack / onTrigger:调试侦听器的依赖。参考侦听器调试
once:回调函数只会运行一次。侦听器将在回调函数首次运行后自动停止。【 3.4+ 版本特性 】
flush
flush: 'post' 的作用:让监听函数在【DOM 更新完成之后】再执行。
默认情况下,watch 是在数据变了、DOM 还没更新 时就触发;
javascript
watch(
  () => state.value.count,  // 监听源
  (newVal, oldVal) => {
    // 🔥 这里执行时,DOM 已经更新完毕!
    console.log('DOM 已更新,新值:', newVal)

    // 在这里操作 DOM、获取最新 DOM 都没问题
  },
  {
    flush: 'post'  // 核心配置
  }
)


只要你在 watch 里操作 DOM / 读取最新 DOM,就必须加!
比如:
获取更新后的 div 宽度 / 高度
操作 DOM 元素
调用依赖最新 DOM 的第三方库(ECharts、滚动条等)
Ontrack/OnTrigger
开发时才用
javascript
<script setup>
import { ref, watch } from 'vue'

const state = ref({ count: 0 })

// 监听
watch(
  () => state.value.count, // 监听源
  (newVal, oldVal) => {
    console.log('count 变化了', newVal)
  },
  {
    // 👇 调试钩子
    onTrack(e) {
      console.log('✅ 追踪依赖触发', e)
      // debugger
    },
    onTrigger(e) {
      console.log('🚨 数据被修改触发', e)
      // debugger
    }
  }
)

// 测试修改
state.value.count++
</script>
停止监听器
在 setup() 或 <script setup> 中用同步语句创建的侦听器,会自动绑定到宿主组件实例上,并且会在宿主组件卸载时自动停止。因此,在大多数情况下,你无需关心怎么停止一个侦听器。
一个关键点是,侦听器必须用同步语句创建:如果用异步回调创建一个侦听器,那么它不会绑定到当前组件上,你必须手动停止它,以防内存泄漏。如下方这个例子
javascript
<script setup>
import { watchEffect } from 'vue'

// 它会自动停止
watchEffect(() => {})

// ...这个则不会!
setTimeout(() => {
  watchEffect(() => {})
}, 100)
</script>
watchEffect()
立即运行一个函数,同时响应式地追踪其依赖,并在依赖更改时重新执行。
watchEffect() 的第一个参数是一个要运行的回调函数。这个回调函数的参数也是一个函数,用来注册清理回调。清理回调会在该副作用下一次执行前被调用,可以用来清理无效的副作用,例如等待中的异步请求
javascript
const unwatch = watchEffect(() => {})

// ...当该侦听器不再需要时
unwatch();


let showWatch = watch(data, (newValue, OldValue, onCleanup) => {
    console.log("数据变化了", `新值是:${newValue}`, `旧值是${OldValue}`);
    onCleanup(() => {
        console.log("清除副作用");
    });
});
// ...当该侦听器不再需要时
showWatch()