文章目录
- [Spring Cloud 学习与实践(8):Spring Cloud Gateway 统一入口、路由转发与双重跨域故障演练](#Spring Cloud 学习与实践(8):Spring Cloud Gateway 统一入口、路由转发与双重跨域故障演练)
-
- [1. 本章背景:为什么微服务还需要一个统一入口](#1. 本章背景:为什么微服务还需要一个统一入口)
- [2. Gateway 在系统中的位置](#2. Gateway 在系统中的位置)
- [3. 本章学习目标](#3. 本章学习目标)
- [4. 本章相关目录结构](#4. 本章相关目录结构)
- [第一部分:理解 Gateway 核心概念](#第一部分:理解 Gateway 核心概念)
-
- [5. Route、Predicate 和 Filter](#5. Route、Predicate 和 Filter)
-
- [5.1 Route:完整路由规则](#5.1 Route:完整路由规则)
- [5.2 Predicate:请求是否匹配当前路由](#5.2 Predicate:请求是否匹配当前路由)
- [5.3 Filter:转发前后加工请求或响应](#5.3 Filter:转发前后加工请求或响应)
- [6. `lb://` 是什么](#6.
lb://是什么) - [7. Gateway 请求处理链](#7. Gateway 请求处理链)
- [8. WebFlux、Netty 与异步非阻塞](#8. WebFlux、Netty 与异步非阻塞)
- [第二部分:搭建 cloud-gateway](#第二部分:搭建 cloud-gateway)
-
- [9. 修改 cloud-gateway/pom.xml](#9. 修改 cloud-gateway/pom.xml)
- [10. 创建 bootstrap.yml](#10. 创建 bootstrap.yml)
- [11. 创建网关启动类](#11. 创建网关启动类)
- 第三部分:配置网关路由
-
- [12. 在 Nacos 创建 cloud-gateway-dev.yaml](#12. 在 Nacos 创建 cloud-gateway-dev.yaml)
- [13. 路由规划](#13. 路由规划)
- [14. 为什么测试 URL 看起来重复](#14. 为什么测试 URL 看起来重复)
- [15. 创建 gateway.http](#15. 创建 gateway.http)
- [16. 启动与路由验证](#16. 启动与路由验证)
- [第四部分:理解浏览器跨域与 OPTIONS 预检](#第四部分:理解浏览器跨域与 OPTIONS 预检)
-
- [17. 什么是跨域](#17. 什么是跨域)
- [18. CORS 是什么](#18. CORS 是什么)
- [19. 什么是 OPTIONS 预检请求](#19. 什么是 OPTIONS 预检请求)
- [第五部分:Gateway 全局跨域配置](#第五部分:Gateway 全局跨域配置)
-
- [20. 为什么跨域应尽量由 Gateway 统一处理](#20. 为什么跨域应尽量由 Gateway 统一处理)
- [21. cloud-gateway-dev.yaml 增加 globalcors](#21. cloud-gateway-dev.yaml 增加 globalcors)
- [22. 为什么不建议使用 allowedOrigins: "*"](#22. 为什么不建议使用 allowedOrigins: "*")
- [23. gateway.http 增加预检请求](#23. gateway.http 增加预检请求)
- 第六部分:使用浏览器页面验证跨域
-
- [24. 创建 cors-test.html](#24. 创建 cors-test.html)
- [25. 启动静态页面服务器](#25. 启动静态页面服务器)
- 第七部分:双重跨域故障演练
-
- [26. 故意在下游 Controller 添加 @CrossOrigin](#26. 故意在下游 Controller 添加 @CrossOrigin)
- [27. 故障现象](#27. 故障现象)
- [28. 为什么会出现双重跨域](#28. 为什么会出现双重跨域)
- 第八部分:修复双重跨域
-
- [29. 第一种修复:跨域统一交给 Gateway](#29. 第一种修复:跨域统一交给 Gateway)
- [30. 第二种修复:DedupeResponseHeader 防御性去重](#30. 第二种修复:DedupeResponseHeader 防御性去重)
- [31. DedupeResponseHeader 是什么](#31. DedupeResponseHeader 是什么)
- [32. 最终 cloud-gateway-dev.yaml](#32. 最终 cloud-gateway-dev.yaml)
- [33. 最终职责边界](#33. 最终职责边界)
- [34. 完整跨域链路](#34. 完整跨域链路)
- [35. 本章常见问题](#35. 本章常见问题)
-
- [35.1 为什么 Postman 成功,浏览器仍然可能失败](#35.1 为什么 Postman 成功,浏览器仍然可能失败)
- [35.2 OPTIONS 是业务接口吗](#35.2 OPTIONS 是业务接口吗)
- [35.3 为什么要开启 add-to-simple-url-handler-mapping](#35.3 为什么要开启 add-to-simple-url-handler-mapping)
- [35.4 为什么下游不建议配置 @CrossOrigin](#35.4 为什么下游不建议配置 @CrossOrigin)
- [35.5 DedupeResponseHeader 是否可以代替删除下游 @CrossOrigin](#35.5 DedupeResponseHeader 是否可以代替删除下游 @CrossOrigin)
- [35.6 Gateway 是否会自动调用所有下游服务](#35.6 Gateway 是否会自动调用所有下游服务)
- [35.7 Gateway 和 OpenFeign 有什么区别](#35.7 Gateway 和 OpenFeign 有什么区别)
- [35.8 cloud-auth 为什么还没有接入路由](#35.8 cloud-auth 为什么还没有接入路由)
- [36. 本章故障演练总结](#36. 本章故障演练总结)
- [37. 本章结论](#37. 本章结论)
Spring Cloud 学习与实践(8):Spring Cloud Gateway 统一入口、路由转发与双重跨域故障演练
本章目标:搭建
cloud-gateway网关服务,让客户端通过统一入口访问cloud-user、cloud-product和cloud-order;理解 Route、Predicate、Filter、lb://、WebFlux、Netty、OPTIONS 预检请求与 CORS;最后通过"双重跨域"故障演练,掌握网关层统一跨域配置和DedupeResponseHeader去重方案。
1. 本章背景:为什么微服务还需要一个统一入口
前七章已经完成:
text
第 1 章:
Maven 多模块项目骨架
cloud-common 公共模块

第 2 章:
cloud-user 用户服务
MyBatis-Plus CRUD
分页失效故障演练

第 3 章:
cloud-product 商品服务
库存扣减
JMeter 并发超卖
数据库原子条件更新

第 4 章:
cloud-order 订单服务
本地创建订单
主动暴露服务边界问题

第 5 章:
Nacos 注册中心
服务实例注册
实例上下线观察

第 6 章:
Nacos 配置中心
bootstrap.yml
DataId、Group、Namespace
@RefreshScope 动态刷新

第 7 章:
OpenFeign 服务调用
cloud-api 远程契约
Nacos 服务发现
LoadBalancer
Feign 超时
fallbackFactory
错误注册 IP
Nacos Server 停机观察
目前可以直接访问三个业务服务:
text
http://localhost:9200/users/1
http://localhost:9300/products/1
http://localhost:9400/orders/1
这种方式在学习早期便于调试,但在真实项目中存在明显问题:
text
前端需要维护多个服务地址
内部服务 IP 和端口直接暴露
跨域配置分散
鉴权逻辑容易重复
日志、限流、灰度、审计难以统一
因此,需要增加统一入口:
text
cloud-gateway客户端只需要访问:
text
http://localhost:9000请求先进入网关,再由网关转发到具体业务服务。
2. Gateway 在系统中的位置
接入网关后,外部请求链路变为:
text
浏览器 / App / 第三方调用方
            ↓
      cloud-gateway:9000
            ↓
       路由规则匹配
            ↓
   LoadBalancer 选择实例
            ↓
 cloud-user / cloud-product / cloud-order
网关适合统一处理:
text
路由转发
跨域
鉴权
日志
限流
灰度
审计
请求头处理
响应头处理
一句话总结:
text
Gateway 是微服务系统的统一入口。3. 本章学习目标
本章完成:
text
1. 创建 cloud-gateway 模块
2. 接入 Spring Cloud Gateway
3. 注册 cloud-gateway 到 Nacos
4. 使用 Nacos Config 管理网关路由
5. 配置 Route、Predicate 和 Filter
6. 使用 lb:// 服务名转发
7. 使用 StripPrefix 处理路径
8. 通过 Gateway 查询用户、商品和订单
9. 通过 Gateway 创建订单
10. 验证未匹配路由返回 404
11. 配置全局 CORS
12. 理解 OPTIONS 预检请求
13. 使用浏览器页面验证跨域
14. 故意在下游 Controller 添加 @CrossOrigin
15. 复现 Access-Control-Allow-Origin 重复
16. 使用 DedupeResponseHeader 去重
17. 明确跨域职责边界
本章暂时不做:
text
JWT 鉴权
用户身份透传
自定义 GlobalFilter
Sentinel 限流
动态路由热更新
这些将在后续章节中继续学习。
4. 本章相关目录结构
完成后目录如下:
text
cloud-demo
├── cloud-common
├── cloud-api
├── cloud-gateway
│   ├── pom.xml
│   └── src
│       ├── main
│       │   ├── java
│       │   │   └── com.example.cloud.gateway
│       │   │       └── CloudGatewayApplication.java
│       │   └── resources
│       │       └── bootstrap.yml
│       └── test
│           └── http
│               └── gateway.http
├── cloud-auth
├── cloud-user
├── cloud-product
└── cloud-order
网关路由配置放到 Nacos 配置中心:
text
dev Namespace
└── DEFAULT_GROUP
    └── cloud-gateway-dev.yaml
此外,项目根目录创建:
text
cors-test.html用于真正模拟浏览器跨域请求。
第一部分:理解 Gateway 核心概念
5. Route、Predicate 和 Filter
Spring Cloud Gateway 最重要的三个概念:
text
Route
Predicate
Filter
5.1 Route:完整路由规则
Route 表示一条完整转发规则。
示例:
yaml
- id: product-route
  uri: lb://cloud-product
  predicates:
    - Path=/api/product/**
  filters:
    - StripPrefix=2
含义:
text
路由名称:
product-route

匹配条件:
请求路径符合 /api/product/**

目标服务:
cloud-product

转发前处理:
删除前两段路径
一条 Route 通常包含:
text
id
uri
predicates
filters
5.2 Predicate:请求是否匹配当前路由
Predicate 可以理解为:
text
路由匹配条件例如:
yaml
predicates:
  - Path=/api/product/**
只有符合:
text
/api/product/**的请求才会进入该路由。
Predicate 不只支持路径,还可以根据:
text
请求方法
请求头
Cookie
Host
查询参数
时间
来源 IP
进行匹配。
5.3 Filter:转发前后加工请求或响应
Filter 可以理解为:
text
网关处理链中的加工步骤它可以在请求转发前或响应返回后执行。
例如:
yaml
filters:
  - StripPrefix=2
表示删除请求路径前两段。
请求:
text
/api/product/products/1删除:
text
/api/product后,下游实际收到:
text
/products/16. lb:// 是什么
网关路由目标不写死:
text
http://localhost:9300而是写:
text
lb://cloud-product其中:
text
lb:
通过 LoadBalancer 选择实例

cloud-product:
Nacos 中注册的服务名
处理链:
text
lb://cloud-product
        ↓
LoadBalancer 查询实例列表
        ↓
例如:
192.168.1.3:9300
        ↓
选择一个实例
        ↓
转发 HTTP 请求
这和第 7 章中的:
java
@FeignClient(name = "cloud-product")思路一致。
区别在于:
| 场景 | 写法 |
|---|---|
| Java 业务代码调用远程服务 | @FeignClient(name = "cloud-product") |
| Gateway 配置目标服务 | uri: lb://cloud-product |
共同点:
text
服务名
    ↓
服务发现
    ↓
实例列表
    ↓
IP 和端口
7. Gateway 请求处理链
请求:
text
GET /api/product/products/1执行过程:
text
客户端请求
        ↓
cloud-gateway:9000
        ↓
Predicate 判断是否匹配:
/api/product/**
        ↓
匹配 product-route
        ↓
Filter 执行:
StripPrefix=2
        ↓
路径变为:
/products/1
        ↓
目标:
lb://cloud-product
        ↓
LoadBalancer 查询 Nacos 实例
        ↓
选择:
192.168.1.3:9300
        ↓
转发:
GET /products/1
        ↓
cloud-product 返回结果
        ↓
Gateway 将响应返回客户端
8. WebFlux、Netty 与异步非阻塞
cloud-user、cloud-product 和 cloud-order 当前使用:
text
Spring MVC
Tomcat
阻塞式请求模型
cloud-gateway 使用:
text
Spring WebFlux
Project Reactor
Netty
异步非阻塞模型
为什么网关适合异步非阻塞
网关处于系统入口,面对大量并发连接。
很多时间花在:
text
等待下游服务响应异步非阻塞模型不会让线程长期阻塞在等待过程中。
当前阶段不需要深入 Reactor 源码,只需理解:
text
Gateway 适合作为高并发入口,
它基于 WebFlux 和 Netty,
不应混入传统 Servlet Web 技术栈。
特别注意
cloud-gateway 中不要引入:
xml
spring-boot-starter-web否则会混入 Spring MVC / Servlet 依赖,增加冲突和理解成本。
第二部分:搭建 cloud-gateway
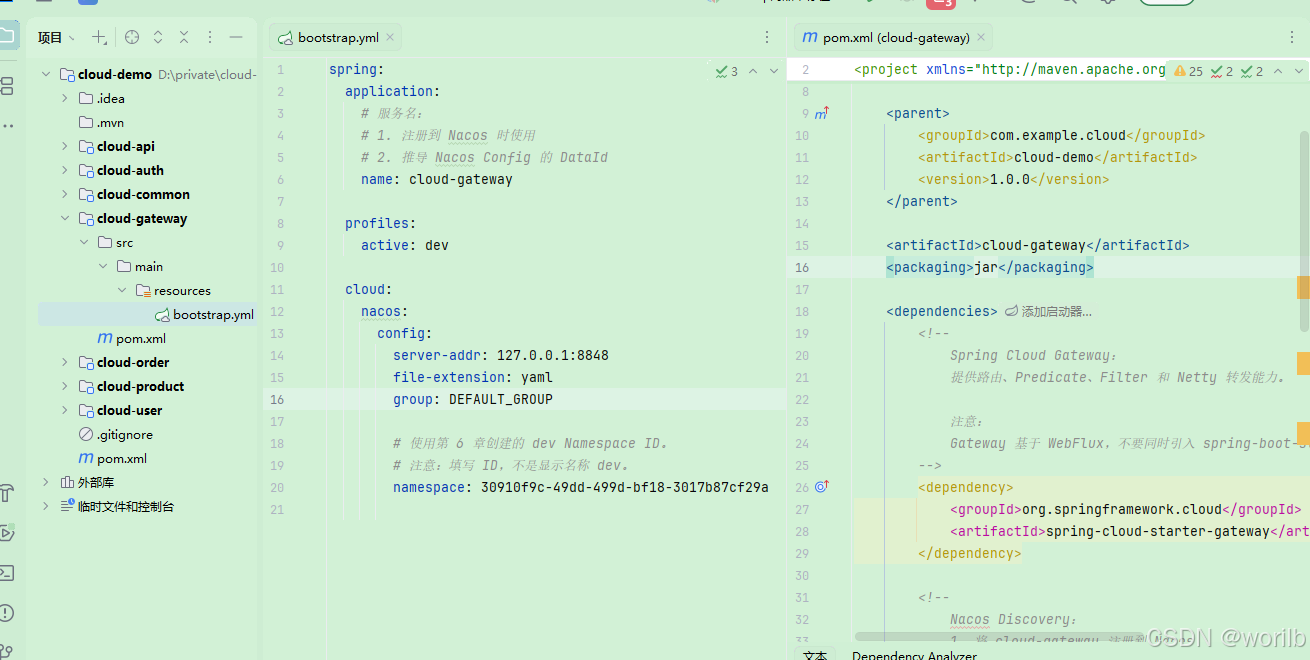
9. 修改 cloud-gateway/pom.xml
完整内容:
xml
<?xml version="1.0" encoding="UTF-8"?>
<project xmlns="http://maven.apache.org/POM/4.0.0"
         xmlns:xsi="http://www.w3.org/2001/XMLSchema-instance"
         xsi:schemaLocation="http://maven.apache.org/POM/4.0.0
         http://maven.apache.org/xsd/maven-4.0.0.xsd">

    <modelVersion>4.0.0</modelVersion>

    <parent>
        <groupId>com.example.cloud</groupId>
        <artifactId>cloud-demo</artifactId>
        <version>1.0.0</version>
    </parent>

    <artifactId>cloud-gateway</artifactId>
    <packaging>jar</packaging>

    <dependencies>
        <!--
            Spring Cloud Gateway:
            提供 Route、Predicate、Filter 和 Netty 转发能力。

            注意:
            Gateway 基于 WebFlux,
            不要同时引入 spring-boot-starter-web。
        -->
        <dependency>
            <groupId>org.springframework.cloud</groupId>
            <artifactId>spring-cloud-starter-gateway</artifactId>
        </dependency>

        <!--
            Nacos Discovery:
            1. 将 cloud-gateway 注册到 Nacos
            2. 让网关发现 cloud-user、cloud-product、cloud-order
        -->
        <dependency>
            <groupId>com.alibaba.cloud</groupId>
            <artifactId>spring-cloud-starter-alibaba-nacos-discovery</artifactId>
        </dependency>

        <!--
            LoadBalancer:
            支持 lb://cloud-user 这种服务名转发方式。
        -->
        <dependency>
            <groupId>org.springframework.cloud</groupId>
            <artifactId>spring-cloud-starter-loadbalancer</artifactId>
        </dependency>

        <!--
            Nacos Config:
            从 Nacos 配置中心读取 cloud-gateway-dev.yaml。
        -->
        <dependency>
            <groupId>com.alibaba.cloud</groupId>
            <artifactId>spring-cloud-starter-alibaba-nacos-config</artifactId>
        </dependency>

        <!--
            启用 bootstrap.yml 启动阶段。
        -->
        <dependency>
            <groupId>org.springframework.cloud</groupId>
            <artifactId>spring-cloud-starter-bootstrap</artifactId>
        </dependency>
    </dependencies>

</project>
10. 创建 bootstrap.yml
位置:
text
cloud-gateway
└── src/main/resources
    └── bootstrap.yml
内容:
yaml
spring:
  application:
    # 服务名:
    # 1. Gateway 注册到 Nacos 时使用
    # 2. 推导 Nacos Config 的 DataId
    name: cloud-gateway

  profiles:
    active: dev

  cloud:
    nacos:
      config:
        server-addr: 127.0.0.1:8848
        file-extension: yaml
        group: DEFAULT_GROUP

        # 使用第 6 章创建的 dev Namespace ID。
        # 注意:填写 ID,不是显示名称 dev。
        namespace: 你的-dev-Namespace-ID
需要注意:
text
spring.cloud.nacos.config.namespace表示:
text
配置中心使用哪个 Namespace它不等于:
text
注册中心的 Namespace当前网关和业务服务仍然注册在默认注册命名空间中。
11. 创建网关启动类
位置:
text
cloud-gateway
└── src/main/java
    └── com.example.cloud.gateway
        └── CloudGatewayApplication.java
代码:
java
package com.example.cloud.gateway;

import org.springframework.boot.SpringApplication;
import org.springframework.boot.autoconfigure.SpringBootApplication;
import org.springframework.cloud.client.discovery.EnableDiscoveryClient;

/**
 * 网关启动类。
 *
 * 当前职责:
 * 1. 注册到 Nacos
 * 2. 接收客户端请求
 * 3. 根据 Route 和 Predicate 匹配下游服务
 * 4. 执行 Filter
 * 5. 通过 lb:// 服务名完成负载转发
 */
@EnableDiscoveryClient
@SpringBootApplication
public class CloudGatewayApplication {

    public static void main(String[] args) {
        SpringApplication.run(CloudGatewayApplication.class, args);
    }
}
第三部分:配置网关路由
12. 在 Nacos 创建 cloud-gateway-dev.yaml
进入:
text
Nacos 控制台
    ↓
配置管理
    ↓
配置列表
    ↓
dev Namespace
    ↓
创建配置
填写:
| 配置项 | 值 |
|---|---|
| Data ID | cloud-gateway-dev.yaml |
| Group | DEFAULT_GROUP |
| 配置格式 | YAML |
初始配置:
yaml
server:
  port: 9000

spring:
  cloud:
    nacos:
      discovery:
        # Gateway 自己注册到 Nacos,
        # 同时通过 Nacos 发现下游服务。
        server-addr: 127.0.0.1:8848

    gateway:
      routes:
        # 用户服务路由
        - id: user-route
          uri: lb://cloud-user
          predicates:
            - Path=/api/user/**
          filters:
            - StripPrefix=2

        # 商品服务路由
        - id: product-route
          uri: lb://cloud-product
          predicates:
            - Path=/api/product/**
          filters:
            - StripPrefix=2

        # 订单服务路由
        - id: order-route
          uri: lb://cloud-order
          predicates:
            - Path=/api/order/**
          filters:
            - StripPrefix=2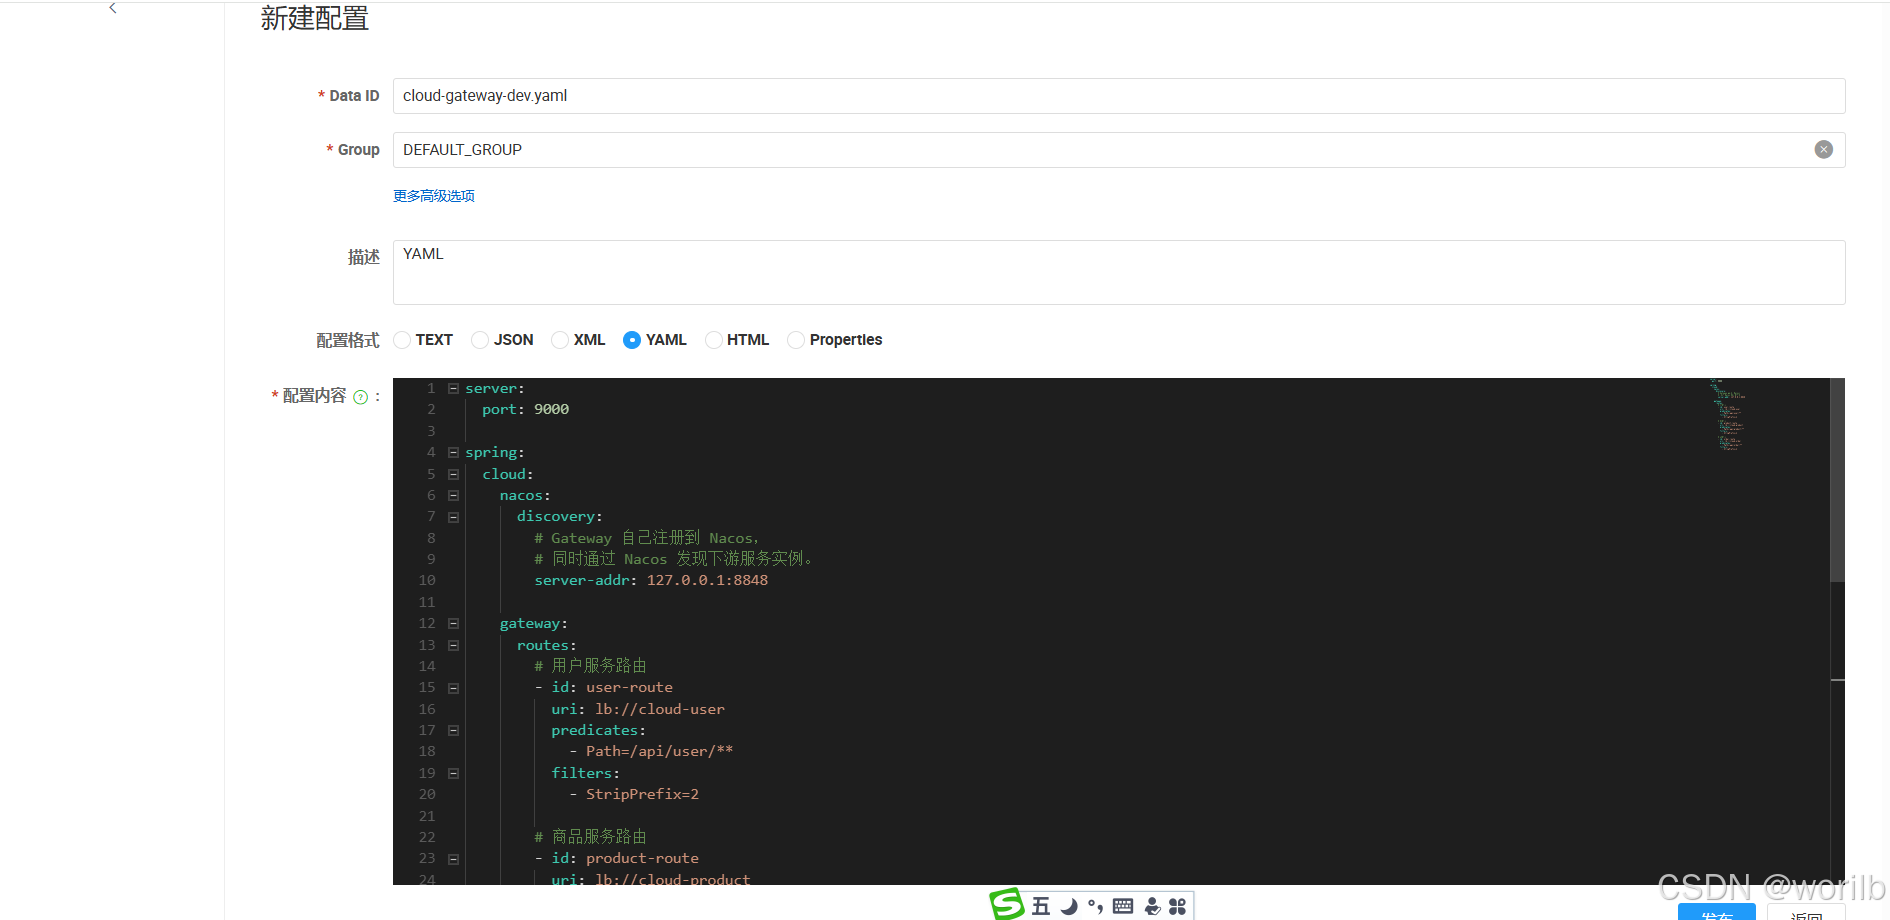
13. 路由规划
当前规划:
text
/api/user/**    -> cloud-user
/api/product/** -> cloud-product
/api/order/**   -> cloud-order
第 9 章增加认证服务后,再补:
text
/api/auth/** -> cloud-auth14. 为什么测试 URL 看起来重复
例如:
text
/api/product/products/1看起来有两层 product。
原因是本章先使用最直观的:
yaml
StripPrefix=2执行:
text
/api/product/products/1
        ↓
删除 /api/product
        ↓
/products/1
这样可以清楚观察 Filter 行为。
后续可以用:
text
RewritePath将外部地址优化为:
text
/api/product/1再转发成:
text
/products/1当前先完成最小闭环。
15. 创建 gateway.http
位置:
text
cloud-gateway
└── src/test/http
    └── gateway.http
内容:
http
### 通过 Gateway 查询用户
GET http://localhost:9000/api/user/users/1
### 通过 Gateway 查询商品
GET http://localhost:9000/api/product/products/1
### 通过 Gateway 查询订单
# 将 1 替换为数据库中真实存在的订单 ID。
GET http://localhost:9000/api/order/orders/1
### 通过 Gateway 创建订单
POST http://localhost:9000/api/order/orders
Content-Type: application/json
{
"userId": 1,
"productId": 1,
"quantity": 1
}
### 不匹配任何路由
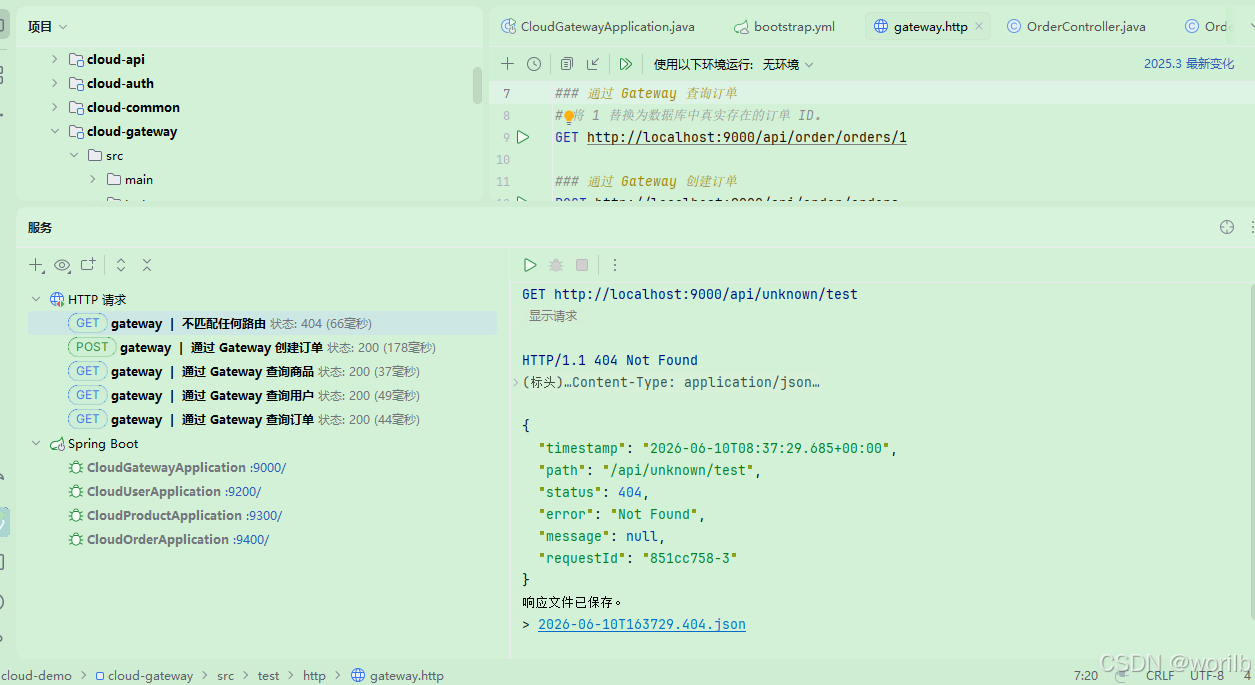
GET http://localhost:9000/api/unknown/test16. 启动与路由验证
启动顺序:
text
1. Nacos Server
2. CloudUserApplication
3. CloudProductApplication
4. CloudOrderApplication
5. CloudGatewayApplication
Nacos 服务列表中应出现:
text
cloud-user
cloud-product
cloud-order
cloud-gateway
网关端口:
text
9000实际验证结果:
text
cloud-gateway 启动成功
Nacos 中出现 cloud-gateway:9000
GET /api/user/users/1 成功
GET /api/product/products/1 成功
GET /api/order/orders/{id} 成功
POST /api/order/orders 成功创建订单并扣减库存
GET /api/unknown/test 返回 404
这说明:
text
Route
Predicate
Filter
StripPrefix
lb://
Nacos Discovery
LoadBalancer
均已生效。
第四部分:理解浏览器跨域与 OPTIONS 预检
17. 什么是跨域
浏览器页面和接口的:
text
协议
域名
端口
只要有一项不同,就属于不同 Origin。
例如:
text
前端页面:
http://localhost:5500

Gateway:
http://localhost:9000
端口不同,所以属于跨域。
需要注意:
text
跨域主要是浏览器安全策略IDEA HTTP Client、Postman 和后端代码通常不会受浏览器 CORS 限制。
因此:
text
gateway.http 能调用成功不代表:
text
浏览器页面一定能成功调用18. CORS 是什么
CORS 全称:
text
Cross-Origin Resource Sharing
跨源资源共享
浏览器默认限制页面随意读取其他 Origin 的响应。
服务端需要通过响应头明确告诉浏览器:
text
允许哪些来源
允许哪些方法
允许哪些请求头
是否允许 Cookie
常见响应头:
text
Access-Control-Allow-Origin
Access-Control-Allow-Methods
Access-Control-Allow-Headers
Access-Control-Allow-Credentials
19. 什么是 OPTIONS 预检请求
浏览器发送部分跨域请求前,会先发送:
http
OPTIONS询问服务端:
text
是否允许当前来源?
是否允许 POST?
是否允许 Content-Type?
是否允许自定义请求头?
这个过程叫:
text
Preflight Request
预检请求
例如浏览器准备发送:
http
POST /api/order/orders
Content-Type: application/json
可能先发送:
http
OPTIONS /api/order/orders
Origin: http://localhost:5500
Access-Control-Request-Method: POST
Access-Control-Request-Headers: Content-Type
只有预检成功,浏览器才会发送正式 POST 请求。
第五部分:Gateway 全局跨域配置
20. 为什么跨域应尽量由 Gateway 统一处理
外部请求已经统一经过 Gateway:
text
客户端
    ↓
Gateway
    ↓
业务服务
因此跨域也适合统一配置在网关:
text
Gateway 统一处理 CORS
业务服务只处理业务逻辑
这样可以避免:
text
每个服务重复配置
配置规则不一致
Gateway 和下游重复添加响应头
21. cloud-gateway-dev.yaml 增加 globalcors
将 Nacos 中:
text
dev Namespace
└── DEFAULT_GROUP
    └── cloud-gateway-dev.yaml
更新为:
yaml
server:
  port: 9000

spring:
  cloud:
    nacos:
      discovery:
        server-addr: 127.0.0.1:8848

    gateway:
      # 全局跨域配置
      globalcors:
        # OPTIONS 预检请求有时无法匹配普通业务路由。
        # 开启后,预检请求即使未命中 Route,
        # 也可以由 Gateway 处理。
        add-to-simple-url-handler-mapping: true

        cors-configurations:
          '[/**]':
            # 当前前端测试页面运行在 5500 端口。
            allowedOrigins:
              - "http://localhost:5500"

            allowedMethods:
              - GET
              - POST
              - PUT
              - DELETE
              - OPTIONS

            allowedHeaders:
              - "*"

            # 允许携带 Cookie 等凭据。
            allowCredentials: true

            # 浏览器缓存预检结果的秒数。
            maxAge: 3600

      routes:
        - id: user-route
          uri: lb://cloud-user
          predicates:
            - Path=/api/user/**
          filters:
            - StripPrefix=2

        - id: product-route
          uri: lb://cloud-product
          predicates:
            - Path=/api/product/**
          filters:
            - StripPrefix=2

        - id: order-route
          uri: lb://cloud-order
          predicates:
            - Path=/api/order/**
          filters:
            - StripPrefix=2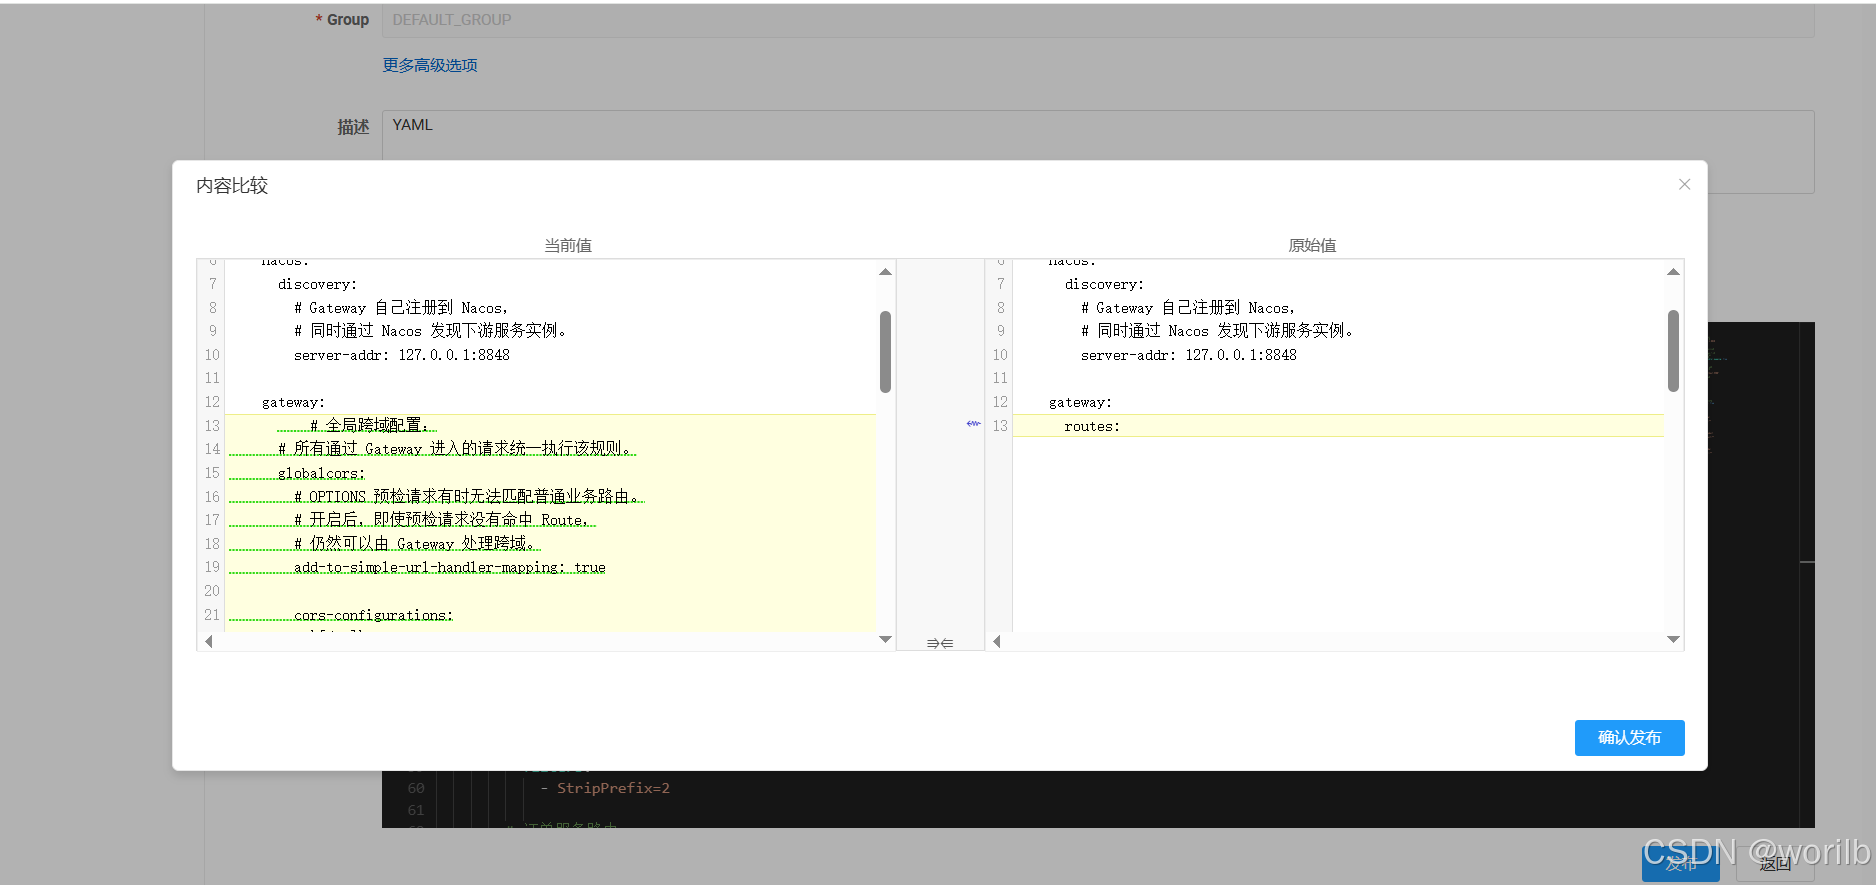
发布配置后,重新启动:
text
CloudGatewayApplication22. 为什么不建议使用 allowedOrigins: "*"
当前配置:
yaml
allowCredentials: true表示允许携带 Cookie 等凭据。
此时不建议配置:
yaml
allowedOrigins:
  - "*"
更合适的是明确指定前端地址:
yaml
allowedOrigins:
  - "http://localhost:5500"
正式环境中应替换为真实前端域名。
23. gateway.http 增加预检请求
http
### 模拟浏览器 OPTIONS 预检请求
OPTIONS http://localhost:9000/api/order/orders
Origin: http://localhost:5500
Access-Control-Request-Method: POST
Access-Control-Request-Headers: Content-Type

### 带 Origin 请求头查询商品
GET http://localhost:9000/api/product/products/1
Origin: http://localhost:5500
实际结果:
text
OPTIONS 预检请求成功
响应中包含允许跨域的响应头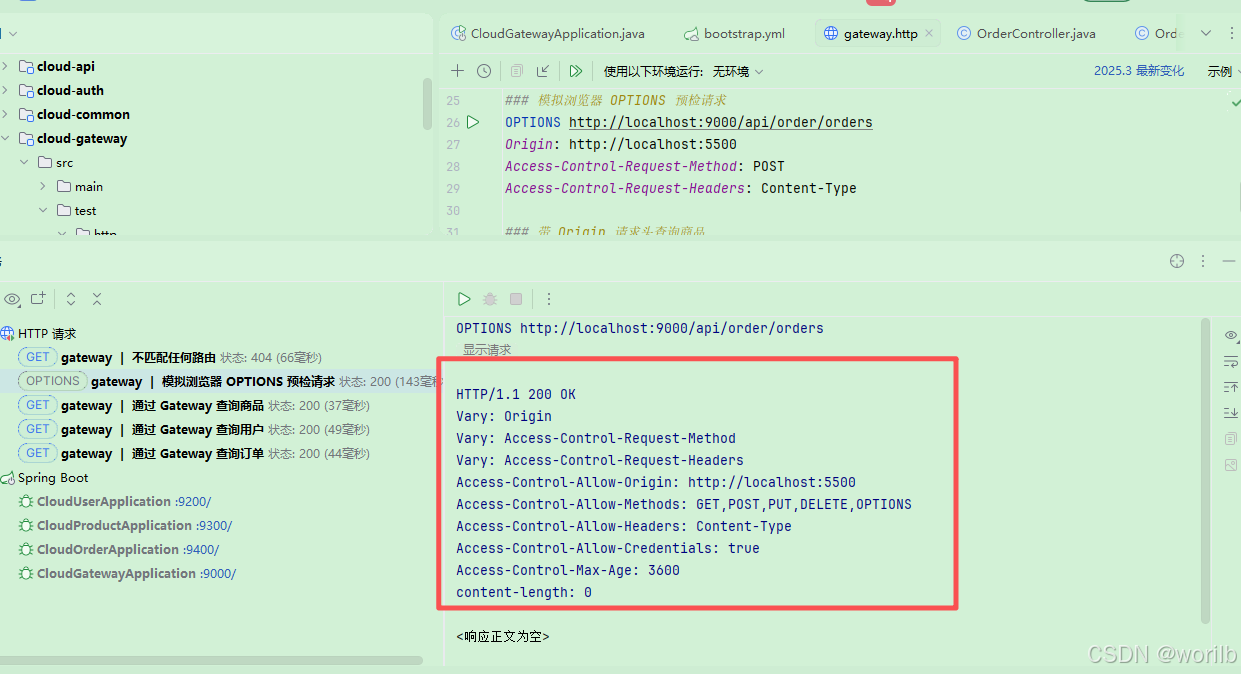
例如:
text
Access-Control-Allow-Origin: http://localhost:5500
Access-Control-Allow-Methods: GET,POST,PUT,DELETE,OPTIONS
Access-Control-Allow-Credentials: true
重点不是:
text
200 还是 204而是:
text
浏览器获得允许跨域的响应头第六部分:使用浏览器页面验证跨域
24. 创建 cors-test.html
位置:
text
cloud-demo
└── cors-test.html
完整内容:
html
<!DOCTYPE html>
<html lang="zh-CN">
<head>
    <meta charset="UTF-8">
    <title>Gateway CORS Test</title>
</head>
<body>
<h1>Spring Cloud Gateway 跨域测试</h1>

<button id="queryProduct">通过 Gateway 查询商品</button>

<pre id="result"></pre>

<script>
    const result = document.getElementById("result");

    document
        .getElementById("queryProduct")
        .addEventListener("click", async () => {
            result.textContent = "请求中...";

            try {
                const response = await fetch(
                    "http://localhost:9000/api/product/products/1"
                );

                const data = await response.json();

                result.textContent = JSON.stringify(data, null, 2);
            } catch (error) {
                result.textContent = String(error);
                console.error(error);
            }
        });
</script>
</body>
</html>
25. 启动静态页面服务器
在 cors-test.html 所在目录打开终端。
Windows下 Python 3 环境优先尝试:
bat
py -m http.server 5500如果命令不可用,再尝试:
bat
python -m http.server 5500Python 2则用:
bash
python -m SimpleHTTPServer 5500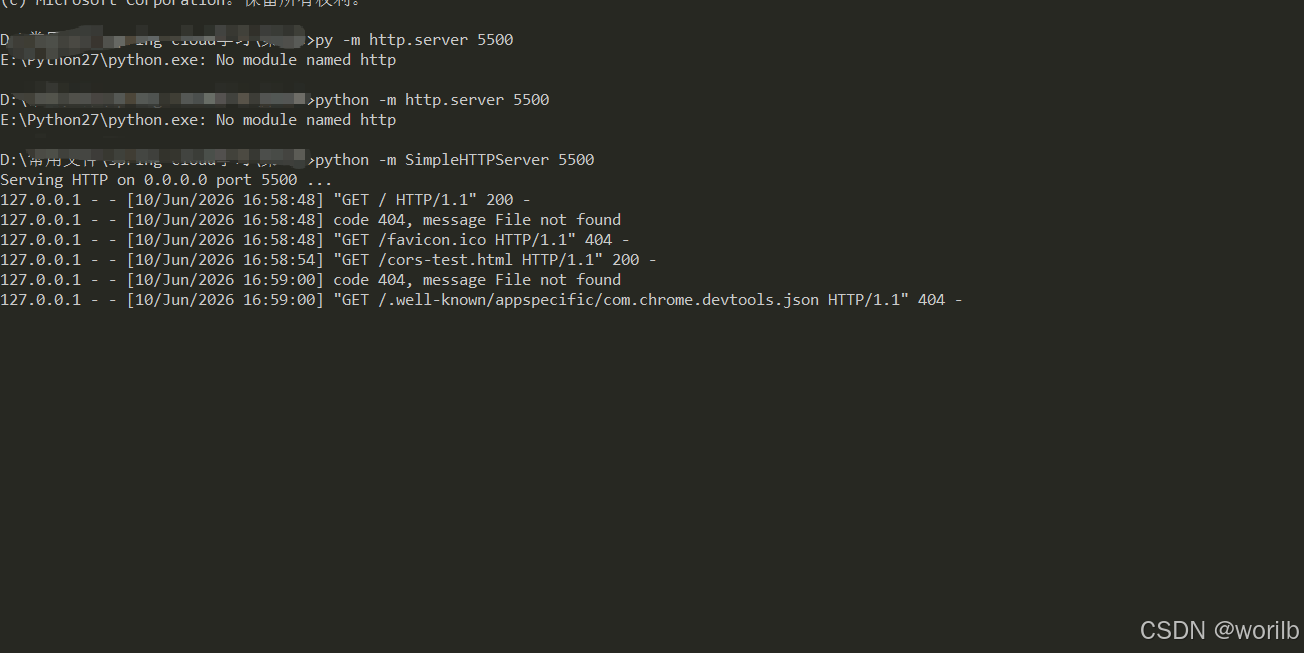
浏览器打开:
text
http://localhost:5500/cors-test.html点击:
text
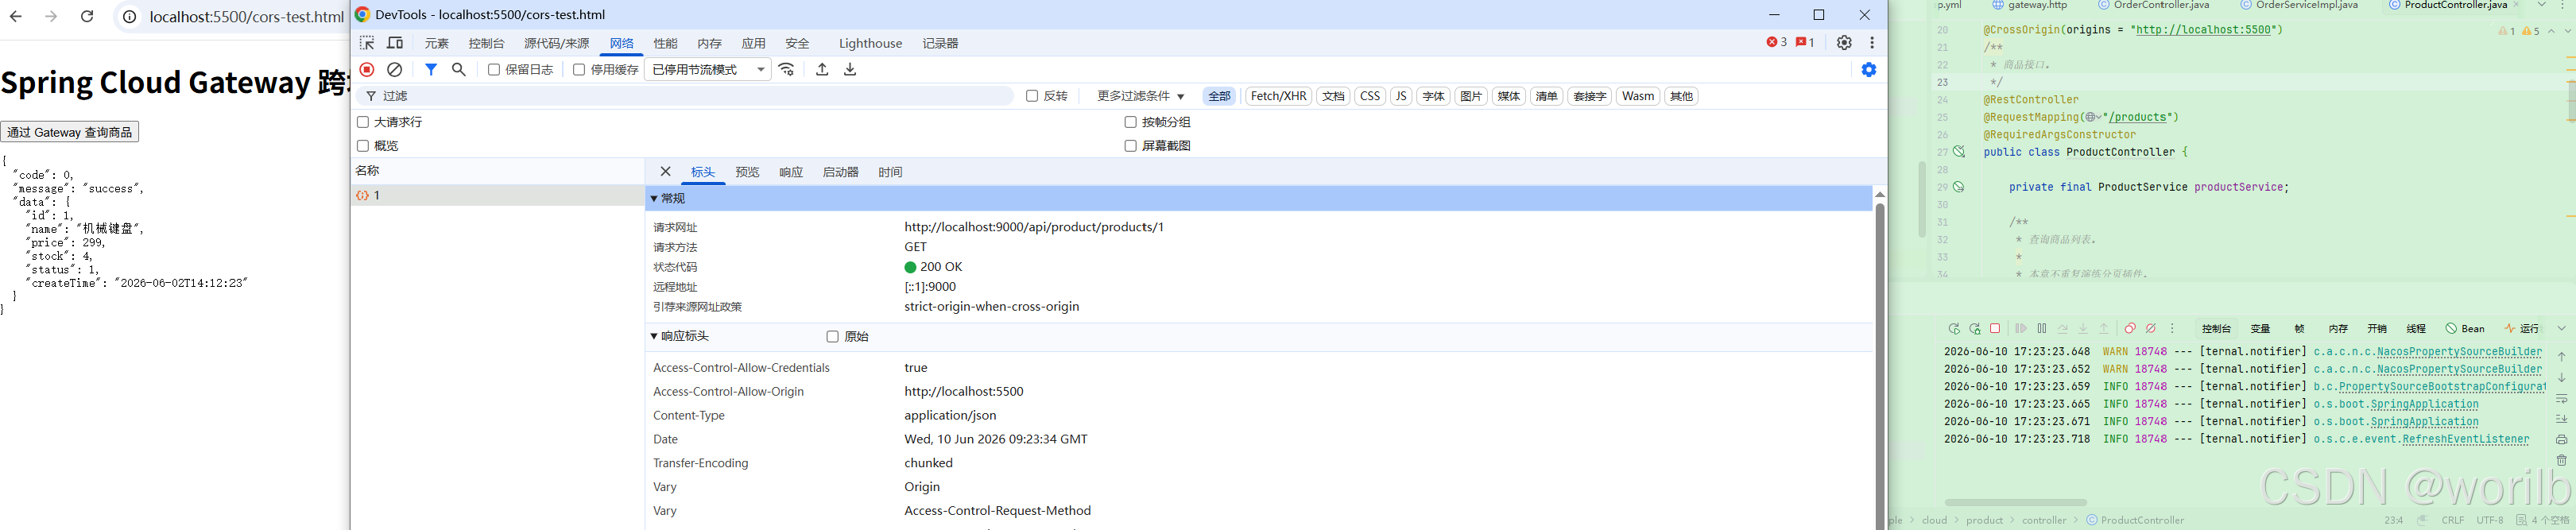
通过 Gateway 查询商品实际结果:
text
浏览器页面成功显示商品 JSON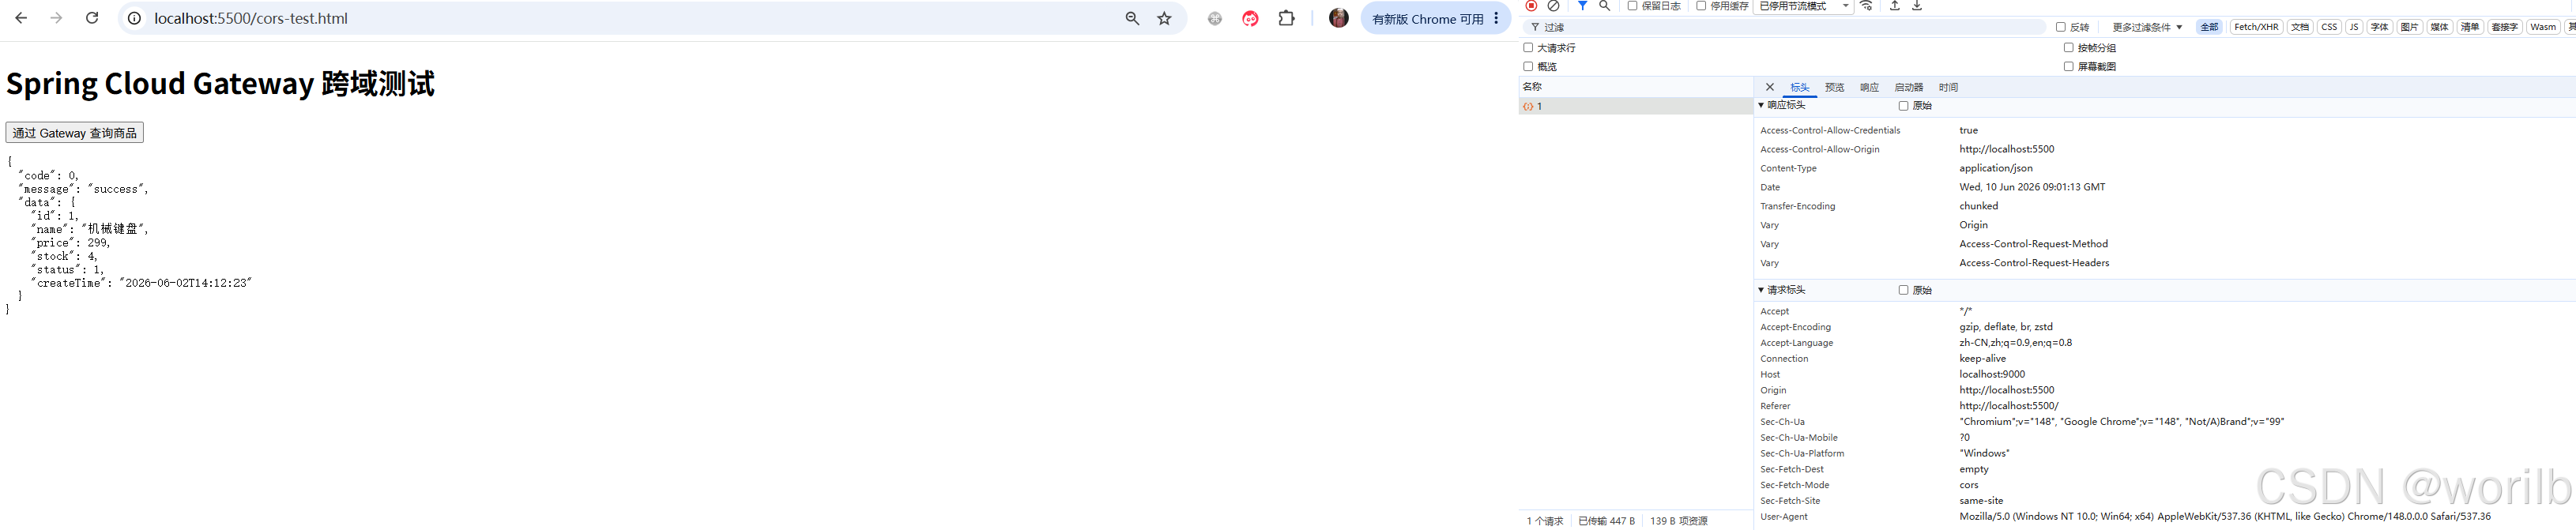
这说明:
text
Gateway 全局 CORS 已生效第七部分:双重跨域故障演练
26. 故意在下游 Controller 添加 @CrossOrigin
Gateway 已经配置全局 CORS。
为了复现双重跨域问题,在商品服务中临时添加:
text
cloud-product
└── src/main/java
    └── com.example.cloud.product.controller
        └── ProductController.java
新增导入:
java
import org.springframework.web.bind.annotation.CrossOrigin;在类上添加:
java
/**
 * 仅用于双重跨域故障演练。
 *
 * Gateway 已经配置全局 CORS。
 * 当前在下游 Controller 再次添加 @CrossOrigin,
 * 可能导致响应头重复。
 *
 * 演练结束后必须删除。
 */
@CrossOrigin(origins = "http://localhost:5500")
@RestController
@RequestMapping("/products")
@RequiredArgsConstructor
public class ProductController {
    // 原有代码保持不变
}
重新启动:
text
CloudProductApplication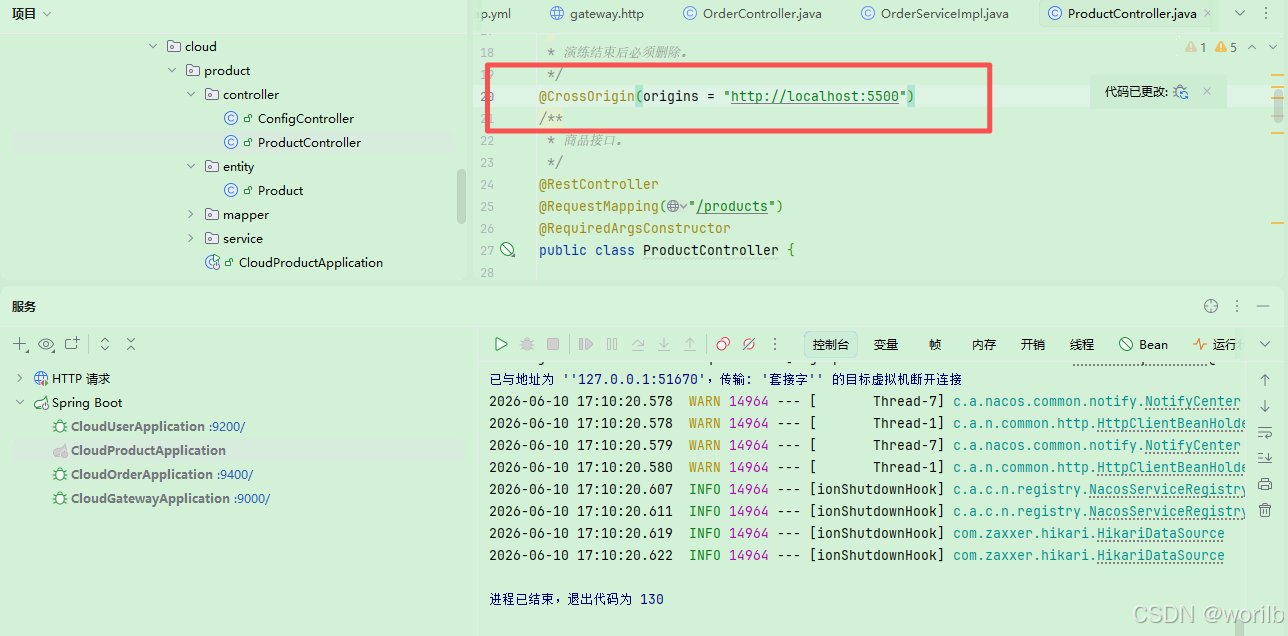
27. 故障现象
再次打开:
text
http://localhost:5500/cors-test.html点击查询商品。
浏览器出现跨域报错。
F12 查看:
text
Network
    ↓
products/1
    ↓
Response Headers
发现:
text
Access-Control-Allow-Origin重复。
可能显示为:
text
Access-Control-Allow-Origin: http://localhost:5500
Access-Control-Allow-Origin: http://localhost:5500
也可能合并为:
text
Access-Control-Allow-Origin:
http://localhost:5500, http://localhost:5500
实际演练结果:
text
响应头出现重复
浏览器跨域报错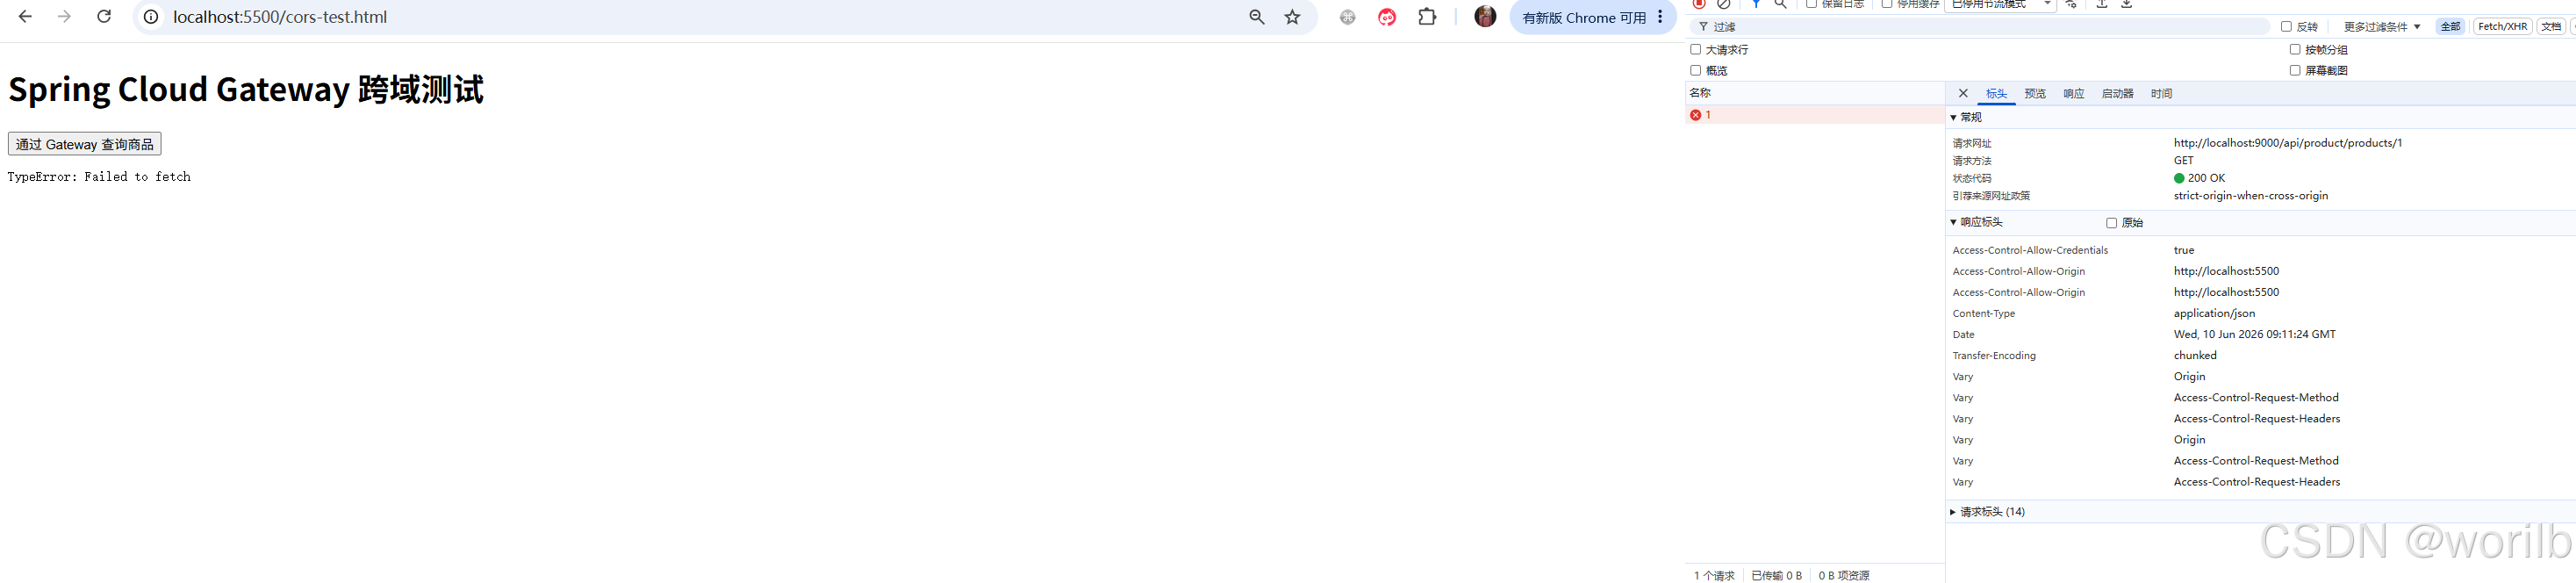
28. 为什么会出现双重跨域
请求经过 Gateway:
text
Gateway globalcors
        ↓
添加 Access-Control-Allow-Origin
然后进入商品服务:
text
ProductController @CrossOrigin
        ↓
再次添加 Access-Control-Allow-Origin
响应返回时:
text
Gateway 跨域响应头
+
下游跨域响应头
最终重复。
这就是:
text
双重跨域第八部分:修复双重跨域
29. 第一种修复:跨域统一交给 Gateway
删除商品服务中的:
java
@CrossOrigin(origins = "http://localhost:5500")重新启动:
text
CloudProductApplication再次访问浏览器测试页面。
实际结果:
text
跨域恢复正常推荐原则:
text
外部请求统一经过 Gateway
        ↓
跨域统一由 Gateway 处理
        ↓
下游业务服务不重复配置 @CrossOrigin
30. 第二种修复:DedupeResponseHeader 防御性去重
真实项目中,可能存在:
text
历史服务
第三方服务
多人协作
遗留 @CrossOrigin
为了避免响应头重复,可以在 Gateway 增加防御性去重。
在:
text
cloud-gateway-dev.yaml中增加:
yaml
spring:
  cloud:
    gateway:
      # 防御性处理:
      # Gateway 和下游如果同时添加跨域响应头,
      # 只保留第一个值。
      default-filters:
        - DedupeResponseHeader=Access-Control-Allow-Credentials Access-Control-Allow-Origin, RETAIN_FIRST
31. DedupeResponseHeader 是什么
DedupeResponseHeader 是 Gateway Filter。
它用于:
text
删除重复响应头语法:
yaml
- DedupeResponseHeader=响应头列表, 策略当前配置:
yaml
- DedupeResponseHeader=Access-Control-Allow-Credentials Access-Control-Allow-Origin, RETAIN_FIRST含义:
text
针对:
Access-Control-Allow-Credentials
Access-Control-Allow-Origin

如果存在重复值:
只保留第一个
常见策略:
| 策略 | 含义 |
|---|---|
RETAIN_FIRST |
保留第一个值 |
RETAIN_LAST |
保留最后一个值 |
RETAIN_UNIQUE |
保留唯一值 |
本章使用:
text
RETAIN_FIRST32. 最终 cloud-gateway-dev.yaml
推荐最终配置:
yaml
server:
  port: 9000

spring:
  cloud:
    nacos:
      discovery:
        server-addr: 127.0.0.1:8848

    gateway:
      # 全局跨域
      globalcors:
        add-to-simple-url-handler-mapping: true

        cors-configurations:
          '[/**]':
            allowedOrigins:
              - "http://localhost:5500"

            allowedMethods:
              - GET
              - POST
              - PUT
              - DELETE
              - OPTIONS

            allowedHeaders:
              - "*"

            allowCredentials: true
            maxAge: 3600

      # 防御性响应头去重
      default-filters:
        - DedupeResponseHeader=Access-Control-Allow-Credentials Access-Control-Allow-Origin, RETAIN_FIRST

      routes:
        - id: user-route
          uri: lb://cloud-user
          predicates:
            - Path=/api/user/**
          filters:
            - StripPrefix=2

        - id: product-route
          uri: lb://cloud-product
          predicates:
            - Path=/api/product/**
          filters:
            - StripPrefix=2

        - id: order-route
          uri: lb://cloud-order
          predicates:
            - Path=/api/order/**
          filters:
            - StripPrefix=2
33. 最终职责边界
推荐最终状态:
text
Gateway:
保留 globalcors
保留 DedupeResponseHeader

cloud-user:
不配置 @CrossOrigin

cloud-product:
删除临时 @CrossOrigin

cloud-order:
不配置 @CrossOrigin
一句话总结:
text
跨域统一放在网关;
下游服务只处理业务;
Gateway 使用 DedupeResponseHeader 做防御性去重。
34. 完整跨域链路
正常链路:
text
浏览器页面:
http://localhost:5500
        ↓
请求 Gateway:
http://localhost:9000
        ↓
浏览器识别为跨域
        ↓
复杂请求先发送 OPTIONS
        ↓
Gateway globalcors 处理预检
        ↓
浏览器发送正式请求
        ↓
Gateway 匹配 Route
        ↓
执行 Filter
        ↓
转发下游服务
        ↓
Gateway 返回跨域响应头
        ↓
浏览器允许 JavaScript 读取响应
故障链:
text
Gateway 配置 globalcors
        ↓
下游 Controller 又配置 @CrossOrigin
        ↓
Access-Control-Allow-Origin 重复
        ↓
浏览器拒绝响应
修复链:
text
删除下游 @CrossOrigin
        ↓
跨域职责集中到 Gateway
        ↓
Gateway 增加 DedupeResponseHeader
        ↓
防御性去重
35. 本章常见问题
35.1 为什么 Postman 成功,浏览器仍然可能失败
因为:
text
CORS 是浏览器安全策略Postman 和后端调用通常不执行浏览器同源限制。
35.2 OPTIONS 是业务接口吗
不是。
它是浏览器为了确认跨域权限发送的:
text
预检请求35.3 为什么要开启 add-to-simple-url-handler-mapping
OPTIONS 请求可能无法匹配普通业务 Route。
开启后,即使预检请求未命中 Route,也可以由 Gateway 的全局 CORS 逻辑处理。
35.4 为什么下游不建议配置 @CrossOrigin
如果所有外部请求都经过 Gateway:
text
跨域应统一由 Gateway 管理下游重复配置容易导致:
text
响应头重复
规则不一致
排查困难
35.5 DedupeResponseHeader 是否可以代替删除下游 @CrossOrigin
不能完全代替。
推荐优先:
text
删除重复职责同时保留:
text
DedupeResponseHeader作为防御性配置。
35.6 Gateway 是否会自动调用所有下游服务
不会。
Gateway 只根据:
text
Route
Predicate
Filter
转发当前请求。
35.7 Gateway 和 OpenFeign 有什么区别
| 场景 | 组件 |
|---|---|
| 外部客户端进入系统 | Gateway |
| 服务内部调用其他服务 | OpenFeign |
共同点:
text
都可以基于服务名发现实例35.8 cloud-auth 为什么还没有接入路由
cloud-auth 当前仍是骨架。
第 9 章实现登录和 JWT 后,再增加:
text
/api/auth/** -> cloud-auth36. 本章故障演练总结
路由转发
text
Gateway 启动
        ↓
注册到 Nacos
        ↓
配置三条 Route
        ↓
通过 lb:// 服务名发现实例
        ↓
StripPrefix 处理路径
        ↓
成功访问用户、商品和订单
未匹配路由
text
GET /api/unknown/test
        ↓
无 Route 匹配
        ↓
返回 404
全局 CORS
text
Gateway 配置 globalcors
        ↓
OPTIONS 预检成功
        ↓
浏览器页面成功读取商品接口
双重跨域
text
Gateway 已配置 globalcors
        ↓
ProductController 又添加 @CrossOrigin
        ↓
Access-Control-Allow-Origin 重复
        ↓
浏览器跨域报错
修复
text
删除下游 @CrossOrigin
        ↓
跨域恢复正常
        ↓
Gateway 增加 DedupeResponseHeader
        ↓
防止重复响应头
37. 本章结论
本章完成:
text
cloud-gateway
Spring Cloud Gateway
WebFlux
Netty
Route
Predicate
Filter
StripPrefix
lb://
Nacos Discovery
LoadBalancer
统一入口
路由转发
404 路由验证
CORS
Origin
OPTIONS
Preflight Request
globalcors
add-to-simple-url-handler-mapping
@CrossOrigin
双重跨域
Access-Control-Allow-Origin 重复
DedupeResponseHeader
RETAIN_FIRST
当前项目已经具备:
text
服务注册
配置中心
环境隔离
OpenFeign 跨服务调用
远程调用降级
统一网关入口
服务名路由转发
全局跨域
响应头去重
下一章进入:
text
第 9 章:Gateway + JWT 统一鉴权下一章会完成:
text
cloud-auth 登录认证
JWT 签发
Gateway 白名单
GlobalFilter
Authorization
Token 校验
X-User-Id 请求头透传
下游用户上下文
ThreadLocal
异步线程身份丢失故障演练
Feign RequestInterceptor