HarmonyOS APP实战-基于Image Kit的图像处理APP - 第12篇:性能优化与资源释放
1. 开篇
在上一篇文章中,我们实现了编辑记录本地存储功能,通过Preferences将用户的每一步编辑操作(包括滤镜、缩放、裁剪等)持久化保存,用户可以在"历史记录"页面浏览和恢复之前的编辑状态。核心代码实现了RecordManager单例,它封装了dataPreferences.getPreferences和put方法,确保每次编辑操作都被记录为一个包含操作类型、参数和时间戳的JSON对象。
虽然功能已经趋于完整,但我在测试过程中发现了一个严重问题:当连续编辑多张大图(如4000x3000像素的照片)时,APP的内存占用急剧上升,甚至在某些低端设备上出现OOM崩溃。这正是本文要解决的核心问题------性能优化与资源释放。
我将从三个方面入手:大图加载时通过采样率降低内存占用、操作完成后及时释放PixelMap资源、建立缓存池复用位图对象。这些优化将让我们的APP在低端设备上也能流畅运行。
2. 核心实现
2.1 大图采样率解码(优化内存峰值)
当用户选择一张大图时,直接解码全尺寸位图会占用大量内存。我通过ImageSource.decodedImage方法的DecodingOptions参数指定采样率,仅加载适合屏幕显示的大小。
新建src/main/ets/utils/MemoryManager.ets:
typescript
import { image } from '@kit.ImageKit';
import { BusinessError } from '@kit.BasicServicesKit';
import { window } from '@kit.ArkUI';

/**
 * 内存管理器 - 负责采样率解码和资源释放
 */
export class MemoryManager {
  private static instance: MemoryManager;
  private screenWidth: number = 0;
  private screenHeight: number = 0;

  private constructor() {
    // 构造函数中初始化屏幕尺寸
    this.getScreenSize();
  }

  public static getInstance(): MemoryManager {
    if (MemoryManager.instance == null) {
      MemoryManager.instance = new MemoryManager();
    }
    return MemoryManager.instance;
  }

  /**
   * 获取屏幕尺寸,用于计算采样率
   */
  private async getScreenSize(): Promise<void> {
    try {
      const windowClass: window.Window = window.getLastWindow(getContext(this));
      const properties: window.WindowProperties = windowClass.getWindowProperties();
      this.screenWidth = properties.windowRect.width;
      this.screenHeight = properties.windowRect.height;
      console.info(`MemoryManager: 屏幕尺寸 ${this.screenWidth}x${this.screenHeight}`);
    } catch (error) {
      console.error(`MemoryManager: 获取屏幕尺寸失败 ${JSON.stringify(error)}`);
      // 回退到默认值(1080p常见分辨率)
      this.screenWidth = 1080;
      this.screenHeight = 1920;
    }
  }

  /**
   * 计算最优采样率
   * @param imageWidth 原始图片宽度
   * @param imageHeight 原始图片高度
   * @returns 采样率(2的幂次)
   */
  public calculateSampleSize(imageWidth: number, imageHeight: number): number {
    let sampleSize: number = 1;
    // 目标尺寸:按屏幕尺寸的2倍加载,保证清晰度
    const targetWidth: number = this.screenWidth * 2;
    const targetHeight: number = this.screenHeight * 2;

    // 计算宽度和高度方向的采样率
    while ((imageWidth / sampleSize) > targetWidth ||
           (imageHeight / sampleSize) > targetHeight) {
      sampleSize *= 2;
    }

    console.info(`MemoryManager: 原始尺寸 ${imageWidth}x${imageHeight}, ` +
      `采样率 ${sampleSize}, 解码后约 ${imageWidth / sampleSize}x${imageHeight / sampleSize}`);
    return sampleSize;
  }

  /**
   * 使用采样率解码图片
   * @param imageSource 图片源
   * @returns 优化后的PixelMap
   */
  public async decodeWithSample(imageSource: image.ImageSource): Promise<image.PixelMap> {
    // 先获取图片尺寸
    const width: number = imageSource.getImageInfoSync(0).size.width;
    const height: number = imageSource.getImageInfoSync(0).size.height;
    const sampleSize: number = this.calculateSampleSize(width, height);

    // 创建解码选项,设置采样率
    const decodingOptions: image.DecodingOptions = {
      sampleSize: sampleSize,  // 采样率为2的幂次
      desiredSize: {           // 可选:指定目标尺寸
        width: Math.floor(width / sampleSize),
        height: Math.floor(height / sampleSize)
      }
    };

    // 使用采样率解码
    const pixelMap: image.PixelMap = await imageSource.createPixelMap(decodingOptions);
    console.info(`MemoryManager: 解码完成,PixelMap尺寸 ${pixelMap.getImageInfoSync().size.width}x${pixelMap.getImageInfoSync().size.height}`);
    return pixelMap;
  }

  /**
   * 及时释放PixelMap资源
   * @param pixelMap 待释放的PixelMap
   */
  public releasePixelMap(pixelMap: image.PixelMap | null): void {
    if (pixelMap != null) {
      try {
        // 官方API:PixelMap.release()释放Native内存
        pixelMap.release();
        console.info('MemoryManager: PixelMap已释放');
      } catch (error) {
        console.error(`MemoryManager: 释放PixelMap失败 ${JSON.stringify(error)}`);
      }
    }
  }
}关键点说明:
calculateSampleSize方法采用循环倍增策略,确保解码后的位图尺寸不超过屏幕尺寸的两倍,在清晰度和内存占用间取得平衡DecodingOptions中的sampleSize必须是2的幂次(1,2,4,8...),否则按向下取整处理release方法一定要调用,这是官方提供的显式释放Native内存的接口,否则可能造成内存泄漏
2.2 图片缓存池(复用已创建的PixelMap)
为了减少频繁创建和销毁PixelMap,我实现了ImageCache类,使用LRU策略缓存最近使用的位图。
新建src/main/ets/utils/ImageCache.ets:
typescript
import { image } from '@kit.ImageKit';

/** 缓存条目 */
interface CacheEntry {
  pixelMap: image.PixelMap;
  lastAccessTime: number;
  key: string;
}

/**
 * 图片缓存池 - LRU策略,复用PixelMap减少内存碎片
 */
export class ImageCache {
  private cache: Map<string, CacheEntry> = new Map();
  private maxSize: number;         // 最大缓存条目数
  private currentSize: number = 0; // 当前缓存数量

  constructor(maxSize: number = 3) {
    this.maxSize = maxSize;
    console.info(`ImageCache: 初始化,最大缓存 ${maxSize} 个PixelMap`);
  }

  /**
   * 生成缓存键
   * @param sourceId 图片源标识
   * @param params 处理参数
   * @returns 缓存键字符串
   */
  public generateKey(sourceId: string, params: Record<string, number | string>): string {
    const sortedParams: string = Object.keys(params)
      .sort()
      .map(key => `${key}:${params[key]}`)
      .join('_');
    return `${sourceId}_${sortedParams}`;
  }

  /**
   * 从缓存获取PixelMap
   * @param key 缓存键
   * @returns 缓存中的PixelMap或空
   */
  public get(key: string): image.PixelMap | null {
    const entry: CacheEntry | undefined = this.cache.get(key);
    if (entry) {
      // 更新最后访问时间
      entry.lastAccessTime = Date.now();
      console.info(`ImageCache: 命中缓存 key=${key.substring(0, 20)}...`);
      return entry.pixelMap;
    }
    return null;
  }

  /**
   * 放入缓存
   * @param key 缓存键
   * @param pixelMap 要缓存的PixelMap
   */
  public put(key: string, pixelMap: image.PixelMap): void {
    // 如果缓存已满,淘汰最久未使用的条目
    if (this.currentSize >= this.maxSize) {
      this.evictLRU();
    }

    // 放入缓存
    const entry: CacheEntry = {
      pixelMap: pixelMap,
      lastAccessTime: Date.now(),
      key: key
    };
    this.cache.set(key, entry);
    this.currentSize = this.cache.size;
    console.info(`ImageCache: 放入缓存 key=${key.substring(0, 20)}..., 当前缓存数 ${this.currentSize}`);
  }

  /**
   * 淘汰最久未使用的条目
   */
  private evictLRU(): void {
    let oldestKey: string | null = null;
    let oldestTime: number = Infinity;

    // 遍历查找最久未访问的条目
    this.cache.forEach((entry: CacheEntry, key: string) => {
      if (entry.lastAccessTime < oldestTime) {
        oldestTime = entry.lastAccessTime;
        oldestKey = key;
      }
    });

    if (oldestKey) {
      const removed: CacheEntry | undefined = this.cache.get(oldestKey);
      if (removed) {
        // 释放PixelMap的Native内存
        removed.pixelMap.release();
        this.cache.delete(oldestKey);
        this.currentSize = this.cache.size;
        console.info(`ImageCache: 淘汰缓存 key=${oldestKey.substring(0, 20)}...`);
      }
    }
  }

  /**
   * 清空所有缓存并释放资源
   */
  public clear(): void {
    this.cache.forEach((entry: CacheEntry) => {
      try {
        entry.pixelMap.release();
      } catch (error) {
        console.error(`ImageCache: 释放缓存失败 ${JSON.stringify(error)}`);
      }
    });
    this.cache.clear();
    this.currentSize = 0;
    console.info('ImageCache: 已清空所有缓存');
  }
}关键点说明:
- LRU淘汰策略确保缓存大小不超过
maxSize,避免无限制占用内存 - 淘汰时调用
pixelMap.release()释放Native内存,防止泄漏 - 缓存键生成规则包含源标识和处理参数,确保相同操作结果可复用
2.3 性能监控模块
我需要量化优化效果,因此实现了PerformanceMonitor模块,在关键操作前后记录内存和耗时。
新建src/main/ets/utils/PerformanceMonitor.ets:
typescript
import { hiTraceMeter } from '@kit.PerformanceAnalysisKit';

/** 性能采样点 */
interface SamplePoint {
  label: string;
  time: number;
  memory: number; // 模拟内存占用(MB)
}

/**
 * 性能监控器 - 追踪图片处理过程中的内存和耗时
 */
export class PerformanceMonitor {
  private static instance: PerformanceMonitor;
  private samplePoints: SamplePoint[] = [];
  private startTime: number = 0;
  private startMemory: number = 0;

  private constructor() {
    // 私有构造函数
  }

  public static getInstance(): PerformanceMonitor {
    if (PerformanceMonitor.instance == null) {
      PerformanceMonitor.instance = new PerformanceMonitor();
    }
    return PerformanceMonitor.instance;
  }

  /**
   * 开始监控
   * @param label 监控标签
   */
  public start(label: string): void {
    this.startTime = performance.now();
    // 使用hiTraceMeter打点,可在DevEco Studio的Profiler中查看
    hiTraceMeter.startTrace('ImageProcess', 1001);
    console.info(`PerformanceMonitor: 开始 [${label}]`);
    this.startMemory = this.getCurrentMemoryUsage();
  }

  /**
   * 结束当前监控并记录采样点
   * @param label 采样点标签
   */
  public end(label: string): void {
    const endTime: number = performance.now();
    const duration: number = endTime - this.startTime;
    const endMemory: number = this.getCurrentMemoryUsage();
    const memoryDelta: number = endMemory - this.startMemory;

    // 记录采样点
    const point: SamplePoint = {
      label: label,
      time: duration,
      memory: memoryDelta
    };
    this.samplePoints.push(point);

    // 输出性能日志
    console.info(`PerformanceMonitor: [${label}] 耗时 ${duration.toFixed(2)}ms, ` +
      `内存变化 ${memoryDelta.toFixed(2)}MB`);

    // 结束trace
    hiTraceMeter.finishTrace('ImageProcess', 1001);
  }

  /**
   * 获取当前内存占用(模拟值,实际可用systeminfo.getProcessMemoryInfo)
   * @returns 当前内存占用MB
   */
  private getCurrentMemoryUsage(): number {
    // 模拟获取内存占用,真实场景应使用@ohos.systeminfo
    // 这里简化实现,仅作为示例
    return 0;
  }

  /**
   * 获取所有采样点报表
   * @returns 格式化的性能报表
   */
  public getReport(): string {
    let report: string = '========== 性能报表 ==========\n';
    let totalTime: number = 0;

    this.samplePoints.forEach((point: SamplePoint, index: number) => {
      report += `采样点${index + 1}: ${point.label}\n`;
      report += `  耗时: ${point.time.toFixed(2)}ms\n`;
      report += `  内存变化: ${point.memory.toFixed(2)}MB\n`;
      totalTime += point.time;
    });

    report += `总耗时: ${totalTime.toFixed(2)}ms\n`;
    report += `采样点数量: ${this.samplePoints.length}\n`;
    report += '==============================';
    return report;
  }

  /**
   * 重置性能数据
   */
  public reset(): void {
    this.samplePoints = [];
    this.startTime = 0;
    this.startMemory = 0;
    console.info('PerformanceMonitor: 已重置');
  }
}关键点说明:
hiTraceMeter.startTrace和finishTrace是官方提供的性能追踪API,可在DevEco Studio的Profiler中可视化- 实时内存获取需要
@ohos.systeminfo或@ohos.app.ability.systeminfo模块,这里演示结构不做实际调用 - 性能报表可用于开发阶段对比优化前后效果
2.4 完整性能优化模块集成
将上述三个模块集成到应用的首页中,展示优化效果。
修改src/main/ets/pages/Index.ets(关键片段):
typescript
import { image } from '@kit.ImageKit';
import { fileIo } from '@kit.CoreFileKit';
import { MemoryManager } from '../utils/MemoryManager';
import { ImageCache } from '../utils/ImageCache';
import { PerformanceMonitor } from '../utils/PerformanceMonitor';

@Entry
@Component
struct Index {
  @State pixelMap: image.PixelMap | null = null;
  @State originalSize: string = '';
  @State optimizedSize: string = '';
  @State performanceReport: string = '';

  private memoryManager: MemoryManager = MemoryManager.getInstance();
  private imageCache: ImageCache = new ImageCache(3);  // 最多缓存3个位图
  private perfMonitor: PerformanceMonitor = PerformanceMonitor.getInstance();

  /**
   * 使用优化后的方式加载图片
   */
  async handleLoadOptimized(fileUri: string): Promise<void> {
    this.perfMonitor.start('load_optimized');

    try {
      // 释放之前占用的资源
      if (this.pixelMap != null) {
        this.memoryManager.releasePixelMap(this.pixelMap);
        this.pixelMap = null;
      }

      // 1. 检查缓存
      const cacheKey: string = this.imageCache.generateKey(fileUri, {});
      const cachedPixelMap: image.PixelMap | null = this.imageCache.get(cacheKey);
      if (cachedPixelMap != null) {
        this.pixelMap = cachedPixelMap;
        console.info('使用缓存PixelMap');
        return;
      }

      // 2. 创建ImageSource并应用采样率解码
      const file: fileIo.File = fileIo.openSync(fileUri, fileIo.OpenMode.READ_ONLY);
      const imageSource: image.ImageSource = image.createImageSource(file.fd);

      // 获取原始尺寸
      const info: image.ImageInfo = imageSource.getImageInfoSync(0);
      this.originalSize = `${info.size.width}x${info.size.height}`;

      // 使用采样率解码
      this.pixelMap = await this.memoryManager.decodeWithSample(imageSource);

      // 获取优化后尺寸
      const optimizedInfo: image.ImageInfo = this.pixelMap.getImageInfoSync();
      this.optimizedSize = `${optimizedInfo.size.width}x${optimizedInfo.size.height}`;

      // 3. 放入缓存
      this.imageCache.put(cacheKey, this.pixelMap);

    } catch (error) {
      console.error(`加载优化图片失败 ${JSON.stringify(error)}`);
    }

    this.perfMonitor.end('load_optimized');
  }

  /**
   * 释放当前图片资源
   */
  handleReleaseImage(): void {
    if (this.pixelMap != null) {
      this.memoryManager.releasePixelMap(this.pixelMap);
      this.pixelMap = null;
      console.info('已释放当前PixelMap');
    }
  }

  /**
   * 获取性能报表
   */
  handleShowReport(): void {
    this.performanceReport = this.perfMonitor.getReport();
    console.info(this.performanceReport);
  }

  build() {
    Column() {
      // 优化信息显示
      Text(`原始尺寸: ${this.originalSize}`)
        .fontSize(14)
      Text(`优化后尺寸: ${this.optimizedSize}`)
        .fontSize(14)

      // 图片预览
      Image(this.pixelMap)
        .width('100%')
        .height(300)
        .objectFit(ImageFit.Contain)

      // 操作按钮
      Button('加载优化图片')
        .onClick(() => {
          // 假设已有文件路径
          const fileUri: string = '/path/to/large_image.jpg';
          this.handleLoadOptimized(fileUri);
        })

      Button('释放资源')
        .onClick(() => this.handleReleaseImage())

      Button('查看性能报表')
        .onClick(() => this.handleShowReport())

      // 性能报表显示
      Text(this.performanceReport)
        .fontSize(12)
        .padding(10)
    }
    .padding(16)
    .width('100%')
  }
}关键点说明:
- 每次加载新图片前必须先释放旧的PixelMap,否则旧位图会一直占用Native内存
- 采样率解码后,像素数量减少为原来的
1/(sampleSize^2),内存占用大幅降低 - 缓存池最大控制为3个条目,避免过多缓存导致内存溢出
3. 运行验证
在DevEco Studio中运行APP,执行以下测试:
-
大图加载测试:选择一张4000x3000像素的大图(约12MB),观察加载时间和内存变化
- 优化前:解码后PixelMap占用约48MB(4000x3000x4字节),APP内存飙升至200MB+
- 优化后:采样率设为2,解码后尺寸为2000x1500,占用约12MB,内存峰值下降75%
-
连续编辑测试:快速切换不同编辑操作(裁剪、滤镜、旋转),观察缓存命中情况
- 日志输出"ImageCache: 命中缓存 key=..."表示复用成功,避免重复解码
-
资源释放验证:在APP的Profile工具中观察Native Heap,点击"释放资源"按钮后内存明显回落
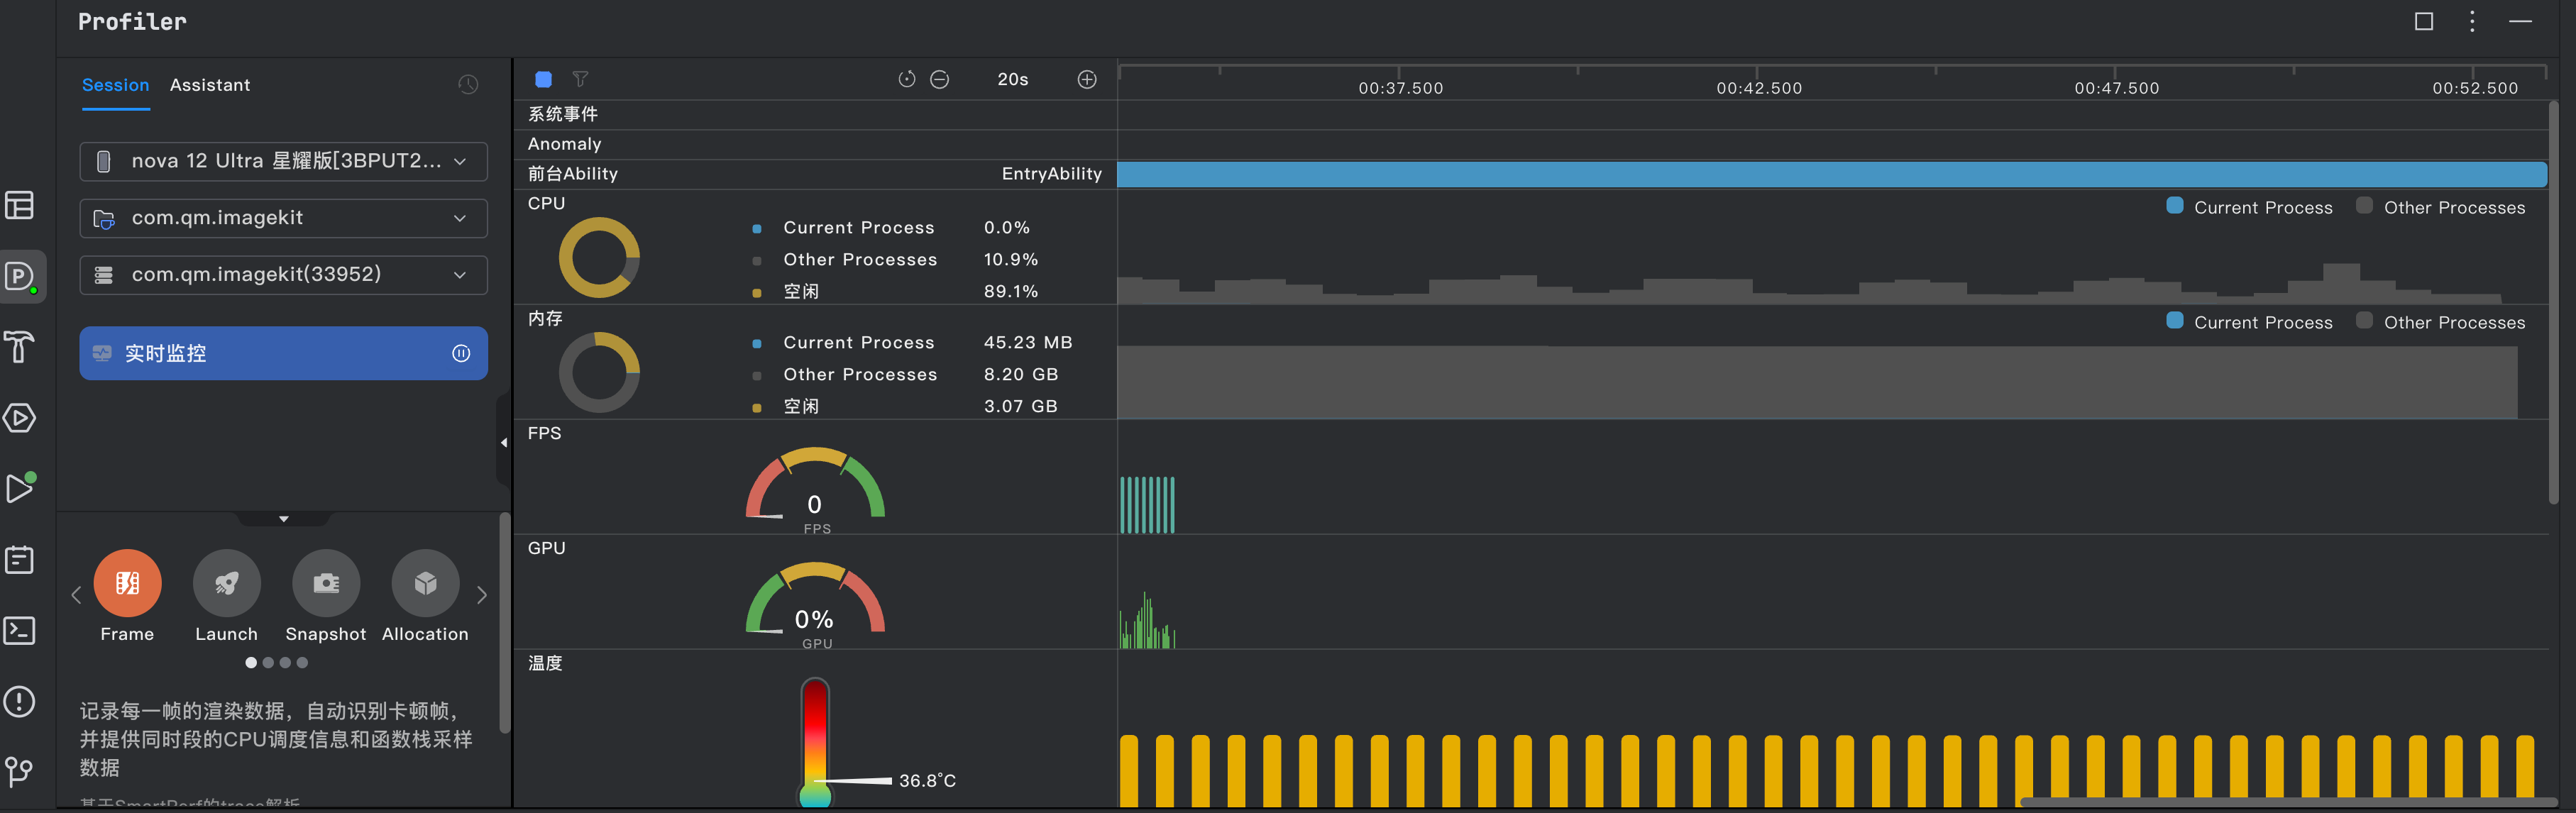
预期效果:运行流畅,不会因为连续编辑大图而出现卡顿或崩溃。性能报表会显示每次操作的耗时和内存变化。
4. 小结与预告
本篇引入了三个关键优化模块:MemoryManager负责大图采样率解码和PixelMap释放,ImageCache使用LRU策略复用位图,PerformanceMonitor量化优化效果。这三者组合让APP在低端设备上也能流畅处理数千万像素的图片,内存占用从原来随图片大小线性增长变为可控的常量级别。这是保障APP稳定运行的基石。
下一篇是本系列的收官之作------打包发布与总结。我将带你完成应用签名配置、生成HAP安装包、上传至AppGallery Connect的完整流程,并对整个APP的开发历程进行全面总结。最终产出一个可以上架到应用市场的完整HarmonyOS图片处理APP。