准备从头搭建一套k8s高可用监控平台,用来监控集群资源
现场以CentOS系统占多数,所以就准备三台CentOS-7-X86服务器部署k8s- Master节点,使用Keepalived 和 HAProxy做高可用配置
注:现场是内网环境,无法连接互联网,所以部分步骤涉及镜像拉取后打包上传到内网服务器
一:部署基础环境和Keepalived 和 HAProxy
依次安装k8s和Keepalive的相关依赖rpm包
bash
socat-1.7.3.2-2.el7.x86_64.rpm
libnetfilter_cthelper-1.0.0-11.el7.x86_64.rpm
libnetfilter_cttimeout-1.0.0-7.el7.x86_64.rpm
libnetfilter_queue-1.0.2-2.el7_2.x86_64.rpm
conntrack-tools-1.4.4-7.el7.x86_64.rpm
3f5ba2b53701ac9102ea7c7ab2ca6616a8cd5966591a77577585fde1c434ef74-cri-tools-1.26.0-0.x86_64.rpm
0f2a2afd740d476ad77c508847bad1f559afc2425816c1f2ce4432a62dfe0b9d-kubernetes-cni-1.2.0-0.x86_64.rpm
a24e42254b5a14b67b58c4633d29c27370c28ed6796a80c455a65acc813ff374-kubectl-1.28.2-0.x86_64.rpm
cee73f8035d734e86f722f77f1bf4e7d643e78d36646fd000148deb8af98b61c-kubeadm-1.28.2-0.x86_64.rpm
e1cae938e231bffa3618f5934a096bd85372ee9b1293081f5682a22fe873add8-kubelet-1.28.2-0.x86_64.rpm
keepalived-1.3.5-19.el7.x86_64.rpm
net-snmp-agent-libs-5.7.2-49.el7_9.4.x86_64.rpm
net-snmp-libs-5.7.2-49.el7_9.4.x86_64.rpm
然后配置Keepalived,也是部署三台Master节点,编写 API Server 健康检查脚本(三台 Master 均需执行)
bash
vim /etc/keepalived/check_apiserver.sh

#!/bin/bash
err=0
for k in $(seq 1 5)
do
    check_code=$(pgrep kube-apiserver)
    if [[ $check_code == "" ]]; then
        err=$(expr $err + 1)
        sleep 5
        continue
    else
        err=0
        break
    fi
done

if [[ $err != "0" ]]; then
    echo "API Server is down, stopping keepalived..."
    /usr/bin/systemctl stop keepalived
    exit 1
else
    exit 0
fi

chmod +x /etc/keepalived/check_apiserver.sh
配置 Keepalived(三台 Master 配置各不相同)
Master1 节点配置
bash
! Configuration File for keepalived
global_defs {
    router_id k8s-master01
    script_user root
    enable_script_security
}

vrrp_script chk_apiserver {
    script "/etc/keepalived/check_apiserver.sh"
    interval 5      # 每5秒检查一次
    weight -5       # 脚本执行失败时,优先级减少5
    fall 2          # 连续2次失败才认为异常
    rise 1          # 连续1次成功即认为恢复
}

vrrp_instance VI_1 {
    state MASTER            # 主节点
    interface eth0          # ⚠️ 请替换为实际网卡名称(如 ens33)
    mcast_src_ip 172.26.198.14  # ⚠️ 替换为 Master1 的真实 IP
    virtual_router_id 51    # 虚拟路由ID,三台必须一致
    priority 100            # 优先级最高
    advert_int 2            # 组播发送间隔
    authentication {
        auth_type PASS
        auth_pass K8SHA_KA_AUTH  # 密码,三台必须一致
    }
    virtual_ipaddress {
        172.26.198.181        # 规划的 VIP
    }
    track_script {
        chk_apiserver       # 关联健康检查脚本
    }
}
Master2 节点配置
bash
! Configuration File for keepalived
global_defs {
    router_id k8s-master02
    script_user root
    enable_script_security
}

vrrp_script chk_apiserver {
    script "/etc/keepalived/check_apiserver.sh"
    interval 5
    weight -5
    fall 2
    rise 1
}

vrrp_instance VI_1 {
    state BACKUP            # 备用节点
    interface eth0          # ⚠️ 替换为实际网卡名称
    mcast_src_ip 172.26.198.15  # ⚠️ 替换为 Master2 的真实 IP
    virtual_router_id 51
    priority 90             # 优先级次之
    advert_int 2
    authentication {
        auth_type PASS
        auth_pass K8SHA_KA_AUTH
    }
    virtual_ipaddress {
        192.168.1.181
    }
    track_script {
        chk_apiserver
    }
}
Master3 节点配置
bash
! Configuration File for keepalived
global_defs {
    router_id k8s-master03
    script_user root
    enable_script_security
    vrrp_strict false     #关闭vrrp_strict
}

vrrp_script chk_apiserver {
    script "/etc/keepalived/check_apiserver.sh"
    interval 5
    weight -5
    fall 2
    rise 1
}

vrrp_instance VI_1 {
    state BACKUP            # 备用节点
    interface eth0          # ⚠️ 替换为实际网卡名称
    mcast_src_ip 172.26.198.16  # ⚠️ 替换为 Master3 的真实 IP
    virtual_router_id 51
    priority 80             # 优先级最低
    advert_int 2
    authentication {
        auth_type PASS
        auth_pass K8SHA_KA_AUTH
    }
    virtual_ipaddress {
        192.168.1.181
    }
    track_script {
        chk_apiserver
    }
}
在三台 Master 上分别启动 Keepalived 并设置开机自启
bash
systemctl start keepalived.service && systemctl enable keepalived.service在 Master1 上验证 VIP 是否绑定成功:如果输出中包含 inet 192.168.1.10/24 scope global eth0,说明配置成功

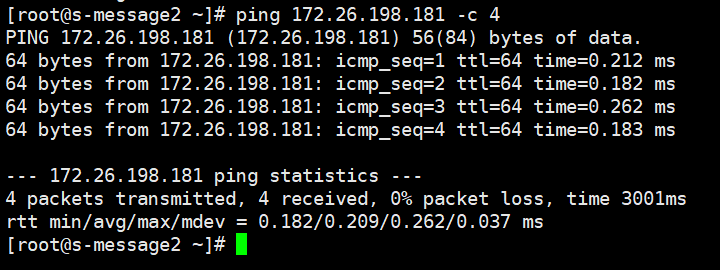
从其他机器测试网络连通性,可能会出现个别机器ping不通VIP的情况,可能是是arp的mac有冲突,可以使用arp -a检查,还可以清除缓存条目arp -n | awk '/^1-9/{system("arp -d "$1)}',重新缓存以下
HAProxy部署
sudo yum install -y haproxy   #在三台集群上安装haproxy
sudo vim /etc/haproxy/haproxy.cfg    #编辑配置文件为以下内容

global
    log         127.0.0.1 local0
    maxconn     4000
    daemon

defaults
    log                     global
    mode                    tcp      # K8s API Server 是 TCP 协议,必须用 tcp 模式
    option                  tcplog
    option                  dontlognull
    timeout connect         5s
    timeout client          30s
    timeout server          30s

# 前端:监听 VIP 的 6444 端口
frontend k8s-api
    bind *:6443              # 监听所有网卡的 6443 端口(包括 Keepalived 提供的 VIP)
    default_backend k8s-masters

# 后端:指向三台 Master 的真实 IP
backend k8s-masters
    balance roundrobin       # 轮询算法,均匀分配流量
    server master1 192.168.1.14:6443 check inter 5s fall 3 rise 2
    server master2 192.168.1.15:6443 check inter 5s fall 3 rise 2
    server master3 192.168.1.16:6443 check inter 5s fall 3 rise 2
然后执行sudo systemctl enable --now haproxy或者 ./haproxy -f haproxy.cfg
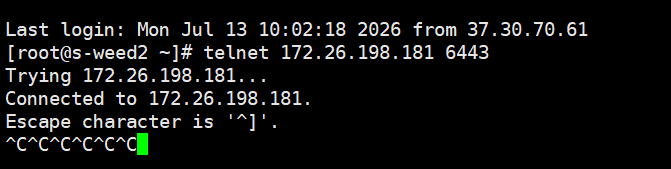
6443端口正在被监听,这里注意最好HAProxy的监听端口不要与k8s冲突,否则后面k8s配置集群时会报错,可以设置6444,下面截图没重新截,就当是6444了

测试vip:端口正常
二 k8s集群部署
首先需要导入镜像包,由于要内网部署,所以先在外网将相关镜像下载下来
bash
[root@iZ2ze6sn544ngzrbbprfmcZ ~]# kubeadm config images list
I0714 19:33:05.775917  355761 version.go:256] remote version is much newer: v1.36.2; falling back to: stable-1.28
registry.k8s.io/kube-apiserver:v1.28.15
registry.k8s.io/kube-controller-manager:v1.28.15
registry.k8s.io/kube-scheduler:v1.28.15
registry.k8s.io/kube-proxy:v1.28.15
registry.k8s.io/pause:3.9
registry.k8s.io/etcd:3.5.9-0
registry.k8s.io/coredns/coredns:v1.10.1

kubeadm config images pull --image-repository registry.cn-hangzhou.aliyuncs.com/google_containers --kubernetes-version v1.28.0
拉取这些镜像后,导出打包
bash
docker pull registry.cn-hangzhou.aliyuncs.com/google_containers/kube-apiserver:v1.28.0 && docker pull registry.cn-hangzhou.aliyuncs.com/google_containers/kube-controller-manager:v1.28.0 && docker pull registry.cn-hangzhou.aliyuncs.com/google_containers/kube-scheduler:v1.28.0 && docker pull registry.cn-hangzhou.aliyuncs.com/google_containers/kube-proxy:v1.28.0 && docker pull registry.cn-hangzhou.aliyuncs.com/google_containers/pause:3.9 && docker pull registry.cn-hangzhou.aliyuncs.com/google_containers/etcd:3.5.9-0 && docker pull registry.cn-hangzhou.aliyuncs.com/google_containers/coredns:v1.8.8

docker save -o k8s-images.tar registry.cn-hangzhou.aliyuncs.com/google_containers/kube-apiserver:v1.28.0 registry.cn-hangzhou.aliyuncs.com/google_containers/kube-controller-manager:v1.28.0 registry.cn-hangzhou.aliyuncs.com/google_containers/kube-scheduler:v1.28.0 registry.cn-hangzhou.aliyuncs.com/google_containers/kube-proxy:v1.28.0 registry.cn-hangzhou.aliyuncs.com/google_containers/pause:3.9 registry.cn-hangzhou.aliyuncs.com/google_containers/etcd:3.5.9-0 registry.cn-hangzhou.aliyuncs.com/google_containers/coredns:latest
然后到内网服务器导入镜像包,内网导入的时候我们使用containerd,相比docker更轻量化,安装containerd
bash
[root@iZ2ze6sn544ngzrbbprfmcZ ~]# ll cont/
total 36220
-rw-r--r-- 1 root root 37045876 Jun 10  2024 containerd.io-1.6.33-3.1.el7.x86_64.rpm
-rw-r--r-- 1 root root    40816 Jul  6  2020 container-selinux-2.119.2-1.911c772.el7_8.noarch.rpm
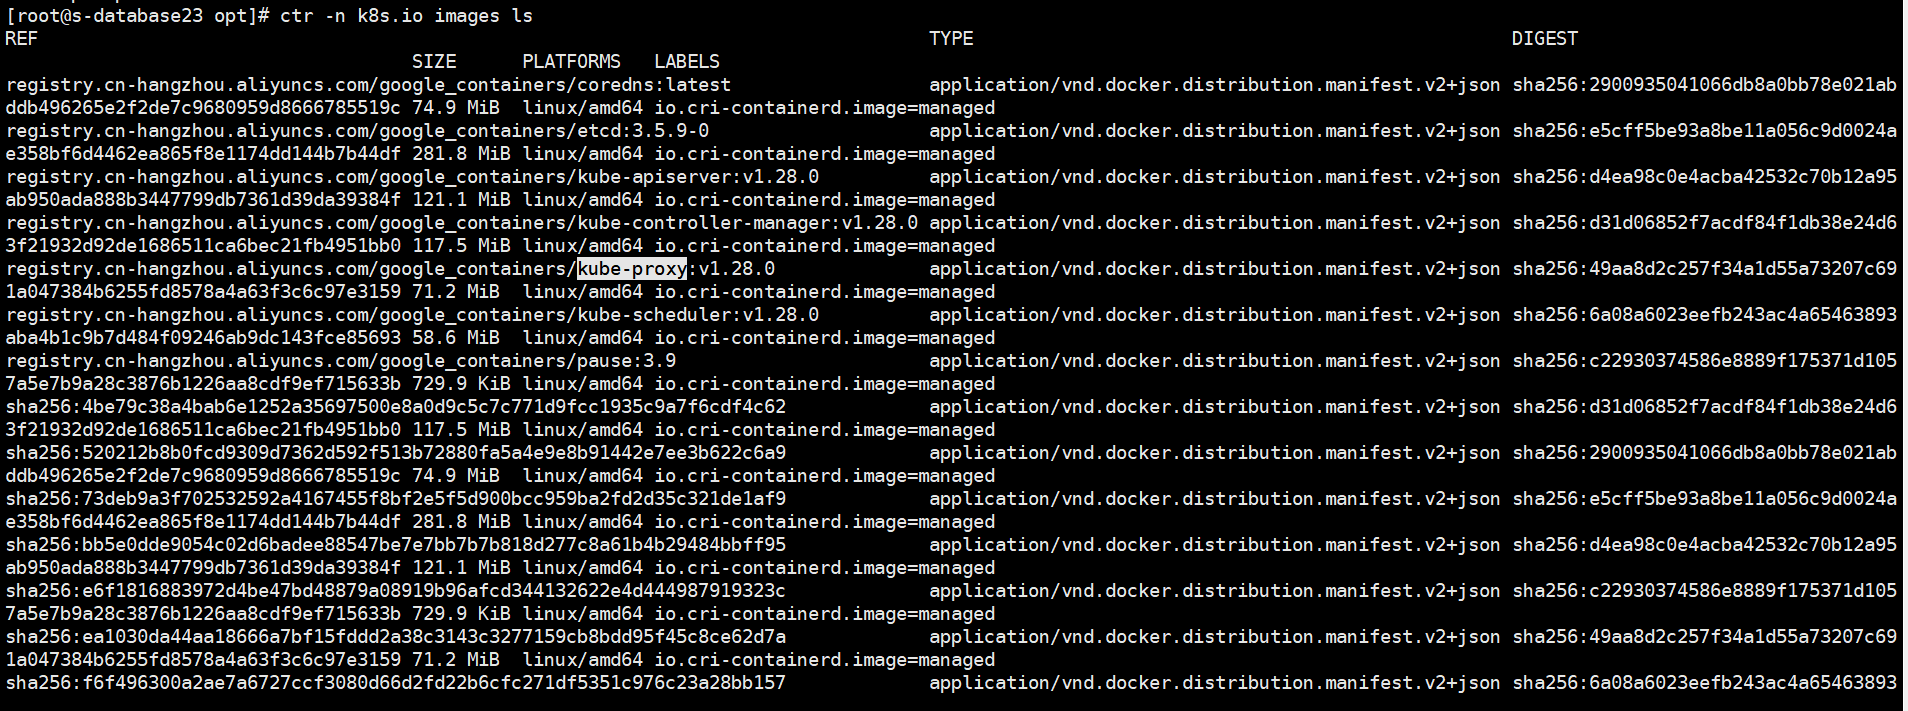
然后将提前准备好的镜像包导入

然后执行初始化,这一步可能会报错,常见原因有:
1.swap未禁用,
2.kubelet未成功启动(启动失败原因大概率是他的配置文件未生成),由于是内网部署无法连接外网,所以需要手动生成kubelet的配置文件,依次执行
bash
sudo kubeadm init phase certs all   #仅生成证书
sudo kubeadm init phase kubeconfig all   生成 kubeconfig 配置文件
sudo kubeadm init phase kubelet-start    生成 kubelet 配置并启动
sudo systemctl restart kubelet    #启动kubelet
3.容器运行时(containerd)默认使用 registry.k8s.io/pause:3.6 作为沙箱镜像,但 kubeadm 推荐使用阿里云的 pause:3.9。这个不一致导致了 kubelet 启动失败,修改config.toml
bash
[plugins."io.containerd.grpc.v1.cri"]
  # ... 其他配置 ...
sandbox_image = "registry.cn-hangzhou.aliyuncs.com/google_containers/pause:3.9"然后再运行初始化命令,由于我们是集群部署就需要配置--control-plane-endpoint参数为keepalived高可用的VIP地址和HAProxy的监听端口,启动后可以看到最后输出了两条命令,复制带有--control-plane参数的命令去另外两台master执行加入控制平面端点
bash
[root@s-database23 k8s]# sudo kubeadm init   --apiserver-advertise-address=172.26.198.82   --control-plane-endpoint="172.26.198.181:6444"   --image-repository registry.cn-hangzhou.aliyuncs.com/google_containers   --pod-network-cidr=192.168.0.0/16   --upload-certs --kubernetes-version v1.28.0
[init] Using Kubernetes version: v1.28.0
[preflight] Running pre-flight checks
	[WARNING Firewalld]: firewalld is active, please ensure ports [6443 10250] are open or your cluster may not function correctly
[preflight] Pulling images required for setting up a Kubernetes cluster
[preflight] This might take a minute or two, depending on the speed of your internet connection
[preflight] You can also perform this action in beforehand using 'kubeadm config images pull'
[certs] Using certificateDir folder "/etc/kubernetes/pki"
[certs] Generating "ca" certificate and key
[certs] Generating "apiserver" certificate and key
[certs] apiserver serving cert is signed for DNS names [kubernetes kubernetes.default kubernetes.default.svc kubernetes.default.svc.cluster.local s-database23] and IPs [10.96.0.1 172.26.198.82 172.26.198.181]
[certs] Generating "apiserver-kubelet-client" certificate and key
[certs] Generating "front-proxy-ca" certificate and key
[certs] Generating "front-proxy-client" certificate and key
[certs] Generating "etcd/ca" certificate and key
[certs] Generating "etcd/server" certificate and key
[certs] etcd/server serving cert is signed for DNS names [localhost s-database23] and IPs [172.26.198.82 127.0.0.1 ::1]
[certs] Generating "etcd/peer" certificate and key
[certs] etcd/peer serving cert is signed for DNS names [localhost s-database23] and IPs [172.26.198.82 127.0.0.1 ::1]
[certs] Generating "etcd/healthcheck-client" certificate and key
[certs] Generating "apiserver-etcd-client" certificate and key
[certs] Generating "sa" key and public key
[kubeconfig] Using kubeconfig folder "/etc/kubernetes"
W0716 20:21:39.119611   27513 endpoint.go:57] [endpoint] WARNING: port specified in controlPlaneEndpoint overrides bindPort in the controlplane address
[kubeconfig] Writing "admin.conf" kubeconfig file
W0716 20:21:39.377396   27513 endpoint.go:57] [endpoint] WARNING: port specified in controlPlaneEndpoint overrides bindPort in the controlplane address
[kubeconfig] Writing "kubelet.conf" kubeconfig file
W0716 20:21:39.582723   27513 endpoint.go:57] [endpoint] WARNING: port specified in controlPlaneEndpoint overrides bindPort in the controlplane address
[kubeconfig] Writing "controller-manager.conf" kubeconfig file
W0716 20:21:39.655127   27513 endpoint.go:57] [endpoint] WARNING: port specified in controlPlaneEndpoint overrides bindPort in the controlplane address
[kubeconfig] Writing "scheduler.conf" kubeconfig file
[etcd] Creating static Pod manifest for local etcd in "/etc/kubernetes/manifests"
[control-plane] Using manifest folder "/etc/kubernetes/manifests"
[control-plane] Creating static Pod manifest for "kube-apiserver"
[control-plane] Creating static Pod manifest for "kube-controller-manager"
[control-plane] Creating static Pod manifest for "kube-scheduler"
[kubelet-start] Writing kubelet environment file with flags to file "/var/lib/kubelet/kubeadm-flags.env"
[kubelet-start] Writing kubelet configuration to file "/var/lib/kubelet/config.yaml"
[kubelet-start] Starting the kubelet
[wait-control-plane] Waiting for the kubelet to boot up the control plane as static Pods from directory "/etc/kubernetes/manifests". This can take up to 4m0s
[apiclient] All control plane components are healthy after 11.532288 seconds
[upload-config] Storing the configuration used in ConfigMap "kubeadm-config" in the "kube-system" Namespace
[kubelet] Creating a ConfigMap "kubelet-config" in namespace kube-system with the configuration for the kubelets in the cluster
[upload-certs] Storing the certificates in Secret "kubeadm-certs" in the "kube-system" Namespace
[upload-certs] Using certificate key:
04d1f7b4e8360a6eec8639b6a28c758d2a77dae95ee7d159977ad71f0b911923
[mark-control-plane] Marking the node s-database23 as control-plane by adding the labels: [node-role.kubernetes.io/control-plane node.kubernetes.io/exclude-from-external-load-balancers]
[mark-control-plane] Marking the node s-database23 as control-plane by adding the taints [node-role.kubernetes.io/control-plane:NoSchedule]
[bootstrap-token] Using token: 0wyvwo.fqfui6swk9qv8a3l
[bootstrap-token] Configuring bootstrap tokens, cluster-info ConfigMap, RBAC Roles
[bootstrap-token] Configured RBAC rules to allow Node Bootstrap tokens to get nodes
[bootstrap-token] Configured RBAC rules to allow Node Bootstrap tokens to post CSRs in order for nodes to get long term certificate credentials
[bootstrap-token] Configured RBAC rules to allow the csrapprover controller automatically approve CSRs from a Node Bootstrap Token
[bootstrap-token] Configured RBAC rules to allow certificate rotation for all node client certificates in the cluster
[bootstrap-token] Creating the "cluster-info" ConfigMap in the "kube-public" namespace
[kubelet-finalize] Updating "/etc/kubernetes/kubelet.conf" to point to a rotatable kubelet client certificate and key
[addons] Applied essential addon: CoreDNS
W0716 20:21:54.524730   27513 endpoint.go:57] [endpoint] WARNING: port specified in controlPlaneEndpoint overrides bindPort in the controlplane address
[addons] Applied essential addon: kube-proxy

Your Kubernetes control-plane has initialized successfully!

To start using your cluster, you need to run the following as a regular user:

  mkdir -p $HOME/.kube
  sudo cp -i /etc/kubernetes/admin.conf $HOME/.kube/config
  sudo chown $(id -u):$(id -g) $HOME/.kube/config

Alternatively, if you are the root user, you can run:

  export KUBECONFIG=/etc/kubernetes/admin.conf

You should now deploy a pod network to the cluster.
Run "kubectl apply -f [podnetwork].yaml" with one of the options listed at:
  https://kubernetes.io/docs/concepts/cluster-administration/addons/

You can now join any number of the control-plane node running the following command on each as root:

  kubeadm join 172.26.198.181:6444 --token 0wyvwo.fqfui6swk9qv8a3l \
	--discovery-token-ca-cert-hash sha256:82f8d3562481f5085672555df66aab1694dca5ac7ce8b3112802a1ab9b927046 \
	--control-plane --certificate-key 04d1f7b4e8360a6eec8639b6a28c758d2a77dae95ee7d159977ad71f0b911923

Please note that the certificate-key gives access to cluster sensitive data, keep it secret!
As a safeguard, uploaded-certs will be deleted in two hours; If necessary, you can use
"kubeadm init phase upload-certs --upload-certs" to reload certs afterward.

Then you can join any number of worker nodes by running the following on each as root:

kubeadm join 172.26.198.181:6444 --token 0wyvwo.fqfui6swk9qv8a3l \
	--discovery-token-ca-cert-hash sha256:82f8d3562481f5085672555df66aab1694dca5ac7ce8b3112802a1ab9b927046
在第一台master上运行时的报错可能时镜像文件拉取失败,我在这里就遇到了,由于我时从外网拉取的最新coredns镜像,标签时latest,导致拉取失败,这种只要把缺的镜像拉取下来或者如果时名字不对就添加镜像的名称
bash
# 1. 为 coredns:latest 镜像添加一个 v1.10.1 的标签
sudo ctr -n k8s.io images tag registry.cn-hangzhou.aliyuncs.com/google_containers/coredns:latest registry.cn-hangzhou.aliyuncs.com/google_containers/coredns:v1.10.1

或者

# 1. 拉取 coredns 镜像
docker pull registry.cn-hangzhou.aliyuncs.com/google_containers/coredns:v1.10.1

# 2. 将镜像保存为 tar 文件
docker save -o coredns_v1.10.1.tar registry.cn-hangzhou.aliyuncs.com/google_containers/coredns:v1.10.1
在第二台master上运行加入控制平面端点的命令,会得到类似这样输出
bash
[root@s-database24 opt]# kubeadm join 172.26.198.82:6443 --token tsewau.v3e8fok7uba1aq03 --discovery-token-ca-cert-hash sha256:8fe051aadf1d8cefefd0aa2dfb009515196b1efbdb31d335e16b3a1ae0e82ca7 --control-plane --certificate-key edec57e1b35ab1062b718f3129b7bd2ac84d67aa73645f99b4a1d747ac17ebdf --ignore-preflight-errors=Port-10250
[preflight] Running pre-flight checks
[preflight] Reading configuration from the cluster...
[preflight] FYI: You can look at this config file with 'kubectl -n kube-system get cm kubeadm-config -o yaml'
error execution phase preflight:
One or more conditions for hosting a new control plane instance is not satisfied.

unable to add a new control plane instance to a cluster that doesn't have a stable controlPlaneEndpoint address

Please ensure that:
* The cluster has a stable controlPlaneEndpoint address.
* The certificates that must be shared among control plane instances are provided.


To see the stack trace of this error execute with --v=5 or higher
[root@s-database24 opt]# kubeadm join 172.26.198.181:6444 --token 0wyvwo.fqfui6swk9qv8a3l \
> --discovery-token-ca-cert-hash sha256:82f8d3562481f5085672555df66aab1694dca5ac7ce8b3112802a1ab9b927046 \
> --control-plane --certificate-key 04d1f7b4e8360a6eec8639b6a28c758d2a77dae95ee7d159977ad71f0b911923
[preflight] Running pre-flight checks
[preflight] Reading configuration from the cluster...
[preflight] FYI: You can look at this config file with 'kubectl -n kube-system get cm kubeadm-config -o yaml'
[preflight] Running pre-flight checks before initializing the new control plane instance
	[WARNING Firewalld]: firewalld is active, please ensure ports [6443 10250] are open or your cluster may not function correctly
[preflight] Pulling images required for setting up a Kubernetes cluster
[preflight] This might take a minute or two, depending on the speed of your internet connection
[preflight] You can also perform this action in beforehand using 'kubeadm config images pull'
[download-certs] Downloading the certificates in Secret "kubeadm-certs" in the "kube-system" Namespace
[download-certs] Saving the certificates to the folder: "/etc/kubernetes/pki"
[certs] Using certificateDir folder "/etc/kubernetes/pki"
[certs] Generating "etcd/server" certificate and key
[certs] etcd/server serving cert is signed for DNS names [localhost s-database24] and IPs [172.26.198.83 127.0.0.1 ::1]
[certs] Generating "etcd/peer" certificate and key
[certs] etcd/peer serving cert is signed for DNS names [localhost s-database24] and IPs [172.26.198.83 127.0.0.1 ::1]
[certs] Generating "etcd/healthcheck-client" certificate and key
[certs] Generating "apiserver-etcd-client" certificate and key
[certs] Generating "apiserver-kubelet-client" certificate and key
[certs] Generating "apiserver" certificate and key
[certs] apiserver serving cert is signed for DNS names [kubernetes kubernetes.default kubernetes.default.svc kubernetes.default.svc.cluster.local s-database24] and IPs [10.96.0.1 172.26.198.83 172.26.198.181]
[certs] Generating "front-proxy-client" certificate and key
[certs] Valid certificates and keys now exist in "/etc/kubernetes/pki"
[certs] Using the existing "sa" key
[kubeconfig] Generating kubeconfig files
[kubeconfig] Using kubeconfig folder "/etc/kubernetes"
W0716 20:23:08.086475   33491 endpoint.go:57] [endpoint] WARNING: port specified in controlPlaneEndpoint overrides bindPort in the controlplane address
[kubeconfig] Writing "admin.conf" kubeconfig file
W0716 20:23:08.209290   33491 endpoint.go:57] [endpoint] WARNING: port specified in controlPlaneEndpoint overrides bindPort in the controlplane address
[kubeconfig] Writing "controller-manager.conf" kubeconfig file
W0716 20:23:08.456019   33491 endpoint.go:57] [endpoint] WARNING: port specified in controlPlaneEndpoint overrides bindPort in the controlplane address
[kubeconfig] Writing "scheduler.conf" kubeconfig file
[control-plane] Using manifest folder "/etc/kubernetes/manifests"
[control-plane] Creating static Pod manifest for "kube-apiserver"
[control-plane] Creating static Pod manifest for "kube-controller-manager"
[control-plane] Creating static Pod manifest for "kube-scheduler"
[check-etcd] Checking that the etcd cluster is healthy
[kubelet-start] Writing kubelet configuration to file "/var/lib/kubelet/config.yaml"
[kubelet-start] Writing kubelet environment file with flags to file "/var/lib/kubelet/kubeadm-flags.env"
[kubelet-start] Starting the kubelet
[kubelet-start] Waiting for the kubelet to perform the TLS Bootstrap...
[etcd] Announced new etcd member joining to the existing etcd cluster
[etcd] Creating static Pod manifest for "etcd"
[etcd] Waiting for the new etcd member to join the cluster. This can take up to 40s
The 'update-status' phase is deprecated and will be removed in a future release. Currently it performs no operation
[mark-control-plane] Marking the node s-database24 as control-plane by adding the labels: [node-role.kubernetes.io/control-plane node.kubernetes.io/exclude-from-external-load-balancers]
[mark-control-plane] Marking the node s-database24 as control-plane by adding the taints [node-role.kubernetes.io/control-plane:NoSchedule]

This node has joined the cluster and a new control plane instance was created:

* Certificate signing request was sent to apiserver and approval was received.
* The Kubelet was informed of the new secure connection details.
* Control plane label and taint were applied to the new node.
* The Kubernetes control plane instances scaled up.
* A new etcd member was added to the local/stacked etcd cluster.

To start administering your cluster from this node, you need to run the following as a regular user:

	mkdir -p $HOME/.kube
	sudo cp -i /etc/kubernetes/admin.conf $HOME/.kube/config
	sudo chown $(id -u):$(id -g) $HOME/.kube/config

Run 'kubectl get nodes' to see this node join the cluster.
其中有这样一部分,按照提示执行这些命令后,就可以查看集群信息了
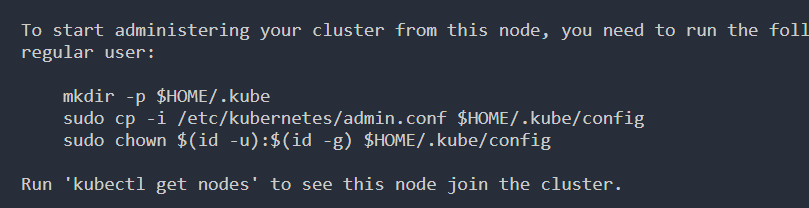
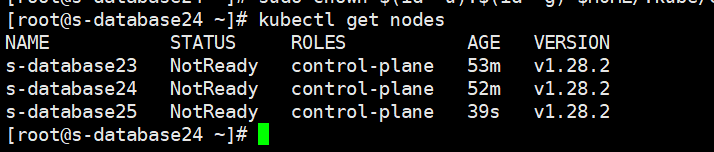
上面截图中可以看到目前ROLES中都显示为"control-plane",这表示这三个都是master节点 ,可以使用下面的命令查看控制平面节点,在输出的 Labels 部分,会看到类似 node-role.kubernetes.io/control-plane= 的标签,这就明确标识了它是控制平面节点,由于我这次部署的是三台高可用架构,所以三个都会带有控制平面标签
bash
#查看节点的详细信息
kubectl describe node <节点名称>

#查看是否都为master节点
kubectl get nodes --show-labels | grep node-role
三 calion网络插件
Kubernetes 本身只提供了一套网络规范和接口,并不自带默认的网络实现。必须自行部署一个兼容 CNI(容器网络接口)规范的网络插件(如 Calico、Flannel 等)来实现这套模型。
如果不部署网络插件,会引发以下连锁反应,导致 Worker 节点彻底瘫痪:
- 节点状态异常 :Worker 节点加入集群后,其状态会一直卡在
NotReady,因为 kubelet 无法完成网络初始化。 - Pod 无法创建 :新加入的 Worker 节点上的 Pod 会一直卡在
ContainerCreating状态,因为系统无法为其分配 IP 地址。 - 网络完全隔离:没有 CNI 插件,Pod 之间无法进行跨节点通信,Service 的服务发现和负载均衡也会失效。
- 核心组件瘫痪:集群的核心组件(如 CoreDNS)在底层网络就绪前根本无法启动,导致整个集群的 DNS 解析失败。
简单来说,没有网络插件的 Kubernetes 集群就像是一堆互相隔离的容器,完全无法作为一个协同工作的分布式系统运行。因此,部署网络插件是集群搭建过程中绝对不可跳过的核心步骤
首先需要下载calion的yaml文件,如果是外网部署直接使用kubectl导入yaml文件即可,但是这里我是内网部署,所以需要根据yaml文件里面的image项拉取相应的镜像
这里需要注意一定要拉取与k8s版本兼容的calico镜像,否则启动后pod状态会一直是CrashLoopBackOff,我这里用的是v1.28.2
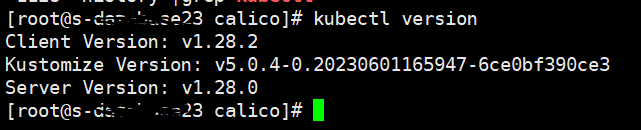
bash
# 下载 Calico 清单文件
curl -O https://raw.githubusercontent.com/projectcalico/calico/v3.28.0/manifests/calico.yaml

# 应用配置
kubectl apply -f calico.yaml

#拉取镜像文件
docker pull docker.io/calico/cni:v3.27.3
docker pull docker.io/calico/node:v3.27.3
docker pull docker.io/calico/kube-controllers:v3.27.3

导出镜像
docker save -o calico-code.tar docker.io/calico/node
docker save -o calico-cni.tar docker.io/calico/cni
docker save -o calico-kube-controllers.tar docker.io/calico/kube-controllers

导入k8s镜像
ctr -n k8s.io images import calico-code.tar
ctr -n k8s.io images import calico-cni.tar
ctr -n k8s.io images import calico-kube-controllers.tar
然后需要将calico.yaml中image里的镜像名字都改成我们下载的镜像
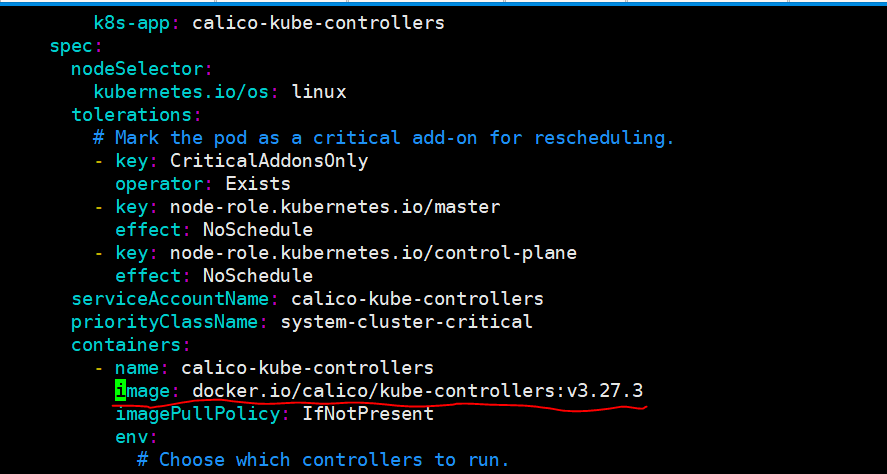
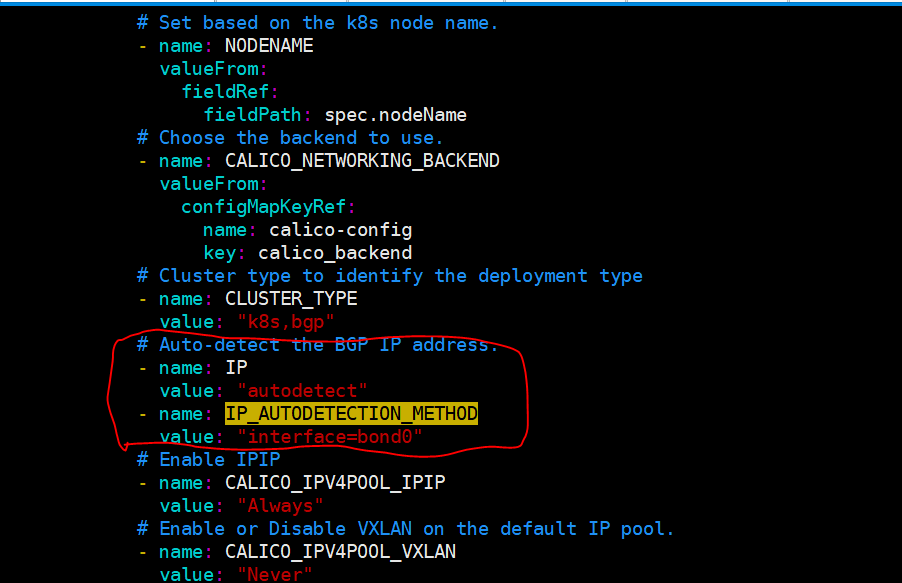
另外如果是多网卡设备,还需要修改网卡配置,否则calico会使用默认配置,可能会选到网络不通的网卡,在这里指定网卡
然后我们导入calico.yaml文件,没有语法错误和异常,导入成功
bash
[root@s-database23 calico]# kubectl apply -f calico.yaml
poddisruptionbudget.policy/calico-kube-controllers configured
serviceaccount/calico-kube-controllers unchanged
serviceaccount/calico-node unchanged
serviceaccount/calico-cni-plugin unchanged
configmap/calico-config unchanged
customresourcedefinition.apiextensions.k8s.io/bgpconfigurations.crd.projectcalico.org configured
customresourcedefinition.apiextensions.k8s.io/bgpfilters.crd.projectcalico.org configured
customresourcedefinition.apiextensions.k8s.io/bgppeers.crd.projectcalico.org configured
customresourcedefinition.apiextensions.k8s.io/blockaffinities.crd.projectcalico.org configured
customresourcedefinition.apiextensions.k8s.io/caliconodestatuses.crd.projectcalico.org configured
customresourcedefinition.apiextensions.k8s.io/clusterinformations.crd.projectcalico.org configured
customresourcedefinition.apiextensions.k8s.io/felixconfigurations.crd.projectcalico.org configured
customresourcedefinition.apiextensions.k8s.io/globalnetworkpolicies.crd.projectcalico.org configured
customresourcedefinition.apiextensions.k8s.io/globalnetworksets.crd.projectcalico.org configured
customresourcedefinition.apiextensions.k8s.io/hostendpoints.crd.projectcalico.org configured
customresourcedefinition.apiextensions.k8s.io/ipamblocks.crd.projectcalico.org configured
customresourcedefinition.apiextensions.k8s.io/ipamconfigs.crd.projectcalico.org configured
customresourcedefinition.apiextensions.k8s.io/ipamhandles.crd.projectcalico.org configured
customresourcedefinition.apiextensions.k8s.io/ippools.crd.projectcalico.org configured
customresourcedefinition.apiextensions.k8s.io/ipreservations.crd.projectcalico.org configured
customresourcedefinition.apiextensions.k8s.io/kubecontrollersconfigurations.crd.projectcalico.org configured
customresourcedefinition.apiextensions.k8s.io/networkpolicies.crd.projectcalico.org configured
customresourcedefinition.apiextensions.k8s.io/networksets.crd.projectcalico.org configured
clusterrole.rbac.authorization.k8s.io/calico-kube-controllers unchanged
clusterrole.rbac.authorization.k8s.io/calico-node unchanged
clusterrole.rbac.authorization.k8s.io/calico-cni-plugin unchanged
clusterrolebinding.rbac.authorization.k8s.io/calico-kube-controllers unchanged
clusterrolebinding.rbac.authorization.k8s.io/calico-node unchanged
clusterrolebinding.rbac.authorization.k8s.io/calico-cni-plugin unchanged
daemonset.apps/calico-node configured
deployment.apps/calico-kube-controllers unchanged
现在在检查calico相关的pod状态,可以看到状态都是Running
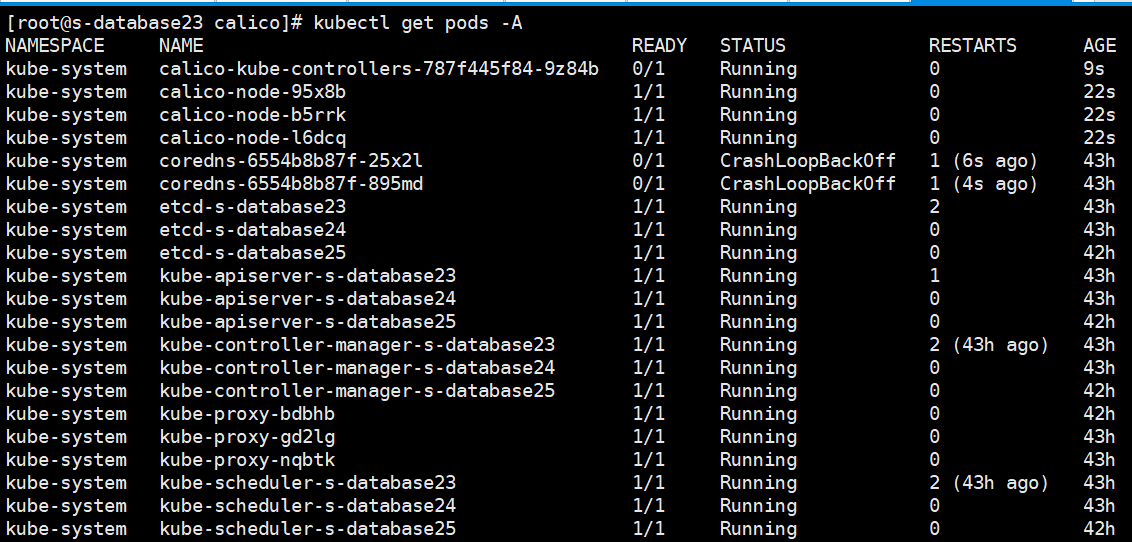
但是coreDNS还是CrashLoopBackOff,可以看一下pod的运行日志里面有什么信息
bash
#查看pod日志
[root@s-database23 calico]# kubectl logs -n kube-system -l k8s-app=kube-dns --tail=50
maxprocs: Leaving GOMAXPROCS=40: CPU quota undefined
plugin/forward: no valid upstream addresses found
maxprocs: Leaving GOMAXPROCS=40: CPU quota undefined
plugin/forward: no valid upstream addresses found

#查看pod事件
[root@s-database23 calico]# kubectl describe pod -n kube-system -l k8s-app=kube-dns
Name:                 coredns-6554b8b87f-25x2l
Namespace:            kube-system
Priority:             2000000000
Priority Class Name:  system-cluster-critical
Service Account:      coredns
Node:                 s-database23/172.26.198.82
Start Time:           Sat, 18 Jul 2026 10:07:09 +0800
Labels:               k8s-app=kube-dns
                      pod-template-hash=6554b8b87f
Annotations:          cni.projectcalico.org/containerID: 17933210ffae67226875a057892dd05b09f38d992b1f2b2f0f2e85a563658df5
日志里提示:"plugin/forward: no valid upstream addresses found",这是因为我这里是内网部署,没有dns服务,所以coreDNS去读取服务器的/etc/resolv.conf配置里的无效地址导致失败,在纯内网 K8s 集群中,CoreDNS 只需要负责集群内部的服务发现 (如解析 kubernetes.default.svc.cluster.local),完全不需要向外转发请求,所以这里我修改配置移除forward
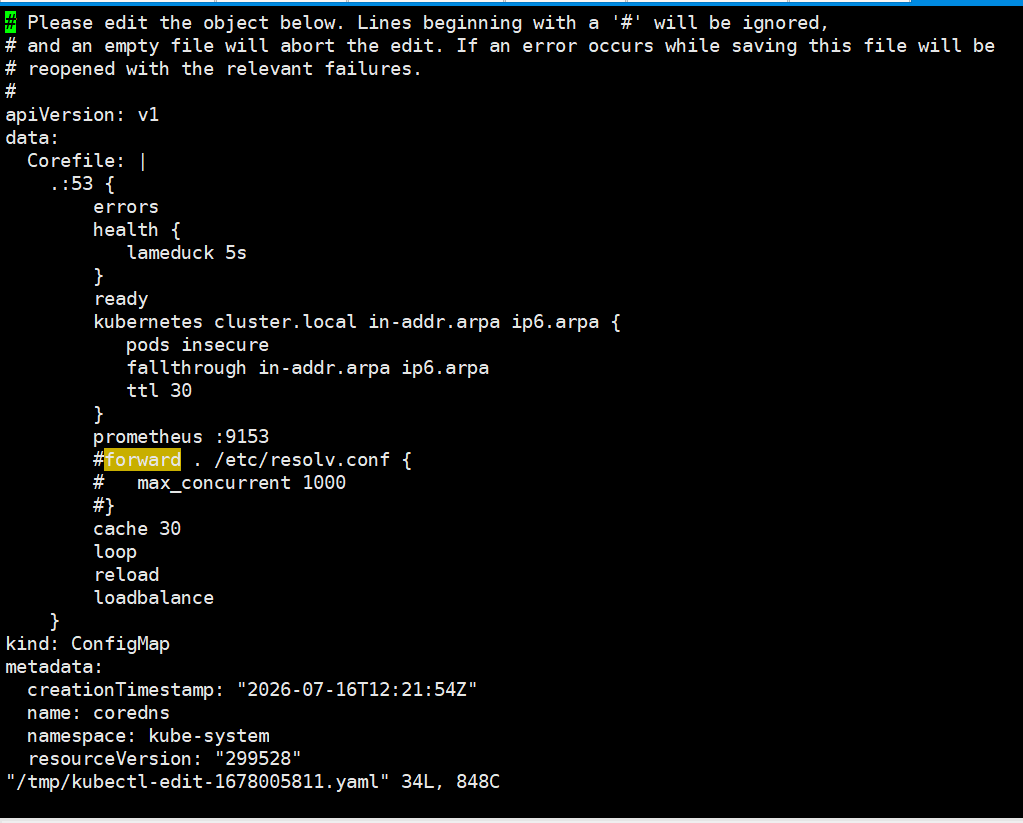
保存退出并重启 Pod,并测试集群内dns解析,再查看pod状态已经变为Running
bash
# 重启pod
kubectl rollout restart deployment coredns -n kube-system

# 验证集群内部 DNS 解析
[root@s-database23 calico]# kubectl run dns-test --rm -it --image=busybox:1.28 --restart=Never -- nslookup kubernetes.default.svc.cluster.local
pod "dns-test" deleted

# 3. 确认节点状态正常
[root@s-database23 calico]# kubectl get nodes
NAME           STATUS   ROLES           AGE   VERSION
s-database23   Ready    control-plane   43h   v1.28.2
s-database24   Ready    control-plane   43h   v1.28.2
s-database25   Ready    control-plane   42h   v1.28.2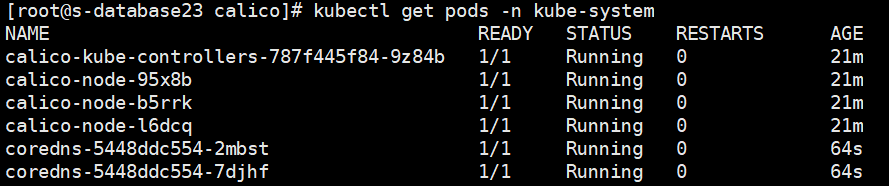
到这里高可用的k8s集群核心组件部署完毕,后面就可以开始具体的业务应用部署了