前言
- 最近刚好有项目在训练 YOLOv8 目标检测模型,为了检验模型训练成效,但看普通的指标和检测框不太能很好的判断模型是否真正学对位置了
- 因此本文我们来探讨:怎么用 CAM 系列算法给目标检测模型做可解释性分析
- 本文将完整走通 从 CAM 原理 → Grad-CAM / Grad-CAM++ 公式推导 → 虚拟环境配置 → YOLO 模型下载 → 热力图可视化 的全流程
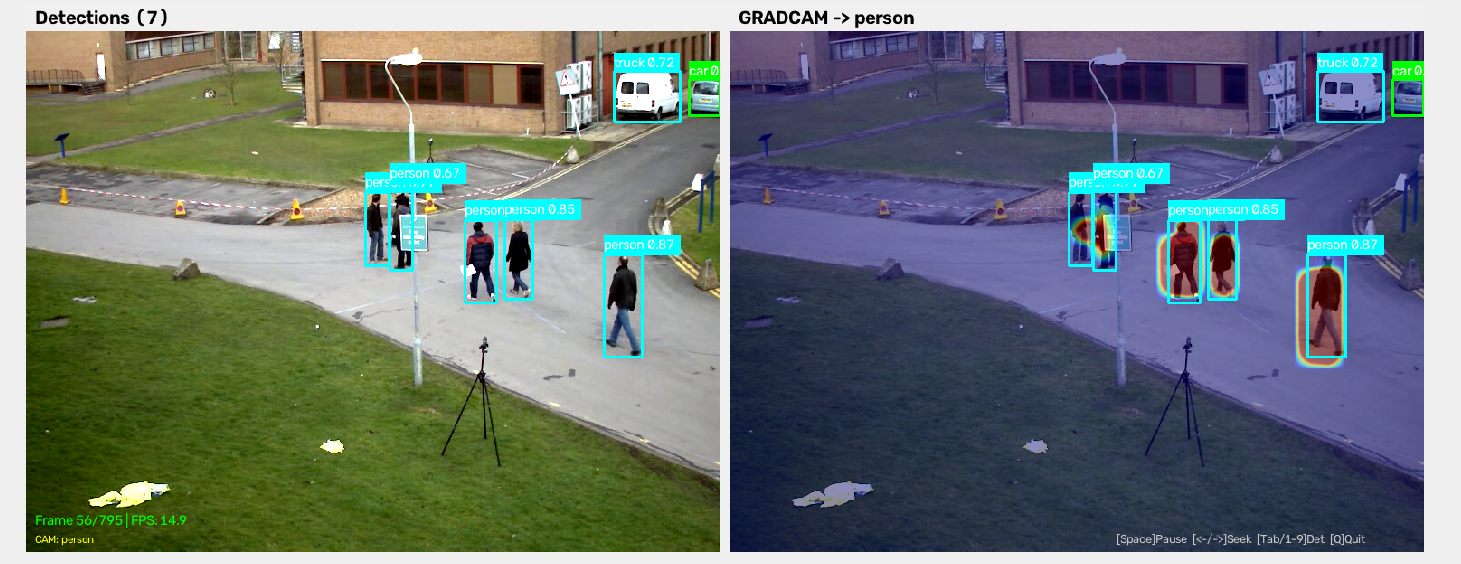
- 用街景视频
test_street.avi做完整演示,附带播放控制功能(空格暂停、方向键逐帧、Tab 切换类别)
核心链路:YOLOv8 输出
[B, 84, 8400]---包装---> 分类格式[B, Nc]---库调用---> Grad-CAM / Grad-CAM++ ---热力图叠加---> 可视化结果。
文章目录
-
- 前言
- [0 YOLOv8 目标检测回顾](#0 YOLOv8 目标检测回顾)
-
-
- [0-1 整体架构](#0-1 整体架构)
- [0-2 Backbone(主干网络)](#0-2 Backbone(主干网络))
- [0-3 Neck(颈部网络)](#0-3 Neck(颈部网络))
- [0-4 Head(检测头)](#0-4 Head(检测头))
- [0-5 输出格式与 CAM 的关联](#0-5 输出格式与 CAM 的关联)
-
- [1 CAM 是什么](#1 CAM 是什么)
-
-
- [1-1 直观理解](#1-1 直观理解)
- [1-2 CAM 的数学本质](#1-2 CAM 的数学本质)
-
- [2 Grad-CAM](#2 Grad-CAM)
-
-
- [2-1 核心思想](#2-1 核心思想)
- [2-2 公式推导](#2-2 公式推导)
- [2-3 说人话版本](#2-3 说人话版本)
-
- [3 Grad-CAM++](#3 Grad-CAM++)
-
-
- [3-1 Grad-CAM 的问题](#3-1 Grad-CAM 的问题)
- [3-2 改进思路与公式](#3-2 改进思路与公式)
- [3-3 Grad-CAM vs Grad-CAM++ 对比](#3-3 Grad-CAM vs Grad-CAM++ 对比)
-
- [4 YOLOv8 + CAM 部署实战](#4 YOLOv8 + CAM 部署实战)
-
-
- [4-1 环境配置](#4-1 环境配置)
- [4-2 YOLO 模型下载与验证](#4-2 YOLO 模型下载与验证)
- [4-3 项目结构与依赖](#4-3 项目结构与依赖)
- [4-4 核心代码解析](#4-4 核心代码解析)
-
- [4-4-1 YOLO 输出包装器](#4-4-1 YOLO 输出包装器)
- [4-4-2 单层目标层选择](#4-4-2 单层目标层选择)
- [4-4-3 Letterbox 裁剪(关键修正)](#4-4-3 Letterbox 裁剪(关键修正))
- [4-4-4 百分位对比度增强](#4-4-4 百分位对比度增强)
- [4-4-5 视频播放控制](#4-4-5 视频播放控制)
- [4-5 运行测试](#4-5 运行测试)
- [4-6 完整代码](#4-6 完整代码)
-
- [5 实战中的关键踩坑](#5 实战中的关键踩坑)
-
-
- [5-1 Letterbox 偏移问题](#5-1 Letterbox 偏移问题)
- [5-2 P3 分支梯度消失](#5-2 P3 分支梯度消失)
- [5-3 Grad-CAM++ 反转现象](#5-3 Grad-CAM++ 反转现象)
-
- 总结
0 YOLOv8 目标检测回顾
0-1 整体架构

- 在讲 CAM 之前,我们先快速回顾一下 YOLOv8 的结构------因为后面所有 CAM 的目标层选择、梯度传播路径都依赖这个架构
- YOLOv8 是一个 one-stage 目标检测器,模型内部推理分为三大部分:Backbone(主干)→ Neck(颈部)→ Head(检测头)
- 注意:完整链路还包含前处理 (resize + letterbox + 归一化)和后处理 (NMS 非极大值抑制------把重叠的重复框去掉 + 坐标解码),这两部分在
model.model之外,由ultralytics框架自动完成,不在 Backbone/Neck/Head 的范畴内 - 输入 640 × 640 × 3 640 \times 640 \times 3 640×640×3 的 RGB 图像,经过 Backbone 提取多尺度特征,Neck 融合不同尺度的特征,最后 Head 输出检测结果
- 以 YOLOv8n(nano 版本)为例,
model.model共有 23 个子模块(索引 0~22),参数总量约 3.2 M 3.2\text{M} 3.2M
python
from ultralytics import YOLO
model = YOLO('yolov8n.pt', verbose=False)
# 打印模型结构
for i, (name, module) in enumerate(model.model.named_modules()):
    if '.' not in name and name != '':
print(f'[{i:2d}] {name:20s} {module.__class__.__name__}')-
输出结构如下:
[ 1] model Sequential
[ 2] model.0 Conv ← Backbone 开始
[ 3] model.1 Conv
[ 4] model.2 C2f
[ 5] model.3 Conv
[ 6] model.4 C2f
[ 7] model.5 Conv
[ 8] model.6 C2f
[ 9] model.7 Conv
[10] model.8 C2f
[11] model.9 SPPF ← Backbone 结束
[12] model.10 Upsample ← Neck (FPN)
[13] model.11 Concat
[14] model.12 C2f
[15] model.13 Upsample
[16] model.14 Concat
[17] model.15 C2f ← P3/8 分支输出
[18] model.16 Conv ← Neck (PAN)
[19] model.17 Concat
[20] model.18 C2f ← P4/16 分支输出
[21] model.19 Conv
[22] model.20 Concat
[23] model.21 C2f ← P5/32 分支输出
[24] model.22 Detect ← Head
0-2 Backbone(主干网络)
- 位置 :
model.0~model.9,共 10 层 - 作用:逐步提取图像特征,从低级纹理到高级语义
- 具体组成:
model.0~model.8:交替的Conv(标准卷积 + BN + SiLU)和C2f(YOLOv8 的核心模块,本质是 CSP 跨阶段连接:把特征拆成两半各卷各的再拼回去,省参数提精度)model.9:SPPF(Spatial Pyramid Pooling Fast),用多个串行的最大池化层(窗口 5 × 5 5 \times 5 5×5,取窗口内最大值)做多尺度融合,感受野大但参数少
- Backbone 输出的特征是最高层语义特征(尺寸 20 × 20 × 256 20 \times 20 \times 256 20×20×256),感受野最大但空间分辨率最低
- 适合检测大目标,但小目标到这个阶段已经丢失太多空间细节了
0-3 Neck(颈部网络)
- 位置 :
model.10~model.21,共 12 层 - 作用:融合 Backbone 不同阶段的特征,让高层语义信息传递回低层,同时保留空间细节
- Neck 分两段:
- FPN(特征金字塔,top-down) :
model.10~model.15,通过上采样把高层语义传回浅层 - PAN(路径聚合,bottom-up) :
model.16~model.21,通过下采样把浅层细节传回深层
- FPN(特征金字塔,top-down) :
- 最终输出三个尺度的特征图(这三个就是后面 CAM 的目标层来源):
model.15(C2f): 80 × 80 × 64 80 \times 80 \times 64 80×80×64,stride=8,负责小目标(P3)model.18(C2f): 40 × 40 × 128 40 \times 40 \times 128 40×40×128,stride=16,负责中目标(P4)model.21(C2f): 20 × 20 × 256 20 \times 20 \times 256 20×20×256,stride=32,负责大目标(P5)- stride(步长)的含义:特征图每隔 1 个像素对应原图 stride 个像素。stride 越小,特征图越密,越能定位小物体
- P 即 Pyramid level(金字塔层级),数字是下采样倍数的指数------P3 即 2 3 = 8 2^3=8 23=8 倍,P4 即 2 4 = 16 2^4=16 24=16 倍,P5 即 2 5 = 32 2^5=32 25=32 倍。数字越大,特征图越小,管的目标越大
说人话:Backbone 把图越压越小但越来越"懂"。Neck 把大图和小图互相对齐,让浅层也能"懂"、深层也能"细"。最后输出三个不同大小的特征图,分别管小物体、中物体、大物体。
- 这三个特征图直接送入下一节 Head,一一对应的关系如下:
| Neck 输出层 | 特征图尺寸 | stride | Head 分支 | 负责目标 |
|---|---|---|---|---|
model.15(C2f) |
80 × 80 × 64 80 \times 80 \times 64 80×80×64 | 8 | cv20 / cv30(P3) | 小目标 |
model.18(C2f) |
40 × 40 × 128 40 \times 40 \times 128 40×40×128 | 16 | cv21 / cv31(P4) | 中目标 |
model.21(C2f) |
20 × 20 × 256 20 \times 20 \times 256 20×20×256 | 32 | cv22 / cv32(P5) | 大目标 |
0-4 Head(检测头)
- 位置 :
model.22,最后一层 - 作用:接收 Neck 的三个特征图,每个分别通过 Box 分支和 Class 分支,转换成检测输出
- 内部结构:
model.22.cv2[i]:Box 分支(预测边界框坐标)model.22.cv3[i]:Class 分支(预测类别分数), i = 0 , 1 , 2 i=0,1,2 i=0,1,2 对应上表中 P3/P4/P5 三路(P 的含义见 0-3 节)
- 每个分支是几个
Conv层的 Sequential,最终输出:- P3 分支(stride=8): 80 × 80 × ( 4 + N c ) 80 \times 80 \times (4 + N_c) 80×80×(4+Nc) 的预测------ 6400 6400 6400 个 grid cells
- P4 分支(stride=16): 40 × 40 × ( 4 + N c ) 40 \times 40 \times (4 + N_c) 40×40×(4+Nc) 的预测------ 1600 1600 1600 个 grid cells
- P5 分支(stride=32): 20 × 20 × ( 4 + N c ) 20 \times 20 \times (4 + N_c) 20×20×(4+Nc) 的预测------ 400 400 400 个 grid cells
- 三路输出被拼接成一个
[B, 4+N_c, 8400]的张量( 8400 = 6400 + 1600 + 400 8400 = 6400 + 1600 + 400 8400=6400+1600+400)
0-5 输出格式与 CAM 的关联
- YOLOv8 的原始输出是
([B, 4+N_c, 8400], dict)------一个包含 8400 个 grid cell 的预测张量,每个 cell 输出 4 个坐标 + N c N_c Nc 个类别分数- B B B(batch size):一次推理的图片数量,通常为 1 1 1
- 4 4 4:边界框的 4 个坐标(cx, cy, w, h,即中心点坐标 + 宽高)
- N c N_c Nc:类别总数(COCO 数据集为 80 80 80,自定义数据集由
datasets.yaml决定) - 8400 8400 8400:三尺度 grid cell 总数(见下文分布)
- 这个格式跟分类模型(输出
[B, N_c])完全不同,是后面 CAM 适配的核心难点 - 8400 8400 8400 个 cell 的分布:
- 0 ∼ 6399 0 \sim 6399 0∼6399:P3 分支( 80 × 80 80 \times 80 80×80),检测小目标
- 6400 ∼ 7999 6400 \sim 7999 6400∼7999:P4 分支( 40 × 40 40 \times 40 40×40),检测中目标
- 8000 ∼ 8399 8000 \sim 8399 8000∼8399:P5 分支( 20 × 20 20 \times 20 20×20),检测大目标
CAM 适配的关键:我们需要把
[B, 4+N_c, 8400]变成[B, N_c],让库以为这是一个分类器。同时要根据目标属于哪个尺度(由最高分 cell 的索引判断),选择对应的 hook 层。
1 CAM 是什么
1-1 直观理解
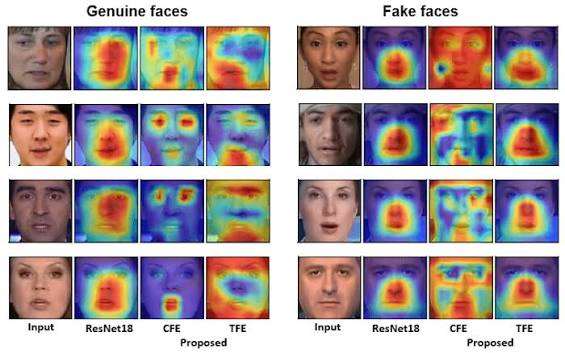
- 深度学习模型一直被称为"黑箱"------我们喂进去一张图,模型吐出一个检测结果,但中间到底发生了什么?模型是看到车轮判断"这是车",还是看到了马路就猜"大概是车"?
- CAM(Class Activation Mapping,类激活映射) 就是用来回答这个问题的:对于某个类别的预测,图像的哪些区域贡献了最大的分数
说人话:CAM 相当于给模型拍一张"注意力热力图"------红色越亮的地方,模型越关注;蓝色越冷的地方,模型基本没看。
1-2 CAM 的数学本质
- CAM 的原始想法很简单:假设一个 CNN 分类网络,最后一层卷积输出特征图 A A A(尺寸 C × H × W C \times H \times W C×H×W),后面接了一个 GAP(全局平均池化,把整张特征图的每个通道压成一个数)+ 全连接层,对整张图做类别判断(比如输出"猫""狗""车"的分类分数)
说人话:CNN 最后一层卷积吐出来的不是"答案",而是一叠"特征地图"(有的通道画车轮、有的画车窗)。GAP 把每张地图压成一个数字,全连接层拿这些数字算出"0.92 分,是车"。既然是全连接层加权求和算的分数,那我把权重乘回原地图------权重大的区域就是模型最"认"为有车的地方,画出来就是 CAM 热力图。
- 特征图: A k A^k Ak(第 k k k 个通道,尺寸 H × W H \times W H×W)
- GAP 后: F k = 1 Z ∑ i ∑ j A i j k F^k = \frac{1}{Z} \sum_i \sum_j A^k_{ij} Fk=Z1∑i∑jAijk(通道 k k k 上所有像素求平均,得到一个标量)
- 分类分数: y c = ∑ k w k c ⋅ F k y^c = \sum_k w_k^c \cdot F^k yc=∑kwkc⋅Fk
- 把两个公式合并:
y c = ∑ k w k c ⋅ 1 Z ∑ i ∑ j A i j k = 1 Z ∑ i ∑ j ∑ k w k c ⋅ A i j k y^c = \sum_k w_k^c \cdot \frac{1}{Z} \sum_i \sum_j A^k_{ij} = \frac{1}{Z} \sum_i \sum_j \left \\sum_k w_k\^c \\cdot A\^k_{ij} \\right yc=k∑wkc⋅Z1i∑j∑Aijk=Z1i∑j∑k∑wkc⋅Aijk
- 中间的 ∑ k w k c ⋅ A i j k \sum_k w_k^c \cdot A^k_{ij} ∑kwkc⋅Aijk 就是 CAM:
L i j c = ∑ k w k c ⋅ A i j k (CAM 核心公式) L^c_{ij} = \sum_k w_k^c \cdot A^k_{ij} \qquad \text{(CAM 核心公式)} Lijc=k∑wkc⋅Aijk(CAM 核心公式)
- L c L^c Lc 是尺寸 H × W H \times W H×W 的二维图,每个像素的值 = 该位置对类别 c c c 的贡献
CAM 的本质 = 用全连接分类权重 w k c w_k^c wkc 对特征图通道加权求和。分类是 GAP+FC 干的,CAM 只是借它的权重画热力图------把分类权重投射回特征图,看清楚哪些区域贡献了分类分数。
- 举个例子你就懂了,完整流程一共四步:
- CNN 看完图 → 输出 512 个特征图通道(每个通道是一张"热度图",比如通道 3 专门激活车轮、通道 7 专门激活车窗)
- GAP 把每张热度图压成一个数 → 512 个数,每个数代表"这个通道整体有多活跃"
- 全连接层拿这 512 个数算分类分数:"这 512 个数加权求和 = 0.92 分,是车"。权重 w k c w_k^c wkc 就是在这一层学到的------比如 w 3 c = 0.8 w_3^c = 0.8 w3c=0.8(车轮很重要)、 w 7 c = 0.5 w_7^c = 0.5 w7c=0.5(车窗也重要)、其他通道权重接近 0
- CAM 把全连接层的权重乘回原来的热度图------权重大的通道(车轮、车窗)被放大,权重小的被压掉,叠加起来就是一张"哪里对分类贡献最大"的热力图
- 一句话概括:CAM 就是权重可视化------把全连接层学到的通道权重乘回对应的特征图,画出来的热力图 = 模型认为哪些像素对分类贡献最大
- 但 CAM 有个致命问题 :它要求网络结构必须是
CNN → GAP → FC,中间不能有自定义结构 - YOLOv8 的 Detect 头显然不满足,所以我们需要更灵活的方法
2 Grad-CAM
2-1 核心思想
- Grad-CAM 解决了 CAM 的架构依赖问题:不需要 GAP,也不需要全连接层,只要能从输出反向传播梯度到目标卷积层就行
核心思想:用梯度信息 替代 CAM 中的全连接权重 w k c w_k^c wkc。梯度天然反映了 "输出对特征图的敏感度",相当于问模型:改变特征图 A k A^k Ak 的每个像素,输出 y c y^c yc 会变多少?
2-2 公式推导
-
预先定义:
- A k A^k Ak:目标卷积层第 k k k 通道特征图,尺寸 H × W H \times W H×W
- y c y^c yc:类别 c c c 的分类分数(对 YOLO 而言,是类别 c c c 在所有 grid cell 中的最高分)
- ∂ y c / ∂ A i j k \partial y^c / \partial A^k_{ij} ∂yc/∂Aijk:类别分数对特征图像素的梯度
-
Step 1:计算每个通道的权重 α k c \alpha_k^c αkc
α k c = 1 Z ∑ i ∑ j ∂ y c ∂ A i j k \alpha_k^c = \frac{1}{Z} \sum_i \sum_j \frac{\partial y^c}{\partial A^k_{ij}} αkc=Z1i∑j∑∂Aijk∂yc
-
也就是对梯度做全局平均池化(GAP)
-
这个 α k c \alpha_k^c αkc 就是通道 k k k 对类别 c c c 的"重要程度"
-
Step 2:加权求和 + ReLU
L Grad-CAM c = ReLU ( ∑ k α k c ⋅ A k ) L^c_{\text{Grad-CAM}} = \text{ReLU}\left( \sum_k \alpha_k^c \cdot A^k \right) LGrad-CAMc=ReLU(k∑αkc⋅Ak)
- ReLU 的作用:只保留对类别有正向贡献的区域
- 负值说明该区域让模型"不认为是 c",我们只关心"是 c"的证据
2-3 说人话版本
说人话:Grad-CAM 做了两件事。第一,对每个特征图通道问"输出变了吗?"------梯度大的通道,就是重要的通道。第二,把重要通道的特征图用梯度做加权平均,得到一张"重要区域"的热力图。ReLU 过滤掉"反向证据",只留正向线索。
- 还是拿车来举例,完整流程四步:
- 前向传播:跟 CAM 一样,CNN 看完图输出 512 个通道的特征图,通道 3 画车轮、通道 7 画车窗
- 反向传播:我们告诉模型"你就当这是车,给我算损失",损失反向传播时,每个特征图像素都会收到一个梯度------"动你这个像素,车的分数会改变多少?"
- 通道加权:对每个通道的梯度图做 GAP(全局平均池化),得到一个数 α k c \alpha_k^c αkc。通道 3(车轮)的梯度平均值大 → α 3 c = 0.8 \alpha_3^c = 0.8 α3c=0.8,通道 7(车窗)的 α 7 c = 0.5 \alpha_7^c = 0.5 α7c=0.5,其他通道梯度接近 0 → α ≈ 0 \alpha \approx 0 α≈0
- 叠加热力图: 0.8 × 0.8 \times 0.8× 通道 3 的特征图 + 0.5 × + 0.5 \times +0.5× 通道 7 的特征图,ReLU 把负值清零,得到的就是"模型靠哪些像素判断这是车"的热力图
Grad-CAM 和 CAM 的核心区别:CAM 的通道权重 w k c w_k^c wkc 是全连接层学出来的参数 (永远在那里);Grad-CAM 的通道权重 α k c \alpha_k^c αkc 是当场算的梯度(每张图、每个类别都不一样)。
- 对应到代码实现(以
pytorch-grad-cam库为准):
python
import torch
import torch.nn.functional as F

def grad_cam(feature_maps, gradients):
    """
    Args:
        feature_maps: [1, C, H, W] 目标层特征图
        gradients:   [1, C, H, W] 目标层梯度
    Returns:
        cam: [H, W] 归一化热力图
    """
    # Step 1: GAP 梯度 → 通道权重 α_k
    weights = gradients.mean(dim=(2, 3), keepdim=True)  # [1, C, 1, 1]

    # Step 2: 加权求和 + ReLU
    cam = (weights * feature_maps).sum(dim=1, keepdim=True)  # [1, 1, H, W]
    cam = torch.relu(cam)

    # 归一化
    cam = cam.squeeze().detach().cpu().numpy()
    cam = (cam - cam.min()) / (cam.max() - cam.min() + 1e-8)
    return cam
3 Grad-CAM++
3-1 Grad-CAM 的问题
- Grad-CAM 有一个默认假设:每个通道的所有空间位置对结果的贡献是均匀的 ------权重 α k c \alpha_k^c αkc 是对梯度做了 GAP,相当于是取了均值
- 实际情况中,同一个通道的不同空间位置可能对应不同的目标
- 如果一张图里有两个人,同一个人体相关的通道在两个位置都有激活,GAP 会把两个位置的权重混在一起,导致热力图定位精度下降
3-2 改进思路与公式
- Grad-CAM++ 不假设每个像素权重均等,而是为每个像素计算独立的重要性系数 α i j k c \alpha^{kc}_{ij} αijkc:
α i j k c = ∂ 2 y ( ∂ A i j k ) 2 2 ⋅ ∂ 2 y ( ∂ A i j k ) 2 + ∑ a ∑ b A a b k ⋅ ∂ 3 y ( ∂ A i j k ) 3 \alpha^{kc}{ij} = \frac{ \frac{\partial^2 y}{(\partial A^k{ij})^2} }{ 2 \cdot \frac{\partial^2 y}{(\partial A^k_{ij})^2} + \sum_a \sum_b A^k_{ab} \cdot \frac{\partial^3 y}{(\partial A^k_{ij})^3} } αijkc=2⋅(∂Aijk)2∂2y+∑a∑bAabk⋅(∂Aijk)3∂3y(∂Aijk)2∂2y
说人话:Grad-CAM++ 比 Grad-CAM 多算了二阶和三阶导数。一阶导数告诉你"变 A 输出变多少",二阶导数告诉你"变 A 输出加速变多少 "。如果一个位置二阶梯度很大------说明这个位置对结果的非线性影响很强,就应该给更大权重。
- 实际实现(来自
pytorch-grad-cam库):
python
def grad_cam_pp(feature_maps, gradients):
    grads = gradients
    grads_power_2 = grads ** 2
    grads_power_3 = grads ** 3

    sum_activations = feature_maps.sum(dim=(2, 3), keepdim=True)

    # 每个像素的独立权重
    alpha_num = grads_power_2
    alpha_denom = 2.0 * grads_power_2 + sum_activations * grads_power_3
    alpha_denom = torch.where(alpha_denom != 0.0, alpha_denom,
                              torch.ones_like(alpha_denom))
    alpha = alpha_num / alpha_denom  # [1, C, H, W]

    # 只取正梯度贡献
    positive_grads = torch.relu(grads)
    weights = (alpha * positive_grads).sum(dim=(2, 3), keepdim=True)

    cam = (weights * feature_maps).sum(dim=1, keepdim=True)
    cam = torch.relu(cam).squeeze().detach().cpu().numpy()
    cam = (cam - cam.min()) / (cam.max() - cam.min() + 1e-8)
    return cam
3-3 Grad-CAM vs Grad-CAM++ 对比
| 维度 | Grad-CAM | Grad-CAM++ |
|---|---|---|
| 权重计算 | GAP 梯度(每通道一个数) | 像素级独立权重(高阶梯度) |
| 梯度阶数 | 一阶 | 一阶 + 二阶 + 三阶 |
| 多目标场景 | 定位精度一般 | 定位更精确 |
| 数值稳定性 | 稳定 | 部分架构可能反转/不稳定 |
| 推荐场景 | 通用、保险 | 多实例精确分析 |
- 注意:在我们的 YOLOv8 部署中,Grad-CAM++ 在 P3 小目标分支上出现了反转现象 (框内热力值低于框外),原因是高阶梯度 ∂ 3 y / ( ∂ A ) 3 \partial^3 y / (\partial A)^3 ∂3y/(∂A)3 的符号翻转
- 如果你的模型出现类似情况,切回
gradcam即可,详见 5-3 节
4 YOLOv8 + CAM 部署实战
4-1 环境配置
- 我们使用 Python 虚拟环境隔离依赖,硬件是 RTX 4060 Laptop + CUDA 12.x
bash
# 1. 创建虚拟环境
cd /home/lzh/postgraduate0
python3 -m venv venv_cam

# 2. 激活虚拟环境
source venv_cam/bin/activate

# 3. 安装 PyTorch(CUDA 版)+ 其他依赖
pip install torch torchvision --index-url https://download.pytorch.org/whl/cu121
pip install ultralytics opencv-python numpy matplotlib pillow grad-cam

# 4. 验证 GPU 可用
python3 -c "import torch; print(torch.cuda.is_available(), torch.cuda.get_device_name(0))"- 如果下载慢,可以换清华镜像源:
bash
pip install torch torchvision ultralytics opencv-python numpy matplotlib pillow grad-cam \
  -i https://pypi.tuna.tsinghua.edu.cn/simple
4-2 YOLO 模型下载与验证
bash
# 自动下载 yolov8n (6MB, nano 版本)
python3 -c "from ultralytics import YOLO; YOLO('yolov8n.pt')"

# 或者下载 yolov8m (52MB, medium 版本, 精度更高)
python3 -c "from ultralytics import YOLO; YOLO('yolov8m.pt')"pytorch-grad-cam库不需要额外算法实现,已内置了GradCAM、GradCAMPlusPlus等类,开箱即用- 我们的工作只是做 YOLO 模型的适配包装------让库能正确消费 YOLO 的输出格式
4-3 项目结构与依赖
yolo_cam/
├── __init__.py
├── main.py              # CLI 入口(图片/视频 + 播放控制)
├── yolo_wrapper.py      # YOLO 模型包装器 + CAM 解释器
├── visualize.py         # 热力图叠加、检测框绘制
├── requirements.txt     # Python 依赖清单
├── run.sh               # 快速启动脚本
├── test_street.avi      # 街景测试视频(行人+车辆)
├── yolov8n.pt           # COCO nano 模型 (6MB)
└── yolov8m.pt # COCO medium 模型 (52MB)-
requirements.txt内容:torch>=2.0
torchvision
ultralytics
opencv-python
numpy
matplotlib
pillow
grad-cam
4-4 核心代码解析
4-4-1 YOLO 输出包装器
- YOLOv8 的
model.model(x)返回([B, 84, 8400], dict) pytorch-grad-cam期望模型返回[B, Nc]分类分数- 我们需要包装一下:
python
class YOLOCAMWrapper(nn.Module):
    def __init__(self, model_path, device="cuda"):
        super().__init__()
        yolo = YOLO(model_path, verbose=False)
        self.model = yolo.model
        self.model.eval()
        self.model.to(torch.device(device))

    def forward(self, x):
        out = self.model(x)                          # ([B,84,8400], dict)
        raw_output = out[0] if isinstance(out, (list, tuple)) else out
        cls_scores = raw_output[:, 4:, :]             # [B, 80, 8400]
        scores = cls_scores.amax(dim=2)               # [B, 80] --- 全局最高分
        return scores
说人话:YOLO 输出有 8400 个 grid cell,每个 cell 有 80 个类别的分数。我们每个类别取全局最高的那个分数,构造一个 "伪分类器" 的输出
[B, 80]。库看到这个格式就知道该对谁求梯度。
4-4-2 单层目标层选择
- YOLOv8 Detect 头有三个输入分支:P3(大小 80×80,stride 8)、P4(40×40,stride 16)、P5(20×20,stride 32)
- 每个检测对应其中一层,我们预跑一次前向,根据最高分 cell 在哪条分支,动态选择对应的卷积层:
python
def _pick_target_layer(self, image_bgr, class_idx):
    input_tensor = self._preprocess(image_bgr)
    with torch.no_grad():
        out = self.wrapper.model(input_tensor)
        cls_scores = out[0][0, 4:, :]          # [80, 8400]
        max_cell = cls_scores[class_idx].argmax().item()

    named = dict(self.wrapper.model.named_modules())
    if max_cell < 6400:
        return [named["model.22.cv3.0"]]        # P3 分支
    elif max_cell < 8000:
        return [named["model.22.cv3.1"]]        # P4 分支
    else:
return [named["model.22.cv3.2"]] # P5 分支- 如果 hook 全部 3 层,pytorch-grad-cam 会平均三层 CAM
- 对只落在某一层的检测而言,另两层的梯度为零,平均后信号被稀释
- 单层选择避免了这个稀释问题
4-4-3 Letterbox 裁剪(关键修正)
-
YOLOv8 推理时会把图像 resize + padding 到 640×640
-
CAM 也在 640×640 上生成,但如果直接把 640×640 的 CAM resize 回原图尺寸,padding 区域(黑边)也会被压缩进去,造成热力图位置偏移
-
修复方法:裁掉 padding 后再 resize:
python
# CAM 在 640x640 上生成,需要裁掉 letterbox padding
h, w = image_bgr.shape[:2]
scale = min(640 / h, 640 / w)
new_h, new_w = int(h * scale), int(w * scale)
pad_top = (640 - new_h) // 2
pad_left = (640 - new_w) // 2

# 裁掉 padding 区域
cam_cropped = cam_640[pad_top:pad_top + new_h, pad_left:pad_left + new_w]
# 缩放到原图尺寸
cam_resized = cv2.resize(cam_cropped, (w, h))- 这是整个项目最常见的对齐问题根源
- 如果没有这一步,热力图会产生垂直/水平偏移,看起来"热力图和检测框不对齐"
4-4-4 百分位对比度增强
- Grad-CAM++ 有时产生的大部分 CAM 值集中在均值附近,用 JET 色图渲染后会呈现"全图一色"------看起来全黄/全绿
- 用百分位归一化拉开对比度:
python
vmin, vmax = np.percentile(cam_resized, [2, 98])
if vmax > vmin:
    cam_resized = np.clip((cam_resized - vmin) / (vmax - vmin), 0, 1)
4-4-5 视频播放控制
- 视频播放支持以下键盘操作:
| 按键 | 功能 |
|---|---|
| 空格 | 暂停 / 继续 |
| 左/右方向键 | 逐帧前进/后退 |
| Tab | 切换到下一个检测类别的 CAM |
| 1-9 | 直接跳到第 N 个类别 |
| 0 | 取消类别锁定,回到默认(最高置信度) |
| Q / ESC / 关窗 | 退出 |
- 核心实现:
python
key = cv2.waitKey(wait_ms) & 0xFF

if key == ord('q') or key == 27:        # Q 或 ESC
    break
elif key == 32:                          # 空格
    paused = not paused
elif key == 9:                           # Tab 切换类别
    cam_lock_class = next_class(...)
elif key == 81:                          # 左方向键
    frame_idx = seek_to(cap, frame_idx - 1, total)
elif key == 83:                          # 右方向键
    frame_idx = seek_to(cap, frame_idx + 1, total)
4-5 运行测试
- 图片模式:
bash
source venv_cam/bin/activate
python yolo_cam/main.py -i yolo_cam/test_street.avi -o result.jpg --video-step 50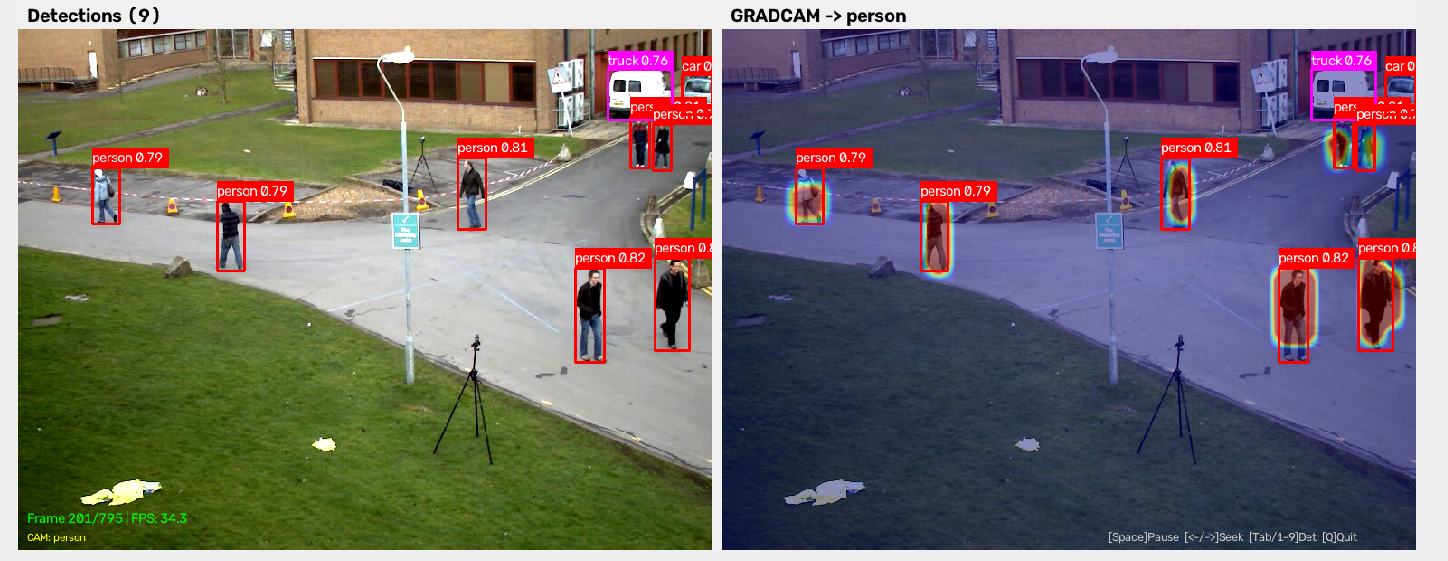
-
生成
result.jpg,左右对比:左侧原图 + 所有检测框,右侧热力图叠加 -
视频模式(实时显示):
bash
source venv_cam/bin/activate
python yolo_cam/main.py -m yolov8m.pt -i yolo_cam/test_street.avi

# 可选参数:
#   --conf 0.3      置信度阈值
#   --video-step 3   每3帧处理一次(降低CPU/GPU负载)
#   -c gradcampp     切换 Grad-CAM++
#   --alpha 0.5      热力图透明度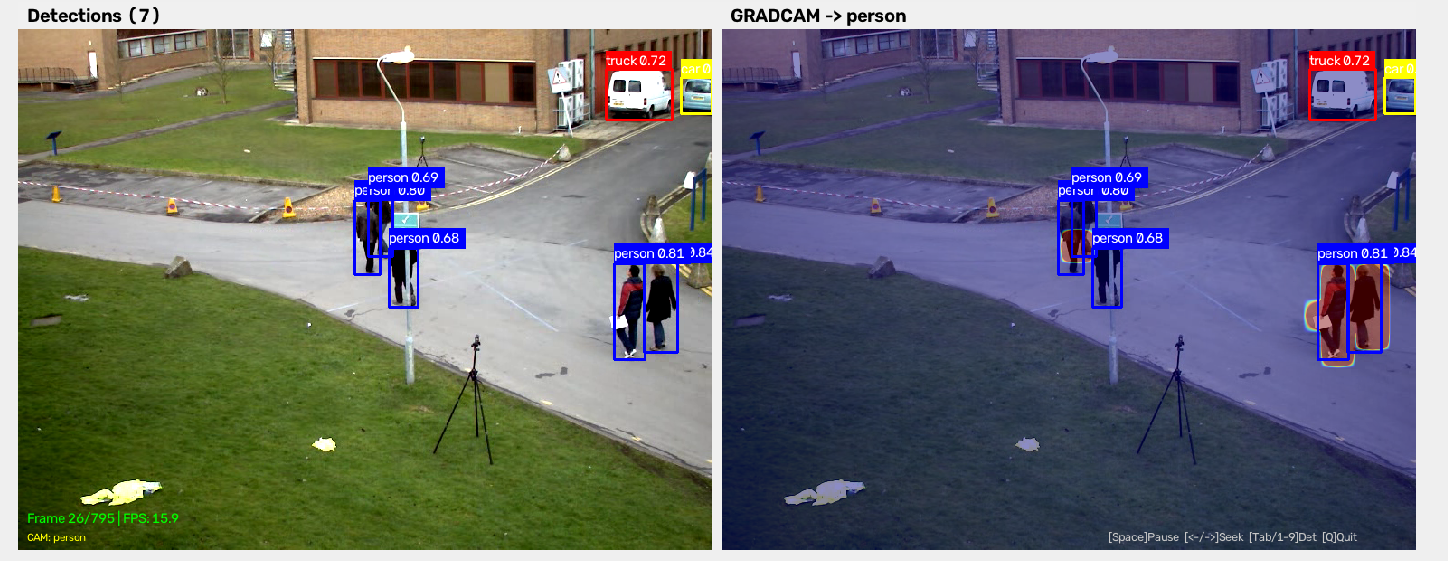
- 使用自定义模型:
bash
python yolo_cam/main.py \
  -m /path/to/your_model.pt \
-i /path/to/your_video.mp4- 快速启动脚本:
bash
bash yolo_cam/run.sh                                                # 默认: test_street.avi + yolov8m.pt
bash yolo_cam/run.sh my_video.mp4 my_model.pt gradcampp             # 自定义
4-6 完整代码
yolo_wrapper.py
python
import numpy as np
import torch
import torch.nn as nn
from ultralytics import YOLO


class YOLOCAMWrapper(nn.Module):
    def __init__(self, model_path: str, device: str = "cuda"):
        super().__init__()
        yolo = YOLO(model_path, verbose=False)
        self.model = yolo.model
        self.model.eval()
        self.device = torch.device(device if torch.cuda.is_available() else "cpu")
        self.model.to(self.device)

    def forward(self, x: torch.Tensor) -> torch.Tensor:
        out = self.model(x)
        if isinstance(out, (list, tuple)):
            raw_output = out[0]
        else:
            raw_output = out
        cls_scores = raw_output[:, 4:, :]
        scores = cls_scores.amax(dim=2)
        return scores


class YOLOCAMExplainer:
    DEFAULT_TARGET_LAYERS = ["model.15", "model.18", "model.21"]

    def __init__(self, model_path="yolov8n.pt", target_layer_name=None, device="cuda"):
        self.device = torch.device(device if torch.cuda.is_available() else "cpu")
        print(f"[设备] 使用: {self.device}")
        self.yolo = YOLO(model_path, verbose=False)
        self.yolo.to(self.device)
        self.wrapper = YOLOCAMWrapper(model_path, device)
        if target_layer_name is None:
            layer_names = self.DEFAULT_TARGET_LAYERS
        else:
            layer_names = [n.strip() for n in target_layer_name.split(",")]
        self.target_layers = self._resolve_target_layers(layer_names)
        print(f"[目标层] {', '.join(layer_names)}")
        self.input_size = 640
        self.class_names = self.yolo.names

    def _resolve_target_layers(self, layer_names):
        named_modules = dict(self.wrapper.model.named_modules())
        layers = []
        for name in layer_names:
            if name in named_modules:
                layers.append(named_modules[name])
            else:
                try:
                    idx = int(name.split(".")[-1]) if "." in name else int(name)
                    layers.append(self.wrapper.model[idx])
                except (ValueError, IndexError, TypeError):
                    print(f"[警告] 找不到层 '{name}',已跳过")
        if not layers:
            raise ValueError(f"无法解析任何目标层: {layer_names}")
        return layers

    def detect(self, image_bgr, conf=0.25, iou=0.45):
        results = self.yolo.predict(image_bgr, conf=conf, iou=iou,
                                     device=self.device, verbose=False)
        return results[0]

    def _pick_target_layer(self, image_bgr, class_idx):
        import torch
        input_tensor = self._preprocess(image_bgr)
        with torch.no_grad():
            out = self.wrapper.model(input_tensor)
            raw_output = out[0] if isinstance(out, (list, tuple)) else out
            cls_scores = raw_output[0, 4:, :]
            max_cell = cls_scores[class_idx].argmax().item()
        named = dict(self.wrapper.model.named_modules())
        if max_cell < 6400:
            return [named["model.22.cv3.0"]]
        elif max_cell < 8000:
            return [named["model.22.cv3.1"]]
        else:
            return [named["model.22.cv3.2"]]

    def explain(self, image_bgr, class_idx, cam_type="gradcam"):
        import cv2
        from pytorch_grad_cam import GradCAM, GradCAMPlusPlus
        from pytorch_grad_cam.utils.model_targets import ClassifierOutputTarget

        input_tensor = self._preprocess(image_bgr)
        target_layers = self._pick_target_layer(image_bgr, class_idx)
        cam_cls = {"gradcam": GradCAM, "gradcampp": GradCAMPlusPlus}[cam_type]
        cam = cam_cls(model=self.wrapper, target_layers=target_layers)
        targets = [ClassifierOutputTarget(class_idx)]
        grayscale_cam = cam(input_tensor=input_tensor, targets=targets)
        cam_640 = grayscale_cam[0]

        h, w = image_bgr.shape[:2]
        scale = min(self.input_size / h, self.input_size / w)
        new_h, new_w = int(h * scale), int(w * scale)
        pad_top = (self.input_size - new_h) // 2
        pad_left = (self.input_size - new_w) // 2
        cam_cropped = cam_640[pad_top:pad_top + new_h, pad_left:pad_left + new_w]
        cam_resized = cv2.resize(cam_cropped, (w, h))
        return cam_resized

    def explain_detection(self, image_bgr, detection_idx=0, cam_type="gradcam", conf=0.3):
        result = self.detect(image_bgr, conf=conf)
        boxes = result.boxes
        if boxes is None or len(boxes) == 0:
            raise ValueError("未检测到任何目标")
        if detection_idx >= len(boxes):
            raise ValueError(f"检测索引 {detection_idx} 超出范围,共 {len(boxes)} 个目标")
        box = boxes[detection_idx]
        class_idx = int(box.cls.item())
        confidence = float(box.conf.item())
        class_name = self.class_names.get(class_idx, str(class_idx))
        bbox_raw = box.xyxy[0].cpu().numpy()
        cam_heatmap = self.explain(image_bgr, class_idx, cam_type)
        return {
            "cam": cam_heatmap, "bbox": bbox_raw,
            "class_name": class_name, "class_idx": class_idx,
            "confidence": confidence,
        }

    def _preprocess(self, image_bgr):
        import cv2
        img = cv2.cvtColor(image_bgr, cv2.COLOR_BGR2RGB)
        h, w = img.shape[:2]
        scale = min(self.input_size / h, self.input_size / w)
        new_h, new_w = int(h * scale), int(w * scale)
        img = cv2.resize(img, (new_w, new_h))
        pad_h = self.input_size - new_h
        pad_w = self.input_size - new_w
        pad_top, pad_bottom = pad_h // 2, pad_h - pad_h // 2
        pad_left, pad_right = pad_w // 2, pad_w - pad_w // 2
        img = cv2.copyMakeBorder(
            img, pad_top, pad_bottom, pad_left, pad_right,
            cv2.BORDER_CONSTANT, value=(114, 114, 114))
        tensor = torch.from_numpy(img).permute(2, 0, 1).float() / 255.0
        tensor = tensor.unsqueeze(0).to(self.device)
        tensor.requires_grad_(True)
        return tensor
main.py
python
#!/usr/bin/env python3
import argparse, os, sys, time
from pathlib import Path
os.environ["QT_LOGGING_RULES"] = "*.debug=false;qt.qpa.fonts=false"
import cv2, numpy as np
sys.path.insert(0, str(Path(__file__).parent.parent))
from yolo_cam.yolo_wrapper import YOLOCAMExplainer
from yolo_cam.visualize import (
    overlay_heatmap, create_side_by_side, draw_detection_box,
)


def parse_args():
    parser = argparse.ArgumentParser(description="YOLOv8 CAM --- Grad-CAM / Grad-CAM++")
    parser.add_argument("--input", "-i", type=str, help="输入图片或视频路径")
    parser.add_argument("--output", "-o", type=str, default=None,
                        help="输出文件路径 (不指定则显示窗口)")
    parser.add_argument("--model", "-m", type=str, default="yolov8n.pt",
                        help="YOLO 模型路径")
    parser.add_argument("--device", "-d", type=str, default="cuda")
    parser.add_argument("--cam", "-c", type=str, default="gradcam",
                        choices=["gradcam", "gradcampp"])
    parser.add_argument("--conf", type=float, default=0.3, help="置信度阈值")
    parser.add_argument("--det-idx", type=int, default=None, help="指定检测框索引")
    parser.add_argument("--video-step", type=int, default=1, help="跳帧步长")
    parser.add_argument("--alpha", "-a", type=float, default=0.45, help="热力图透明度")
    return parser.parse_args()


def process_video(args, explainer):
    KEY_SPACE, KEY_LEFT, KEY_RIGHT = 32, 81, 83
    KEY_Q, KEY_ESC, KEY_TAB = 113, 27, 9
    SEEK_STEP = 1

    cap = cv2.VideoCapture(args.input)
    fps = cap.get(cv2.CAP_PROP_FPS)
    total_frames = int(cap.get(cv2.CAP_PROP_FRAME_COUNT))
    width = int(cap.get(cv2.CAP_PROP_FRAME_WIDTH))
    height = int(cap.get(cv2.CAP_PROP_FRAME_HEIGHT))
    print(f"[视频] {args.input}  {width}x{height}  {fps:.1f}fps  {total_frames}帧")
    print(f"  控制: Space=暂停  <-/->=跳帧  Tab=切类别  Q=退出")

    WINDOW_NAME = "YOLOv8 CAM"
    cv2.namedWindow(WINDOW_NAME, cv2.WINDOW_NORMAL | cv2.WINDOW_KEEPRATIO)
    init_w = width * 2
    init_h = height + 30
    scale = min(1.0, 1600 / init_w, 900 / init_h)
    cv2.resizeWindow(WINDOW_NAME, int(init_w * scale), int(init_h * scale))
    out_fps = fps
    writer = None
    writer_initialized = False
    paused = False
    frame_idx = 0
    processed = 0
    cam_cache = None
    cam_lock_class = None
    output_frame = None

    def _compute_cam(image, f_idx):
        result = explainer.detect(image, conf=args.conf)
        boxes = result.boxes
        all_dets = []
        if boxes is not None and len(boxes) > 0:
            for i in range(len(boxes)):
                box = boxes[i]
                cls_name = explainer.class_names.get(int(box.cls.item()), "?")
                all_dets.append((
                    box.xyxy[0].cpu().numpy(), cls_name, float(box.conf.item()),
                ))
            if cam_lock_class is not None:
                target_idx = next(
                    (i for i, (_, n, _) in enumerate(all_dets) if n == cam_lock_class), 0)
            elif args.det_idx is not None:
                target_idx = min(args.det_idx, len(boxes) - 1)
            else:
                target_idx = 0
            try:
                r = explainer.explain_detection(
                    image, detection_idx=target_idx,
                    cam_type=args.cam, conf=args.conf)
                cam_info = (r["cam"], r["bbox"], r["class_name"], r["confidence"])
            except Exception as e:
                print(f"  帧 {f_idx} CAM 失败: {e}")
                cam_info = None
            return all_dets, cam_info
        return [], None

    def _cls_color(name):
        COLORS = [(0,255,0),(0,0,255),(255,0,0),(0,255,255),(255,0,255),(255,255,0)]
        return COLORS[hash(name) % len(COLORS)]

    def _render(image, all_dets, cam_info):
        result_frame = image.copy()
        if cam_info is not None:
            result_frame = overlay_heatmap(result_frame, cam_info[0], alpha=args.alpha)
        for bbox, name, conf in all_dets:
            result_frame = draw_detection_box(result_frame, bbox, name, conf,
                                               color=_cls_color(name))
        left = image.copy()
        for bbox, name, conf in all_dets:
            left = draw_detection_box(left, bbox, name, conf, color=_cls_color(name))
        cam_label = args.cam.upper()
        if cam_info:
            cam_label += f" -> {cam_info[2]}"
        return create_side_by_side(
            left, result_frame,
            title_left=f"Detections ({len(all_dets)})",
            title_right=cam_label)

    def _draw_osd(img, f_idx, all_dets, cam_info, elapsed=0.0, is_paused=False):
        fps_str = f"FPS: {1/elapsed:.1f}" if elapsed > 0 else ""
        cv2.putText(img, f"Frame {f_idx}/{total_frames} | {fps_str}",
                    (10, img.shape[0]-30), cv2.FONT_HERSHEY_SIMPLEX, 0.5, (0,255,0), 1)
        if all_dets and cam_info:
            cv2.putText(img, f"CAM: {cam_info[2]}", (10, img.shape[0]-10),
                        cv2.FONT_HERSHEY_SIMPLEX, 0.4, (0,255,255), 1)
        hint = "[Space]Pause  [<-/->]Seek  [Tab]Det  [Q]Quit"
        cv2.putText(img, hint, (img.shape[1]-340, img.shape[0]-10),
                    cv2.FONT_HERSHEY_SIMPLEX, 0.45, (200,200,200), 1)
        if is_paused:
            overlay = img.copy()
            cv2.rectangle(overlay, (0,0), (img.shape[1], img.shape[0]), (0,0,0), -1)
            img[:] = cv2.addWeighted(img, 0.6, overlay, 0.4, 0)
            cv2.putText(img, "|| PAUSED", (img.shape[1]//2-120, img.shape[0]//2),
                        cv2.FONT_HERSHEY_SIMPLEX, 1.5, (0,255,255), 3)

    def _seek_to(cap, target_idx, total):
        target = max(1, min(target_idx, total))
        cap.set(cv2.CAP_PROP_POS_FRAMES, target - 1)
        return target - 1

    try:
        while True:
            if not paused:
                ret, frame = cap.read()
                if not ret:
                    break
                frame_idx += 1
                if (frame_idx - 1) % args.video_step != 0:
                    continue
                processed += 1
                t0 = time.time()
                if cam_cache and cam_cache[0] == frame_idx:
                    all_dets, cam_info = cam_cache[1], cam_cache[2]
                else:
                    all_dets, cam_info = _compute_cam(frame, frame_idx)
                    cam_cache = (frame_idx, all_dets, cam_info)
                output_frame = _render(frame, all_dets, cam_info)
                _draw_osd(output_frame, frame_idx, all_dets, cam_info,
                         time.time()-t0, paused)

            if args.output and output_frame is not None:
                if not writer_initialized:
                    fourcc = cv2.VideoWriter_fourcc(*"mp4v")
                    h, w = output_frame.shape[:2]
                    writer = cv2.VideoWriter(args.output, fourcc, out_fps, (w, h))
                    writer_initialized = True
                writer.write(output_frame)

            if output_frame is not None:
                cv2.imshow(WINDOW_NAME, output_frame)

            wait_ms = 1 if not paused else 0
            key = cv2.waitKey(wait_ms) & 0xFF

            if cv2.getWindowProperty(WINDOW_NAME, cv2.WND_PROP_VISIBLE) < 1:
                break
            if key in (KEY_Q, KEY_ESC):
                break
            elif key == KEY_SPACE:
                paused = not paused
            elif key == KEY_TAB and output_frame is not None and all_dets:
                classes = list(dict.fromkeys(name for _, name, _ in all_dets))
                if cam_lock_class is None or cam_lock_class not in classes:
                    cam_lock_class = classes[0]
                else:
                    idx = classes.index(cam_lock_class)
                    cam_lock_class = classes[(idx+1) % len(classes)]
                cam_cache = None
                print(f"  CAM 锁定类别: {cam_lock_class}")
            elif key in (ord('1'),ord('2'),ord('3'),ord('4'),ord('5'),
                         ord('6'),ord('7'),ord('8'),ord('9')):
                if all_dets:
                    classes = list(dict.fromkeys(name for _, name, _ in all_dets))
                    n = key - ord('1')
                    if n < len(classes):
                        cam_lock_class = classes[n]
                        cam_cache = None
            elif key == ord('0'):
                cam_lock_class = None
                cam_cache = None
            elif key == KEY_LEFT:
                frame_idx = _seek_to(cap, frame_idx - SEEK_STEP, total_frames)
                cam_cache = None
                ret, frame = cap.read()
                if ret:
                    frame_idx += 1
                    all_dets, cam_info = _compute_cam(frame, frame_idx)
                    cam_cache = (frame_idx, all_dets, cam_info)
                    output_frame = _render(frame, all_dets, cam_info)
                    _draw_osd(output_frame, frame_idx, all_dets, cam_info, 0, False)
            elif key == KEY_RIGHT:
                frame_idx = _seek_to(cap, frame_idx + SEEK_STEP, total_frames)
                cam_cache = None
                ret, frame = cap.read()
                if ret:
                    frame_idx += 1
                    all_dets, cam_info = _compute_cam(frame, frame_idx)
                    cam_cache = (frame_idx, all_dets, cam_info)
                    output_frame = _render(frame, all_dets, cam_info)
                    _draw_osd(output_frame, frame_idx, all_dets, cam_info, 0, False)

            if processed % 10 == 0 and not paused:
                print(f"  已处理 {processed} 帧 (第 {frame_idx}/{total_frames} 帧)")
    finally:
        cap.release()
        if writer:
            writer.release()
        cv2.destroyAllWindows()
    print(f"  完成! 共处理 {processed} 帧")


def main():
    args = parse_args()
    if not args.input or not Path(args.input).exists():
        print("[错误] 请指定 --input")
        return
    explainer = YOLOCAMExplainer(
        model_path=args.model, target_layer_name=None, device=args.device)
    ext = Path(args.input).suffix.lower()
    if ext in {".mp4", ".avi", ".mov", ".mkv"}:
        process_video(args, explainer)
    else:
        image_bgr = cv2.imread(args.input)
        result = explainer.detect(image_bgr, conf=args.conf)
        boxes = result.boxes
        print(f"检测到 {len(boxes) if boxes else 0} 个目标")
        if boxes and len(boxes) > 0:
            detection_cams = []
            for idx in range(len(boxes)):
                cam_result = explainer.explain_detection(
                    image_bgr, detection_idx=idx,
                    cam_type=args.cam, conf=args.conf)
                detection_cams.append(cam_result)
                print(f"  [{idx}] {cam_result['class_name']} conf={cam_result['confidence']:.3f}")
            if len(detection_cams) == 1:
                det = detection_cams[0]
                result_img = overlay_heatmap(image_bgr.copy(), det["cam"], alpha=args.alpha)
                result_img = draw_detection_box(
                    result_img, det["bbox"], det["class_name"], det["confidence"])
                output = create_side_by_side(
                    image_bgr, result_img,
                    title_left="Original",
                    title_right=f"{args.cam.upper()} -- {det['class_name']}")
            else:
                from yolo_cam.visualize import draw_all_detections_cam
                output = draw_all_detections_cam(image_bgr, detection_cams, alpha=args.alpha)
            if args.output:
                cv2.imwrite(args.output, output)
                print(f"[保存] {args.output}")
            else:
                cv2.imshow(f"YOLOv8 {args.cam.upper()}", output)
                cv2.waitKey(0)
                cv2.destroyAllWindows()


if __name__ == "__main__":
    main()
visualize.py
python
import cv2
import numpy as np


def overlay_heatmap(image_bgr, cam, alpha=0.45, colormap=cv2.COLORMAP_JET):
    h, w = image_bgr.shape[:2]
    cam_resized = cv2.resize(cam, (w, h))
    vmin, vmax = np.percentile(cam_resized, [2, 98])
    if vmax > vmin:
        cam_resized = np.clip((cam_resized - vmin) / (vmax - vmin), 0, 1)
    heatmap = cv2.applyColorMap(np.uint8(255 * cam_resized), colormap)
    return cv2.addWeighted(image_bgr, 1 - alpha, heatmap, alpha, 0)


def draw_detection_box(image_bgr, bbox, class_name, confidence,
                       color=(0, 255, 0), thickness=2):
    x1, y1, x2, y2 = map(int, bbox)
    cv2.rectangle(image_bgr, (x1, y1), (x2, y2), color, thickness)
    label = f"{class_name} {confidence:.2f}"
    (lw, lh), baseline = cv2.getTextSize(label, cv2.FONT_HERSHEY_SIMPLEX, 0.5, 2)
    cv2.rectangle(image_bgr, (x1, y1 - lh - baseline - 5), (x1 + lw, y1), color, -1)
    cv2.putText(image_bgr, label, (x1, y1 - baseline - 3),
                cv2.FONT_HERSHEY_SIMPLEX, 0.5, (255, 255, 255), 1)
    return image_bgr


def create_side_by_side(original, result, title_left="Original",
                        title_right="CAM Heatmap", gap_width=10, title_height=30):
    h1, w1 = original.shape[:2]
    h2, w2 = result.shape[:2]
    max_h = max(h1, h2)
    canvas = np.ones((max_h + title_height, w1 + gap_width + w2, 3), dtype=np.uint8) * 240
    cv2.putText(canvas, title_left, (10, 22), cv2.FONT_HERSHEY_SIMPLEX, 0.7, (0, 0, 0), 2)
    cv2.putText(canvas, title_right, (w1 + gap_width + 10, 22),
                cv2.FONT_HERSHEY_SIMPLEX, 0.7, (0, 0, 0), 2)
    canvas[title_height:title_height + h1, :w1] = original
    canvas[title_height:title_height + h2, w1 + gap_width:w1 + gap_width + w2] = result
    return canvas


def draw_all_detections_cam(image_bgr, detection_results, alpha=0.4):
    h, w = image_bgr.shape[:2]
    result = image_bgr.copy()
    colors = [(0,255,0),(0,0,255),(255,0,0),(0,255,255),(255,0,255),(255,255,0)]
    for i, det in enumerate(detection_results):
        color = colors[i % len(colors)]
        cam_resized = cv2.resize(det["cam"], (w, h))
        heatmap = cv2.applyColorMap(np.uint8(255 * cam_resized), cv2.COLORMAP_JET)
        result = cv2.addWeighted(result, 1 - alpha * 0.5, heatmap, alpha * 0.5, 0)
        x1, y1, x2, y2 = map(int, det["bbox"])
        cv2.rectangle(result, (x1, y1), (x2, y2), color, 2)
        cv2.putText(result, f"{det['class_name']} {det['confidence']:.2f}",
                    (x1, max(y1 - 5, 15)), cv2.FONT_HERSHEY_SIMPLEX, 0.5, color, 2)
    return result
5 实战中的关键踩坑
5-1 Letterbox 偏移问题
| 现象 | 原因 | 修复 |
|---|---|---|
| 热力图整体偏离检测框 | CAM 在 640×640(含黑边)上生成,resize 到原图时黑边被压缩 | 裁掉 padding 后再 resize(见 4-4-3 节) |
5-2 P3 分支梯度消失
| 现象 | 原因 | 修复 |
|---|---|---|
| 某些类别的 CAM 全黑(热力值为 0) | P3 小目标分支(stride=8)梯度太稀疏,经过多层反向传播后大部分通道梯度为 0 | 使用 Detect 头内部 cv3 层(更靠近输出)替代 C2f 层(见 4-4-2 节) |
5-3 Grad-CAM++ 反转现象
| 现象 | 原因 | 修复 |
|---|---|---|
| 框内热力值低于框外(全图热唯目标框冷) | Grad-CAM++ 计算 grad³ 时,P3 分支梯度符号翻转,导致权重反转 |
切回 gradcam(默认),或仅对 P4/P5 使用 gradcampp |
- 我们实测:同一个模型、同一帧,
table(P5 分支)用 Grad-CAM++ 正常,material(P3 分支)用 Grad-CAM++ 反转 - 结论:P3 用 Grad-CAM,P4/P5 可用 Grad-CAM++
- 项目默认使用
gradcam,稳定可靠
总结
- 本文从 CAM 的原始思想出发,推导了 Grad-CAM(一阶梯度加权)和 Grad-CAM++(高阶梯度逐像素加权)的数学原理
- 给出了 YOLOv8 + CAM 完整部署方案 ,包括:
- YOLO 检测输出到分类格式的包装适配 (
YOLOCAMWrapper) - 三尺度检测分支的动态层选择 (
_pick_target_layer) - Letterbox padding 的裁剪对齐(消除热力图偏移)
- 百分位对比度增强(消除全图一色)
- 视频播放控制(空格暂停、方向键逐帧、Tab 类别锁定)
- YOLO 检测输出到分类格式的包装适配 (
核心要点回顾:
- CAM = 权重 × 特征图。Grad-CAM 用梯度做权重,Grad-CAM++ 用高阶梯度逐像素做权重
- YOLO 适配的关键 :
[B,84,8400]→cls_scores.amax(dim=2)→[B,Nc],伪装成分类器- 对齐的关键:CAM 在 640×640 上生成 → 裁掉 letterbox padding → resize 到原图尺寸
- 稳定性的关键:单层目标层 + Grad-CAM(Grad-CAM++ 在 P3 分支可能反转)
- 完整代码在
yolo_cam/目录下,requirements.txt+run.sh可以直接复制跑 - 如有错误,欢迎指出!
- 感谢观看!