部署 ingress-nginx
官网:
Welcome - Ingress-Nginx Controller
1. 下载镜像
docker pull registry.k8s.io/ingress-nginx/controller:v1.13.3

docker pull registry.k8s.io/ingress-nginx/kube-webhook-certgen:v1.6.3
2. 上传到私有仓库
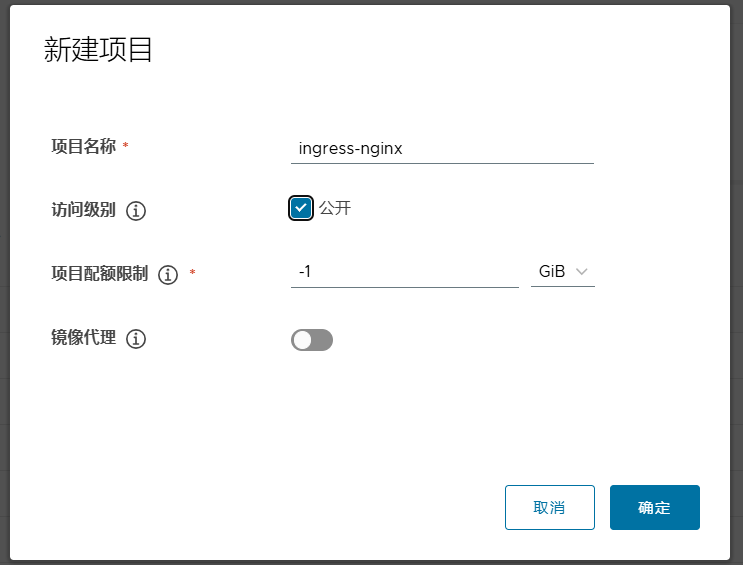
修改镜像标签:
docker images | grep ingress-nginx | awk '{print $1":"$2}' \
| awk -F/ '{system("docker tag "$0" reg.westos.org/ingress-nginx/"$3)}'
推送:
docker images | grep reg.westos.org/ingress-nginx \
| awk '{system("docker push "$1":"$2)}'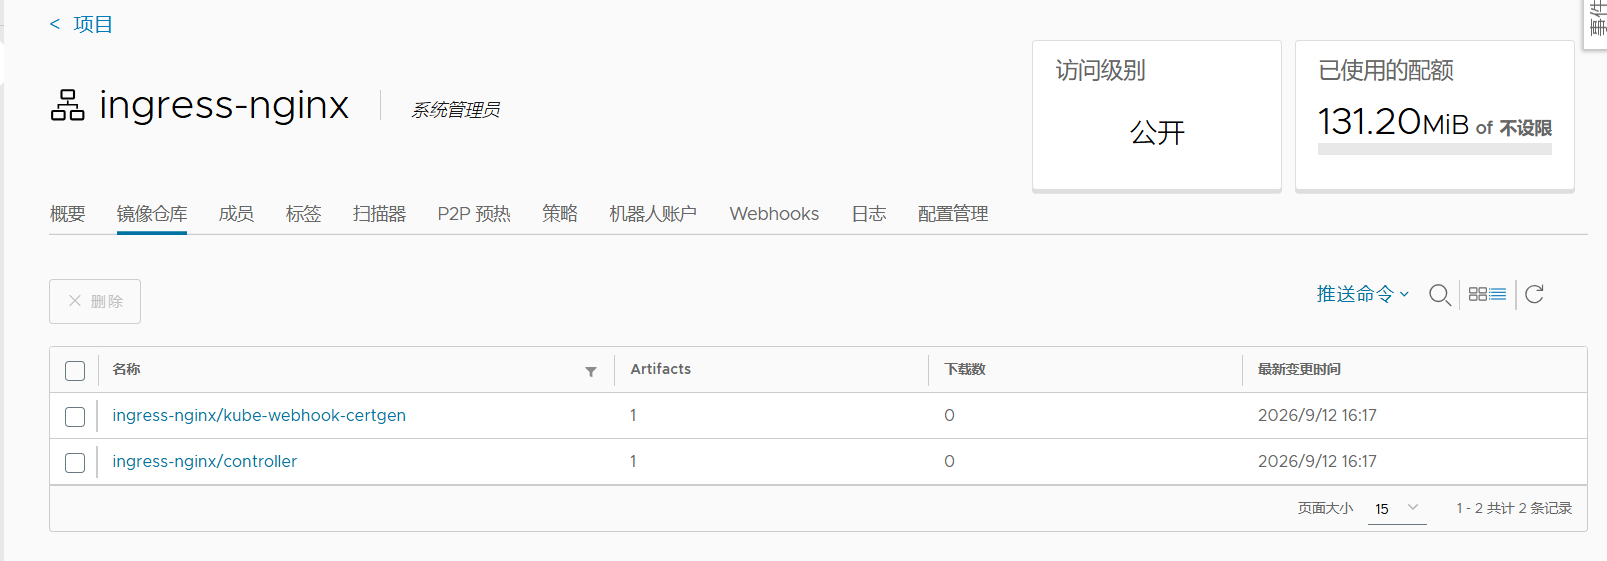
3. 下载部署文件
wget https://raw.githubusercontent.com/kubernetes/ingress-nginx/controller-v1.13.3/deploy/static/provider/baremetal/deploy.yaml4. 修改镜像地址
修改 deploy.yaml
将官方镜像:
registry.k8s.io/ingress-nginx/controller:v1.13.3修改为:
reg.westos.org/ingress-nginx/controller:v1.13.3两个 webhook 镜像:
registry.k8s.io/ingress-nginx/kube-webhook-certgen:v1.6.3修改为:
reg.westos.org/ingress-nginx/kube-webhook-certgen:v1.6.3共三处。
5. 部署 ingress-nginx
kubectl apply -f deploy.yaml查看状态:
kubectl -n ingress-nginx get pod,svc,deployment示例:
NAME                         READY   STATUS
ingress-nginx-controller     1/1     Running
默认访问方式
裸机环境部署时,默认 Service 类型:
kubectl get svc -n ingress-nginx通常为:
TYPE: NodePort访问方式:
http://NodeIP:NodePort例如:
http://192.168.150.101:30080Ingress 暴露方式
方式一:LoadBalancer + ingress-nginx
适用于:
- 云平台环境
- 裸金属环境配合 MetalLB
修改 Service 类型:
kubectl -n ingress-nginx edit svc ingress-nginx-controller修改:
type: LoadBalancer查看:
kubectl -n ingress-nginx get svc示例:
NAME                       TYPE           EXTERNAL-IP
ingress-nginx-controller   LoadBalancer   192.168.36.101
访问:
http://192.168.36.101特点:
优点:
- 架构简单
- 支持高可用
缺点:
- 多一层 Service 转发
- 性能略有损耗
方式二:DaemonSet + hostNetwork
适用于:
- 裸金属环境
- 对性能要求较高场景
特点:
Ingress Controller 直接监听节点网络端口。
请求链路:
客户端
  ↓
节点IP:80/443
  ↓
Ingress Controller
  ↓
Service
  ↓
Pod
修改部署文件:
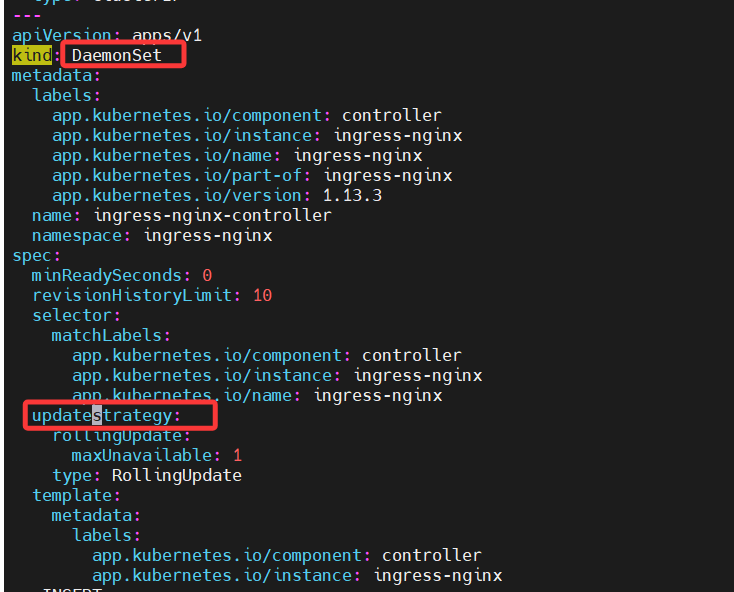
updateStrategy
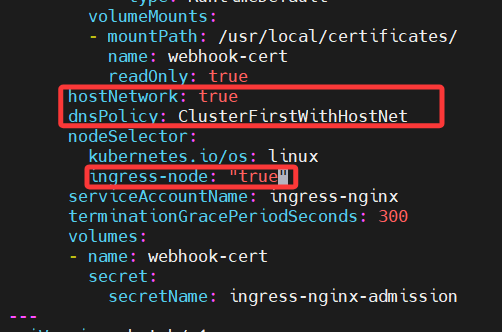
参数解释:
kind: DaemonSet #使用DaemonSet控制器
updateStrategy #更新策略
hostNetwork: true # 使用主机网络
dnsPolicy: ClusterFirstWithHostNet # 优先集群 DNS(内部域名),再用节点 DNS ,设置 "hostNetwork: true "时是必须要配置的。
nodeSelector: #选择专用节点
给节点添加标签:
kubectl label node k8s-worker-01 ingress-node=true重新部署:
kubectl apply -f deploy.yaml查看:
kubectl -n ingress-nginx get pod -o wide如果 Pod IP 与节点 IP 一致,说明使用 hostNetwork。

基于域名的虚拟主机
创建 Ingress
apiVersion: networking.k8s.io/v1
kind: Ingress

metadata:
  name: ingress-virtual-host

spec:
  ingressClassName: nginx

  rules:
  - host: web.example.com
    http:
      paths:
      - path: /
        pathType: Prefix

        backend:
          service:
            name: web-service
            port:
              number: 80
创建:
kubectl apply -f ingress-virtual-host.yml查看:
kubectl get ingress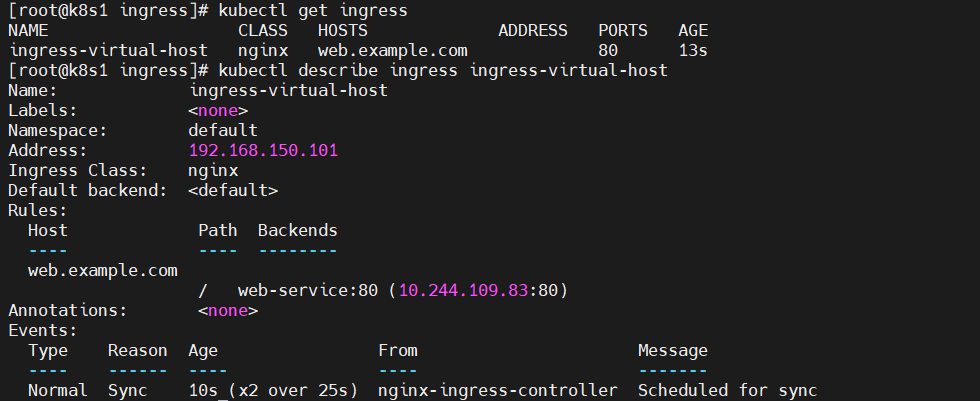
测试前需要配置解析:
192.168.150.240 web.example.com访问:
curl web.example.com多域名访问
[root@docker1 harbor]# docker pull yakexi007/myapp:v1
[root@docker1 harbor]# docker tag yakexi007/myapp:v2 reg.westos.org/library/myapp:v2
[root@docker1 harbor]# docker push reg.westos.org/library/myapp:v2
创建两个 Web 服务:
web1.example.com  ---> web-v1 Service ---> v1 Pod

web2.example.com  ---> web-v2 Service ---> v2 Pod
创建测试服务
kubectl create -f deploy-web1.yml
# cat deploy-web1.yml
apiVersion: "v1"
kind: "Pod"
metadata:
  name: "web1"
  labels:
    app: "web1"
spec:
  containers:
  - name: "web1"
    image: "reg.westos.org/library/myapp:v1"
    ports:
    - containerPort: 80

---
apiVersion: v1
kind: Service
metadata:
  labels:
    app: web-v1
  name: web-v1
spec:
  ports:
  - port: 80
    protocol: TCP
    targetPort: 80
  selector:
    app: web1
  type: ClusterIP

# cat deploy-web2.yml
apiVersion: "v1"
kind: "Pod"
metadata:
  name: "web2"
  labels:
    app: "web2"
spec:
  containers:
  - name: "web2"
    image: "reg.westos.org/library/myapp:v2"
    ports:
    - containerPort: 80

---
apiVersion: v1
kind: Service
metadata:
  labels:
    app: web-v2
  name: web-v2
spec:
  ports:
  - port: 80
    protocol: TCP
    targetPort: 80
  selector:
    app: web2
  type: ClusterIP
Ingress:
# cat ingress-virtual-host.yml
apiVersion: networking.k8s.io/v1
kind: Ingress
metadata:
  name: ingress-virtual-host
spec:
  ingressClassName: nginx
  rules:
  - host: web1.example.com
    http:
      paths:
      - path: /
        pathType: Prefix
        backend:
          service:
            name: web-v1
            port:
              number: 80

  - host: web2.example.com
    http:
      paths:
      - path: /
        pathType: Prefix
        backend:
          service:
            name: web-v2
            port:
              number: 80

# kubectl create -f ingress-virtual-host.yml
测试:
curl web1.example.com

Hello MyApp | Version: v1


curl web2.example.com

Hello MyApp | Version: v2
基于路径访问
不同 URL 转发到不同 Service。
例如:
web.example.com/v1  ---> web-v1

web.example.com/v2  ---> web-v2

kubectl create -f ingress-virtual-path.yml


# cat ingress-virtual-path.yml
apiVersion: networking.k8s.io/v1
kind: Ingress
metadata:
  name: ingress-virtual-path
  annotations:
    nginx.ingress.kubernetes.io/rewrite-target: /
spec:
  ingressClassName: nginx
  rules:
  - host: web.example.com
    http:
      paths:
      - path: /v1
        pathType: Prefix
        backend:
          service:
            name: web-v1
            port:
              number: 80

      - path: /v2
        pathType: Prefix
        backend:
          service:
            name: web-v2
            port:
              number: 80
查看ingress资源
# kubectl get ingress

# kubectl describe ingress ingress-virtual-path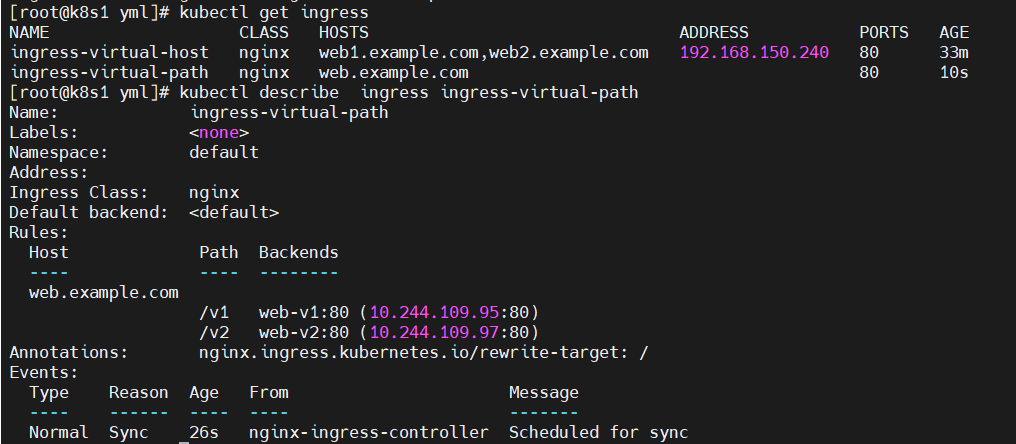
访问:
curl web.example.com/v1

Hello MyApp | Version: v1


curl web.example.com/v2

Hello MyApp | Version: v2
总结
Ingress 提供 Kubernetes 七层流量管理能力:
| 功能 | 作用 |
|---|---|
| 域名转发 | 不同域名访问不同服务 |
| 路径转发 | 不同 URL 访问不同服务 |
| TLS | HTTPS 加密 |
| 认证 | Basic Auth 等访问控制 |
| 灰度发布 | 按比例分配流量 |
| 负载均衡 | 自动转发到后端 Pod |
Default Backend
---
apiVersion: v1
kind: Service
metadata:
  name: nginx-errors
  labels:
    app.kubernetes.io/name: nginx-errors
    app.kubernetes.io/part-of: ingress-nginx
spec:
  selector:
    app.kubernetes.io/name: nginx-errors
    app.kubernetes.io/part-of: ingress-nginx
  ports:
  - port: 80
    targetPort: 8080
    name: http
---
apiVersion: v1
kind: ConfigMap
metadata:
  name: custom-error-pages
data:
  404: |
    <!DOCTYPE html>
    <html>
      <head><title>PAGE NOT FOUND</title></head>
      <body>PAGE NOT FOUND</body>
    </html>
  503: |
    <!DOCTYPE html>
    <html>
      <head><title>CUSTOM SERVICE UNAVAILABLE</title></head>
      <body>CUSTOM SERVICE UNAVAILABLE</body>
    </html>
---
apiVersion: apps/v1
kind: Deployment
metadata:
  name: nginx-errors
  labels:
    app.kubernetes.io/name: nginx-errors
    app.kubernetes.io/part-of: ingress-nginx
spec:
  replicas: 1
  selector:
    matchLabels:
      app.kubernetes.io/name: nginx-errors
      app.kubernetes.io/part-of: ingress-nginx
  template:
    metadata:
      labels:
        app.kubernetes.io/name: nginx-errors
        app.kubernetes.io/part-of: ingress-nginx
    spec:
      containers:
      - name: nginx-error-server
        image: reg.westos.org/ingress-nginx/custom-error-pages:v1.2.4
        ports:
        - containerPort: 8080
        # Setting the environment variable DEBUG we can see the headers sent
        # by the ingress controller to the backend in the client response.
        env:
        - name: DEBUG
          value: "true"

        # Mounting custom error page from configMap
        volumeMounts:
        - name: custom-error-pages
          mountPath: /www

      # Mounting custom error page from configMap
      volumes:
      - name: custom-error-pages
        configMap:
          name: custom-error-pages
          items:
          - key: "404"
            path: "404.html"
          - key: "503"
            path: "503.html"
Ingress 默认情况下没有匹配到规则时,会返回默认 404 页面。
可以通过自定义 default backend 修改错误页面。
创建资源
# kubectl -n ingress-nginx create -f custom-default-backend.yml
查看
# kubectl -n ingress-nginx get pod,svc
修改 ingress-nginx-controller:
kubectl -n ingress-nginx edit ds ingress-nginx-controller添加:
- --default-backend-service=ingress-nginx/nginx-errors
# 指定默认后端服务(namespace/service)
部署:
kubectl -n ingress-nginx create -f custom-default-backend.yml查看:
kubectl -n ingress-nginx get pod,svcIngress 未匹配规则时会转发到 nginx-errors。
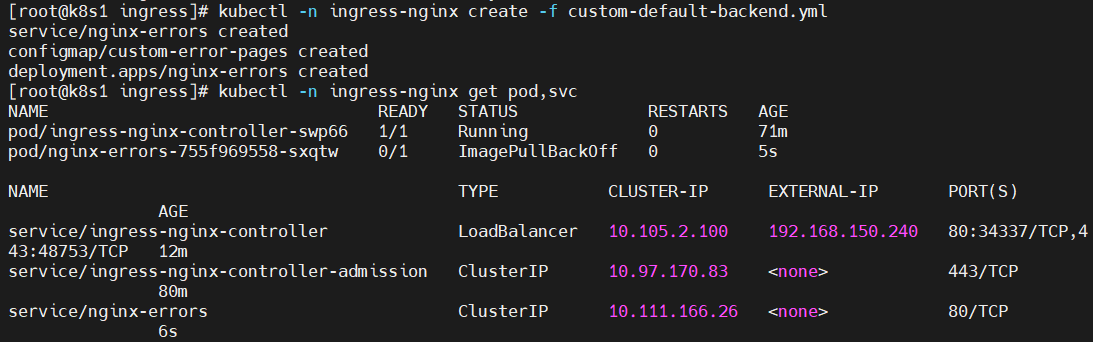
2. TLS 加密访问
Ingress 可以通过 Secret 保存证书,实现 HTTPS。
创建证书:
openssl req -x509 -sha256 -nodes \
-days 365 \
-newkey rsa:2048 \
-keyout tls.key \
-out tls.crt \
-subj "/CN=nginxsvc/O=nginxsvc"
创建 Secret:
kubectl create secret tls tls-secret \
--key tls.key \
--cert tls.crt
Ingress 配置:
创建ingress资源
# kubectl delete -f ingress-virtual-host.yml #删除之前的资源不然会冲突

# kubectl create -f ingress-web-tls.yml

# cat ingress-web-tls.yml
apiVersion: networking.k8s.io/v1
kind: Ingress
metadata:
  name: ingress-web-tls
spec:
  tls:
    - hosts:
      - web1.example.com
      - web2.example.com
      secretName: tls-secret
  ingressClassName: nginx
  rules:
  - host: web1.example.com
    http:
      paths:
      - path: /
        pathType: Prefix
        backend:
          service:
            name: web-v1
            port:
              number: 80

  - host: web2.example.com
    http:
      paths:
      - path: /
        pathType: Prefix
        backend:
          service:
            name: web-v2
            port:
              number: 80

强制重定向80到443
# curl -I web1.example.com
HTTP/1.1 308 Permanent Redirect
Date: Fri, 31 Oct 2025 15:56:56 GMT
Content-Type: text/html
Content-Length: 164
Connection: keep-alive
Location: https://web1.example.com
访问:
curl -k https://web1.example.com
curl -k https://web2.example.com
3. Basic Auth 认证
使用 htpasswd 创建用户:
yum install -y httpd-tools

htpasswd -c auth zyl
创建 Secret:
kubectl create secret generic basic-auth \
--from-file=auth

创建ingress
# kubectl delete -f ingress-web-tls.yml
# kubectl create -f ingress-web-tls-auth.yml
Ingress 添加认证:
# cat ingress-web-tls-auth.yml
apiVersion: networking.k8s.io/v1
kind: Ingress
metadata:
  name: ingress-web-tls-auth
  annotations:
    nginx.ingress.kubernetes.io/auth-type: basic
    nginx.ingress.kubernetes.io/auth-secret: basic-auth
    nginx.ingress.kubernetes.io/auth-realm: 'Authentication Required - wxh'
spec:
  tls:
    - hosts:
      - web1.example.com
      - web2.example.com
      secretName: tls-secret
  ingressClassName: nginx
  rules:
  - host: web1.example.com
    http:
      paths:
      - path: /
        pathType: Prefix
        backend:
          service:
            name: web-v1
            port:
              number: 80

  - host: web2.example.com
    http:
      paths:
      - path: /
        pathType: Prefix
        backend:
          service:
            name: web-v2
            port:
              number: 80

kubectl get ingress
kubectl describe ingress ingress-web-tls-auth
测试:
curl -u zyl:123456 -k https://web1.example.com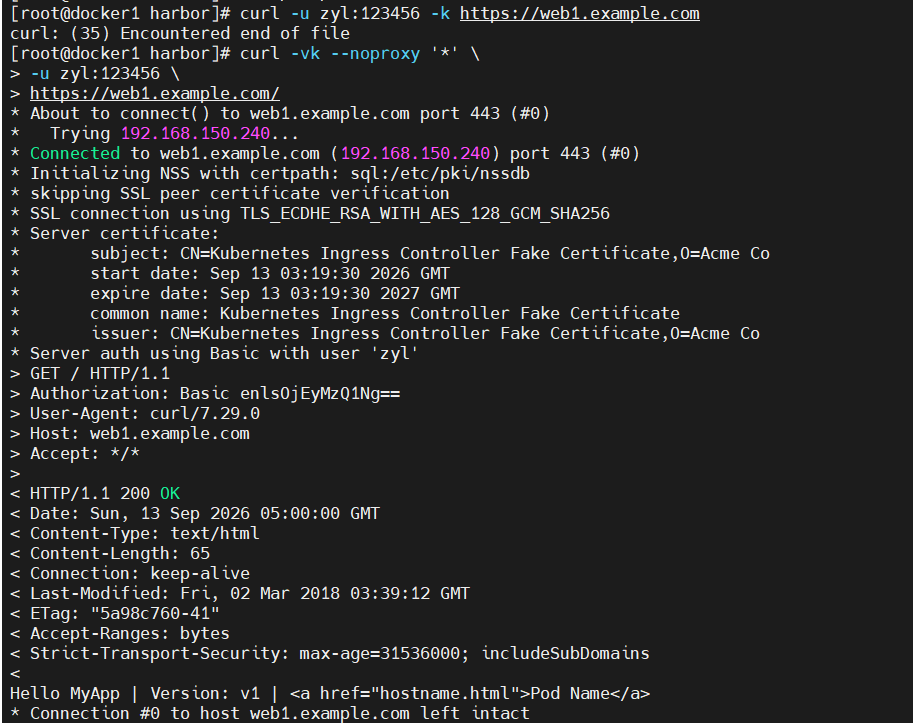
4. Rewrite 重定向
基于路径重写
# kubectl create -f ingress-rewrite-1.yml

# cat ingress-rewrite-1.yml
apiVersion: networking.k8s.io/v1
kind: Ingress
metadata:
  name: ingress-rewrite-1
  annotations:
    nginx.ingress.kubernetes.io/auth-type: basic
    nginx.ingress.kubernetes.io/auth-secret: basic-auth
    nginx.ingress.kubernetes.io/auth-realm: 'Authentication Required - wxh'
    nginx.ingress.kubernetes.io/app-root: /cgi-bin/action
spec:
  tls:
    - hosts:
      - web.example.com
      secretName: tls-secret
  ingressClassName: nginx
  rules:
  - host: web.example.com
    http:
      paths:
      - path: /
        pathType: Prefix
        backend:
          service:
            name: web-service
            port:
              number: 80
访问:
curl -u zyl:123456 -k -I https://web.example.com请求路径会被重写后转发给后端服务。
基于正则重写
开启正则:
annotations:

 nginx.ingress.kubernetes.io/use-regex: "true"

 nginx.ingress.kubernetes.io/rewrite-target: /$2
示例:
path: /testing(/|$)(.*)
pathType: ImplementationSpecific

# kubectl delete -f ingress-rewrite-1.yml
# kubectl create -f ingress-rewrite-2.yml
访问:
curl https://web.example.com/testing/cgi-bin/action会匹配正则并重写路径。
5. Canary 金丝雀发布
金丝雀发布:
先部署新版本,只分配少量流量测试。
优点:
- 降低新版本故障影响
- 可以逐步扩大流量
缺点:
- 发布周期较长
创建旧版本 Ingress
apiVersion: networking.k8s.io/v1

kind: Ingress

metadata:
  name: ingress-canary-v1

spec:
  ingressClassName: nginx

  rules:
  - host: myapp.example.com
    http:
      paths:
      - path: /
        pathType: Prefix
        backend:
          service:
            name: web-v1
            port:
              number: 80
创建新版本 Ingress
metadata:
  name: ingress-canary-v2

  annotations:

    nginx.ingress.kubernetes.io/canary: "true"

    nginx.ingress.kubernetes.io/canary-weight: "10"

    nginx.ingress.kubernetes.io/canary-weight-total: "100"
表示:
10% 流量访问 v2,90%访问 v1。
编写测试脚本
# cat ingress-canary.sh
#!/bin/bash

v1=0
v2=0

for (( i=0; i<100; i++))
do
    response=`curl -s myapp.example.com |grep -c v1` # 域名需要解析
    v1=`expr $v1 + $response`
    v2=`expr $v2 + 1 - $response`

done

echo "v1:$v1, v2:$v2"
测试:
sh ingress-canary.sh结果:
v1:90,v2:10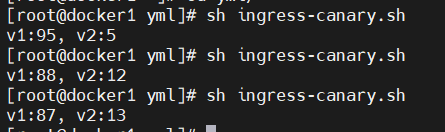
6. A/B 测试
A/B 测试根据请求信息决定流量方向。
常用方式:
- Header
- Cookie
Header 流量切分
Ingress:
# cat ingress-ab-header.yml
apiVersion: networking.k8s.io/v1
kind: Ingress
metadata:
  name: ingress-ab-header
  annotations:
    nginx.ingress.kubernetes.io/canary: "true"
    nginx.ingress.kubernetes.io/canary-by-header: stage
    nginx.ingress.kubernetes.io/canary-by-header-value: gray
spec:
  ingressClassName: nginx
  rules:
  - host: myapp.example.com
    http:
      paths:
      - pathType: Prefix
        path: /
        backend:
          service:
            name: web-v2
            port:
              number: 80
测试:
curl -H "stage:gray" myapp.example.com匹配 Header 进入 v2。

Cookie 流量切分
annotations:

 nginx.ingress.kubernetes.io/canary: "true"

 nginx.ingress.kubernetes.io/canary-by-cookie: user_from_sz
测试:
curl --cookie "user_from_sz=always" myapp.example.com进入 v2。

7. Multus 多网络插件
作用
Multus CNI 可以让一个 Pod 同时拥有多个网络接口。
默认:
Pod
 |
eth0
 |
默认CNI(Calico)
使用 Multus 后:
Pod
 |
eth0  主网络
 |
net1  附加网络
主要应用:
- 多网络隔离
- NFV
- 高性能计算
- 多租户环境
Multus 本身不提供网络,只负责调用其他 CNI 插件。
8. 部署 Multus
下载:
wget https://raw.githubusercontent.com/k8snetworkplumbingwg/multus-cni/master/deployments/multus-daemonset.yml拉取镜像:
docker pull ghcr.io/k8snetworkplumbingwg/multus-cni:snapshot上传私有仓库:
docker tag \
ghcr.io/k8snetworkplumbingwg/multus-cni:snapshot \
reg.westos.org/multus/multus-cni:snapshot

docker push reg.westos.org/multus/multus-cni:snapshot
修改镜像:
image:
 reg.westos.org/multus/multus-cni:snapshot
部署:
kubectl apply -f multus-daemonset.yml查看:
kubectl get pods -n kube-system -l app=multus9. 创建 Macvlan 网络
静态 IP 网络
apiVersion: k8s.cni.cncf.io/v1

kind: NetworkAttachmentDefinition

metadata:
  name: macvlan-static

spec:

  config: '{
    "cniVersion":"0.4.0",

    "type":"macvlan",

    "master":"eth0",

    "mode":"bridge",

    "ipam":{
      "type":"static",

      "addresses":[
        {
        "address":"192.168.36.71/24",
        "gateway":"192.168.36.2"
        }
      ]
    }
  }'
参数:
type: macvlan        # 使用macvlan插件
master: eth0         # 绑定物理网卡
mode: bridge         # 二层桥接模式
创建多网络接口 Pod
1. 创建静态 Macvlan 网络
先创建 NetworkAttachmentDefinition,用于定义 Pod 的额外网络。
# cat macvlan-static.yml
apiVersion: "k8s.cni.cncf.io/v1"
kind: NetworkAttachmentDefinition
metadata:
  name: macvlan-static
spec:
  config: '{
    "cniVersion": "0.4.0",
    "type": "macvlan",
    "master": "eth0",
    "mode": "bridge",
    "ipam": {
      "type": "static",
      "addresses": [{
        "address": "192.168.36.71/24",
        "gateway": "192.168.36.2"
      }]
    }
  }'
创建:
kubectl apply -f macvlan-static.yml注释:
type: macvlan
→ 使用 Macvlan 网络

master: eth0
→ 绑定主机的 eth0 网卡
# 实际环境中需要根据节点真实网卡名称修改

mode: bridge
→ 使用 Macvlan bridge 模式

ipam: static
→ 手动指定额外接口 IP
2. 创建多网络接口 Pod
# cat pod-web-multus-static.yml
apiVersion: "v1"
kind: Pod
metadata:
  name: "multus-web"
  labels:
    app: "multus"
  annotations:
    k8s.v1.cni.cncf.io/networks: macvlan-static
spec:
  containers:
  - name: "apache-frontend"
    image: "reg.westos.org/library/httpd:dns"
    ports:
    - containerPort: 80
创建 Pod:
kubectl create -f pod-web-multus-static.yml查看网络:
kubectl describe net-attach-def macvlan-static查看 Pod:
kubectl describe pod multus-web关键配置
annotations:
  k8s.v1.cni.cncf.io/networks: macvlan-static
表示:
给这个 Pod 增加
macvlan-static定义的额外网络接口。
因此 Pod 最终会有两个网络接口,例如:
eth0 → 默认 CNI 网络
net1 → Multus + Macvlan 网络
PDF 实验中 Pod 会获得两个 IP,并可以直接通过额外网络 IP 访问业务:
curl 192.168.36.713. 创建动态 IP 地址池
静态方式需要自己指定 IP,也可以让 Multus 从地址池自动分配。
# cat macvlan-pool.yml
apiVersion: "k8s.cni.cncf.io/v1"
kind: NetworkAttachmentDefinition
metadata:
  name: macvlan-pool    # 从网络名称
spec:
  config: '{
    "cniVersion": "0.4.0",    # 与 macvlan 插件支持的版本匹配
    "type": "macvlan",         # 网络插件类型
    "master": "eth0",          # 绑定主机物理网卡
    "mode": "bridge",           # macvlan bridge 模式
    "ipam": {
      "type": "host-local",     # 自动从本地地址池分配 IP
      "subnet": "192.168.36.0/24",   # Pod 使用的子网
      "rangeStart": "192.168.36.200", # IP 起始范围
      "rangeEnd": "192.168.36.216",   # IP 结束范围
      "gateway": "192.168.36.2"       # 网关
    }
  }'
创建:
kubectl apply -f macvlan-pool.yml和静态方式的区别
静态:
ipam = static
自己指定 192.168.36.71

动态:
ipam = host-local
从 192.168.36.200 ~ 192.168.36.216 自动分配
PDF 中给出的动态地址池配置就是这种方式。
4. 创建使用动态地址池的 Pod
# cat pod-web-multus-dynamic.yml
apiVersion: "v1"
kind: Pod
metadata:
  name: "multus-web2"
  labels:
    app: "multus"
  annotations:
    k8s.v1.cni.cncf.io/networks: macvlan-pool
spec:
  containers:
  - name: "apache-frontend"
    image: "reg.westos.org/library/httpd:dns"
    ports:
    - containerPort: 80
创建:
kubectl create -f pod-web-multus-dynamic.yml这里最关键的是:
annotations:
  k8s.v1.cni.cncf.io/networks: macvlan-pool
表示这个 Pod 使用前面创建的 macvlan-pool 作为额外网络。
这次不需要手动填写 Pod 的额外 IP,由:
host-local从:
192.168.36.200 ~ 192.168.36.216范围中进行分配。
网络策略 NetworkPolicy
1. NetworkPolicy 简介
NetworkPolicy 用于控制 Pod 的网络流量,主要分为:
Ingress → 控制进入 Pod 的流量
Egress  → 控制 Pod 发出的流量
NetworkPolicy 必须依赖支持它的网络插件才能真正生效,单独创建 NetworkPolicy 资源但没有对应控制器,是没有实际作用的。
默认情况下:
Pod 入站:允许
Pod 出站:允许
2. 限制 Pod 流量
创建策略:
kubectl apply -f networkpolicy-test1.yml查看:
kubectl describe networkpolicies networkpolicy-test1配置:
apiVersion: networking.k8s.io/v1
kind: NetworkPolicy

metadata:
  name: networkpolicy-test1
  namespace: default

spec:
  podSelector:
    matchLabels:
      app: web

  policyTypes:
  - Ingress

  ingress:
  - from:
    - podSelector:
        matchLabels:
          run: test
    ports:
    - protocol: TCP
      port: 80
配置含义
podSelector:
app=web表示被保护的目标 Pod。
from:
  podSelector:
run=test表示允许访问目标 Pod 的来源 Pod。
port: 80表示只允许访问目标 Pod 的 TCP 80 端口。
所以整体可以理解成:
run=test 的 Pod
       ↓
   TCP 80
       ↓
app=web 的 Pod
3. 创建测试 Pod
使用:
kubectl run demo --image reg.westos.org/library/busyboxplus -it --rm测试:
curl 10.244.141.240修改测试 Pod 的标签:
kubectl get pod demo --show-labels原来:
run=demo修改为策略要求的:
kubectl label pod demo run=test --overwrite再次查看:
kubectl get pod demo --show-labels变成:
run=test这样 demo 才满足 NetworkPolicy 的来源条件。
遇到的问题
测试 NetworkPolicy 时必须有:
测试 Pod
   ↓
目标 Pod
如果 test Namespace 里只有 demo 一个 Pod,那么不能很好地测试 Pod → Pod 的访问控制。
另外,实际使用 busybox 时遇到过:
curl: not found因为普通 BusyBox 不一定带 curl,可以使用:
wget -O- http://目标PodIP进行测试。
4. 限制 Namespace 流量
创建:
kubectl apply -f networkpolicy-test2.yml查看:
kubectl describe networkpolicies networkpolicy-test2配置核心:
apiVersion: networking.k8s.io/v1
kind: NetworkPolicy

metadata:
  name: networkpolicy-test2
  namespace: default

spec:
  podSelector:
    matchLabels:
      app: web1

  policyTypes:
  - Ingress

  ingress:
  - from:
    - namespaceSelector:
        matchLabels:
          project: test
      podSelector:
        matchLabels:
          run: test

    ports:
    - protocol: TCP
      port: 80
这里增加了:
namespaceSelector:
  matchLabels:
    project: test
表示来源 Pod 所在的 Namespace 必须满足:
project=test同时来源 Pod 还必须满足:
run=test所以:
Namespace:
project=test

      +

Pod:
run=test

      ↓

允许访问 app=web1 的 Pod
5. 创建 test Namespace
kubectl create ns test查看
kubectl get ns --show-labels test给 Namespace 添加标签:
kubectl label ns test project=test查看:
kubectl get ns --show-labels test最终:
test ... project=test这个标签就是 namespaceSelector 使用的匹配条件。
6. Harbor 私有仓库认证
因为测试 Pod 使用:
reg.westos.org/...私有 Harbor 镜像,所以需要镜像仓库认证。
创建 Secret:
kubectl create -f secret-registry.yml -n test查看:
kubectl get secret -n testSecret:
myregkey类型:
kubernetes.io/dockerconfigjson作用:
Pod
 ↓
拉取 Harbor 私有镜像
 ↓
myregkey 提供认证信息
遇到的报错
执行:
kubectl run demo --image reg.westos.org/library/busybox -n test出现:
authorization failed: no basic auth credentials就是镜像仓库认证没有正确配置。
而且 Secret 是 Namespace 隔离的:
default/myregkey不能直接给:
test/demo使用。
7. ServiceAccount 绑定镜像仓库 Secret
创建:
kubectl apply -f sa-registry.yml -n testsa-registry.yml:
apiVersion: v1
kind: ServiceAccount

metadata:
  name: default

imagePullSecrets:
- name: myregkey
作用:
test Namespace
      ↓
default ServiceAccount
      ↓
imagePullSecrets: myregkey
      ↓
Pod 拉取 Harbor 镜像
这样以后使用这个 ServiceAccount 创建 Pod 时,可以自动使用 myregkey。
8. 同时限制 Namespace 和 Pod
创建:
kubectl apply -f networkpolicy-test3.yml查看
kubectl describe networkpolicies networkpolicy-test3核心配置:
apiVersion: networking.k8s.io/v1
kind: NetworkPolicy

metadata:
  name: networkpolicy-test3
  namespace: default

spec:
  podSelector:
    matchLabels:
      app: web2

  policyTypes:
  - Ingress

  ingress:
  - from:
    - namespaceSelector:
        matchLabels:
          project: test
      podSelector:
        matchLabels:
          run: test

    ports:
    - protocol: TCP
      port: 80
这里的条件更加严格:
来源 Namespace
project=test
        +
来源 Pod
run=test
        ↓
访问目标
app=web2
        ↓
TCP 80
所以 强调:
Namespace 和 Pod 都要满足对应标签条件才能访问。
9. 测试 networkpolicy-test3
给 test Namespace 中的 demo 添加标签:
kubectl -n test label pod demo run=test --overwrite创建测试 Pod:
kubectl run demo \
  --image reg.westos.org/library/busyboxplus \
  -it --rm -n test
测试目标 web2:
curl 10.244.141.236PDF 中测试可以正常访问 web2。
10. 限制集群外部流量
创建:
kubectl apply -f networkpolicy-test4.yml核心配置:
apiVersion: networking.k8s.io/v1
kind: NetworkPolicy

metadata:
  name: networkpolicy-test4
  namespace: default

spec:
  podSelector:
    matchLabels:
      app: web

  policyTypes:
  - Ingress

  ingress:
  - from:
    - ipBlock:
        cidr: 192.168.0.0/16
        except:
        - 192.168.36.0/24

    ports:
    - protocol: TCP
      port: 80
IPBlock 含义
cidr: 192.168.0.0/16允许这个网段。
except:
- 192.168.36.0/24
但是排除 192.168.36.0/24。
也就是:
192.168.0.0/16
      ↓
排除 192.168.36.0/24
11. 测试外部访问
策略创建之前:
kubectl run demo \
  --image reg.westos.org/library/busyboxplus \
  -it --rm -n test
访问目标 Pod:
curl 10.244.141.240可以正常访问。
创建策略:
kubectl apply -f networkpolicy-test4.yml之后, 验证:
集群内部访问正常
集群外部访问受到限制
查看:
kubectl describe networkpolicies networkpolicy-test4主要看:
IPBlock
CIDR: 192.168.0.0/16
Except: 192.168.36.0/24
12. LoadBalancer + NetworkPolicy 测试
查看 LoadBalancer:
kubectl get svc web-service-lb环境:
web-service-lb LoadBalancer ... 192.168.36.100 80测试:
curl 192.168.36.100这里:
192.168.36.100是 LoadBalancer 的 EXTERNAL-IP。
13. 回收 NetworkPolicy
实验完成后:
kubectl delete networkpolicies --all