本文要求读者会基本的 kotlin 语法,阅读中请注意代码块里标⭐的地方,本文内容较长,快速浏览阅读大约需要20分钟。
一、前言
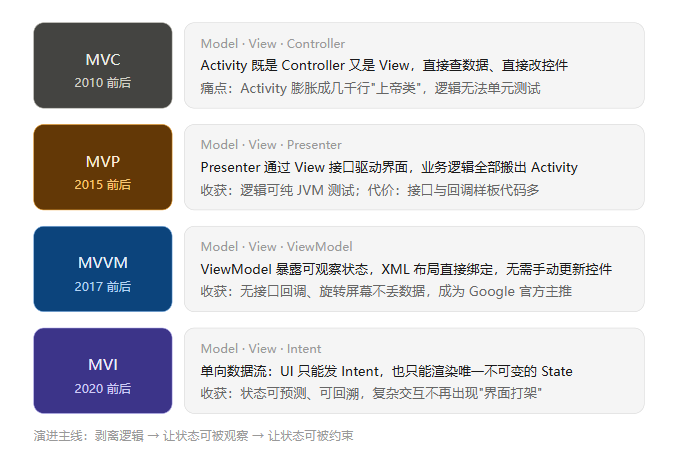
上面的图展示了 Android 架构的四次演进和每次架构解决的痛点,通过这张演进图我们来理解架构的本质 ------同一件事的四个答案,如何把业务逻辑 从界面代码里剥离干净,并且让二者之间的通信方式越来越可预测。
本文会利用一款天气 APP,分别展示 MVC → MVP → MVVM → MVI 四种架构写法的完整对照。同时为了方便更多朋友学习架构,在UI方面会继续使用传统的 XML 方式来完成,代码则使用 Kotlin 完成。
二、需求确认和项目结构
2.1 需求定义
开始写代码前,我们先约定本次实战项目【天气APP】做的功能点:四套代码会实现完全相同的下面四条需求,方便接下去的横向对比。
| 编号 | 需求 | 观察点 |
|---|---|---|
| 1 | 输入城市名 → 点击查询 | 事件从哪里来到哪里去 |
| 2 | 查询中显示进度、失败显示错误 + 重试 | 状态怎么表达 |
| 3 | 成功后显示温度/天气/湿度/风速 + 3 天预报列表 | 数据怎么流回界面 |
| 4 | 旋转屏幕后结果不丢 | 谁持有状态 |
2.2 项目结构
shell
com.example.weather/
├── data/           ← 四套共用,位置不变
│   ├── Weather.kt
│   ├── WeatherRepository.kt
│   └── MockWeatherRepository.kt
├── common/         ← 四套共用
│   └── ForecastAdapter.kt
├── mvc/            ← 第一套
│   └── WeatherActivity.kt
├── mvp/            ← 第二套
│   ├── IWeatherContract.kt
│   ├── WeatherPresenter.kt
│   └── WeatherActivity.kt
├── mvvm/           ← 第三套
│   ├── WeatherUiState.kt
│   ├── WeatherViewModel.kt
│   └── WeatherActivity.kt
└── mvi/            ← 第四套
    ├── WeatherIntent.kt
    ├── WeatherState.kt
    ├── WeatherViewModel.kt
└── WeatherActivity.kt🧑💻数据
data/和common/在四套代码里将保持不变,这也正是代码架构设计要明白的一点------换个架构就要改数据模型,那恰恰说明了你的设计有问题。
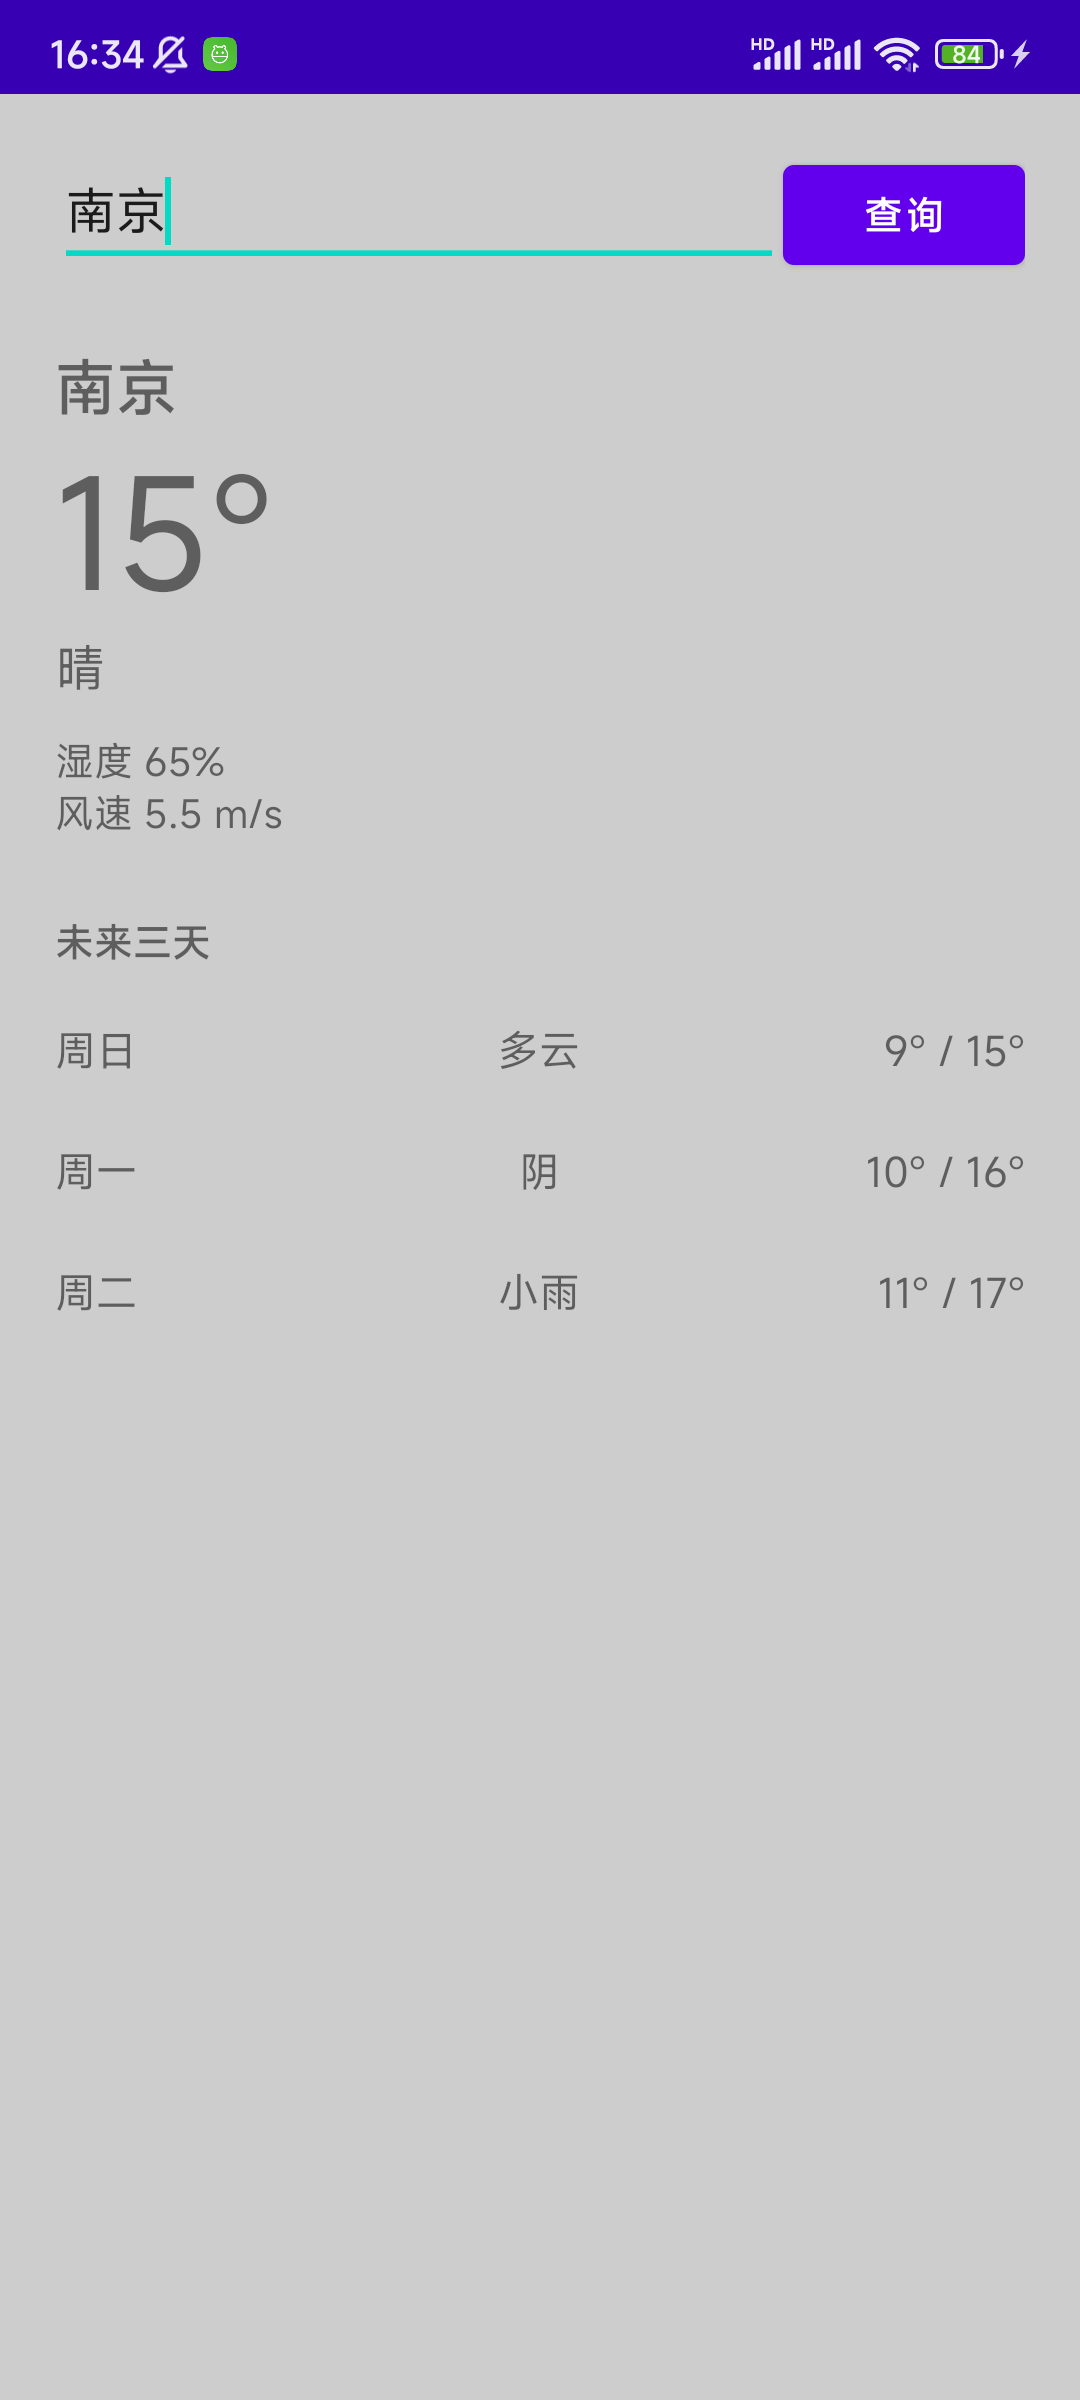
2.3 运行效果
代码最终的运行效果如下截图所示(为了看清楚,临时设置界面背景灰色):
三、共用代码
本小节被用来展示共用层的代码详细内容,读者可以直接拿去复制到项目中,不建议手敲浪费时间。
3.1 数据模型
data/Weather.kt
kotlin
/**
 * 天气数据模型。
 * ⭐四套架构共用。
 */
data class Weather(
    val city: String,
    val temperature: Int,
    val condition: String,
    val humidity: Int,
    val windSpeed: Double,
    val forecast: List<Forecast>
)

data class Forecast(
    val date: String,
    val high: Int,
    val low: Int,
    val condition: String
)
3.2 数据源抽象
data/WeatherRepository.kt
kotlin
/**
 * 数据源抽象。
 * ⭐注意使用了 【suspend】挂起函数
 */
interface WeatherRepository {
    suspend fun getWeather(city: String): Weather
}🧑💻suspend 关键字 属于 Kotlin 协程内容。
data/MockWeatherRepository.kt
kotlin
import kotlinx.coroutines.delay

/**
 * 假数据源,无需 API Key 即可运行。
 * ⭐埋了两条规则:
 *   1. 输入「火星」会抛异常,用来触发错误态
 *   2. 其他城市根据 hashCode 生成稳定数据,同一城市每次结果一致
 */
class MockWeatherRepository : WeatherRepository {

    override suspend fun getWeather(city: String): Weather {
        delay(1000) // ⭐延迟1秒,返回假数据

        val name = city.trim()
        if (name.isEmpty()) throw IllegalArgumentException("城市名不能为空")
        if (name.contains("火星")) throw IllegalStateException("查不到「$name」的天气数据")

        // 用位与抹掉符号位,保证 seed 恒为非负(比 abs 安全,不会踩到 Int.MIN_VALUE)
        val seed = name.hashCode() and 0x7FFFFFFF
        val base = 15 + seed % 15

        return Weather(
            city = name,
            temperature = base,
            condition = CONDITIONS[seed % CONDITIONS.size],
            humidity = 40 + seed % 50,
            windSpeed = 1.0 + (seed % 60) / 10.0,
            forecast = (1..3).map { day ->
                Forecast(
                    date = "周" + WEEK[(seed + day) % 7],
                    high = base + day - 1,
                    low = base - 7 + day,
                    condition = CONDITIONS[(seed + day) % CONDITIONS.size]
                )
            }
        )
    }

    private companion object {
        val CONDITIONS = listOf("晴", "多云", "阴", "小雨", "雷阵雨")
        val WEEK = listOf("一", "二", "三", "四", "五", "六", "日")
    }
}
我们的目的是学习架构设计,要尽量减少类的数量,所以这里直接 Mock 了假数据。另外注意数据源中特意埋了两条规则:
- 输入
火星抛出异常,用来验证错误状态。 - 避免同一城市,每次返回天气数据不一致,采用
hasCode来生成稳定的假数据。
这些规则都是为了简化我们理解:架构的差异只是体现在逻辑层和界面层怎么搭。
3.3 预报列表 Adapter
common/ForecastAdapter.kt
kotlin
import android.view.LayoutInflater
import android.view.View
import android.view.ViewGroup
import android.widget.TextView
import androidx.recyclerview.widget.RecyclerView
import com.example.weather.R
import com.example.weather.data.Forecast

/**
 * 预报列表适配器。四套架构共用。
 */
class ForecastAdapter : RecyclerView.Adapter<ForecastAdapter.VH>() {

    private val items = mutableListOf<Forecast>()

    fun submit(list: List<Forecast>) {
        items.clear()
        items.addAll(list)
        notifyDataSetChanged()
    }

    override fun onCreateViewHolder(parent: ViewGroup, viewType: Int): VH {
        val view = LayoutInflater.from(parent.context)
            .inflate(R.layout.item_forecast, parent, false)
        return VH(view)
    }

    override fun onBindViewHolder(holder: VH, position: Int) {
        holder.bind(items[position])
    }

    override fun getItemCount(): Int = items.size

    class VH(itemView: View) : RecyclerView.ViewHolder(itemView) {
        private val tvDate: TextView = itemView.findViewById(R.id.tvForecastDate)
        private val tvCondition: TextView = itemView.findViewById(R.id.tvForecastCondition)
        private val tvRange: TextView = itemView.findViewById(R.id.tvForecastRange)

        fun bind(forecast: Forecast) {
            tvDate.text = forecast.date
            tvCondition.text = forecast.condition
            tvRange.text = "${forecast.low}° / ${forecast.high}°"
        }
    }
}
很简单的适配器常见代码,没啥要注意的。
3.4 布局文件
四套架构的 Activity 会采用完全一样的 XML,控件的可见性也会全部交由代码控制,XML 里不会有任何业务状态------换句话说,不会使用 databinding。
res/layout/activity_weather.xml
xml
<?xml version="1.0" encoding="utf-8"?>
<LinearLayout xmlns:android="http://schemas.android.com/apk/res/android"
    android:layout_width="match_parent"
    android:layout_height="match_parent"
    android:orientation="vertical"
    android:padding="20dp">

    <LinearLayout
        android:layout_width="match_parent"
        android:layout_height="wrap_content"
        android:orientation="horizontal">

        <EditText
            android:id="@+id/etCity"
            android:layout_width="0dp"
            android:layout_height="wrap_content"
            android:layout_weight="1"
            android:hint="输入城市名,如:苏州"
            android:inputType="text"
            android:maxLines="1" />

        <Button
            android:id="@+id/btnSearch"
            android:layout_width="wrap_content"
            android:layout_height="wrap_content"
            android:text="查询" />
    </LinearLayout>

    <ProgressBar
        android:id="@+id/progressBar"
        android:layout_width="wrap_content"
        android:layout_height="wrap_content"
        android:layout_gravity="center_horizontal"
        android:layout_marginTop="32dp"
        android:visibility="gone" />

    <LinearLayout
        android:id="@+id/errGroup"
        android:layout_width="match_parent"
        android:layout_height="wrap_content"
        android:layout_marginTop="32dp"
        android:gravity="center_horizontal"
        android:orientation="vertical"
        android:visibility="gone">

        <TextView
            android:id="@+id/tvError"
            android:layout_width="wrap_content"
            android:layout_height="wrap_content"
            android:textColor="#E24B4A"
            android:textSize="15sp" />

        <Button
            android:id="@+id/btnRetry"
            android:layout_width="wrap_content"
            android:layout_height="wrap_content"
            android:layout_marginTop="8dp"
            android:text="重试" />
    </LinearLayout>

    <LinearLayout
        android:id="@+id/contentGroup"
        android:layout_width="match_parent"
        android:layout_height="0dp"
        android:layout_weight="1"
        android:layout_marginTop="24dp"
        android:orientation="vertical"
        android:visibility="gone">

        <TextView
            android:id="@+id/tvCity"
            android:layout_width="wrap_content"
            android:layout_height="wrap_content"
            android:textSize="22sp"
            android:textStyle="bold" />

        <TextView
            android:id="@+id/tvTemperature"
            android:layout_width="wrap_content"
            android:layout_height="wrap_content"
            android:textSize="56sp" />

        <TextView
            android:id="@+id/tvCondition"
            android:layout_width="wrap_content"
            android:layout_height="wrap_content"
            android:textSize="18sp" />

        <TextView
            android:id="@+id/tvHumidity"
            android:layout_width="wrap_content"
            android:layout_height="wrap_content"
            android:layout_marginTop="12dp"
            android:textSize="14sp" />

        <TextView
            android:id="@+id/tvWind"
            android:layout_width="wrap_content"
            android:layout_height="wrap_content"
            android:textSize="14sp" />

        <TextView
            android:layout_width="wrap_content"
            android:layout_height="wrap_content"
            android:layout_marginTop="28dp"
            android:text="未来三天"
            android:textStyle="bold" />

        <androidx.recyclerview.widget.RecyclerView
            android:id="@+id/rvForecast"
            android:layout_width="match_parent"
            android:layout_height="0dp"
            android:layout_weight="1"
            android:layout_marginTop="8dp" />
    </LinearLayout>
</LinearLayout>
res/layout/item_forecast.xml
xml
<?xml version="1.0" encoding="utf-8"?>
<LinearLayout xmlns:android="http://schemas.android.com/apk/res/android"
    android:layout_width="match_parent"
    android:layout_height="wrap_content"
    android:orientation="horizontal"
    android:paddingTop="12dp"
    android:paddingBottom="12dp">

    <TextView
        android:id="@+id/tvForecastDate"
        android:layout_width="0dp"
        android:layout_height="wrap_content"
        android:layout_weight="1"
        android:textSize="15sp" />

    <TextView
        android:id="@+id/tvForecastCondition"
        android:layout_width="0dp"
        android:layout_height="wrap_content"
        android:layout_weight="1"
        android:gravity="center"
        android:textSize="15sp" />

    <TextView
        android:id="@+id/tvForecastRange"
        android:layout_width="0dp"
        android:layout_height="wrap_content"
        android:layout_weight="1"
        android:gravity="end"
        android:textSize="15sp" />
</LinearLayout>
四、MVC
其实提到 MVC 的架构设计,最佳的案例还是 Java Web------HTML是 View、Servlet 是Controller,然而将其强行移植到了 Android 这边后变为了------XML布局是 View、Activity 是Controller。但 XML 布局是死的,无法接收点击事件也不能改变自己,所有的交互刷新都交给了 Activity,这导致实际上 Activity 同时是 Controller 又是真正的 View。
text
用户点击 → Activity(既是 C 又是 V)→ Repository → 回调 → Activity 手动改控件4.1 代码
mvc/WeatherActivity.kt
kotlin
import android.os.Bundle
import android.view.View
import android.widget.Button
import android.widget.EditText
import android.widget.ProgressBar
import android.widget.TextView
import androidx.appcompat.app.AppCompatActivity
import androidx.lifecycle.lifecycleScope
import androidx.recyclerview.widget.LinearLayoutManager
import androidx.recyclerview.widget.RecyclerView
import com.example.weather.R
import com.example.weather.common.ForecastAdapter
import com.example.weather.data.MockWeatherRepository
import com.example.weather.data.WeatherRepository
import kotlinx.coroutines.launch

/**
 * MVC 版本。
 * ⭐Activity 同时扮演 Controller(接收事件、调度逻辑)和 View(操作控件)两个角色。
 */
class WeatherActivity : AppCompatActivity() {

    private val repository: WeatherRepository = MockWeatherRepository()
    private val forecastAdapter = ForecastAdapter()

    private lateinit var etCity: EditText
    private lateinit var progressBar: ProgressBar
    private lateinit var errGroup: View
    private lateinit var tvError: TextView
    private lateinit var contentGroup: View
    private lateinit var tvCity: TextView
    private lateinit var tvTemperature: TextView
    private lateinit var tvCondition: TextView
    private lateinit var tvHumidity: TextView
    private lateinit var tvWind: TextView

    override fun onCreate(savedInstanceState: Bundle?) {
        super.onCreate(savedInstanceState)
        setContentView(R.layout.activity_weather)

        etCity = findViewById(R.id.etCity)
        progressBar = findViewById(R.id.progressBar)
        errGroup = findViewById(R.id.errGroup)
        tvError = findViewById(R.id.tvError)
        contentGroup = findViewById(R.id.contentGroup)
        tvCity = findViewById(R.id.tvCity)
        tvTemperature = findViewById(R.id.tvTemperature)
        tvCondition = findViewById(R.id.tvCondition)
        tvHumidity = findViewById(R.id.tvHumidity)
        tvWind = findViewById(R.id.tvWind)

        val rvForecast = findViewById<RecyclerView>(R.id.rvForecast)
        rvForecast.layoutManager = LinearLayoutManager(this)
        rvForecast.adapter = forecastAdapter

        findViewById<Button>(R.id.btnSearch).setOnClickListener { search() }
        findViewById<Button>(R.id.btnRetry).setOnClickListener { search() }
    }

    /**
     * 校验输入、请求数据、切换界面------三件事全挤在一个方法里。
     * ⭐这段代码无法单元测试,因为它依赖 etCity、errGroup 这些控件。
     */
    private fun search() {
        val city = etCity.text.toString().trim()

        if (city.isEmpty()) {
            errGroup.visibility = View.VISIBLE
            tvError.text = "请输入城市名"
            return
        }

        progressBar.visibility = View.VISIBLE
        errGroup.visibility = View.GONE
        contentGroup.visibility = View.GONE

        lifecycleScope.launch {
            try {
                val weather = repository.getWeather(city)

                tvCity.text = weather.city
                tvTemperature.text = "${weather.temperature}°"
                tvCondition.text = weather.condition
                tvHumidity.text = "湿度 ${weather.humidity}%"
                tvWind.text = "风速 ${weather.windSpeed} m/s"
                forecastAdapter.submit(weather.forecast)

                contentGroup.visibility = View.VISIBLE
            } catch (e: Exception) {
                tvError.text = e.message ?: "查询失败"
                errGroup.visibility = View.VISIBLE
            } finally {
                progressBar.visibility = View.GONE
            }
        }
    }
}
4.2 问题出在哪里
这段代码大约80行,但在这短短80行内,不同的职责混在一起:
- 无法单元测试 :想校验
search(),需要etCity、errGroup等控件才可以运行。你用Robolectric去跑,测试代码都要写好久了。 - 职责没有边界:校验输入、调数据源、切控件可见性三件事混在同一个方法里。一旦新的需求过来------错误提示改为Toast,你不得不在这段逻辑里找哪几行是UI界面代码,会不会漏哪个。
- 状态寄生在控件上 :现在的状态是什么?必须看
progressBar和errGroup的 visibility 组合。 状态没有独立的数据结构,散落在 View 的属性里。 - 编号4不成立:旋转屏幕时 Activity 会重建,用户界面回到初始状态。
| 优点 | 缺点 |
|---|---|
| 代码量少,新手也能一眼看懂,没有额外概念 | 逻辑不可测、职责无边界、状态寄生、配置变更丢失 |
还能用的场景: 一次性 Demo、只有一屏且只有一个按钮的极小页面。一旦页面有 2 个以上状态需要切换,就该换架构了。
五、MVP
MVP 把 "界面长什么样" 抽象成一个接口 IWeatherContact.View。Presenter 只认这个接口,不认 Activity。于是业务逻辑变成了一个纯 Kotlin 类,跑在 JVM 上就能测。
text
Activity(implements View 接口)⇄ Presenter(持有 View 接口引用)→ Repository5.1 Contract
MVP 有个约定俗成的做法------把 View 和 Presenter 两个接口放进同一个文件,让你一眼看清这个页面能做什么、能显示什么。
mvp/IWeatherContract.kt
kotlin
import com.example.weather.data.Weather

/**
 * ⭐契约接口:把一个页面「能做什么」和「能显示什么」集中写在一处。
 *
 * MVP 的核心动作就是这一份接口------它让 View 变成可替换的抽象。
 * Activity 实现 View,Presenter 只持有 View 接口引用,双方互不认识对方的实现。
 */
interface IWeatherContract {

    /** 界面能做的事情。Presenter 只能通过这些方法驱动界面。 */
    interface View {
        fun showLoading()
        fun hideLoading()
        fun renderWeather(weather: Weather)
        fun showError(message: String)
    }

    /** 界面能触发的事情。Activity 只能通过这些方法表达用户意图。 */
    interface Presenter {
        fun search(city: String)
        /** Activity 销毁时断开,避免 Presenter 持有 Activity 造成内存泄漏 */
        fun detach()
    }
}
5.2 Presenter
所有的逻辑代码(业务代码)都放到了 Prestener 类中。
mvp/WeatherPresenter.kt
kotlin
import com.example.weather.data.WeatherRepository
import kotlinx.coroutines.CoroutineDispatcher
import kotlinx.coroutines.CoroutineScope
import kotlinx.coroutines.Dispatchers
import kotlinx.coroutines.SupervisorJob
import kotlinx.coroutines.cancel
import kotlinx.coroutines.launch

/**
 * Presenter:纯 Kotlin 类,不 import 任何 android.* 包。
 * 这是它能在 JVM 上被单元测试的根本原因。
 *
 * dispatcher 参数默认主线程,测试时传入 UnconfinedTestDispatcher() 即可测试异步逻辑。
 */
class WeatherPresenter(
    private val repository: WeatherRepository,
    private val view: IWeatherContract.View,
    dispatcher: CoroutineDispatcher = Dispatchers.Main
) : IWeatherContract.Presenter {

    private val scope = CoroutineScope(SupervisorJob() + dispatcher)

    override fun search(city: String) {
        val name = city.trim()

        if (name.isEmpty()) {
            view.showError("请输入城市名")
            return
        }

        view.showLoading()

        scope.launch {
            try {
                view.renderWeather(repository.getWeather(name))
            } catch (e: Exception) {
                view.showError(e.message ?: "查询失败")
            } finally {
                view.hideLoading()
            }
        }
    }

    override fun detach() {
        scope.cancel()
    }
}
构造函数里的
dispatcher参数------默认是主线程,测试时传入UnconfinedTestDispatcher()。这是一个非常小的设计动作,却决定了这个类能不能被测试。
5.3 Activity 代码
mvp/WeatherActivity.kt
kotlin
import android.os.Bundle
import android.view.View
import android.widget.Button
import android.widget.EditText
import android.widget.ProgressBar
import android.widget.TextView
import androidx.appcompat.app.AppCompatActivity
import androidx.recyclerview.widget.LinearLayoutManager
import androidx.recyclerview.widget.RecyclerView
import com.example.weather.R
import com.example.weather.common.ForecastAdapter
import com.example.weather.data.MockWeatherRepository
import com.example.weather.data.Weather

/**
 * MVP 版本。
 * Activity 退化成控件搬运工:它只实现 View 接口,不包含任何业务判断。
 */
class WeatherActivity : AppCompatActivity(), IWeatherContract.View {

    private lateinit var presenter: IWeatherContract.Presenter
    private val forecastAdapter = ForecastAdapter()

    private lateinit var etCity: EditText
    private lateinit var progressBar: ProgressBar
    private lateinit var errGroup: View
    private lateinit var tvError: TextView
    private lateinit var contentGroup: View
    private lateinit var tvCity: TextView
    private lateinit var tvTemperature: TextView
    private lateinit var tvCondition: TextView
    private lateinit var tvHumidity: TextView
    private lateinit var tvWind: TextView

    override fun onCreate(savedInstanceState: Bundle?) {
        super.onCreate(savedInstanceState)
        setContentView(R.layout.activity_weather)

        etCity = findViewById(R.id.etCity)
        progressBar = findViewById(R.id.progressBar)
        errGroup = findViewById(R.id.errGroup)
        tvError = findViewById(R.id.tvError)
        contentGroup = findViewById(R.id.contentGroup)
        tvCity = findViewById(R.id.tvCity)
        tvTemperature = findViewById(R.id.tvTemperature)
        tvCondition = findViewById(R.id.tvCondition)
        tvHumidity = findViewById(R.id.tvHumidity)
        tvWind = findViewById(R.id.tvWind)

        val rvForecast = findViewById<RecyclerView>(R.id.rvForecast)
        rvForecast.layoutManager = LinearLayoutManager(this)
        rvForecast.adapter = forecastAdapter

        presenter = WeatherPresenter(MockWeatherRepository(), this)

        findViewById<Button>(R.id.btnSearch).setOnClickListener {
            presenter.search(etCity.text.toString())
        }
        findViewById<Button>(R.id.btnRetry).setOnClickListener {
            presenter.search(etCity.text.toString())
        }
    }

    // ---------- 以下全是纯界面操作,没有任何 if 判断业务的动作 ----------

    override fun showLoading() {
        progressBar.visibility = View.VISIBLE
        errGroup.visibility = View.GONE
        contentGroup.visibility = View.GONE
    }

    override fun hideLoading() {
        progressBar.visibility = View.GONE
    }

    override fun renderWeather(weather: Weather) {
        tvCity.text = weather.city
        tvTemperature.text = "${weather.temperature}°"
        tvCondition.text = weather.condition
        tvHumidity.text = "湿度 ${weather.humidity}%"
        tvWind.text = "风速 ${weather.windSpeed} m/s"
        forecastAdapter.submit(weather.forecast)
        contentGroup.visibility = View.VISIBLE
    }

    override fun showError(message: String) {
        tvError.text = message
        errGroup.visibility = View.VISIBLE
    }

    override fun onDestroy() {
        presenter.detach()
        super.onDestroy()
    }
}
⚠️ 后续 MVVM + MVI 的 Activity 代码会省去 findViewBydId 的内容,它们两个和这边的一模一样。
5.4 单元测试
MVP 架构的一大优势就是可以写单元测试了。下面的测试可以直接跑在 JVM 上,不需要模拟器、不需要 Robolectric。
test/WeatherPresenterTest.kt
kotlin
import com.example.weather.data.Forecast
import com.example.weather.data.Weather
import com.example.weather.data.WeatherRepository
import kotlinx.coroutines.Dispatchers
import kotlinx.coroutines.test.UnconfinedTestDispatcher
import kotlinx.coroutines.test.resetMain
import kotlinx.coroutines.test.runTest
import kotlinx.coroutines.test.setMain
import org.junit.After
import org.junit.Assert.assertEquals
import org.junit.Assert.assertNotNull
import org.junit.Before
import org.junit.Test

/**
 * MVP 存在的全部意义:这段测试跑在 JVM 上,不需要模拟器、不需要 Robolectric。
 */
class WeatherPresenterTest {

    private val dispatcher = UnconfinedTestDispatcher()

    @Before
    fun setUp() {
        Dispatchers.setMain(dispatcher)
    }

    @After
    fun tearDown() {
        Dispatchers.resetMain()
    }

    @Test
    fun `城市为空时提示输入城市名,且不调用数据源`() = runTest {
        val repository = RecordingRepository()
        val view = FakeView()
        val presenter = WeatherPresenter(repository, view, dispatcher)

        presenter.search("   ")

        assertEquals("请输入城市名", view.errorMessage)
        assertEquals(0, repository.callCount)
        assertEquals(null, view.weather)
    }

    @Test
    fun `查询成功时把数据交给界面渲染`() = runTest {
        val expected = Weather("苏州", 26, "晴", 55, 3.2, listOf(Forecast("周一", 28, 20, "多云")))
        val view = FakeView()
        val presenter = WeatherPresenter(FakeRepository(expected), view, dispatcher)

        presenter.search("苏州")

        assertEquals(expected, view.weather)
        assertEquals(null, view.errorMessage)
    }

    @Test
    fun `数据源抛异常时把错误信息交给界面`() = runTest {
        val view = FakeView()
        val presenter = WeatherPresenter(ThrowingRepository(), view, dispatcher)

        presenter.search("火星")

        assertNotNull(view.errorMessage)
        assertEquals(null, view.weather)
    }

    // ---------- 测试替身 ----------

    private class FakeView : IWeatherContract.View {
        var loading = false
        var weather: Weather? = null
        var errorMessage: String? = null

        override fun showLoading() { loading = true }
        override fun hideLoading() { loading = false }
        override fun renderWeather(weather: Weather) { this.weather = weather }
        override fun showError(message: String) { errorMessage = message }
    }

    private class FakeRepository(private val result: Weather) : WeatherRepository {
        override suspend fun getWeather(city: String): Weather = result
    }

    private class RecordingRepository : WeatherRepository {
        var callCount = 0
        override suspend fun getWeather(city: String): Weather {
            callCount++
            return Weather(city, 0, "", 0, 0.0, emptyList())
        }
    }

    private class ThrowingRepository : WeatherRepository {
        override suspend fun getWeather(city: String): Weather =
            throw IllegalStateException("查不到「$city」的天气数据")
    }
}
5.5 MVP 的代价
鱼与熊掌不可兼得,MVP 让逻辑可测了,但也付出了代价:
- 接口爆炸 :每个页面至少2个接口、5-10个方法。页面一多,
IWeatherContract这类文件会占满contract/目录。 - 回调顺序人肉维护 :
showLoading()和hideLoading()必须成对出现,中间任何一条分支忘写就是转圈圈永不消失。 - 内存泄漏风险 :Presenter 持有 View 引用,
onDestroy()里忘了detach()就泄漏 Activity。这是 MVP 项目最常见的线上问题。 - 编号4不成立:Presenter 跟着 Activity 走,旋转屏幕一样重建、一样丢状态。
| 优点 | 缺点 |
|---|---|
| 逻辑与界面彻底解耦、可以纯 JVM 测试、职责清晰 | 接口和回调样板代码多、手工管理生命周期、配置变更丢状态 |
还能用的场景: 维护存量项目、单元测试有极端要求的项目、非 Android 原生UI的嵌入式/SDK开发等。
六、MVVM
MVVM 在 MVP 基础上换了个思路------不要回调,要状态。
MVVM 把 Presenter 主动调用 View 的某个方法 换成了 ViewModel 持有一个可观察的状态容器,界面自己去订阅。
text
Activity ──search(city)──▶ ViewModel ──▶ Repository
Activity ◀──StateFlow 状态流── ViewModel
6.1 密封类表示状态
MVP 里"加载中"是 progressBar.visibility,"错误"是 errGroup.visibility------状态是隐含的。MVVM 的第一步就是把状态变成一个显式的、互斥的枚举。因为加载中、成功、失败三者在任何时刻只可能有一个成立 ,用 sealed interface 最合适。
mvvm/WeatherUiState.kt
kotlin
import com.example.weather.data.Weather

/**
 * 用密封类型表达互斥的三种情况。
 *
 * MVP 里状态是隐含的------【加载中】表现为 progressBar.visibility,
 * 这里把它变成了显式的、编译器能检查的数据结构。
 */
sealed interface WeatherUiState {

    data object Idle : WeatherUiState

    data object Loading : WeatherUiState

    data class Success(val weather: Weather) : WeatherUiState

    data class Error(val message: String) : WeatherUiState
}
6.2 ViewModel
mvvm/WeatherViewModel.kt
kotlin
import androidx.lifecycle.ViewModel
import androidx.lifecycle.viewModelScope
import com.example.weather.data.MockWeatherRepository
import com.example.weather.data.WeatherRepository
import kotlinx.coroutines.flow.MutableStateFlow
import kotlinx.coroutines.flow.StateFlow
import kotlinx.coroutines.flow.asStateFlow
import kotlinx.coroutines.launch

/**
 * MVVM 版本 ViewModel。
 *
 *   ⭐与 MVP 的 Presenter 最大的区别:
 *   1. 不持有 View 接口,改为暴露一个可观察的状态流
 *   2. 生命周期由 ViewModel 管,配置变更(旋转屏幕)时状态原地保留
 */
class WeatherViewModel(
    private val repository: WeatherRepository = MockWeatherRepository()
) : ViewModel() {

    private val _uiState = MutableStateFlow<WeatherUiState>(WeatherUiState.Idle)

    /** 对外只读。外部只能观察状态,不能篡改。 */
    val uiState: StateFlow<WeatherUiState> = _uiState.asStateFlow()

    fun search(city: String) {
        val name = city.trim()

        if (name.isEmpty()) {
            _uiState.value = WeatherUiState.Error("请输入城市名")
            return
        }

        viewModelScope.launch {
            _uiState.value = WeatherUiState.Loading
            _uiState.value = try {
                WeatherUiState.Success(repository.getWeather(name))
            } catch (e: Exception) {
                WeatherUiState.Error(e.message ?: "查询失败")
            }
        }
    }
}
6.3 Activity
mvvm/WeatherActivity.kt
kotlin
import android.os.Bundle
import android.view.View
import android.widget.Button
import android.widget.EditText
import android.widget.ProgressBar
import android.widget.TextView
import androidx.activity.viewModels
import androidx.appcompat.app.AppCompatActivity
import androidx.lifecycle.Lifecycle
import androidx.lifecycle.lifecycleScope
import androidx.lifecycle.repeatOnLifecycle
import androidx.recyclerview.widget.LinearLayoutManager
import androidx.recyclerview.widget.RecyclerView
import com.example.weather.R
import com.example.weather.common.ForecastAdapter
import kotlinx.coroutines.launch

/**
 * MVVM 版本。
 * Activity 只做两件事:把用户事件转发给 ViewModel、把状态渲染到控件。
 * 读不到任何 try/catch,也读不到任何业务分支。
 */
class WeatherActivity : AppCompatActivity() {

    private val viewModel: WeatherViewModel by viewModels()
    private val forecastAdapter = ForecastAdapter()

    // ⭐ 省略控件的声明,可以查看上面 mvp 的示例
    // ......

    override fun onCreate(savedInstanceState: Bundle?) {
        super.onCreate(savedInstanceState)
        setContentView(R.layout.activity_weather)

        // ⭐ 省略控件的声明,可以查看上面 mvp 的示例
    	// ......

        val rvForecast = findViewById<RecyclerView>(R.id.rvForecast)
        rvForecast.layoutManager = LinearLayoutManager(this)
        rvForecast.adapter = forecastAdapter

        findViewById<Button>(R.id.btnSearch).setOnClickListener {
            viewModel.search(etCity.text.toString())
        }
        findViewById<Button>(R.id.btnRetry).setOnClickListener {
            viewModel.search(etCity.text.toString())
        }

        // repeatOnLifecycle:界面可见时收集,进入后台自动取消,回到前台自动重启。
        // ⭐少了这一层,后台时收集器仍在运行,白白消耗资源。
        lifecycleScope.launch {
            repeatOnLifecycle(Lifecycle.State.STARTED) {
                viewModel.uiState.collect { state -> render(state) }
            }
        }
    }

    private fun render(state: WeatherUiState) {
        // ⭐ 注意这里,下面的MVI会和这里比较
        when (state) {
            WeatherUiState.Idle -> {
                progressBar.visibility = View.GONE
                errGroup.visibility = View.GONE
                contentGroup.visibility = View.GONE
            }

            WeatherUiState.Loading -> {
                progressBar.visibility = View.VISIBLE
                errGroup.visibility = View.GONE
                contentGroup.visibility = View.GONE
            }

            is WeatherUiState.Success -> {
                val weather = state.weather
                progressBar.visibility = View.GONE
                errGroup.visibility = View.GONE
                contentGroup.visibility = View.VISIBLE

                tvCity.text = weather.city
                tvTemperature.text = "${weather.temperature}°"
                tvCondition.text = weather.condition
                tvHumidity.text = "湿度 ${weather.humidity}%"
                tvWind.text = "风速 ${weather.windSpeed} m/s"
                forecastAdapter.submit(weather.forecast)
            }

            is WeatherUiState.Error -> {
                progressBar.visibility = View.GONE
                contentGroup.visibility = View.GONE
                errGroup.visibility = View.VISIBLE
                tvError.text = state.message
            }
        }
    }
}
6.4 MVVM 的代价
- 状态可能分散且互相矛盾 :如果不用
sealed interface,而是定义isLoading、error、weather三个独立字段,就可能出现【转圈还在,数据已显示】这种物理上不该存在的组合。约束靠人自觉。 - 状态流向不固定:ViewModel 暴露几个 StateFlow 都可以,界面调用哪个方法也可以,随着迭代容易出现同一份数据被三处修改。
- 双向绑定的坑 :真用 DataBinding 的
@={}双向绑定,调试时很难定位是谁改的值。
| 优点 | 缺点 |
|---|---|
| 无接口回调、代码量较MVP少、旋转不丢状态 | 状态约束全靠规范、页面复杂后仍可能失控 |
适用场景:当前 Android 开发中适用范围最广、容错率最高的默认选项。新启动的项目、Jetpack Compose 项目等。它不是最完美的架构,但在2026年的当下Android生态中,它是风险最低、收益最稳、生命周期最长的选择。
七、MVI
MVVM 依然留了一个口子:ViewModel 里可以暴露任意多个字段,界面状态可能分散在 isLoading、error、weather 三个变量里,可能出现"转圈还在、数据已经显示"这种自相矛盾的组合。
MVI 就用来堵住这个口子:状态只有一个,且只能由纯函数推导。
🎓MVI 是目前官方推荐的架构方式,处于快速增长阶段。由于和 MVC/MVP 的同名概念有本质区别,这里也简单展示下核心概念:
- Intent(意图)
- 不是
android.content.Intent,是【用户想要什么】的抽象描述。- Model(状态模型/State)
- 不是数据库实体或网络响应对象,是 UI 状态的唯一真实来源(Single Source of Truth)
- View(视图)
- 是一个纯函数:
Veiw = f(state),View 不包含任何逻辑,只负责将 State 渲染到屏幕上。
MVI 里界面被剥夺了修改状态的权力,它只能做两件事:发 Intent、渲染 State。
text
Intent → reduce → State → View 渲染 → 用户操作 → Intent(闭环)7.1 两个核心数据结构
mvi/WeatherIntent.kt
kotlin
/**
 * Intent:用户意图的完整枚举。
 *
 * 注意这是「用户想做什么」,不是「发生了什么」。
 * 界面只能通过发送 Intent 表达意愿,不能直接改状态。
 */
sealed interface WeatherIntent {

    data class Search(val city: String) : WeatherIntent

    /** 重试不需要参数------城市名已经在 State 里了 */
    data object Retry : WeatherIntent

    data object ClearError : WeatherIntent
}
mvi/WeatherState.kt
kotlin
import com.example.weather.data.Weather

/**
 * State:一份数据描述整个界面。
 *
 * 与 MVVM 的 sealed interface WeatherUiState 不同,这里用 data class,
 * 因为「刷新时保留旧数据继续显示」是真实需求------isLoading 和 weather 应该可以并存。
 *
 * 所有字段都是 val,状态一旦生成就不可变。想改?只能生成一个新的 State。
 */
data class WeatherState(
    val city: String = "",
    val isLoading: Boolean = false,
    val weather: Weather? = null,
    val errorMessage: String? = null
) {
    /** 派生属性:由已有字段推导,不额外增加状态维度 */
    val hasError: Boolean get() = errorMessage != null

    val canRetry: Boolean get() = hasError && city.isNotBlank()
}
7.2 ViewModel
所有状态变更都走 send()。
mvi/WeatherViewModel.kt
kotlin
import androidx.lifecycle.ViewModel
import androidx.lifecycle.viewModelScope
import com.example.weather.data.MockWeatherRepository
import com.example.weather.data.WeatherRepository
import kotlinx.coroutines.flow.MutableStateFlow
import kotlinx.coroutines.flow.StateFlow
import kotlinx.coroutines.flow.asStateFlow
import kotlinx.coroutines.flow.update
import kotlinx.coroutines.launch

/**
 * MVI 版本 ViewModel。
 *
 * 唯一的对外入口是 send(intent)------状态的所有变更都必须经过这里。
 * 界面没有任何办法绕过它去改状态,这是 MVI 最核心的约束。
 */
class WeatherViewModel(
    private val repository: WeatherRepository = MockWeatherRepository()
) : ViewModel() {

    private val _state = MutableStateFlow(WeatherState())

    val state: StateFlow<WeatherState> = _state.asStateFlow()

    fun send(intent: WeatherIntent) {
        when (intent) {
            is WeatherIntent.Search -> search(intent.city)
            WeatherIntent.Retry -> search(_state.value.city)
            WeatherIntent.ClearError -> _state.update { it.copy(errorMessage = null) }
        }
    }

    private fun search(rawCity: String) {
        val city = rawCity.trim()

        if (city.isEmpty()) {
            _state.update { it.copy(isLoading = false, errorMessage = "请输入城市名") }
            return
        }

        viewModelScope.launch {
            _state.update { it.copy(city = city, isLoading = true, errorMessage = null) }

            val result = runCatching { repository.getWeather(city) }

            // 用 update 而不是直接赋值:保证读到的一定是最新的旧状态
            _state.update { old ->
                result.fold(
                    onSuccess = { old.copy(isLoading = false, weather = it, errorMessage = null) },
                    onFailure = { old.copy(isLoading = false, errorMessage = it.message ?: "查询失败") }
                )
            }
        }
    }
}
7.3 Activity
mvi/WeatherActivity.kt
kotlin
import android.os.Bundle
import android.view.View
import android.widget.Button
import android.widget.EditText
import android.widget.ProgressBar
import android.widget.TextView
import androidx.activity.viewModels
import androidx.appcompat.app.AppCompatActivity
import androidx.core.view.isVisible
import androidx.lifecycle.Lifecycle
import androidx.lifecycle.lifecycleScope
import androidx.lifecycle.repeatOnLifecycle
import androidx.recyclerview.widget.LinearLayoutManager
import androidx.recyclerview.widget.RecyclerView
import com.example.weather.R
import com.example.weather.common.ForecastAdapter
import kotlinx.coroutines.launch

/**
 * MVI 版本。
 *
 * 与 MVVM 版本 Activity 的关键区别在 render():
 *   MVVM 是 when(state) 分支,每个分支各自决定显示什么;
 *   MVI 是逐行读 state 字段直接赋值,没有任何条件判断。
 *
 * 这让 render 变成幂等函数------不管调用多少次、从哪个状态切过来,结果都一致。
 */
class WeatherActivity : AppCompatActivity() {

    private val viewModel: WeatherViewModel by viewModels()
    private val forecastAdapter = ForecastAdapter()

    // ⭐ 省略控件的声明,可以查看上面 mvp 的示例
    // ......

    override fun onCreate(savedInstanceState: Bundle?) {
        super.onCreate(savedInstanceState)
        setContentView(R.layout.activity_weather)

        // ⭐ 省略控件的声明,可以查看上面 mvp 的示例
    	// ......

        val rvForecast = findViewById<RecyclerView>(R.id.rvForecast)
        rvForecast.layoutManager = LinearLayoutManager(this)
        rvForecast.adapter = forecastAdapter

        // 界面只发 Intent,不碰状态
        findViewById<Button>(R.id.btnSearch).setOnClickListener {
            viewModel.send(WeatherIntent.Search(etCity.text.toString()))
        }
        btnRetry.setOnClickListener {
            viewModel.send(WeatherIntent.Retry)
        }
        etCity.setOnFocusChangeListener { _, hasFocus ->
            if (hasFocus) viewModel.send(WeatherIntent.ClearError)
        }

        lifecycleScope.launch {
            repeatOnLifecycle(Lifecycle.State.STARTED) {
                viewModel.state.collect { state -> render(state) }
            }
        }
    }

    /**
     *  ⭐幂等渲染:每一行都直接读 state 的字段,没有 when 分支。
     * 「界面显示错了」这类 bug 的排查范围因此缩小到 reduce 一处。
     */
    private fun render(state: WeatherState) {
        progressBar.isVisible = state.isLoading
        errGroup.isVisible = state.hasError
        contentGroup.isVisible = state.weather != null

        state.errorMessage?.let { tvError.text = it }

        state.weather?.let { weather ->
            tvCity.text = weather.city
            tvTemperature.text = "${weather.temperature}°"
            tvCondition.text = weather.condition
            tvHumidity.text = "湿度 ${weather.humidity}%"
            tvWind.text = "风速 ${weather.windSpeed} m/s"
            forecastAdapter.submit(weather.forecast)
        }
    }
}
我们来比较下 MVI 和 MVVM 的 render():
- MVVM 的
render()里有一个when,每个分支各自决定显示什么------界面什么样的定义散落在这些分支里。 - MVI 的
render()每一行都在读 state 的某个字段直接赋值,没有任何条件判定。
这样的好处就是无论当前处于什么状态、render被调用多少次、从哪个状态切过来,结果都完全一致。
还有多说一句,本示例展示的 MVI 架构中 Intent 只包含用户意图,异步结果直接 update 进去。想要状态可完整回溯(如录制回放),需要把异步结果也变成 Intent,让状态变更集中在一个纯函数里。但会导致代码量明显上升,不利于理解MVI,有兴趣的大家可以自行搜索学习。
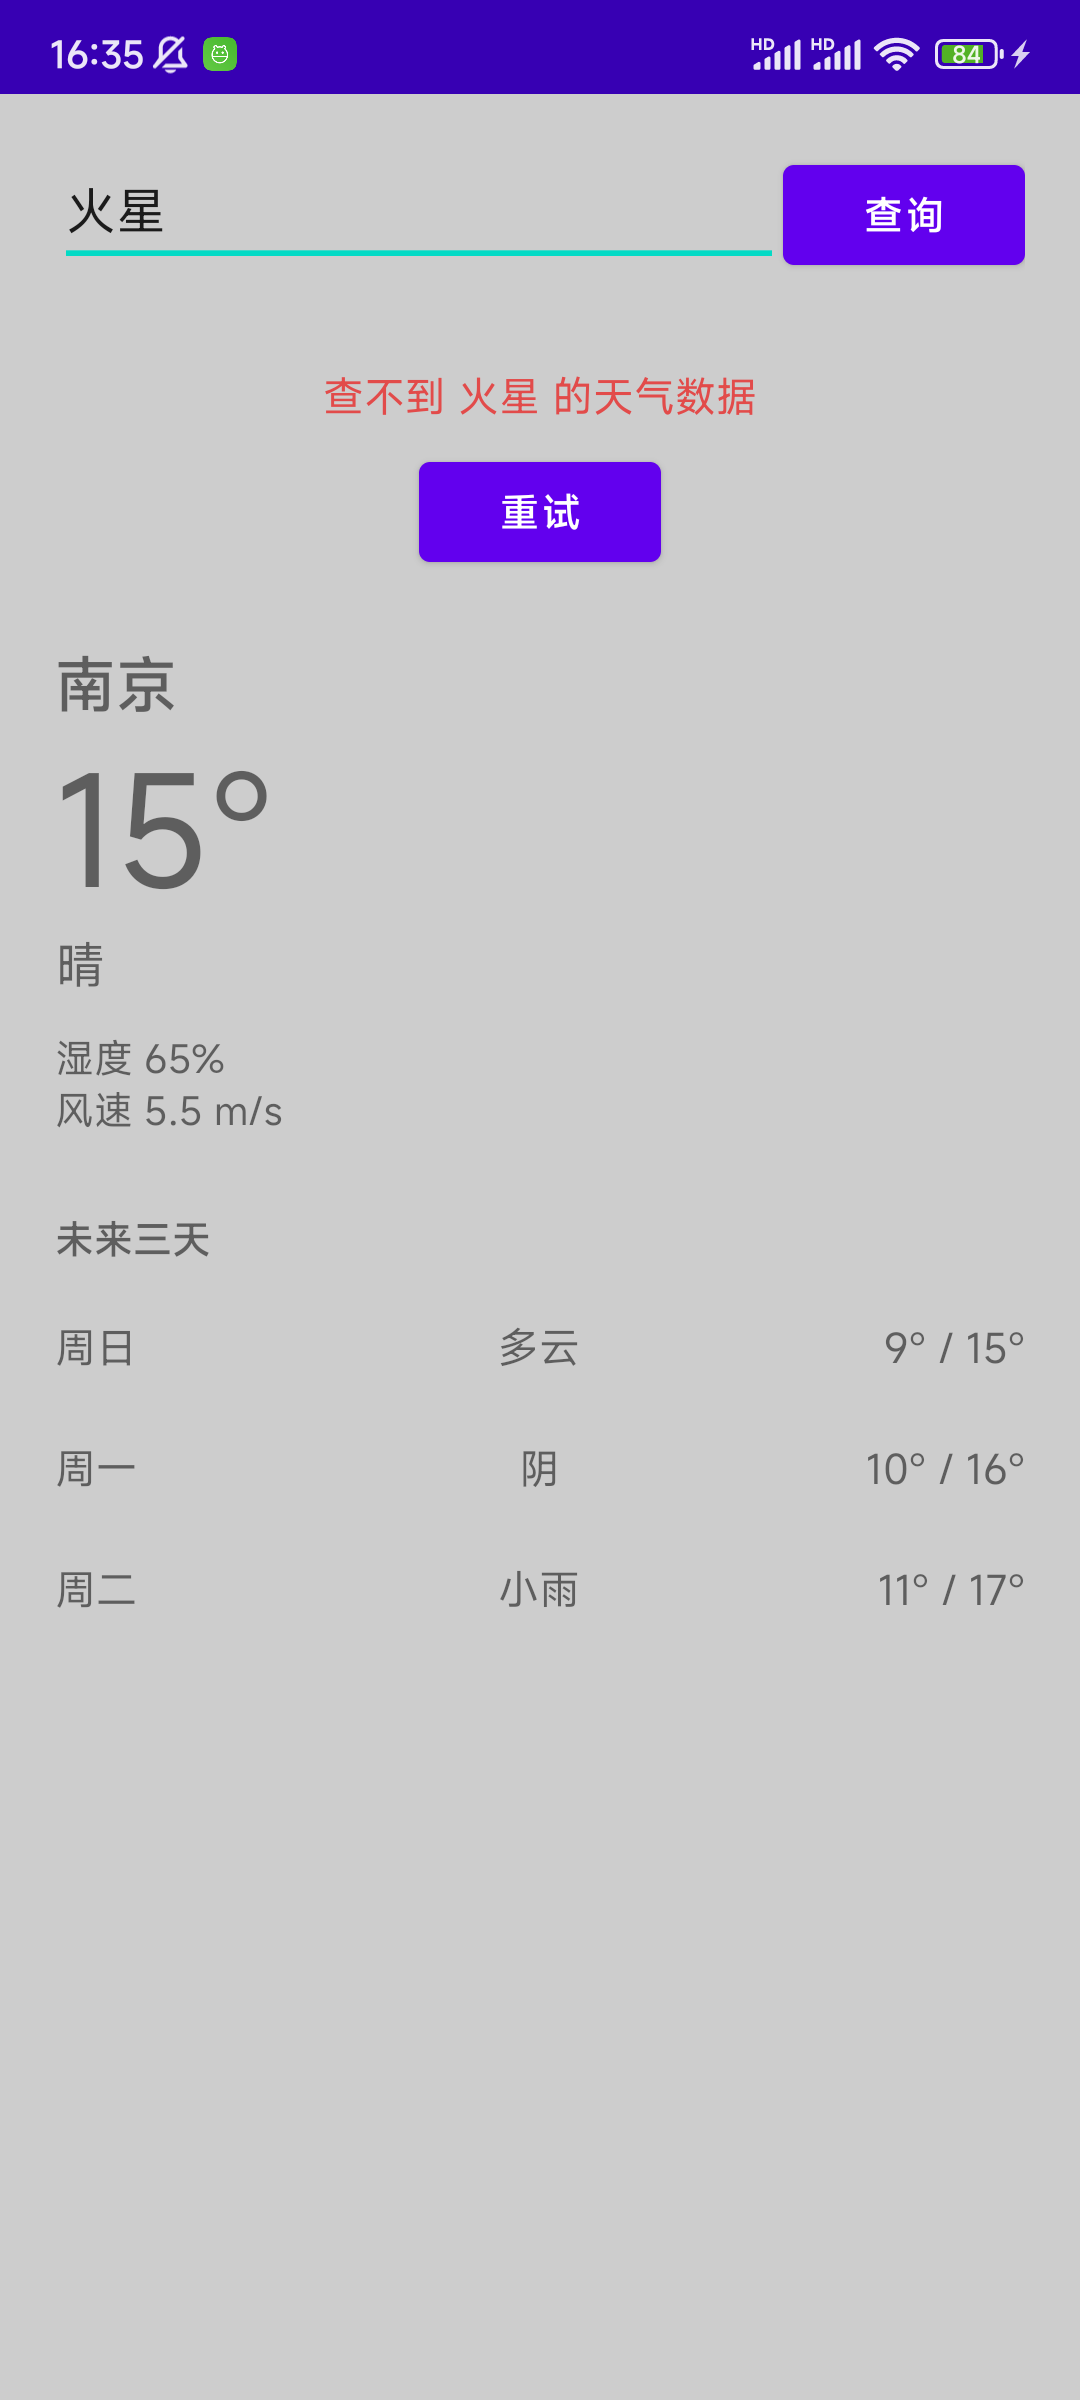
本示例还展示一个效果就是:先查【南京】天气成功,再查【火星】失败(之前埋的规则),MVI 架构下可以状态叠加------城市的天气数据和错误提示会同时显示。如下图:
想要和 MVVM 一样仅显示错误提示,可以选择在 reduce 里显式写
weather = null清掉它。
7.4 MVI 的代价
- 样板代码增多:Intent、State、reduce 三件套,小功能的代码量比 MVVM 多 30%~50%
- 学习曲线陡峭:状态要一次性设计好,考验对函数式编程思想的理解------纯函数、不可变性、Kotlin Flow 高级操作符
- 过渡 MVI 设计:简单的列表页面、开关设置页面用MVI,杀鸡用牛刀了。
适用场景: 在当下看来,MVI 不是为了替代 MVVM,是针对特定复杂度问题的一种"工程化方案"。状态高度复杂且相互关联的页面、对状态可预测性与可审计性有硬性要求的项目、用户交互意图密集且有并发竞争的场景、纯 Jetpack Compose 且团队已具备函数式编程基础等。
八、架构对比和选择
8.1 能力对比
| 维度 | MVC | MVP | MVVM | MVI |
|---|---|---|---|---|
| ⭐逻辑可单元测试 | ✗ | ✓ | ✓ | ✓ |
| ⭐旋转屏幕不丢状态 | ✗ | ✗ | ✓ | ✓ |
| 界面层有接口 | ✗ | ✓ | ✗ | ✗ |
| 状态是显式数据结构 | ✗ | ✗ | 部分 | ✓ |
| 状态唯一不可变 | ✗ | ✗ | ✗ | ✓ |
| 状态可回溯调试 | ✗ | ✗ | ✗ | ✓ |
| 关系最少的代码量 | ✓ | ✗ | 中等 | ✗ |
| ⭐逻辑放哪 | Activity | Presenter | ViewModel | ViewModel |
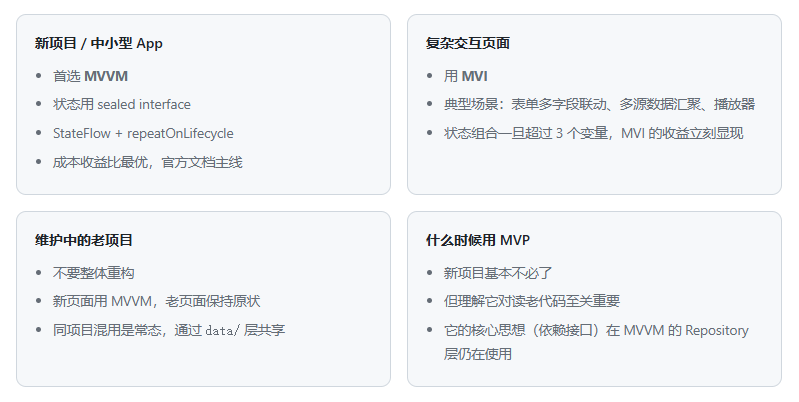
8.2 选型建议
九、总结
架构是给变化留位置,不是给代码分房子。
同一款天气 APP,MVC 把逻辑与界面混在 Activity;MVP 用接口解耦、逻辑可单元测试;MVVM 以 StateFlow 驱动、屏幕旋转不丢状态;MVI 则进一步收敛状态为唯一来源。将这四套程序全部跑一遍,你会明显感受到它们间的不同差异。
十、参考资料
- https://developer.android.google.cn/topic/architecture?hl=zh-cn#modern-app-architecture
- https://wikiandroid.com/advanced/architecture/architecture-evolution.html
- https://www.geeksforgeeks.org/android/difference-between-mvc-mvp-and-mvvm-architecture-pattern-in-android/
- https://github.com/android/architecture-samples/tree/todo-mvp
- https://juejin.cn/post/7684439645419274267