一、引言:叠字点选验证码的对抗本质
- 极验叠字点选与传统点选验证码的差异:字形重叠、语义干扰、动态渲染
- 深度学习破解的总体技术路线:目标检测 + 语义匹配 +色彩处理
- 文章目标:聚焦YOLO系列模型在叠字场景下的检测精度提升与数学优化方法
二、叠字点选数据形态与预处理数学建模
样本采集以及处理
极验的叠字是通过汉字+语序来进行生成的。所以采集多少张图片都没有意义。这里通过微软字体+汉字库和真实的背景来生成训练图。采集一千张作为收集背景和作为验证使用
数据生成
背景图制作:为了方便将有限的数据变为尽可能的无限。减少数据的失真,将背景裁剪为64*64尺寸。先用cv2读取图片,然后判断宽高。最后通过灰度来判断是否是可用的背景块
python
# 判断是否是干净的背景块(过滤掉黑块、彩色字、白色水印)
def is_clean_block(block):
    gray = cv2.cvtColor(block, cv2.COLOR_BGR2GRAY)
    if np.min(gray) < 30:
        return False
    hsv = cv2.cvtColor(block, cv2.COLOR_BGR2HSV)
    if np.max(hsv[:, :, 1]) > 150:
        return False
    if np.max(gray) > 250:
        return False
    if np.std(gray) < 15:
        return False
    return True


#裁剪图片
for y in range(0, h - BLOCK_SIZE + 1, STEP):
        for x in range(0, w - BLOCK_SIZE + 1, STEP):
            block = img[y:y + BLOCK_SIZE, x:x + BLOCK_SIZE]

            if is_clean_block(block):
                save_path = os.path.join(OUTPUT_DIR, f"bg_{total_count}.jpg")
                cv2.imencode('.jpg', block)[1].tofile(save_path)
                total_count += 1
处理完之后会得到这种真实图片采集的小背景图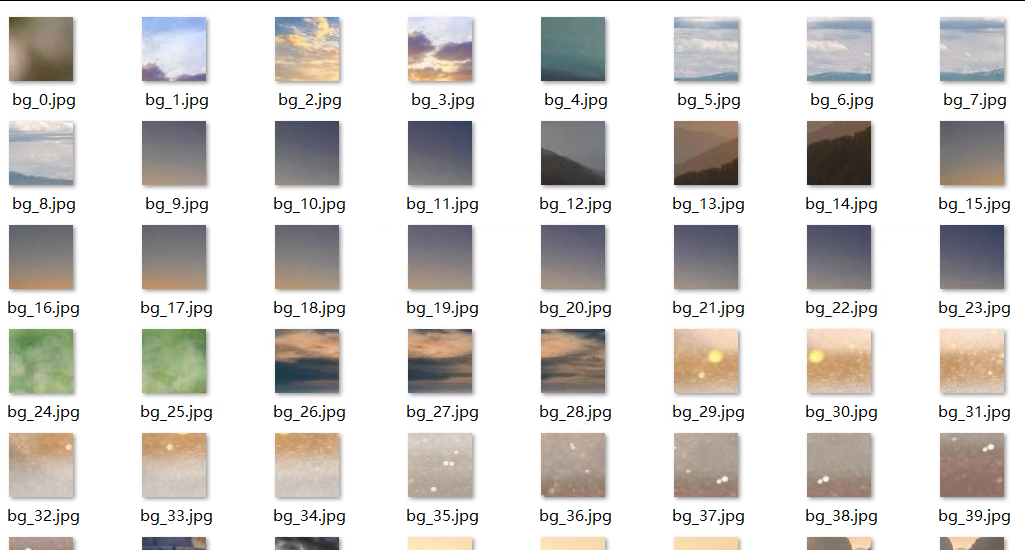
数据集合成:首先从网上搜集一下汉字,大约20000+。
背景读取并随机做模糊处理
python
    bg_path = random.choice(bg_files)
    img = Image.open(bg_path).convert("RGB")
    W, H = 640, 640
    img = img.resize((W, H))

    # 随机对背景做模糊处理
    if random.random() > 0.5:
        img = img.filter(ImageFilter.GaussianBlur(radius=random.uniform(0.5, 2.0)))
将背景图的通道增加一个透明通道方便贴字,并强制随机每个图贴3-4个字(符合极验的数量)
python
    result_layer = img.convert("RGBA")
    num_chars = random.randint(3, 4)
    label_lines = []
循环字库,随机抽取一个字体将大小随机一个范围并添加字体描边为了更突出字体的特征
python
for _ in range(num_chars):  # 循环 num_chars 次
        char_idx = random.randint(0, len(font_lib) - 1)
        char = font_lib[char_idx]

        # 创建一个全透明的文字图层(RGBA全为0)
        txt_layer = Image.new("RGBA", (W, H), (0, 0, 0, 0))
        draw = ImageDraw.Draw(txt_layer)

        # 随机字体大小
        font_size = random.randint(80, 160)
        # 随机选择一个字体文件并设置大小
        font = ImageFont.truetype(random.choice(FONT_PATHS), font_size)

        # 获取随机的主颜色,并在后面追加一个透明度值
        main_color = get_random_color() + (random.randint(150, 255),)
        # 随机描边颜色
        stroke_color = (0, 0, 0, 255) if random.random() > 0.3 else (255, 255, 255, 255)
        # 随机描边粗细
        stroke_width = random.randint(3, 6)
最后加上+-45°的角度旋转并计算宽高,根据宽高随机生成xy的位置放在背景图
python
        # 随机生成旋转角度(-45度到45度)
        angle = random.randint(-45, 45)
        if random.random() > 0.5:
            txt_layer = txt_layer.rotate(angle, expand=False, resample=Image.BICUBIC)
        bbox = txt_layer.getbbox()
        if bbox is None:
            continue
        box_w = bbox[2] - bbox[0]
        box_h = bbox[3] - bbox[1]
        # 随机生成文字中心点 (cx, cy),
        cx = random.randint(int(box_w / 2), W - int(box_w / 2))
        cy = random.randint(int(box_h / 2), H - int(box_h / 2))
        # 将文字图层裁剪到只包含文字的区域
        txt_layer_cropped = txt_layer.crop((bbox[0], bbox[1], bbox[2], bbox[3]))
最后生成yolo所需要的格式
python
        # 将中心点坐标归一化
        x_center_norm = cx / W
        y_center_norm = cy / H
        # 将宽高归一化
        w_norm = box_w / W
        h_norm = box_h / H
        class_id = char_idx if USE_CLASS_ID else 0
        # 生成标准 YOLO 格式
        label_lines.append(f"{class_id} {x_center_norm:.6f} {y_center_norm:.6f} {w_norm:.6f} {h_norm:.6f}")
处理完会得到位置随机,还会重叠的数据集。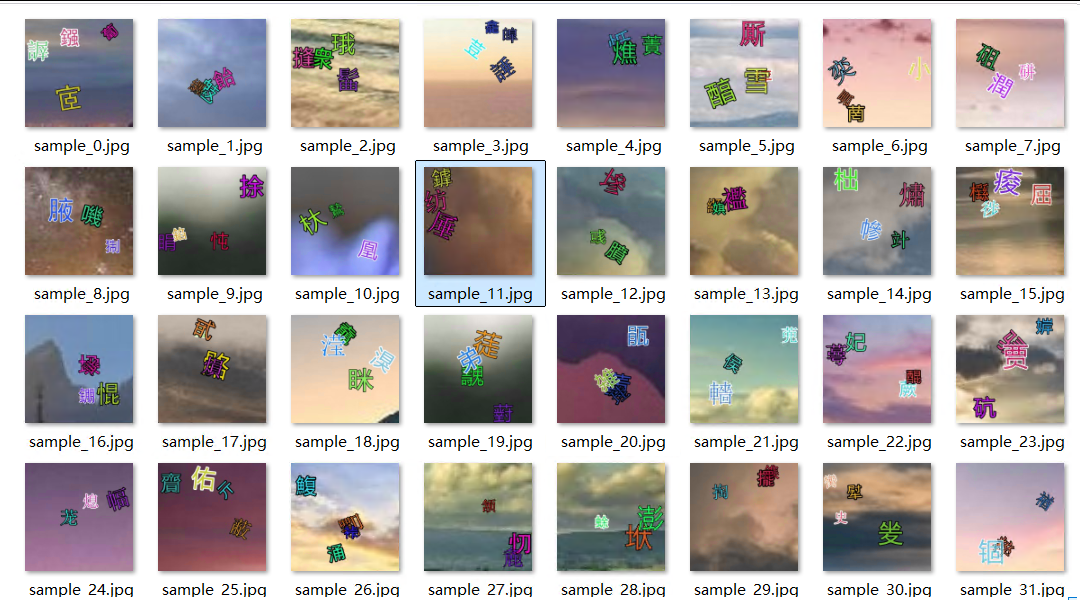
三、YOLO系列模型训练
本次训练使用的设备是RTX 5060Ti(16G)
yolo系列选择
常见的v8 v11 v26,性能都都比较不错,拉不开太大距离。为了体验新东西。这里用了yolo26s
v8调优的上限比较高
v11在v8的基础上降低了参数并提高了精度
v26支持端到端,部署简单,对小目标检测稳定性高
yolo n s m l x模型选择:
n:快速的训练。参数量极少,弊端就是需要海量数据
s:参数相对于m少,但是对于n又提升特别大。
m l x:这三个参数量成几何倍数增加,适合对于精度要求大的项目。(高模型确实牛,三百张手工标注的图片跑完准确率在98%。缺点就是太慢了,参数多了。扫描的特征也多。推理就会变慢)
这里选择了s模型。相对于n提升了7倍。速度也没有比n慢多少
优化函数选择
SGD:随机梯度优化器,可控性强,但是学习率需要手动验证,而且这个时候批次大的时候用
AdamW:自适应优化器,对小数据集友好,但是收敛速度慢
MuSGD:新增的优化器,官方给的解释是:专为大模型和小批量的场景设计,收敛快,精度高
对于随机生成的数据集大约有10w+。且生成的尺寸小。所以使用了MuSGD
其它参数
因为yolo只负责表框字体,做的是一分类。这样完全不需要人工打标。所以批次不用太高,图片分辨率降低到512。batch批次设置为32对于这个显卡是最优解。学习率和系数都用官方默认。并开启缓存和多线程读取数据集
python
 results = model.train(
        data=DATA_YAML,
        epochs=100,
        imgsz=512,
        batch=32,
        device=device,
        workers=4,
        optimizer='MuSGD',
        lr0=0.00038,
        lrf=0.882,
        cache=True,
        close_mosaic=10,
        project='runs/train',
        name='yolo26s_text',
        exist_ok=True,
        patience=15,
        save=True,
        val=True,
        plots=True,
        amp=False
    )
训练完得到模型转成onx格式去使用。方便跨设备使用
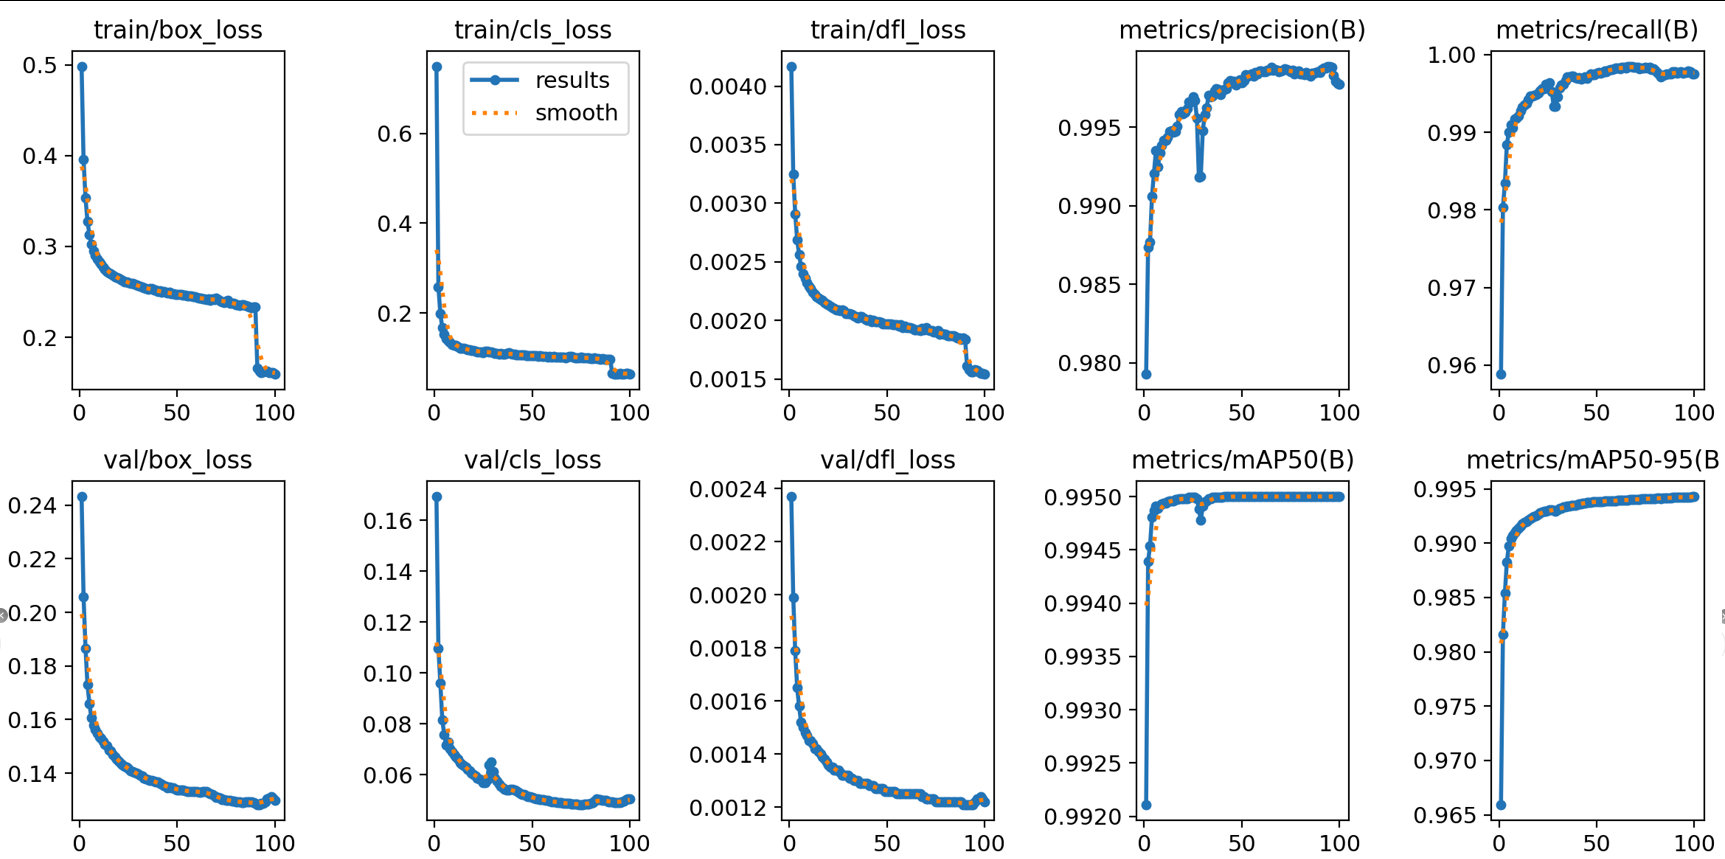
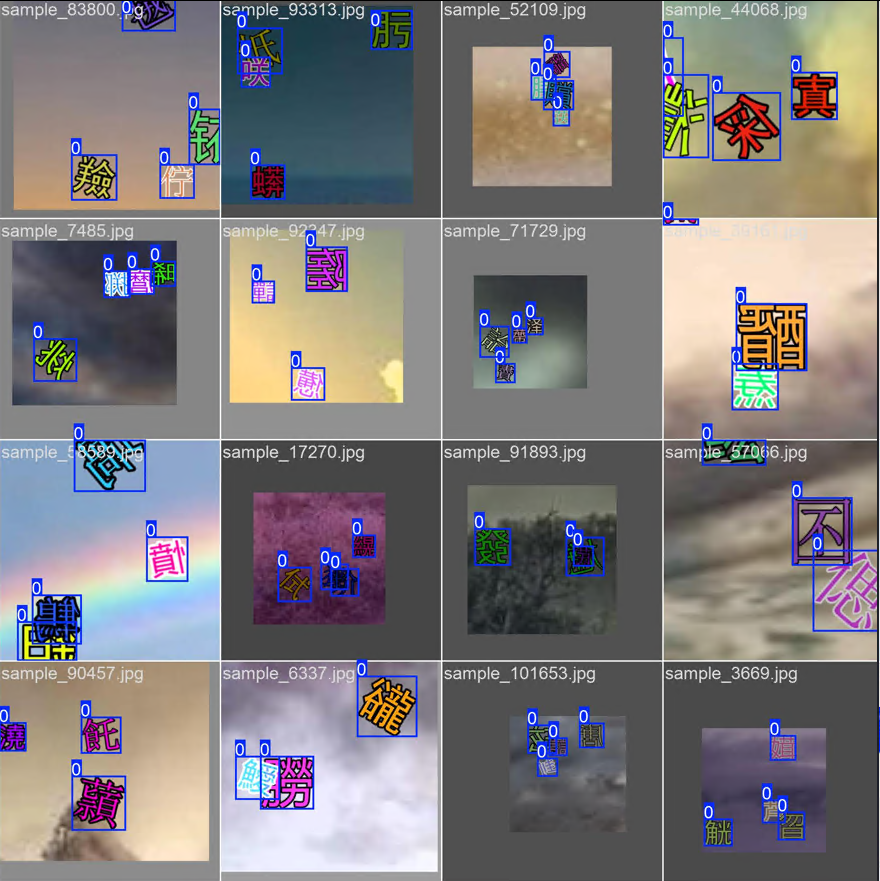
根据训练完的结果训练的准确率和测试集的准确率都在90批次左右得到了一次提升。
四、高阶数学工具在YOLO调优中的应用
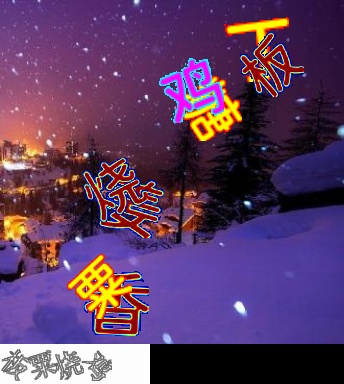
对于真实的数据来说,真正有难度的不是位置,而且上下文字的顺序怎么排。下图的分辨率低,且都是白底黑字,对于 yolo如果来单独训练就得不偿失,反而会把上面的彩色也做的失真非常严重。所以我的思路是:进行分割,让yolo只负责识图,打标注。然后把文字切片,加上描边。做一次概率矩阵。同样的对下发的提示词也是这样处理。严格区分上下的空间。避免yolo识别的时候将提示词处理了。最后用匈牙利算法将两个上下文进行比对选出最接近的文字。再对字体排序,最后取标注的xy的中间值作为位置
找出白底黑字的提示词,固定位左下角,利用opencv阈值分割,大于170当成白色。过滤掉云层,高光,水面反光等干扰
python
def find_white_blocks_cv(img_ori):
    h, w = img_ori.shape[:2]
    gray = cv2.cvtColor(img_ori, cv2.COLOR_BGR2GRAY)

    _, thresh = cv2.threshold(gray, 170, 255, cv2.THRESH_BINARY)
    contours, _ = cv2.findContours(thresh, cv2.RETR_EXTERNAL, cv2.CHAIN_APPROX_SIMPLE)
    boxes = []
    for cnt in contours:
        x, y, w, h = cv2.boundingRect(cnt)
        # 提示条固定在左下角;
        if (
            15 < w < 1200
            and 10 < h < 200
            and y >= img_ori.shape[0] * 0.70
            and x <= img_ori.shape[1] * 0.70
        ):
            boxes.append((x, y, x + w, y + h))
    return boxes
根据上一步的操作,通过XY轴来判断真正的提示词
python
def select_prompt_block(white_boxes, image_shape):
    """选择左下角的白底提示条,避免把背景中的高亮区域当成提示。"""
    h, w = image_shape[:2]
    candidates = []
    for box in white_boxes:
        x1, y1, x2, y2 = box
        if y1 < h * 0.65 or y2 < h * 0.88 or x1 > w * 0.35:
            continue
        area = max(0, x2 - x1) * max(0, y2 - y1)
        if area >= 200:
            candidates.append((area, box))
    if not candidates:
        return None
    return max(candidates, key=lambda item: item[0])[1]
然后将原图按照比例填充黑边,变成512*512.
python
def letterbox_yolo(img, new_shape=(512, 512), color=(114, 114, 114)):
    shape = img.shape[:2]
    r = min(new_shape[0] / shape[0], new_shape[1] / shape[1])
    new_unpad = int(round(shape[1] * r)), int(round(shape[0] * r))
    dw = new_shape[1] - new_unpad[0]
    dh = new_shape[0] - new_unpad[1]
    dw /= 2;
    dh /= 2
    top = int(round(dh - 0.1));
    bottom = int(round(dh + 0.1))
    left = int(round(dw - 0.1));
    right = int(round(dw + 0.1))
    img = cv2.resize(img, new_unpad, interpolation=cv2.INTER_LINEAR)
    img = cv2.copyMakeBorder(img, top, bottom, left, right, cv2.BORDER_CONSTANT, value=color)
    return img, r, left, top
然后反转通道,将BGR转成RGB。再给高度宽度通道转成通道高度宽度,最后归一化。然后进行推理
python
    img_resized, r, left, top = letterbox_yolo(img_ori)
    img_input = img_resized[:, :, ::-1].transpose(2, 0, 1).astype(np.float32) / 255.0
    img_input = np.expand_dims(img_input, axis=0)
    yolo_outputs = yolo_session.run(None, {yolo_input_name: img_input})[0]
    valid_dets = yolo_outputs[0][yolo_outputs[0][:, 4] > YOLO_CONF_THRESHOLD]
将推理的坐标还原成真实坐标,并添加边界,防止越界
python
boxes_xyxy = scale_yolo_boxes(valid_dets[:, 0:4], r, left, top)
boxes_xyxy[:, [0, 2]] = np.clip(boxes_xyxy[:, [0, 2]], 0, orig_w)
boxes_xyxy[:, [1, 3]] = np.clip(boxes_xyxy[:, [1, 3]], 0, orig_h)


def scale_yolo_boxes(boxes, r, left, top):
    boxes = np.array(boxes)
    boxes[:, [0, 2]] = (boxes[:, [0, 2]] - left) / r
    boxes[:, [1, 3]] = (boxes[:, [1, 3]] - top) / r
    return boxes
对图片进行裁剪并加上黑边。转成png格式进行第一次识别
python
def recognize_crop(crop_img):

    try:
        h, w = crop_img.shape[:2]
        if h < 5 or w < 5:
            return "", 0.0

        padded = cv2.copyMakeBorder(crop_img, 5, 5, 5, 5, cv2.BORDER_CONSTANT, value=(0, 0, 0))

        # 使用无损 PNG
        is_success, buffer = cv2.imencode('.png', padded)
        if not is_success:
            return "", 0.0
        text = ocr.classification(buffer.tobytes()).strip()
        if text:
            return text, 99.0
    except Exception as e:
        print(f"识别异常: {e}")
    return "", 0.0
然后进行过滤无用的框和剔除提示词。取当前框的左上角和右下角来判断尺寸是否合适。然后计算中心点。最后判断中心点是否再落在了提示词的区域
python
        final_dets = []
        for det in detections:
            x1, y1, x2, y2 = det['box']
            if (x2 - x1) > 95 or (y2 - y1) > 95:
                continue
            det_cx = (x1 + x2) / 2
            det_cy = (y1 + y2) / 2
            is_white_region = False
            for wb in ([prompt_box] if prompt_box is not None else []):
                wb_cx = (wb[0] + wb[2]) / 2
                wb_cy = (wb[1] + wb[3]) / 2
                center_inside = wb[0] <= det_cx <= wb[2] and wb[1] <= det_cy <= wb[3]
                if center_inside or box_intersection_ratio((x1, y1, x2, y2), wb) > 0.20:
                    is_white_region = True;
                    break
            if not is_white_region:
                final_dets.append(det)
对处理的文字进行置信度*尺寸惩罚系数进行打分,如果尺寸框大于95说明框了两个字。然后从最高分开始剔除重叠比例大于50%的。来限制yolo打错框或者框了重叠的字
python
def deduplicate_detections(detections, iou_threshold=0.30):
    def rank(item):
        x1, y1, x2, y2 = item["box"]
        width = max(1.0, x2 - x1)
        height = max(1.0, y2 - y1)
        if 50.0 <= width <= 90.0 and 50.0 <= height <= 90.0:
            size_penalty = 1.0
        else:
            size_penalty = np.exp(
                -0.5 * (abs(np.log(width / 68.0)) + abs(np.log(height / 68.0)))
            )
        return item.get("conf", 0.0) * float(size_penalty)

    pending = sorted(detections, key=rank, reverse=True)
    kept = []
    while pending:
        current = pending.pop(0)
        kept.append(current)
        kept_pending = []
        for item in pending:
            iou = box_iou(current["box"], item["box"])
            overlap = max(
                box_intersection_ratio(current["box"], item["box"]),
                box_intersection_ratio(item["box"], current["box"]),
            )
            if iou < iou_threshold and overlap < 0.50:
                kept_pending.append(item)
        pending = kept_pending
    return kept
然后对提示词框和彩色框再次做一个概率向量匹配使用匈牙利算法进行一对一匹配,返回排序结果和标签
python
def align_detections_to_prompt(img_ori, prompt_box, detections):
    prompt_boxes = _prompt_char_boxes(img_ori, prompt_box)
    if not prompt_boxes or not detections:
        return [], []
    candidate_chars = []
    for det in detections:
        x1, y1, x2, y2 = det["box"]
        crop = img_ori[y1:y2, x1:x2]
        candidate_chars.extend(_ocr_candidate_chars(crop))
    candidate_chars = list(dict.fromkeys(candidate_chars))
    if not candidate_chars:
        return [], []
最后就是保存图片,将切片图片保存下来便于调试和保存推理后的图片
五、实验结果
整体结果标注框准确率在90%以上,搭配算法调优排序后的准确率在70-80%。汉字分类识别率在70%左右
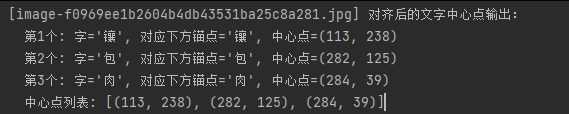
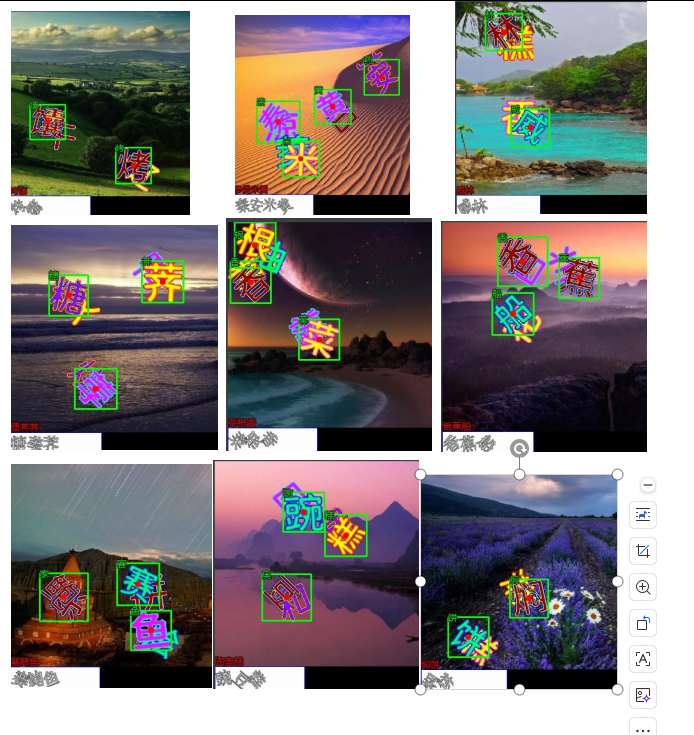
六、工程实践中的数学陷阱与解决案例
- 过拟合处理:数据过拟合说明掺杂的真实背景图太少,可以减少单个背景的生成的数量。或者增加真实的背景图
- 训练过慢:尝试更换默认的损失函数或者更换更小的模型
七、附录
- 逆向技术的合法使用范围
- 企业防护与用户隐私的平衡
- 个人观点,禁止商业行为,侵权请联系下架