在 Kubernetes 集群上部署一个高可用的 Consul 集群,确保一个节点挂了之后不会影响已注册到 Consul 的服务。利用 StatefulSet 和无头服务 HeadLess 的选举机制来实现 Consul 集群的高可用性,数据持久化方式选择HostPath,通过 nodeSelector 节点选择器将 Pod 调度到指定的三台机器(10.10.100.44,10.10.50.71,10.10.50.72)上运行,这样可以避免集群整体故障导致的数据丢失。
1. 准备工作
1.确定要创建的目录:
在我们的配置文件中,我们指定了
/data/consul作为hostPath的挂载目录,因此我们需要在三个节点(10.10.100.44,10.10.50.71,10.10.50.72)上创建此目录。2.创建目录的命令:
bashmkdir -p /data/consul chmod -R 755 /data/consul 登陆节点 10.10.100.44 ssh root@10.10.100.44 mkdir -p /data/consul chmod -R 755 /data/consul 登陆节点 10.10.50.71 ssh root@10.10.50.71 mkdir -p /data/consul chmod -R 755 /data/consul 登陆节点 10.10.50.72 ssh root@110.10.50.72 mkdir -p /data/consul chmod -R 755 /data/consul3.为要固定consul_pod的node节点打标签:
bash➜ ~ kubectl label nodes 10.10.100.44 nodeType=consul node/10.10.100.44 labeled ➜ ~ kubectl label nodes 10.10.50.71 nodeType=consul node/10.10.50.71 labeled ➜ ~ kubectl label nodes 10.10.50.72 nodeType=consul node/10.10.50.72 labeled4.创建 Consul Namespace
为 Consul 创建一个命名空间:
bashkubectl create namespace consul2.consul yaml文件编排
1.创建无头服务Service(Headless Service) :
无头服务将帮助我们识别集群中的所有Consul server节点:
bash# 新建consul-server-service.yaml touch consul-server-service.yaml
XMLapiVersion: v1 kind: Service metadata: name: consul namespace: consul labels: name: consul spec: selector: name: consul ports: - name: http port: 8500 targetPort: 8500 - name: https port: 8443 targetPort: 8443 - name: rpc port: 8400 targetPort: 8400 - name: serf-lan-tcp protocol: "TCP" port: 8301 targetPort: 8301 - name: serf-lan-udp protocol: "UDP" port: 8301 targetPort: 8301 - name: serf-wan-tcp protocol: "TCP" port: 8302 targetPort: 8302 - name: serf-wan-udp protocol: "UDP" port: 8302 targetPort: 8302 - name: server port: 8300 targetPort: 8300 - name: consul-dns port: 8600 targetPort: 8600保存为consul-server-service.yaml,并运行:
XMLkubectl create -f consul-server-service.yaml2.创建pod控制器StatefulSet:
XML# 新建consul-server-statefulset.yaml touch consul-server-statefulset.yaml
XMLapiVersion: apps/v1 kind: StatefulSet metadata: name: consul namespace: consul labels: name: consul spec: serviceName: consul selector: matchLabels: name: consul replicas: 3 template: metadata: labels: name: consul spec: terminationGracePeriodSeconds: 10 nodeSelector: nodeType: consul containers: - name: consul image: hashicorp/consul:1.17.3 imagePullPolicy: IfNotPresent args: - "agent" - "-server" - "-bootstrap-expect=3" - "-ui" - "-data-dir=/consul/data" - "-bind=0.0.0.0" - "-client=0.0.0.0" - "-advertise=$(POD_IP)" - "-retry-join=consul-0.consul.$(NAMESPACE).svc.cluster.local" - "-retry-join=consul-1.consul.$(NAMESPACE).svc.cluster.local" - "-retry-join=consul-2.consul.$(NAMESPACE).svc.cluster.local" - "-domain=cluster.local" - "-disable-host-node-id" env: - name: POD_IP valueFrom: fieldRef: fieldPath: status.podIP - name: NAMESPACE valueFrom: fieldRef: fieldPath: metadata.namespace ports: - containerPort: 8500 name: http - containerPort: 8400 name: rpc - containerPort: 8443 name: https-port - containerPort: 8301 name: serf-lan - containerPort: 8302 name: serf-wan - containerPort: 8600 name: consul-dns - containerPort: 8300 name: server volumeMounts: - name: data-volume mountPath: /consul/data volumes: - name: data-volume hostPath: path: /data/consul如何是单点部署的话,只需要修改consul-statefulset.yaml内容为:
XMLapiVersion: apps/v1 kind: StatefulSet metadata: name: consul namespace: consul labels: name: consul spec: serviceName: consul selector: matchLabels: name: consul replicas: 1 template: metadata: labels: name: consul spec: terminationGracePeriodSeconds: 10 nodeSelector: nodeType: consul containers: - name: consul image: hashicorp/consul:1.17.3 imagePullPolicy: IfNotPresent args: - "agent" - "-server" - "-dev" # 启用开发模式,取消选举机制 - "-ui" - "-data-dir=/consul/data" - "-bind=0.0.0.0" - "-client=0.0.0.0" - "-advertise=$(POD_IP)" - "-domain=cluster.local" - "-disable-host-node-id" env: - name: POD_IP valueFrom: fieldRef: fieldPath: status.podIP - name: NAMESPACE valueFrom: fieldRef: fieldPath: metadata.namespace ports: - containerPort: 8500 name: http - containerPort: 8400 name: rpc - containerPort: 8443 name: https-port - containerPort: 8301 name: serf-lan - containerPort: 8302 name: serf-wan - containerPort: 8600 name: consul-dns - containerPort: 8300 name: server volumeMounts: - name: data-volume mountPath: /consul/data volumes: - name: data-volume hostPath: path: /data/consul保存为
consul-server-statefulset.yaml,并运行:
XMLkubectl create -f consul-statefulset.yaml3.创建DNS Service:
Consul Dns Service将负责consul_web的访问入口,服务的注册地址:
bash# 新建consul-server-http.yaml touch consul-server-http.yaml
bashapiVersion: v1 kind: Service metadata: name: consul-server-http namespace: consul # 添加 namespace 字段并设置为 consul spec: selector: name: consul type: NodePort ports: - protocol: TCP port: 8500 targetPort: 8500 nodePort: 30018 name: consul-server-tcp保存为
consul-server-http.yaml,并运行:
bashkubectl create -f consul-server-http.yaml4.验证部署:
你可以通过检查 Pod 是否在预期的节点上运行来验证部署:
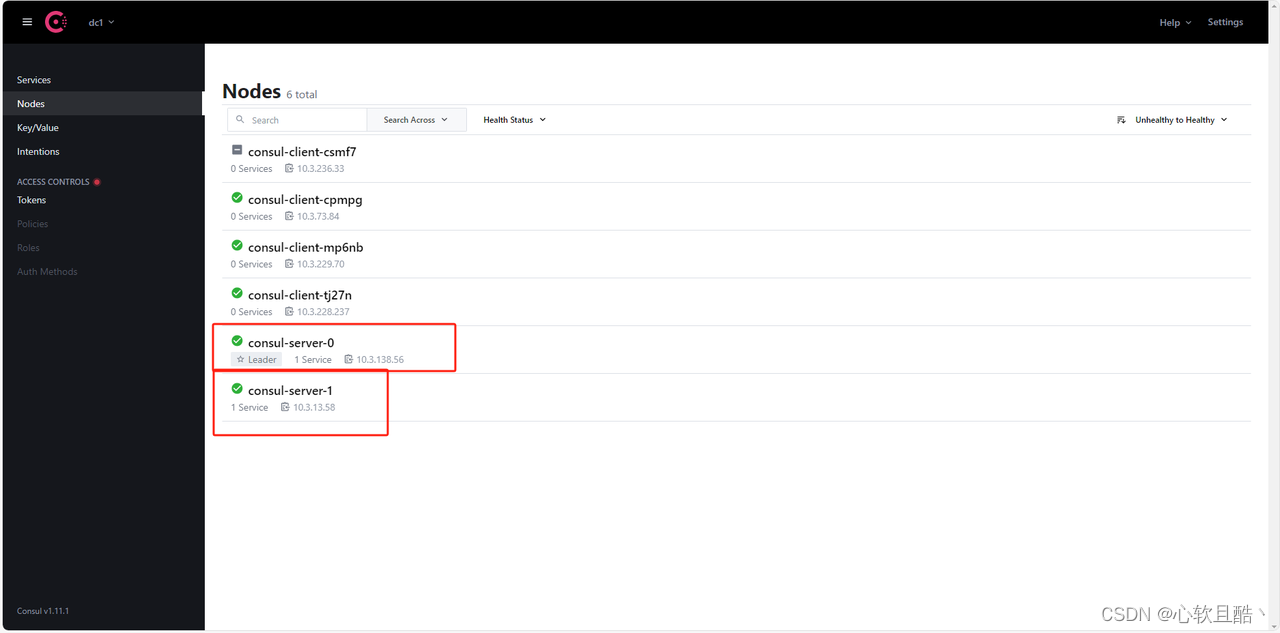
bashkubectl get pods -o wide -n consul可以看到3个consul server pod已正常启动并绑定到10.10.100.44 10.10.50.72 10.10.50.71 指定节点上:
随便找三台中的一个nodeip+30018端口打开consul_webui确定节点选举机制是否正常,在UI界面的Nodes栏可以看到,选举机制生效
bash在浏览器中访问 http://10.10.100.44:30018
5.服务注册:
k8s集群内部服务需要注册conusl服务只需要在启动参数中添加consul的注册地址端口和具体要注册的服务的key,即可实现服务的配置注册引用:
bashArgs: --consul-addr consul-server.consul:8500 --consul-key /app/dev/account_module
k8s部署(单点或)高可用consul集群
心软且酷丶2024-06-03 21:14

相关推荐
成为你的宁宁2 小时前
【K8s HPA 水平扩缩容】欢醉2 小时前
k8s调度容器失败The node had condition: [DiskPressure]Hui Baby19 小时前
K8S使用CRD和控制器简单应用Zhu7581 天前
在k8s环境部署Apache Superset最新版Zhu7581 天前
在k8s环境部署Apache zookeeper3.9.5,高可用,多pod运维大师1 天前
【K8S 运维实战】07-Pod生命周期与故障排查索西引擎1 天前
【React】Redux 中间件机制:副作用处理与数据流增强的形式化分析糖果店的幽灵2 天前
【DeepAgents 从入门到精通】Context Management 上下文管理easy_coder2 天前
K8s Pod 创建失败深度解析:从 IPAM 400 错误到子网资源耗尽heimeiyingwang2 天前
【架构实战】可观测性三支柱:日志、指标、链路的融合