Dlib是一个功能丰富的C++库,设计用于构建复杂的软件系统,尤其在机器学习、计算机视觉和数值计算等领域有着广泛的应用。以下是对Dlib的简要介绍:
-
特性:
- 机器学习算法:Dlib包含了各种机器学习算法,如支持向量机(SVMs)、决策树、随机森林、神经网络等。
- 深度学习框架:Dlib有一个简洁而强大的深度学习接口,允许开发者定义和训练自己的卷积神经网络(CNNs)。
- 图像处理:提供图像处理和计算机视觉工具,如面部特征检测、物体检测、图像变换等。
- 数学工具:提供线性代数、优化算法和统计工具,适合数值计算任务。
- 实用工具:包括日志记录、线程管理、内存管理、序列化等功能。
-
文档和示例:
- 全面文档:Dlib的每个类和函数都有详细的文档说明,方便开发者理解和使用。
- 调试支持:在调试模式下,Dlib提供帮助调试代码的功能,有助于快速定位问题。
- 示例代码:官方提供许多实例代码,便于学习和参考。
-
平台兼容性:
- 跨平台:Dlib可以在Windows、Mac OS和Linux等多种操作系统上编译和运行。
- 独立性:不依赖于第三方库,易于集成到项目中,编译过程简单。
-
开源许可:
- BSD许可证:Dlib采用宽松的BSD许可证,允许在商业和非商业项目中免费使用。
-
应用领域:
- 工业界:在机器人、嵌入式设备、移动应用等领域有应用。
- 学术界:在研究项目中作为强大的工具,用于实验和原型设计。
环境搭建
源码地址:https://github.com/davisking/dlib
人脸检测
cpp
#include <dlib/image_processing/frontal_face_detector.h>
#include <dlib/image_processing.h>
#include <dlib/opencv.h>
#include <opencv2/opencv.hpp>
void FaceDetector(cv::Mat& img)
{
// 加载人脸检测器
auto detector = dlib::get_frontal_face_detector();
// 将图片转换为dlib图像格式
dlib::cv_image<dlib::bgr_pixel> cimg(cvIplImage(img));
// 检测人脸
std::vector<dlib::rectangle> dets = detector(cimg);
std::cout << "number of faces detected:" << dets.size() << std::endl;
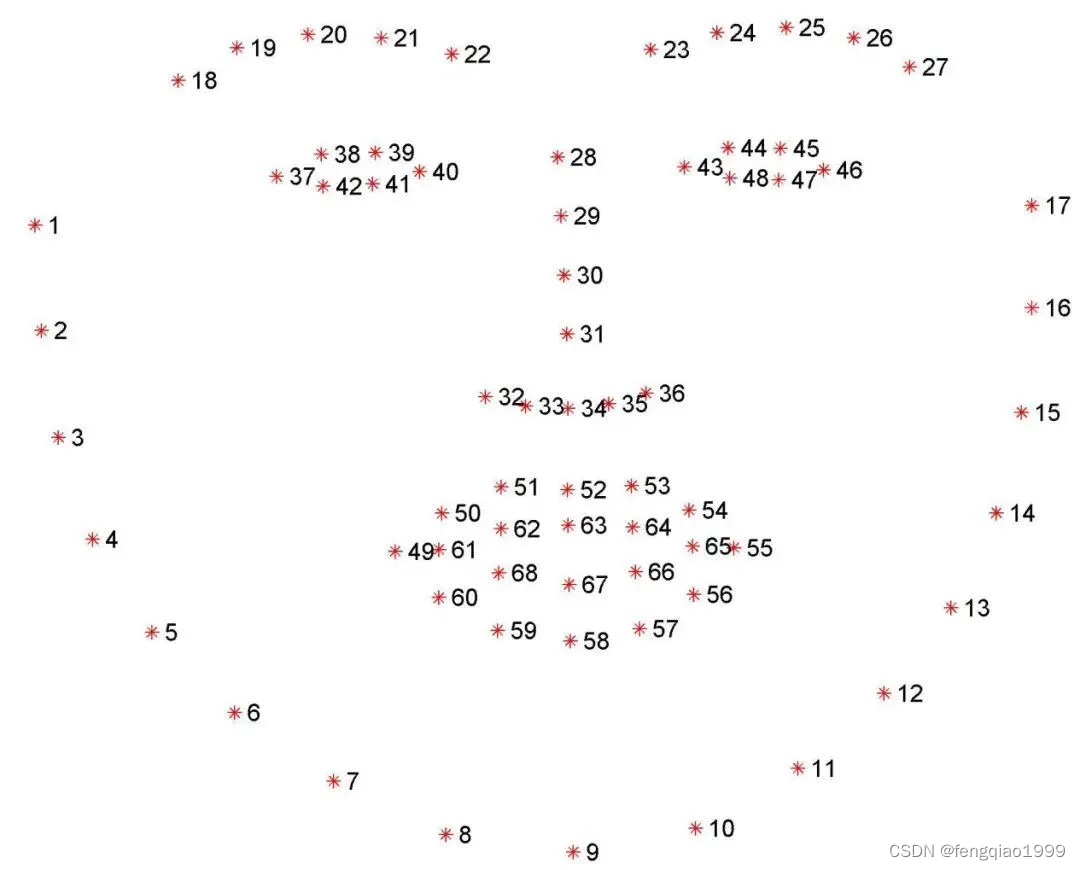
}人脸关键点检测
关键点分布
示例代码
cpp
#include <dlib/image_processing/frontal_face_detector.h>
#include <dlib/image_processing/render_face_detections.h>
#include <dlib/image_processing.h>
#include <dlib/opencv.h>


using namespace dlib;
using namespace std;

int main()
{
    // 加载人脸检测器
    frontal_face_detector detector = get_frontal_face_detector();

    // 加载人脸关键点检测器
    shape_predictor sp;
    deserialize("shape_predictor_68_face_landmarks.dat") >> sp;

    // 读取图片
    cv::Mat img = cv::imread("image.jpg");

    // 将图片转换为dlib图像格式
    cv_image<bgr_pixel> cimg(img);

    // 检测人脸
    std::vector<rectangle> faces = detector(cimg);

    // 选择最大的人脸
    int max_area = 0;
    rectangle max_face;
    for (int i = 0; i < faces.size(); i++)
    {
        int area = faces[i].area();
        if (area > max_area)
        {
            max_area = area;
            max_face = faces[i];
        }
    }

    // 检测关键点
    full_object_detection shape = sp(cimg, max_face);


}
人脸识别
参考代码
cpp
#include <dlib/dnn.h>
#include <dlib/gui_widgets.h>
#include <dlib/clustering.h>
#include <dlib/string.h>
#include <dlib/image_io.h>
#include <dlib/image_processing/frontal_face_detector.h>

using namespace dlib;
using namespace std;

// ----------------------------------------------------------------------------------------

// The next bit of code defines a ResNet network.  It's basically copied
// and pasted from the dnn_imagenet_ex.cpp example, except we replaced the loss
// layer with loss_metric and made the network somewhat smaller.  Go read the introductory
// dlib DNN examples to learn what all this stuff means.
//
// Also, the dnn_metric_learning_on_images_ex.cpp example shows how to train this network.
// The dlib_face_recognition_resnet_model_v1 model used by this example was trained using
// essentially the code shown in dnn_metric_learning_on_images_ex.cpp except the
// mini-batches were made larger (35x15 instead of 5x5), the iterations without progress
// was set to 10000, and the training dataset consisted of about 3 million images instead of
// 55.  Also, the input layer was locked to images of size 150.
template <template <int,template<typename>class,int,typename> class block, int N, template<typename>class BN, typename SUBNET>
using residual = add_prev1<block<N,BN,1,tag1<SUBNET>>>;

template <template <int,template<typename>class,int,typename> class block, int N, template<typename>class BN, typename SUBNET>
using residual_down = add_prev2<avg_pool<2,2,2,2,skip1<tag2<block<N,BN,2,tag1<SUBNET>>>>>>;

template <int N, template <typename> class BN, int stride, typename SUBNET>
using block  = BN<con<N,3,3,1,1,relu<BN<con<N,3,3,stride,stride,SUBNET>>>>>;

template <int N, typename SUBNET> using ares      = relu<residual<block,N,affine,SUBNET>>;
template <int N, typename SUBNET> using ares_down = relu<residual_down<block,N,affine,SUBNET>>;

template <typename SUBNET> using alevel0 = ares_down<256,SUBNET>;
template <typename SUBNET> using alevel1 = ares<256,ares<256,ares_down<256,SUBNET>>>;
template <typename SUBNET> using alevel2 = ares<128,ares<128,ares_down<128,SUBNET>>>;
template <typename SUBNET> using alevel3 = ares<64,ares<64,ares<64,ares_down<64,SUBNET>>>>;
template <typename SUBNET> using alevel4 = ares<32,ares<32,ares<32,SUBNET>>>;

using anet_type = loss_metric<fc_no_bias<128,avg_pool_everything<
                            alevel0<
                            alevel1<
                            alevel2<
                            alevel3<
                            alevel4<
                            max_pool<3,3,2,2,relu<affine<con<32,7,7,2,2,
                            input_rgb_image_sized<150>
                            >>>>>>>>>>>>;

// ----------------------------------------------------------------------------------------

std::vector<matrix<rgb_pixel>> jitter_image(
    const matrix<rgb_pixel>& img
);

// ----------------------------------------------------------------------------------------

int main(int argc, char** argv) try
{
    if (argc != 2)
    {
        cout << "Run this example by invoking it like this: " << endl;
        cout << "   ./dnn_face_recognition_ex faces/bald_guys.jpg" << endl;
        cout << endl;
        cout << "You will also need to get the face landmarking model file as well as " << endl;
        cout << "the face recognition model file.  Download and then decompress these files from: " << endl;
        cout << "http://dlib.net/files/shape_predictor_5_face_landmarks.dat.bz2" << endl;
        cout << "http://dlib.net/files/dlib_face_recognition_resnet_model_v1.dat.bz2" << endl;
        cout << endl;
        return 1;
    }

    // The first thing we are going to do is load all our models.  First, since we need to
    // find faces in the image we will need a face detector:
    frontal_face_detector detector = get_frontal_face_detector();
    // We will also use a face landmarking model to align faces to a standard pose:  (see face_landmark_detection_ex.cpp for an introduction)
    shape_predictor sp;
    deserialize("shape_predictor_5_face_landmarks.dat") >> sp;
    // And finally we load the DNN responsible for face recognition.
    anet_type net;
    deserialize("dlib_face_recognition_resnet_model_v1.dat") >> net;

    matrix<rgb_pixel> img;
    load_image(img, argv[1]);
    // Display the raw image on the screen
    image_window win(img);

    // Run the face detector on the image of our action heroes, and for each face extract a
    // copy that has been normalized to 150x150 pixels in size and appropriately rotated
    // and centered.
    std::vector<matrix<rgb_pixel>> faces;
    for (auto face : detector(img))
    {
        auto shape = sp(img, face);
        matrix<rgb_pixel> face_chip;
        extract_image_chip(img, get_face_chip_details(shape,150,0.25), face_chip);
        faces.push_back(move(face_chip));
        // Also put some boxes on the faces so we can see that the detector is finding
        // them.
        win.add_overlay(face);
    }

    if (faces.size() == 0)
    {
        cout << "No faces found in image!" << endl;
        return 1;
    }

    // This call asks the DNN to convert each face image in faces into a 128D vector.
    // In this 128D vector space, images from the same person will be close to each other
    // but vectors from different people will be far apart.  So we can use these vectors to
    // identify if a pair of images are from the same person or from different people.
    std::vector<matrix<float,0,1>> face_descriptors = net(faces);


    // In particular, one simple thing we can do is face clustering.  This next bit of code
    // creates a graph of connected faces and then uses the Chinese whispers graph clustering
    // algorithm to identify how many people there are and which faces belong to whom.
    std::vector<sample_pair> edges;
    for (size_t i = 0; i < face_descriptors.size(); ++i)
    {
        for (size_t j = i; j < face_descriptors.size(); ++j)
        {
            // Faces are connected in the graph if they are close enough.  Here we check if
            // the distance between two face descriptors is less than 0.6, which is the
            // decision threshold the network was trained to use.  Although you can
            // certainly use any other threshold you find useful.
            if (length(face_descriptors[i]-face_descriptors[j]) < 0.6)
                edges.push_back(sample_pair(i,j));
        }
    }
    std::vector<unsigned long> labels;
    const auto num_clusters = chinese_whispers(edges, labels);
    // This will correctly indicate that there are 4 people in the image.
    cout << "number of people found in the image: "<< num_clusters << endl;


    // Now let's display the face clustering results on the screen.  You will see that it
    // correctly grouped all the faces.
    std::vector<image_window> win_clusters(num_clusters);
    for (size_t cluster_id = 0; cluster_id < num_clusters; ++cluster_id)
    {
        std::vector<matrix<rgb_pixel>> temp;
        for (size_t j = 0; j < labels.size(); ++j)
        {
            if (cluster_id == labels[j])
                temp.push_back(faces[j]);
        }
        win_clusters[cluster_id].set_title("face cluster " + cast_to_string(cluster_id));
        win_clusters[cluster_id].set_image(tile_images(temp));
    }


    // Finally, let's print one of the face descriptors to the screen.
    cout << "face descriptor for one face: " << trans(face_descriptors[0]) << endl;

    // It should also be noted that face recognition accuracy can be improved if jittering
    // is used when creating face descriptors.  In particular, to get 99.38% on the LFW
    // benchmark you need to use the jitter_image() routine to compute the descriptors,
    // like so:
    matrix<float,0,1> face_descriptor = mean(mat(net(jitter_image(faces[0]))));
    cout << "jittered face descriptor for one face: " << trans(face_descriptor) << endl;
    // If you use the model without jittering, as we did when clustering the bald guys, it
    // gets an accuracy of 99.13% on the LFW benchmark.  So jittering makes the whole
    // procedure a little more accurate but makes face descriptor calculation slower.


    cout << "hit enter to terminate" << endl;
    cin.get();
}
catch (std::exception& e)
{
    cout << e.what() << endl;
}

// ----------------------------------------------------------------------------------------

std::vector<matrix<rgb_pixel>> jitter_image(
    const matrix<rgb_pixel>& img
)
{
    // All this function does is make 100 copies of img, all slightly jittered by being
    // zoomed, rotated, and translated a little bit differently. They are also randomly
    // mirrored left to right.
    thread_local dlib::rand rnd;

    std::vector<matrix<rgb_pixel>> crops;
    for (int i = 0; i < 100; ++i)
        crops.push_back(jitter_image(img,rnd));

    return crops;
}
其中关键点检测shape_predictor_5_face_landmarks.dat模型也可以改成shape_predictor_68_face_landmarks.dat
人脸识别过程中,需要根据预先录入的人脸信息得到人脸关键点数组
std::vector<matrix<rgb_pixel>> faces;
然后得到人脸描述信息数组
std::vector<matrix<float,0,1>> face_descriptors = net(faces);
同样可以以这种形式得到当前人脸的描述信息,然后去数组中匹配最接近的人脸信息
length(face_descriptorsi-face_descriptorsj)
计算人脸描述的差异,值越小标识越接近。
效果展示
人脸检测
