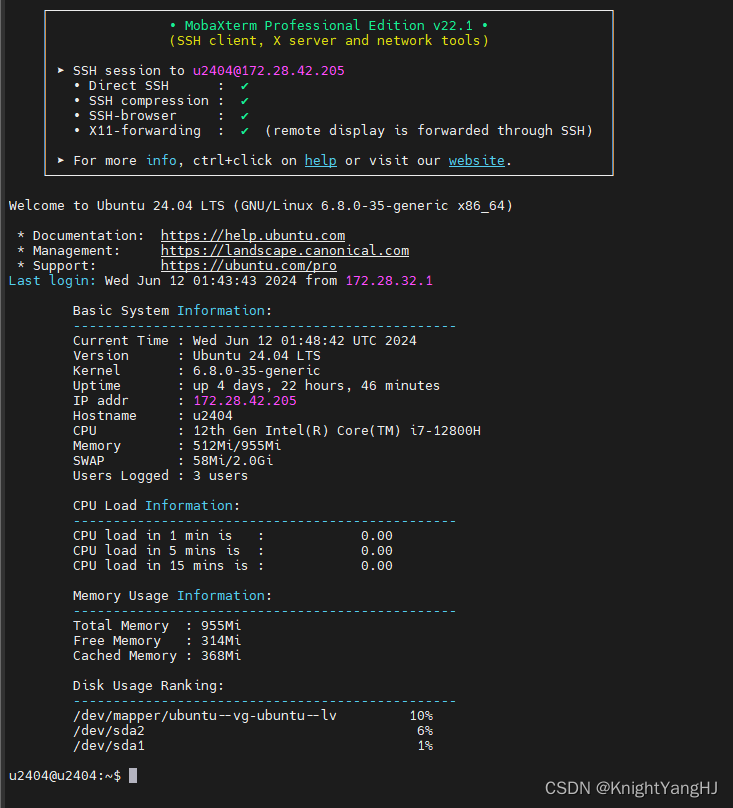
作为Linux运维工程师,我们经常需要快速掌握系统的状态,包括内存使用、CPU负载等关键信息。手动检查这些信息不仅繁琐,而且效率低下。今天,我要给大家介绍一个实用的小技巧,通过一个简单的脚本,每次登录Linux终端时,系统信息就能自动显示出来,大大提高了我们的工作效率。
脚本原理
这个脚本的核心原理是利用Linux的/etc/profile.d/目录。在该目录下的脚本会在每次用户登录时自动执行。因此,我们只需要将编写好的脚本放入此目录,并确保其具有可执行权限。
脚本内容
脚本内容可以根据系统管理员的需求进行定制,但基本的框架通常包括以下几个部分:
- 系统基本信息:包括系统版本、内核版本、运行时间、IP地址、主机名等。
- 硬件信息:如CPU型号、内存总量及使用情况、交换分区使用情况。
- 系统负载:显示CPU在1分钟、5分钟和10分钟的平均负载。
- 磁盘使用情况:列出各分区的使用率。
以下是一个脚本的示例框架:
bash
#!/bin/bash

# System status check script written by Knight Yang

# Define the log file path
LOGFILE="$HOME/system_status_check.log"

# Function to log messages with a timestamp
log() {
    echo "$(date '+%Y-%m-%d %H:%M:%S') - $1" >> "$LOGFILE"
}

# Check if the log file directory is writable
if [ ! -w "$(dirname "$LOGFILE")" ]; then
    log "Error: Unable to write to log file."
    exit 1
fi

# Check for the existence of required commands
required_commands=("hostname" "awk" "free" "df" "uptime" "lscpu" "uname" "who" "cat")
for cmd in "${required_commands[@]}"; do
    if ! command -v "$cmd" &> /dev/null; then
        log "Error: Command '$cmd' is required but not found."
        exit 1
    fi
done

# Function to display system information
display_system_info() {
    # Get IP address and hostname
    IP_ADDR=$(hostname -I | cut -d' ' -f1)
    HOSTNAME=$(hostname)

    # Get CPU model name and remove leading spaces and tabs
    CPU_MODEL=$(lscpu | awk -F': ' '/^Model name:/ {sub(/^[ \t]+/, ""); print $2}')

    # Trim any remaining leading spaces, just in case
    CPU_MODEL=$(echo "$CPU_MODEL" | sed 's/^[ \t]*//')


    # Log and display basic system information
    log "Starting basic system information check."
    echo
    echo -e "\tBasic System Information:"
    echo -e "\t------------------------------------------------"
    echo -e "\tCurrent Time : $(date)"
    echo -e "\tVersion      : $(cat /etc/os-release | grep -w "PRETTY_NAME" | cut -d= -f2 | tr -d '"')"
    echo -e "\tKernel       : $(uname -r)"
    echo -e "\tUptime       : $(uptime -p)"
    echo -e "\tIP addr      : $IP_ADDR"
    echo -e "\tHostname     : $HOSTNAME"
    echo -e "\tCPU          : $CPU_MODEL"
    echo -e "\tMemory       : $(free -h | awk '/^Mem:/ { print $3 "/" $2 }')"
    echo -e "\tSWAP         : $(free -h | awk '/^Swap:/ { print $3 "/" $2 }')"
    echo -e "\tUsers Logged : $(who | wc -l) users"
    echo
    log "Completed basic system information check."
}

# Function to display CPU load information
display_cpu_load() {
    log "Starting CPU load information check."
    echo -e "\tCPU Load Information:"
    echo -e "\t------------------------------------------------"
    echo -e "\tCPU load in 1 min is   : $(awk '{printf "%15s", $1}' /proc/loadavg)"
    echo -e "\tCPU load in 5 mins is  : $(awk '{printf "%15s", $2}' /proc/loadavg)"
    echo -e "\tCPU load in 15 mins is : $(awk '{printf "%15s", $3}' /proc/loadavg)"
    echo
    log "Completed CPU load information check."
}

# Function to display memory information
display_memory_info() {
    log "Starting memory information check."
    echo -e "\tMemory Usage Information:"
    echo -e "\t------------------------------------------------"
    echo -e "\tTotal Memory  : $(free -h | awk '/Mem/{print $2}')"
    echo -e "\tFree Memory   : $(free -h | awk '/Mem/{print $4}')"
    echo -e "\tCached Memory : $(free -h | awk '/Mem/{print $6}')"
    echo
    log "Completed memory information check."
}

# Function to rank disk usage
rank_disk_usage() {
    log "Starting disk usage ranking check."
    echo -e "\tDisk Usage Ranking:"
    echo -e "\t------------------------------------------------"
    df -h -x tmpfs -x devtmpfs | sort -nr -k 5 | awk '/dev/{printf "\t%-39s %5s\n", $1, $5}'
    echo
    log "Completed disk usage ranking check."
}

# Main execution logic
log "Script execution started."
display_system_info
display_cpu_load
display_memory_info
rank_disk_usage
log "Script execution completed."
脚本部署
要部署这个脚本,您需要执行以下步骤:
-
将脚本保存为
systeminfo.sh。 -
将脚本复制到
/etc/profile.d/目录下:bashsudo cp systeminfo.sh /etc/profile.d/ -
给予脚本可执行权限:
bashsudo chmod +x /etc/profile.d/systeminfo.sh

结语
通过这个简单的脚本,我们不仅能够让每次登录Linux系统时自动显示关键的系统信息,还能够根据需要轻松地扩展或修改显示的内容。这不仅提升了运维工作的效率,也增加了工作的科技感。希望这个小技巧能够帮助到每一位Linux运维工程师。