「OC」UI
文章目录
无限轮播图的实现以及UIPageControl的实际运用
明确要求
我们要实现一个能够进行无限滚动播放的视图程序,首先需要实现的是一个简单的滚动图片视图,在视图之中添加相关的UIPageControl的控件,让我们能够知道我们当前图片是处在滚动页面的哪个位置上。在实现简单滚动视图的基础上进行修改,使其实现无限轮播的功能。
简单滚动视图的实现
提到滚动视图,我们就会想起刚刚学习的UIScrollView,使用UIImageVIew布局在UIScrollView之中,我们写给其写个函数将UIScrollView的框架封装起来
objc
- (void)setupScrollView {
    //进行初始化操作
    self.scrollView = [[UIScrollView alloc] init];
    self.scrollView.frame = CGRectMake(0, 80, [UIScreen mainScreen].bounds.size.width, [UIScreen mainScreen].bounds.size.height - 320);
  //设置整页滚动
    self.scrollView.pagingEnabled = YES;
    self.scrollView.scrollEnabled = YES;
    self.scrollView.delegate = self;
  //由于我们使用UIPageControl所以,
    self.scrollView.showsHorizontalScrollIndicator = NO;

    CGFloat h = [UIScreen mainScreen].bounds.size.height - 320;
    CGFloat w = [UIScreen mainScreen].bounds.size.width;
    self.scrollView.contentSize = CGSizeMake(w * 5, h); // 五个图片设置五个宽度

    for (int i = 0; i < 5; i++) {
        NSString *name = [NSString stringWithFormat:@"%d.jpg", i];
        UIImageView *imageView = [[UIImageView alloc] initWithImage:[UIImage imageNamed:name]];
        imageView.frame = CGRectMake(i * w, 0, w, h);
        [self.scrollView addSubview:imageView];
    }
    [self.view addSubview:self.scrollView];
}
UIPageControl的实现
对于UIPageControl的实现十分简单,实现如下
objc
- (void)setupPageControl {
    self.pageControl = [[UIPageControl alloc] init];
    //设置PageControl与滚动视图对齐
    self.pageControl.frame = CGRectMake(0, CGRectGetMaxY(self.scrollView.frame) - 20, CGRectGetWidth(self.scrollView.frame), 20);
    self.pageControl.numberOfPages = 5;
    //设置初始页面
    self.pageControl.currentPage = 0;
    self.pageControl.pageIndicatorTintColor = [UIColor redColor];
    self.pageControl.currentPageIndicatorTintColor = [UIColor blueColor];
    self.pageControl.userInteractionEnabled = NO;
    [self.view addSubview:self.pageControl];
}那么对于当前位置的UIPageControl显示的变化,我们也要控制下面显示的变化,对于我们显示的变化,我们可以进行更深入的控制,,我们在当前偏移量添加半个视图宽度,这样当我们当前图片偏移量超过半个宽度之后,UIPageControl的位置就会发生变化,就会显得我们的显示更加智能,我们将代码写在scrollViewDidScroll:(UIScrollView *)scrollView之中,这个函数是当UIScrollView发生滚动就会调用。
objc
(void)scrollViewDidScroll:(UIScrollView *)scrollView {
    CGFloat offSetX = scrollView.contentOffset.x;
    //求取当前页
    CGFloat pageWidth = scrollView.frame.size.width;
    int currentPage = floor((offSetX - pageWidth / 2) / pageWidth) + 1;
    //控制UIPageControl 的当前页
    self.pageControl.currentPage = currentPage;
}
设置NSTimer实现自动移动
我们可以设置一个定时器,使其不断进行视图的替换,我们设置间隔为2秒,每两秒调用翻页的方法,对滚动视图界面进行翻页,需要特殊判断的是,当移动到最后的时候,我们需要将其调到第一个视图。
objc
- (void)setupTimer {
    //创建定时器
	_timer = [NSTimer scheduledTimerWithTimeInterval:2.0 target:self selector:@selector(nextPage) userInfo:nil repeats:YES];

}

- (void)nextPage {
    NSInteger page = self.pageControl.currentPage;
   	if (page == self.pageControl.numberOfPages - 1) {
    		page = 0;
    } else {
    	 	page++;
    }
    CGFloat offSetX = page * self.scrollView.frame.size.width;
    [self.scrollView setContentOffset:CGPointMake(offSetX, 0) animated:YES];

}
补充实现
当我们在使用鼠标对滚动视图进行抓取移动时,由于定时器的存在,视图仍然会进行移动,因此,我们为了方便操作,我们可以在当鼠标进行点击时,将计时器取消,当鼠标结束拖拽时重新创建计时器,我们就需要用上两个函数。
-(void)scrollViewWillBeginDragging:(UIScrollView *)scrollView:当开始进行拖拽-(void)scrollViewDidEndDragging:(UIScrollView *)scrollView willDecelerate:(BOOL)decelerate:当拖拽结束时
实现如下:
objc
-(void)scrollViewWillBeginDragging:(UIScrollView *)scrollView {
    if ([self.timer isValid]) {
        [self.timer invalidate];
        self.timer = nil;
    }
}
-(void)scrollViewDidEndDragging:(UIScrollView *)scrollView willDecelerate:(BOOL)decelerate{
    if (![_timer isValid]) {
    _timer = [NSTimer scheduledTimerWithTimeInterval:2.0 target:self selector:@selector(nextPage) userInfo:nil repeats:YES];
    }
}
进行无限滚动视图的修改
思路
我们在对其进行无限滚动视图的修改,首先我们要了解无限滚动视图的如何进行实现的,我们需要在原本的滚动视图之中,左右各自添加一个新的视图。这是为什么呢?
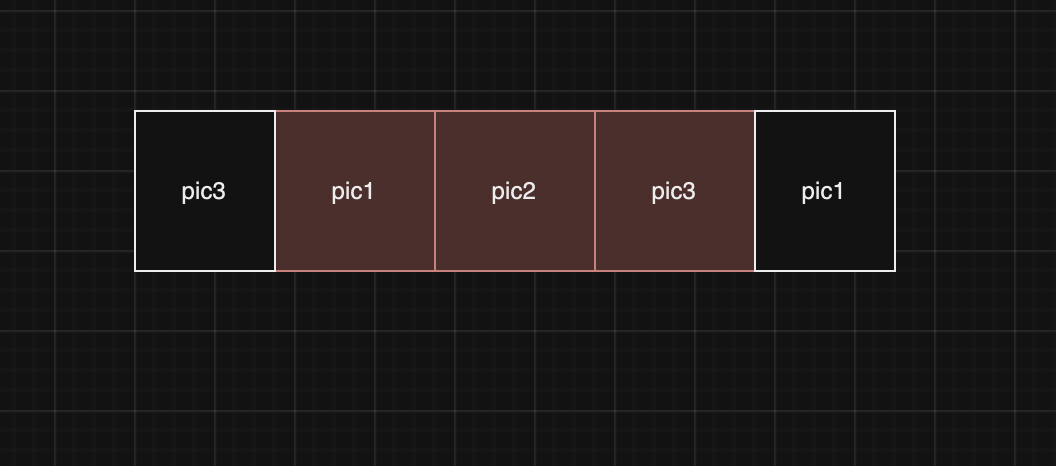
我们将五张图片简化为三张图片,形状如下:

通过观察我们的原理图,我们可以很清晰的了解我们需要实现的功能:当我们的滚动视图处于第二张视图的位置(第一张pic1的位置)时,向前滑动所展示的图片是png3;当处于倒数第二张视图的位置(第二张pic3)时,向后滚动要展现的图片是pic1。了解轮播图是这个结构之后,我们就要思考如何去实现这个功能,我们使用偏移量进行解决,当我们即将翻到从pic1翻到pic3(情况1)或者pic3直接翻到pic1(情况2)的时候,我们从偏移量之中读取这种情况,然后进行滚动视图的变化,当情况1出现时,就会将当前视图从pic1的位置直接跳到标红的pic3的位置:情况2同理视图就会从pic3跳转到标红的pic1。由于动画效果的存在,我们进行滑动的时候,并不会在显示之中发现视图变化的不自然。
实现
我们对以上的程序进行修改,由于是五张图片,那么我们在左右两边多添加两张图片,我们称第一张和最后一张图片为实现无限滚动视图的假图,我们对框架内的函数进行修改,此外我们还需要将滚动视图的定位定位至pic1处。
ScrollView
objc
- (void)setupScrollView {
    self.scrollView = [[UIScrollView alloc] init];
    self.scrollView.frame = CGRectMake(0, 80, [UIScreen mainScreen].bounds.size.width, [UIScreen mainScreen].bounds.size.height - 320);
    self.scrollView.pagingEnabled = YES;
    self.scrollView.scrollEnabled = YES;
    self.scrollView.delegate = self;
    self.scrollView.showsHorizontalScrollIndicator = NO;

    CGFloat h = [UIScreen mainScreen].bounds.size.height - 320;
    CGFloat w = [UIScreen mainScreen].bounds.size.width;
    self.scrollView.contentSize = CGSizeMake(w * 7, h); // 包括两个额外的页面

    for (int i = 0; i < 7; i++) {
        NSString *name;
        if (i == 0) {
            name = @"5.jpg"; // 第一页前面的假页
        } else if (i == 6) {
            name = @"1.jpg"; // 最后一页后面的假页
        } else {
            name = [NSString stringWithFormat:@"%d.jpg", i];
        }

        UIImageView *imageView = [[UIImageView alloc] initWithImage:[UIImage imageNamed:name]];
        imageView.frame = CGRectMake(i * w, 0, w, h);
        [self.scrollView addSubview:imageView];
    }

    // 设置默认显示的页面(实际第一页)
    [self.scrollView setContentOffset:CGPointMake(w, 0) animated:NO];
    [self.view addSubview:self.scrollView];
}
scrollViewDidScroll:(UIScrollView *)scrollView在这个函数之中的内容就是我们实现无限滚动视图的关键,请看代码
objc
- (void)scrollViewDidScroll:(UIScrollView *)scrollView {
    CGFloat offsetX = scrollView.contentOffset.x;
  //滚动视图的显示宽度
    CGFloat pageWidth = scrollView.frame.size.width;

  //新添加的内容
    if (offsetX >= pageWidth * 6) {
        // 滚动到假的最后一页,瞬间跳到实际第一页
        [self.scrollView setContentOffset:CGPointMake(pageWidth, 0) animated:NO];
    } else if (offsetX <= 0) {
        // 滚动到假的第一页,瞬间跳到实际最后一页
        [self.scrollView setContentOffset:CGPointMake(pageWidth * 5, 0) animated:NO];
    }

    // 更新UIPageControl的当前页
    NSInteger currentPage = (scrollView.contentOffset.x + pageWidth / 2) / pageWidth;
  //当翻到假页时对pagecontrol进行修改,使其符合要求
    if (currentPage == 0) {
        self.pageControl.currentPage = 4;
    } else if (currentPage == 6) {
        self.pageControl.currentPage = 0;
    } else {
        self.pageControl.currentPage = currentPage - 1;
    }
}- 在我们使用翻页的方法也需要进行一点点的改变,我们要将page的偏移量加一。在这里还有一个小细节,由于无限滚动视图的实现,我们不再需要对最后一张视图进行特判,我们只需要在每次调用的时候然page++就可以了。
objc
- (void)nextPage {
    NSInteger page = self.pageControl.currentPage;
    if (page == self.pageControl.numberOfPages - 1) {
        page = 0;
    } else {
        page++;
    }

    CGFloat offsetX = (page + 1) * self.scrollView.frame.size.width; // 偏移量加1,因为第1页是假的
    [self.scrollView setContentOffset:CGPointMake(offsetX, 0) animated:YES];
}
完整代码展示
objc
#import "ViewController.h"

@interface ViewController () <UIScrollViewDelegate>
@property (nonatomic, strong) UIScrollView *scrollView;
@property (nonatomic, strong) UIPageControl *pageControl;
@property (nonatomic, strong) NSTimer *timer;
@end

@implementation ViewController

- (void)viewDidLoad {
    [super viewDidLoad];

    [self setupScrollView];
    [self setupPageControl];
    [self setupTimer];
}

- (void)setupScrollView {
    self.scrollView = [[UIScrollView alloc] init];
    self.scrollView.frame = CGRectMake(0, 80, [UIScreen mainScreen].bounds.size.width, [UIScreen mainScreen].bounds.size.height - 320);
    self.scrollView.pagingEnabled = YES;
    self.scrollView.scrollEnabled = YES;
    self.scrollView.delegate = self;
    self.scrollView.showsHorizontalScrollIndicator = NO;

    CGFloat h = [UIScreen mainScreen].bounds.size.height - 320;
    CGFloat w = [UIScreen mainScreen].bounds.size.width;
    self.scrollView.contentSize = CGSizeMake(w * 7, h); // 包括两个额外的页面

    for (int i = 0; i < 7; i++) {
        NSString *name;
        if (i == 0) {
            name = @"5.jpg"; // 第一页前面的假页
        } else if (i == 6) {
            name = @"1.jpg"; // 最后一页后面的假页
        } else {
            name = [NSString stringWithFormat:@"%d.jpg", i];
        }

        UIImageView *imageView = [[UIImageView alloc] initWithImage:[UIImage imageNamed:name]];
        imageView.frame = CGRectMake(i * w, 0, w, h);
        [self.scrollView addSubview:imageView];
    }

    // 设置默认显示的页面(实际第一页)
    [self.scrollView setContentOffset:CGPointMake(w, 0) animated:NO];
    [self.view addSubview:self.scrollView];
}

- (void)setupPageControl {
    self.pageControl = [[UIPageControl alloc] init];
    self.pageControl.frame = CGRectMake(0, CGRectGetMaxY(self.scrollView.frame) - 20, CGRectGetWidth(self.scrollView.frame), 20);
    self.pageControl.numberOfPages = 5;
    self.pageControl.currentPage = 0;
    self.pageControl.pageIndicatorTintColor = [UIColor redColor];
    self.pageControl.currentPageIndicatorTintColor = [UIColor blueColor];
    self.pageControl.userInteractionEnabled = NO;

    [self.view addSubview:self.pageControl];
}

- (void)setupTimer {
    self.timer = [NSTimer scheduledTimerWithTimeInterval:2.0 target:self selector:@selector(nextPage) userInfo:nil repeats:YES];
}

- (void)nextPage {
    NSInteger page = self.pageControl.currentPage;
    if (page == self.pageControl.numberOfPages - 1) {
        page = 0;
    } else {
        page++;
    }

    CGFloat offsetX = (page + 1) * self.scrollView.frame.size.width; // 偏移量加1,因为第1页是假的
    [self.scrollView setContentOffset:CGPointMake(offsetX, 0) animated:YES];
}

- (void)scrollViewDidScroll:(UIScrollView *)scrollView {
    CGFloat offsetX = scrollView.contentOffset.x;
    CGFloat pageWidth = scrollView.frame.size.width;

    if (offsetX >= pageWidth * 6) {
        // 滚动到假的最后一页,瞬间跳到实际第一页
        [self.scrollView setContentOffset:CGPointMake(pageWidth, 0) animated:NO];
    } else if (offsetX <= 0) {
        // 滚动到假的第一页,瞬间跳到实际最后一页
        [self.scrollView setContentOffset:CGPointMake(pageWidth * 5, 0) animated:NO];
    }

    // 更新UIPageControl的当前页
    NSInteger currentPage = (scrollView.contentOffset.x + pageWidth / 2) / pageWidth;
    if (currentPage == 0) {
        self.pageControl.currentPage = 4;
    } else if (currentPage == 6) {
        self.pageControl.currentPage = 0;
    } else {
        self.pageControl.currentPage = currentPage - 1;
    }- (void)nextPage {
    NSInteger page = self.pageControl.currentPage;
    if (page == self.pageControl.numberOfPages - 1) {
        page = 0;
    } else {
        page++;
    }

    CGFloat offsetX = (page + 1) * self.scrollView.frame.size.width; // 偏移量加1,因为第1页是假的
    [self.scrollView setContentOffset:CGPointMake(offsetX, 0) animated:YES];
}

- (void)scrollViewDidScroll:(UIScrollView *)scrollView {
    CGFloat offsetX = scrollView.contentOffset.x;
    CGFloat pageWidth = scrollView.frame.size.width;

    if (offsetX >= pageWidth * 6) {
        // 滚动到假的最后一页,瞬间跳到实际第一页
        [self.scrollView setContentOffset:CGPointMake(pageWidth, 0) animated:NO];
    } else if (offsetX <= 0) {
        // 滚动到假的第一页,瞬间跳到实际最后一页
        [self.scrollView setContentOffset:CGPointMake(pageWidth * 5, 0) animated:NO];
    }

    // 更新UIPageControl的当前页
    NSInteger currentPage = (scrollView.contentOffset.x + pageWidth / 2) / pageWidth;
    if (currentPage == 0) {
        self.pageControl.currentPage = 4;
    } else if (currentPage == 6) {
        self.pageControl.currentPage = 0;
    } else {
        self.pageControl.currentPage = currentPage - 1;
    }
}
-(void)scrollViewWillBeginDragging:(UIScrollView *)scrollView{
    if ([_timer isValid]) {
        [_timer invalidate];
        _timer = nil;
    }
}
-(void)scrollViewDidEndDragging:(UIScrollView *)scrollView willDecelerate:(BOOL)decelerate{
    if (![_timer isValid]) {
        _timer = [NSTimer scheduledTimerWithTimeInterval:2.0 target:self selector:@selector(nextPage) userInfo:nil repeats:YES];
    }
}
@end
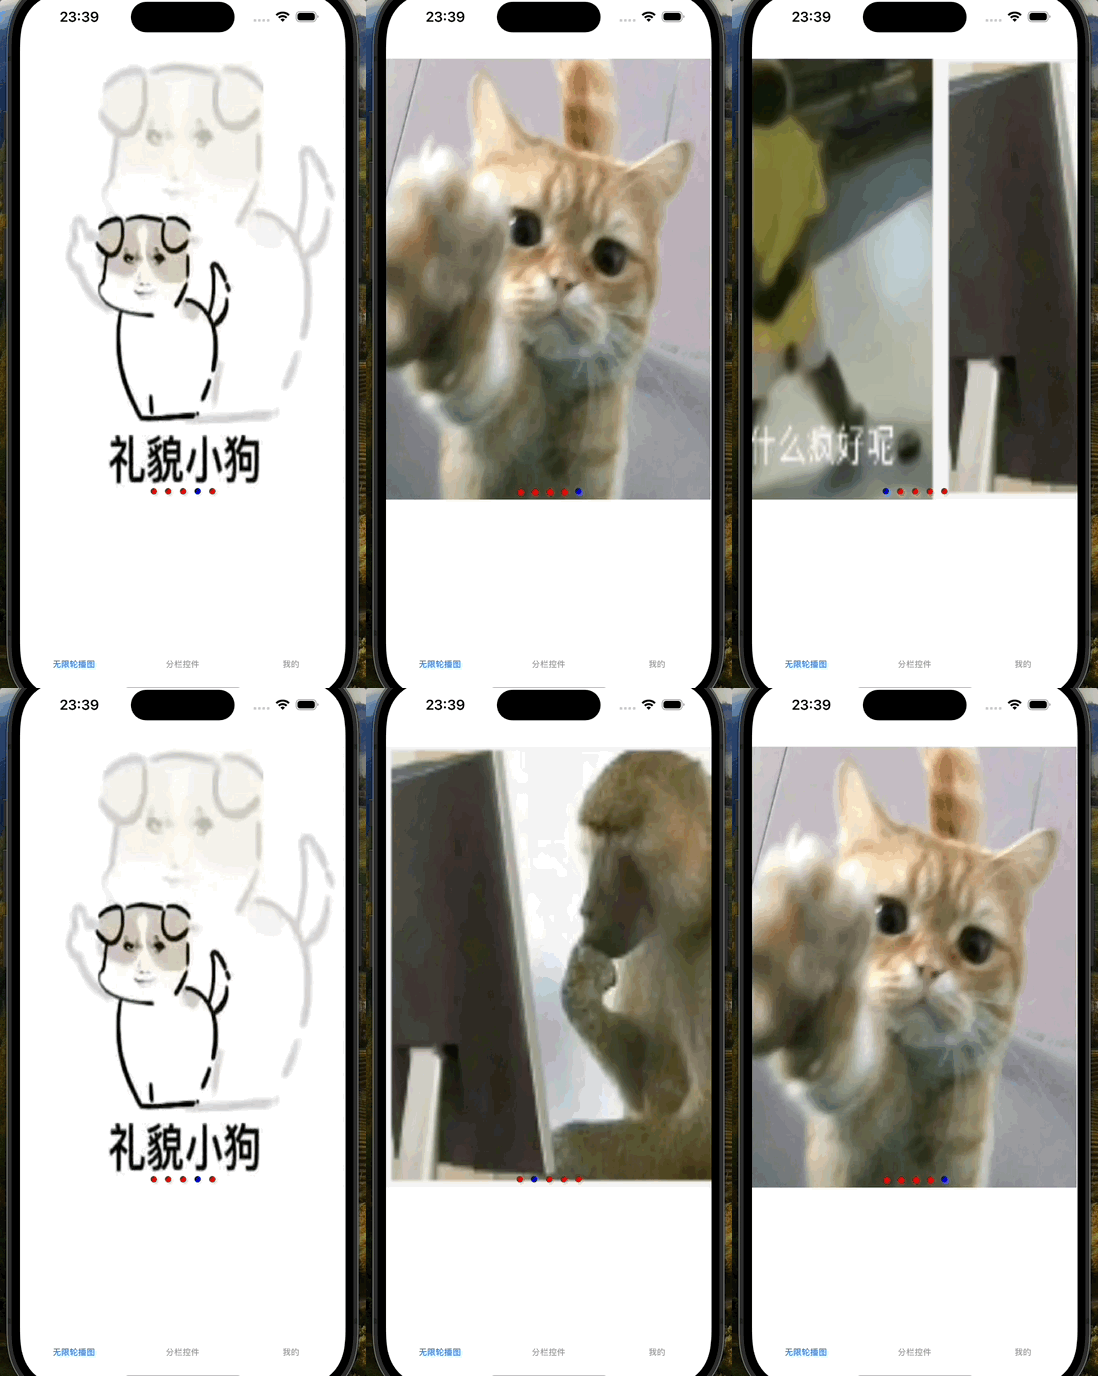
完整展示如下:
