26网络中的网络NiN

python
import torch
from torch import nn
import liliPytorch as lp
import matplotlib.pyplot as plt

# 定义一个NiN块
def nin_block(in_channels, out_channels, kernel_size, strides, padding):
    return nn.Sequential(
        # 传统的卷积层
        nn.Conv2d(in_channels, out_channels, kernel_size, strides, padding),
        nn.ReLU(),  # 激活函数ReLU
        # 1x1卷积层
        nn.Conv2d(out_channels, out_channels, kernel_size=1),
        nn.ReLU(),
        # 另一个1x1卷积层
        nn.Conv2d(out_channels, out_channels, kernel_size=1),
        nn.ReLU()
    )

# 设置dropout的概率
dropout = 0.5

# 定义NiN模型
net = nn.Sequential(
    # 第一个NiN块,输入通道数为1,输出通道数为96
    nin_block(1, 96, kernel_size=11, strides=4, padding=0),
    # 最大池化层
    nn.MaxPool2d(kernel_size=3, stride=2),
    # 第二个NiN块,输入通道数为96,输出通道数为256
    nin_block(96, 256, kernel_size=5, strides=1, padding=2),
    # 最大池化层
    nn.MaxPool2d(kernel_size=3, stride=2),
    # 第三个NiN块,输入通道数为256,输出通道数为384
    nin_block(256, 384, kernel_size=3, strides=1, padding=1),
    # 最大池化层
    nn.MaxPool2d(kernel_size=3, stride=2),
    # Dropout层,用于防止过拟合
    nn.Dropout(dropout),

    # 最后一个NiN块,输入通道数为384,输出通道数为10
    nin_block(384, 10, kernel_size=3, strides=1, padding=1),
    # 全局平均池化层,将特征图的每个通道的空间维度调整为1x1
    nn.AdaptiveAvgPool2d((1, 1)),
    nn.Flatten()
)

X = torch.rand(size=(1, 1, 224, 224))
for layer in net:
    X = layer(X)
    print(layer.__class__.__name__,'output shape:\t', X.shape)
"""
Sequential output shape:         torch.Size([1, 96, 54, 54])
MaxPool2d output shape:  torch.Size([1, 96, 26, 26])
Sequential output shape:         torch.Size([1, 256, 26, 26])
MaxPool2d output shape:  torch.Size([1, 256, 12, 12])
Sequential output shape:         torch.Size([1, 384, 12, 12])
MaxPool2d output shape:  torch.Size([1, 384, 5, 5])
Dropout output shape:    torch.Size([1, 384, 5, 5])
Sequential output shape:         torch.Size([1, 10, 5, 5])
AdaptiveAvgPool2d output shape:  torch.Size([1, 10, 1, 1])
Flatten output shape:    torch.Size([1, 10])
"""

lr, num_epochs, batch_size = 0.1, 10, 128
train_iter, test_iter = lp.loda_data_fashion_mnist(batch_size, resize=224)
lp.train_ch6(net, train_iter, test_iter, num_epochs, lr, lp.try_gpu())
plt.show()  # 显示绘图
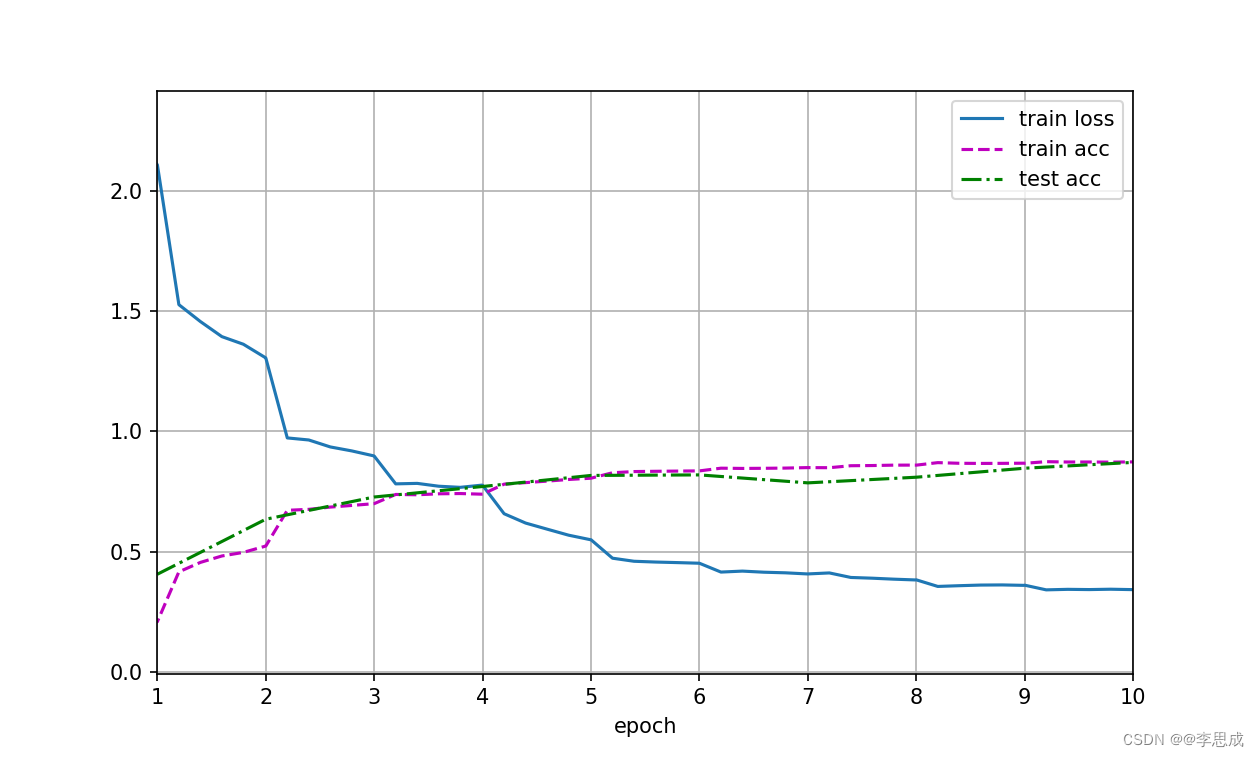
# loss 0.342, train acc 0.873, test acc 0.871
# 1395.1 examples/sec on cuda:0
运行结果:
