项目概述
随着科技的发展,零售行业正经历着一场数字化转型。智能零售系统通过集成嵌入式技术和大数据分析,为商家提供了高效的运营管理工具。该系统的核心目标是提升顾客体验、优化库存管理、降低运营成本以及实现精准营销。
本项目将结合多种技术栈,包括嵌入式硬件、嵌入式软件、网络通信、后端服务器、数据库、大数据处理、数据分析、云平台和前端开发等,构建一个完整的智能零售系统。
系统设计
硬件设计
在硬件方面,智能零售系统主要由以下组件构成:
- 微控制器:选择Arduino、Raspberry Pi或ESP32作为控制中心,负责数据采集和处理。
- RFID读取器和标签:用于商品的自动识别和库存管理。
- 摄像头模块:监控顾客行为,为后续的数据分析提供支持。
- 重量传感器:用于监测商品重量,辅助识别商品。
- 蓝牙/WiFi模块:实现设备间的无线通信。
软件设计
在软件方面,系统分为几个主要模块:
- 嵌入式软件:使用C/C++进行设备驱动和数据处理,使用FreeRTOS实现实时操作。
- 网络通信:采用MQTT协议进行设备间的消息传递,HTTP/HTTPS用于与后端服务器的交互。
- 后端服务器:使用Spring Boot(Java)或Django(Python)构建RESTful API,处理业务逻辑。
- 数据库:关系型数据库(如MySQL)用于存储用户和商品信息;NoSQL数据库(如MongoDB)用于存储非结构化数据;时序数据库(如InfluxDB)用于存储实时数据。
- 大数据处理:使用Apache Spark对大规模数据进行处理和分析。
- 数据分析和机器学习:使用Python的NumPy和Pandas库进行数据分析,使用TensorFlow或PyTorch进行模型训练和预测。
- 数据可视化:使用Tableau或D3.js进行数据展示和分析结果的可视化。
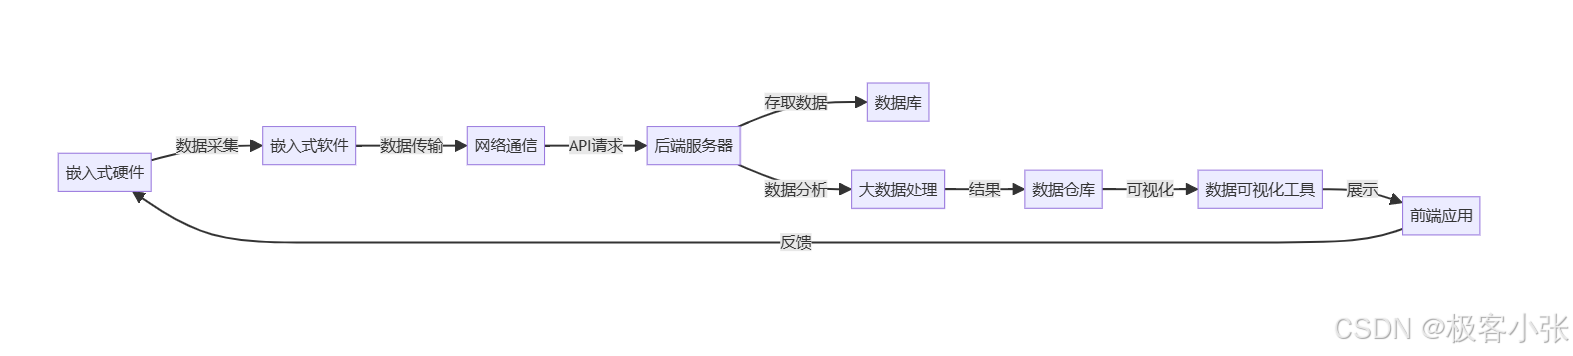
系统架构图
代码实现
下面是智能零售系统中嵌入式软件部分的示例代码,展示了如何使用Arduino读取RFID数据并通过MQTT发送到服务器。
代码片段:RFID读取模块
cpp
#include <SPI.h>
#include <MFRC522.h>
#include <WiFi.h>
#include <PubSubClient.h>

// WiFi和MQTT配置
const char* ssid = "your_SSID";
const char* password = "your_PASSWORD";
const char* mqtt_server = "mqtt.example.com";

WiFiClient espClient;
PubSubClient client(espClient);
MFRC522 rfid(SS_PIN, RST_PIN); // RFID引脚定义

void setup() {
    Serial.begin(115200);
    WiFi.begin(ssid, password);
    client.setServer(mqtt_server, 1883);

    SPI.begin();
    rfid.PCD_Init(); // 初始化RFID模块
}

void loop() {
    if (!client.connected()) {
        reconnect(); // 重新连接MQTT
    }
    client.loop();

    if (rfid.PICC_IsNewCardPresent() && rfid.PICC_ReadCardSerial()) {
        String rfidTag = "";
        for (byte i = 0; i < rfid.uid.size; i++) {
            rfidTag += String(rfid.uid.uidByte[i], HEX);
        }
        Serial.println("RFID Tag: " + rfidTag);
        client.publish("retail/rfid", rfidTag.c_str()); // 发布RFID数据
        delay(1000);
    }
}
代码说明
-
WiFi和MQTT配置:
const char* ssid和const char* password:WiFi网络的名称和密码。const char* mqtt_server:MQTT服务器的地址。
-
MQTT客户端初始化:
- 创建一个
WiFiClient对象和一个PubSubClient对象,用于连接MQTT服务器。
- 创建一个
-
setup()函数:Serial.begin(115200):初始化串口通信,波特率设置为115200,方便调试输出。WiFi.begin(ssid, password):连接到指定的WiFi网络。client.setServer(mqtt_server, 1883):设置MQTT服务器的地址和端口(通常为1883)。
-
RFID模块初始化:
SPI.begin():初始化SPI总线,用于与RFID模块通信。rfid.PCD_Init():初始化MFRC522 RFID模块。
-
loop()函数:if (!client.connected()):检查MQTT客户端是否已连接。如果未连接,则调用reconnect()函数尝试重新连接。client.loop():保持MQTT客户端的连接,并处理传入的消息。if (rfid.PICC_IsNewCardPresent() && rfid.PICC_ReadCardSerial()):检查是否有新的RFID卡片被检测到。如果检测到,读取卡片的UID。String rfidTag = "";:初始化一个字符串,用于存储读取到的RFID标签值。for (byte i = 0; i < rfid.uid.size; i++):遍历RFID标签的UID字节,并将其转换为十六进制字符串,存储到rfidTag变量中。Serial.println("RFID Tag: " + rfidTag);:打印读取到的RFID标签值到串口,以便调试。client.publish("retail/rfid", rfidTag.c_str());:将RFID标签值发布到指定的MQTT主题(在这里是retail/rfid),以供后端服务器或其他设备订阅。delay(1000);:延迟1秒,避免重复读取同一张卡片。
后端服务器
1. 使用Spring Boot构建RESTful API
Spring Boot是一个用于快速开发Java应用程序的框架,非常适合构建RESTful API。以下是使用Spring Boot构建简单的用户和商品管理API的示例。
代码示例:Spring Boot RESTful API
1. 项目结构
bash
src
└── main
    ├── java
    │   └── com
    │       └── example
    │           ├── controller
    │           │   └── UserController.java
    │           ├── model
    │           │   └── User.java
    │           ├── repository
    │           │   └── UserRepository.java
    │           └── Application.java
    └── resources
        └── application.properties
2. 应用程序主入口
java
package com.example;

import org.springframework.boot.SpringApplication;
import org.springframework.boot.autoconfigure.SpringBootApplication;

@SpringBootApplication
public class Application {
    public static void main(String[] args) {
        SpringApplication.run(Application.class, args);
    }
}
3. 用户模型
java
package com.example.model;

import javax.persistence.Entity;
import javax.persistence.GeneratedValue;
import javax.persistence.GenerationType;
import javax.persistence.Id;

@Entity
public class User {
    @Id
    @GeneratedValue(strategy = GenerationType.IDENTITY)
    private Long id;
    private String username;
    private String email;

    // Getters and Setters
    public Long getId() {
        return id;
    }

    public void setId(Long id) {
        this.id = id;
    }

    public String getUsername() {
        return username;
    }

    public void setUsername(String username) {
        this.username = username;
    }

    public String getEmail() {
        return email;
    }

    public void setEmail(String email) {
        this.email = email;
    }
}
4. 用户存储库
java
package com.example.repository;

import com.example.model.User;
import org.springframework.data.jpa.repository.JpaRepository;

public interface UserRepository extends JpaRepository<User, Long> {
}
5. 用户控制器
java
package com.example.controller;

import com.example.model.User;
import com.example.repository.UserRepository;
import org.springframework.beans.factory.annotation.Autowired;
import org.springframework.http.ResponseEntity;
import org.springframework.web.bind.annotation.*;

import java.util.List;

@RestController
@RequestMapping("/api/users")
public class UserController {

    @Autowired
    private UserRepository userRepository;

    @GetMapping
    public List<User> getAllUsers() {
        return userRepository.findAll();
    }

    @PostMapping
    public User createUser(@RequestBody User user) {
        return userRepository.save(user);
    }

    @GetMapping("/{id}")
    public ResponseEntity<User> getUserById(@PathVariable Long id) {
        return userRepository.findById(id)
            .map(user -> ResponseEntity.ok().body(user))
            .orElse(ResponseEntity.notFound().build());
    }

    @DeleteMapping("/{id}")
    public ResponseEntity<Void> deleteUser(@PathVariable Long id) {
        userRepository.deleteById(id);
        return ResponseEntity.noContent().build();
    }
}
6. 配置文件
在src/main/resources/application.properties中,配置数据库连接信息:
java
spring.datasource.url=jdbc:mysql://localhost:3306/retail_db
spring.datasource.username=root
spring.datasource.password=your_password
spring.jpa.hibernate.ddl-auto=update
spring.jpa.show-sql=true
2. 使用Django构建RESTful API
Django是一个强大的Python Web框架,使用Django REST framework可以快速构建RESTful API。
代码示例:Django RESTful API
1. 环境准备
首先,确保你已经安装Django和Django REST framework。可以使用以下命令安装:
bash
pip install django djangorestframework2. 创建Django项目和应用
使用以下命令创建Django项目和应用:
bash
django-admin startproject myproject
cd myproject
django-admin startapp myapp
3. 配置项目
在myproject/settings.py中,添加myapp和rest_framework到INSTALLED_APPS:
bash
INSTALLED_APPS = [
    ...
    'rest_framework',
    'myapp',
]
4. 用户模型
在myapp/models.py中定义用户模型:
python
from django.db import models

class User(models.Model):
    username = models.CharField(max_length=100)
    email = models.EmailField()

    def __str__(self):
        return self.username
5. 数据迁移
运行以下命令以生成数据库迁移文件并应用迁移:
bash
python manage.py makemigrations
python manage.py migrate
6. 创建序列化器
在myapp/serializers.py中创建序列化器:
python
from rest_framework import serializers
from .models import User

class UserSerializer(serializers.ModelSerializer):
    class Meta:
        model = User
        fields = '__all__'  # 或者列出具体字段 ['id', 'username', 'email']
7. 创建视图
在myapp/views.py中创建视图:
python
from rest_framework import generics
from .models import User
from .serializers import UserSerializer

class UserListCreate(generics.ListCreateAPIView):
    queryset = User.objects.all()
    serializer_class = UserSerializer

class UserDetail(generics.RetrieveUpdateDestroyAPIView):
    queryset = User.objects.all()
    serializer_class = UserSerializer
8. 配置路由
在myproject/urls.py中配置路由:
python
from django.contrib import admin
from django.urls import path
from myapp.views import UserListCreate, UserDetail

urlpatterns = [
    path('admin/', admin.site.urls),
    path('api/users/', UserListCreate.as_view(), name='user-list-create'),
    path('api/users/<int:pk>/', UserDetail.as_view(), name='user-detail'),
]
9. 启动开发服务器
在命令行中运行以下命令启动Django开发服务器:
bash
python manage.py runserver现在,你可以通过访问以下URL来测试API:
- 获取用户列表 :
GET http://127.0.0.1:8000/api/users/ - 创建新用户 :
POST http://127.0.0.1:8000/api/users/ - 获取单个用户 :
GET http://127.0.0.1:8000/api/users/<id>/ - 更新用户 :
PUT http://127.0.0.1:8000/api/users/<id>/ - 删除用户 :
DELETE http://127.0.0.1:8000/api/users/<id>/
数据库设计
在智能零售系统中,我们将使用多种数据库来满足不同的数据存储需求:
-
关系型数据库(MySQL):
- 用于存储用户信息、商品信息和订单信息。
- 例如,
User表、Product表和Order表。
-
NoSQL数据库(MongoDB):
- 用于存储非结构化数据,例如用户行为日志、商品评论等。
- 适合快速变化的数据模型。
-
时序数据库(InfluxDB):
- 用于存储实时数据,如销售数据、库存变化等。
- 适合处理高频率和时间序列的数据。
大数据处理
在智能零售系统中,使用Apache Spark来处理和分析大规模数据。以下是Spark的基本使用示例。
Spark数据处理示例
python
from pyspark.sql import SparkSession

# 创建Spark会话
spark = SparkSession.builder \
    .appName("RetailDataProcessing") \
    .getOrCreate()

# 读取CSV数据
df = spark.read.csv("sales_data.csv", header=True, inferSchema=True)
# 查看数据框的前几行
df.show()

# 打印数据框的结构
df.printSchema()

# 选择和重命名列
df_selected = df.select(
    df["order_id"].alias("Order ID"),
    df["product_id"].alias("Product ID"),
    df["quantity"].alias("Quantity"),
    df["price"].alias("Price"),
    df["timestamp"].alias("Timestamp")
)

# 计算总销售额
df_total_sales = df_selected.withColumn("Total Sales", df_selected["Quantity"] * df_selected["Price"])

# 按产品ID汇总总销售额
df_sales_by_product = df_total_sales.groupBy("Product ID").agg({"Total Sales": "sum"}).withColumnRenamed("sum(Total Sales)", "Total Sales")

# 按时间段汇总销售额(假设timestamp列是时间戳格式)
from pyspark.sql.functions import window

df_sales_by_time = df_total_sales.groupBy(
    window(df_total_sales["Timestamp"], "1 hour")  # 每小时汇总
).agg({"Total Sales": "sum"}).withColumnRenamed("sum(Total Sales)", "Total Sales")

# 显示结果
df_sales_by_product.show()
df_sales_by_time.show()

# 数据写入(保存处理后的数据到新的CSV文件)
df_sales_by_product.write.csv("output/sales_by_product.csv", header=True)
df_sales_by_time.write.csv("output/sales_by_time.csv", header=True)

# 关闭Spark会话
spark.stop()
代码说明
-
查看数据框的前几行:
df.show():显示数据框的前20行,方便快速查看数据内容。
-
打印数据框的结构:
df.printSchema():打印数据框的结构,包括每一列的名称和数据类型。
-
选择和重命名列:
df.select(...):选择需要的列,并使用alias方法重命名列,方便后续处理。
-
计算总销售额:
df_total_sales:使用withColumn方法添加一个新列"Total Sales",通过计算"Quantity"和"Price"的乘积。
-
按产品ID汇总总销售额:
df_sales_by_product:使用groupBy和agg方法按"Product ID"进行分组,并计算每个产品的总销售额。
-
按时间段汇总销售额:
window(df_total_sales["Timestamp"], "1 hour"):使用窗口函数按小时对销售额进行汇总。agg({"Total Sales": "sum"}):对每个时间段的销售额进行求和。
-
显示结果:
- 使用
show()方法展示按产品和时间汇总的销售额数据。
- 使用
-
数据写入:
write.csv(...):将处理后的数据保存到新的CSV文件中,方便后续使用或分析。
-
关闭Spark会话:
spark.stop():结束Spark会话,释放资源。
数据分析和机器学习
在智能零售系统中,我们可以使用Python的NumPy和Pandas库进行数据分析,并使用TensorFlow或PyTorch进行机器学习模型的训练和预测。
数据分析示例
以下是使用Pandas进行简单数据分析的示例:
python
import pandas as pd

# 读取CSV文件
df = pd.read_csv("sales_data.csv")

# 查看数据的基本信息
print(df.info())

# 计算总销售额
df['Total Sales'] = df['Quantity'] * df['Price']
total_sales = df['Total Sales'].sum()
print(f"总销售额: {total_sales}")

# 按产品ID汇总总销售额
sales_by_product = df.groupby('product_id')['Total Sales'].sum().reset_index()
print(sales_by_product)

# 可视化(使用Matplotlib或Seaborn库)
import matplotlib.pyplot as plt
import seaborn as sns

plt.figure(figsize=(10, 6))
sns.barplot(x='product_id', y='Total Sales', data=sales_by_product)
plt.title('按产品ID汇总的总销售额')
plt.xlabel('产品ID')
plt.ylabel('总销售额')
plt.show()
代码说明
-
查看数据的基本信息:
print(df.info()):打印DataFrame的基本信息,包括数据类型、非空值数量和内存使用情况。这对于了解数据集结构和数据质量很有帮助。
-
计算总销售额:
df['Total Sales'] = df['Quantity'] * df['Price']:创建一个新列"Total Sales",通过将"Quantity"(数量)和"Price"(价格)相乘得到每一条记录的总销售额。total_sales = df['Total Sales'].sum():计算"Total Sales"列的总和,以获取所有销售的总额。print(f"总销售额: {total_sales}"):打印总销售额。
-
按产品ID汇总总销售额:
sales_by_product = df.groupby('product_id')['Total Sales'].sum().reset_index():df.groupby('product_id'):按照"product_id"(产品ID)对数据进行分组。['Total Sales'].sum():对每个产品ID计算其总销售额。reset_index():将结果转换为DataFrame格式,便于后续处理和查看。
print(sales_by_product):打印按产品ID汇总的总销售额。
-
可视化(使用Matplotlib或Seaborn库):
import matplotlib.pyplot as plt:导入Matplotlib库,以便用于绘图。import seaborn as sns:导入Seaborn库,提供更美观的图形样式。plt.figure(figsize=(10, 6)):设置绘图区域的大小为10x6英寸。sns.barplot(x='product_id', y='Total Sales', data=sales_by_product):sns.barplot(...):创建柱状图,x轴为"product_id",y轴为"Total Sales",数据来源于sales_by_product。
plt.title('按产品ID汇总的总销售额'):设置图形标题。plt.xlabel('产品ID'):设置x轴标签。plt.ylabel('总销售额'):设置y轴标签。plt.show():显示绘制的图形。
数据可视化
在智能零售系统中,数据可视化是一个重要的环节。使用可视化工具可以帮助我们更好地理解数据,识别趋势和模式。我们可以使用如Tableau、Power BI、D3.js等工具进行数据可视化。这里展示一个使用D3.js进行简单数据可视化的示例。
D3.js 数据可视化示例
下面是一个简单的D3.js示例,用于展示按产品ID汇总的总销售额。
HTML结构
html
<!DOCTYPE html>
<html lang="en">
<head>
    <meta charset="UTF-8">
    <meta name="viewport" content="width=device-width, initial-scale=1.0">
    <title>产品销售额可视化</title>
    <script src="https://d3js.org/d3.v7.min.js"></script>
    <style>
        .bar {
            fill: steelblue;
        }
        .bar:hover {
            fill: orange;
        }
        .axis--x path {
            display: none;
        }
    </style>
</head>
<body>
    <svg width="600" height="400"></svg>
    <script>
        // 数据(通常从后端API获取)
        const data = [
            { product_id: 'P1', total_sales: 5000 },
            { product_id: 'P2', total_sales: 7000 },
            { product_id: 'P3', total_sales: 3000 },
            { product_id: 'P4', total_sales: 9000 }
        ];

        const svg = d3.select("svg");
        const margin = { top: 20, right: 30, bottom: 40, left: 40 };
        const width = +svg.attr("width") - margin.left - margin.right;
        const height = +svg.attr("height") - margin.top - margin.bottom;
        const g = svg.append("g").attr("transform", `translate(${margin.left},${margin.top})`);

        const x = d3.scaleBand()
            .domain(data.map(d => d.product_id))
            .range([0, width])
            .padding(0.1);
        const y = d3.scaleLinear()
            .domain([0, d3.max(data, d => d.total_sales)])
            .range([height, 0]);

        // 创建X轴
        g.append("g")
            .attr("class", "axis axis--x")
            .attr("transform", `translate(0,${height})`)
            .call(d3.axisBottom(x));

        // 创建Y轴
        g.append("g")
            .attr("class", "axis axis--y")
            .call(d3.axisLeft(y));

        // 绘制条形图
        g.selectAll(".bar")
            .data(data)
            .enter().append("rect")
            .attr("class", "bar")
            .attr("x", d => x(d.product_id))
            .attr("y", d => y(d.total_sales))
            .attr("width", x.bandwidth())
            .attr("height", d => height - y(d.total_sales));
    </script>
</body>
</html>
代码说明
-
引入D3.js库:
- 使用
<script src="https://d3js.org/d3.v7.min.js"></script>引入D3.js库,以便使用其功能。
- 使用
-
设置SVG区域:
<svg width="600" height="400"></svg>:创建一个SVG元素,设置其宽度和高度为600x400像素。
-
JavaScript代码:
const data = [...]:定义一个包含产品ID和总销售额的数组。通常,这些数据会通过调用后端API获取,但在这个示例中我们使用静态数据。
-
创建SVG画布:
const svg = d3.select("svg");:选择SVG元素。- 定义
margin、width和height,并创建一个新的组(g),以便在指定的坐标系中绘制图形。
-
定义坐标比例:
-
X轴比例:
javascriptconst x = d3.scaleBand() .domain(data.map(d => d.product_id)) .range([0, width]) .padding(0.1);- 使用
d3.scaleBand()创建一个带状比例尺,设置X轴的域为产品ID。 range([0, width])表示带状图宽度在0到指定宽度之间。padding(0.1)设置带状图之间的间隔。
- 使用
-
Y轴比例:
javascriptconst y = d3.scaleLinear() .domain([0, d3.max(data, d => d.total_sales)]) .range([height, 0]);- 使用
d3.scaleLinear()创建一个线性比例尺,Y轴的域为0到数据中的最大销售额。 range([height, 0])将Y轴的值反转,以便在SVG坐标系中适当绘制。
- 使用
-
-
创建X轴和Y轴:
-
创建X轴:
javascriptg.append("g") .attr("class", "axis axis--x") .attr("transform", `translate(0,${height})`) .call(d3.axisBottom(x)); -
创建Y轴:
javascriptg.append("g") .attr("class", "axis axis--y") .call(d3.axisLeft(y)); -
这两段代码分别为X轴和Y轴添加坐标轴线和刻度。
-
项目总结
本项目展示了一个智能零售系统的基本构架,结合了嵌入式技术和大数据分析。通过使用RFID技术识别商品、实时数据传输和分析,我们能够优化库存管理、提高顾客体验和实现精准营销。
这个系统的成功实施需要多种技术的协同工作,包括硬件设计、嵌入式软件开发、网络通信、后端开发、数据存储与处理等。通过不断迭代和优化,智能零售系统将为商家带来更高的效率和收益。