结论写在前面
- 作为LLM的应用发展方向,Agent的应用潜力非常大
- Lagent是一个agent开发框架,可以快速的构筑agent应用
- Lagent已预置强有力的工具:搜索、地图、Python解释器
- 参考官方例开发天气查询功能(高德API),让LLM获取实时天气信息,验证Agent开发外挂API的流程
- 通过@tool_api注解,利用Python的注释即可自动将API的信息注入给LLM,非常方便
- 验证效果相当好:可精确识别关键字并传递给agent的外挂API,并正确识别和组织返回信息(见文末)
- 甚至可以做两地的气温比较等这样需要LLM介入的高级功能
- 显示出internlm2_5-7b-chat模型的强大能力,因为agent的核心执行还是依赖LLM
一、什么是Agent
在大型语言模型(LLM)的应用中,Agent(代理)是一个非常重要的概念。Agent通常指的是一个能够自主执行任务的智能实体,它能够理解环境、做出决策并采取行动以达到特定的目标。在LLM的背景下,Agent通常是指那些利用LLM的能力来处理和响应用户请求、执行复杂任务或与环境交互的系统。
以下是Agent在LLM应用中的一些关键特征和功能:
- 理解能力:Agent能理解自然语言输入,这是通过LLM来实现。LLM使得Agent能解析复杂的指令或对话,从中提取有用的信息。
- 决策能力:基于理解的信息,Agent能够做出决策。这些决策可能涉及到选择最佳的响应、确定下一步的行动或解决特定的问题。
- 行动能力:Agent不仅能做出决策,还能执行这些决策。这可能包括生成文本响应、调用外部API、控制物理设备或与其他系统交互。
- 学习能力:许多Agent具备学习能力,能够从经验中改进其性能。这可能涉及到监督学习、无监督学习或强化学习等技术。
- 交互能力:Agent通常设计为与用户或其他系统进行交互。这可能包括通过聊天界面、语音接口或API进行交互。
- 自主性:Agent的重要特征是其自主性,即能在没有人干预的情况下执行任务。使得Agent能在各种场景中独立工作.
我自己的理解,本质上Agent可以被视为能利用LLM和外部工具,独立完成任务(问题)的理解、分解、逐步执行、反馈、再分解和再执行,直到最终任务完成的一种驱动程序。
二、Lagent 介绍
参考链接:
InternLM/lagent: A lightweight framework for building LLM-based agents (github.com)
欢迎来到 Lagent 的中文文档! --- Lagent
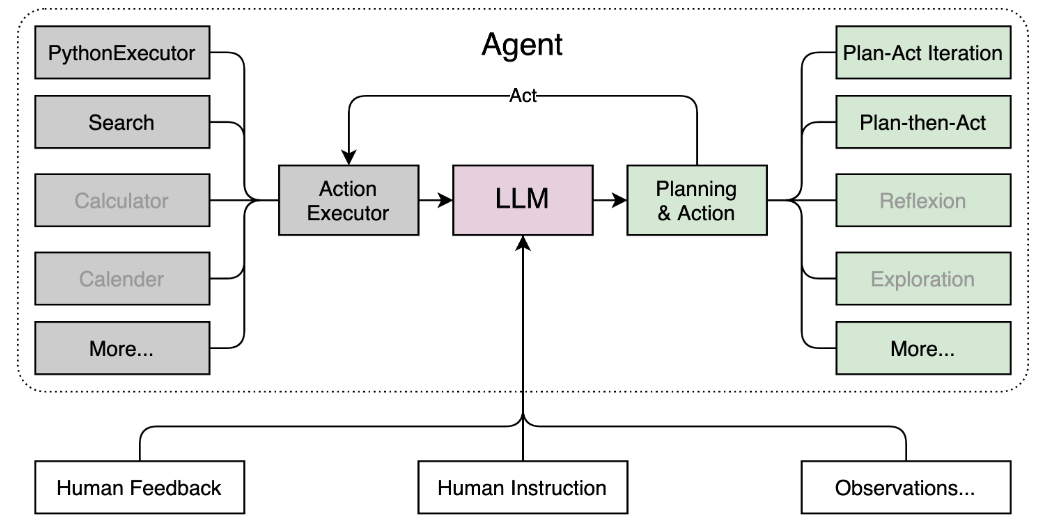
Lagent 是一个轻量级开源智能体框架,是InternLM生态工具的一环,旨在让用户可以高效地构建基于大语言模型的智能体。同时它也提供了一些典型工具以增强大语言模型的能力。
Lagent 目前已经支持了包括 AutoGPT、ReAct 等在内的多个经典智能体范式,也支持了如下工具:
- Arxiv 搜索
- Bing 地图
- Google 学术搜索
- Google 搜索
- 交互式 IPython 解释器
- IPython 解释器
- PPT
- Python 解释器
其基本结构如下所示:
三、环境配置
开发机选择 30% A100,镜像选择为 Cuda12.2-conda。
首先来为 Lagent 配置一个可用的环境。
# 创建环境
conda create -n agent_camp3 python=3.10 -y
# 激活环境
conda activate agent_camp3
# 安装 torch
conda install pytorch==2.1.2 torchvision==0.16.2 torchaudio==2.1.2 pytorch-cuda=12.1 -c pytorch -c nvidia -y
# 安装其他依赖包
pip install termcolor==2.4.0
pip install lmdeploy==0.5.2
接下来,通过源码安装的方式安装 lagent。
# 创建目录以存放代码
mkdir -p /root/agent_camp3
cd /root/agent_camp3
git clone https://github.com/InternLM/lagent.git
cd lagent && git checkout 81e7ace && pip install -e . && cd ..
四、Lagent Web Demo 使用
接下来,将使用 Lagent 的 Web Demo 来体验 InternLM2.5-7B-Chat 的智能体能力。
首先,先使用 LMDeploy 部署 InternLM2.5-7B-Chat,并启动一个 API Server。
conda activate agent_camp3
lmdeploy serve api_server /share/new_models/Shanghai_AI_Laboratory/internlm2_5-7b-chat --model-name internlm2_5-7b-chat
然后,在另一个窗口中启动 Lagent 的 Web Demo。
cd /root/agent_camp3/lagent
conda activate agent_camp3
streamlit run examples/internlm2_agent_web_demo.py
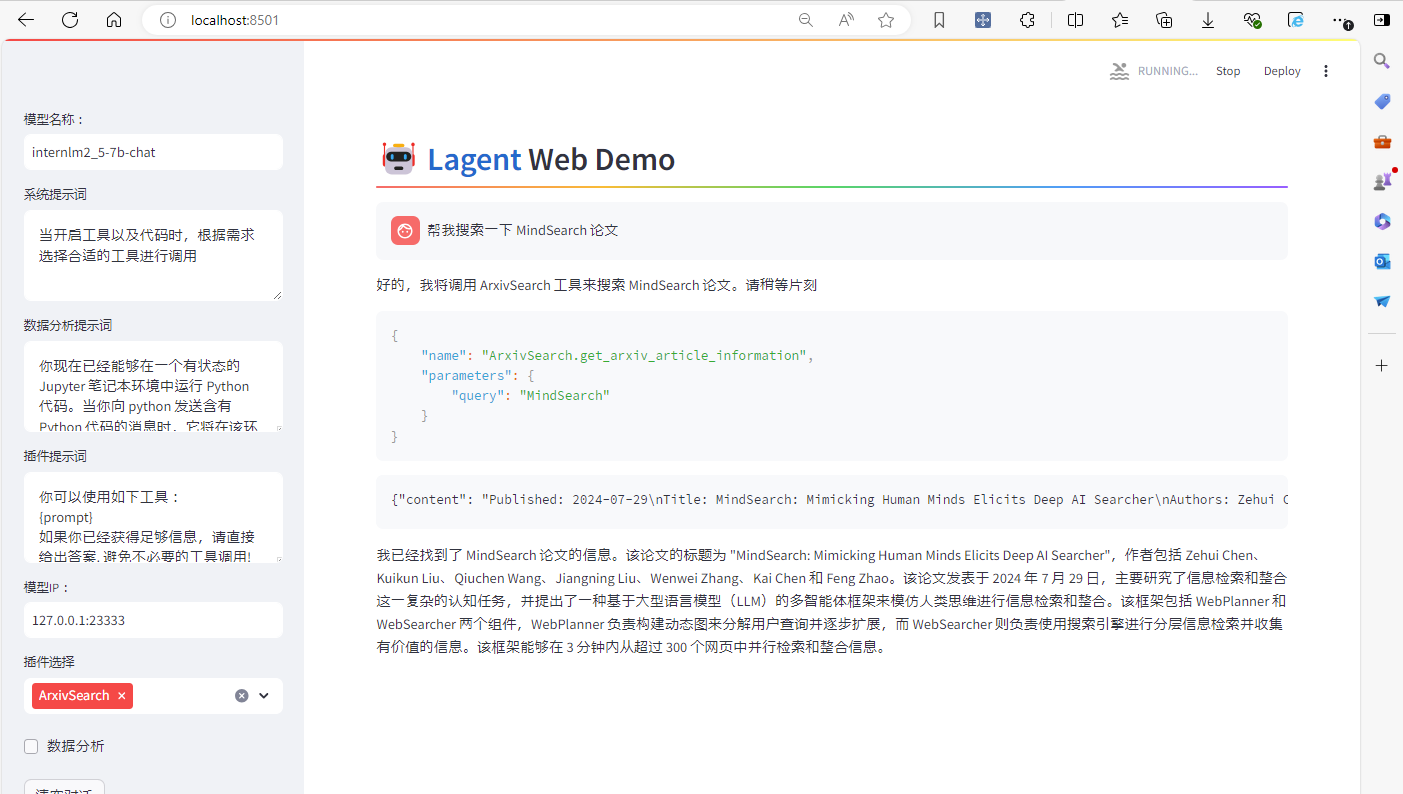
在等待两个 server 都完全启动(如下图所示)后,在 本地 的 PowerShell 中输入如下指令来进行端口映射:
ssh -CNg -L 8501:127.0.0.1:8501 -L 23333:127.0.0.1:23333 root@ssh.intern-ai.org.cn -p <你的 SSH 端口号>接下来,在本地浏览器中打开 localhost:8501,并修改模型名称 一栏为 internlm2_5-7b-chat,修改模型 ip 一栏为127.0.0.1:23333。
然后,在插件选择一栏选择 ArxivSearch,并输入指令"帮我搜索一下 MindSearch 论文"。
最后,可以看到,模型已经回复了相关信息。但是速度极慢,用了2分钟左右。
五、基于 Lagent 自定义智能体
在本节中,将带大家基于 Lagent 自定义自己的智能体。
Lagent 中关于工具部分的介绍文档位于 https://lagent.readthedocs.io/zh-cn/latest/tutorials/action.html 。
使用 Lagent 自定义工具主要分为以下几步:
- 继承
BaseAction类 - 实现简单工具的
run方法;或者实现工具包内每个子工具的功能 - 简单工具的
run方法可选被tool_api装饰;工具包内每个子工具的功能都需要被tool_api装饰
下面参考官方的MagicMaker做一个实时天气查询的的Plugin,因为LLM默认情况下,尤其是私有部署的LLM,局限在固有的知识范围内,是不可能知道实时的天气情况,并且做出相应反馈和互动的。
1. 创建工具(即API)
cd /root/agent_camp3/lagent
touch lagent/actions/weatherquery.py
然后,将下面的代码复制进入 /root/agent_camp3/lagent/lagent/actions/weatherquery.py
代码很简单,使用高德API接口先把地址翻译成adcode,再用adcode获取实时天气信息。
import json
import requests

from lagent.actions.base_action import BaseAction, tool_api
from lagent.actions.parser import BaseParser, JsonParser
from lagent.schema import ActionReturn, ActionStatusCode


class WeatherQuery(BaseAction):
    adcode = '370102'

    def __init__(self, adcode='370102'):
        super().__init__()
        self.adcode=adcode

    @tool_api
    def weather_query(self, keywords: str) -> dict:
        """Run weatherquery and get the weather information according to the keywords.

        Args:
           keywords (:class:`str`): the keywords to query weather information. such as address.

        Returns:
           :class:`dict`: the generated image
               * image (str): path to the generated image
               * province: the province of address
               * city: the city of address
               * adcode: city code of the address
               * weather: weather detail information
               * temperature: temperature of the address
               * winddirection: wind's direction
               * windpower: wind's power
               * humidity: humidity information
               * reporttime: report timestamp, example: 2024-08-15 16:01:03
               * temperature_float: temperature informations with float. such as 30.0
               * humidity_float: humidity information with float format. such as 63.0
        """
        try:
          # Use Address info to get adcode
            url_get_address = 'https://restapi.amap.com/v3/geocode/geo?key=c7f6ae7c9a1bf1bc4ef72eaa36fc1d83&address=' + keywords
            addr_rsp = requests.get(url=url_get_address)
            adcode = addr_rsp.json()['geocodes'][0]['adcode']

            # Query weather info with adcode
            url_weather_query = 'https://restapi.amap.com/v3/weather/weatherInfo?key=c7f6ae7c9a1bf1bc4ef72eaa36fc1d83&city=' + adcode
            response = requests.get(
                url=url_weather_query
            )

        except Exception as exc:
            return ActionReturn(
                errmsg=f'WeatherQuery exception: {exc}',
                state=ActionStatusCode.HTTP_ERROR)
        result = response.json()['lives'][0]
        return {'result': result}
要特别注意如下的注释,会被lagent框架注入给LLM作为API的说明。LLM用它来理解这个API的用途,所需要的keyword以及返回数据的类型和含义。所以这个注释的正确性和易读性非常重要。
        """Run weatherquery and get the weather information according to the keywords.

        Args:
           keywords (:class:`str`): the keywords to query weather information. such as address.

        Returns:
           :class:`dict`: the generated image
               * image (str): path to the generated image
               * province: the province of address
               * city: the city of address
               * adcode: city code of the address
               * weather: weather detail information
               * temperature: temperature of the address
               * winddirection: wind's direction
               * windpower: wind's power
               * humidity: humidity information
               * reporttime: report timestamp, example: 2024-08-15 16:01:03
               * temperature_float: temperature informations with float. such as 30.0
               * humidity_float: humidity information with float format. such as 63.0
        """
2. 追加工具到LLM
最后,修改 /root/agent_camp3/lagent/examples/internlm2_agent_web_demo.py 来适配的自定义工具。
-
在
from lagent.actions import ActionExecutor, ArxivSearch, IPythonInterpreter的下一行添加from lagent.actions.weatherquery import WeatherQuery -
在第27行添加
MagicMaker()。from lagent.actions import ActionExecutor, ArxivSearch, IPythonInterpreter
from lagent.actions.weatherquery import WeatherQuery
from lagent.agents.internlm2_agent import INTERPRETER_CN, META_CN, PLUGIN_CN, Internlm2Agent, Internlm2Protocol...
action_list = [
ArxivSearch(),-
      WeatherQuery()
  ]
-
原始代码参考
https://github.com/InternLM/lagent/blob/main/examples/internlm2_agent_web_demo.py
下面是核心处理的分析(TBC)
import copy
import hashlib
import json
import os

import streamlit as st

from lagent.actions import ActionExecutor, ArxivSearch, IPythonInterpreter
from lagent.actions.weatherquery import WeatherQuery
from lagent.agents.internlm2_agent import INTERPRETER_CN, META_CN, PLUGIN_CN, Internlm2Agent, Internlm2Protocol
from lagent.llms.lmdeploy_wrapper import LMDeployClient
from lagent.llms.meta_template import INTERNLM2_META as META
from lagent.schema import AgentStatusCode

# from streamlit.logger import get_logger

class SessionState:

    def init_state(self):
···
        # 插件(API)定义
        action_list = [
            ArxivSearch(),
            WeatherQuery()
        ]
···


class StreamlitUI:
···
        plugin_action = [
            st.session_state['plugin_map'][name] for name in plugin_name
        ]

        if 'chatbot' in st.session_state:

            # 将Plugin指定给ActionExecutor
            if len(plugin_action) > 0:
                st.session_state['chatbot']._action_executor = ActionExecutor(
                    actions=plugin_action)
            else:
                st.session_state['chatbot']._action_executor = None
···
    # LLM的初始化并没有用到ActionExecutor,但是确实template上声明了plugin
    def initialize_chatbot(self, model, plugin_action):
        """Initialize the chatbot with the given model and plugin actions."""
        return Internlm2Agent(
            llm=model,
            protocol=Internlm2Protocol(
                tool=dict(
                    begin='{start_token}{name}\n',
                    start_token='<|action_start|>',
                    name_map=dict(
                        plugin='<|plugin|>', interpreter='<|interpreter|>'),
                    belong='assistant',
                    end='<|action_end|>\n',
                ), ),
            max_turn=7)


def main():
 ···
    # Agent的状态机处理(是否需要调用plugin,是否渲染,是否结束)
    if user_input := st.chat_input(''):
         st.session_state['last_status'] = AgentStatusCode.SESSION_READY
        for agent_return in st.session_state['chatbot'].stream_chat(
                st.session_state['session_history'] + user_input):
            if agent_return.state == AgentStatusCode.PLUGIN_RETURN:
                with st.container():
                    st.session_state['ui'].render_plugin_args(
                        agent_return.actions[-1])
                    st.session_state['ui'].render_action_results(
                        agent_return.actions[-1])
            elif agent_return.state == AgentStatusCode.CODE_RETURN:
                with st.container():
                    st.session_state['ui'].render_action_results(
                        agent_return.actions[-1])
            elif (agent_return.state == AgentStatusCode.STREAM_ING
                  or agent_return.state == AgentStatusCode.CODING):
             elif agent_return.state == AgentStatusCode.END:
                st.session_state['session_history'] += (
                    user_input + agent_return.inner_steps)
                agent_return = copy.deepcopy(agent_return)
                agent_return.response = st.session_state['temp']
                st.session_state['assistant'].append(
                    copy.deepcopy(agent_return))
            st.session_state['last_status'] = agent_return.state
3. 测试
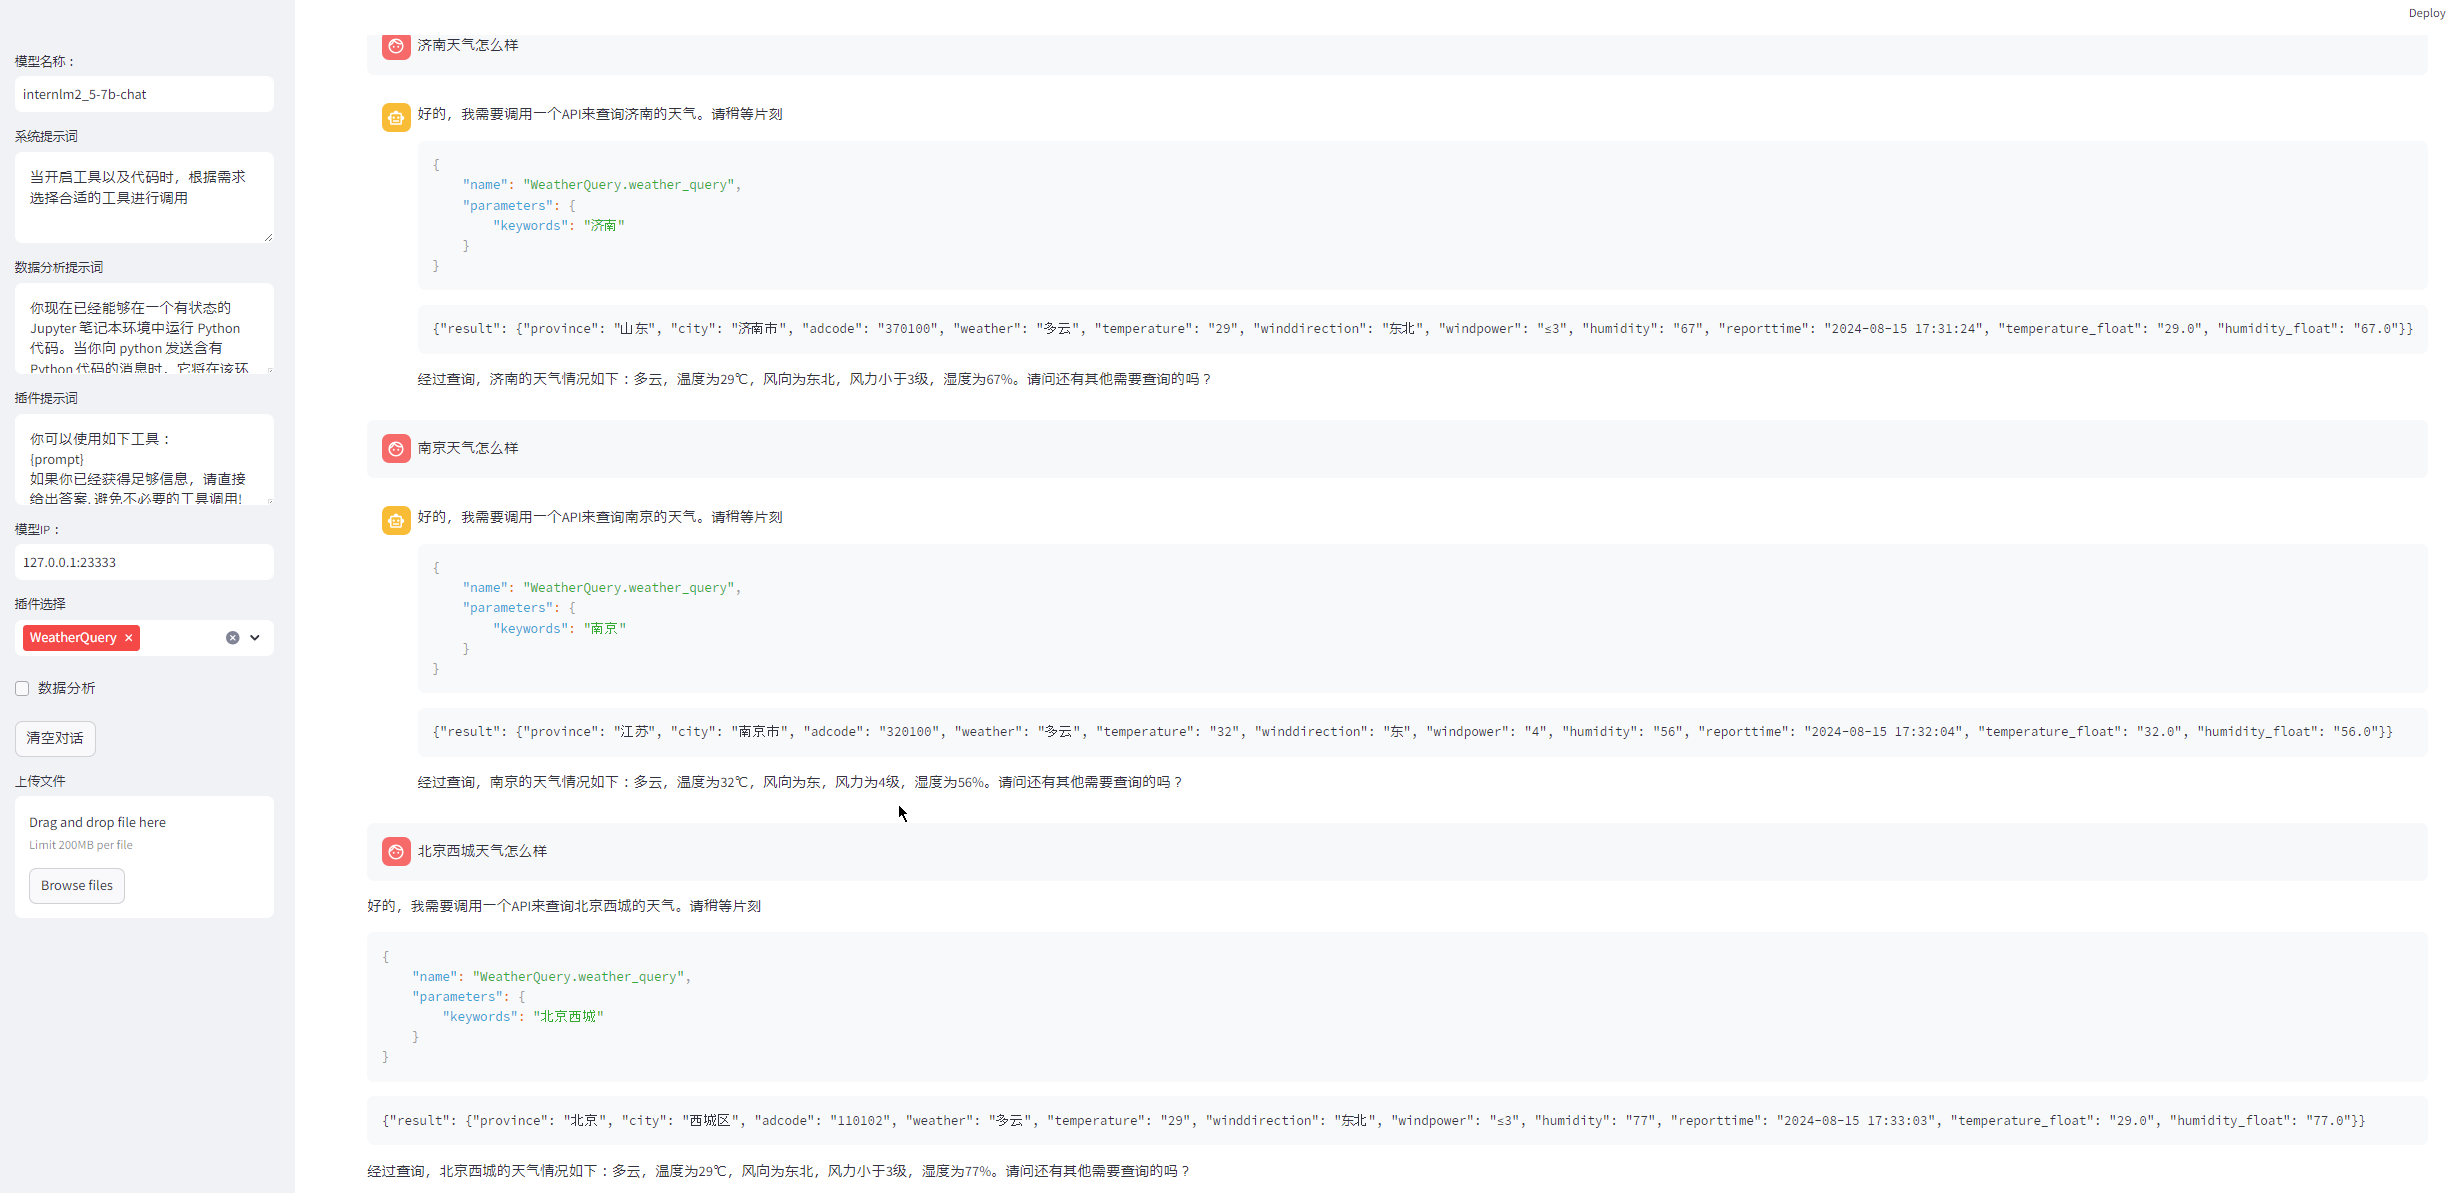
接下来,启动 Web Demo 来体验一下吧!同时启用WeatherQuery工具后,可以输入一下测试。比如:
济南天气怎么样
南京天气怎么样
北京西城区天气怎么样
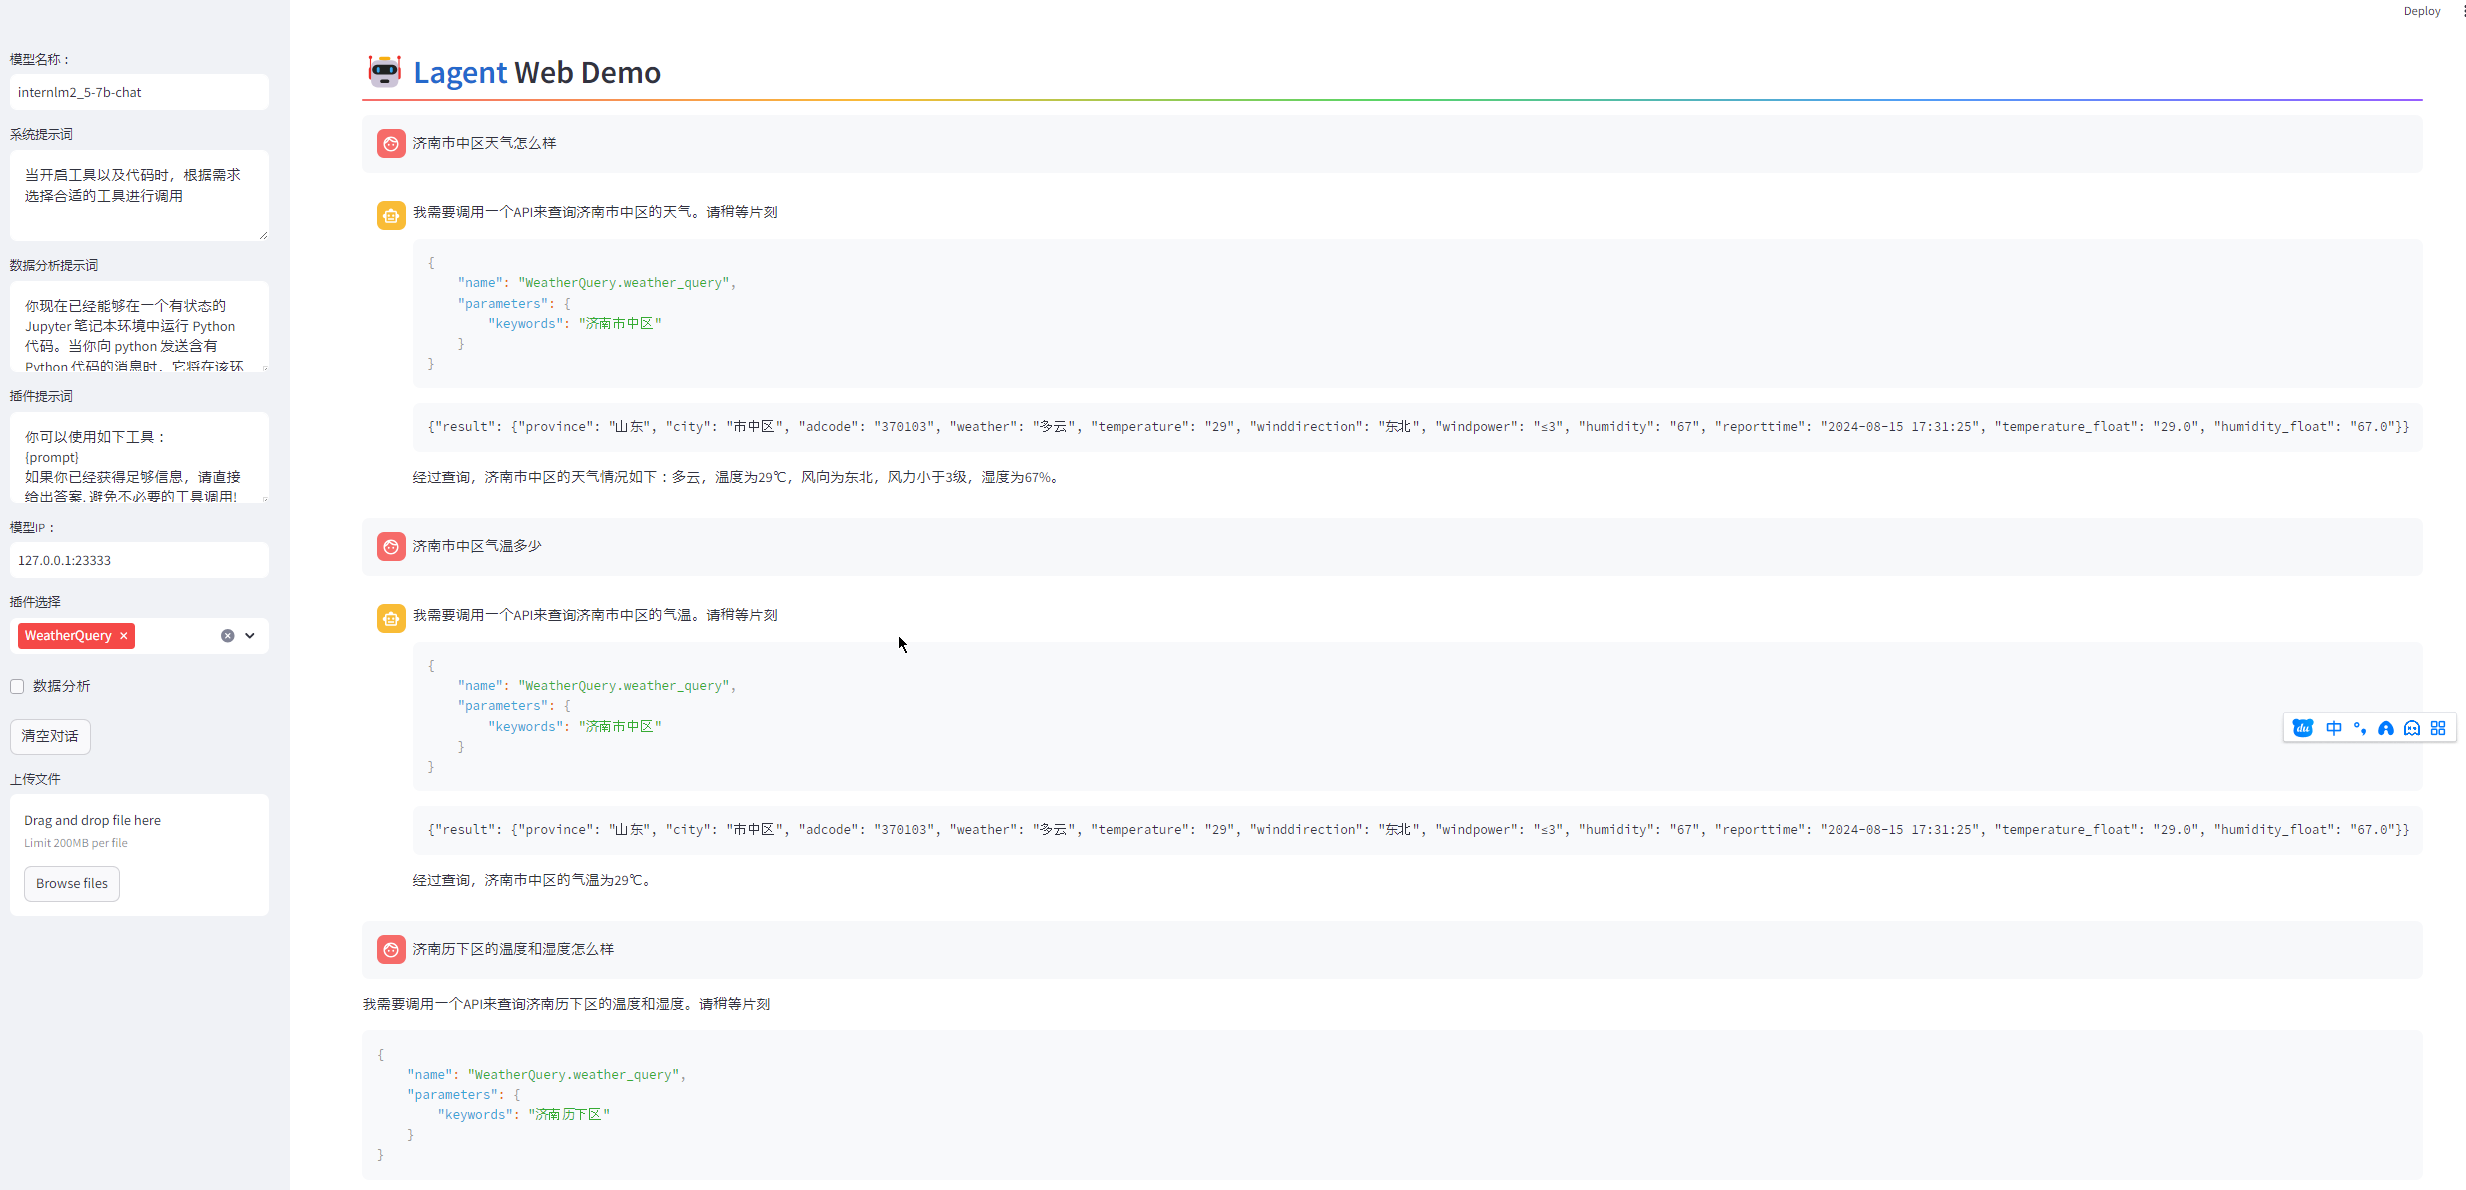
济南历下区的气温和湿度怎么样
北京的风力状况如何
现在济南和北京哪边气温高?
Agent会很智能的提示调用API,明确指出是WeatherQuery,并给出调用参数"济南市中区"
而且汇总了返回的结果,还将英文转换成了中文。作为debug信息,还把高德API返回结果全部显示出来
济南市中区天气怎么样

我需要调用一个API来查询济南市中区的天气。请稍等片刻

{
    "name": "WeatherQuery.weather_query",
    "parameters": {
        "keywords": "济南市中区"
    }
}

{"result": {"province": "山东", "city": "市中区", "adcode": "370103", "weather": "多云", "temperature": "29", "winddirection": "东北", "windpower": "≤3", "humidity": "67", "reporttime": "2024-08-15 17:31:25", "temperature_float": "29.0", "humidity_float": "67.0"}}

经过查询,济南市中区的天气情况如下:多云,温度为29℃,风向为东北,风力小于3级,湿度为67%。
可以根据输入的地址自动查询天气情况,并能根据结果汇总。
也能精确识别气温、湿度等关键字用户要求,并筛选回答。
https://lagent.readthedocs.io/zh-cn/latest/tutorials/action.html#id5
甚至通过多次调用API,可以做两地的比较。可以看到,中间Agent还根据反馈动态做了调整
现在济南和北京哪边气温高?

我需要查询济南和北京的天气信息,然后比较它们的气温。

{
    "name": "WeatherQuery.weather_query",
    "parameters": {
        "keywords": "济南"
    }
}

{"result": {"province": "山东", "city": "济南市", "adcode": "370100", "weather": "多云", "temperature": "29", "winddirection": "东", "windpower": "≤3", "humidity": "71", "reporttime": "2024-08-15 19:31:19", "temperature_float": "29.0", "humidity_float": "71.0"}}

我需要查询北京的天气信息,然后比较它的气温。

{
    "name": "WeatherQuery.weather_query",
    "parameters": {
        "keywords": "武崚"
    }
}

WeatherQuery exception: 'geocodes'

现在,我需要重新查询北京的天气信息,并确保使用正确的关键词。

{
    "name": "WeatherQuery.weather_query",
    "parameters": {
        "keywords": "北京"
    }
}

{"result": {"province": "北京", "city": "北京市", "adcode": "110000", "weather": "阴", "temperature": "28", "winddirection": "东北", "windpower": "≤3", "humidity": "85", "reporttime": "2024-08-15 19:32:59", "temperature_float": "28.0", "humidity_float": "85.0"}}

济南的气温为29°C,北京的气温为28°C。因此,济南的气温比北京高。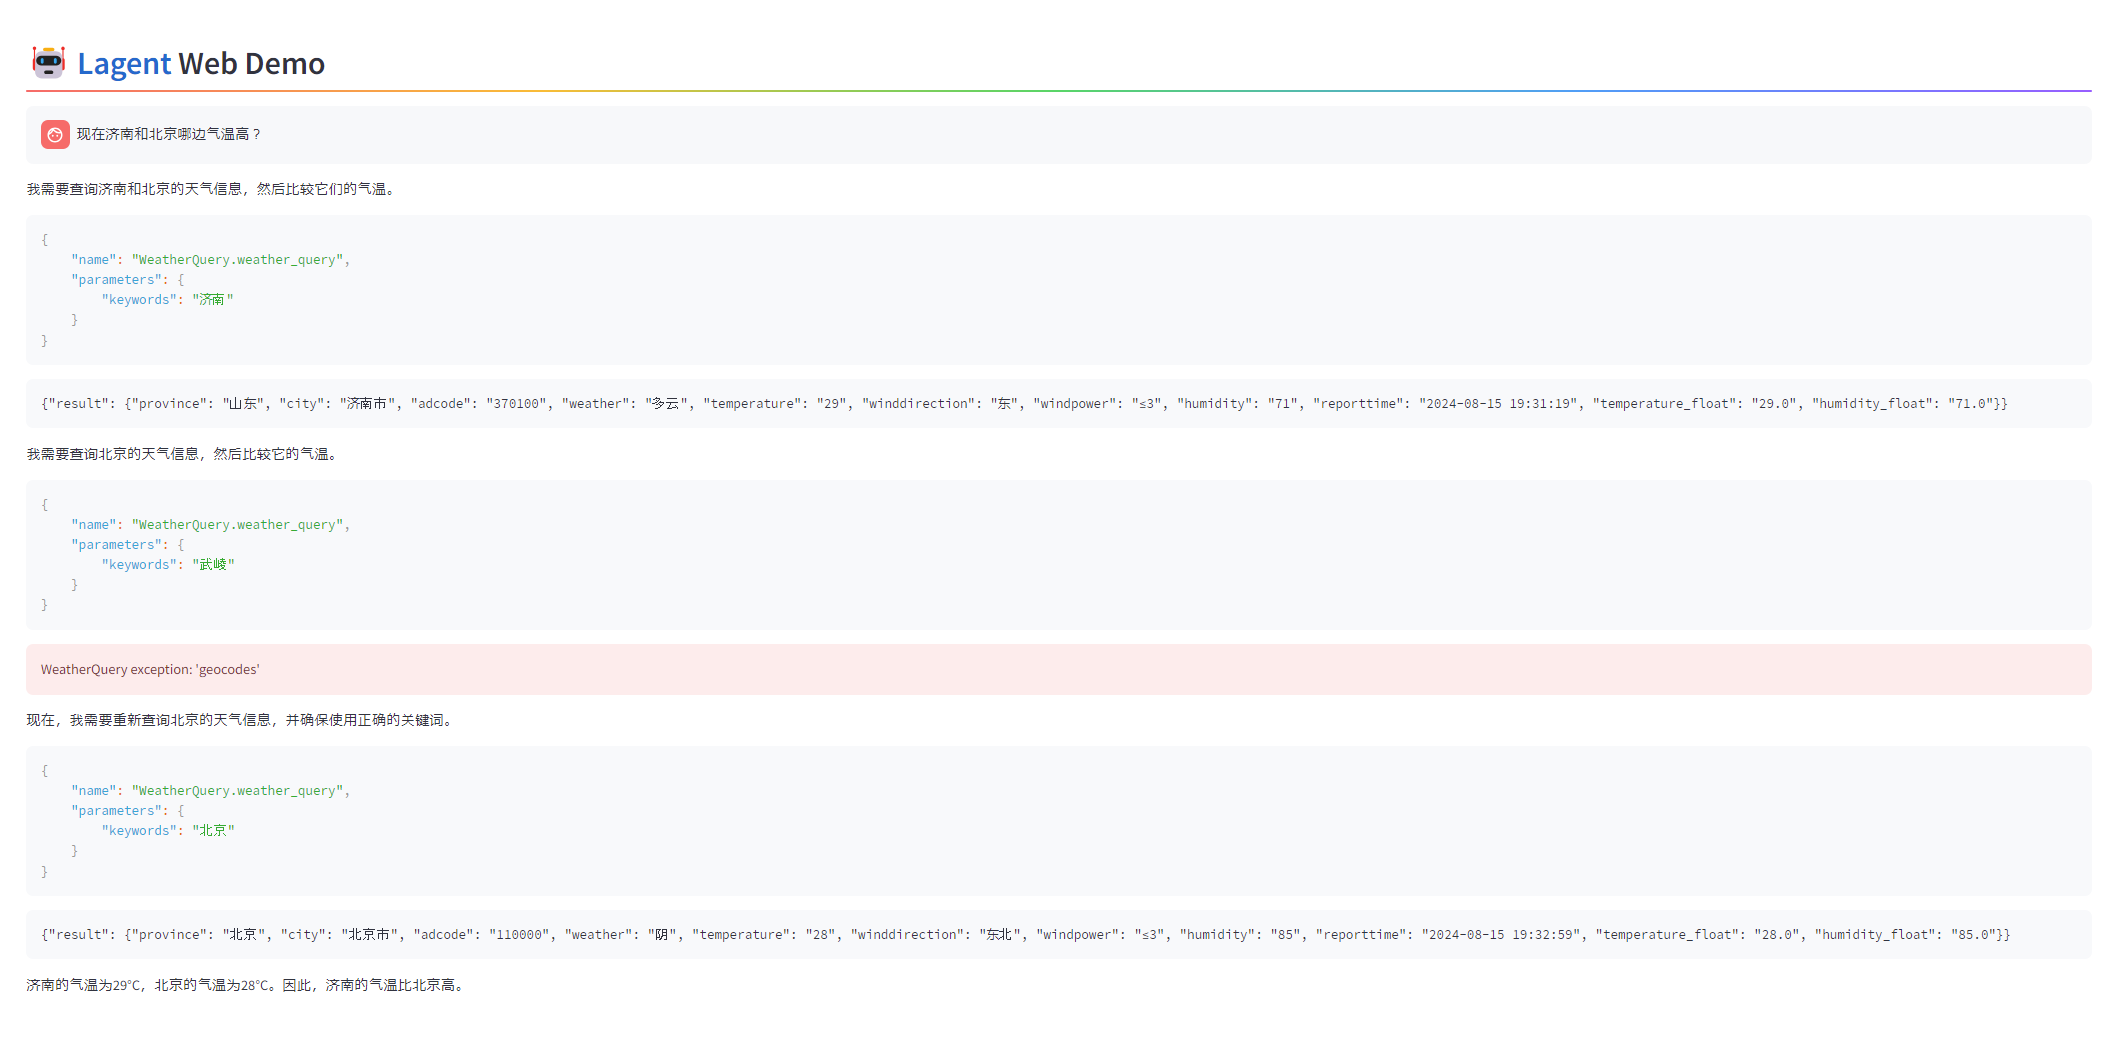
五、参考:高德地图服的调用例子
前提:注册高德开发者,创建API访问key。
-
地址转换adcode:https://restapi.amap.com/v3/geocode/geo
curl -X GET 'https://restapi.amap.com/v3/geocode/geo?key=c7f6ae7c9a1bf1bc4ef72eaa36fc1d83&address=山东济南市中区'| jq .
{
"status": "1",
"info": "OK",
"infocode": "10000",
"count": "1",
"geocodes": [
{
"formatted_address": "山东省济南市市中区",
"country": "中国",
"province": "山东省",
"citycode": "0531",
"city": "济南市",
"district": "市中区",
"township": [],
"neighborhood": {
"name": [],
"type": []
},
"building": {
"name": [],
"type": []
},
"adcode": "370103",
"street": [],
"number": [],
"location": "116.997472,36.651121",
"level": "区县"
}
]
} -
根据adcode获取天气信息:https://restapi.amap.com/v3/weather/weatherInfo
curl -X GET 'https://restapi.amap.com/v3/weather/weatherInfo?key=c7f6ae7c9a1bf1bc4ef72eaa36fc1d83&city=370102' | jq .
{
"status": "1",
"count": "1",
"info": "OK",
"infocode": "10000",
"lives": [
{
"province": "山东",
"city": "历下区",
"adcode": "370102",
"weather": "中雨",
"temperature": "30",
"winddirection": "北",
"windpower": "≤3",
"humidity": "63",
"reporttime": "2024-08-15 16:01:03",
"temperature_float": "30.0",
"humidity_float": "63.0"
}
]
}