目录
定时任务
本篇来聊聊定时与时间轮,对于一个应用来说,其实很多场景需要采用定时任务进行执行,比如每天定时发送统计报表的数据,金融支付中的对账文件推送,除了业务场景中,在客户端服务端常连接的心跳检测、延时任务执行中其实都需要定时任务进行支持。JDK本身提供了几种定时任务,但是netty进一步优化了,那么本篇带着这三个问题聊聊
- Jdk原生方案有哪些不满足的地方
- Netty为什么采用时间轮算法来实现
- netty时间轮算法流程源码解析
其实定时任务有三种方式,固定周期执行 (每天9点执行)、延迟一定时间执行(5S后执行)、执行某个时间执行(1月20号 10点执行)
JDK定时任务
Timer
具体执行就是集成TimerTask任务,覆盖run方法,其实就是另外启动一个线程。
java
public class TestTimer extends TimerTask{

    public static void main(String[] args) {
        Timer timer = new Timer();
        timer.schedule(new TestTimer(),6000); // 6S后执行
    }

    @Override
    public void run() {
        System.out.println(Thread.currentThread().getName()+"\t timer");
    }
}
原理
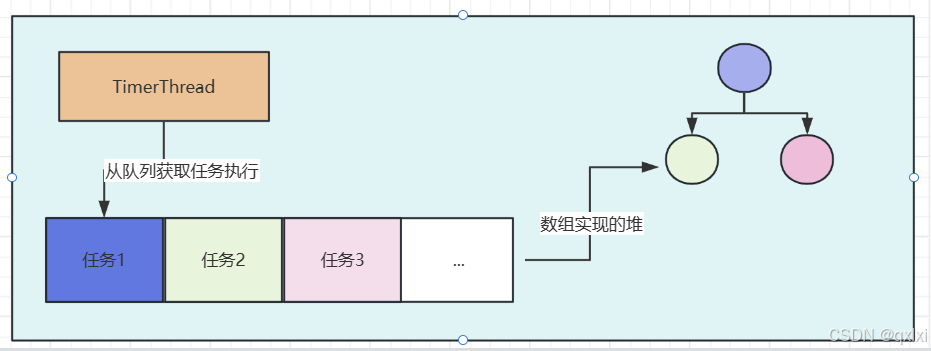
在构造方法的时候 创建一个线程。而这个线程会从queue中获取对应的任务执行,
java
	private final TaskQueue queue = new TaskQueue(); // 小根堆
	private final TimerThread thread = new TimerThread(queue);

    public Timer(String name) {
        thread.setName(name);
        thread.start();
    }
TaskQueue是一个数组实现的小根堆,越快deadline执行的任务,越在根部,所以执行一个任务的之间复杂度是O(1) 但是插入一个任务的时间复杂度是O(LogN)
ScheduledThreadPoolExecutor
上面的Timer其实存在一定设计的缺陷
- Timer是单线程模型,如果一个任务执行太久,可能影响后面任务的执行。
- TimerTask 如果执行出现异常,Timer 并不会捕获,会导致线程终止,其他任务永远不会执行。
java
   ScheduledExecutorService exthreadPool = Executors.newScheduledThreadPool(5);
    exthreadPool.scheduleAtFixedRate(() ->
            System.out.println("HelloWorld"),
            1000, // 延迟1S后开始执行
            2000,  // 2S执行一次
            TimeUnit.MILLISECONDS);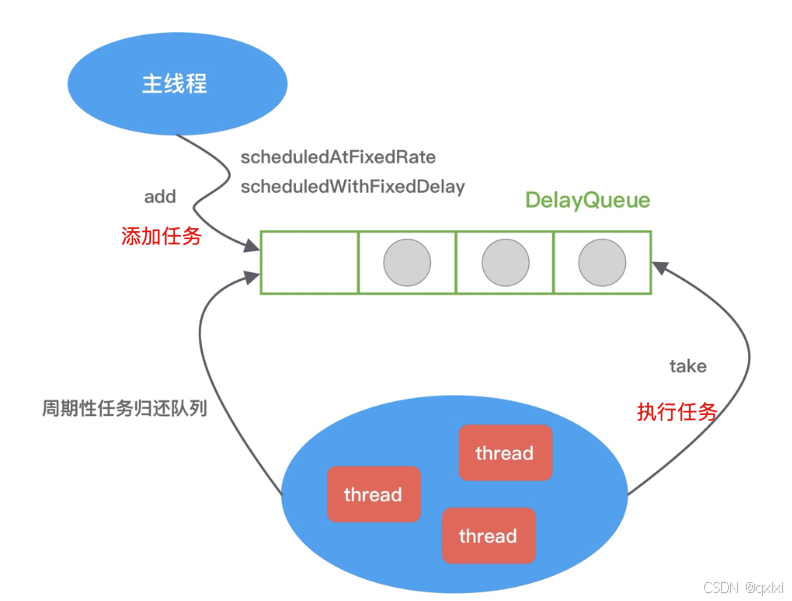
可以发现上述其实都有 执行任务的线程,添加任务的主线程、封装任务的任务。但是由于其本身数据结构的复杂度是O(N) , 所以在海量任务执行的场景中,其实性能和效率并不高。
时间轮算法
时间轮就是一个环形队列,类似于时钟的结构,所以叫时间轮。
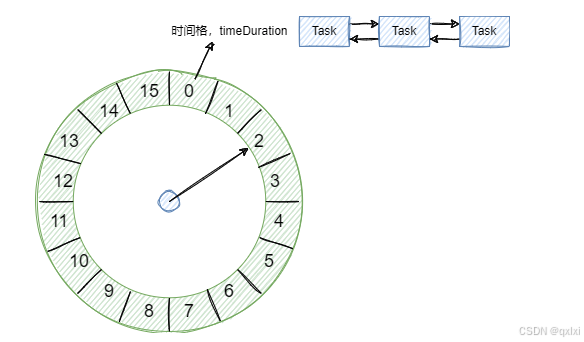
如图所示,将时间轮划分为16个格子,每1S执行一个格子的任务。而每个格子的都是一个链表结构,通过指针进行连接所要执行的任务。
比如当前要执行一个1S后执行的任务,就可以根据当前指针所指的位置,添加到对应的3位置,但是如果要执行的是26S后的位置,那么如何计算的呢。其实很简单就是 26%15 = 11, 也就是一轮之后的第11个位置。
相比于JDK提供的定时任务,时间轮算法增加、删除任务的时间复杂度都是O(1) ,而时间轮算法是一种思想,具体的落地在Netty、Kafka、Dubbo中都有对应的具体实现。
netty时间轮架构


整体架构其实由三部分组成
- HashedWheelBucket 数组 构建成一个时间轮结构
- 每个格子 其实就是一个HashedWheelBucket对象,内部持有head、tail节点 分别指向 HashedWheelTimeout 具体的任务
- HashedWheelTimeout 封装具体执行的任务
- Woker 执行具体的任务
netty时间轮 源码解析
基本使用
java
public class TestHashWheelTimer {
public static void main(String[] args) {
// tickDuration : 时间间隔
// TimeUnit : 单位
// ticksPerWheel : 划分多少块 默认512
HashedWheelTimer hashedWheelTimer = new HashedWheelTimer(1, TimeUnit.SECONDS, 20);
hashedWheelTimer.newTimeout(new TimerTask() {
@Override
public void run(Timeout timeout) throws Exception {
System.out.println(Thread.currentThread().getName()+"\t hello");
}
}, 1, TimeUnit.SECONDS);
}
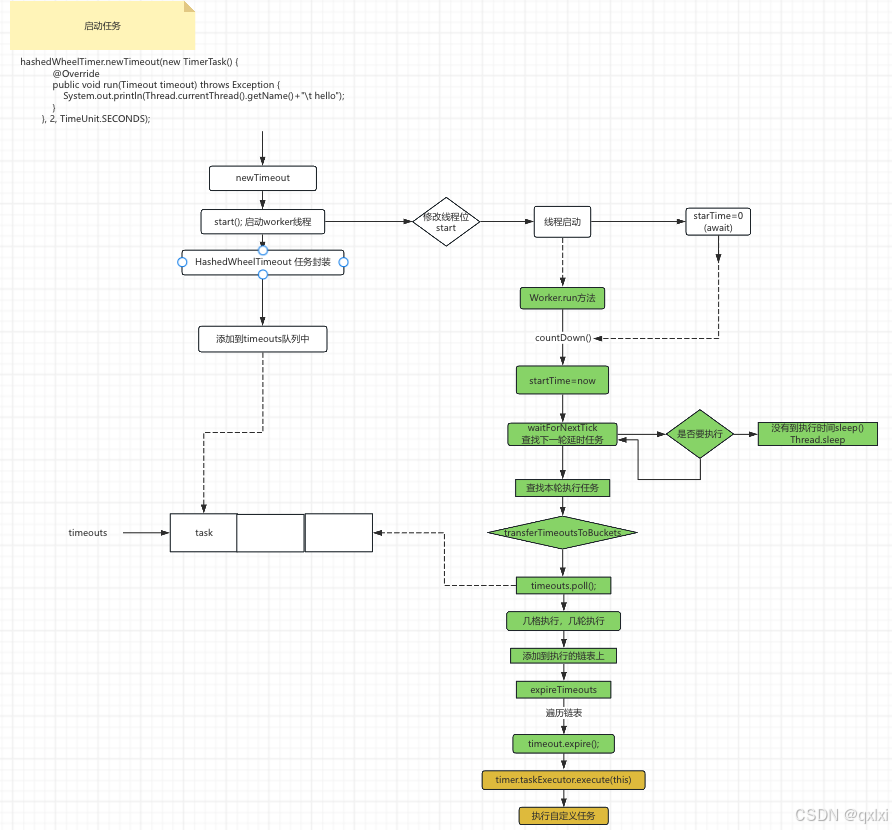
}其实主要就是初始化时间轮、添加任务(之后执行任务)
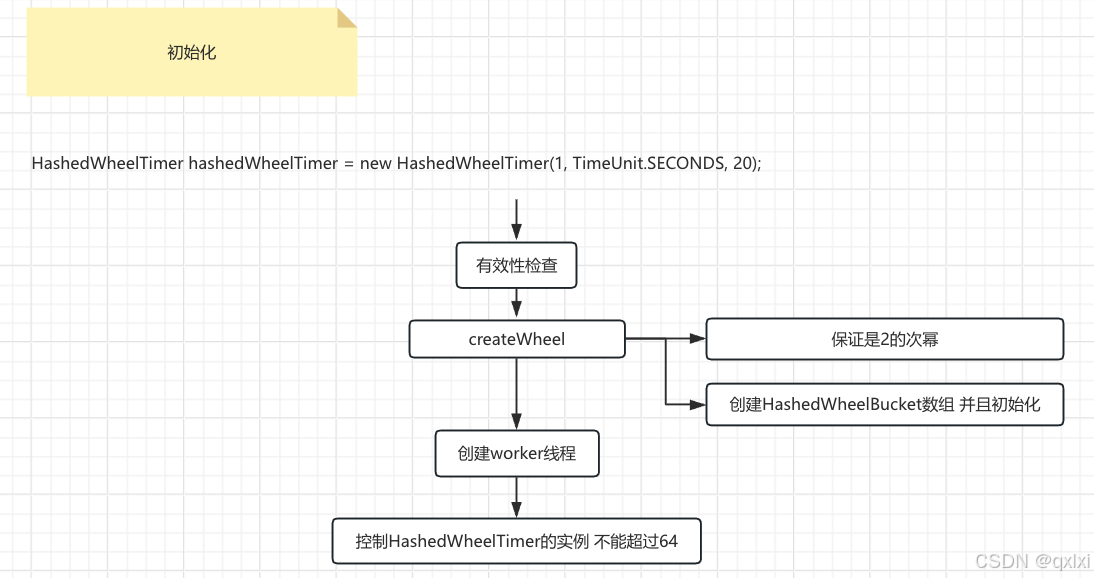
HashedWheelTimer 初始化
-
- 先进行参数的有效检查
-
- 创建时间轮,以及计算 & 运算的掩码
-
- 创建执行任务的线程
-
- 异常边界处理
java
	// threadFactory 线程工厂 构建woker线程的
    // tickDuration 时间间隔
    // ticksPerWheel 时间轮的槽
    public HashedWheelTimer(
            ThreadFactory threadFactory,
            long tickDuration, TimeUnit unit, int ticksPerWheel, boolean leakDetection,
            long maxPendingTimeouts, Executor taskExecutor) {

        // 有效性检查
        checkNotNull(threadFactory, "threadFactory");
        checkNotNull(unit, "unit");
        checkPositive(tickDuration, "tickDuration");
        checkPositive(ticksPerWheel, "ticksPerWheel");
        this.taskExecutor = checkNotNull(taskExecutor, "taskExecutor");

        // 核心 ⭐️
        wheel = createWheel(ticksPerWheel);
        // 掩码 计算任务  应该存放在时间轮的具体位置 & 替换 % 运算
        mask = wheel.length - 1;

        // 转换成纳秒 10^6 毫秒 秒
        long duration = unit.toNanos(tickDuration);

        // 创建woker线程
        workerThread = threadFactory.newThread(worker);

        // 指定最大延时任务有多少
        this.maxPendingTimeouts = maxPendingTimeouts;

        // 控制HashedWheelTimer的实例 不能超过64
        if (INSTANCE_COUNTER.incrementAndGet() > INSTANCE_COUNT_LIMIT &&
            WARNED_TOO_MANY_INSTANCES.compareAndSet(false, true)) {
            reportTooManyInstances();
        }
    }
createWheel 创建HashedWheelBucket数组
- 1.这里其实就是判断传入的值,如果是2的幂次 直接使用,否则找到第一个大于该数的2的次幂,比如当前传入的是15,那么就会转换成16,至于为什么要进行这样处理,这样的方式 可以利用 i & (length - 1) 进行高效的位运算。而前提必须是2的次幂。
- 2.创建时间轮数组 并且初始化每个单独时间轮,需要注意的是
HashedWheelBucket中包含头和尾部节点,通过双向链表的方式
java
    private static HashedWheelBucket[] createWheel(int ticksPerWheel) {
        // 调整成2的次幂
        // 目的: 位运算 替换 %的 运算 效率高
        ticksPerWheel = MathUtil.findNextPositivePowerOfTwo(ticksPerWheel);

        // 初始化数组 HashedWheelBucket
        HashedWheelBucket[] wheel = new HashedWheelBucket[ticksPerWheel];
        for (int i = 0; i < wheel.length; i ++) {
            wheel[i] = new HashedWheelBucket();
        }
        return wheel;
    }
newTimeout 添加任务
- 1.先判断任务和时间单位是否为空
- 2.延时任务+1 以及判断是否超过阈值
- 3.启动执行任务的核心线程
- 4.将任务封装进
HashedWheelTimeout并且添加到timeouts队列中
java
    public Timeout newTimeout(TimerTask task, long delay, TimeUnit unit) {
        // 判断处理
        checkNotNull(task, "task");
        checkNotNull(unit, "unit");

        long pendingTimeoutsCount = pendingTimeouts.incrementAndGet();

        // 超越延时任务的最大值
        // 控制一个HashedWheelTimer中的 延时任务的个数
        if (maxPendingTimeouts > 0 && pendingTimeoutsCount > maxPendingTimeouts) {
            pendingTimeouts.decrementAndGet();
            throw new RejectedExecutionException("Number of pending timeouts ("
                + pendingTimeoutsCount + ") is greater than or equal to maximum allowed pending "
                + "timeouts (" + maxPendingTimeouts + ")");
        }

        // 核心 ⭐️ 启动woker线程
        start();

        // 当前时间+延时时间 - 开启时间
        long deadline = System.nanoTime() + unit.toNanos(delay) - startTime;

        // Guard against overflow.
        if (delay > 0 && deadline < 0) {
            deadline = Long.MAX_VALUE;
        }
        // 创建任务 封装 HashedWheelTimeout
        HashedWheelTimeout timeout = new HashedWheelTimeout(this, task, deadline);
        // 添加到队列中 不会立即加入到Bucked 加入到一个Mpsc的队列中 无所队列 并发效率比较高
        timeouts.add(timeout);
        return timeout;
    }
执行任务
启动的时候,其实先启动woker线程,然后会判断启动时间starTime =0 会使用CountDownLatch进行Wait()
java
    public void start() {
        // 线程启动
        // 判断线程状态
        switch (WORKER_STATE_UPDATER.get(this)) {
            case WORKER_STATE_INIT:
                if (WORKER_STATE_UPDATER.compareAndSet(this, WORKER_STATE_INIT, WORKER_STATE_STARTED)) {
                    // 启动线程 只有init才能启动
                    workerThread.start();
                }
                break;
        }

        // 线程不一定马上启动  会进行等待
        while (startTime == 0) {
            try {
                // 线程启动完成后, woker线程进行等待唤醒
                // 后续会进行唤醒
                startTimeInitialized.await();
            }
        }
}- 1.启动线程,然后赋值startTime的值 countDown() 上面的步骤就可以执行了。
- 2.等到下一批次要执行的时间,如果不到就sleep
- 3.计算当前任务轮下标,取出对应时间轮的链表
- 4.从队列中获取10W个任务,然后添加到对应的位置
- 5.从链表中获取任务进行执行。
java
        public void run() {
            startTime = System.nanoTime();
            if (startTime == 0) {
                 startTime = 1;
            }

            startTimeInitialized.countDown();

            do {
                final long deadline = waitForNextTick();
                if (deadline > 0) {
                    // % 操作
                    int idx = (int) (tick & mask);
                    processCancelledTasks();
                    // 获取对应时间轮中的链表
                    HashedWheelBucket bucket =
                            wheel[idx];
                    transferTimeoutsToBuckets();
                    //
                    bucket.expireTimeouts(deadline);
                    tick++;
                }
                // worker 如果一直启动 就一直循环
            } while (WORKER_STATE_UPDATER.get(HashedWheelTimer.this) == WORKER_STATE_STARTED);

            for (HashedWheelBucket bucket: wheel) {
                bucket.clearTimeouts(unprocessedTimeouts);
            }
            for (;;) {
                HashedWheelTimeout timeout = timeouts.poll();
                if (timeout == null) {
                    break;
                }
                if (!timeout.isCancelled()) {
                    unprocessedTimeouts.add(timeout);
                }
            }
            processCancelledTasks();
        }
java
        private void transferTimeoutsToBuckets() {
            // 先取10W个任务 不关心任务在时间轮的格子
            for (int i = 0; i < 100000; i++) {
                HashedWheelTimeout timeout = timeouts.poll();
                if (timeout == null) {
                    break;
                }
                if (timeout.state() == HashedWheelTimeout.ST_CANCELLED) {
                    continue;
                }

                // 结束时间 / 时间轮的个数  还有几格需要执行
                long calculated = timeout.deadline / tickDuration;
                // 获取几轮执行
                timeout.remainingRounds = (calculated - tick) / wheel.length;

                final long ticks = Math.max(calculated, tick);
                int stopIndex = (int) (ticks & mask);

                HashedWheelBucket bucket = wheel[stopIndex];
                // 存储在对应的格子中 链表结构
                bucket.addTimeout(timeout);
            }
        }
java
        public void expireTimeouts(long deadline) {
            HashedWheelTimeout timeout = head;

            while (timeout != null) {
                HashedWheelTimeout next = timeout.next;
                if (timeout.remainingRounds <= 0) {
                    next = remove(timeout);
                    // 保证当前链表中,过期任务也可以执行
                    // deadline 当前时间 远远大于timeOut的deadline
                    // 这个timerout已经过期了 会执行
                    if (timeout.deadline <= deadline) {
                        // 执行
                        timeout.expire();
                    } else {
                        throw new IllegalStateException(String.format(
                                "timeout.deadline (%d) > deadline (%d)", timeout.deadline, deadline));
                    }
                } else if (timeout.isCancelled()) {
                    next = remove(timeout);
                } else {
                    timeout.remainingRounds --;
                }
                timeout = next;
            }
        }
时间轮的优缺点
优点
- 高效的插入和过期检查:插入的时间复杂度O(1) 因为是直接定位到对应的格子以及链表操作
- 可配置的时间粒度:时间轮的槽数量可以可配置
- 处理大量定时任务:比较适合处理大量定时任务的场景,超时监测。
缺点
- 任务延迟执行:执行的时间可能不精确,会延后。
- 极端情况的空推进,A任务1S后执行,B任务6小时后执行,中间这段时间就是空推进。这里Kafka使用了多级时间轮的方式进行解决。
品一品优秀设计
1.利用CountDownLatch锁
巧妙使用CountDownLatch 进行等待线程启动后 才执行后面的任务添加。
2.MPSC的应用
性能优化&线程安全,使用MPSC可以多生产者安全添加任务,单消费者消费,既减少了并发竞争也提高的了性能。
实际的生产环境选择
ScheduledThreadPoolExecutor和HashedWheelTimer 各有优劣,需要根据使用场景进行权衡
- 关注任务调度的及时性:选择ScheduledThreadPoolExecutor
- 存在大量调度任务:选择HashedWheelTimer