文章目录
- 一个刚初始化的服务器需要下载的应用
-
- [google chrome](#google chrome)
- ghelp
- 解压安装包
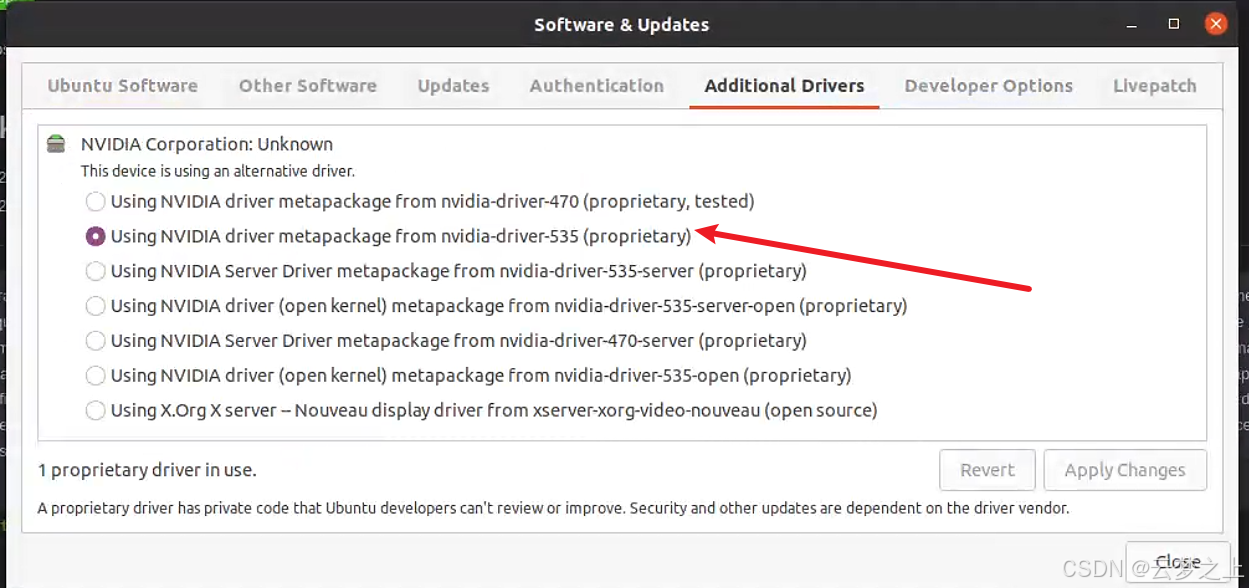
- 更新nvidia的驱动
- pycharm设置
- conda相关
- torch相关
- 导包的方法
一个刚初始化的服务器需要下载的应用
google chrome
下载google浏览器
python
https://www.google.cn/intl/zh-CN/chrome/ghelp
python
https://ghelper.net/解压安装包
.tar.gz文件
python
tar xzvf pycharm-community-2024.1.4.tar.gz
#x:解压。
#z:使用 gzip 解压。
#v:显示解压过程中的文件。
#f:指定文件名。
.deb文件
python
sudo dpkg -i google-chrome-stable_current_amd64.deb解压大型zip文件
直接终端输入jar,找到中间版本的jar进行安装
python
#sudo apt install
jar -xvf filename.zip
更新nvidia的驱动
出现nvidia-smi 指令显示不了的情况
pycharm设置
参考:pycharm设置
linux设置pycharm桌面图标
方法①
- 终端输入
python
sudo gedit /usr/share/applications/Pycharm.desktop- 然后修改打开文件的内容,将其中icon路径和exec路劲修改为你自己的路径
python
[Desktop Entry]
Type=Application
Name=Pycharm
GenericName=Pycharm3
Comment=Pycharm3:The Python IDE
Exec=sh /home/dell/Downloads/pycharm-community-2024.1.4/bin/pycharm.sh
Icon=/home/dell/Downloads/pycharm-community-2024.1.4/bin/pycharm.png
Terminal=pycharm
Categories=Pycharm;
然后就加入成功了

方法②
直接用命令打开pycharm后,在菜单栏的tools里面选择创建desk top entry

conda相关
下载conda
参考资料: Conda超详细的linux-conda环境安装教程
下载conda的链接
python
https://www.anaconda.com/download/success选择这个进行下载

然后终端输入bash命令安装
python
bash Anaconda3-2024.06-1-Linux-x86_64.shconda换源
参考 conda换源
python
conda config --add channels https://mirrors.tuna.tsinghua.edu.cn/anaconda/cloud/msys2/
conda config --add channels https://mirrors.tuna.tsinghua.edu.cn/anaconda/cloud/conda-forge
conda config --add channels https://mirrors.tuna.tsinghua.edu.cn/anaconda/pkgs/free/
conda config --add channels https://mirrors.tuna.tsinghua.edu.cn/anaconda/cloud/pytorch/
conda config --add channels https://mirrors.tuna.tsinghua.edu.cn/anaconda/pkgs/main/
python
conda config --set show_channel_urls yes测试看一下加的源加成功了没有
python
conda config --show channels
通过"conda config --show-sources" 查看配置文件的路径。配置文件为用户目录下的.condarc文件
python
conda config --show-sources
打开这个文件对里面的默认包进行修改

.condarc文件里面
python
show_channel_urls: true
default_channels:
  - https://mirrors.tuna.tsinghua.edu.cn/anaconda/pkgs/main
  - https://mirrors.tuna.tsinghua.edu.cn/anaconda/pkgs/r
  - https://mirrors.tuna.tsinghua.edu.cn/anaconda/pkgs/msys2
custom_channels:
  conda-forge: https://mirrors.tuna.tsinghua.edu.cn/anaconda/cloud
  msys2: https://mirrors.tuna.tsinghua.edu.cn/anaconda/cloud
  bioconda: https://mirrors.tuna.tsinghua.edu.cn/anaconda/cloud
  menpo: https://mirrors.tuna.tsinghua.edu.cn/anaconda/cloud
  pytorch: https://mirrors.tuna.tsinghua.edu.cn/anaconda/cloud
  pytorch-lts: https://mirrors.tuna.tsinghua.edu.cn/anaconda/cloud
  simpleitk: https://mirrors.tuna.tsinghua.edu.cn/anaconda/cloud
  deepmodeling: https://mirrors.tuna.tsinghua.edu.cn/anaconda/cloud/
channels:
  - https://mirrors.tuna.tsinghua.edu.cn/anaconda/pkgs/main/
  - https://mirrors.tuna.tsinghua.edu.cn/anaconda/cloud/pytorch/
  - https://mirrors.tuna.tsinghua.edu.cn/anaconda/pkgs/free/
  - https://mirrors.tuna.tsinghua.edu.cn/anaconda/cloud/conda-forge
  - https://mirrors.tuna.tsinghua.edu.cn/anaconda/cloud/msys2/
  - defaults
如果出现大量debug报错
降低conda-build的版本
python
conda install "conda-build!=3.26.0"torch相关
安装torch包,浏览器下载包
这个网址找到对应的包进行下载
python
https://download.pytorch.org/whl/cu118torch、torchvision、torchaudio
然后pip名
python
pip install -i https://pypi.tuna.tsinghua.edu.cn/simple安装pytorch
一般是安装11.8 pytorch 为2.0.1
python
conda install pytorch==2.0.1 torchvision==0.15.2 torchaudio==2.0.2 pytorch-cuda=11.8 -c pytorch -c nvidia常用包安装
python
#PIL包
pip install Pillow -i https://pypi.tuna.tsinghua.edu.cn/simple
导包的方法
python
import supervision as sv  (import 的路径不能带点)
from .datasets import transforms as T   (.导入当前目录或者包中的模块)
from ..datasets import transforms as T (..导入上一级目录中的模块)