一、针孔照相机模型
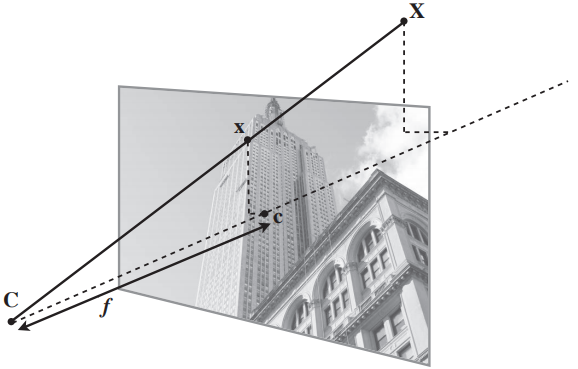
针孔照相机模型(有时称为射影照相机模型)是计算机视觉中广泛使用的照相机模型。针孔照相机模型简单,并且具有足够的精确度。这个名字来源于一种类似暗箱机的照相机。该照相机从一个小孔采集射到暗箱内部的光线。在针孔照相机模型中,在光线投影到图像平面之前,从唯一一个点经过,也就是照相机中心C。
1照相机矩阵
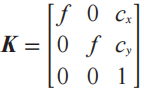
照相机矩阵可以分解为:
标定矩阵仅和照相机自身的情况相关,在大多数情况下,倾斜参数s可以设置成0,默认设置 α=1.经过这些假设,标定矩阵变为:
2三维点的投影
创建照相机类,处理对照相机和投影建模所需要的全部操作主要代码:
python
from numpy import *
from scipy import linalg


class Camera(object):
    """ Class for representing pin-hole cameras. """

    def __init__(self,P):
        """ Initialize P = K[R|t] camera model. """
        self.P = P
        self.K = None # calibration matrix
        self.R = None # rotation
        self.t = None # translation
        self.c = None # camera center


    def project(self,X):
        """    Project points in X (4*n array) and normalize coordinates. """

        x = dot(self.P,X)
        for i in range(3):
            x[i] /= x[2]
        return x


    def factor(self):
        """    Factorize the camera matrix into K,R,t as P = K[R|t]. """

        # factor first 3*3 part
        K,R = linalg.rq(self.P[:,:3])

        # make diagonal of K positive
        T = diag(sign(diag(K)))
        if linalg.det(T) < 0:
            T[1,1] *= -1

        self.K = dot(K,T)
        self.R = dot(T,R) # T is its own inverse
        self.t = dot(linalg.inv(self.K),self.P[:,3])

        return self.K, self.R, self.t


    def center(self):
        """    Compute and return the camera center. """

        if self.c is not None:
            return self.c
        else:
            # compute c by factoring
            self.factor()
            self.c = -dot(self.R.T,self.t)
            return self.c


# helper functions

def rotation_matrix(a):
    """    Creates a 3D rotation matrix for rotation
        around the axis of the vector a. """
    R = eye(4)
    R[:3,:3] = linalg.expm([[0,-a[2],a[1]],[a[2],0,-a[0]],[-a[1],a[0],0]])
    return R


def rq(A):
    from scipy.linalg import qr

    Q,R = qr(flipud(A).T)
    R = flipud(R.T)
    Q = Q.T

    return R[:,::-1],Q[::-1,:]
运行结果:


3照相机矩阵的分解
对照相机矩阵P,需要恢复内参数K以及照相机的位置t和姿势R。矩阵分块操作称为因子分解,这里使用的矩阵因子分解方法为RQ因子分解。因为RQ因子分解的结果不唯一,分解的结果存在符号二义性,所以需要限制矩阵R为正定的,可以在求解到的结果中加入变换T来改变符号。
运行代码:
python
import camera
from numpy import *
from scipy import linalg

K = array([[1000,0,500],[0,1000,300],[0,0,1]])
tmp = camera.rotation_matrix([0,0,1])[:3,:3]
Rt = hstack((tmp,array([[50],[40],[30]])))
cam = camera.Camera(dot(K,Rt))

print(K,Rt)
print(cam.factor())
运行结果:
4 计算照相机中心
给定照相机投影矩阵P,可以计算出空间上照相机的所在位置。照相机的中心C满足PC=0,
于是,
代码已经写入camera类,函数为: def center(self)
二、照相机标定
一个简单的标定方法:
需要准备一个平面矩形的标定物体(一个书本即可)、用于测量的卷尺和直尺,以及一个平面。
下面是具体操作步骤:
- 测量你选定矩形标定物体的边长X和dY;
- 将照相机和标定物体放置在平面上,使得照相机的背面和标定物体平行,同时物体位于照相机图像视图的中心,你可能需要调整照相机或者物体来获得良好的对齐效果;
- 测量标定物体到照相机的距离dZ;
- 拍摄一副图像来检验该设置是否正确,即标定物体的边要和图像的行和列对齐;
- 使用像素数来测量标定物体图像的宽度和高度dx和dy。
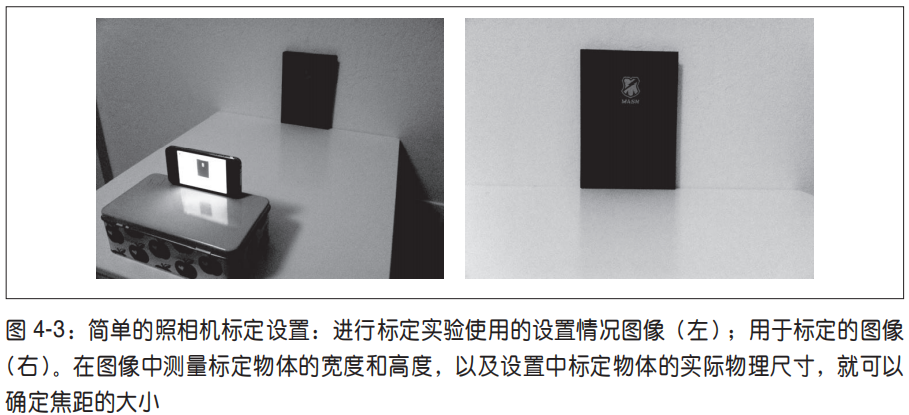
使用相似三角形可获得焦距:
代码如下:
python
def my_calibration(sz):
    row, col = sz
    fx = 2555 * col / 2592
    fy = 2586 * row / 1936
    K = diag([fx, fy, 1])
    K[0, 2] = 0.5 * col
    K[1, 2] = 0.5 * row
    return K
三、以平面和标记物进行姿态估计
如果图像中包含平面状的标记物体,并且以对照相机进行了标定,那么我们可以计算出照相机的姿态(旋转和平移)。这里的标记物可以为对任何平坦的物体。
姿态估计的方法:
1、先提取两幅图像的SIFT特征,然后使用RANSAC算法稳健地估计单应性矩阵
python
# compute features
sift.process_image('a3.jpg', 'a3.sift')
l0, d0 = sift.read_features_from_file('a3.sift')

sift.process_image('a4.jpg', 'a4.sift')
l1, d1 = sift.read_features_from_file('a4.sift')

# match features and estimate homography
matches = sift.match_twosided(d0, d1)
ndx = matches.nonzero()[0]
fp = homography.make_homog(l0[ndx, :2].T)
ndx2 = [int(matches[i]) for i in ndx]
tp = homography.make_homog(l1[ndx2, :2].T)

model = homography.RansacModel()
H, inliers = homography.H_from_ransac(fp, tp, model)
2、定义相应的三维坐标系,使标记物在X−Y平面上(Z=0),原点在标记物的某位置上
为了检验单应性矩阵结果的正确性,我们需要将一些简单的三维物体放置在标记物上,这里我们使用一个立方体。可以使用下面的函数来产生立方体上的点:
python
def cube_points(c, wid):
    """ Creates a list of points for plotting
        a cube with plot. (the first 5 points are
        the bottom square, some sides repeated). """
    p = []
    # bottom
    p.append([c[0] - wid, c[1] - wid, c[2] - wid])
    p.append([c[0] - wid, c[1] + wid, c[2] - wid])
    p.append([c[0] + wid, c[1] + wid, c[2] - wid])
    p.append([c[0] + wid, c[1] - wid, c[2] - wid])
    p.append([c[0] - wid, c[1] - wid, c[2] - wid])  # same as first to close plot

    # top
    p.append([c[0] - wid, c[1] - wid, c[2] + wid])
    p.append([c[0] - wid, c[1] + wid, c[2] + wid])
    p.append([c[0] + wid, c[1] + wid, c[2] + wid])
    p.append([c[0] + wid, c[1] - wid, c[2] + wid])
    p.append([c[0] - wid, c[1] - wid, c[2] + wid])  # same as first to close plot

    # vertical sides
    p.append([c[0] - wid, c[1] - wid, c[2] + wid])
    p.append([c[0] - wid, c[1] + wid, c[2] + wid])
    p.append([c[0] - wid, c[1] + wid, c[2] - wid])
    p.append([c[0] + wid, c[1] + wid, c[2] - wid])
    p.append([c[0] + wid, c[1] + wid, c[2] + wid])
    p.append([c[0] + wid, c[1] - wid, c[2] + wid])
    p.append([c[0] + wid, c[1] - wid, c[2] - wid])

    return array(p).T
3、有了单应性矩阵和照相机的标定矩阵,现在可以得出两个视图间的相对变换
python
# 计算照相机标定矩阵
K = my_calibration((300, 400))

# 位于边长为0.2 z=0平面的三维点
box = cube_points([0, 0, 0.1], 0.1)

# 投影第一幅图像上底部的正方形
cam1 = camera.Camera(hstack((K, dot(K, array([[0], [0], [-1]])))))
# 底部正方形上的点
box_cam1 = cam1.project(homography.make_homog(box[:, :5]))


# 使用H将点变换到第二幅图像中
box_trans = homography.normalize(dot(H,box_cam1))

# 从cam1和H中计算第二个照相机矩阵
cam2 = camera.Camera(dot(H, cam1.P))
A = dot(linalg.inv(K), cam2.P[:, :3])
A = array([A[:, 0], A[:, 1], cross(A[:, 0], A[:, 1])]).T
cam2.P[:, :3] = dot(K, A)

# 使用第二个照相机矩阵投影
box_cam2 = cam2.project(homography.make_homog(box))

# 测试:将点投影在 z=0 上,应该能够得到相同的点
point = array([1,1,0,1]).T
print(homography.normalize(dot(dot(H,cam1.P),point)))
print(cam2.project(point))
4、可视化投影后的点
python
# plotting
im0 = array(Image.open('a3.jpg'))
im1 = array(Image.open('a4.jpg'))

figure()
imshow(im0)
plot(box_cam1[0, :], box_cam1[1, :], linewidth=3)
title('2D projection of bottom square')
axis('off')

figure()
imshow(im1)
plot(box_trans[0, :], box_trans[1, :], linewidth=3)
title('2D projection transfered with H')
axis('off')

figure()
imshow(im1)
plot(box_cam2[0, :], box_cam2[1, :], linewidth=3)
title('3D points projected in second image')
axis('off')

show()
四、增强现实(AR)
增强现实 (Augmented Reality,AR)是将物体和相应信息放置在图像数据上的一系列操作的总称。我们会用到两个工具包:PyGame和PyOpenGL。
1PyGame和PyOpenGL
OpenGL 中这里主要使用两个部分:GL 部分包含所有以"gl"开头的函数,其中包含我们需要的大部分函数;GLU 部分是 OpenGL的实用函数库,里面包含了一些高层的函数。我们主要使用它来设置照相机投影。
pygame 部分用来设置窗口和事件控制;其中pygame.image 用来载入图像和创建 OpenGL 的纹理,pygame.locals 用来设置 OpenGL 的显示区域。
2从照相机矩阵到OpenGL格式
1、假设我们已经获得了标定好的照相机,即已知标定矩阵 K,下面的函数可以将照相机参数转换为 OpenGL 中的投影矩阵
python
def set_projection_from_camera(K):
    """从照相机标定矩阵中获得视图"""
    glMatrixMode(GL_PROJECTION)
    glLoadIdentity()
    fx = K[0, 0]
    fy = K[1, 1]
    fovy = 2 * math.atan(0.5 * height / fy) * 180 / math.pi
    aspect = (width * fy) / (height * fx)
    near = 0.1  #定义近的和远的裁剪平面
    far = 100.0
    gluPerspective(fovy, aspect, near, far)  #设定透视
    glViewport(0, 0, width, height)
2、获得移除标定矩阵后的 3×4 针孔照相机矩阵(将 P 和 K-1 相乘),并创建一个模拟视图
python
def set_modelview_from_camera(Rt):
    """从照相机姿态中获得模拟视图矩阵"""
    glMatrixMode(GL_MODELVIEW)
    glLoadIdentity()
    Rx = np.array([[1, 0, 0], [0, 0, -1], [0, 1, 0]])  #围绕x轴将茶壶旋转90度,使z轴向上
    R = Rt[:, :3]  #获得旋转的最佳逼近
    U, S, V = np.linalg.svd(R)
    R = np.dot(U, V)
    R[0, :] = -R[0, :]  #改变x轴的符号
    t = Rt[:, 3]  #获得平移量
    M = np.eye(4) #获得4*4的模拟视图矩阵
    M[:3, :3] = np.dot(R, Rx)
    M[:3, 3] = t
    M = M.T  #转置并压平以获得列序数值
    m = M.flatten()
    glLoadMatrixf(m)  #将模拟视图矩阵替换为新的矩阵
3、载入一幅图像,然后将其转换成一个 OpenGL 纹理,并将该纹理放置在四边形上
python
def draw_background(imname):
    """使用四边形绘制背景图像"""

    #载入背景图像,转为OpenGL纹理
    bg_image = pygame.image.load(imname).convert()
    bg_data = pygame.image.tostring(bg_image, "RGBX", 1)
    glMatrixMode(GL_MODELVIEW)
    glLoadIdentity()

    glClear(GL_COLOR_BUFFER_BIT | GL_DEPTH_BUFFER_BIT)
    #绑定纹理
    glEnable(GL_TEXTURE_2D)
    glBindTexture(GL_TEXTURE_2D, glGenTextures(1))
    glTexImage2D(GL_TEXTURE_2D, 0, GL_RGBA, width, height, 0, GL_RGBA, GL_UNSIGNED_BYTE, bg_data)
    glTexParameterf(GL_TEXTURE_2D, GL_TEXTURE_MAG_FILTER, GL_NEAREST)
    glTexParameterf(GL_TEXTURE_2D, GL_TEXTURE_MIN_FILTER, GL_NEAREST)
    #创建四方形填充整个窗口
    glBegin(GL_QUADS)
    glTexCoord2f(0.0, 0.0);
    glVertex3f(-1.0, -1.0, -1.0)
    glTexCoord2f(1.0, 0.0);
    glVertex3f(1.0, -1.0, -1.0)
    glTexCoord2f(1.0, 1.0);
    glVertex3f(1.0, 1.0, -1.0)
    glTexCoord2f(0.0, 1.0);
    glVertex3f(-1.0, 1.0, -1.0)
    glEnd()
    #清除纹理
    glDeleteTextures(1)
4、将物体放置入场景中
python
def draw_teapot(size):  # 红色茶壶
    glEnable(GL_LIGHTING)
    glEnable(GL_LIGHT0)
    glEnable(GL_DEPTH_TEST)
    glClear(GL_DEPTH_BUFFER_BIT)
    # 绘制红色茶壶
    glMaterialfv(GL_FRONT, GL_AMBIENT, [0, 0, 0, 0])
    glMaterialfv(GL_FRONT, GL_DIFFUSE, [0.5, 0.0, 0.0, 0.0])
    glMaterialfv(GL_FRONT, GL_SPECULAR, [0.7, 0.6, 0.6, 0.0])
    glMaterialf(GL_FRONT, GL_SHININESS, 0.25 * 128.0)
    glutSolidTeapot(size)


def drawFunc(size):  # 白色茶壶
    glRotatef(0.5, 5, 5, 0)  # (角度,x,y,z)
    glutWireTeapot(size)
    # 刷新显示
    glFlush()
综合代码:
python
# -*- coding: utf-8 -*-
import math
import pickle
import sys
from pylab import *
from OpenGL.GL import *
from OpenGL.GLU import *
from OpenGL.GLUT import *
import pygame, pygame.image
from pygame.locals import *
import homography, camera
import sift


def cube_points(c, wid):  # 绘制立方体的一各点列表
    """ Creates a list of points for plotting
        a cube with plot. (the first 5 points are
        the bottom square, some sides repeated). """
    p = []
    # 底部
    p.append([c[0] - wid, c[1] - wid, c[2] - wid])
    p.append([c[0] - wid, c[1] + wid, c[2] - wid])
    p.append([c[0] + wid, c[1] + wid, c[2] - wid])
    p.append([c[0] + wid, c[1] - wid, c[2] - wid])
    p.append([c[0] - wid, c[1] - wid, c[2] - wid])  # 和第一个相同

    # 顶部
    p.append([c[0] - wid, c[1] - wid, c[2] + wid])
    p.append([c[0] - wid, c[1] + wid, c[2] + wid])
    p.append([c[0] + wid, c[1] + wid, c[2] + wid])
    p.append([c[0] + wid, c[1] - wid, c[2] + wid])
    p.append([c[0] - wid, c[1] - wid, c[2] + wid])  # 和第一个相同

    # 竖直边
    p.append([c[0] - wid, c[1] - wid, c[2] + wid])
    p.append([c[0] - wid, c[1] + wid, c[2] + wid])
    p.append([c[0] - wid, c[1] + wid, c[2] - wid])
    p.append([c[0] + wid, c[1] + wid, c[2] - wid])
    p.append([c[0] + wid, c[1] + wid, c[2] + wid])
    p.append([c[0] + wid, c[1] - wid, c[2] + wid])
    p.append([c[0] + wid, c[1] - wid, c[2] - wid])

    return array(p).T


def my_calibration(sz):
    row, col = sz
    fx = 2555 * col / 2592
    fy = 2586 * row / 1936
    K = diag([fx, fy, 1])
    K[0, 2] = 0.5 * col
    K[1, 2] = 0.5 * row
    return K


def set_projection_from_camera(K):  # 获取视图
    glMatrixMode(GL_PROJECTION)
    glLoadIdentity()
    fx = K[0, 0]
    fy = K[1, 1]
    fovy = 2 * math.atan(0.5 * height / fy) * 180 / math.pi
    aspect = (width * fy) / (height * fx)
    # 定义近和远的剪裁平面
    near = 0.1
    far = 100.0
    # 设定透视
    gluPerspective(fovy, aspect, near, far)
    glViewport(0, 0, width, height)


def set_modelview_from_camera(Rt):  # 获取矩阵
    glMatrixMode(GL_MODELVIEW)
    glLoadIdentity()
    # 围绕x轴将茶壶旋转90度,使z轴向上
    Rx = np.array([[1, 0, 0], [0, 0, -1], [0, 1, 0]])
    # 获得旋转的最佳逼近
    R = Rt[:, :3]
    U, S, V = np.linalg.svd(R)
    R = np.dot(U, V)
    R[0, :] = -R[0, :]  # 改变x轴的符号
    # 获得平移量
    t = Rt[:, 3]
    # 获得4*4的的模拟视图矩阵
    M = np.eye(4)
    M[:3, :3] = np.dot(R, Rx)
    M[:3, 3] = t
    # 转置并压平以获取列序数值
    M = M.T
    m = M.flatten()
    # 将模拟视图矩阵替换成新的矩阵
    glLoadMatrixf(m)


def draw_background(imname):
    # 载入背景图像
    bg_image = pygame.image.load(imname).convert()
    bg_data = pygame.image.tostring(bg_image, "RGBX", 1)  # 将图像转为字符串描述
    glMatrixMode(GL_MODELVIEW)  # 将当前矩阵指定为投影矩阵
    glLoadIdentity()  # 把矩阵设为单位矩阵

    glClear(GL_COLOR_BUFFER_BIT | GL_DEPTH_BUFFER_BIT)  # 清楚颜色、深度缓冲
    glEnable(GL_TEXTURE_2D)  # 纹理映射
    glBindTexture(GL_TEXTURE_2D, glGenTextures(1))
    glTexImage2D(GL_TEXTURE_2D, 0, GL_RGBA, width, height, 0, GL_RGBA, GL_UNSIGNED_BYTE, bg_data)
    glTexParameterf(GL_TEXTURE_2D, GL_TEXTURE_MAG_FILTER, GL_NEAREST)
    glTexParameterf(GL_TEXTURE_2D, GL_TEXTURE_MIN_FILTER, GL_NEAREST)
    # 绑定纹理
    glBegin(GL_QUADS)
    glTexCoord2f(0.0, 0.0);
    glVertex3f(-1.0, -1.0, -1.0)
    glTexCoord2f(1.0, 0.0);
    glVertex3f(1.0, -1.0, -1.0)
    glTexCoord2f(1.0, 1.0);
    glVertex3f(1.0, 1.0, -1.0)
    glTexCoord2f(0.0, 1.0);
    glVertex3f(-1.0, 1.0, -1.0)
    glEnd()
    glDeleteTextures(1)  # 清除纹理


def draw_teapot(size):  # 红色茶壶
    glEnable(GL_LIGHTING)
    glEnable(GL_LIGHT0)
    glEnable(GL_DEPTH_TEST)
    glClear(GL_DEPTH_BUFFER_BIT)
    # 绘制红色茶壶
    glMaterialfv(GL_FRONT, GL_AMBIENT, [0, 0, 0, 0])
    glMaterialfv(GL_FRONT, GL_DIFFUSE, [0.5, 0.0, 0.0, 0.0])
    glMaterialfv(GL_FRONT, GL_SPECULAR, [0.7, 0.6, 0.6, 0.0])
    glMaterialf(GL_FRONT, GL_SHININESS, 0.25 * 128.0)
    glutSolidTeapot(size)


def drawFunc(size):  # 白色茶壶
    glRotatef(0.5, 5, 5, 0)  # (角度,x,y,z)
    glutWireTeapot(size)
    # 刷新显示
    glFlush()


width, height = 300,400


def setup():  # 设置窗口和pygame环境
    pygame.init()
    pygame.display.set_mode((width, height), OPENGL | DOUBLEBUF)
    pygame.display.set_caption("OpenGL AR demo")


# 计算特征
sift.process_image('a3.jpg', 'a3.sift')
l0, d0 = sift.read_features_from_file('a3.sift')

sift.process_image('a4.jpg', 'a4.sift')
l1, d1 = sift.read_features_from_file('a4.sift')

# 匹配特征,计算单应性矩阵
matches = sift.match_twosided(d0, d1)
ndx = matches.nonzero()[0]
fp = homography.make_homog(l0[ndx, :2].T)
ndx2 = [int(matches[i]) for i in ndx]
tp = homography.make_homog(l1[ndx2, :2].T)

model = homography.RansacModel()
H, inliers = homography.H_from_ransac(fp, tp, model)

# 计算照相机标定矩阵
K = my_calibration((300,400))
# 位于边长为0.2,z=0平面上的三维点
box = cube_points([0, 0, 0.1], 0.1)

# 投影第一幅图下个上底部的正方形
cam1 = camera.Camera(hstack((K, dot(K, array([[0], [0], [-1]])))))
# 底部正方形上的点
box_cam1 = cam1.project(homography.make_homog(box[:, :5]))

# 使用H将点变换到第二幅图像中
box_trans = homography.normalize(dot(H, box_cam1))

# 从cam1和H中计算第二个照相机矩阵
cam2 = camera.Camera(dot(H, cam1.P))
A = dot(linalg.inv(K), cam2.P[:, :3])
A = array([A[:, 0], A[:, 1], cross(A[:, 0], A[:, 1])]).T
cam2.P[:, :3] = dot(K, A)
# 使用第二个照相机矩阵投影
box_cam2 = cam2.project(homography.make_homog(box))

Rt = dot(linalg.inv(K), cam2.P)
setup()
draw_background("a4.jpg")
set_projection_from_camera(K)
set_modelview_from_camera(Rt)

draw_teapot(0.05)  # 显示红色茶壶
# drawFunc(0.05)  # 显示白色空心茶壶
pygame.display.flip()
while True:
    for event in pygame.event.get():
        if event.type == pygame.QUIT:
            sys.exit()