大家好,我是小黄。
近期,众多大学生炸鱼小猿口算APP,把一众小学生都快虐哭了,小黄听闻后,也跃跃欲试。对此小黄也参考网上的资料写了一个自动Pk的脚步。
首先大家需要安装一个pytorch环境过程中,如果小伙伴对此不熟悉的话可以参考网上的相关教程。
我们需要用到Tesseract-OCR文本识别。他的原理就是先截图,之后框选出比较大小的两个数字所在的区域,使用Tesseract-OCR识别出来后进行判断,最后模拟鼠标绘制出>,<,=号就可以了。
Tesseract-OCR下载地址:
https://github.com/tesseract-ocr/tesseract这个需要科学上网,不会科学上网的小伙伴可以关注小黄的公众号回复:小猿口算关键字获取。

脚本代码
import cv2
import pytesseract
import numpy as np
import re
import pyautogui
import time
import threading
from threading import Thread, Lock
import pynput
from pynput.mouse import Controller, Button
from pynput.keyboard import Listener

# 如果 Tesseract 没有在环境变量中,设置 Tesseract 可执行文件的路径
pytesseract.pytesseract.tesseract_cmd = r'D:\Program Files\Tesseract-OCR\tesseract.exe'

# 初始化鼠标控制器
mouse = Controller()


# 定义绘图函数,并限制在0.1秒左右完成
def draw_symbol(symbol):
    start_time = time.time()  # 记录开始时间

    screen_width, screen_height = pyautogui.size()
    x = int(screen_width * 0.28)  # 水平居中
    y = draw_y + 200  # 使用新的 y 坐标
    duration = 0.1  # 每条线的持续时间,设定为 0.1 秒以保持绘制时间

    print(f"当前鼠标位置: ({x}, {y})")

    mouse.position = (x, y)  # 将鼠标移动到起始位置
    mouse.press(Button.left)

    if symbol == '>':
        # 绘制 ">" 符号
        mouse.move(screen_width * 0.03, screen_height * 0.03)  # 右下斜线(缩短)
        time.sleep(duration)
        # 增加转弯处的形状
        mouse.move(screen_width * 0.01, 0)  # 横向移动
        time.sleep(duration)
        mouse.move(0, screen_height * 0.15)  # 右上斜线(缩短)
        time.sleep(duration)

    elif symbol == '<':
        # 绘制 "<" 符号
        mouse.move(-screen_width * 0.03, screen_height * 0.03)  # 左下斜线(缩短)
        time.sleep(duration)
        # 增加转弯处的形状
        mouse.move(-screen_width * 0.01, 0)  # 横向移动
        time.sleep(duration)
        mouse.move(0, -screen_height * 0.09)  # 左上斜线(缩短)
        time.sleep(duration)

    elif symbol == '=':
        # 绘制 "=" 符号
        mouse.move(-screen_width * 0.02, 0)  # 向左移动一点
        mouse.release(Button.left)
        mouse.press(Button.left)
        mouse.move(screen_width * 0.03, 0)  # 第一条横线(缩短)
        time.sleep(duration)
        mouse.release(Button.left)

        mouse.position = (x - screen_width * 0.02, y + screen_height * 0.02)  # 向下移动一点
        mouse.press(Button.left)
        mouse.move(screen_width * 0.03, 0)  # 第二条横线(缩短)
        time.sleep(duration)
        mouse.release(Button.left)
    else:
        print("无法绘制该符号")

    mouse.release(Button.left)  # 确保释放鼠标按键
    end_time = time.time()  # 记录结束时间
    print(f"绘图 '{symbol}' 完成,耗时: {end_time - start_time:.4f} 秒")


# 全局变量
running = False  # 标志变量,控制任务的运行
lock = Lock()  # 定义锁
draw_y = 970 + 100  # ROI 的底部加上 300 像素


def process_questions():
    global running
    i = 0
    previous_result = None
    previous_numbers = (None, None)  # 新增,用于存储前一题的数字
    stable_count = 0
    stable_threshold = 1  # 可以将阈值设为1,因为我们已经检测题目变化

    while running:
        start_time = time.time()  # 开始时间

        # 获取屏幕截图
        screenshot_start_time = time.time()
        image = pyautogui.screenshot()
        image = cv2.cvtColor(np.array(image), cv2.COLOR_RGB2BGR)
        screenshot_end_time = time.time()

        print(f"截图耗时: {screenshot_end_time - screenshot_start_time:.4f} 秒")

        # 提取需要识别的区域(根据实际情况调整坐标)
        roi = image[850:970, 700:1200]


        # 图像预处理
        processing_start_time = time.time()
        roi_gray = cv2.cvtColor(roi, cv2.COLOR_BGR2GRAY)
        roi_contrast = cv2.convertScaleAbs(roi_gray, alpha=2.0, beta=0)  # 增强对比度
        roi_blur = cv2.GaussianBlur(roi_contrast, (5, 5), 0)
        _, roi_thresh = cv2.threshold(roi_blur, 0, 255, cv2.THRESH_BINARY + cv2.THRESH_OTSU)
        processing_end_time = time.time()

        print(f"图像处理耗时: {processing_end_time - processing_start_time:.4f} 秒")

        # OCR 识别
        ocr_start_time = time.time()
        custom_config = r'--oem 3 --psm 6'
        roi_text = pytesseract.image_to_string(roi_thresh, config=custom_config)
        ocr_end_time = time.time()

        print(f"OCR 识别耗时: {ocr_end_time - ocr_start_time:.4f} 秒")

        # 提取数字并判断大小
        matches = re.findall(r'\d+', roi_text)

        if len(matches) >= 2:
            num1, num2 = int(matches[0]), int(matches[1])
            print(f"第{i + 1}题识别到的数字:{num1}, {num2}")

            # 检查是否为新题目
            if (num1, num2) == previous_numbers:
                print("检测到重复的题目,跳过处理")
            else:
                # 更新前一题的数字
                previous_numbers = (num1, num2)

                # 判断大小
                if num1 < num2:
                    result = '<'
                elif num1 > num2:
                    result = '>'
                else:
                    result = '='
                print(f"判断结果:{num1} {result} {num2}")

                # 绘制符号
                draw_start_time = time.time()
                # 启动绘图线程
                draw_thread = Thread(target=draw_symbol, args=(result,))
                draw_thread.start()
                draw_thread.join()  # 等待绘图完成
                draw_end_time = time.time()
                time.sleep(0.1)
                print(f"绘图耗时: {draw_end_time - draw_start_time:.4f} 秒")

        else:
            print(f"第{i + 1}题未能识别出足够的数字")

        # 等待一小段时间以确保下一题加载
        i += 1
        end_time = time.time()
        print(f"第{i}题处理总耗时: {end_time - start_time:.4f} 秒\n")


def toggle_running(key):
    global running
    if key == pynput.keyboard.Key.enter:
        if not running:
            running = True
            print("任务已启动")
            # 启动处理线程
            t = threading.Thread(target=process_questions)
            t.start()
        else:
            running = False
            print("任务已停止")


# 监听键盘输入
with Listener(on_press=toggle_running) as listener:
listener.join()我们需要注意的地方是这个参数,由于屏幕大小不一样,他可能需要微调,所以小黄写了一测试的代码,来看看是否框选正确。

在这里插入代码片运行完之后参数对的话可以看到刚刚好可以看到框选的就是数字的大小就是对的。
import cv2
import numpy as np
import pyautogui
# 获取屏幕截图
image = pyautogui.screenshot()
image = cv2.cvtColor(np.array(image), cv2.COLOR_RGB2BGR)
# 提取需要识别的区域,调整 Y 轴范围
roi = image[850:970, 700:1200] # 更新 ROI 的 Y 轴范围,从 850 到 970
# 在原图上绘制 ROI,矩形的 Y 坐标也需要更新
cv2.rectangle(image, (700, 850), (1200, 970), (0, 255, 0), 2) # 绘制绿色矩形
# 显示原图和 ROI
cv2.imshow("Original Image", image)
cv2.imshow("Region of Interest", roi)
cv2.waitKey(0) # 等待按键
cv2.destroyAllWindows() # 关闭所有窗口
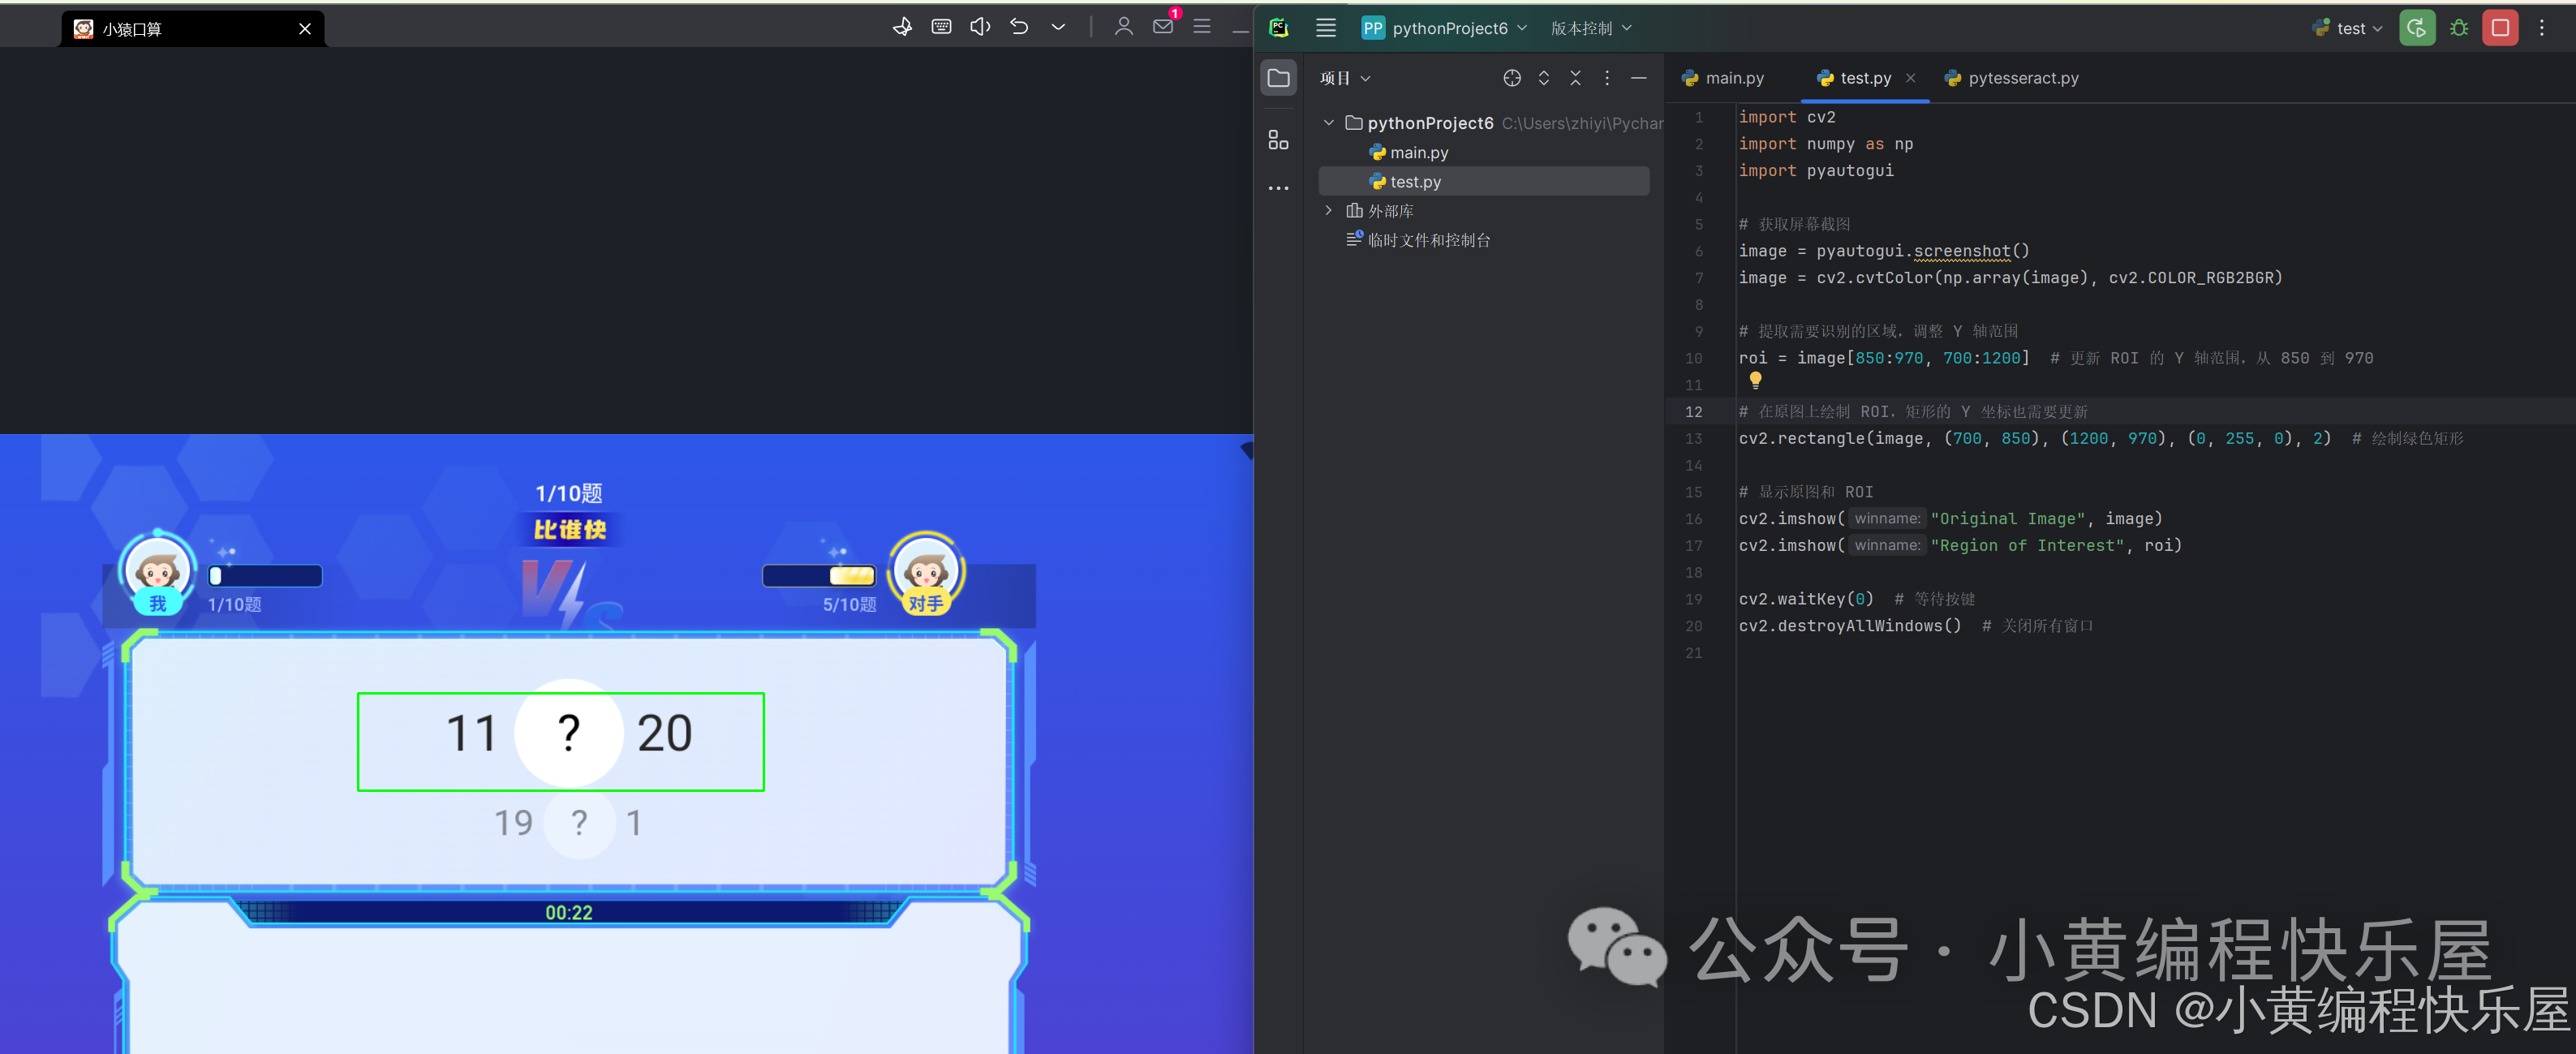
OK,完事具备,现在就有可以运行上面的代码了。我们看看具体效果。

由于时间比较仓储,大家可以改改绘制<,>,=号的位置,感觉小黄的绘制得不是很准确。
最后祝大家玩得愉快,有问题请给我留言或私信。需要软件的小伙伴记得回复关键字:小猿口算

不懂的小伙伴大家可以进群交流一下。