背景
最近在实际操作阿拉伯文小语种OCR功能的时候,尝试了诸多开源算法,但效果均不尽如人意。
说实在的,针对阿拉伯文的OCR开源算法,若仅仅是效果没那么优秀,比如识别率能有个70%80%,我还能微调微调,但是现在很多开源算法连最基础的识别率都不能保证,丝毫没有微调的可能性,这和从头训练没有区别!
但是前几天以一种不抱希望的态度尝试EasyOCR里面阿拉伯文模型的时候,带给了我惊喜,在我实际操作使用的过程中,easyOCR算法无论在实际效果、运行效率、易操作性都大大领先与一众其他的OCR开源算法。
本文则重点介绍EasyOCR算法中CRAFT文本检测模型的微调方法
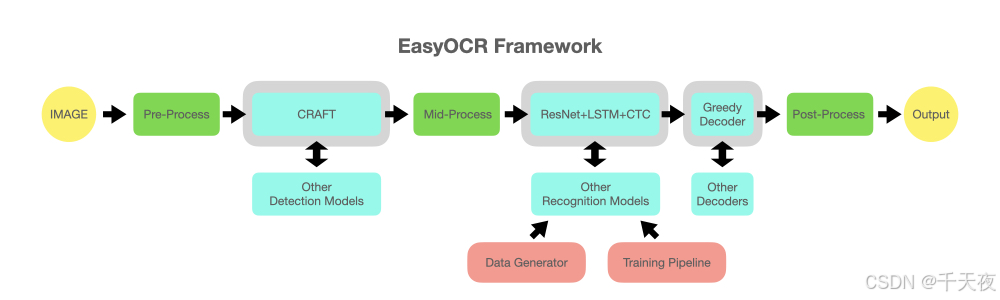
EasyOCR简介
一般的OCR算法主要分三步走:
- 文本检测模型框出待检测图像内的文本,并输出文本框的坐标描述。
- 文本分割模型分割文本框内的文本,最终输出字符的文本框坐标描述
- 文本识别模型针对每个字符进行识别,并最终输出
显然这种方式丢失了各个字符之间的相互关系信息,使得前后字符无法互相纠错,识别率自然大大降低。
故EasyOCR将后续两步进行了大修,先用基础的ResNet进行特征提取,后采用了时间序列的循环神经网络LSTM和CTC解码的方式进行整体单词的识别和输出,这使得EasyOCR在对于一些基于字母排列顺序的文本识别效果极佳(例如:英文、阿拉伯文、德语......)
EasyOCR详细的架构图如下
CRAFT微调方法
其实官网有详细的说明文档,本文也是基于官网的操作步骤进行补充说明,以期使得更加易懂和富有操作性。
官网连接如下:
EasyOCR/trainer/craft/README.md at master · JaidedAI/EasyOCR · GitHub
step1:安装相关项目和库
1. 下载项目
bash
git clone https://github.com/JaidedAI/EasyOCR.git2. 安装相关库
进入项目根目录下的trainer\craft文件夹,并执行:
bash
pip install -r requirements.txt注:实测并非一定要求版本号一模一样,具体的可以按照自己的环境配置具体试试
conda==4.10.3
opencv-python==4.5.3.56
Pillow==9.3.0
Polygon3==3.0.9.1
PyYAML==5.4.1
scikit-image==0.17.2
Shapely==1.8.0
torch==1.13.1
torchvision==0.10.0
wandb==0.12.9
step2:准备本地数据集
1. craft文件夹下文件树结构介绍
trainer\craft文件目录下的文件树如下所示,重点为下列加粗红色标记的文件
├── config(放置训练时候的配置文件)
│ ├── syn_train.yaml
│ └── custom_data_train.yaml(本地训练使用的yaml)
├── data
│ ├── pseudo_label
│ │ ├── make_charbox.py
│ │ └── watershed.py
│ ├── boxEnlarge.py
│ ├── dataset.py
│ ├── gaussian.py
│ ├── imgaug.py
│ └── imgproc.py
├── loss
│ └── mseloss.py
├── metrics
│ └── eval_det_iou.py
├── model
│ ├── craft.py
│ └── vgg16_bn.py
├── utils
│ ├── craft_utils.py
│ ├── inference_boxes.py
│ └── utils.py
├── trainSynth.py
├── train.py(训练程序入口)├── train_distributed.py
├── eval.py
├── data_root_dir (数据集存放位置)
└── exp (模型输出位置)
2. 数据集结构说明
└── data_root_dir (you can change root dir in yaml file)
├── ch4_training_images(存放训练图片)
│ ├── img_1.jpg
│ └── img_2.jpg
├── ch4_training_localization_transcription_gt((存放所有图片的标签文件))
│ ├── gt_img_1.txt
│ └── gt_img_2.txt
└── ch4_test_images(存放测试图片)
├── img_1.jpg
└── img_2.jpg
注:ch4_training_localization_transcription_gt文件夹内的label文本命名方式是图片名称前面增加gt_!
label文本文件的结构如下:
x1,71x2,y2,x3,y3,x4,y4,txt(文本内容)
对应的图形化说明如下:
label文本文件的一个示例如下:
377,117,463,117,465,130,378,130,Genaxis Theatre
493,115,519,115,519,131,493,131,06
374,155,409,155,409,170,374,170,###
3. 使用labelimg来帮助标注
easyocr的标注格式奇奇怪怪的,没找到合适的标注软件,之前常用labelimg来进行模型标注,相似的标注格式为YOLO的图像标注,故采用labelimg来进行标注。若读者有更好的标注方式,请评论告知,满城百姓,感谢不尽!
我猜测easyocr还支持相似变换的OCR功能,所以标注文件需要把四个点的坐标都输出,以支持类似平行四边形、梯形的文本框。(待验证)
注意:YOLO 的标注文件的格式为:
类别id 检测框中心坐标x 检测框中心坐标y 检测框长度 检测框宽度
我们需要自己手动进行一个格式的转换,可尝试使用python代码如下:
yolo标签格式转easyocr标签格式:
python
def yolo_to_corners(txt_file_path, img_path):
    # 读取图像尺寸
    img = cv2.imread(img_path)
    img_height, img_width, _ = img.shape

    # 读取YOLO格式的标签文件
    with open(txt_file_path, 'r') as f:
        lines = f.readlines()
    results = []
    for line in lines:
        parts = line.strip().split(' ')
        cls = int(parts[0])
        x_center = float(parts[1])
        y_center = float(parts[2])
        width = float(parts[3])
        height = float(parts[4])

        # 将相对坐标转换为绝对像素坐标
        x_center_px = int(x_center * img_width)
        y_center_px = int(y_center * img_height)
        half_width = int(width * img_width / 2)
        half_height = int(height * img_height / 2)

        # 计算四个角的坐标
        x1, y1 = x_center_px - half_width, y_center_px - half_height
        x2, y2 = x_center_px + half_width, y_center_px - half_height
        x3, y3 = x_center_px + half_width, y_center_px + half_height
        x4, y4 = x_center_px - half_width, y_center_px + half_height
        results.append(f"{x1},{y1},{x2},{y2},{x3},{y3},{x4},{y4},txt")

    return results
step3:下载预训练模型,并更新config配置
1. 下载预训练模型
官方链接如下:
https://drive.google.com/file/d/1enVIsgNvBf3YiRsVkxodspOn55PIK-LJ/view?usp=sharing
下载完毕后,放于EasyOCR\trainer\craft\pretrained_model目录下,若没有pretrained_model目录,自己新建一个即可。
2. 更新config配置
进入config文件夹,里面有一个custom_data_train.yaml文件。
若你是根据上诉步骤一步步来的,实际上无需修改任何配置,但是也许你可以修改一下end_iter字段,这个是训练轮次的意思,原来数据为25000,一开始你可以设置的小一点。
总之我的custom_data_train.yaml文件内容如下:
wandb_opt: False
results_dir: "./exp/"
vis_test_dir: "./vis_result/"
data_root_dir: "./data_root_dir/"
score_gt_dir: None # "/data/ICDAR2015_official_supervision"
mode: "weak_supervision"
train:
backbone : vgg
use_synthtext: False # If you want to combine SynthText in train time as CRAFT did, you can turn on this option
synth_data_dir: "/data/SynthText/"
synth_ratio: 5
real_dataset: custom
ckpt_path: "./pretrained_model/CRAFT_clr_amp_29500.pth"
eval_interval: 1000
batch_size: 5
st_iter: 0
end_iter: 25
lr: 0.0001
lr_decay: 7500
gamma: 0.2
weight_decay: 0.00001
num_workers: 0 # On single gpu, train.py execution only works when num worker = 0 / On multi-gpu, you can set num_worker > 0 to speed up
amp: True
loss: 2
neg_rto: 0.3
n_min_neg: 5000
data:
vis_opt: False
pseudo_vis_opt: False
output_size: 768
do_not_care_label: '###', ''
mean: 0.485, 0.456, 0.406
variance: 0.229, 0.224, 0.225
enlarge_region : 0.5, 0.5 # x axis, y axis
enlarge_affinity: 0.5, 0.5
gauss_init_size: 200
gauss_sigma: 40
watershed:
version: "skimage"
sure_fg_th: 0.75
sure_bg_th: 0.05
syn_sample: -1
custom_sample: -1
syn_aug:
random_scale:
range: 1.0, 1.5, 2.0
option: False
random_rotate:
max_angle: 20
option: False
random_crop:
version: "random_resize_crop_synth"
option: True
random_horizontal_flip:
option: False
random_colorjitter:
brightness: 0.2
contrast: 0.2
saturation: 0.2
hue: 0.2
option: True
custom_aug:
random_scale:
range: 1.0, 1.5, 2.0
option: False
random_rotate:
max_angle: 20
option: True
random_crop:
version: "random_resize_crop"
scale: 0.03, 0.4
ratio: 0.75, 1.33
rnd_threshold: 1.0
option: True
random_horizontal_flip:
option: True
random_colorjitter:
brightness: 0.2
contrast: 0.2
saturation: 0.2
hue: 0.2
option: True
test:
trained_model : null
custom_data:
test_set_size: 500
test_data_dir: "./data_root_dir/"
text_threshold: 0.75
low_text: 0.5
link_threshold: 0.2
canvas_size: 2240
mag_ratio: 1.75
poly: False
cuda: True
vis_opt: False
step3:微调训练开始!
进入EasyOCR\trainer\craft目录运行如下代码:
bash
python train.py --yaml=custom_data_train 然后静待结束即可 。训练完成的模型输出目录为:EasyOCR\trainer\craft\exp\custom_data_train