- 🍨 本文为🔗365天深度学习训练营 中的学习记录博客
- 🍖 原作者:K同学啊
目标
具体实现
(一)环境
语言环境 :Python 3.10
编 译 器: PyCharm
框 架:
(二)具体步骤
1.查询TF版本和设置使用GPU
from tensorflow import keras
from tensorflow.keras import models, layers
import os, PIL, pathlib
import matplotlib.pyplot as plt
import tensorflow as tf
import numpy as np

# 查询tensorflow版本
print("Tensorflow Version:", tf.__version__)

# 设置使用GPU
gpus = tf.config.list_physical_devices("GPU")
print(gpus)

if gpus:
    gpu0 = gpus[0]  # 如果有多个GPU,仅使用第0个GPU
    tf.config.experimental.set_memory_growth(gpu0, True)    # 设置GPU显存按需使用
    tf.config.set_visible_devices([gpu0], "GPU")

Tensorflow Version: 2.10.0
[PhysicalDevice(name='/physical_device:GPU:0', device_type='GPU')]
2.导入数据
目录结构如下:

# 导入数据
data_dir = './datasets/hollywood/'
data_dir = pathlib.Path(data_dir)

# 查看数据
image_count = len(list(data_dir.glob('*/*.jpg')))
print('图片总数为:', image_count)

图片总数为: 1800

# 看看Brad Pitt(布拉德·皮特)的图片
brad_pitt = list(data_dir.glob('Brad Pitt/*.jpg'))
im = PIL.Image.open(brad_pitt[0])
im.show()
3.数据预处理
# 数据预处理
batch_size = 32
image_height = 224
image_width = 224

train_ds = tf.keras.preprocessing.image_dataset_from_directory(
    directory=data_dir,
    validation_split=0.1,
    subset="training",
    label_mode="categorical",
    seed=123,
    image_size=(image_height, image_width),
    batch_size=batch_size
)
val_ds = tf.keras.preprocessing.image_dataset_from_directory(
    directory=data_dir,
    validation_split=0.1,
    subset="validation",
    label_mode="categorical",
    seed=123,
    image_size=(image_height, image_width),
    batch_size=batch_size
)

Found 1800 files belonging to 17 classes.
Using 1620 files for training.
Found 1800 files belonging to 17 classes.
Using 180 files for validation.

# 输出数据集的标签(标签按字母顺序对应于目录名称)
class_names = train_ds.class_names
print(class_names)

['Angelina Jolie', 'Brad Pitt', 'Denzel Washington', 'Hugh Jackman', 'Jennifer Lawrence', 'Johnny Depp', 'Kate Winslet', 'Leonardo DiCaprio', 'Megan Fox', 'Natalie Portman', 'Nicole Kidman', 'Robert Downey Jr', 'Sandra Bullock', 'Scarlett Johansson', 'Tom Cruise', 'Tom Hanks', 'Will Smith']

# 可视化数据
plt.figure(figsize=(20, 10))
for images, labels in train_ds.take(1):
    for i in range(20):
        ax = plt.subplot(5, 10, i + 1)
        plt.imshow(images[i].numpy().astype("uint8"))
        plt.title(class_names[np.argmax(labels[i])])

        plt.axis("off")
plt.show()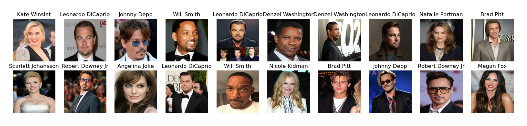
# 再次检查数据
for image_batch, labels_batch in train_ds:
    print(image_batch.shape)
    print(labels_batch.shape)
    break

(32, 224, 224, 3)
(32, 17)
4.配置数据集
# 配置数据集
AUTOTUNE = tf.data.AUTOTUNE
train_ds = train_ds.cache().shuffle(1000).prefetch(buffer_size=AUTOTUNE)
val_ds = val_ds.cache().prefetch(buffer_size=AUTOTUNE)
5.构建CNN网络
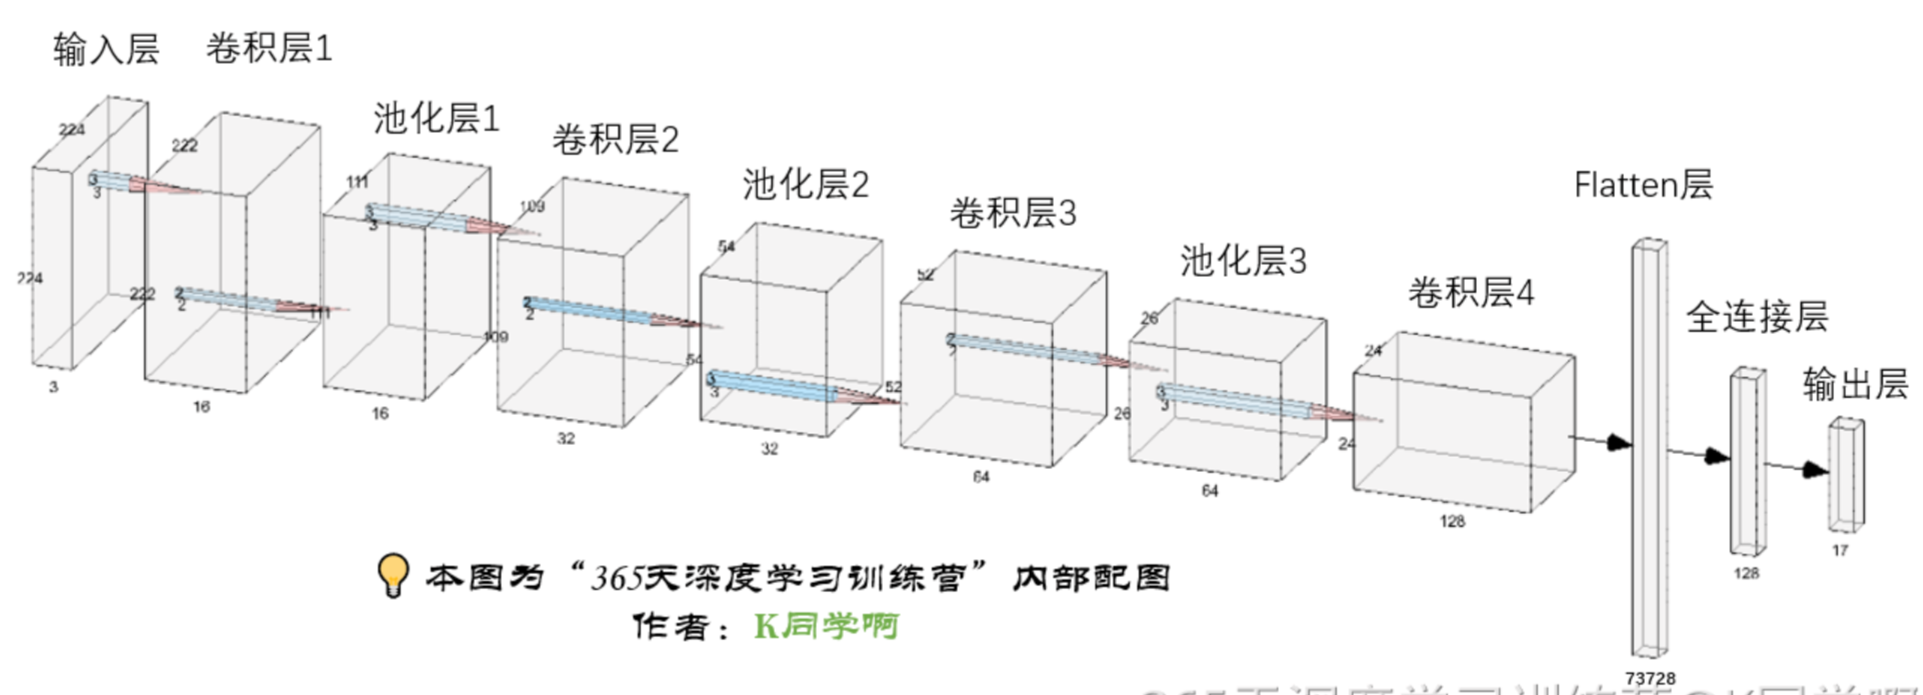
# 构建CNN网络
model = models.Sequential([
    layers.experimental.preprocessing.Rescaling(1./255, input_shape=(image_height, image_width, 3)),
    layers.Conv2D(16, (3, 3), 1, activation='relu', input_shape=(image_height, image_width)),
    layers.AveragePooling2D((2, 2)),
    layers.Conv2D(32, (3, 3), activation='relu'),
    layers.AveragePooling2D((2, 2)),
    layers.Dropout(0.5),
    layers.Conv2D(64, (3, 3), activation='relu'),
    layers.AveragePooling2D((2, 2)),
    layers.Dropout(0.5),
    layers.Conv2D(128, (3, 3), activation='relu'),
    layers.Dropout(0.5),

    layers.Flatten(),
    layers.Dense(128, activation='relu'),
    layers.Dense(len(class_names))
])
print(model.summary())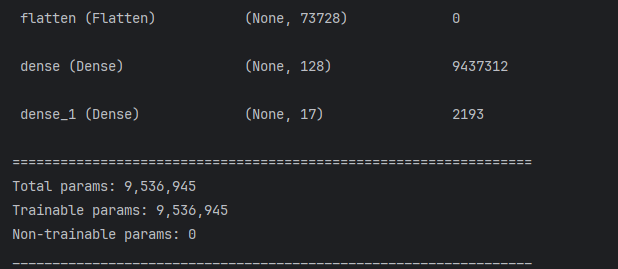
6.训练模型
# 训练模型
# 1. 设置动态学习率
initial_learning_rate = 1e-4    # 设置初始学习率
lr_schedule = tf.keras.optimizers.schedules.ExponentialDecay(  # 对学习率使用指数衰减
    initial_learning_rate=initial_learning_rate,
    decay_steps=60,  # 学习率衰减的步数。在经过 decay_steps 步后,学习率将按照指数函数衰减。
    decay_rate=0.96,  # 学习率的衰减率。它决定了学习率如何衰减。通常,取值在 0 到 1 之间。
    staircase=True
)
# 2. 将指数衰减学习率送入优化器
optimizer = tf.keras.optimizers.Adam(learning_rate=lr_schedule)

# 3. 设置损失函数
loss = tf.keras.losses.CategoricalCrossentropy(from_logits=True)    # 多分类的对数损失函数

model.compile(
    optimizer=optimizer,
    loss=loss,
    metrics=['accuracy']
)

epochs = 100

# 保存模型最佳参数
checkpointer = ModelCheckpoint(
    filepath='./models/hollywood-best.h5',
    monitor='val_accuracy',
    verbose=1,
    save_best_only=True,
    save_weights_only=True
)

# 设置早停
earlystopper = EarlyStopping(
    monitor='val_accuracy',
    min_delta=0.001,
    patience=20,
    verbose=1
)

# 训练
history = model.fit(
    x=train_ds,
    validation_data=val_ds,
    epochs=epochs,
    callbacks=[checkpointer, earlystopper]
)

# 模型评估

acc = history.history['accuracy']
val_acc = history.history['val_accuracy']

loss = history.history['loss']
val_loss = history.history['val_loss']

epochs_range = range(len(loss))

plt.figure(figsize=(12, 4))
plt.subplot(1, 2, 1)
plt.plot(epochs_range, acc, label="Training Accuracy")
plt.plot(epochs_range, val_acc, label="Validation Accuracy")
plt.legend(loc="lower right")
plt.title("Training and validation accuracy")

plt.subplot(1, 2, 2)
plt.plot(epochs_range, loss, label="Loss Accuracy")
plt.plot(epochs_range, val_loss, label="Validation Loss")
plt.legend(loc="lower right")
plt.title("Training and validation Loss")

plt.show()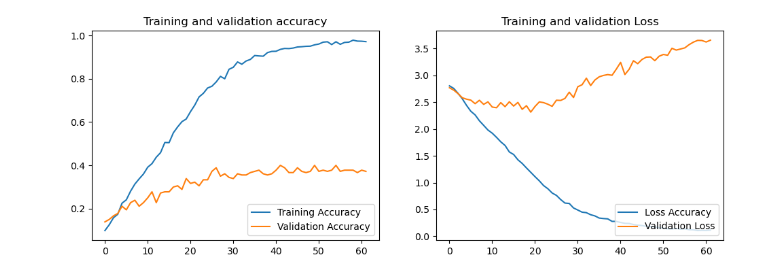
7.真实图片预测
# 加载效果最好的模型权重
model.load_weights('./models/hollywood-best.h5')
# img = PIL.Image.open("./datasets/hollywood/Jennifer Lawrence/021_2eaafb9f.jpg")
# image = tf.image.resize(img, [image_height, image_width])

image = tf.keras.utils.load_img('./datasets/hollywood/Jennifer Lawrence/021_2eaafb9f.jpg', target_size=(image_height, image_width))
image_array = tf.keras.utils.img_to_array(image)  # 将PIL对象转换成numpy数组
img_array = tf.expand_dims(image_array, 0)    # /255.0  # 记得做归一化处理(与训练集处理方式保持一致)

predictions =model.predict(img_array)

print("预测结果为:", class_names[np.argmax(predictions)])

预测结果为: Jennifer Lawrence
(三)总结
实际预测会发现结果有很大概率会出错的。其次看模型评估,其实训练的结果是比较差的, val_accuracy最好只有40%左右。如何提高准确率,还需要研究,后续出实践总结。