(本文所需图片在文章上面的资源中,点击"立即下载"。)
本文介绍了如何通过UI工具包(UI Toolkit)来创建一个编辑器UI。
一、创建项目
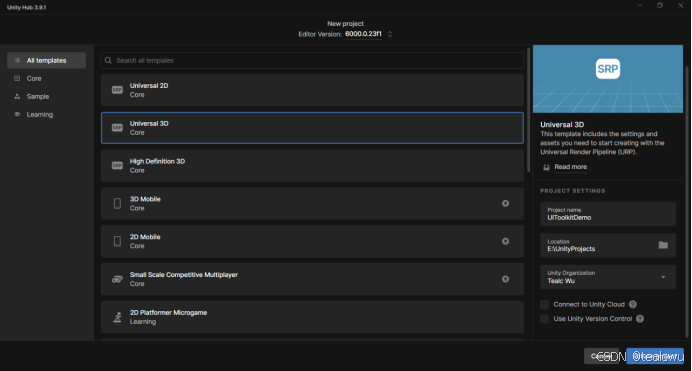
- 打开Unity创建一个空项目(任意模板),这里我们以URP 3D为例。
-
在项目的Assets 文件夹中,新建一个文件夹Editor ,并在Editor 中新建一个文件夹Resources 。我们将把脚本放在Assets/Editor 中,其他资源文件放在Assets/Editor/Resources 中。(关于Unity中的特殊文件夹,请参见这篇文章)
-
右键点击Editor文件夹,选择Create > UI Toolkit > Editor Window。

- 将本文资源中几个图标文件下载后存放在Editor/Resources/Icons中。
二、创建项目
接下来我们将创建编辑器窗体并将其添加到Unity的菜单中。
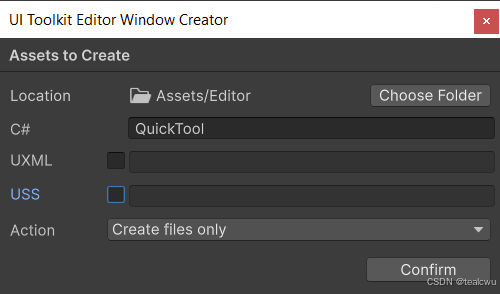
- 在UI Toolkit Editor Window Creator 中,在C#一栏输入QuickTool ,并且取消勾选UXML和USS。如下图所示。(当然你也可以不取消勾选这两项,那么将会自动创建UXML和USS文件。不过在这篇文章中,我们将手动创建这两个文件。)
-
点击"Confirm"保存,以创建Editor窗体。
-
现在我们将设置窗体的大小以及在菜单中的位置。打开QuickTool.cs文件(以Visual Studio为例),并将其中的MenuItem和ShowExample部分用下面的代码替换。
|-----------------------------------------------------------------------------------------------------------------------------------------------------------------------------------------------------------------------------------------------------------------------------------------------------------------------------------------------------------------------------------------|
| public class QuickTool : EditorWindow { MenuItem("QuickTool/Open _%#T") public static void ShowWindow() { // Opens the window, otherwise focuses it if it's already open. var window = GetWindow<QuickTool>(); // Adds a title to the window. window.titleContent = new GUIContent("QuickTool"); // Sets a minimum size to the window. window.minSize = new Vector2(280, 50); } } |
说明:代码中MenuItem字符串末尾的_%#T,是为了添加一个打开窗口的快捷键,在Windows中是Ctrl+ Shift + T(在Mac上是Command + Shift + T)
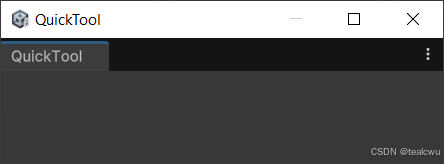
- 保存代码并返回Unity。这时你将在菜单中看到QuickTool。点击QuickTool > Open,将打开新建的Editor窗口。
三、搭建UI
在UI工具包中,用户界面是由单个的可视化元素组成。多个界面元素设计并组合到UI模板文件中,也是就*.uxml文件中。一个UXML文件存储所有界面元素的结构,样式和布局。这种组合的方式在Unity中被称为可视化树(Visual Tree)。
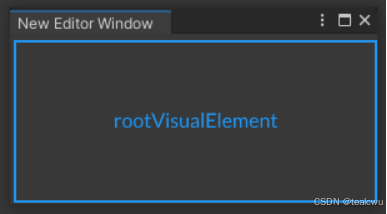
一个UI界面是由一个或多个Visual Tree组成的。一个界面或Panel中会保存一个对根元素的引用,被称谓rootVisualElement。而通过UI模板文件或C#脚本创建的Visual Tree将被添加到这个根元素下面,这样就可以显示在屏幕上。
每一个EditorWindow都会将所有的UI元素保存在rootVisualElement中。
通过脚本来创建界面元素
在我们进入UXML之前,先来看看如何通过脚本创建界面元素。
在QuickTool.cs文件中,找到QuickTool类,它里面有一个CreateGUI()方法。这个方法就包括了对rootVisualElement的引用,并将一个label显示在窗体中。
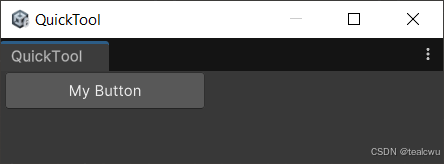
当然你也可以在这里添加更多的页面元素。下面的代码将添加一个按钮,并将其大小设置为160x30 px。
|-------------------------------------------------------------------------------------------------------------------------------------------------------------------------------------------------------------------------------------------------------------------------------------------------------------------------------------|
| private void CreateGUI() { // Reference to the root of the window. var root = rootVisualElement; // Creates our button and sets its Text property. var myButton = new Button() { text = "My Button" }; // Give it some style. myButton.style.width = 160; myButton.style.height = 30; // Adds it to the root. root.Add(myButton); } |
保存代码并返回到Unity,现在窗体将显示为如下图所示的样子。
我们可以通过C#脚本添加更多的页面元素。但是当界面变得复杂时,通过这种方式将增加维护的难度。Unity推荐的方法是,使用UXML单独保存页面元素,使用USS保存样式,并在C#中加载UI模板和添加对元素行为的控制以及数据绑定关系。
下面先删除或注释掉CreateGUI()方法中的代码,我们将先创建一个新的UXML文件。
创建UXML文件
接下来我们将创建一个单独的UXML文件。
当然比较高效的方法是先创建一个可重用的UI模板,然后就可以在其他模板中反复调用来创建新元素。下面我们将创建两个模板:
- ButtonTemplate:保存带有图标的按钮。
- QuickTool_Main:保存将添加到rootVisualElement中的UI结构。它将通过button模板创建5个工具栏按钮,并进行布局。
-
在Unity中,在Project 中找到Assets/Editor/Resources 文件夹。从菜单中,选择Assets > Create > UI Toolkit > UI Document。这样就会在文件夹中新建一个UXML文件。
-
将这个文件命名为ButtonTemplate。
-
重复上面的过程,再新建一个UXML文件,并命名为QuickTool_Main。
说明:双击UXML文件会打开UIBuilder* 窗口,如果想在文本编辑器中打开文件,需要点击文件右侧的箭头,并双击inlineStyle(将用Unity中关联的默认代码编辑器打开,比如Visual Studio)。*
- 在文本编辑器打开ButtonTemplate.uxml文件,并将内容替换为下面的代码:
|------------------------------------------------------------------------------------------------------------------------------------------------------------------------------------------------------------------------------------------------------------------------------------------|
| <UXML xmlns="UnityEngine.UIElements"> <!-- Creates the button. --> <VisualElement class="quicktool-button unity-button"> <!-- Adds a VisualElement child (corresponding to the button's icon). --> <VisualElement class="quicktool-button-icon"/> </VisualElement> </UXML> |
上面的UXML代码将创建一个带有图标的按钮。这个按钮和图标在UXML中有不同的名称。添加名称的目的主要是:
- 通过脚本访问元素
- 为这些元素添加样式
- 下一步,利用上面的button模板创建UI。打开QuickTool_Main.uxml文件,并将其内容用下面代码替换。
|------------------------------------------------------------------------------------------------------------------------------------------------------------------------------------------------------------------------------------------------------------------------------------------------------------------------------------------------------------------------------------------------------------------------------------------------------------------------------------------------------------------------------------------------------------------------------------------------------------------------------------------------------------------------------------------------------------------------------------------------------------------------|
| <UXML xmlns="UnityEngine.UIElements"> <!-- Creates our template and gives it a name for future reference. --> <Template path="Assets/Editor/Resources/ButtonTemplate.uxml" name="button-template" /> <!-- Creates a parent VisualElement inside which we will use our button template. --> <VisualElement class="buttons-container"> <!-- Instantiates the template multiple times. Each time, we give it a name for future reference. --> <Instance template="button-template" name="Cube"/> <Instance template="button-template" name="Sphere"/> <Instance template="button-template" name="Capsule"/> <Instance template="button-template" name="Cylinder"/> <Instance template="button-template" name="Plane"/> </VisualElement> </UXML> |
这个UXML中包括了5个以button模板创建的按钮。每一个按钮都有不同的UXML标签名称。后面我们将通过这些名称来创建不同的基础对象。务必确保这些名称和上面的代码完全一致,否则在后面使用时将会出错。
四、创建脚本
上面我们已经完成了UXML的内容。接下来将开始编写C#脚本。
- 打开QuickTool.cs文件,将其中CreateUI()的内容用下面的代码替换。
|----------------------------------------------------------------------------------------------------------------------------------------------------------------------------------------------------------------------------------------------------------------------------------------------------------------------------------------------------------------------------------------------------------------------------------------------------------------------------------------------------------|
| private void CreateGUI() { // Reference to the root of the window. var root = rootVisualElement; // Loads and clones our VisualTree (eg. our UXML structure) inside the root. var quickToolVisualTree = Resources.Load<VisualTreeAsset>("QuickTool_Main"); quickToolVisualTree.CloneTree(root); // Queries all the buttons (via class name) in our root and passes them // in the SetupButton method. var toolButtons = root.Query(className: "quicktool-button"); toolButtons.ForEach(SetupButton); } |
上面的CreateGUI()方法将加载UI模板并用Clone()方法创建元素将其添加到窗体的根元素中。然后通过SetupButton()方法来创建工具栏中的多个按钮。
- 在QuickTool.cs中,创建SetupButton方法。
|----------------------------------------------------------------------------------------------------------------------------------------------------------------------------------------------------------------------------------------------------------------------------------------------------------------------------------------------------------------------------------------------------------------------------------------------------------------------------------------------------------------------------------------------------------------------------------------------------------------------------------------------------------------------------------------------------------------------------------------------------|
| private void SetupButton(VisualElement button) { // Reference to the VisualElement inside the button that serves // as the button's icon. var buttonIcon = button.Q(className: "quicktool-button-icon"); // Icon's path in our project. var iconPath = "Icons/" + button.parent.name + "_icon"; // Loads the actual asset from the above path. var iconAsset = Resources.Load<Texture2D>(iconPath); // Applies the above asset as a background image for the icon. buttonIcon.style.backgroundImage = iconAsset; // Instantiates our primitive object on a left click. button.RegisterCallback<PointerUpEvent, string>(CreateObject, button.parent.name); // Sets a basic tooltip to the button itself. button.tooltip = button.parent.name; } |
SetupButton()方法检索到按钮下方的VisualElement(可视化元素)引用,该元素用于容纳按钮的图标。它通过Q()方法以及在UXML文件中指定的类名quicktool-button-icon来获取元素。接着,将一个图像分配给该元素。同时,它还为按钮分配了一个回调方法,该方法会在用户点击按钮时触发。
-
在QuickTool.cs文件最前面添加using System的命名。
-
在QuickTool类中,创建一个CreateObject回调方法。这是一个根据按钮名称来创建基础对象的简单方法。
|--------------------------------------------------------------------------------------------------------------------------------------------------------------------------------------------------------------------------------------------------|
| private void CreateObject(PointerUpEvent _, string primitiveTypeName) { var pt = (PrimitiveType)Enum.Parse (typeof(PrimitiveType), primitiveTypeName, true); var go = ObjectFactory.CreatePrimitive(pt); go.transform.position = Vector3.zero; } |
- 保存代码并返回Unity。当打开窗体时,你将看到按钮显示出来,但是没有图标并且没有按横向排列。在下面这一部分我们将进一步完善。

五、设计样式
每一个VisualElement(可视化元素)都可以通过样式属性来影响其在屏幕上显示的效果。这些样式属性既可以在C#脚本中直接设置,也可以通过样式来设置。除了布局属性外,还有像backgroundImage或borderColor这些影响显示效果的属性。
在Unity中是通过USS文件来保存样式表的。在USS文件中可以定义多个部分。主要有:
- 以 "."开始,将匹配类(所有包括了有特定class属性名称的元素)。
- 以 "#"开始,将匹配VisualElement名称(不是唯一的)。
- 简单的按C#中的类型匹配。
说明:为了简单起见,我们将为整个窗体使用一个样式文件。当然,如果需要的话,你也可以使用多个样式文件。
-
在Unity的Project中,找到Assets > Editor > Resources。
-
通过菜单Assets > Create > UI Toolkit > Style Sheet 创建一个新的USS文件,并命名为QuickTool_Style。
-
在样式文件中,添加下面样式,用于button容器。
|-------------------------------------------------------------------------------------------------------------------------------------------------------------------------------------------|
| .buttons-container { /* Populates the elements in this container horizontally. */ flex-direction: row; /* Makes the content of the container wrap when resized. */ flex-wrap: wrap; } |
说明:这里我们只是在设置Flex属性。这是任何UI Toolkit布局的核心,理解其工作流程是必不可少的。要了解更多关于Flex属性的信息,点击此处。
- 为button和图标创建样式。
|-----------------------------------------------------------------------------------------------------------------------------------------------------------------------------------------------------------------------------------------------------------------------------------------------------------------------------------------------------------------------------------------------------------------------------------------------------------------------------------------------------------------------------------------|
| .quicktool-button { width: 50px; height: 50px; /* Style rule that aligns items on the horizontal axis. */ align-items: flex-start; /* Style rule that aligns items on the vertical axis. */ justify-content: center; } .quicktool-button-icon { height: 40px; width: 40px; opacity: 0.8; } /* How the icon should behave when hovered. */ .quicktool-button-icon:hover { opacity: 1; } /* How the icon should behave when its parent button is clicked. */ .quicktool-button:active > .quicktool-button-icon { opacity: 0.6; } |
说明:在C#脚本中定义的样式将覆盖USS文件中对应的样式。比如,你在USS文件中设置了margin-top:5,在C#脚本中设置了VisualElement.style.marginTop=2,那么这个元素将使用VisualElement.style.marginTop =2。
- 最后,我们将通过VisualElement.styleSheets.Add()方法将样式与VisualElement关联起来。在QuickTool.cs中,将CreateGUI()方法更新成如下。
|-----------------------------------------------------------------------------------------------------------------------------------------------------------------------------------------------------------------------------------------------------------------------------------------------------------------------------------------------------------------------------------------------------------------------------------------------------------------------------------------------------------------------------------------------------------------------------------------------------------------------------------------------------------------------------------------|
| private void CreateGUI() { // Reference to the root of the window. var root = rootVisualElement; // Associates a stylesheet to our root. Thanks to inheritance, all root's // children will have access to it. root.styleSheets.Add(Resources.Load<StyleSheet>("QuickTool_Style")); // Loads and clones our VisualTree (eg. our UXML structure) inside the root. var quickToolVisualTree = Resources.Load<VisualTreeAsset>("QuickTool_Main"); quickToolVisualTree.CloneTree(root); // Queries all the buttons (via type) in our root and passes them // in the SetupButton method. var toolButtons = root.Query(className: "quicktool-button"); toolButtons.ForEach(SetupButton); } |
说明:对样式表的更改将对运行中的Editor窗口立即生效。样式可以附件到任何VisualElement上,并可以应用到这个容器内的所有子元素上。
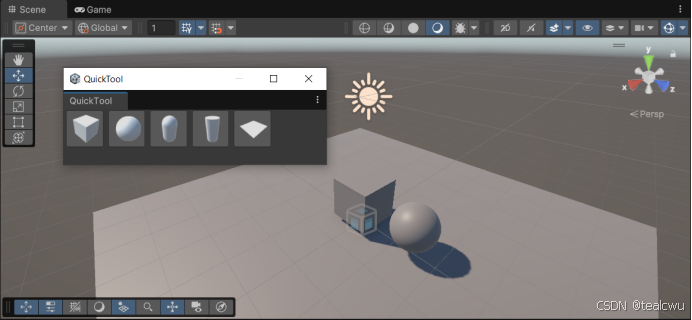
- 保存文件并返回Unity。
现在这个自定义的Editor窗体已经完成。我们可以看到一个小的横向排列的工具栏,点击上面的按钮将在场景中创建对应的基础对象。