概述
之前分析了IWR6843上的高精度测距程序框架,虽然可以看到大致的系统运行过程,但是总有一种"混乱"的感觉。TI为了展现ARM与DSP协作能力将如此"简单"的一个功能分布在多处理器上,结合BIOS以及semaphore、event、mailbox等机制,导致我们对关键的雷达数据处理过程理解很模糊。
我们再分析一下官方提供的运行于xWR14xx上的高精度测距程序,IWR1443中只有ARM作为主处理器,应该可以为我们排除很多干扰因素。
代码分析

main
- 器件初始化:ESM、SOC
- 创建任务:MmwDemo_initTask
- 启动系统:BIOS_start
MmwDemo_initTask
此函数中实现了完整的系统流程,除了初始化必要的外设外还执行了数据路径初始化、BSS初始化、数据路径使能、创建雷达控制任务、创建命令行、传感器管理初始化、系统中断监听器的注册、创建数据路径任务等。
外设初始化
- UART_init
- Mailbox_init
- GPIO_init
MmwDemo_dataPathInit
- ADCBuf_init
- MmwDemo_hwaInit
- MmwDemo_edmaInit
BSS初始化
- MMWave_init
- MMWave_sync
MmwDemo_dataPathOpen
注意:这里没有使能EDMA
- MmwDemo_hwaOpen
- MmwDemo_ADCBufOpen
MmwDemo_mmWaveCtrlTask
循环调用MMWave_execute()。
MmwDemo_CLIInit
初始化命令行工具。
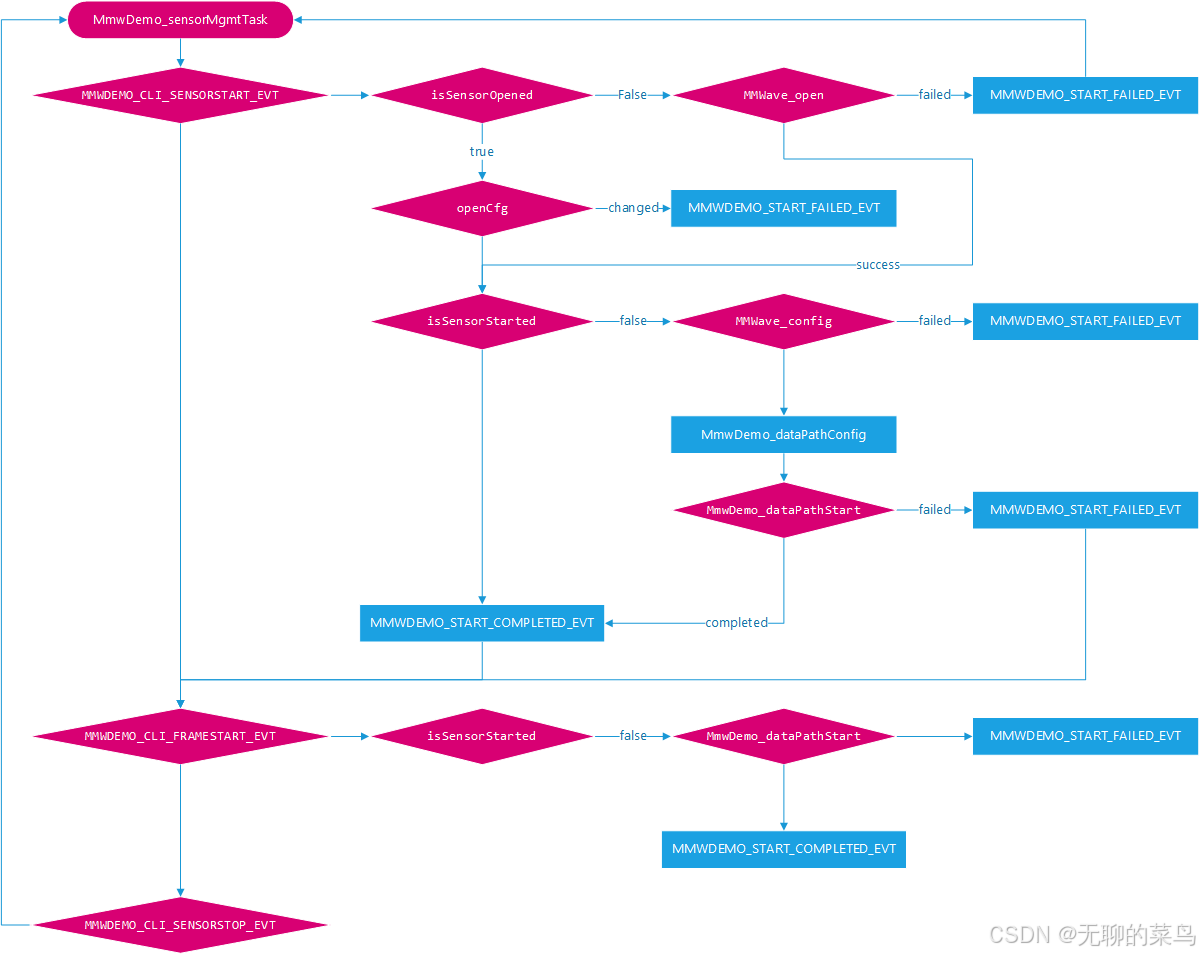
MmwDemo_sensorMgmtInit
创建了相关event handle后,创建任务MmwDemo_sensorMgmtTask,这是一个由事件驱动的控制任务,主要功能则是执行毫米波雷达的配置、打开、关闭控制。
SOC_registerSysIntListener
关联了帧起始中断句柄MmwDemo_frameStartIntHandler(),用于推送相关semaphore。
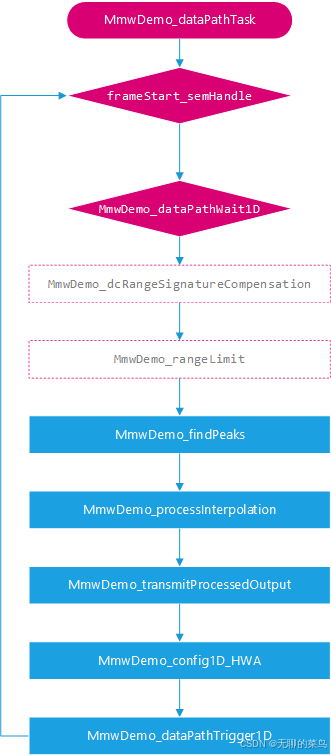
MmwDemo_dataPathTask
数据处理过程就在此任务中,当获得帧起始semaphore时,等待1D FFT完成。按需进行直流补偿、测距范围限制。查找信号峰值、进行zoom-FFT处理,获得高精度测距结果。发送目标数据,配置HWA和datapath为下一帧处理做准备。
关键部分的zoom-FFT代码(按照之前寻找的信号峰值进行插值处理,每次处理一个峰值)
/**
 *  @b Description
 *  @n
 *      Interpolation using complex multiplication module.
 */
void MmwDemo_processInterpolation(MmwDemo_DataPathObj *obj)
{
    int32_t        i, max_ind, interp_factor, coarseIndStart;
    cmplx32ImRe_t *interpOutsAddr;
    float          power, maxP;

    float fpower[3], interpIndx, maxIndexFine, fineFreqEst;


    interp_factor  = (obj->zoomInFFTSize >> (obj->log2RangeBins));
    interpOutsAddr = (cmplx32ImRe_t *)MMW_HWA_INTERP_OUT;

    MmwDemo_configInterp_HWA(obj);
    MmwDemo_dataPathTriggerInterp(obj);
    MmwDemo_dataPathWaitInterp(obj);

    if (obj->rangeProcStats.maxIndex < SAMPLES_TO_ZOOM_IN_ONE_SIDE)
    {
        coarseIndStart = 0;
    }
    else if (obj->rangeProcStats.maxIndex > (obj->numRangeBins - SAMPLES_TO_ZOOM_IN_ONE_SIDE))
    {
        coarseIndStart = obj->numRangeBins - 2 * SAMPLES_TO_ZOOM_IN_ONE_SIDE;
    }
    else
    {
        coarseIndStart = obj->rangeProcStats.maxIndex - SAMPLES_TO_ZOOM_IN_ONE_SIDE;
    }

    maxP = 0.f;
    for (i = 0; i < 2 * SAMPLES_TO_ZOOM_IN_ONE_SIDE * interp_factor; i++)
    {
        power = (float)interpOutsAddr[i].imag * (float)interpOutsAddr[i].imag + (float)interpOutsAddr[i].real * (float)interpOutsAddr[i].real;
        if (power > maxP)
        {
            maxP    = power;
            max_ind = i;
        }
    }
    obj->finePeakIndex = max_ind;

    i         = max_ind - 1;
    fpower[0] = (float)interpOutsAddr[i].imag * (float)interpOutsAddr[i].imag + (float)interpOutsAddr[i].real * (float)interpOutsAddr[i].real;
    i         = max_ind;
    fpower[1] = (float)interpOutsAddr[i].imag * (float)interpOutsAddr[i].imag + (float)interpOutsAddr[i].real * (float)interpOutsAddr[i].real;
    i         = max_ind + 1;
    fpower[2] = (float)interpOutsAddr[i].imag * (float)interpOutsAddr[i].imag + (float)interpOutsAddr[i].real * (float)interpOutsAddr[i].real;

    interpIndx = 0.5f * (fpower[0] - fpower[2]) / (fpower[0] + fpower[2] - 2.f * fpower[1]);

    obj->interpIndex = interpIndx;
    maxIndexFine     = (float)(interp_factor * coarseIndStart + max_ind) + interpIndx;
    fineFreqEst      = maxIndexFine * obj->maxBeatFreq / (interp_factor * obj->numRangeBins);
    obj->rangeEst    = (fineFreqEst * 3.0e8 * obj->chirpRampTime) / (2 * obj->chirpBandwidth);
}
总结
xWR14xx上的高精度测距工程分析完成了,简单明了!
由于使用了HWA,而HWA的FFT大小是有限制的,所以一定程度上限制了此工程的精度。如果需要更高精度的实现,可以在DSP中实现、优化算法。