📝个人主页🌹:Eternity._
🌹🌹期待您的关注 🌹🌹


❀ DETR
概述
在目标检测需要许多手工设计的组件,例如非极大值抑制(NMS),基于人工经验生成的先验框(Anchor)等。DETR这篇文章通过将目标检测作为一个直接的集合预测问题,减少了人工设计组件的知识,简化了目标检测的流程。给定一组固定的可学习的目标查询,DETR推理目标和全局图像的上下文关系,由于DETR没有先验框的约束,因此对于较大的物体预测性能会更好。
本文所涉及的所有资源的获取方式:这里
模型主体框架

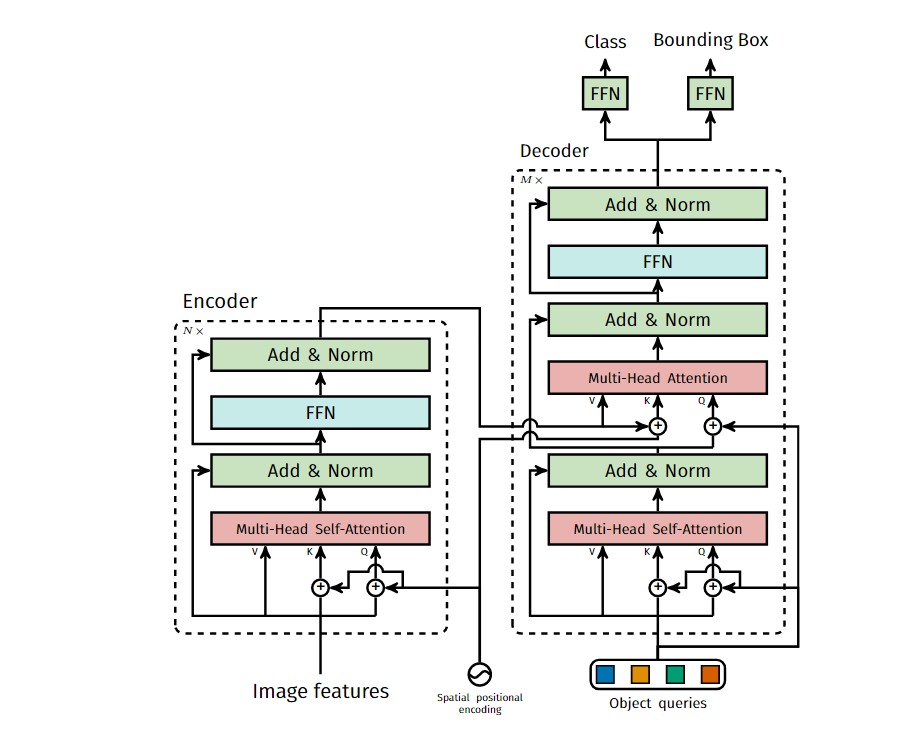
如图所示为DETR的主体框架,由于直接采用transformer结构,模型的计算量较大,因此DETR首先采用CNN卷积神经网络进行抽取特征,此时生成的特征图一般而言降采样32倍。之后将提取的特征图送Transformer的encoder结构中进行自注意力的交互,获取特征图中每个像素和其他像素之间关系。decoder首先预设了N个查询,该N个查询首先进行自注意力机制除去模型中的冗余框,之后与来自Encoder的特征进行交互形成数量为N查询,该查询通过线性层生成模型预测的类别和相应的边界框输出,最终预测得到结果。
在实验的时候N的数据要大于一张图片上所含有所有物体的数量,在计算损失函数的时候,DETR首先采用匈牙利算法去寻找到正确的匹配方式。之后再去计算bbox和分类的损失值。由于
L 1 L_1 L1 损失函数对于不同大小的边界框产生的误差不相同,因此我们采用了 G I o U G_{IoU} GIoU 损失函数去弥补这些误差。下图所示是DETR更详细的示意图:

主干网络
针对于一张通道数大小为3的图片,首先经过CNN的骨干网络,得到一个通道数为2048(该数据是我们人工设置的),长宽分别为原始图像大小1/32的特征图 f ∈ R C × H × W f∈R ^{C×H×W} f∈RC×H×W 。
Transformer编码器
首先1×1卷积将特征图f的通道维数从C降低到更小的维度d,生成一个新的特征图
z 0 ∈ R C × H × W z_0∈R ^{C×H×W} z0∈RC×H×W ,编码器期望一个序列作为输入,因此我们将 z 0 z _0 z0 的空间维度压缩为一个维度,从而产生d×HW的特征图。每个编码器层都有一个标准架构,由一个多头自注意力模块和一个前馈网络(FFN)组成。由于Transformer架构具有置换不变性(改变输入序列的顺序,输出的结果不发生改变),我们用维度大小相同的位置编码来弥补这个缺点,位置编码被添加到每个注意力层的输入中。
Transformer解码器
与标准的Transformer架构中的decoder不同,DETR没有采用掩码机制,因此N个预测的边界框可以同时输出。由于解码器仍然具有置换不变性,因此我们采用可学习的位置编码作为解码器的输入嵌入,并把它称为object query。通过多个层结构,该object query最终转变为输出的边界框,通过FFN结构,生成N个坐标点和分类的对象。

上图所示是模型Transformer的主要结构,来自CNN主干网络的图像特征被送到transformer编码器中,在每个多头自注意力机制中与空间位置编码相加作为多头自注意力机制的键和查询,(生成q,k,v需要矩阵相乘,并不是一个直接的结果)。作为在解码器和编码器进行注意力机制计算之前,首先object query需要进行一个自注意力机制,该步骤是为了去除模型中的冗余框。
演示效果
DETR 进行目标检测

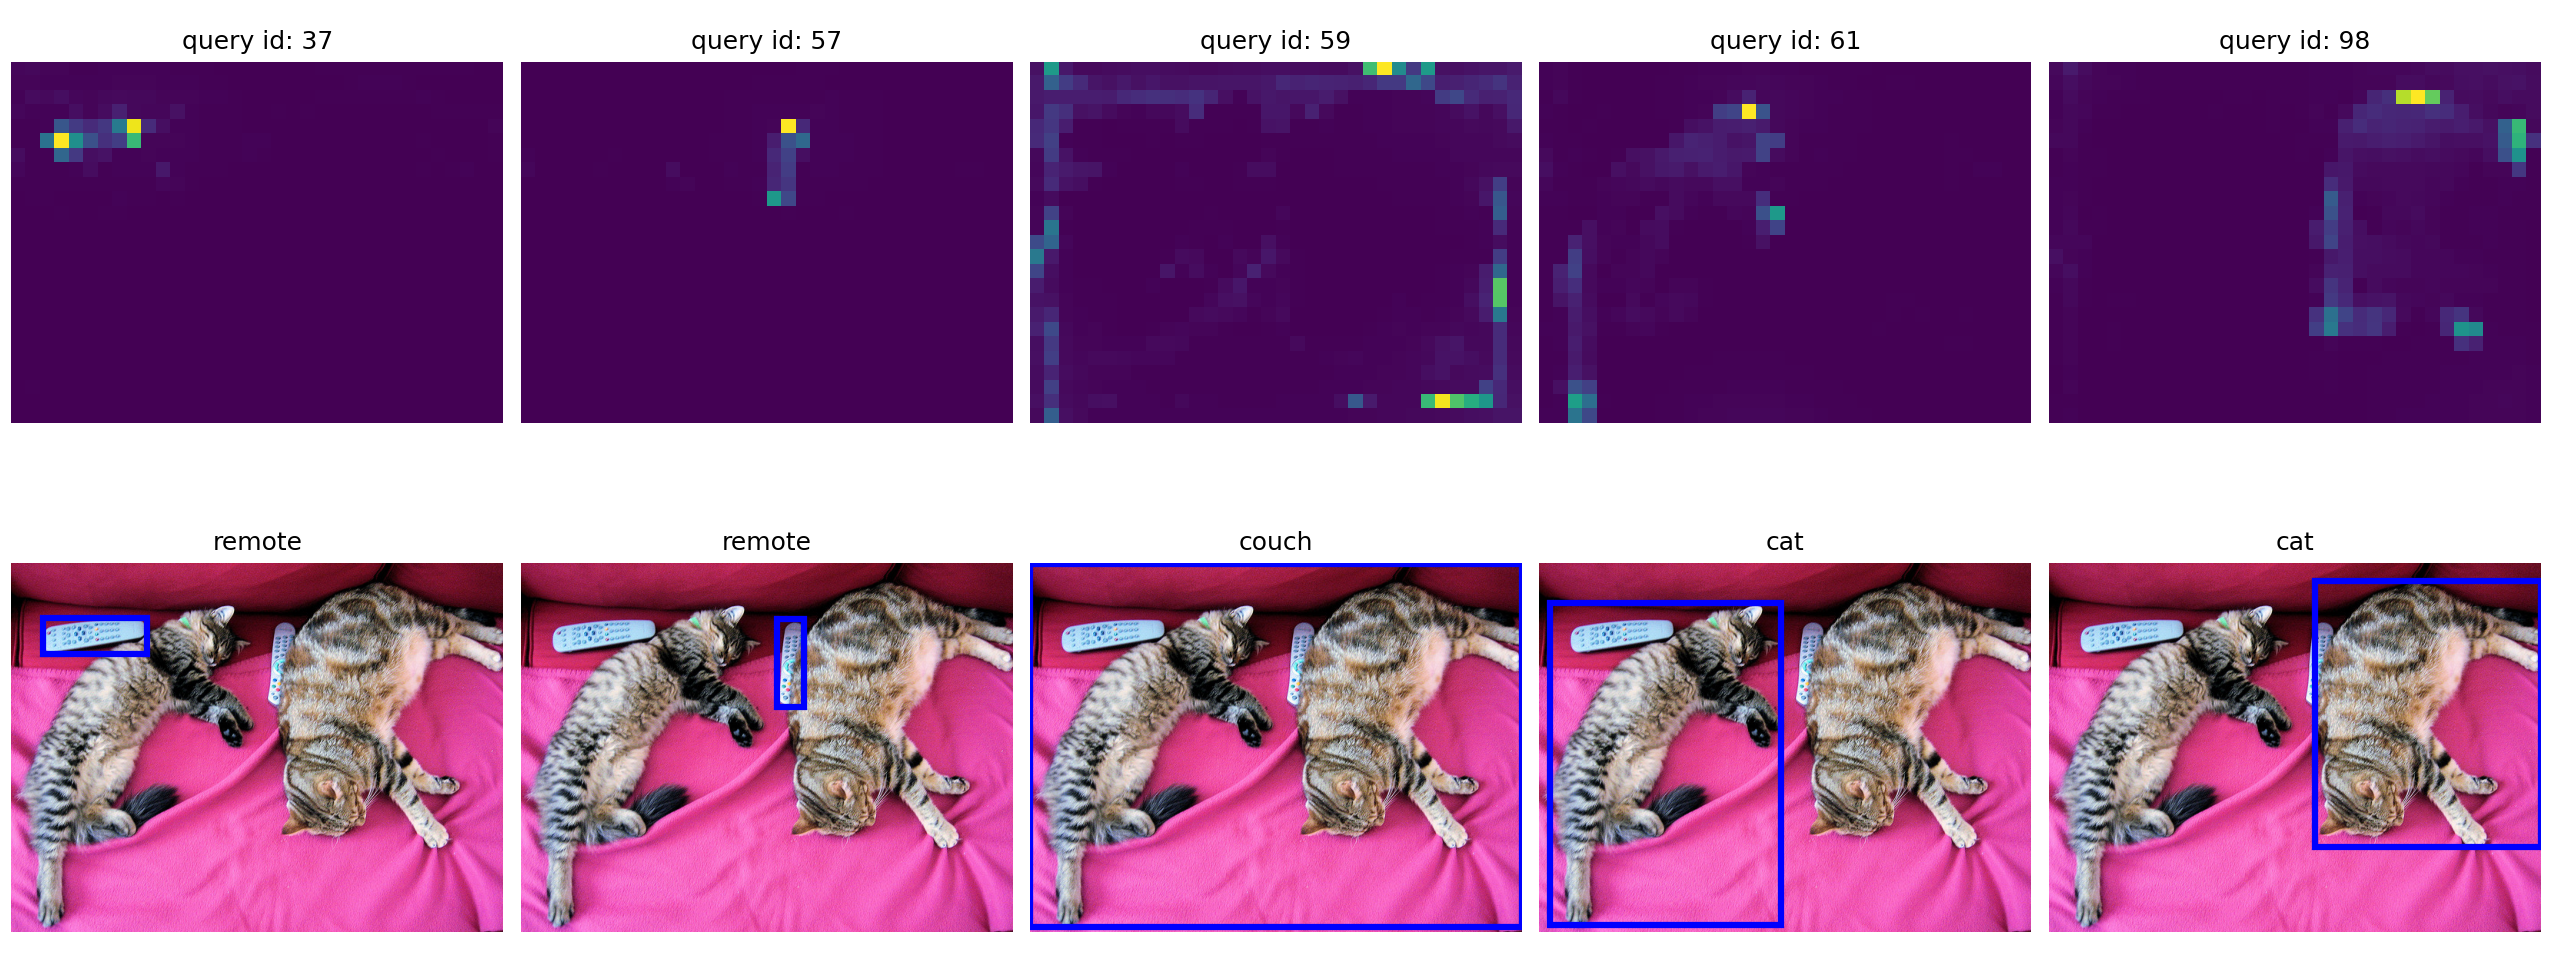
DETR 交叉注意力机制可视化

query表示当前物体的标号,下方对应的是相应的名称
DETR自注意力机制可视化

上方显示的点可以人工手动调整
核心逻辑
DETR模型的基本框架
python
class DETR(nn.Module):
    """ This is the DETR module that performs object detection """
    def __init__(self, backbone, transformer, num_classes, num_queries, aux_loss=False):
        """ Initializes the model.
        Parameters:
            backbone: torch module of the backbone to be used. See backbone.py
            transformer: torch module of the transformer architecture. See transformer.py
            num_classes: number of object classes
            num_queries: number of object queries, ie detection slot. This is the maximal number of objects
                         DETR can detect in a single image. For COCO, we recommend 100 queries.
            aux_loss: True if auxiliary decoding losses (loss at each decoder layer) are to be used.
        """
        super().__init__()
        self.num_queries = num_queries
        self.transformer = transformer
        hidden_dim = transformer.d_model
        self.class_embed = nn.Linear(hidden_dim, num_classes + 1)
        self.bbox_embed = MLP(hidden_dim, hidden_dim, 4, 3)
        self.query_embed = nn.Embedding(num_queries, hidden_dim)
        self.input_proj = nn.Conv2d(backbone.num_channels, hidden_dim, kernel_size=1)
        self.backbone = backbone
        self.aux_loss = aux_loss

    def forward(self, samples: NestedTensor):
        """ The forward expects a NestedTensor, which consists of:
               - samples.tensor: batched images, of shape [batch_size x 3 x H x W]
               - samples.mask: a binary mask of shape [batch_size x H x W], containing 1 on padded pixels

            It returns a dict with the following elements:
               - "pred_logits": the classification logits (including no-object) for all queries.
                                Shape= [batch_size x num_queries x (num_classes + 1)]
               - "pred_boxes": The normalized boxes coordinates for all queries, represented as
                               (center_x, center_y, height, width). These values are normalized in [0, 1],
                               relative to the size of each individual image (disregarding possible padding).
                               See PostProcess for information on how to retrieve the unnormalized bounding box.
               - "aux_outputs": Optional, only returned when auxilary losses are activated. It is a list of
                                dictionnaries containing the two above keys for each decoder layer.
        """
        if isinstance(samples, (list, torch.Tensor)):
            samples = nested_tensor_from_tensor_list(samples)

        # backbone 网络进行了两个操作,分别是获取特征图和位置编码
        features, pos = self.backbone(samples)

        src, mask = features[-1].decompose()
        assert mask is not None
        # input_proj: src: [2,2048,28,38]->[2,256,28,38] 改变特征图的通道维数
        # mask: [2,28,38] mask的通道维数为1 pos: [2,256,28,38] query表示查询,也就是图片里面可能有多少物体的个数
        hs = self.transformer(self.input_proj(src), mask, self.query_embed.weight, pos[-1])[0]

        outputs_class = self.class_embed(hs)
        outputs_coord = self.bbox_embed(hs).sigmoid()
        # 都只使用最后一层decoder输出的结果
        out = {'pred_logits': outputs_class[-1], 'pred_boxes': outputs_coord[-1]}
        if self.aux_loss:
            out['aux_outputs'] = self._set_aux_loss(outputs_class, outputs_coord)
        return out

    @torch.jit.unused
    def _set_aux_loss(self, outputs_class, outputs_coord):
        # this is a workaround to make torchscript happy, as torchscript
        # doesn't support dictionary with non-homogeneous values, such
        # as a dict having both a Tensor and a list.
        return [{'pred_logits': a, 'pred_boxes': b}
                for a, b in zip(outputs_class[:-1], outputs_coord[:-1])]
Transformer模块
python
class Transformer(nn.Module):

    def __init__(self, d_model=512, nhead=8, num_encoder_layers=6,
                 num_decoder_layers=6, dim_feedforward=2048, dropout=0.1,
                 activation="relu", normalize_before=False,
                 return_intermediate_dec=False):
        super().__init__()

        encoder_layer = TransformerEncoderLayer(d_model, nhead, dim_feedforward,
                                                dropout, activation, normalize_before)
        encoder_norm = nn.LayerNorm(d_model) if normalize_before else None
        self.encoder = TransformerEncoder(encoder_layer, num_encoder_layers, encoder_norm)

        decoder_layer = TransformerDecoderLayer(d_model, nhead, dim_feedforward,
                                                dropout, activation, normalize_before)
        decoder_norm = nn.LayerNorm(d_model)
        self.decoder = TransformerDecoder(decoder_layer, num_decoder_layers, decoder_norm,
                                          return_intermediate=return_intermediate_dec)

        self._reset_parameters()

        self.d_model = d_model
        self.nhead = nhead

    def _reset_parameters(self):
        for p in self.parameters():
            if p.dim() > 1:
                nn.init.xavier_uniform_(p)

    def forward(self, src, mask, query_embed, pos_embed):
        # flatten NxCxHxW to HWxNxC [2,256,28,38]
        bs, c, h, w = src.shape
        # src: [2,256,28,38]->[2,256,28*38]->[1064,2,256]
        # pos_embed: [2,256,28,38]->[2,256,28*38]->[1064,2,256]
        src = src.flatten(2).permute(2, 0, 1)
        pos_embed = pos_embed.flatten(2).permute(2, 0, 1)
        # query_embed:[100,256]->[100,1,256]->[100,2,256]
        query_embed = query_embed.unsqueeze(1).repeat(1, bs, 1)
        # mask: [2,28,38]->[2,1064]
        mask = mask.flatten(1)
        # 其实也是一个位置编码,表示目标的信息,一开始被初始化为0 [100,2,256]
        tgt = torch.zeros_like(query_embed)
        # memory的shape和src的一样是[1064,2,256]
        memory = self.encoder(src, src_key_padding_mask=mask, pos=pos_embed)
        hs = self.decoder(tgt, memory, memory_key_padding_mask=mask,
                          pos=pos_embed, query_pos=query_embed)

        # hs 不止输出最后一层的结构,而是输出解码器所有层结构的输出情况
        # hs: [6,100,2,256]->[6,2,100,256] [depth,batch_size,num_query,channel]
        # 一般只使用最后一层特征所以未hs[-1]
        return hs.transpose(1, 2), memory.permute(1, 2, 0).view(bs, c, h, w)
使用方式
模型训练
使用一个GPU训练
python
python -m torch.distributed.launch --nproc_per_node=1 --use_env main.py --coco_path data/coco 模型验证
python
python main.py --batch_size 2 --no_aux_loss --eval --resume ckpt/detr-r50-e632da11.pth --coco_path data/coco模型可视化
python
python imshow.py部署方式
python
# 首先安装相应版本的PyTorch 1.5+和torchvision 0.6+ ,如果有GPU则安装GPU版本的,没有安装相应cpu版本的,注意linux和window之间的区别
conda install -c pytorch pytorch torchvision
# 安装pycococtools(在COCO数据集上进行预测)和scipy(为了训练)
conda install cython scipy
pip install -U 'git+https://github.com/cocodataset/cocoapi.git#subdirectory=PythonAPI'
数据准备
从http://cocodataset.org下载COCO2017的train和val图像,相应地annotation,具体如下截图所示

将数据集按照下面的形式进行摆放
python
data/coco/
  annotations/  # annotation json files
  train2017/    # train images
val2017/ # val images从detr-r50-e632da11.pth下载相应的权重,并命名为ckpt/detr-r50-e632da11.pth,放在ckpt文件夹下,如下图所示

参考文献
编程未来,从这里启航!解锁无限创意,让每一行代码都成为你通往成功的阶梯,帮助更多人欣赏与学习!
更多内容详见:这里