1、应用现状
长短期记忆神经网络(LSTM)是一种特殊的循环神经网络(RNN)。原始的RNN在训练中,随着训练时间的加长以及网络层数的增多,很容易出现梯度爆炸或者梯度消失的问题,导致无法处理较长序列数据,从而无法获取长距离数据的信息。
LSTM主要用于处理序列数据,广泛应用于自然语言处理(NLP)、时间序列预测、语音识别、机器翻译、生成图像描述和视频标记等领域。具体来说,LSTM在以下任务中表现出色:
- 语言模型:预测序列中的下一个词或字符。
- 文本生成:根据输入生成相应的文本序列。
- 时间序列预测:如股票价格、气象数据的预测。
- 语音识别:将语音信号转化为文本。
- 机器翻译:将一种语言翻译成另一种语言。
2009年, 应用LSTM搭建的神经网络模型赢得了ICDAR手写识别比赛冠军。
2015年以来,在机械故障诊断和预测领域,相关学者应用LSTM来处理机械设备的振动信号。
2016年, 谷歌公司应用LSTM来做语音识别和文字翻译,其中Google翻译用的就是一个7-8层的LSTM模型。
2016年, 苹果公司使用LSTM来优化Siri应用。
2、发展历史
1997年,Sepp Hochreiter 和 Jürgen Schmidhuber[1]提出了长短期记忆神经网络(LSTM),有效解决了RNN难以解决的人为延长时间任务的问题,并解决了RNN容易出现梯度消失的问题。
1999年,Felix A. Gers等人[2]发现[1]中提出的LSTM在处理连续输入数据时,如果没有重置网络内部的状态,最终会导致网络崩溃。因此,他们在文献[1]基础上引入了遗忘门机制,使得LSTM能够重置自己的状态。
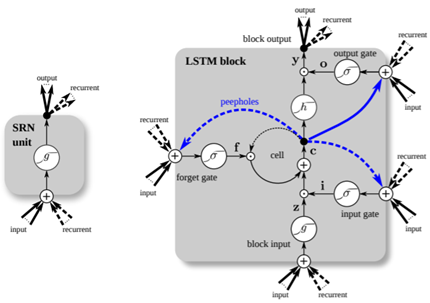
2000年,Felix A. Gers和Jiirgen Schmidhuber[3]发现,通过在LSTM内部状态单元内添加窥视孔(Peephole)连接,可以增强网络对输入序列之间细微特征的区分能力。
2005年,Alex Graves和Jürgen Schmidhuber[4]在文献[1] [2] [3]的基础上提出了一种双向长短期记忆神经网络(BLSTM),也称为vanilla LSTM,是当前应用最广泛的一种LSTM模型。
2005年-2015年期间,相关学者提出了多种LSTM变体模型,此处不多做描述。
2016年,Klaus Greff 等人[5]回顾了LSTM的发展历程,并比较分析了八种LSTM变体在语音识别、手写识别和弦音乐建模方面的能力,实验结果表明这些变体不能显著改进标准LSTM体系结构,并证明了遗忘门和输出激活功能是LSTM的关键组成部分。在这八种变体中,vanilla LSTM的综合表现能力最佳。另外,还探索了LSTM相关超参数的设定影响,实验结果表明学习率是最关键的超参数,其次是网络规模(网络层数和隐藏层单元数),而动量梯度等设置对最终结果影响不大。
下图展示了Simple RNN(图左)和vanilla LSTM(图右,图中蓝色线条表示窥视孔连接)的基本单元结构图[5]:
在众多LSTM变体中,2014年Kyunghyun Cho等人[6]提出的变体引起了众多学者的关注。Kyunghyun Cho等人简化了LSTM架构,称为门控递归单元(GRU)。GRU摆脱了单元状态,基本结构由重置门和更新门组成。LSTM和GRU的基本结构单元如下图(具体可参考:Illustrated Guide to LSTM's and GRU's: A step by step explanation)。
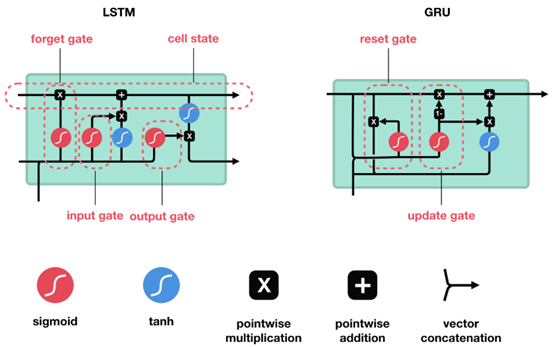
在GRU被提出后,Junyoung Chung等人[7]比较了LSTM和GRU在复音音乐和语音信号建模方面的能力,实验结果表明GRU和LSTM表现相当。
GRU被提出至今(2019年),也只有几年时间,关于它的一些应用利弊到目前还未探索清楚。不过,相对于LSTM架构,GRU的的参数较少,在数据量较大的情况下,其训练速度更快。
LSTM是深度学习技术中的一员,其基本结构比较复杂,计算复杂度较高,导致较难进行较深层次的学习,例如谷歌翻译也只是应用7-8层的LSTM网络结构。另外,在训练学习过程中有可能会出现过拟合,可以通过应用dropout来解决过拟合问题(这在Keras等框架中均有实现,具体可参考:LSTM原理与实践,原来如此简单)。
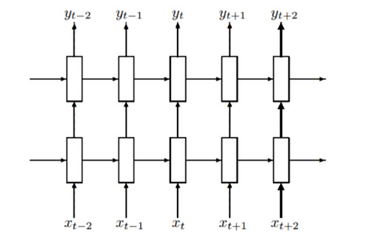
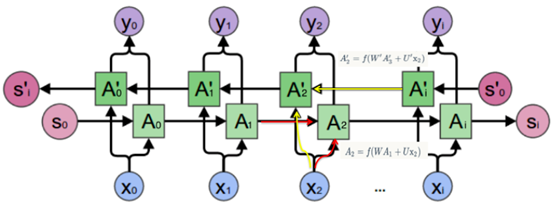
LSTM在当前应用比较的结构是双向LSTM或者多层堆叠LSTM,这两种结构的实现在Keras等框架中均有对应的API可以调用。
下图展示一个堆叠两层的LSTM结构图(来源:运用TensorFlow处理简单的NLP问题):
下图展示了一个双向LSTM的结构图(来源:双向LSTM)
3、基本原理
本节首先讲解一下RNN的基本结构,然后说明LSTM的具体原理(下面要介绍的LSTM即为vanilla LSTM)。
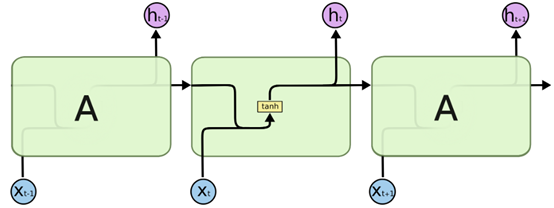
原始的RNN基本结构图如下图所示(原图来源:Understanding LSTM Networks)。

由上图可知,RNN展开后由多个相同的单元连续连接。但是,RNN的实际结构确和上图左边的结构所示,是一个自我不断循环的结构。即随着输入数据的不断增加,上述自我循环的结构把上一次的状态传递给当前输入,一起作为新的输入数据进行当前轮次的训练和学习,一直到输入或者训练结束,最终得到的输出即为最终的预测结果。
一般来说,RNN的输入和输出都是一个序列,分别记为seqin={x1,x2,...,xn}和 seqout={o1,o2,...,on},同时ot的取值不仅与xt有关还与序列中更早的输入有关(序列中的第t个元素我们叫做序列在time_step=t时的取值)。更直观的理解可看下图:

把上图用公式表达就是:
S[t]=f(U⋅X[t]+W⋅S[t−1]),Ot=g(V⋅S[t]) 训练RNN需要用BPTT去优化,但是当序列过长时很容易引起梯度爆炸或梯度消失现象。
LSTM是一种特殊的RNN,两者的区别在于普通的RNN单个循环结构内部只有一个状态。而LSTM的单个循环结构(又称为细胞)内部有四个状态。相比于RNN,LSTM循环结构之间保持一个持久的单元状态不断传递下去,用于决定哪些信息要遗忘或者继续传递下去。
包含三个连续循环结构的RNN如下图,每个循环结构只有一个输出:
包含三个连续循环结构的LSTM如下图,每个循环结构有两个输出,其中一个即为单元状态:
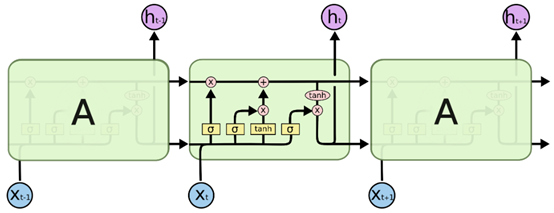
一层LSTM是由单个循环结构结构组成,既由输入数据的维度和循环次数决定单个循环结构需要自我更新几次,而不是多个单个循环结构连接组成(此处关于这段描述,在实际操作的理解详述请参考:Keras关于LSTM的units参数,还是不理解? ),即当前层LSTM的参数总个数只需计算一个循环单元就行,而不是计算多个连续单元的总个数。
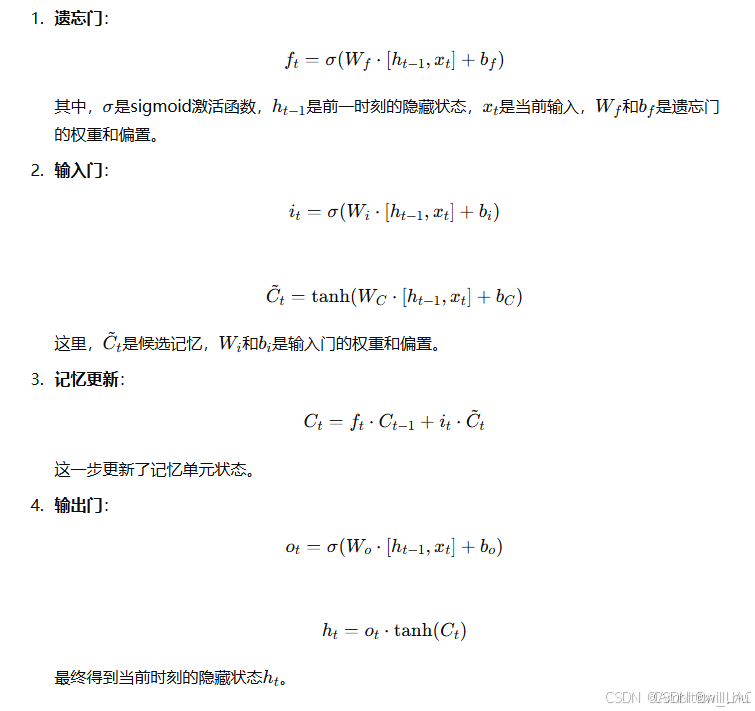
下面将由一组图来详细结构LSTM细胞的基本组成和实现原理。LSTM细胞由输入门、遗忘门、输出门和单元状态组成。
- 输入门:决定当前时刻网络的输入数据有多少需要保存到单元状态。
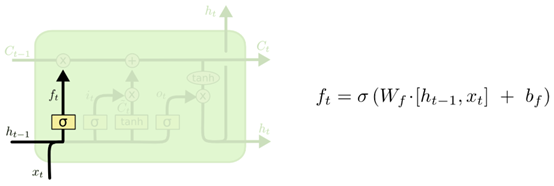
- 遗忘门:决定上一时刻的单元状态有多少需要保留到当前时刻。
- 输出门:控制当前单元状态有多少需要输出到当前的输出值。
此外,LSTM还有一个记忆单元(Cell State),用于保存跨时间步长的信息。通过这些门控机制,LSTM能够在时间步长之间灵活地存储和删除信息,从而有效解决了长时间依赖问题。
下图展示了应用上一个时刻的输出h_t-1和当前的数据输入x_t,通过遗忘门得到f_t的过程。(下面的一组原图来源:Understanding LSTM Networks)
下图展示了应用上一个时刻的输出h_t-1和当前的数据输入x_t,通过输入门得到i_t,以及通过单元状态得到当前时刻暂时状态C~t的过程。

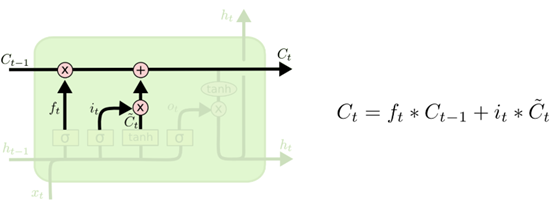
下图展示了应用上一个细胞结构的单元状态C_t-1、遗忘门输出f_t、输入门输出i_t以及单元状态的输出C~t,得到当前细胞的状态C_t的过程。
下图展示了应用上一个时刻的输出h_t-1和当前的数据输入x_t,通过输出门得到o_t的过程,以及结合当前细胞的单元状态C_t和o_t得到最终的输出h_t的过程。

4、LSTM的优缺点
优点:
- 解决长时依赖问题:相比于传统RNN,LSTM能够更好地捕捉序列中的长时依赖关系。
- 适用性广泛:LSTM可以处理不同类型的序列数据,如文本、语音、时间序列等。
- 在复杂任务中的表现更好:如机器翻译、图像字幕生成等任务。
缺点:
- 计算开销大:LSTM结构复杂,计算量大,训练时间较长。
- 难以调参:LSTM模型包含多个超参数,如层数、隐藏单元数量等,调参较为复杂。
- 容易过拟合:由于模型复杂,训练时容易发生过拟合,需要加入正则化手段。
5、示例
5.1、简单的LSTM示例代码
以下是一个使用Python和Keras库实现LSTM的简单示例代码,来完成一个基本的时间序列预测任务:
python
import numpy as np
import matplotlib.pyplot as plt
from keras.models import Sequential
from keras.layers import LSTM, Dense

# 生成示例数据
def generate_data(seq_length=100, num_samples=1000):
    X = []
    y = []
    for _ in range(num_samples):
        start = np.random.rand()
        seq = np.sin(np.linspace(start, start + 2*np.pi, seq_length))
        X.append(seq[:-1])
        y.append(seq[-1])
    return np.array(X), np.array(y)

# 数据集
seq_length = 50
X, y = generate_data(seq_length)

# 调整形状以符合LSTM输入要求
X = np.expand_dims(X, axis=2)

# 构建LSTM模型
model = Sequential()
model.add(LSTM(50, activation='tanh', input_shape=(seq_length-1, 1)))
model.add(Dense(1))
model.compile(optimizer='adam', loss='mse')

# 训练模型
model.fit(X, y, epochs=20, batch_size=32)

# 测试模型
test_seq = np.sin(np.linspace(0, 2*np.pi, seq_length-1))
test_seq = np.expand_dims(test_seq, axis=0)
test_seq = np.expand_dims(test_seq, axis=2)
predicted = model.predict(test_seq)

# 显示结果
plt.plot(np.linspace(0, 2*np.pi, seq_length), np.sin(np.linspace(0, 2*np.pi, seq_length)), label='True')
plt.plot(np.linspace(0, 2*np.pi, seq_length-1), test_seq.flatten(), label='Input')
plt.scatter([2*np.pi], predicted, color='red', label='Predicted')
plt.legend()
plt.show()
代码解释
数据生成:generate_data函数生成了一些模拟的正弦波数据作为训练集。
LSTM模型:模型包含一个LSTM层和一个Dense层,用于输出预测值。
模型训练:使用MSE(均方误差)作为损失函数,Adam优化器进行训练。
测试和可视化:用训练好的模型对一个完整的正弦波进行预测,并与真实值进行对比。
这个示例展示了LSTM如何被应用于一个简单的时间序列预测任务中。根据任务的复杂度,LSTM模型的层数、单元数以及其他超参数可以进行调整。
5.2、基于Keras框架的手写数字识别实验
本节应用Keras提供的API,比较和分析Simple RNN、LSTM和GRU在手写数字mnist数据集上的预测准确率。
应用Simple RNN进行手写数字预测训练的代码如下:
python
import keras from keras.layers
import LSTM , SimpleRNN, GRU from keras.layers
import Dense, Activation from keras.datasets
import mnist from keras.models
import Sequential from keras.optimizers
import Adam
learning_rate = 0.001
training_iters = 20
batch_size = 128
display_step = 10
n_input = 28
n_step = 28
n_hidden = 128
n_classes = 10
(x_train, y_train), (x_test, y_test) = mnist.load_data()
x_train = x_train.reshape(-1, n_step, n_input)
x_test = x_test.reshape(-1, n_step, n_input)
x_train = x_train.astype('float32')
x_test = x_test.astype('float32')
x_train /= 255
x_test /= 255
y_train = keras.utils.to_categorical(y_train, n_classes)
y_test = keras.utils.to_categorical(y_test, n_classes)
model = Sequential()
model.add(SimpleRNN(n_hidden, batch_input_shape=(None, n_step, n_input), unroll=True)) model.add(Dense(n_classes))
model.add(Activation('softmax'))
adam = Adam(lr=learning_rate)
model.summary()
model.compile(optimizer=adam, loss='categorical_crossentropy', metrics=['accuracy']) history = model.fit(x_train, y_train, batch_size=batch_size, epochs=training_iters, verbose=1, validation_data=(x_test, y_test))
scores = model.evaluate(x_test, y_test, verbose=0)
print('Simple RNN test score(loss value):', scores[0])
print('Simple RNN test accuracy:', scores[1])
训练结果:
_________________________________________________________________ Layer (type) Output Shape Param # ================================================================= simple_rnn_1 (SimpleRNN) (None, 128) 20096 _________________________________________________________________ dense_1 (Dense) (None, 10) 1290 _________________________________________________________________ activation_1 (Activation) (None, 10) 0 ================================================================= Total params: 21,386 Trainable params: 21,386 Non-trainable params: 0 _________________________________________________________________ Train on 60000 samples, validate on 10000 samples Epoch 1/20 60000/60000 [==============================] - 3s 51us/step - loss: 0.4584 - acc: 0.8615 - val_loss: 0.2459 - val_acc: 0.9308 Epoch 2/20 60000/60000 [==============================] - 3s 47us/step - loss: 0.1923 - acc: 0.9440 - val_loss: 0.1457 - val_acc: 0.9578 Epoch 3/20 60000/60000 [==============================] - 3s 47us/step - loss: 0.1506 - acc: 0.9555 - val_loss: 0.1553 - val_acc: 0.9552 Epoch 4/20 60000/60000 [==============================] - 3s 47us/step - loss: 0.1326 - acc: 0.9604 - val_loss: 0.1219 - val_acc: 0.9642 Epoch 5/20 60000/60000 [==============================] - 3s 47us/step - loss: 0.1184 - acc: 0.9651 - val_loss: 0.1014 - val_acc: 0.9696 Epoch 6/20 60000/60000 [==============================] - 3s 47us/step - loss: 0.1021 - acc: 0.9707 - val_loss: 0.1254 - val_acc: 0.9651 Epoch 7/20 60000/60000 [==============================] - 3s 47us/step - loss: 0.0987 - acc: 0.9708 - val_loss: 0.0946 - val_acc: 0.9733 Epoch 8/20 60000/60000 [==============================] - 3s 47us/step - loss: 0.0959 - acc: 0.9722 - val_loss: 0.1163 - val_acc: 0.9678 Epoch 9/20 60000/60000 [==============================] - 3s 47us/step - loss: 0.0888 - acc: 0.9742 - val_loss: 0.0983 - val_acc: 0.9718 Epoch 10/20 60000/60000 [==============================] - 3s 47us/step - loss: 0.0833 - acc: 0.9750 - val_loss: 0.1199 - val_acc: 0.9651 Epoch 11/20 60000/60000 [==============================] - 3s 47us/step - loss: 0.0814 - acc: 0.9750 - val_loss: 0.0939 - val_acc: 0.9722 Epoch 12/20 60000/60000 [==============================] - 3s 47us/step - loss: 0.0767 - acc: 0.9773 - val_loss: 0.0865 - val_acc: 0.9761 Epoch 13/20 60000/60000 [==============================] - 3s 47us/step - loss: 0.0747 - acc: 0.9778 - val_loss: 0.1077 - val_acc: 0.9697 Epoch 14/20 60000/60000 [==============================] - 3s 47us/step - loss: 0.0746 - acc: 0.9779 - val_loss: 0.1098 - val_acc: 0.9693 Epoch 15/20 60000/60000 [==============================] - 3s 47us/step - loss: 0.0671 - acc: 0.9799 - val_loss: 0.0776 - val_acc: 0.9771 Epoch 16/20 60000/60000 [==============================] - 3s 47us/step - loss: 0.0639 - acc: 0.9810 - val_loss: 0.0961 - val_acc: 0.9730 Epoch 17/20 60000/60000 [==============================] - 3s 47us/step - loss: 0.0701 - acc: 0.9792 - val_loss: 0.1046 - val_acc: 0.9713 Epoch 18/20 60000/60000 [==============================] - 3s 47us/step - loss: 0.0600 - acc: 0.9822 - val_loss: 0.0865 - val_acc: 0.9767 Epoch 19/20 60000/60000 [==============================] - 3s 47us/step - loss: 0.0635 - acc: 0.9813 - val_loss: 0.0812 - val_acc: 0.9790 Epoch 20/20 60000/60000 [==============================] - 3s 47us/step - loss: 0.0579 - acc: 0.9827 - val_loss: 0.0981 - val_acc: 0.9733 Simple RNN test score(loss value): 0.09805978989955037 Simple RNN test accuracy: 0.9733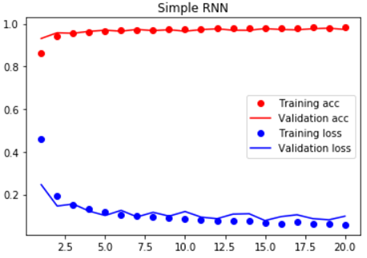
可知Simple RNN在测试集上的最终预测准确率为97.33%。
只需修改下方代码中Simple RNN为LSTM,即可调用LSTM进行模型训练:
python
model.add(SimpleRNN(n_hidden, batch_input_shape=(None, n_step, n_input), unroll=True))改变为:
python
model.add(LSTM(n_hidden, batch_input_shape=(None, n_step, n_input), unroll=True))训练结果:
python
_________________________________________________________________ Layer (type) Output Shape Param # ================================================================= lstm_1 (LSTM) (None, 128) 80384 _________________________________________________________________ dense_2 (Dense) (None, 10) 1290 _________________________________________________________________ activation_2 (Activation) (None, 10) 0 ================================================================= Total params: 81,674 Trainable params: 81,674 Non-trainable params: 0 _________________________________________________________________ Train on 60000 samples, validate on 10000 samples Epoch 1/20 60000/60000 [==============================] - 10s 172us/step - loss: 0.5226 - acc: 0.8277 - val_loss: 0.1751 - val_acc: 0.9451 Epoch 2/20 60000/60000 [==============================] - 8s 133us/step - loss: 0.1474 - acc: 0.9549 - val_loss: 0.1178 - val_acc: 0.9641 Epoch 3/20 60000/60000 [==============================] - 8s 133us/step - loss: 0.1017 - acc: 0.9690 - val_loss: 0.0836 - val_acc: 0.9748 Epoch 4/20 60000/60000 [==============================] - 8s 133us/step - loss: 0.0764 - acc: 0.9764 - val_loss: 0.0787 - val_acc: 0.9759 Epoch 5/20 60000/60000 [==============================] - 8s 133us/step - loss: 0.0607 - acc: 0.9811 - val_loss: 0.0646 - val_acc: 0.9813 Epoch 6/20 60000/60000 [==============================] - 8s 133us/step - loss: 0.0542 - acc: 0.9834 - val_loss: 0.0630 - val_acc: 0.9801 Epoch 7/20 60000/60000 [==============================] - 8s 133us/step - loss: 0.0452 - acc: 0.9859 - val_loss: 0.0603 - val_acc: 0.9803 Epoch 8/20 60000/60000 [==============================] - 8s 133us/step - loss: 0.0406 - acc: 0.9874 - val_loss: 0.0531 - val_acc: 0.9849 Epoch 9/20 60000/60000 [==============================] - 8s 133us/step - loss: 0.0345 - acc: 0.9888 - val_loss: 0.0540 - val_acc: 0.9834 Epoch 10/20 60000/60000 [==============================] - 8s 132us/step - loss: 0.0305 - acc: 0.9901 - val_loss: 0.0483 - val_acc: 0.9848 Epoch 11/20 60000/60000 [==============================] - 8s 133us/step - loss: 0.0281 - acc: 0.9913 - val_loss: 0.0517 - val_acc: 0.9843 Epoch 12/20 60000/60000 [==============================] - 8s 133us/step - loss: 0.0256 - acc: 0.9918 - val_loss: 0.0472 - val_acc: 0.9847 Epoch 13/20 60000/60000 [==============================] - 8s 133us/step - loss: 0.0229 - acc: 0.9929 - val_loss: 0.0441 - val_acc: 0.9874 Epoch 14/20 60000/60000 [==============================] - 8s 133us/step - loss: 0.0204 - acc: 0.9935 - val_loss: 0.0490 - val_acc: 0.9855 Epoch 15/20 60000/60000 [==============================] - 8s 133us/step - loss: 0.0192 - acc: 0.9938 - val_loss: 0.0486 - val_acc: 0.9851 Epoch 16/20 60000/60000 [==============================] - 8s 133us/step - loss: 0.0203 - acc: 0.9937 - val_loss: 0.0450 - val_acc: 0.9866 Epoch 17/20 60000/60000 [==============================] - 8s 133us/step - loss: 0.0160 - acc: 0.9948 - val_loss: 0.0391 - val_acc: 0.9882 Epoch 18/20 60000/60000 [==============================] - 8s 133us/step - loss: 0.0147 - acc: 0.9955 - val_loss: 0.0544 - val_acc: 0.9834 Epoch 19/20 60000/60000 [==============================] - 8s 133us/step - loss: 0.0147 - acc: 0.9953 - val_loss: 0.0456 - val_acc: 0.9880 Epoch 20/20 60000/60000 [==============================] - 8s 133us/step - loss: 0.0153 - acc: 0.9952 - val_loss: 0.0465 - val_acc: 0.9867 LSTM test score(loss value): 0.046479647984029725 LSTM test accuracy: 0.9867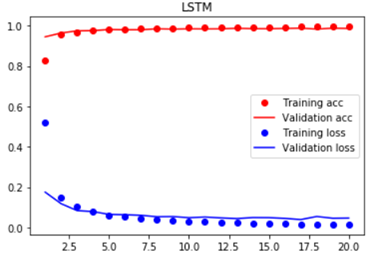
可知LSTM在测试集上的最终预测准确率为98.67%。
采用同样的思路,把Simple RNN改为GRU,即可调用GRU进行模型训练。
训练结果:
python
_________________________________________________________________ Layer (type) Output Shape Param # ================================================================= gru_1 (GRU) (None, 128) 60288 _________________________________________________________________ dense_3 (Dense) (None, 10) 1290 _________________________________________________________________ activation_3 (Activation) (None, 10) 0 ================================================================= Total params: 61,578 Trainable params: 61,578 Non-trainable params: 0 _________________________________________________________________ Train on 60000 samples, validate on 10000 samples Epoch 1/20 60000/60000 [==============================] - 10s 166us/step - loss: 0.6273 - acc: 0.7945 - val_loss: 0.2062 - val_acc: 0.9400 Epoch 2/20 60000/60000 [==============================] - 8s 130us/step - loss: 0.1656 - acc: 0.9501 - val_loss: 0.1261 - val_acc: 0.9606 Epoch 3/20 60000/60000 [==============================] - 8s 130us/step - loss: 0.1086 - acc: 0.9667 - val_loss: 0.0950 - val_acc: 0.9697 Epoch 4/20 60000/60000 [==============================] - 8s 130us/step - loss: 0.0824 - acc: 0.9745 - val_loss: 0.0761 - val_acc: 0.9769 Epoch 5/20 60000/60000 [==============================] - 8s 130us/step - loss: 0.0644 - acc: 0.9797 - val_loss: 0.0706 - val_acc: 0.9793 Epoch 6/20 60000/60000 [==============================] - 8s 130us/step - loss: 0.0540 - acc: 0.9829 - val_loss: 0.0678 - val_acc: 0.9799 Epoch 7/20 60000/60000 [==============================] - 8s 130us/step - loss: 0.0479 - acc: 0.9854 - val_loss: 0.0601 - val_acc: 0.9811 Epoch 8/20 60000/60000 [==============================] - 8s 130us/step - loss: 0.0402 - acc: 0.9877 - val_loss: 0.0495 - val_acc: 0.9848 Epoch 9/20 60000/60000 [==============================] - 8s 130us/step - loss: 0.0346 - acc: 0.9895 - val_loss: 0.0591 - val_acc: 0.9821 Epoch 10/20 60000/60000 [==============================] - 8s 130us/step - loss: 0.0306 - acc: 0.9901 - val_loss: 0.0560 - val_acc: 0.9836 Epoch 11/20 60000/60000 [==============================] - 8s 130us/step - loss: 0.0290 - acc: 0.9910 - val_loss: 0.0473 - val_acc: 0.9857 Epoch 12/20 60000/60000 [==============================] - 8s 130us/step - loss: 0.0249 - acc: 0.9922 - val_loss: 0.0516 - val_acc: 0.9852 Epoch 13/20 60000/60000 [==============================] - 8s 130us/step - loss: 0.0222 - acc: 0.9930 - val_loss: 0.0448 - val_acc: 0.9863 Epoch 14/20 60000/60000 [==============================] - 8s 130us/step - loss: 0.0206 - acc: 0.9934 - val_loss: 0.0453 - val_acc: 0.9872 Epoch 15/20 60000/60000 [==============================] - 8s 130us/step - loss: 0.0178 - acc: 0.9944 - val_loss: 0.0559 - val_acc: 0.9833 Epoch 16/20 60000/60000 [==============================] - 8s 130us/step - loss: 0.0173 - acc: 0.9947 - val_loss: 0.0502 - val_acc: 0.9854 Epoch 17/20 60000/60000 [==============================] - 8s 130us/step - loss: 0.0150 - acc: 0.9955 - val_loss: 0.0401 - val_acc: 0.9880 Epoch 18/20 60000/60000 [==============================] - 8s 130us/step - loss: 0.0164 - acc: 0.9949 - val_loss: 0.0486 - val_acc: 0.9872 Epoch 19/20 60000/60000 [==============================] - 8s 130us/step - loss: 0.0133 - acc: 0.9960 - val_loss: 0.0468 - val_acc: 0.9882 Epoch 20/20 60000/60000 [==============================] - 8s 130us/step - loss: 0.0107 - acc: 0.9965 - val_loss: 0.0470 - val_acc: 0.9879 GRU test score(loss value): 0.04698457587567973 GRU test accuracy: 0.9879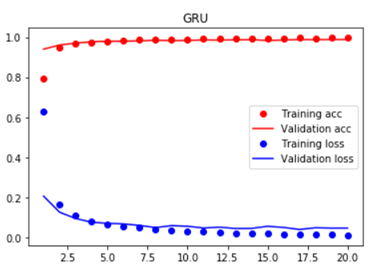
可知GRU在测试集上的最终预测准确率为98.79%。
由上述实验结果可知,LSTM和GRU的预测准确率要显著高于Simple RNN,而LSTM和GRU的预测准确率相差较小。
5.3、基于Pytorch的实战
5.3.1、核心API
torch.nn.LSTM(*args,**kwargs)其构造器的参数列表如下:
- input_size -- 每个time step中其输入向量xt的维度。
- hidden_size -- 每个time step中其隐藏状态向量ht的维度。
- num_layers -- 每个time step中其纵向有几个LSTM单元,默认为1。如果取2,第二层的 xt是第一层的ht,有时也会加一个dropout因子。
- bias -- 如果为False,则计算中不用偏置,默认为True。
- batch_first --若为True,则实际调用时input和output张量格式为(batch, seq, feature),默认为False。
- dropout -- 是否加dropout,Default: 0。
- bidirectional -- 是否为双向LSTM,Default: False。
定义了模型,实际调用按如下方式:
lstm = nn.LSTM(3, 3)

# Inputs: input, (h_0, c_0)
# Outputs: output, (h_n, c_n)
Outputs=lstm(Inputs)
注意上述代码中:
1)h_0, c_0分别代表batch中每个元素的hidden state和cell state的初始化值。
2)h_n, c_n分别代表当t = seq_len时,hidden state和cell state的值。
3)如果batch_first=False时,input格式为:(seq_len, batch=1, input_size),output格式为:(seq_len, batch=1, num_directions * hidden_size)。但是当batch_first=True时,input的格式变为:(batch_size, seq_len, input_size),而output的格式变为:(batch_size, seq_len, num_directions * hidden_size)。
5.3.2、LSTM实战
1)简单demo
# simple demo
import torch
import torch.nn as nn
import torch.nn.functional as F
import torch.optim as optim

torch.manual_seed(1)

lstm = nn.LSTM(3, 3)  # 一个词的 input_size, hidden_state_size
inputs = [torch.randn(1, 3) for _ in range(5)] # 定义LSTM的输入数据,此处不是mini batch

hidden = (torch.randn(1, 1, 3),    # h_0(initial hidden state) of shape (num_layers * num_directions, batch, hidden_size)
          torch.randn(1, 1, 3))    # c_0(initial cell state) of shape (num_layers * num_directions, batch, hidden_size)

for i in inputs:
    # Step through the sequence one element at a time: 此处一个sequence中实际只有一个word

    # out shape (seq_len, batch, num_directions * hidden_size): return (h_t) from the last layer of the LSTM, for each t
    # hidden=(hn,cn) when t = seq_len
    # h_n of shape (num_layers * num_directions, batch, hidden_size), c_n of shape (num_layers * num_directions, batch, hidden_size)
    out, hidden = lstm(i.view(1, 1, -1), hidden)
    print("i={},out={},hidden={}".format(i,out,hidden))


# 接下来,我们把5个单词全部放在一个sequence中进行处理
inputs = torch.cat(inputs).view(len(inputs), 1, -1)  # 先转为ndarray,把二维张量转为三维张量
hidden = (torch.randn(1, 1, 3), torch.randn(1, 1, 3))  # clean out h0,c0
out, hn_cn = lstm(inputs, hidden)
print("\nout={},hn_cn={}".format(out,hn_cn))
2)完整demo
###数据准备
def prepare_sequence(seq, to_ix):
    idxs = [to_ix[w] for w in seq]
    return torch.tensor(idxs, dtype=torch.long)


training_data = [
    ("The dog ate the apple".split(), ["DET", "NN", "V", "DET", "NN"]),
    ("Everybody read that book".split(), ["NN", "V", "DET", "NN"])
]
word_to_ix = {}
for sent, tags in training_data:
    for word in sent:
        if word not in word_to_ix:
            word_to_ix[word] = len(word_to_ix)
print(word_to_ix)
tag_to_ix = {"DET": 0, "NN": 1, "V": 2}

# These will usually be more like 32 or 64 dimensional.
# We will keep them small, so we can see how the weights change as we train.
EMBEDDING_DIM = 6
HIDDEN_DIM = 6

### 定义模型
class LSTMTagger(nn.Module):

    def __init__(self, embedding_dim, hidden_dim, vocab_size, tagset_size):
        super(LSTMTagger, self).__init__()
        self.hidden_dim = hidden_dim

        self.word_embeddings = nn.Embedding(vocab_size, embedding_dim)
        self.lstm = nn.LSTM(embedding_dim, hidden_dim)

        # The linear layer that maps from hidden state space to tag space,相当于一个全连接层
        self.hidden2tag = nn.Linear(hidden_dim, tagset_size)

    def forward(self, sentence):
        embeds = self.word_embeddings(sentence)
        lstm_out, _ = self.lstm(embeds.view(len(sentence), 1, -1))
        tag_space = self.hidden2tag(lstm_out.view(len(sentence), -1))  # 把三维张量转化为二级张量
        tag_scores = F.log_softmax(tag_space, dim=1)
        return tag_scores

### 模型训练及预测
model = LSTMTagger(EMBEDDING_DIM, HIDDEN_DIM, len(word_to_ix), len(tag_to_ix))
loss_function = nn.NLLLoss()    # 调用时形式为:预测值(N*C),label(N)。其中N为序列中word数,C为label的类别数
optimizer = optim.SGD(model.parameters(), lr=0.1)

# See what the scores are before training
# Note that element i,j of the output is the score for tag j for word i.
# Here we don't need to train, so the code is wrapped in torch.no_grad()
with torch.no_grad():
    inputs = prepare_sequence(training_data[0][0], word_to_ix)
    tag_scores = model(inputs)  # 此处的inputs只能是一个sequence
    print(tag_scores)

for epoch in range(300):  # again, normally you would NOT do 300 epochs, it is toy data
    for sentence, tags in training_data:
        # Step 1. Remember that Pytorch accumulates gradients.
        # We need to clear them out before each instance
        model.zero_grad()

        # Step 2. Get our inputs ready for the network, that is, turn them into
        # Tensors of word indices.
        sentence_in = prepare_sequence(sentence, word_to_ix)
        targets = prepare_sequence(tags, tag_to_ix)    #一个sequence对应的词性标注list

        # Step 3. Run our forward pass.
        tag_scores = model(sentence_in)

        # Step 4. Compute the loss, gradients, and update the parameters by
        #  calling optimizer.step()
        loss = loss_function(tag_scores, targets)
        loss.backward()
        optimizer.step()

# See what the scores are after training
with torch.no_grad():
    inputs = prepare_sequence(training_data[0][0], word_to_ix)
    tag_scores = model(inputs)

    # The sentence is "the dog ate the apple".  i,j corresponds to score for tag j
    # for word i. The predicted tag is the maximum scoring tag.
    # Here, we can see the predicted sequence below is 0 1 2 0 1
    # since 0 is index of the maximum value of row 1,
    # 1 is the index of maximum value of row 2, etc.
    # Which is DET NOUN VERB DET NOUN, the correct sequence!
    print("[result]tag_scores={}".format(tag_scores))
参考文献
1\] S. Hochreiter and J. Schmidhuber, "Long Short-Term Memory," *Neural Comput*, vol. 9, no. 8, pp. 1735--1780, Nov. 1997. \[2\] F. A. Gers, J. Schmidhuber, and F. A. Cummins, "Learning to Forget: Continual Prediction with LSTM," *Neural Comput.*, vol. 12, pp. 2451--2471, 2000. \[3\] F. A. Gers and J. Schmidhuber, "Recurrent nets that time and count," *Proc. IEEE-INNS-ENNS Int. Jt. Conf. Neural Netw. IJCNN 2000 Neural Comput. New Chall. Perspect. New Millenn.*, vol. 3, pp. 189--194 vol.3, 2000. \[4\] A. Graves and J. Schmidhuber, "Framewise phoneme classification with bidirectional LSTM and other neural network architectures," *Neural Netw.*, vol. 18, no. 5, pp. 602--610, Jul. 2005. \[5\] K. Greff, R. K. Srivastava, J. Koutník, B. R. Steunebrink, and J. Schmidhuber, "LSTM: A Search Space Odyssey," *IEEE Trans. Neural Netw. Learn. Syst.*, vol. 28, no. 10, pp. 2222--2232, Oct. 2017. \[6\] K. Cho *et al.* , "Learning Phrase Representations using RNN Encoder-Decoder for Statistical Machine Translation," *ArXiv14061078 Cs Stat*, Jun. 2014. \[7\] J. Chung, C. Gulcehre, K. Cho, and Y. Bengio, "Empirical Evaluation of Gated Recurrent Neural Networks on Sequence Modeling," *ArXiv14123555 Cs*, Dec. 2014. 参考链接: [长短期记忆神经网络(LSTM)介绍以及简单应用分析「建议收藏」-腾讯云开发者社区-腾讯云](https://cloud.tencent.com/developer/article/2109462 "长短期记忆神经网络(LSTM)介绍以及简单应用分析「建议收藏」-腾讯云开发者社区-腾讯云") [LSTM原理及实战 - 知乎](https://zhuanlan.zhihu.com/p/128098497 "LSTM原理及实战 - 知乎") [LSTM--概念、作用、原理、优缺点以及简单的示例代码_lstm一般用来处理什么数据-CSDN博客](https://blog.csdn.net/GDHBFTGGG/article/details/141163022 "LSTM--概念、作用、原理、优缺点以及简单的示例代码_lstm一般用来处理什么数据-CSDN博客")