NLP的网络结构大同小异,只不过训练策略可能会不同。因为与图像cv不同,文本训练数据非常的多,cv可以使用10几张就可以获得特征向量,而文本做不到学几句话就能让计算机听得懂话。因此,我们都需要使用预训练模型,所以模型的结构都差不多,不会有太大的改变。
配置环境
下载Huggingface包,Huggingface可以说是一个社区,集成了很多nlp的模型、数据集、预训练权重文件等等,并且免费,只需要pip install下载即可。
pip install transformers
测试

cpp
import warnings
warnings.filterwarnings("ignore")
from transformers import pipeline
classifier = pipeline("sentiment-analysis")
print(classifier(
    [
        "I've been waiting for a HuggingFace course my whole life.",
        "I hate this so much!"
    ]
))

但是登这个网页需要梯子!
1.分词器tokenizer
from transformers import AutoTokenizer #自动判断模型选用哪种分词器进行分词操作
cpp
from transformers import AutoTokenizer
checkpoint = "distilbert-base-uncased-finetuned-sst-2-english"
tokenizer = AutoTokenizer.from_pretrained(checkpoint)
raws_inputs = [
        "I've been waiting for a HuggingFace course my whole life.",
        "I hate this so much!"
]
inputs = tokenizer(raws_inputs,padding=True,truncation=True,return_tensors="pt")
print(inputs)
代码中使用了自动分词器选择,它是由checkpoint指定的预训练模型关联的,不用我们自己选择tokenizer,它自动帮我们选择好了。
tokenizer(raws_inputs,padding=True,truncation=True,return_tensors="pt")*中padding代表是否需要自动补零;truncation代表是否需要隔断,默认是true,指不超过计算机的上限512,它也可以被你指定你设定的文本长度然后进行隔断;return_tensors="pt"指的是使用pytorch.

模型的输入经过tokenizer得到两部分: 1)input_id:它由id、CLSSEP两个特殊字符、补零占位符组成;2)attention_mask:为1的表示可以跟谁算,为0的不会参与到self-attention的进一步计算。
注意: attention_mask和padding是配套使用的,当人为去修改padding的时候,也要把attention_mask里面的参数进行修改。不修改的话计算机会认为人为padding的0占位符是有效位将会参与self-attention计算,那么这时候输出结果会有区别。
2.模型Model
from transformers import AutoModel #自动在预训练模型中选择模型
在上述代码加入模型部分:
cpp
from transformers import AutoTokenizer
from transformers import AutoModel
checkpoint = "distilbert-base-uncased-finetuned-sst-2-english"
tokenizer = AutoTokenizer.from_pretrained(checkpoint)自动加载分词器
model = AutoModel.from_pretrained(checkpoint)#自动加载模型
raws_inputs = [
        "I've been waiting for a HuggingFace course my whole life.",
        "I hate this so much!"
]
inputs = tokenizer(raws_inputs,padding=True,truncation=True,return_tensors="pt")#输入经过tokenizer得到两部分进行网络输入
outputs = model(**inputs)
print(outputs.last_hidden_state.shape)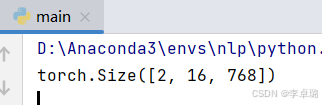
这里面2指的是两个输入,16指的是最长id尺寸,768指定是维度。也就是说输出把每个token都编码成768维度的向量。
3.输出头
NLP任务其实就是做分类,比如情感分析是对一个序列做2分类等等。解决任务不同实际上就是对哪部分做分类。那么用什么做分类就选择什么输出头,就import什么东西。
cpp
from transformers import AutoTokenizer
from transformers import AutoModelForSequenceClassification
checkpoint = "distilbert-base-uncased-finetuned-sst-2-english"
tokenizer = AutoTokenizer.from_pretrained(checkpoint)
model = AutoModelForSequenceClassification.from_pretrained(checkpoint)
raws_inputs = [
        "I ve been waiting for a HuggingFace course my whole life.",
        "I hate this so much!"
]
inputs = tokenizer(raws_inputs,padding=True,truncation=True,return_tensors="pt")#可以自己写最大长度max_length=8,truncation=True时超过8会被截断
outputs = model(**inputs)
print(outputs.logits.shape)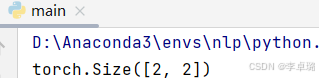
输出结果的含义:两个文本,两种可能性所得概率
4.预测
cpp
import torch
from transformers import AutoTokenizer
from transformers import AutoModelForSequenceClassification
checkpoint = "distilbert-base-uncased-finetuned-sst-2-english"
tokenizer = AutoTokenizer.from_pretrained(checkpoint)
model = AutoModelForSequenceClassification.from_pretrained(checkpoint)
raws_inputs = [
"I ve been waiting for a HuggingFace course my whole life.",
"I hate this so much!"
]
inputs = tokenizer(raws_inputs,padding=True,truncation=True,return_tensors="pt")
outputs = model(**inputs)
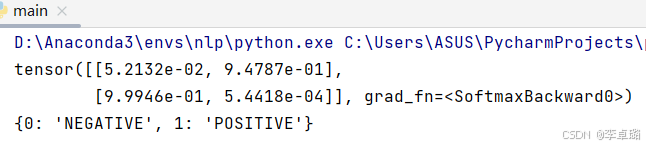
predictions = torch.nn.functional.softmax(outputs.logits,dim=-1)#对最后一个维度进行softmax
print(predictions)
print(model.config.id2label)