一、Sobel 算子

通过 X 梯度核与 Y 梯度核求得图像在,水平与垂直方向的梯度。
python
img = cv2.Sobel(src=*,ddepth=*,dx=*,dy=*,ksize=*,scale=*,delta=*,borderType=*)**img:**目标图像。
**src:**原始图像。
**ddepth:**目标图像深度,-1 代表与原始图像深度相同。
**dx、dy:**x或y 轴方向的求导阶数,可以为:0、1、3 等。0 表示不求导。
**ksize:**Soble核大小。
**scale:**导数计算的缩放系数,默认为:1。
**delta:**常数项,默认为:0。
**borderType:**边界样式,使用默认即可。
python
import cv2

img = cv2.imread('jin.png')
dst_x = cv2.Sobel(src=img,ddepth=cv2.CV_32F,dx=1,dy=0)
dst_y = cv2.Sobel(src=img,ddepth=cv2.CV_32F,dx=0,dy=1)
# 取梯度的绝对值
dst_x = cv2.convertScaleAbs(dst_x)
dst_y = cv2.convertScaleAbs(dst_y)

dst = cv2.addWeighted(dst_x,0.5,dst_y,0.5,0)

cv2.imshow('img',img)
cv2.imshow('dst',dst)
cv2.waitKey(0)
cv2.destroyAllWindows()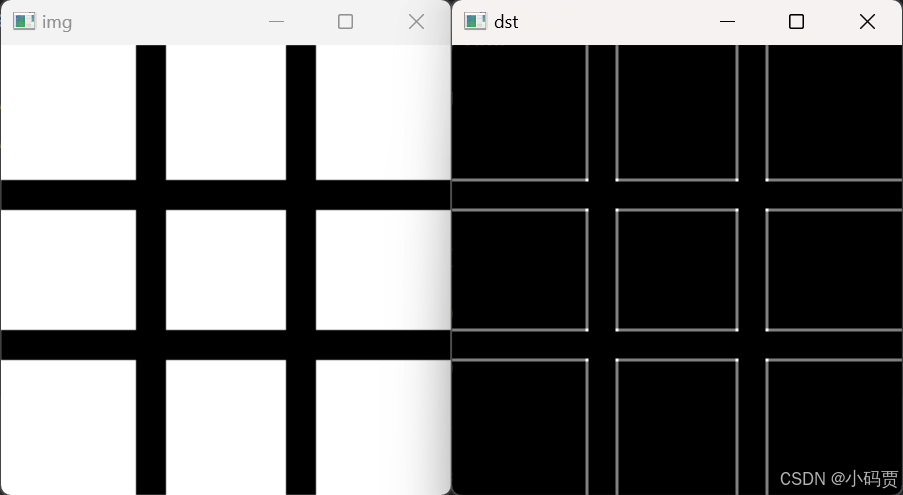
python
import cv2

img = cv2.imread('Lena.png')[::2,::2,:]
dst_x = cv2.Sobel(src=img,ddepth=cv2.CV_32F,dx=1,dy=0)
dst_y = cv2.Sobel(src=img,ddepth=cv2.CV_32F,dx=0,dy=1)
# 取梯度的绝对值
dst_x = cv2.convertScaleAbs(dst_x)
dst_y = cv2.convertScaleAbs(dst_y)

dst = cv2.addWeighted(dst_x,0.5,dst_y,0.5,0)

cv2.imshow('img',img)
cv2.imshow('Sobel',dst)
cv2.waitKey(0)
cv2.destroyAllWindows()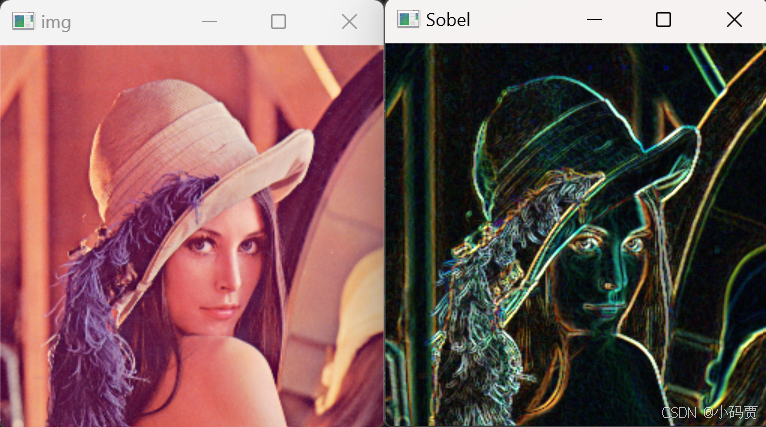
二、Scharr 算子

python
img = cv2.Scharr(src=*,ddepth=*,dx=*,dy=*,ksize=*,scale=*,delta=*,borderType=*)**img:**目标图像。
**src:**原始图像。
**ddepth:**目标图像深度,-1 代表与原始图像深度相同。
**dx、dy:**x或y 轴方向的求导阶数,可以为:0、1、3 等。0 表示不求导。
**ksize:**Soble核大小。
**scale:**导数计算的缩放系数,默认为:1。
**delta:**常数项,默认为:0。
**borderType:**边界样式,使用默认即可。
python
import cv2

img = cv2.imread('Lena.png')[::2,::2,:]
cv2.imshow('img',img)
# Sobel 算子
dst_x = cv2.Sobel(src=img,ddepth=cv2.CV_32F,dx=1,dy=0)
dst_y = cv2.Sobel(src=img,ddepth=cv2.CV_32F,dx=0,dy=1)
dst_x = cv2.convertScaleAbs(dst_x) # 取梯度的绝对值
dst_y = cv2.convertScaleAbs(dst_y)
dst_Sobel = cv2.addWeighted(dst_x,0.5,dst_y,0.5,0)
cv2.imshow('Sobel',dst_Sobel)

# Scharr 算子
dst_x = cv2.Scharr(src=img,ddepth=cv2.CV_32F,dx=1,dy=0)
dst_y = cv2.Scharr(src=img,ddepth=cv2.CV_32F,dx=0,dy=1)
dst_x = cv2.convertScaleAbs(dst_x) # 取梯度的绝对值
dst_y = cv2.convertScaleAbs(dst_y)
dst_Scharr = cv2.addWeighted(dst_x,0.5,dst_y,0.5,0)
cv2.imshow('Scharr',dst_Scharr)

cv2.waitKey(0)
cv2.destroyAllWindows()
三、Laplacian 算子
python
img = cv2.Laplacian(src=*,ddepth=*,ksize=*,scale=*,delta=*,borderType=*)**img:**目标图像。
**src:**原始图像。
**ddepth:**目标图像深度,-1 代表与原始图像深度相同。
**ksize:**Soble核大小。
**scale:**导数计算的缩放系数,默认为:1。
**delta:**常数项,默认为:0。
**borderType:**边界样式,使用默认即可。
python
import cv2

img = cv2.imread('Lena.png')[::2,::2,:]
cv2.imshow('img',img)
# Sobel 算子
dst_x = cv2.Sobel(src=img,ddepth=cv2.CV_32F,dx=1,dy=0)
dst_y = cv2.Sobel(src=img,ddepth=cv2.CV_32F,dx=0,dy=1)
dst_x = cv2.convertScaleAbs(dst_x) # 取梯度的绝对值
dst_y = cv2.convertScaleAbs(dst_y)
dst_Sobel = cv2.addWeighted(dst_x,0.5,dst_y,0.5,0)
cv2.imshow('Sobel',dst_Sobel)

# Sobel 算子
dst_x = cv2.Scharr(src=img,ddepth=cv2.CV_32F,dx=1,dy=0)
dst_y = cv2.Scharr(src=img,ddepth=cv2.CV_32F,dx=0,dy=1)
dst_x = cv2.convertScaleAbs(dst_x) # 取梯度的绝对值
dst_y = cv2.convertScaleAbs(dst_y)
dst_Scharr = cv2.addWeighted(dst_x,0.5,dst_y,0.5,0)
cv2.imshow('Scharr',dst_Scharr)

# Laplacian 算子
dst = cv2.Laplacian(src=img,ddepth=cv2.CV_32F,ksize=3)
dst_Laplacian = cv2.convertScaleAbs(dst_x) # 取梯度的绝对值
cv2.imshow('Laplacian',dst_Laplacian)

cv2.waitKey(0)
cv2.destroyAllWindows()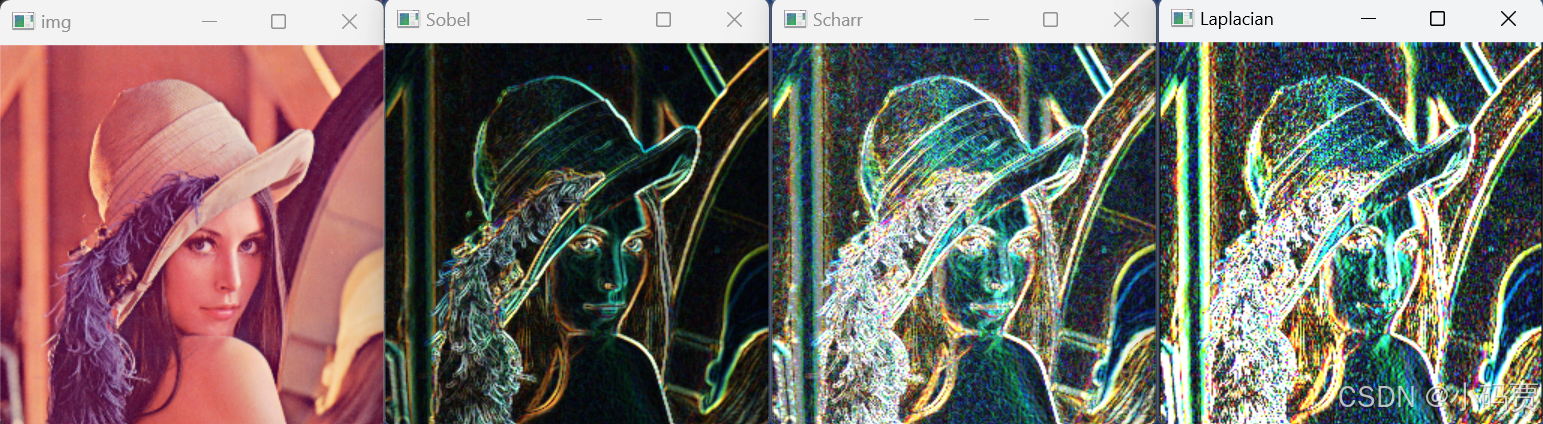
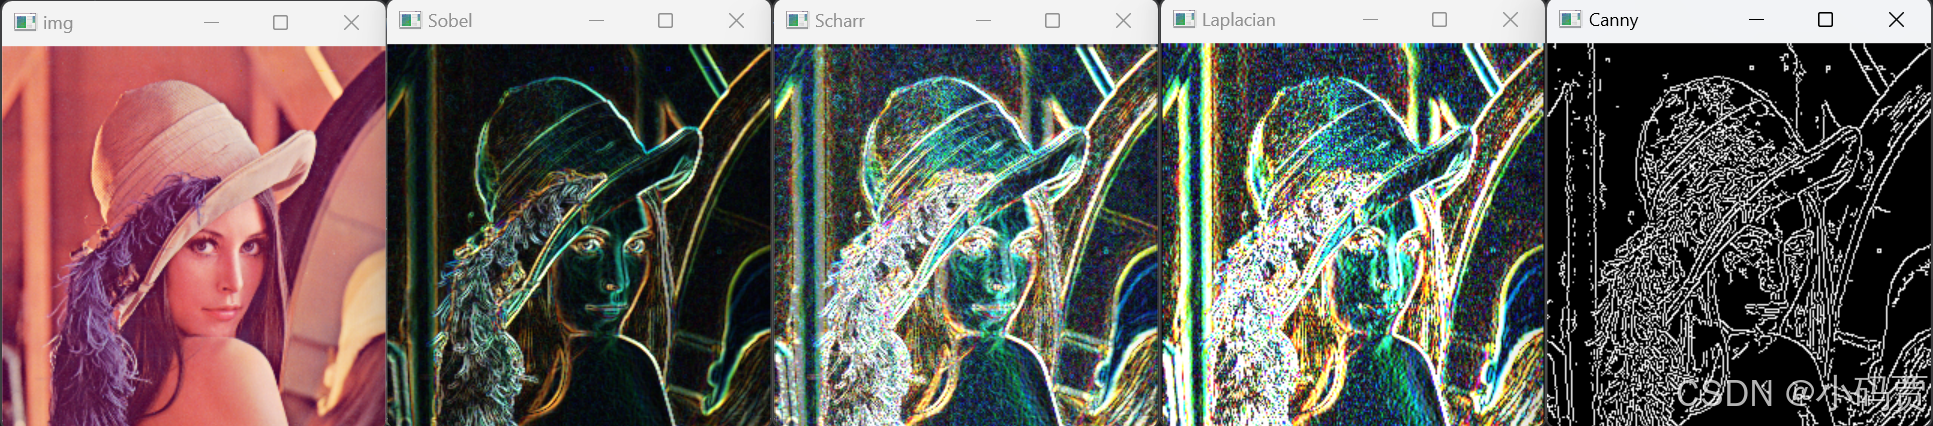
四、Canny 边缘检测 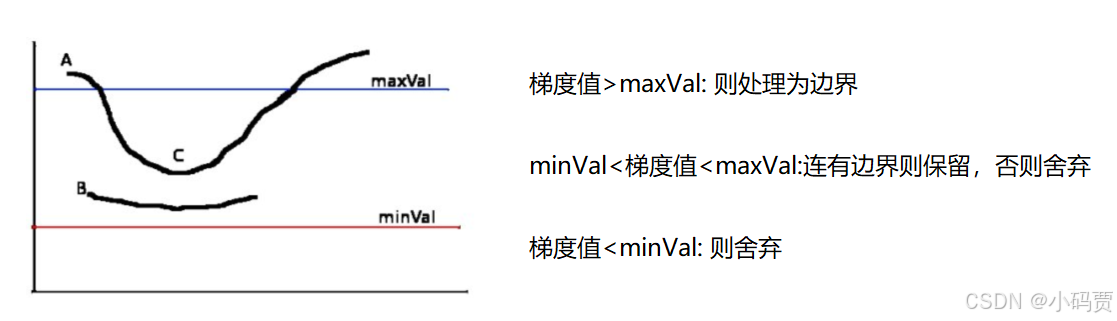
python
img = cv2.Canny(image=*,edges=*,threshold1=*,threshold2=*,apertureSize=*,L2gradient=False)**img:**目标图像。
**image:**原始图像。
edges:边缘数。
threshold1、threshold2:minVal 和 maxVal。
apertureSize:运算符大小。
L2gradient:梯度公式:默认为False,;如果为Ture则:
python
import cv2

img = cv2.imread('Lena.png')[::2,::2,:]
cv2.imshow('img',img)
# Sobel 算子
dst_x = cv2.Sobel(src=img,ddepth=cv2.CV_32F,dx=1,dy=0)
dst_y = cv2.Sobel(src=img,ddepth=cv2.CV_32F,dx=0,dy=1)
dst_x = cv2.convertScaleAbs(dst_x) # 取梯度的绝对值
dst_y = cv2.convertScaleAbs(dst_y)
dst_Sobel = cv2.addWeighted(dst_x,0.5,dst_y,0.5,0)
cv2.imshow('Sobel',dst_Sobel)

# Sobel 算子
dst_x = cv2.Scharr(src=img,ddepth=cv2.CV_32F,dx=1,dy=0)
dst_y = cv2.Scharr(src=img,ddepth=cv2.CV_32F,dx=0,dy=1)
dst_x = cv2.convertScaleAbs(dst_x) # 取梯度的绝对值
dst_y = cv2.convertScaleAbs(dst_y)
dst_Scharr = cv2.addWeighted(dst_x,0.5,dst_y,0.5,0)
cv2.imshow('Scharr',dst_Scharr)

# Laplacian 算子
dst = cv2.Laplacian(src=img,ddepth=cv2.CV_32F,ksize=3)
dst_Laplacian = cv2.convertScaleAbs(dst_x) # 取梯度的绝对值
cv2.imshow('Laplacian',dst_Laplacian)

# Canny 算子
dst_Canny = cv2.Canny(image=img,threshold1=50,threshold2=100)
cv2.imshow('Canny',dst_Canny)

cv2.waitKey(0)
cv2.destroyAllWindows()